SPRINGTIME PIPED FLOWER MACARONS

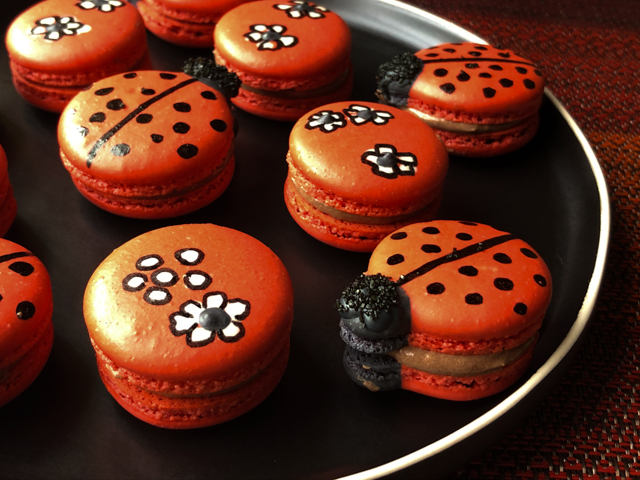
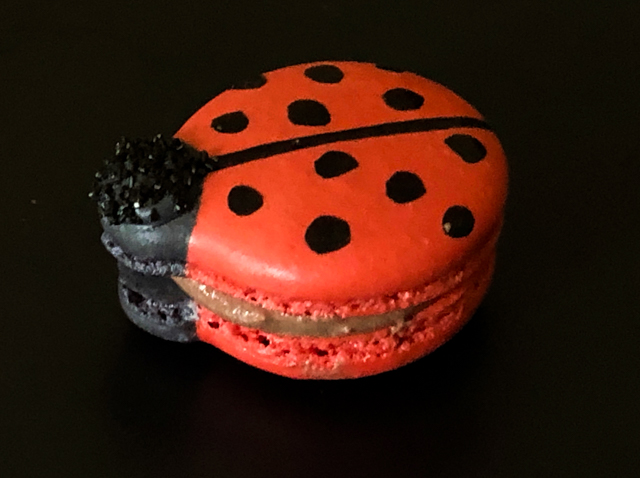
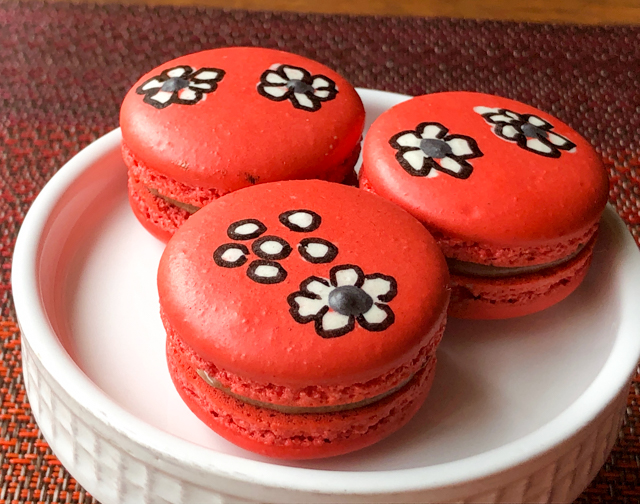
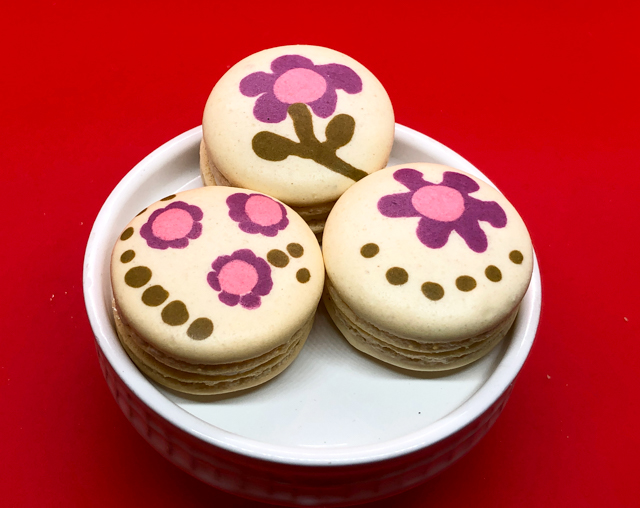
This method might seem a bit intimidating if you are new to baking these finicky creatures, but as long as you feel comfortable with the macaronage step, it’s not complicated at all. You will make a single batter, start incorporating the almond mixture with the meringue, and then divide the batter in four portions: one large to be left plain, and three smaller portions dyed with two different colors for the flower petals, and green for the leaves. The piping is very loose, no need for precision, no need for hyperventilation. You know I never lie to you. After baking, you can either leave the design plain or draw an outline with a fine tip black food pen. The outline gives a more dramatic look, it’s totally up to you to go for it or not. Your bake, your rules.

SPRINGTIME PIPED FLOWER MACARONS
(from the Bewitching Kitchen)

For the shells:
200g powdered sugar
115 g almond flour
115 g egg whites at room temperature (approx. 4 eggs)
1/8 tsp of cream of tartar (optional)
100 g granulated sugar
¼ tsp vanilla paste or extract
pink, purple and green food gel color (I used Sugarflair and Americolor)

For filling:
60 g unsalted butter softened
160 g powdered sugar
zest of 1 lemon
2 tsp lemon juice
1/8 tsp lemon oil
pinch of salt
heavy cream if needed to adjust consistency


Line 3 heavy baking sheets with parchment/baking paper or Silpat mats. Layer the powdered sugar and ground almonds/almond meal in a food processor. Pulse until the mixture looks like fine meal, about 12 pulses. Pass through a sieve and transfer to a small bowl or to a sheet of parchment paper. Set aside.

Place the egg whites and cream of tartar in the bowl of a stand mixer fitted with the whisk attachment. Make sure that the bowl and the whisk are impeccably clean. Starting on medium speed, whip the whites with the cream of tartar until they look like light foam. Add all the sugar at once and keep whisking until the meringue is soft and shiny. Add vanilla extract.

Whip the egg whites until the mixture begins to dull and the lines of the whisk are visible on the surface of the meringue. Check the peak. It should be firm. Transfer the whites to a medium bowl.

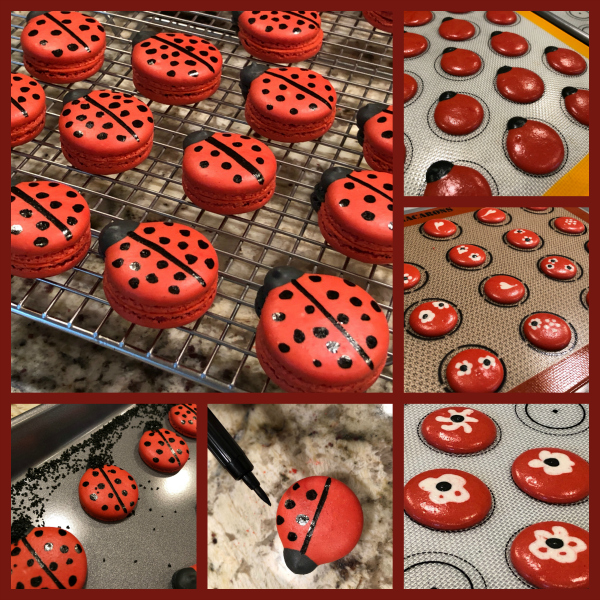
Fold in the ground almond/almond meal mixture in two increments. Start incorporating, but before you do the macaronage, divide the mixture in four bowls, one large, three small. Dye the small portions pink, purple, and green, then proceed with the macaronage for all four portions of the batter. Place the plain mixture in a piping bag fitted with your choice of piping tip (round, ¼ or ½ inch in diameter or 6 – 12 mm). Place the other portions in small piping bags, with no tips. Pipe shells, and then use the colored batters to make any design you like. Leave half of the shells plain, as they can be the bottom side of your macarons.

Gently bang each sheet four to six times on the counter/worktop. Be careful not to disturb the designs. Let the unbaked macarons dry until they look dull but not overly dry. Drying time depends on humidity. In a dry climate, the macarons can dry in 15 to 20 minutes; in a humid climate, it can take 35 to 40 minutes.

While the macarons are drying, heat the oven to 300 F. Bake one sheet at a time on the middle rack. Check in 11 minutes. If the tops slide or move (independently of the ‘feet’ when you gently twist the top), then bake for 2 to 3 more minutes. Check one or two. If they move when gently touched, put them back in the oven for 1 to 2 more minutes until they don’t move when touched. Let the macaroons cool for 10 minutes before removing from the pan. The macarons should release without sticking. If desired, do the outline and details with a black food pen.

For the filling, use a hand-held electric mixer and whisk the butter until creamy. Add the other ingredients except the heavy cream, and whisk until creamy and smooth. If needed, add a bit of heavy cream to loosen the mixture.

Assemble the macarons: find two macarons similar in size and add a good amount of filling to the bottom of one of them. Place the other on top and squeeze gently to take the filling all the way to the edge. Store in the fridge for 24 hours for perfect texture.

ENJOY!

to print the recipe, click here

Comments: As you can see, the design is very loose. Let your inner child come out to play, just have fun with it. I think I like the ones with the outline better, but in the end decided to leave half the batch without it. For this type of design to work, the batters need to have approximately the same texture, and should not be too thick, or it will look a bit coarse. Another thing to keep in mind is that piping the design adds additional batter to each shell, so they get bigger. Make a row with the flower piping, and then grab the plain batter and pipe a row of plain shells right by them so you can more efficiently match their sizes. Of course, you can draw on all shells, but I prefer to save my energy and leave the bottom shell plain.

ONE YEAR AGO: Charcoal Sourdough

TWO YEARS AGO: Ispahan Macarons

THREE YEAR AGO: Smokin’ Hot Meatloaf and Homemade Ketchup

FOUR YEARS AGO: Banana Bread with Espresso Glaze

FIVE YEARS AGO: Slow-Cooker Carnitas & Paleo Planet Cookbook Review

SIX YEARS AGO: The Making of a Nobel Reception

SEVEN YEARS AGO: Fennel Soup with Almonds and Mint 

EIGHT YEARS AGO: Green Curry Pork Tenderloin

NINE YEARS AGO: Farfalle with Zucchini and Ricotta

TEN YEARS AGO: Slow-baked Salmon with Lemon and Thyme

ELEVEN YEARS AGO: Hoisin Explosion Chicken

OVER THE MOON BLUEBERRY-LEMON MACARONS

Today my original plan was to share a series of macarons with different styles of decoration. But, I am so over the moon with these, they elbowed every macaron in the waiting line and here they are. Alone in all their golden glory.

OVER THE MOON BLUEBERRY-LEMON MACARONS
(from the Bewitching Kitchen)

For the shells:
200g powdered sugar  
115 g almond flour  
115 g egg whites at room temperature (approx. 4 eggs)
1/8 tsp of cream of tartar (optional)
100 g granulated sugar  
¼ tsp vanilla paste or extract
blue and black food gel color (I used Sugarflair and Americolor)
Egyptian gold luster powder
everclear

For filling:
60 g unsalted butter softened 
160 g powdered sugar
1 tablespoon blueberry jam
zest of 1 lemon
2 tsp lemon juice
1/8 tsp lemon oil
pinch of salt
heavy cream if needed to adjust consistency

Line 3 heavy baking sheets with parchment/baking paper or Silpat mats. Layer the powdered sugar and ground almonds/almond meal in a food processor. Pulse until the mixture looks like fine meal, about 12 pulses. Pass through a sieve and transfer to a small bowl or to a sheet of parchment paper. Set aside.

Place the egg whites and cream of tartar in the bowl of a stand mixer fitted with the whisk attachment. Make sure that the bowl and the whisk are impeccably clean. Starting on medium speed, whip the whites with the cream of tartar until they look like light foam. Add all the sugar at once and keep whisking until the meringue is soft and shiny. Add vanilla and food colors.

Whip the egg whites until the mixture begins to dull and the lines of the whisk are visible on the surface of the meringue. Check the peak. It should be firm. Transfer the whites to a medium bowl.

Fold in the ground almond/almond meal mixture in two increments. Paint the mixture halfway up the side of the bowl, using the flat side of a spatula. Scrape the mixture down to the center of the bowl. Repeat two or three times, then check to see if the mixture slides slowly down the side of the bowl. Put the mixture in a piping bag fitted with your choice of piping tip (round, ¼ or ½ inch in diameter or 6 – 12 mm). Pipe shells, I like to count numbers in my head and use the same count for each shell so they end up similar in size. If making snowmen, make a template with two circles joined together to form head and body, and pipe each section. 

Slam each sheet hard four to six times on the counter/worktop. Let the unbaked macarons dry until they look dull but not overly dry. Drying time depends on humidity. In a dry climate, the macarons can dry in 15 to 20 minutes; in a humid climate, it can take 35 to 40 minutes. When they form a skin, use a very small fondant baller tool to draw a moon.

While the macarons are drying, heat the oven to 300 F. Bake one sheet at a time on the middle rack. Check in 11 minutes. If the tops slide or move (independently of the ‘feet’ when you gently twist the top), then bake for 2 to 3 more minutes. Check one or two. If they move when gently touched, put them back in the oven for 1 to 2 more minutes until they don’t move when touched. Let the macaroons cool for 10 minutes before removing from the pan. The macarons should release without sticking. Mix the golden luster dust with everclear and paint the dimpled region. Flick some of the suspension to get a few golden dots on the smooth part of the shells.

For the filling, use a hand-held electric mixer and whisk the butter until creamy. Add the other ingredients except the heavy cream, and whisk until creamy and smooth. If needed, add a bit of heavy cream to loosen the mixture.

Assemble the macarons: find two macarons similar in size and add a good amount of filling to the bottom of one of them. Place the other on top and squeeze gently to take the filling all the way to the edge. Store in the fridge for 24 hours for perfect texture.

ENJOY!


to print the recipe, click here

Comments: I recently saw macarons on Instagram with this dimpled effect but absolutely no mention of the technique used. I realized it was similar to what I’ve done with sugar cookies before, so I played with it a bit. At first I thought that I should bake the shells and make the dimples while they were warm. Don’t even try it, it just cracks in a pathetic way. Could be a nice effect too, depending on how you manage to create cracks, but definitely not what I was hoping for. So what you do is allow the skin to form, and right before you bake the shells, very delicately press the surface with the smallest fondant baller tool you can find (mine is the smallest from this set). You can also use the handle of a small painting brush. Bake as you would normally do, then paint the dimpled region with gold luster powder. I used Egyptian gold which is the brightest kind.

Fling some extra gold with a brush over the surface, and that’s about it. The recipe was my default, but I changed one important step: instead of adding the granulated sugar in stages, I dumped the whole amount after the egg whites were starting to leave traces as the whisk moved through them, maybe 1 to 2 minutes after starting the Kitchen Aid. The meringue will take slightly longer to firm, but what that does is give a better chance for the sugar to fully dissolve. You would not do that if making an Angel Food Cake that requires a very light and airy meringue, but for macarons it works like a charm. You can read the rationale behind it in this article. Interestingly, this method is the one favored by JC Gregg, The Macaron King, former contestant of the Great American Baking Show, season 3. I really like how much simpler it is, and how it improves the shells. Particularly the base, there are no crystals making the surface rough, or the shell threatening to glue to the silpat. Smooth like a mirror, as you can see in my composite photo above. I am sold.

It still amazes me that you can totally mess up the surface of a macaron and have it bake as if nothing happened. The possibilities of decoration are mind-blowing, so if you are into baking macarons, consider trying this method. Way too cool for words, don’t you agree?

Some shells baked without the dimpled effect were decorated with a stencil. Silver stars to go along with the golden moon…

ONE YEAR AGO: Springtime Macarons Bake-Along

TWO YEARS AGO: Macarons for a Little Princess

THREE YEARS AGO: Gilding the Sourdough Loaf

FOUR YEARS AGO: Lolita Joins the Bewitching Kitchen

FIVE YEARS AGO: Cashew Cream Sauce

SIX YEARS AGO: Blood Orange Margaritas

SEVEN YEARS AGO: Smoked Salmon Appetizer

EIGHT YEARS AGO: Clementine Cake

NINE YEARS AGO: Springtime Spinach Risotto

TEN YEARS AGO: The end of green bean cruelty

ELEVEN YEARS AGO: Torta di Limone e Mandorle

LADY BUG MACARONS

The other day I was minding my own business when a friend tagged me on Facebook. Quite nonchalantly – Caroline, I am looking at you! – she shared a video… “Sally, your next addiction, I mean… project?  ;-)”   The video was all about meringues and macarons, with amazing piping techniques made by a professional baker from Los Angeles. Truth is, this was not the first time a “friend” suggested baking projects for me. Usually they involve either macarons or mirror glazes, all with levels of complexity that make me tempted to ask “do you hate me that much?” or “what have I done to you?”  But, pandemic times do strange things to humans. Somehow, I decided to tackle one of the simpler projects from the video, macarons shaped as Lady Bugs. Having recently enraged Cheetahs, I figured I would be safer upsetting a small insect. I had a total blast with this adventure, and find them adorable… I hope you do too…

LADY BUG MACARONS WITH CHOCOLATE BUTTERCREAM FILLING
(from the Bewitching Kitchen)

For the shells:
200g Icing/powdered sugar
115 g almond flour
115 g egg whites at room temperature (approx. 4 eggs)
1/8 tsp of cream of tartar
100 g granulated sugar
1/4 tsp vanilla paste or extract
red and black food color

for the filling:
Chocolate Russian Buttercream Recipe
113g unsalted butter, room temperature  (1 stick)
1/2 tsp vanilla paste
1/8 tsp of salt
50g  unsweetened cocoa powder (1/2 cup)
200 g condensed milk (about 1/2 can)

to decorate:
Royal Icing (black) or Candy melts (black)
Black sanding sugar
food pen (black)

Make the shells:
Line 3 heavy baking sheets with parchment/baking paper or Silpat mats. Layer the powdered sugar, and ground almonds in a food processor. Pulse until the mixture looks like fine meal, about 12 pulses. Pass through a sieve and transfer to a small bowl or to a sheet of parchment/baking paper. Set aside.

Place the egg whites and cream of tartar in the bowl of a stand mixer fitted with the whisk attachment. Make sure that the bowl and the whisk are impeccably clean. Starting on medium speed, whip the whites with the cream of tartar until they look like light foam. The whites should not appear liquid. The foam will be light and should not have any structure.

Slowly rain in the granulated sugar in five additions, trying to aim the stream between the whisk and the side of the bowl. Turn the speed up to high. Continue to whip the meringue until it is soft and shiny. It should look like marshmallow creme (marshmallow fluff). Add the vanilla and the food color. Whip the egg whites until the mixture begins to dull and the lines of the whisk are visible on the surface of the meringue. Check the peak. It should be firm. Transfer the whites to a medium bowl.

Fold in the ground almond/almond meal mixture in two increments. When the mixture is starting to get homogeneous, remove a small amount and dye black. Remove a small amount and leave it white. Dye the rest red.  Continue with the three portions of batter until you get proper mixing (macaronage).  Put the mixtures in a piping bag fitted with your choice of piping tip (large, 8mm for red, 4mm for black, white can be left without a piping tip, just make a cut in the bag with scissors. To make the lady bugs, pipe a regular round red shell, then a small black round where the head will be. To make the flowers, use the white batter right after piping the red shell, and do the decorations you want, as if working with Royal Icing, “wet on wet” technique.

Slam each sheet  four times on the counter/worktop. Let the unbaked macarons dry until they look dull but not overly dry. Drying time depends on humidity. In a dry climate, the macarons can dry in 15 to 20 minutes; in a humid climate, it can take 35 to 40 minutes.

While the macarons are drying, heat the oven to 300 F. Bake one sheet at a time on the middle rack. Check in 11 minutes. If the tops slide or move (independently of the ‘feet’ when you gently twist the top), then bake for 2 to 3 more minutes. Check one or two. If they move when gently touched, put them back in the oven for 1 to 2 more minutes until they don’t move when touched. Let the macaroons cool for 10 minutes before removing from the pan. The macarons should release without sticking. When the shells are cold, made the black decorations with a food pen, for the lady bug’s body and the outline of the flowers and hearts. If desired, paint the lady bug’s head  with Royal Icing or Candy melts dyed black. Before it sets, sprinkle black sanding sugar.

Make the Russian buttercream. Whip the room temperature unsalted butter on a medium-high speed with a whisk attachment for 5 minutes. The butter should lighten in color as you incorporate air into it. Add in the vanilla extract, salt, and sifted cocoa powder mix on the lowest speed until incorporated.  Pour very slowly the sweetened condensed milk as you whisk at medium-speed. Scrape the  bowl to make sure it is all very well incorporated. Refrigerate until needed to fill the shells.

Assemble the macarons: match two shells similar in size and add buttercream to the bottom of one of them. Place another shell on top and gently squeeze to take the filling all the way to the edge. Store in the fridge overnight before consuming.

ENJOY!

to print the recipe, click here

Comments: In the video, the decorations for the lady bugs were made with piped Royal Icing, but I decided that a food pen was simpler. Also, you can make antennas with candy melts piping them on parchment or acetate, allowing them to fully set, and then stick them in between the two shells, held by the filling. Some bakers use licorice strands cut in small pieces. Since my macs are donated and each must be wrapped individually, I skipped the antennas. My Lady Bugs are mutants, and I hope they don’t hate me for that.

The filling… My first time using Russian buttercream. I decided to try it because many people claim it to be less sweet than American and very easy to prepare. I will say that the texture is really nice, but it is still quite sweet. Of course, it is made with condensed milk, so what was I expecting?  I had a few problems with the texture too, I believe you need to get the butter temperature just right, not too cold, not too warm. My buttercream ended up a tad too soft. When opting for a chocolate filling for macs, I think I’ll stick with a ganache-base.

For the flowers and hearts decorations, the secret is to work fast. Pipe two or three red shells and immediately start to work on the details, because you want to make sure the design will set and dry homogeneously with the background.  It is exactly the same technique I used before, except that I used the food pen to outline the drawings. It does not have to be perfect, in fact I think that being a bit more lax with the outline makes them more interesting. That’s my story…  😉

I hope you enjoyed my little Lady Bug Macarons. Just want to make something abundantly clear: Unicorns are simply never ever happening.  There. I feel better.

ONE YEAR AGO: Five-Stranded Braided Bread

TWO YEARS AGO: Green Olive Salad

THREE YEARS AGO: Coffee Macarons Dressed up to Party

FOUR YEARS AGO: Blogging Hiatus

FIVE YEARS AGO: Tomato Tatin

SIX YEARS AGO: Headed to Colorado!   

SEVEN YEARS AGO: Farofa Brasileira

EIGHT  YEARS AGO: Thai-Inspired Pork Tenderloin

NINE YEARS AGO: A yummy Brazilian cake: Bolo de Fuba’

TEN YEARS AGO:  Summer’s Tomatoes

ELEVEN YEARS AGO: Leaving on a jet plane…