A BRAZILIAN HUMMINGBIRD

Hummingbird Cake is a classic concotion quite common in Southern regions of the US. Today I share with you my Brazilian take on this classic, which I am calling Beija-Flor Cake. As you may have guessed, Beija-Flor is Portuguese for hummingbird. A three-layer cake very moist with banana, mango, and passion fruit, with a bit of texture given by Brazil nuts. Everyone loved it, including the resident critic, grandson and son of fantastic bakers, the man I married 19 years ago.  He actually said (and I should have captured it in a video) that the frosting was as good as his Grandma’s.  My heart missed 3 beats in a row. Obviously, I am very happy with this bake!

BEIJA-FLOR CAKE
(from the Bewitching Kitchen, inspired by this recipe)

recipe is enough for 4 cakes,  only 3 cake layers were used for the final dessert)

1 + 1/4 cup chopped Brazil nuts
3 cups (370g) all-purpose flour
1 teaspoon baking soda
1 and 1/2 teaspoons mixed spice (or use cinnamon plus a touch of cloves)
1/2 teaspoon salt
1 cup mashed banana
1 cup mango coarsely pureed
½ cup passionfruit pulp
3 large eggs, at room temperature
1/2 cup grapeseed oil
1 cup (200g) packed brown sugar
3/4 cup (150g) granulated sugar
1 teaspoons vanilla paste   

Heat the oven to 300°F. Spread Brazil nuts onto a lined baking pan. Toast for 8 minutes. Remove from the oven. Turn oven up to 350°F, then grease and lightly flour four 6-inch cake pans.

Whisk the flour, baking soda, mixed spice and salt together in a large bowl. Whisk the rest of the cake ingredients in a medium bowl. Pour wet ingredients into dry ingredients and whisk until completely combined. Fold in the nuts. Spread batter evenly between the 4 prepared cake pans. Bake for 25-30 minutes or until a toothpick inserted in the center comes out clean.

Remove cakes from the oven and allow to cool completely in the pans set on a wire rack. Once completely cooled, remove cakes from pan and level the tops off if necessary to make them completely flat.

CREAM CHEESE FROSTING
(adapted from Sweet Bake Shop)  

2 cups (450 g) unsalted butter, room temperature
½ cup (110 g) cream cheese, softened
5½ cups (700 g) confectioners’ sugar
1 teaspoon pure vanilla extract
2 to 3 drops yellow and orange gel food dye
¾ cup yellow and orange sprinkles

In the bowl of a stand mixer fitted with the paddle attachment, beat together the butter and cream cheese on medium speed until smooth.

With the mixer running on low-speed, slowly add the confectioners’ sugar. Add the vanilla, then turn the mixer up to medium speed and beat until light and fluffy, about 2 minutes. Stop the mixer and scrape down the sides and bottom of the bowl, then beat again on medium speed again for a few seconds. Use immediately or store in the fridge for a couple of days.

CAKE ASSEMBLY:  Place 3/4 cup frosting in a small bowl and dye it yellow. Place 3/4 frosting in another small bowl and dye it orange. Prepare two small piping bags (with no icing tips) containing the two colors, each in one bag. Carefully cut the tips with scissors, and place them delicately in a larger piping bag fitted with a 1M tip or any other tip of your choice. Make sure the opening of both bags are at the same distance of the 1M tip. Test that both colors are coming out together. Reserve.  Add sprinkles to the rest of the frosting that was not dyed.

Place the first cake on a board, cut side up.  Add a layer of frosting with sprinkles. Add another cake on top, cut side up.  Spread a bit more frosting, top with the final cake, cut side down (this makes sure that the top will be smooth and leveled).  Add a thin layer of frosting and refrigerate the cake for 30 minutes, or place in the freezer for about 10 minutes to set the frosting.

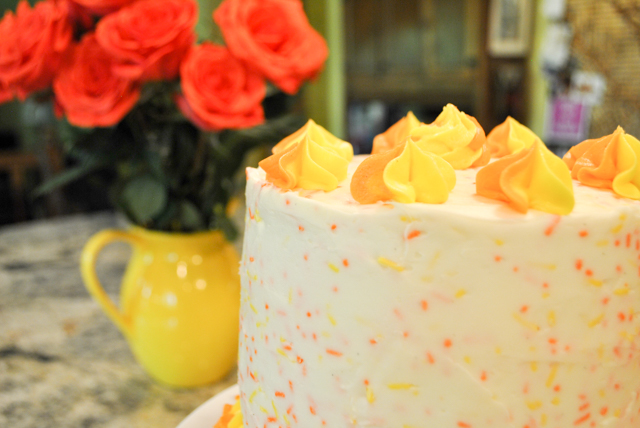
Frost the cake, top and sides, then use the two-color frosting to pipe decorative swirls on the bottom and top.  Refrigerate and bring to room temperature 30 minutes before serving.

ENJOY!

to print the recipe, click here

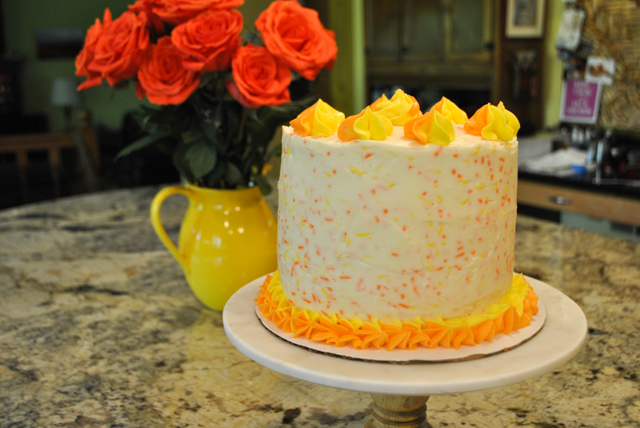
Comments: Hummingbird Cake originated in Jamaica, containing banana and pineapple as the main flavors, plus pecans and spices such as cinnamon and cloves. It is normally covered with cream cheese frosting. I wanted to make a version with Brazilian flavors, so I used mangos and passionfruit. I kept the banana component since I imagined it would be important in the texture of the cake.  Brazil nuts seemed a natural choice, and with that in mind, my “Beija-Flor Cake” was born. In the composite below, you can see that the cake is not as massive as it might seem.  It is not a small cake, but definitely not humongous. See the little yogurt bottle next to it for perspective.

Traditionally, Hummingbird Cakes have a homey, rustic look which I find quite appealing, but I wanted to try something a bit different, and opted for a smooth frosting with yellow and orange sprinkles to reflect the fruits used in the cake. A small amount of sprinkle-free frosting was dyed in the same two colors and used for piping. The frosting is very easy to make and much more forgiving to spread than a classic buttercream, so if you are absolutely paranoid about a bit afraid of frosting a cake, this is a very good starting point.

My apologies for not showing the picture of a slice. We cut one slice to “test-taste” it the evening before, but the first slice never cuts too well. We took the cake to the department next morning, and I completely forgot all about it. By the time I got to the mail room hoping to snap a picture, it was too late. It was a big hit with our colleagues and graduate students. I liked how moist and flavorful it turned out, but in my opinion the passionfruit flavor was not prominent enough. Next time I will skip the banana, and maybe stick with two fruits only, for instance mango and passionfruit. Those are the ideas floating in my mind for a new version. The frosting will stay exactly the same.  A total winner, that will show up again in future bakings. You can count on that.

ONE YEAR AGO: A Cookbook Review

TWO YEARS AGO: Air-Fried Carrots, Two Ways

THREE YEARS AGO: Sweet Potato Crust Quiche

FOUR YEARS AGO: Chicken Thighs with Artichokes and Capers

FIVE YEARS AGO: Pea Pancakes with Herbed Yogurt

SIX YEARS AGO: Mushroom Stroganoff

SEVEN YEARS AGO: Tomato Sourdough

EIGHT YEARS AGO: Gamberetti con rucola e pomodori

NINE YEARS AGO: Flirting with Orzo


LEMONY SHREDDED BRUSSELS SPROUTS WITH ALMONDS

Definitely not the most popular veggie around, but even if you are a self-professed BS hater (cannot believe what I just did here), I suspect you will enjoy this recipe. Sometimes all it takes is cutting a veggie in a different way and a new horizon opens up. It is just what happens when you finely shred these babies. You can use a knife, but the food processor will be faster and give slices more homogeneous in thickness. Once you are done prepping the sprouts, the whole thing comes together in less than 10 minutes. Perfect side dish for a busy work day.

LEMONY SAUTEED BRUSSELS SPROUTS WITH ALMONDS
(from the Bewitching Kitchen)

(This is a heart-healthy recipe, with 1.5 g saturated fat per serving)

12 oz Brussels sprouts
2 celery ribs, finely diced
1/3 cup almonds
1 to 2 tablespoons olive oil
salt and pepper
4 slices of preserved lemons, diced (optional, see comments)
fresh lemon juice to taste

Shred the sprouts in a food processor to 1/8 inch thick. Reserve.

Heat the oil in a large non-stick skillet, add the celery, season with salt and pepper, saute until fragrant. Add the almonds and cook them until they just start to get some color.

Increase the heat to high, add the shredded Brussels sprouts, and saute them moving them around a  bit.  When they start to get a bit softer, add the preserved lemons, close the pan with a lid, and let it all cook undisturbed for 2 minutes.

Open the skillet, check if the sprouts are cooked to your liking. If they seem tough, add a bit of  lemon juice, close the pan again and cook a bit longer. If they are al dente, squirt a little lemon juice, adjust seasoning and serve.

ENJOY!

to print the recipe, click here

Comments: Amounts are all pretty flexible, I shredded enough sprouts to have what seemed enough for our dinner and leftovers for my lunch next day. It was close, let’s say that my lunch turned out a bit light.  A fried egg was needed to the rescue.  Preserved lemons will add a very intense citric flavor but don’t worry if you don’t have any around, just add  good dose of lemon (or even lime) zest, and it should be equally tasty.

That same evening I was roasting butternut squash as another side dish for grilled pork tenderloin, and decided to serve both veggies together.  Loved the color contrast and they got along great as far as taste is concerned. I admit I almost did not need the meat. But then I did.

ONE YEAR AGO: Savory Oatmeal with Bacon and Cheddar

TWO YEARS AGO: Air-Fried Carrots, Two Ways (most popular post on my blog!)

THREE YEARS AGO: Five Minutes in L.I.T (a tour of our laboratory!)

FOUR YEARS AGO: Chicken Thighs with Artichokes and Capers

FIVE YEARS AGO: Pea Pancakes with Herbed Yogurt

SIX YEARS AGO: Mushroom Stroganoff

SEVEN YEARS AGO: Tomato Sourdough

EIGHT YEARS AGO: Gamberetti con rucola e pomodori

NINE YEARS AGO: Flirting with Orzo

VENTING ON VACCINES

I am re-blogging this article, which I originally wrote in 2015, since it seems even more relevant today.  Please feel free to share if you like it. (comments are shutdown, you can add comments to the original post, if so desired)

sallybr's avatarBewitching Kitchen

Disclaimer #1:  This is not a food-related post

Disclaimer #2: I am taking my gloves off

Few things upset me more than the disturbing movement to stop vaccinating babies and kids. For a while now I’ve been debating whether I should write about it. Having watched an episode of Frontline the other day that dealt with the subject, and almost succumbing to cardiac arrest while screaming at the screen, I decided I cannot stay silent any longer. First of all, let me get this straight out up front: I have a doctoral degree in Biochemistry, three years post-doctoral experience in the Department of Microbiology and Immunology at Stanford, and I taught Microbiology to Medical students in Brazil at Universidade de Sao Paulo. I also worked for about 10 years on basic research into the biotechnology of vaccines.   I’m not bragging, but I am stating my experience, that hopefully will convince…

View original post 2,544 more words

COCONUT AND LIME MACARONS

So many macarons, so little time… These were made using my default recipe – French meringue, resting for about 30 minutes before baking (the macs, not the baker) – but with one small change in the method: I did most of the macaronage in the Kitchen Aid mixer with the paddle attachment. If you are new to making macarons, I don’t advise trying it on your first time, but as soon as you get a bit more familiar with the extent of mixing needed before piping, go for it. It is fast, a lot easier on your arms, and works like a charm. I must say these are fighting to sit in the position of Sally’s Favorite Macarons of All Times. Can you imagine that?

COCONUT AND LIME MACARONS
(from the Bewitching Kitchen)

for the shells:
198 g powdered sugar
113 g almond meal
113 g egg whites at room temperature
a pinch of cream of tartar
100 g granulated sugar
Green food gel from Chefmaster
1/8 tsp coconut extract

for the filling:
250 g white chocolate, chopped finely
50 g heavy whipping cream
50 g coconut milk (full-fat)
zest of 1 lime

to decorate:
melted white candy melts
sprinkles of your choice

Line 2 or 3 heavy baking sheets with parchment paper or Silpat mats. Layer the powdered sugar and almond meal   in a food processor. Pulse until the mixture looks like fine meal, about 15 seconds. Pass through a sieve and transfer to a small bowl. Set aside.

Place the egg whites and pinch of cream of tartar in the bowl of a stand mixer fitted with the whisk attachment. Make sure that the bowl and the whisk are impeccably clean. Starting on medium speed, whip the whites with the cream of tartar until they look like light foam. The whites should not appear liquid. The foam will be light and should not have any structure.

Slowly rain in the granulated sugar, trying to aim the stream between the whisk and the side of the bowl. Turn the speed up to medium-high. Continue to whip the meringue until it is soft and shiny. It should look like marshmallow creme. Add the gel color and the vanilla. Staying at medium-high speed, whip the egg whites until the mixture begins to dull and the lines of the whisk are visible on the surface of the meringue. Check the peak. It should be firm.

Switch to paddle attachment. Add half the almond meal mixture, turn the mixer on low and mix for about 3 seconds. Stop and add the rest of the almond mixture, turn the mixer on low, and process for about 5 more seconds. It should still be reasonably thick, but the grains of almond should be more or less disappearing in the batter.  Remove the bowl from the mixer, and finish the macaronage by hand.  Put the mixture in a piping bag fitted with one of the tips listed above. Pipe on the prepared baking sheets.

Slam each sheet hard four to six times on the counter. Then fist bump each end of the sheet’s underside twice. Let the unbaked macarons dry until they look dull but not overly dry. Drying time depends on humidity. Ina dry climate, the macarons can dry in 15 to 20 minutes; in a humid climate, it can take 35 to 40 minutes.

While the macarons are drying, heat the oven to 300 F. Bake one sheet at a time on the middle rack. Check in 11 minutes. If the tops slide, then bake for 2 to 3 more minutes. The macarons should release without sticking. Check one or two. If they stick, put them back in the oven for 1 to 2 more minutes. Let the macaroons cool for 10 minutes before removing from the pan.

Make the filling: Place the chopped white chocolate in a bowl. Warm up the heavy cream almost to boiling, add the lime zest and allow it to sit for 15 minutes, covered. Add the coconut milk, heat the mixture again to almost boiling, pour over the chocolate. Wait for a couple of minutes and gently mix the chocolate to dissolve it fully. White chocolate is very delicate, if you need to heat it in the microwave to fully dissolve it, do it in at most 10 second intervals using 50% power. Once it is fully dissolved, allow it to cool to room temperature and then whip it with a handheld mixer until fluffy. Do not do it for too long or the ganache will turn grainy.

Assemble the macarons: find two macarons similar in size and add a good amount of filling to the bottom of one of them. Place the other on top and squeeze gently to take the filling all the way to the edge.  Store in the fridge for 24 hours for perfect texture.

ENJOY!

to print the recipe, click here

Comments: Macarons inflict fear on bakers. Things can go wrong, and when they do, it’s pretty frustrating, although there are uses for ruined shells. Macawrongs, as some call them, can be crumbled and used to add texture in cake layers, can go over mousses or ice creams, no need to trash them. In fact, I have recently seen amazing macarons in which badly cracked shells turned into works of art. The clever baker simply used gold pearl dust dissolved in vodka and painted the cracks using a fine brush. The effect is stunning!  I’ve been hoping for cracked shells, but of course, once you want them, they don’t happen. Yeah, macarons. They know how to keep you on your toes. 

These macs delivered just what I wanted, a good taste of coconut with the delicate sourness of limes to go with it. The labor of love was separating the white and green sprinkles from the other colors, but it was worth it.  Since I used candy melts for the drizzle, I had to work fast because that tends to solidify quickly. So I drizzled four macarons at a time, decorated them and moved to the following set of four. I felt pretty fancy using tweezers to place the large sprinkles exactly where I wanted, but of course that slows things down. Baking: one of the most efficient ways to practice patience.

Summarizing what’s new about this post: you can do 90% of the macaronage in your Kitchen Aid, just change the whisk to the paddle, add the almond mixture in two installments. Beat 3 seconds after first addition, in low-speed, add the second half, and beat 5 seconds.  Finish by hand after that. And, to make a coconut flavored shell and filling, simply use coconut extract instead of vanilla in the shells, and a portion of coconut milk in place of heavy cream when you make the ganache with the white chocolate. You can use that as a basis for different flavors, maybe adding a touch of passion fruit, or mango instead of infusing the cream with lime zest.  Have fun with it… That’s what macs are for. Apart from sometimes driving you crazy.

ONE YEAR AGO: Flank Steak Carnitas

TWO YEARS AGO: Sesame and Poppy Seed Sourdough

THREE YEARS AGO: Pecan-Crusted Chicken from Southern at Heart

FOUR YEARS AGO: Lamb Shanks en Papillote with Cauliflower-Celeriac Purée

FIVE YEARS AGO: Chestnut Brownies and a Blog Award!

SIX YEARS AGO: Quinoa with Cider-Glazed Carrots

SEVEN YEARS AGO: Celebrate Wednesday: Heirloom Tomatoes Steal the Show

EIGHT YEARS AGO: Pain de Provence

NINE YEARS AGO: Golspie Loaf, from the Scottish Highlands

ASIAN-STYLE EGGPLANT “MEATBALLS”

Disclaimer: these are not meatballs, they are actually vegetarian. But it’s hard to avoid the association. Eggplant Balls? Eggplant Morsels? Nah, neither one works for me. Plus, “meatballs” is  the way Katie Lee referred to them in the FoodTV show The Kitchen, so I can always lay blame on her. Having said that, these are pretty awesome. A bit more work than you might expect, but worth it. What makes them a bit more involved is the fact that you must (according to Katie) process each component separately.  Other than that, a very straightforward method, for a tasty alternative to meatballs.

ASIAN-STYLE EGGPLANT MEATBALLS
(slightly modified from Katie Lee)

6 cups small cubed eggplant, peel left on (from 1 large eggplant)
2 tablespoons plus 1 teaspoon olive oil
Kosher salt and freshly ground black pepper
8 ounces cremini mushrooms, quartered
1/2 cup unsalted raw cashews
1/2 cup panko breadcrumbs
2 tablespoons grated fresh ginger
2 tablespoons minced fresh basil
1 large egg, lightly whisked

Heat oven to 450 degrees F. Line two baking sheets with parchment paper.

Place eggplant in a large mixing bowl and slowly drizzle with 1 tablespoon olive oil. Stir and drizzle in an additional tablespoon of oil. Sprinkle generously with salt and pepper and toss to combine. Spread on a prepared baking sheet. Combine mushrooms and remaining teaspoon oil and spread on remaining baking sheet.

Bake eggplant and mushrooms 10 minutes, then stir and bake an additional 10 minutes.

Reduce oven heat to 400 degrees F. Pulse eggplant a few times in a food processor until coarse in texture. Transfer to a large mixing bowl. Pulse mushrooms until coarse and add to the same bowl. Pulse cashews until coarse and transfer to bowl.  Add panko, ginger, basil, egg, salt and pepper to the mixture and stir to combine.

Use a small ice cream scoop or yours hands to scoop eggplant mixture into 12 balls and arrange on reserved lined baking sheet. Bake until crispy and browned, about 20 minutes.

ENJOY!

to print the recipe, click here

Comments: This was our dinner on a Monday, so I prepared everything up to the final roasting on the day before. It would be too hard to make it after work, but if you can spread the preparation in two days, it is perfect. Less than 30 minutes and a nice dinner is ready for you. I took them into a more Italian territory by warming up some tomato sauce and serving with them. These are quite delicate, so don’t try to simmer them covered in the sauce, they might fall apart.  Mine were probably more fragile even, because since my eggplant was a bit small, I included one zucchini in the mixture.  Zucchini has quite a bit more moisture, and I should have adjusted the amount of panko to account for that.  I am giving you the original recipe, and advise you to stick with eggplant and mushrooms only.

Making them the day before also helps them retain the shape during baking, but you could stick them in the fridge for an hour or so and proceed with roasting.  It is nice to reduce the amount of meat we consume, so these are quite likely going into our regular rotation. They could work well also as appetizers, making them smaller and serving with a dipping sauce, perhaps a tahini-yogurt to keep with the Asian flavor, if so desired.  Two thumbs up from both of us, omnivores at heart…


ONE YEAR AGO: Uzbek Flatbread

TWO YEARS AGO: First Monday Favorite – Black Sesame Macarons

THREE YEARS AGO: Chocolate Orange Mini-Cakes

FOUR YEARS AGO: In My Kitchen, May 2015

FIVE YEARS AGO: P90X3, a Review of Tony Horton’s Latest Fitness Program 

SIX YEARS AGO: Pasta and Mussels in Saffron Broth

SEVEN YEARS AGO: Triple Chocolate Brownies

EIGHT YEARS AGO: Shanghai Soup Dumplings

NINE YEARS AGO: Bite-sized Chocolate Pleasure