I wanted the first post in my second decade of blogging to be special. Macarons have a permanent spot in my heart. My fascination with these cookies made me persist after many failures, but what ultimately led me to conquer them was getting the perfect instructor to virtually hold my hand and show me the tricks to master these finicky creatures. Colette Christian is her name. Her class on Bluprint (former Craftsy) will turn ANY person into a confident macaron baker. If you’ve been following my blog for a while, you may notice that her recipe is my go-to. I sometimes venture into Italian and Swiss territory just for fun, but if I have a very important batch to make I don’t blink, Colette’s tried and true it is. Her instructions are flawless, and if you have questions she always answers them. The inspiration for the flavor and looks of this batch came from Ettore Cioccia, an Italian patissier who works in Spain. I follow his beautiful productions closely online.
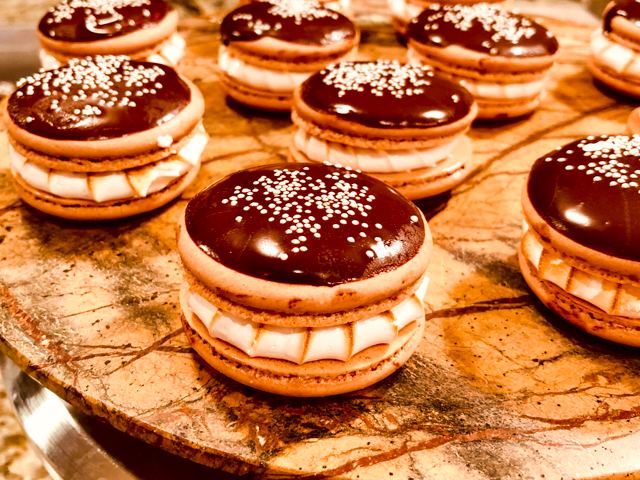
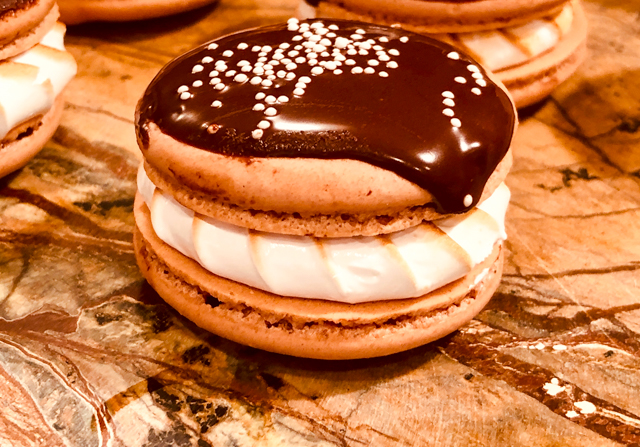
MARSHMALLOW MACARONS
(adapted from Colette Christian’s Craftsy version)
for the shells:
198 g powdered sugar
113 g almond meal
113 g egg whites at room temperature
a pinch of cream of tartar
100 g granulated sugar
caramel food gel from Chefmaster
1/8 tsp vanilla extract
for the filling:
90g egg whites (from about 3 eggs)
130g sugar (superfine if available)
1/8 teaspoon kosher salt
1/8 teaspoon cream of tartar
to decorate:
4 ounces (113 g) 70% chocolate
1 + 1/2 tsp coconut oil
white non-pareils sprinkles
Line 2 or 3 heavy baking sheets with parchment paper or Silpat mats. Layer the powdered sugar and almond meal in a food processor. Pulse until the mixture looks like fine meal, about 15 seconds. Pass through a sieve and transfer to a small bowl. Set aside.
Place the egg whites and pinch of cream of tartar in the bowl of a stand mixer fitted with the whisk attachment. Make sure that the bowl and the whisk are impeccably clean. Starting on medium speed, whip the whites with the cream of tartar until they look like light foam. The whites should not appear liquid. The foam will be light and should not have any structure.
Slowly rain in the granulated sugar, trying to aim the stream between the whisk and the side of the bowl. Turn the speed up to medium-high. Continue to whip the meringue until it is soft and shiny. It should look like marshmallow creme. Add the gel color and the vanilla. Staying at medium-high speed, whip the egg whites until the mixture begins to dull and the lines of the whisk are visible on the surface of the meringue. Check the peak. It should be firm.
Switch to paddle attachment. Add half the almond meal mixture, turn the mixer on low and mix for about 3 seconds. Stop and add the rest of the almond mixture, turn the mixer on low, and process for about 5 more seconds. It should still be reasonably thick, but the grains of almond should be more or less disappearing in the batter. Remove the bowl from the mixer, and finish the macaronage by hand. Put the mixture in a piping bag fitted with one of the tips listed above. Pipe on the prepared baking sheets.
Slam each sheet hard four to six times on the counter. Then fist bump each end of the sheet’s underside twice. Let the unbaked macarons dry until they look dull but not overly dry. Drying time depends on humidity. Ina dry climate, the macarons can dry in 15 to 20 minutes; in a humid climate, it can take 35 to 40 minutes.
While the macarons are drying, heat the oven to 300 F. Bake one sheet at a time on the middle rack. Check in 11 minutes. If the tops slide, then bake for 2 to 3 more minutes. The macarons should release without sticking. Check one or two. If they stick, put them back in the oven for 1 to 2 more minutes. Let the macaroons cool for 10 minutes before removing from the pan.
Decorate half the shells with chocolate. Place chocolate and coconut oil in a microwave-safe bowl. Melt gently, mixing well. Dip half of the shells into the chocolate, leave to almost set. Add the white sprinkles when the chocolate is still a bit sticky to the touch. Reserve.
Make the filling: Fill a wide pot with a couple of inches of water. Place over high heat until almost boiling, then adjust temperature to maintain a gentle simmer. Combine egg whites, sugar, salt, and cream of tartar in the bowl of a stand mixer. Set over steaming water, stirring and scraping constantly with a flexible spatula, until egg whites reach 175°F. It should take less than 10 minutes. Transfer to a stand mixer fitted with a whisk attachment and whip at high speed until meringue is glossy and beginning to ball up inside the whisk, about 5 minutes. Place the mixture in a piping bag fitted with a closed start tip. Pipe on the shells that are not decorated with chocolate. Burn the surface with a torch, and immediately close the macaron with a decorated shell. Press gently so that the burned design shows through the edge.
Store in the fridge for 24 hours for perfect texture.
ENJOY!
to print the recipe, click here
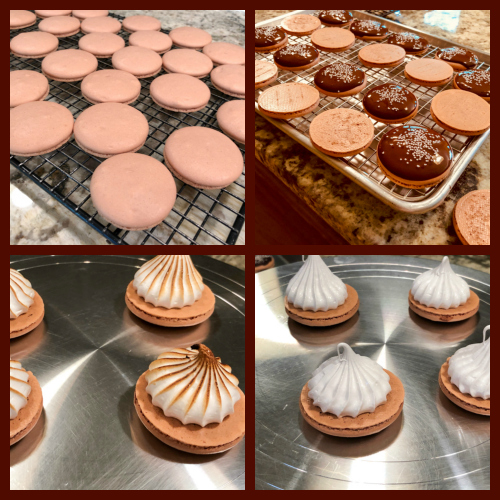
Comments: These macs were a ton of fun to make… I wasn’t sure how the Swiss meringue would behave as I torched it, but the whole thing worked flawlessly. Remember that I cooked the egg whites to a slightly higher temperature than most recipes call for, resulting in a more stable meringue. I piped and torched four at a time. More than that could be a bit tricky. The chocolate shell was still pretty nice after 2 days in the fridge. You could use tempered chocolate or if you truly want to simplify, candy melts work too. However, real chocolate tastes a lot better and in this case there’s quite a bit of it on the shell. Just make sure to coat the shells carefully so that no chocolate drips to the side.
Although, I doubt anyone would mind a little chocolate insinuating its presence down the shell… Would you?
About Chef Colette Christian
Chef Christian not only teaches SIX classes at Bluprint (Macarons, Miniature French Desserts, Croissants, Pain au Chocolat, Danish and other goodies), she also published a macaron cookbook that goes way beyond the basics to show amazing decorating techniques and cool things to bake using macarons as the basic method. To order your copy click here. To visit her blog click here.
ONE YEAR AGO: Fujisan Bread
TWO YEARS AGO: Air-Fried Tomatoes with Hazelnut Pesto & Halloumi Cheese
THREE YEARS AGO: Red Velvet Layered Cake
FOUR YEARS AGO: Lemon-Lavender Bars
FIVE YEARS AGO: Quinoa Fried Rice
SIX YEARS AGO: Carrot Flan with Greens and Lemon Vinaigrette
SEVEN YEARS AGO: The Secret Recipe Club: Granola Bars
EIGHT YEARS AGO: Awesome Broccolini
NINE YEARS AGO: A Twist on Pesto
TEN YEARS AGO: Ciabatta: Judging a bread by its holes