THE HOME BAKERS COLLECTIVE: APRIL PROJECT

Here we are, once again, baking together under the same theme, this month designed by Tanya. Doughnuts. Any kind. Baked, fried, yeast-raised, filled, glazed, or as she put it “any doughnut is a good doughnut.”  She is one smart cookie, that Tanya. I went tropical (surprised?).  Mine were flavored with coconut and lime, and they got a mango-glaze. The recipe was based on one from a former contestant of the Great American Baking Show, the lovely Cheryl. One of the positive aspects of passing by a certain tent is that I got to know (virtually at least) several of the former contestants and found out they are  incredibly nice people!

COCONUT AND LIME DOUGHNUTS WITH MANGO GLAZE
(slightly modified from Cheryl’s blog)

for doughnuts:
2 cups (260 grams) all-purpose flour
2 teaspoons baking powder
1 teaspoon kosher salt
2/3 cup (126 grams) granulated sugar
zest of 1 lime
2 large eggs at room-temperature
1 cup coconut milk at room-temperature
1/2 cup (100 grams) coconut oil, melted

for glaze:
1 + 1/2 cup (172 grams) powdered sugar
1 tablespoon coconut milk
1 tablespoon mango Artisan flavor (Amoretti)
sprinkles to decorate

Heat the oven to 400 degrees F.

Mix the sugar with the lime zest, rubbing it well. Let it sit for 5 minutes as you gather the other ingredients. Combine the flour, baking powder and salt in a medium bowl and whisk to combine. Melt the coconut oil and set aside.

In a large bowl mix the sugar-lime, milk and the egg and whisk until the sugar is dissolved. Add the melted coconut oil (which should be cooled but still liquid) to the liquid ingredients in a steady stream and whisk constantly.  Add the dry ingredients and use a spatula to fold the ingredients until you cannot see any bits of flour.

The easiest way to fill the pan is to add the batter into a piping bag, no need to add a piping tip, just cut the end. Add the batter to 12 doughnut wellsand bake for 10-12 minutes. The doughnuts are done when the you press them with your finger, and they spring back. Turn the doughnuts out on a wire rack to cool completely.

While the doughnuts are cooling combine the powdered sugar, coconut milk, mango extract and if needed adjust the consistency with lime juice or water.
Dip the doughnuts into the glaze and swirl to coat the tops and halfway down the sides. Place on a rack or parchment paper. Decorate with sprinkles.

ENJOY!

to print the recipe, click here

Comments: These turned out delicious! The flavor of the coconut was perfect, delicate and subtle, and I had to add some lime zest because I find that combination a classic.  I made them to donate for the Common Table meal, and as usual, I like to think about the things that some people are not too fond of.  I know that shredded coconut is a bit iffy for some, that’s why I did not do the toasted coconut topping (but please see Cheryl’s original post if you want to do it her way). I love Amoretti flavors, and had this mango bottle in my pantry begging to be used. It tastes delicious, and the glaze complemented the doughnuts the way I expected.

If you want to bake along with us, tag us in Instagram with #homebakerscollective. To see what all my baking-buddies did this month, visit our group blog,  The Home Bakers Collective (post might be published later today or tomorrow morning, so keep that in mind)

Before I leave you, here is a picture of my contribution to the Common Table meal a couple of weeks ago.


Chocolate Chip Cookies (recipe from Doubletree Hilton, recently made public),  Almond Tea Cakes with Boysenberry Jam, Springerle Cookies (coming soon to a food blog near you), and the doughnuts from this month’s group project.

Tanya, thank you for the challenge, I had fun planning and making them, and now I look forward to our next adventure…
Cheryl, thank you for a great recipe!

ONE YEAR AGO: Asian-Style Eggplant Meatballs

ONE YEAR AGO: Uzbek Flatbread

TWO YEARS AGO: First Monday Favorite – Black Sesame Macarons

THREE YEARS AGO: Chocolate Orange Mini-Cakes

FOUR YEARS AGO: In My Kitchen, May 2015

FIVE YEARS AGO: P90X3, a Review of Tony Horton’s Latest Fitness Program 

SIX YEARS AGO: Pasta and Mussels in Saffron Broth

SEVEN YEARS AGO: Triple Chocolate Brownies

EIGHT YEARS AGO: Shanghai Soup Dumplings

NINE YEARS AGO: Bite-sized Chocolate Pleasure

MANGO HAZELNUT ENTREMET CAKE

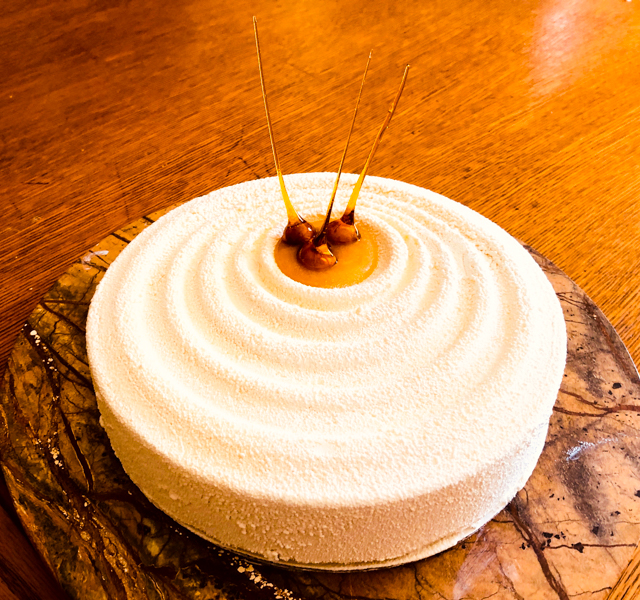
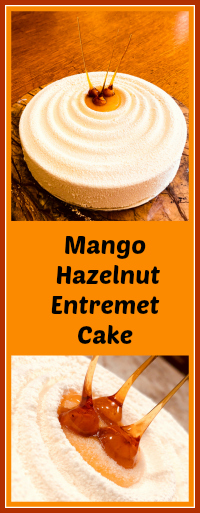
It’s been a while since I made what is probably my favorite type of dessert. As far as entremet goes, this is a reasonably simple example, with a single insert in the center (mango gelée) and only two components in the base, a hazelnut dacquoise and a crunchy chocolate layer. I used the Silikomart Vague mold, I love its design and how easy it is to remove the frozen cake for final decoration, which involved chocolate spray and a few caramel-coated hazelnuts.

MANGO HAZELNUT ENTREMET CAKE
(from the Bewitching Kitchen)

For the hazelnut dacquoise:
75 g egg whites, at room temperature
50 g sugar
70 g hazelnut flour (I processed toasted hazelnuts)
50 g sugar
20 g all-purpose flour

Heat oven to 350F.

Beat the egg whites (with whisk attachment) until you can see a trail forming as the beater moves through them. Add the sugar slowly and beat until firm peaks form, but do not overbeat or it will get grainy (and ruined).  Add the hazelnut flour mixed with remaining 50 g of sugar and the flour, folding delicately. Pour or pipe the mixture in a circle about 8-in diameter over parchment paper. Cook for about 10 minutes, let it cool on a rack, while still a bit warm cut a circle of the exact dimension of the mold you’ll use to make the dessert (if using Vague mold, that will be 20 cm or 7 and 3/4 in).

For the mango insert:
150 g mango puree (I used frozen mango chunks)
25 g sugar
5 g gelatin in sheets (230 Bloom)

Soak the gelatine cut into pieces in cold water for 10 minutes.

Bring the puree together with the sugar to 120F, add the drained gelatin, mix and pour in a 6-inch ring, covered on the bottom with film and placed on a tray. Remove a small amount (about 2 tablespoons) for the decoration on top.

for the chocolate-crisp:
113 g Lindt milk chocolate with hazelnuts
10 g pistachio paste (or add 2 tsp coconut oil)
10 g puffed quinoa (or rice crisps cereal, or crumbled corn flakes)

Toast the puffed quinoa in a 350F oven for a few minutes, until fragrant. Melt the chocolate gently and mix it with the toasted quinoa and the pistachio paste. Spread as a thin circle on parchment paper, with dimensions a bit bigger than the bottom of the dessert mold.  Once it cools slightly,  cut it to fit exactly on top of the hazelnut dacquoise (20cm or 7 and 3/4 in).

For the white chocolate mousse:
175 g whole milk
35 g sugar
70 g egg yolks
7 g gelatin in sheets
175 g white chocolate
1/4 tsp vanilla paste
350 g cream

Soak the gelatin in cold water for 10 minutes. Break up the chocolate and place it in a bowl with the vanilla paste.

Bring the milk to a simmer in a saucepan. Whisk the egg yolks and sugar by hand in a bowl, pour over a bit of the simmering milk to temper it, then transfer the whole mixture to the pan and bring the temperature to 180F. Remove from heat, add the squeezed gelatin, pour into the bowl with the chocolate and emulsify using an immersion blender or a whisk. Make sure it is all very well combined and smooth. Allow it to cool.

Meanwhile whip the heavy cream to a consistency of melted ice cream. When the custard is around body temperature or just a bit warmer, fold the cream into it. Pour about 1/3 of the mixture into the Vague mold , place the frozen mango insert, pour chocolate mousse almost to the top, allowing just enough room for the crunchy chocolate layer and the dacquoise.  Add them, and fill any gaps on the sides with mousse. Wrap with plastic and freeze overnight.

for the chocolate spray:
300 g white chocolate
200 g cocoa butter

Melt together and place in sprayer at 90 F (I use a normal paint sprayer dedicated to chocolate only).

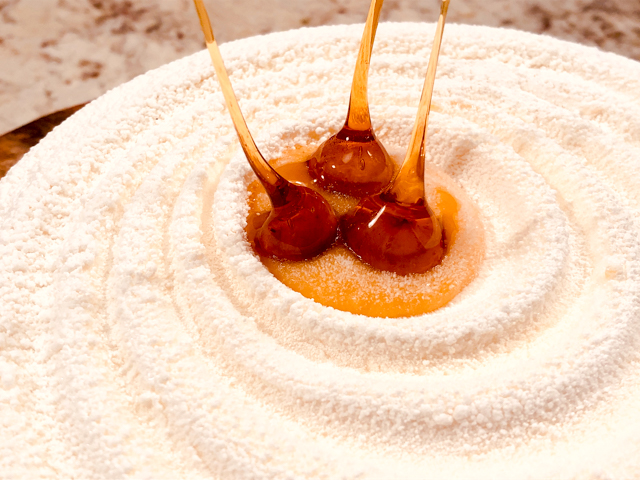
Turn out the frozen cake and spray immediately with a light coating of white chocolate suspension.  Melt the reserved mango gelatin very gently, and spoon some in the center of the mold. Keep in the fridge for at least 4 hours before serving. Decorate with caramel-coated hazelnuts.

ENJOY!

to print the recipe, click here

Comments: I am very happy with the flavors and textures of this baby. The tricky part of this type of dessert is assembling it, because it’s a process that is a bit “in the dark”, so to speak. With a regular layered cake, you can visualize the layers well, because you either bake them individually or cut slices from a bigger cake. As the cake is assembled, it is also easier to judge how much filling to add so that the layers end up as uniform as you want them to be. In mousse cakes like this one, it becomes a bit of a guessing game. For instance, how much to allow the insert to sink in, how to make sure it is properly leveled,  how to prevent large air bubbles to form, or to make sure the sides are smooth.  Small details can go wrong, but you may not realize until unmolding the frozen cake next day. Talk about cake-anxiety…  😉

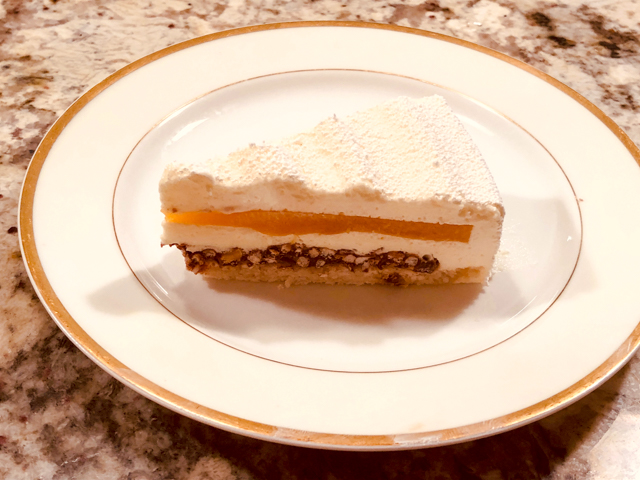
You can see that part of the mango insert got a little wavy. That happened because when I first made the insert and set it in the fridge overnight, the pan got a bit tilted and I had to melt the layer again and re-freeze it, not an ideal situation. Lesson learned.  It is crucial to have space in your freezer that allows all components to lay flat and absolutely leveled.

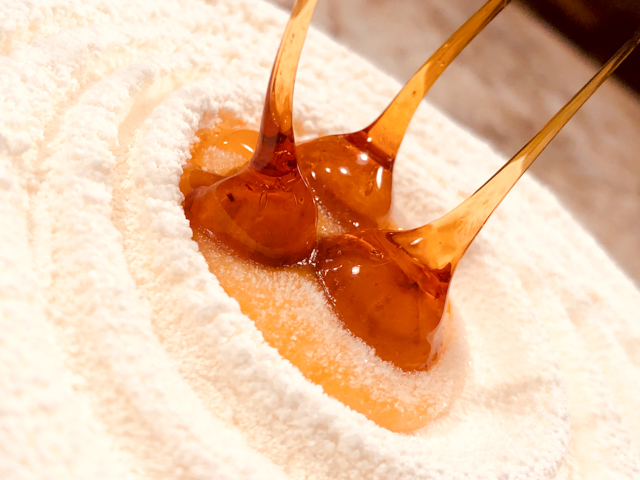
The most fun part? Making the hazelnut with the pointy caramel bits. I followed the method described in Martha Stewart’s site, and it worked like a charm. My only advice is that you make more hazelnuts than you need. Some end up cracking as you stick the skewer, so it’s better to start with more. Also, some might roll a bit as the caramel drips compromising the shape of the drip. It is very important to let the caramel rest before coating the hazelnuts, but once it reaches the right viscosity, you must work fast. It is possible to re-warm the caramel briefly to continue using it, but it’s a bit of a hassle. I prefer to hit that magical point and work with it right away.

Finally, don’t let the lack of a Silikomart mold stop you from making this dessert. A simple ring or springform pan will work, as long as you have a second ring with smaller diameter to form the insert. And the velvet coating is also optional (although you can also buy a spray can with the suspension ready to use; be ready for sticker shock!). The surface is very smooth to start with (see the large photo in the composite picture), so you could leave it as it is, or melt some white chocolate and drizzle it all over the top, in a Pollock-manner.  You could dye the chocolate orange and then add the hazelnuts here and there.

ONE YEAR AGO: Lebanese Lentil Salad and a Cookbook Review

TWO YEARS AGO: Cottage Loaf

THREE YEARS AGO: Sourdough Loaf with Cranberries and Walnuts

FOUR YEAR AGO: Sichuan Pork Stir-Fry in Garlic Sauce

FIVE YEARS AGO: Our Green Trip to Colorado

SIX YEARS AGO: Ditalini Pasta Salad

SEVEN YEARS AGO: Celebrate Wednesday with a Thai Seafood Curry

EIGHT YEARS AGO:  Post-workout Breakfast

NINE YEARS AGO: Semolina Barbecue Buns

TEN YEARS AGO: Lavash Crackers


A BRAZILIAN HUMMINGBIRD

Hummingbird Cake is a classic concotion quite common in Southern regions of the US. Today I share with you my Brazilian take on this classic, which I am calling Beija-Flor Cake. As you may have guessed, Beija-Flor is Portuguese for hummingbird. A three-layer cake very moist with banana, mango, and passion fruit, with a bit of texture given by Brazil nuts. Everyone loved it, including the resident critic, grandson and son of fantastic bakers, the man I married 19 years ago.  He actually said (and I should have captured it in a video) that the frosting was as good as his Grandma’s.  My heart missed 3 beats in a row. Obviously, I am very happy with this bake!

BEIJA-FLOR CAKE
(from the Bewitching Kitchen, inspired by this recipe)

recipe is enough for 4 cakes,  only 3 cake layers were used for the final dessert)

1 + 1/4 cup chopped Brazil nuts
3 cups (370g) all-purpose flour
1 teaspoon baking soda
1 and 1/2 teaspoons mixed spice (or use cinnamon plus a touch of cloves)
1/2 teaspoon salt
1 cup mashed banana
1 cup mango coarsely pureed
½ cup passionfruit pulp
3 large eggs, at room temperature
1/2 cup grapeseed oil
1 cup (200g) packed brown sugar
3/4 cup (150g) granulated sugar
1 teaspoons vanilla paste   

Heat the oven to 300°F. Spread Brazil nuts onto a lined baking pan. Toast for 8 minutes. Remove from the oven. Turn oven up to 350°F, then grease and lightly flour four 6-inch cake pans.

Whisk the flour, baking soda, mixed spice and salt together in a large bowl. Whisk the rest of the cake ingredients in a medium bowl. Pour wet ingredients into dry ingredients and whisk until completely combined. Fold in the nuts. Spread batter evenly between the 4 prepared cake pans. Bake for 25-30 minutes or until a toothpick inserted in the center comes out clean.

Remove cakes from the oven and allow to cool completely in the pans set on a wire rack. Once completely cooled, remove cakes from pan and level the tops off if necessary to make them completely flat.

CREAM CHEESE FROSTING
(adapted from Sweet Bake Shop)  

2 cups (450 g) unsalted butter, room temperature
½ cup (110 g) cream cheese, softened
5½ cups (700 g) confectioners’ sugar
1 teaspoon pure vanilla extract
2 to 3 drops yellow and orange gel food dye
¾ cup yellow and orange sprinkles

In the bowl of a stand mixer fitted with the paddle attachment, beat together the butter and cream cheese on medium speed until smooth.

With the mixer running on low-speed, slowly add the confectioners’ sugar. Add the vanilla, then turn the mixer up to medium speed and beat until light and fluffy, about 2 minutes. Stop the mixer and scrape down the sides and bottom of the bowl, then beat again on medium speed again for a few seconds. Use immediately or store in the fridge for a couple of days.

CAKE ASSEMBLY:  Place 3/4 cup frosting in a small bowl and dye it yellow. Place 3/4 frosting in another small bowl and dye it orange. Prepare two small piping bags (with no icing tips) containing the two colors, each in one bag. Carefully cut the tips with scissors, and place them delicately in a larger piping bag fitted with a 1M tip or any other tip of your choice. Make sure the opening of both bags are at the same distance of the 1M tip. Test that both colors are coming out together. Reserve.  Add sprinkles to the rest of the frosting that was not dyed.

Place the first cake on a board, cut side up.  Add a layer of frosting with sprinkles. Add another cake on top, cut side up.  Spread a bit more frosting, top with the final cake, cut side down (this makes sure that the top will be smooth and leveled).  Add a thin layer of frosting and refrigerate the cake for 30 minutes, or place in the freezer for about 10 minutes to set the frosting.

Frost the cake, top and sides, then use the two-color frosting to pipe decorative swirls on the bottom and top.  Refrigerate and bring to room temperature 30 minutes before serving.

ENJOY!

to print the recipe, click here

Comments: Hummingbird Cake originated in Jamaica, containing banana and pineapple as the main flavors, plus pecans and spices such as cinnamon and cloves. It is normally covered with cream cheese frosting. I wanted to make a version with Brazilian flavors, so I used mangos and passionfruit. I kept the banana component since I imagined it would be important in the texture of the cake.  Brazil nuts seemed a natural choice, and with that in mind, my “Beija-Flor Cake” was born. In the composite below, you can see that the cake is not as massive as it might seem.  It is not a small cake, but definitely not humongous. See the little yogurt bottle next to it for perspective.

Traditionally, Hummingbird Cakes have a homey, rustic look which I find quite appealing, but I wanted to try something a bit different, and opted for a smooth frosting with yellow and orange sprinkles to reflect the fruits used in the cake. A small amount of sprinkle-free frosting was dyed in the same two colors and used for piping. The frosting is very easy to make and much more forgiving to spread than a classic buttercream, so if you are absolutely paranoid about a bit afraid of frosting a cake, this is a very good starting point.

My apologies for not showing the picture of a slice. We cut one slice to “test-taste” it the evening before, but the first slice never cuts too well. We took the cake to the department next morning, and I completely forgot all about it. By the time I got to the mail room hoping to snap a picture, it was too late. It was a big hit with our colleagues and graduate students. I liked how moist and flavorful it turned out, but in my opinion the passionfruit flavor was not prominent enough. Next time I will skip the banana, and maybe stick with two fruits only, for instance mango and passionfruit. Those are the ideas floating in my mind for a new version. The frosting will stay exactly the same.  A total winner, that will show up again in future bakings. You can count on that.

ONE YEAR AGO: A Cookbook Review

TWO YEARS AGO: Air-Fried Carrots, Two Ways

THREE YEARS AGO: Sweet Potato Crust Quiche

FOUR YEARS AGO: Chicken Thighs with Artichokes and Capers

FIVE YEARS AGO: Pea Pancakes with Herbed Yogurt

SIX YEARS AGO: Mushroom Stroganoff

SEVEN YEARS AGO: Tomato Sourdough

EIGHT YEARS AGO: Gamberetti con rucola e pomodori

NINE YEARS AGO: Flirting with Orzo


ICE CREAM MELTS FOR MANGO

I grew up watching my family members eating mangos and making a huge mess in the process.  Some varieties of Brazilian mango are so fibrous that the “correct” way to eat them is to cut a small hole in the top and suck out the juices while compressing the fruit, which leaves your mouth, face, hands, and possibly even your clothes covered with juice and sticky mango bits.  Some people view this process as part of the fun, but both me and my Dad had nothing to do with it, and only enjoyed a mango if it was laying on a pristine plate, dissected by a knife and fork, with a napkin alongside.

This simple dessert would certainly receive the seal of  approval from my Dad.

MANGOS FLAMBE  (MANGAS FLAMBADAS)
(inspired by my friend Vanda)

4 ripe mangos
1 Tbs butter
2 Tbs granulated sugar (or more)
pinch of salt
1/4 cup rum (or Cointreau or a mix of both)
2 tsp fresh lemon juice

Cut the mango in medium-sized pieces.  Go take a quick shower (optional).  Come back and melt the butter in a large skillet over medium heat.   Add the diced mango, sprinkle sugar all over it, add the salt, and cook gently until the mango starts to get soft.   Taste a piece and decide if you need more sugar.

Carefully add the rum, heat it for a few seconds, and ignite with a match.  Wait until the flames die down, sprinkle a little lemon juice, taste again.   Serve over vanilla ice cream.

ENJOY!

to print the recipe, click here

Comments: You can change this basic recipe in many ways.  For example, you may first caramelize the sugar, and then add the fruit on top.  But, I prefer this preparation I’m posting because it’s simpler and the taste of the fruit is more pronounced.  You may also skip the alcohol with no major harm, but I like the extra flavor it imparts.   If you have leftovers (highly unlikely), they are delicious in the morning with yogurt and a little granola sprinkled on top.   You can prepare bananas in almost exactly the same way, or even along with the mango, but when making bananas flambe, I like to caramelize the sugar first.     My friend Vanda,  who makes risottos and souffles with her eyes closed and one hand tied behind her back, loves to prepare mangos this way.  After dicing the fruit, she usually grabs the pit and takes great pleasure in sucking all the mango-goodness clinging to it, standing next to the sink.   Unfortunately, I never seem to have my camera ready when that happens.  😉

Add to FacebookAdd to DiggAdd to Del.icio.usAdd to StumbleuponAdd to RedditAdd to BlinklistAdd to TwitterAdd to TechnoratiAdd to Yahoo BuzzAdd to Newsvine