Another great recipe using my beloved pressure cooker, but no need to run away if you don’t own one, the original method (found here) uses a regular pan. We’ve been so busy lately (by lately I guess I mean a few years in a row…) that shortcuts to get dinner at the table faster are more than welcome. As long as they don’t compromise flavor. No need to worry about it in this recipe, flavorful is one adjective that comes to mind to describe it.
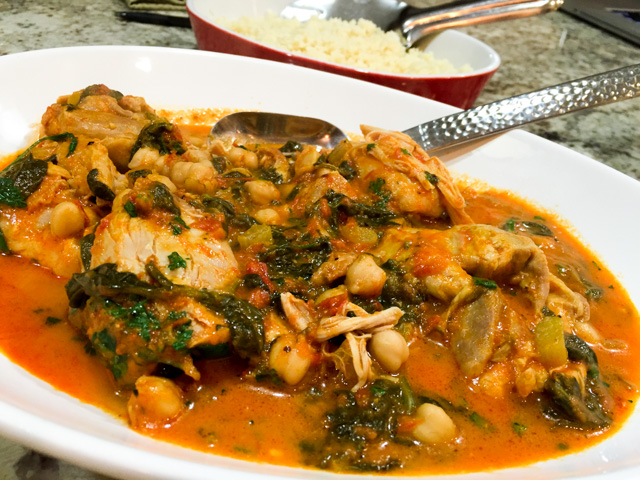
INDIAN SPICED CHICKEN WITH CHICKPEAS AND SPINACH
(adapted from Bon Appetit)
1 tablespoon vegetable oil (I used grape seed oil)
6 boneless, skinless chicken thighs
Kosher salt
1 tablespoon unsalted butter
1 large shallot, thinly sliced
1 + 1/2 tablespoons grated ginger
2 teaspoons ground coriander
1 teaspoon ground cumin
1 teaspoon ground turmeric
1/4 teaspoon cayenne pepper
1 15-ounce can chickpeas, rinsed
1 cups chicken broth
5 ounces baby spinach
1/4 cup Greek yogurt
1/4 cup cilantro leaves, coarsely chopped (optional)
Heat oil in a large heavy pot over medium-high heat or in your pressure cooker. Season chicken with salt. Working in batches, cook chicken, reducing heat as needed to prevent over-browning, until golden brown on all side.Transfer to a plate.
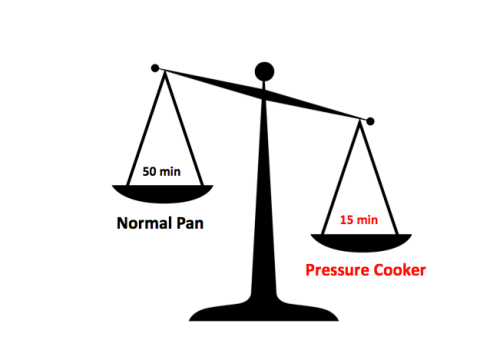
Add butter and shallot to drippings in pot; season with salt. Cook, stirring often, until soft and fragrant. Stir in ginger, coriander, cumin, turmeric, and cayenne. Cook, stirring constantly, until spices are fragrant, about 1 minute. Stir in chickpeas and chicken broth. Return chicken and any accumulated juices to pot. Bring to a simmer. Cover pot and either braise it in a 325 F oven for about 50 minutes, or cook under pressure for 15 minutes.
Quickly release the steam (or place the closed pan under running cold water in the sink), and when the pressure equalizes open the pan. Return the pan to the stove, add the spinach and simmer for a couple of minutes until wilted. Stir yogurt into cooking liquid, mix gently and serve right away, sprinkled with fresh cilantro, if you like.
ENJOY!
to print the recipe, click here
Comments: I absolutely love the way pressure cooking intensifies the flavors of a sauce, and this one with all the warm spices and the chickpeas turned out quite spectacular indeed. The recipe made so much sauce that even after leftovers were enjoyed at lunch, a little sauce remained. I went at it with a spoon on day 3. Yeah, that good. And, of course the time-saving aspect is hard to be neglected…
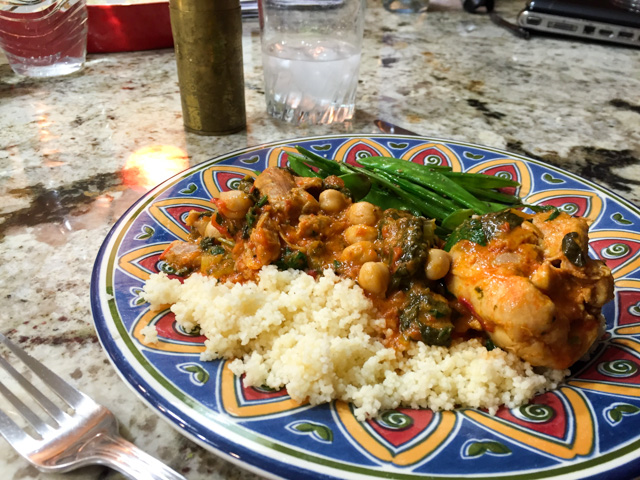
This recipe could be served quite simply with a slice of naan bread, but I opted for cauli-rice and some snow peas sautéed in olive oil and a little mint. We ate like the King and the Queen… except for the fact that we did the dishes afterwards. I doubt royalty deals with such mundane issues. Their loss. Doing dishes can be a lot of fun. All you need is the right music in the background…
😉
ONE YEAR AGO: Curry Cardamon Cookies
TWO YEARS AGO: In My Kitchen, March 2014
THREE YEARS AGO: Boeuf Bourguignon for a Snowy Evening
FOUR YEARS AGO: Chickpea Salad
FIVE YEARS AGO: Soft Spot for Chevre
SIX YEARS AGO: Roasted Onion and Asiago Cheese Miche