PINECONE ALMOND COOKIES AND A COOKBOOK TO LOVE

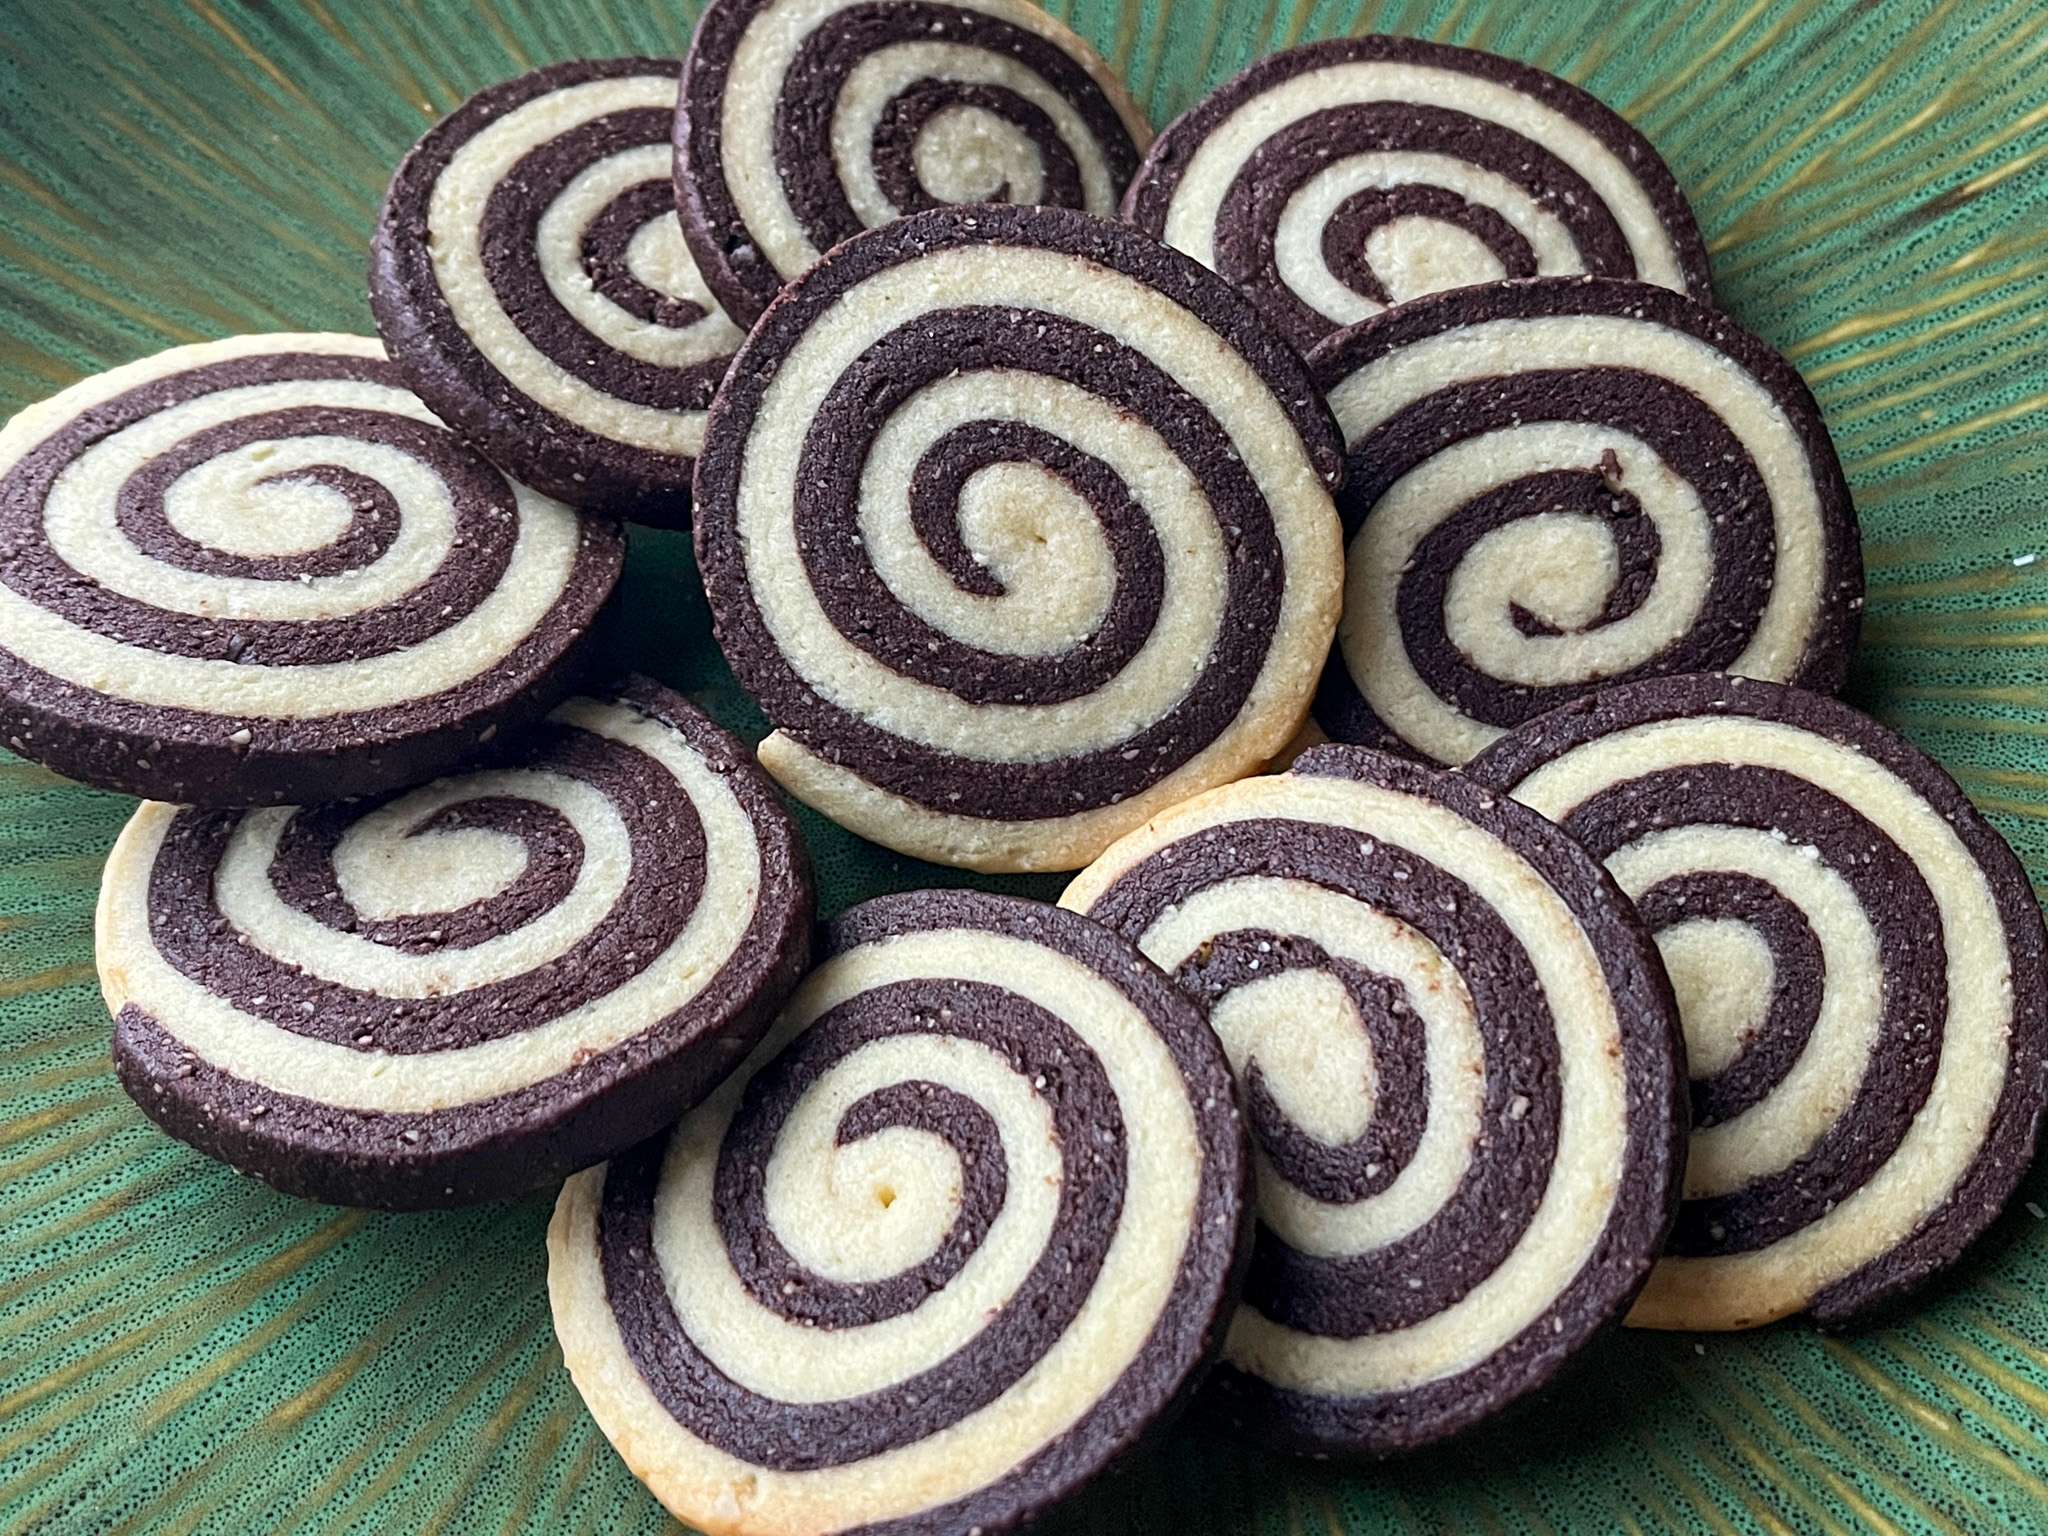
I follow wonderful bakers on Instagram, they are a great source of inspiration, from cookies to cakes, from tarts to bread baking, and patisserie in general. A few months ago I learned that Winnie Lee (IG ohcakeswinnie) was going to publish her first cookbook. I placed an order and anxiously waited. If you like to order Bake with Winnie for you or to gift to someone, click here. Her style of baking is whimsical, clever, creative. Reminds me of one of my favorite bakers from The Great British Bake-Off, Kim-Joy. Bake with Winnie is a book full of gorgeous bakes, colorful, playful, impossible to look at them and not smile. And dream. Today I share with you the second recipe I tried: Pinecone Almond Cookies Tartlets, absolutely adorable!

PINECONE ALMOND COOKIES
(published with permission from Bake with Winnie)

350g (3 ½ cups) ground almonds
125g (1 cup) icing sugar
3 eggs (medium)
1 tsp almond extract
1 tsp vanilla paste
sliced almonds (for decoration)
50g (⅓ cup) dark chocolate (for dipping)
Icing sugar for dusting

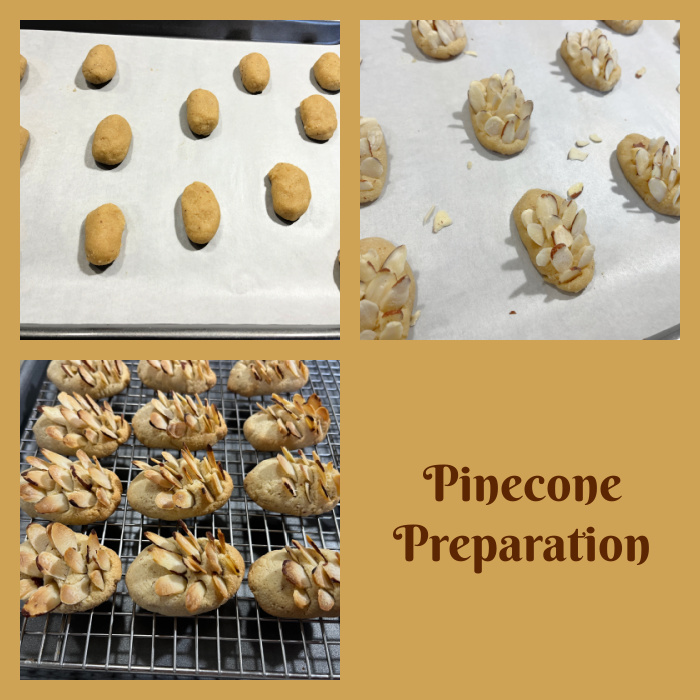
Preheat your oven to 175°C and line a flat baking tray with baking paper.

In a large mixing bowl, combine the ground almonds and sifted icing sugar. Whisk the eggs, vanilla and almond extract in a separate bowl and add them to the dry ingredients. Mix with a whisk or spatula until you get a thick, slightly sticky paste. You can add a bit more ground almonds (25g / ¼cup) so it’s easier to work with.

Using a small ice cream scoop or your hands slightly damp, portion out the dough. Roll into long oval shapes and slightly flatten them. Arrange on the baking tray. Press sliced almonds into the top of each cookie in overlapping rows to mimic the look of pinecones, leaving about 1/3 of the cookie bare for
dipping in chocolate later.

Bake for about 12–15 minutes or until lightly golden. Allow the cookies to cool completely on a wire rack.

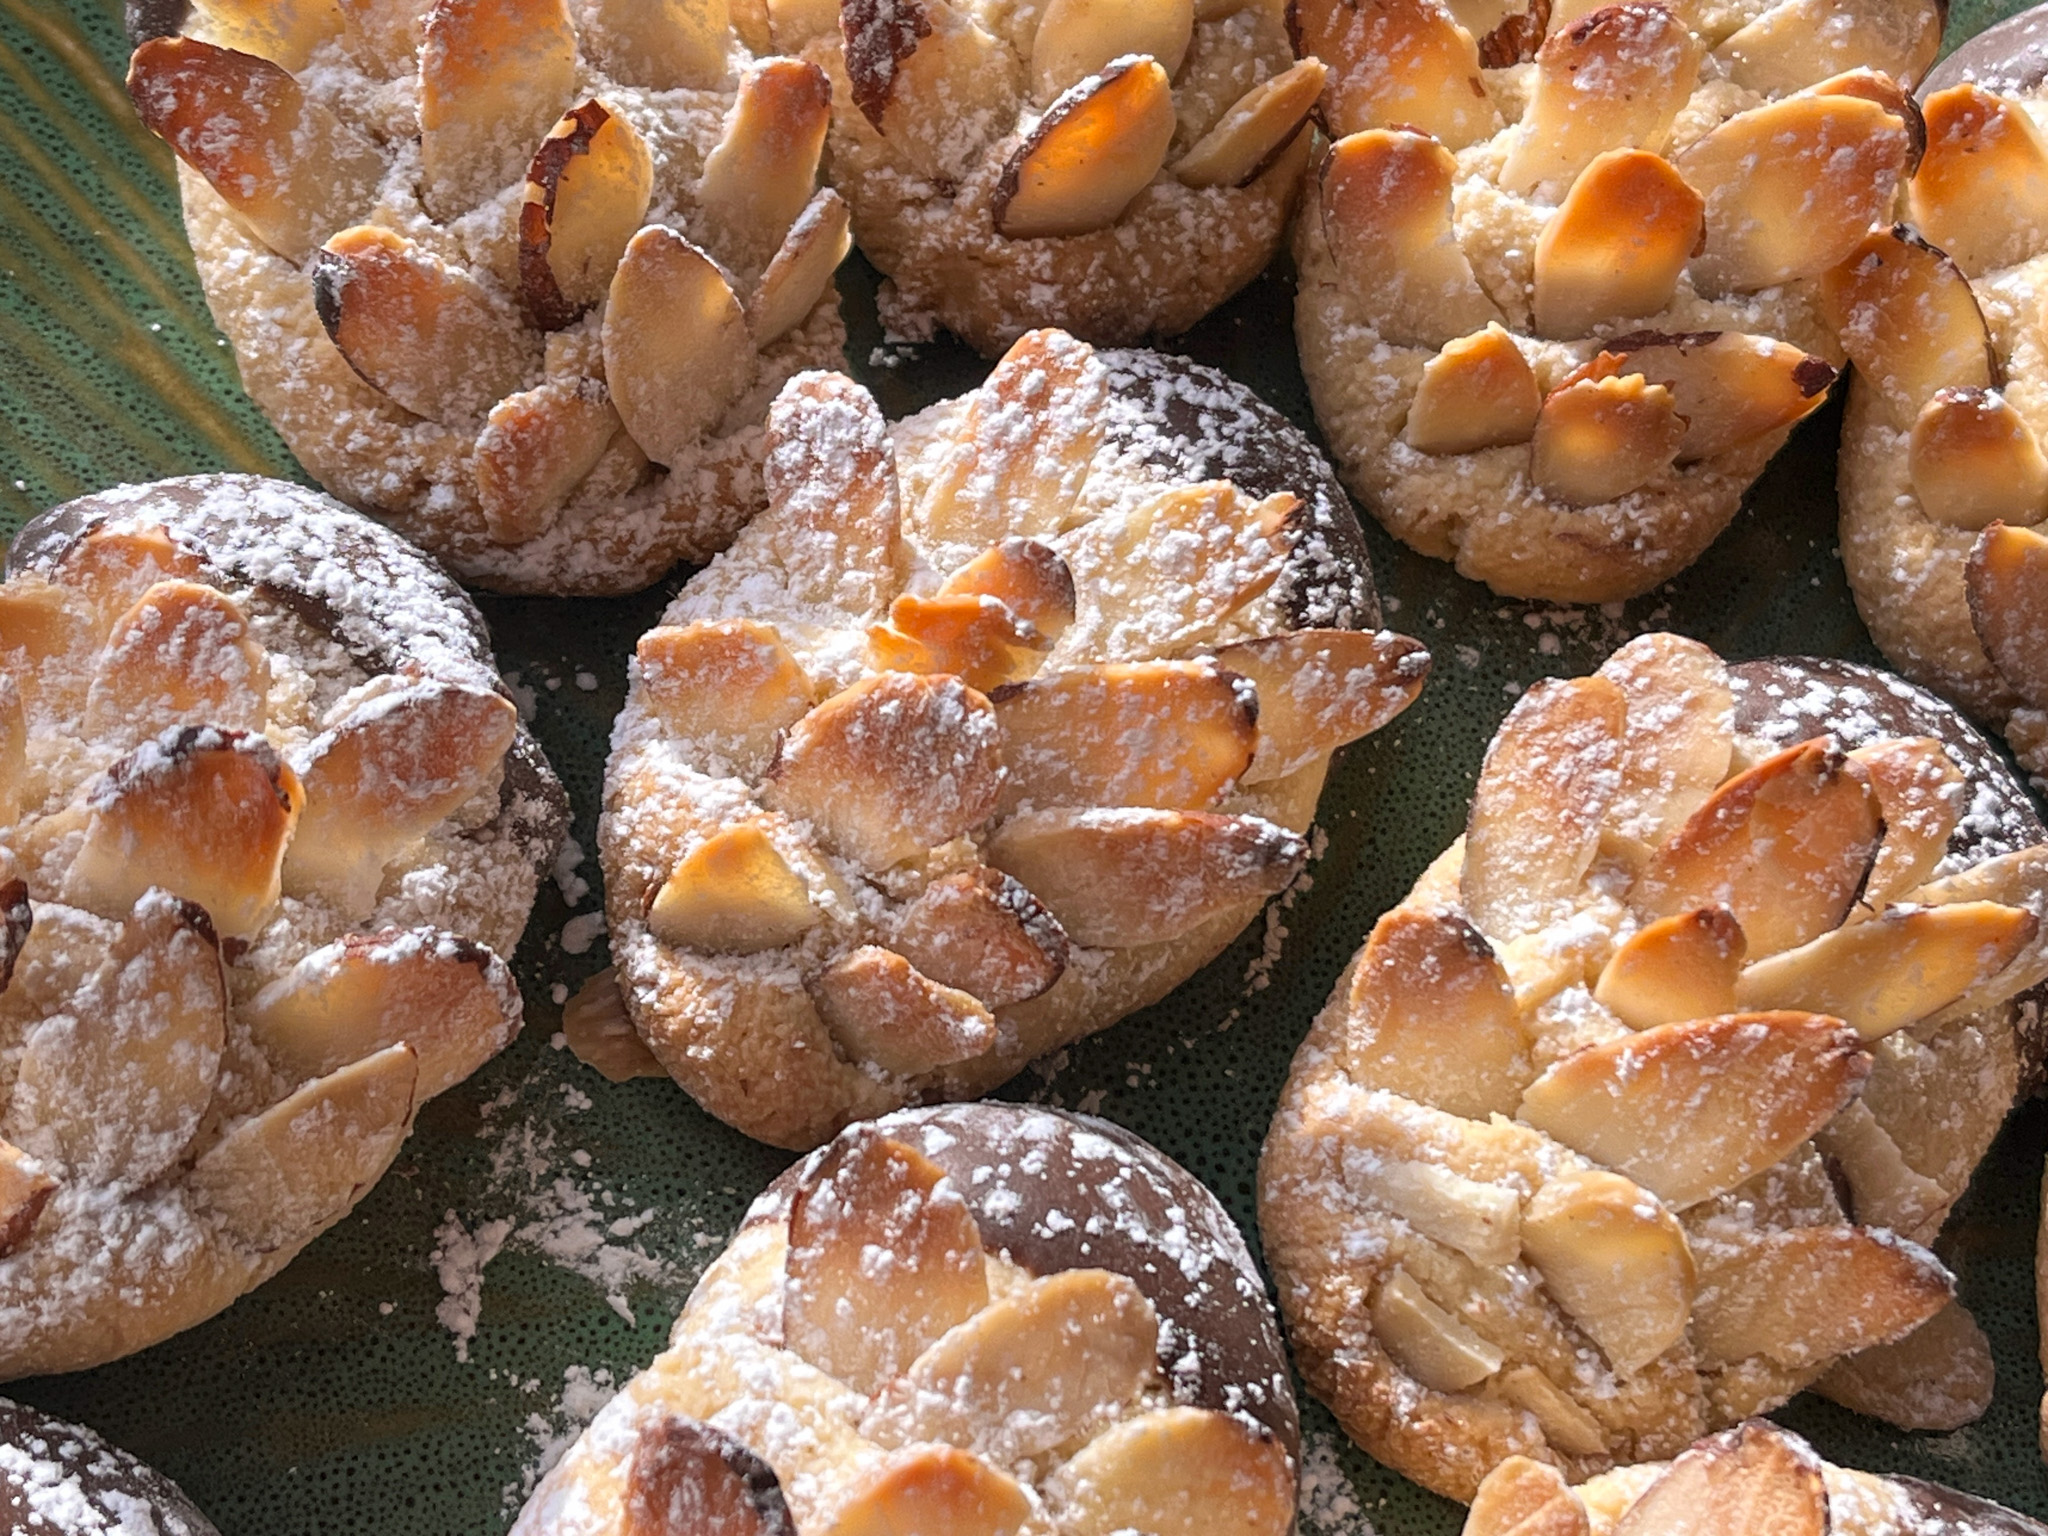
Dust with icing sugar the almond section of the cookie. Melt the dark chocolate and dip the bare end of each cookie into the chocolate. Let the dipped cookies set on parchment paper before serving.

ENJOY!

to print the recipe, click here

Comments: Just loved making this batch of cookies, which could easily also be flipped into hedgehogs, don’t you think? Add the chocolate to the other side, a couple of white drops of chocolate or Royal icing, or even sprinkles for the eyes, and there you go! New shape….. They have a nice texture and that delicious taste of almonds made more intense by the roasted pieces all over. The only time-consuming step is finding nicely shaped almond slices in the bag, they are often a bit too broken or damaged. But it is totally worth it.


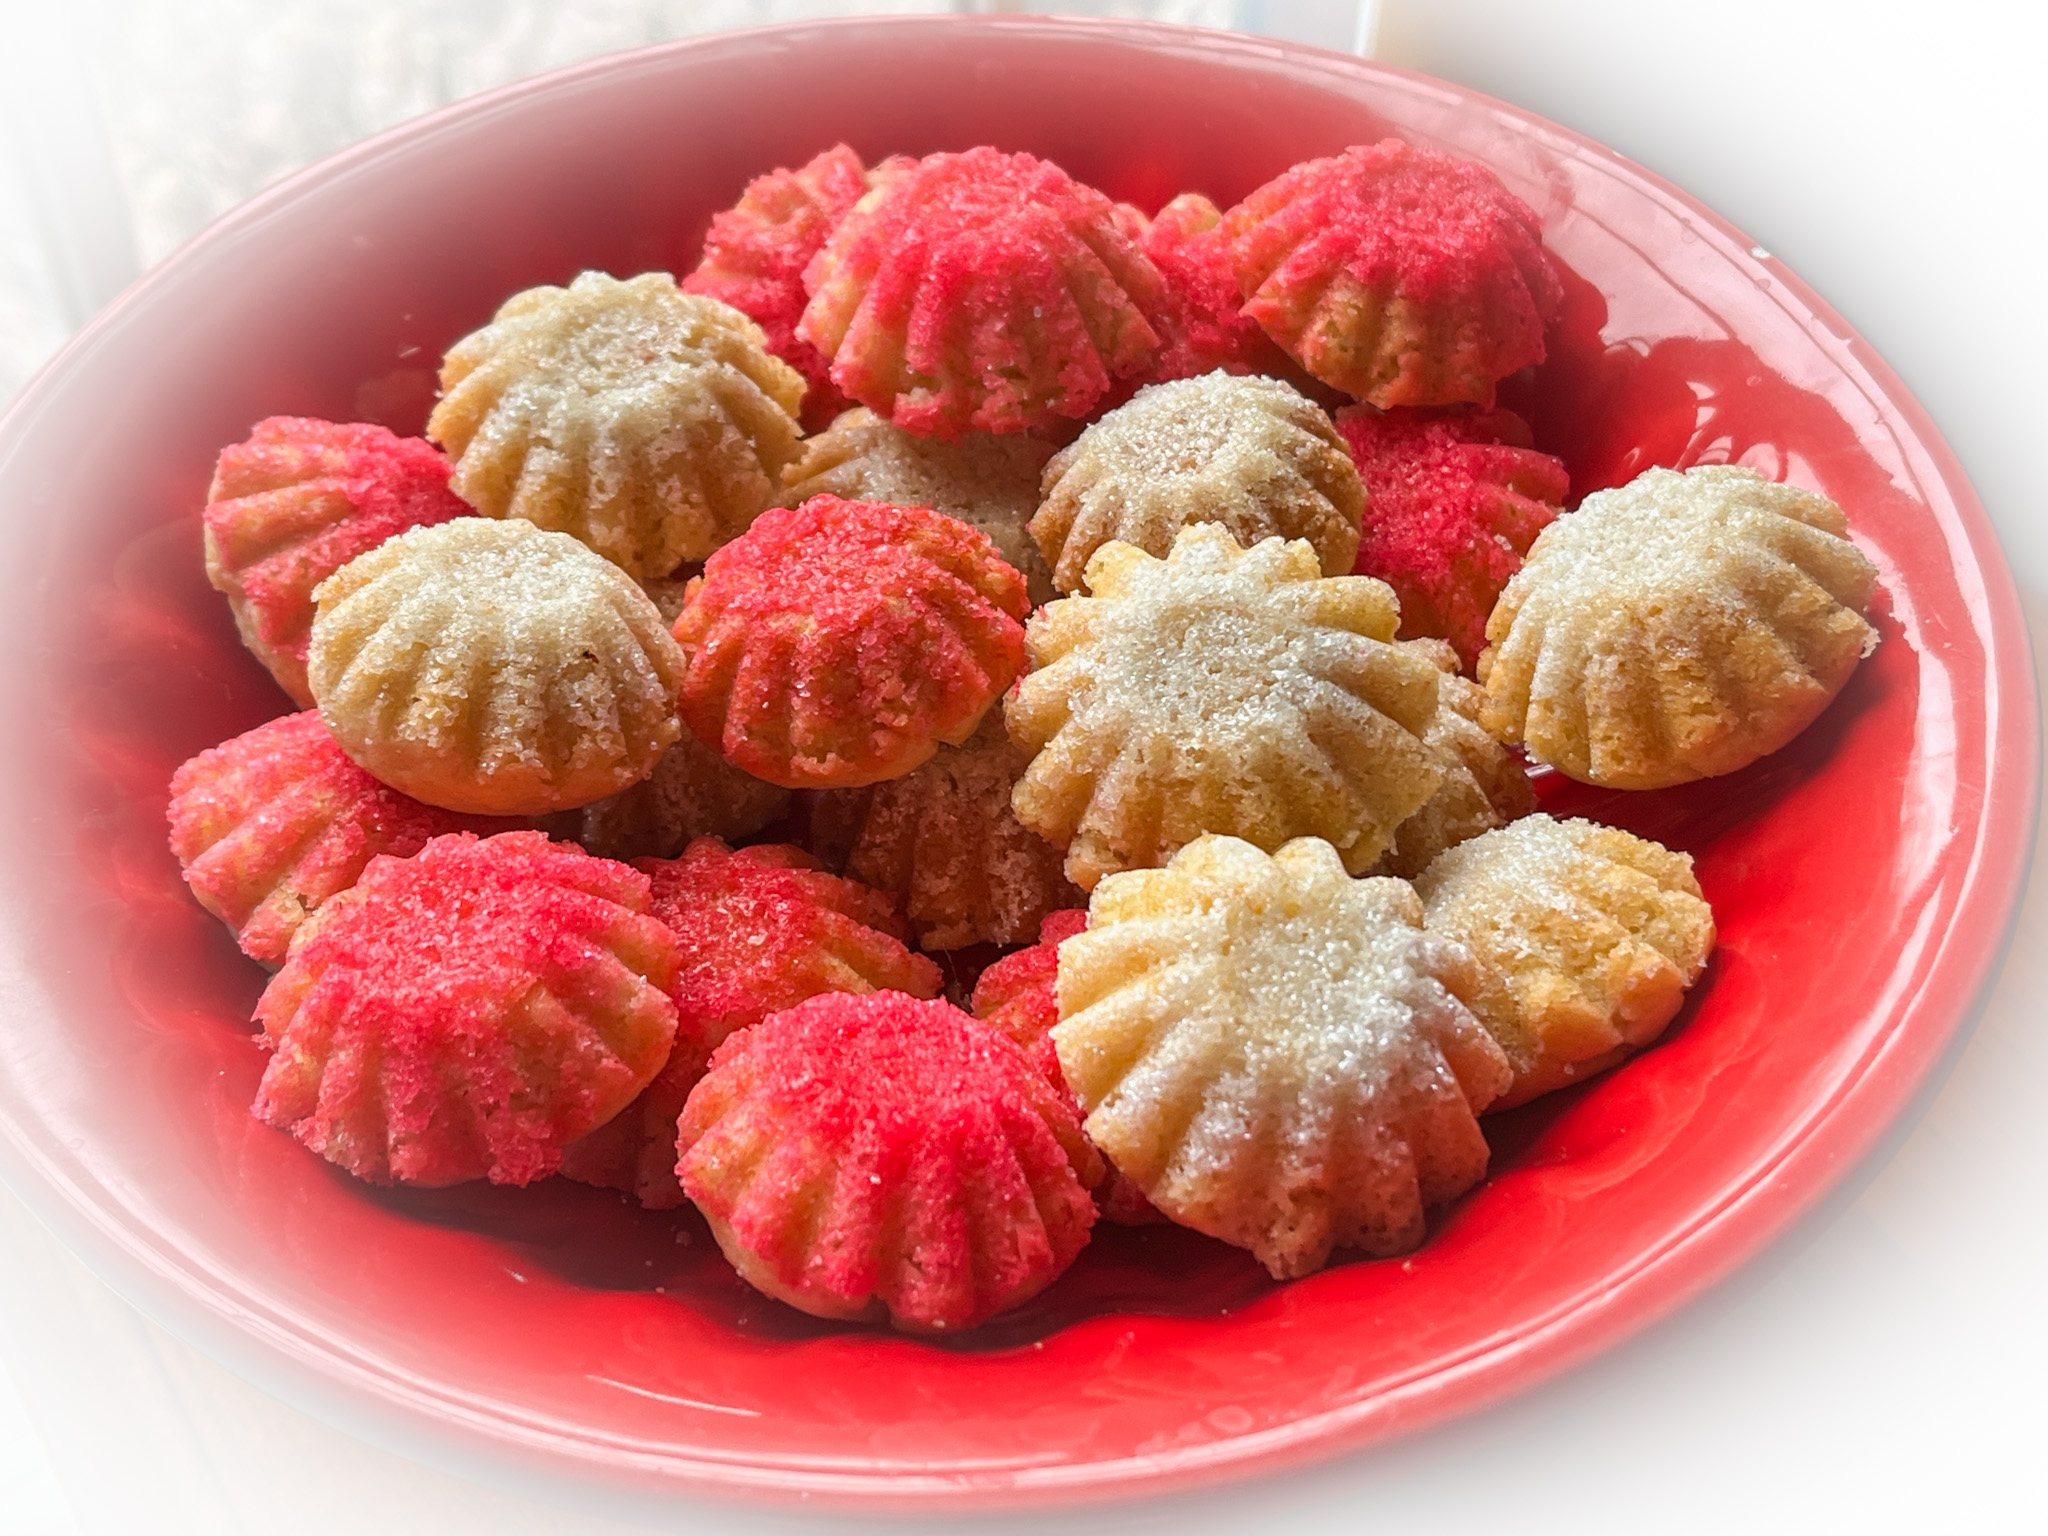
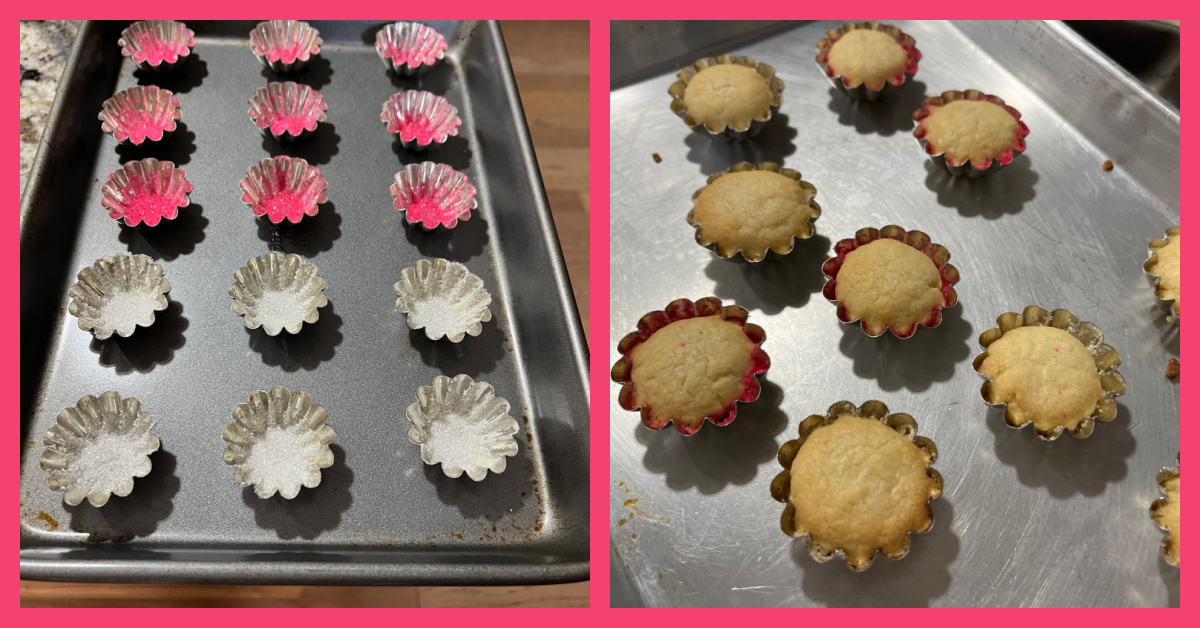
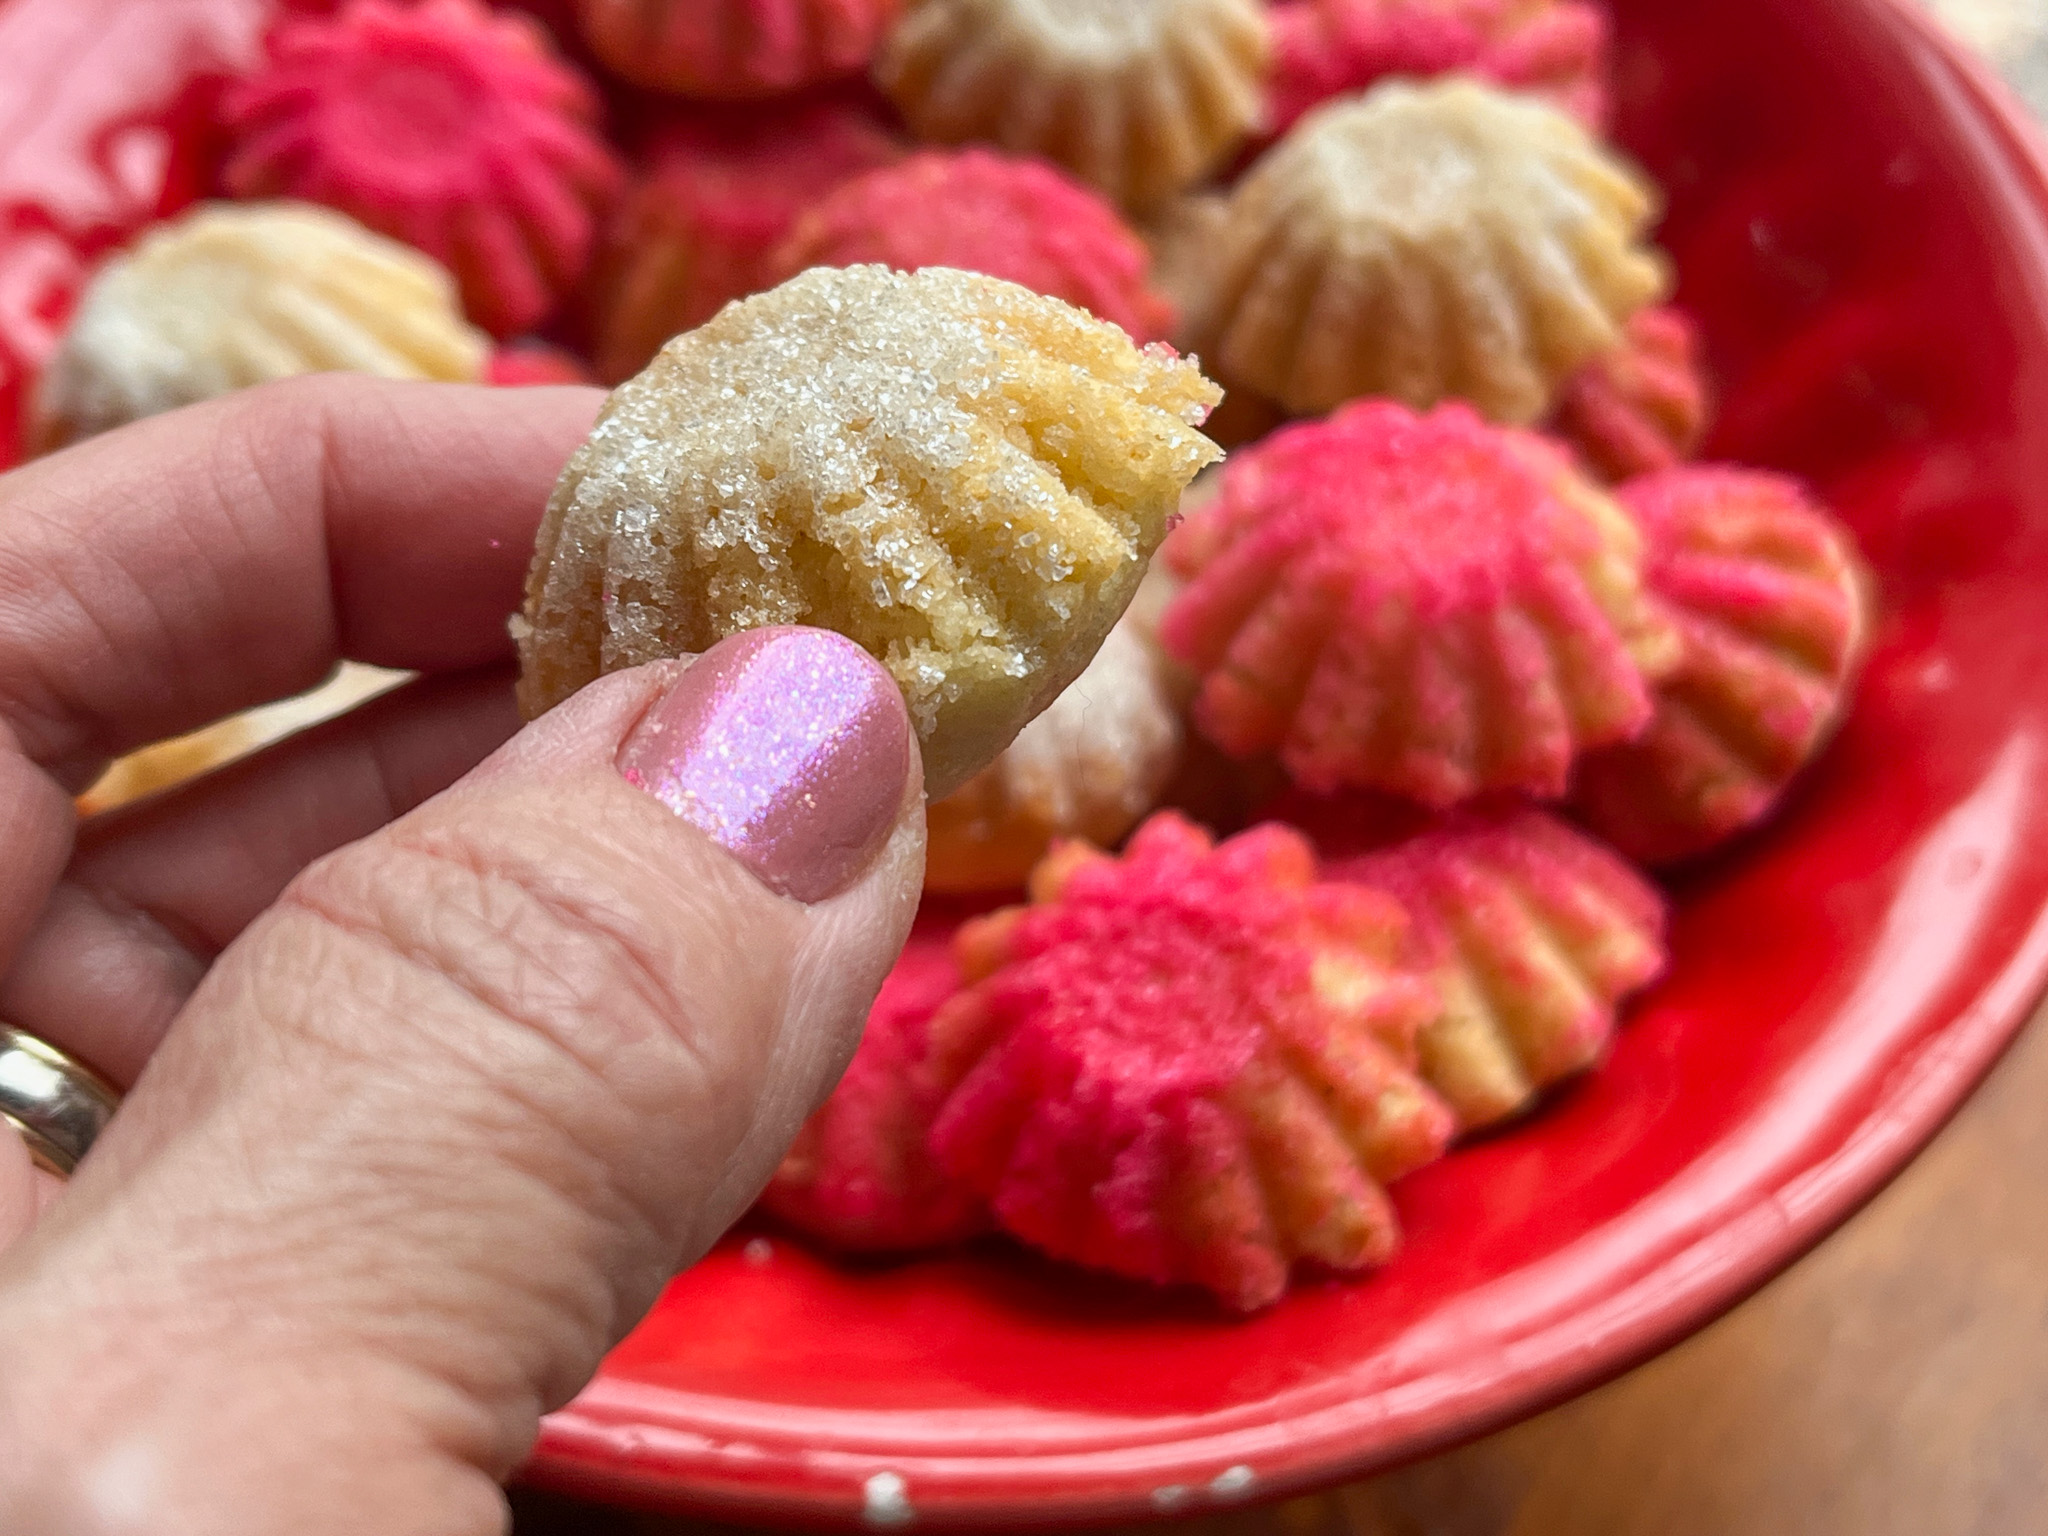
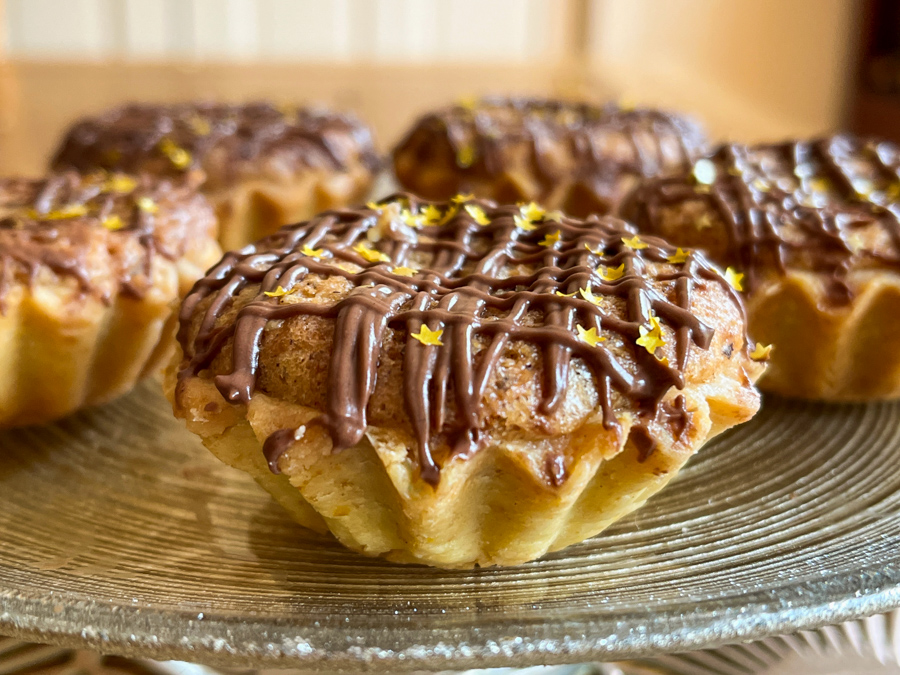
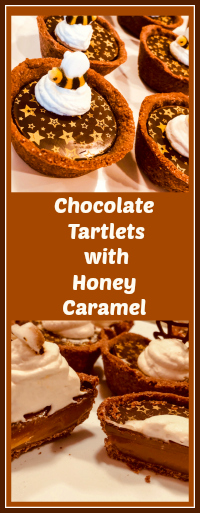
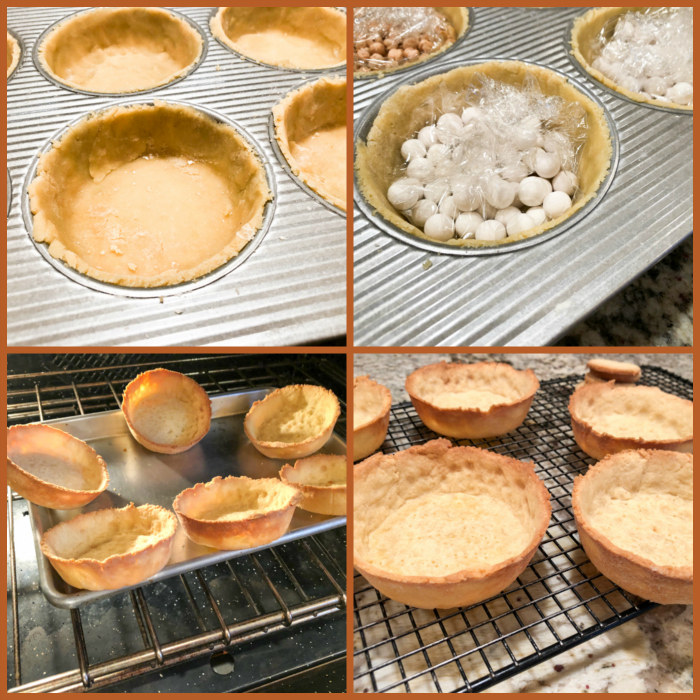
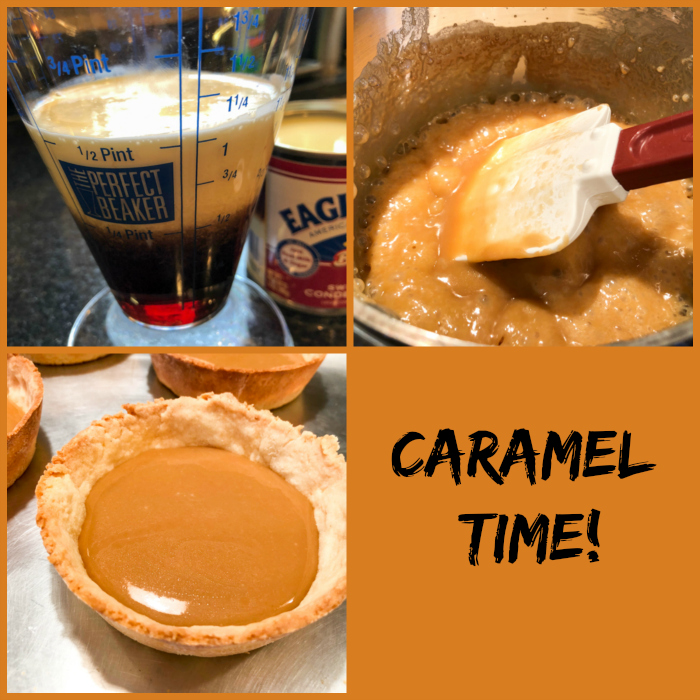
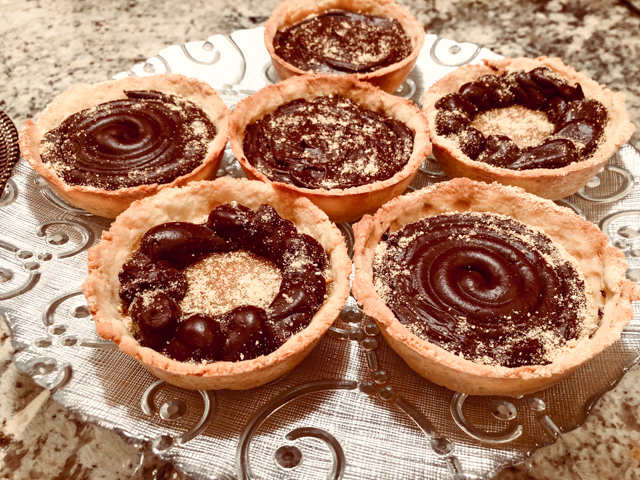
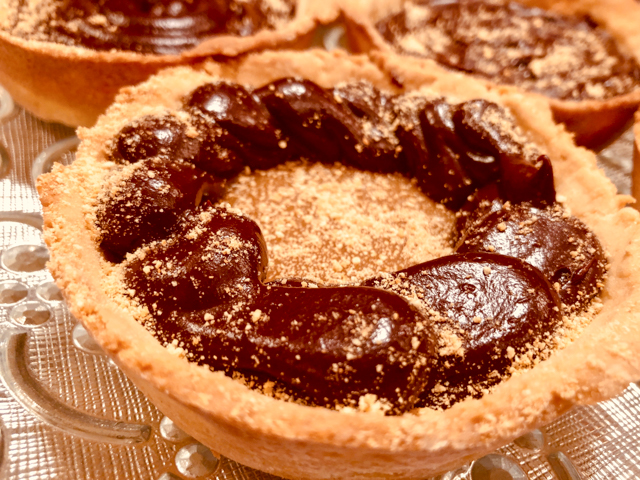
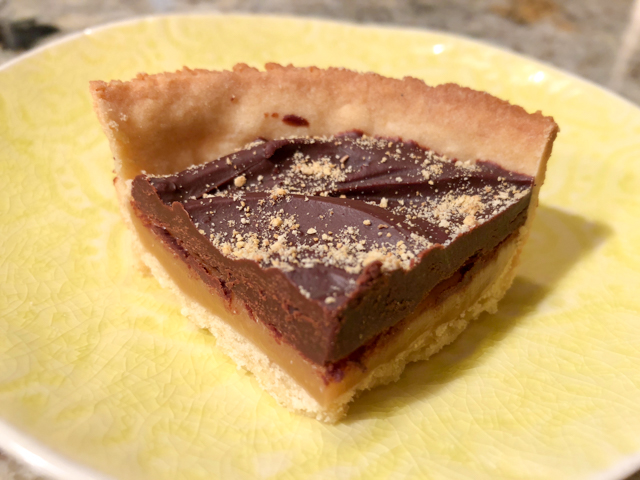
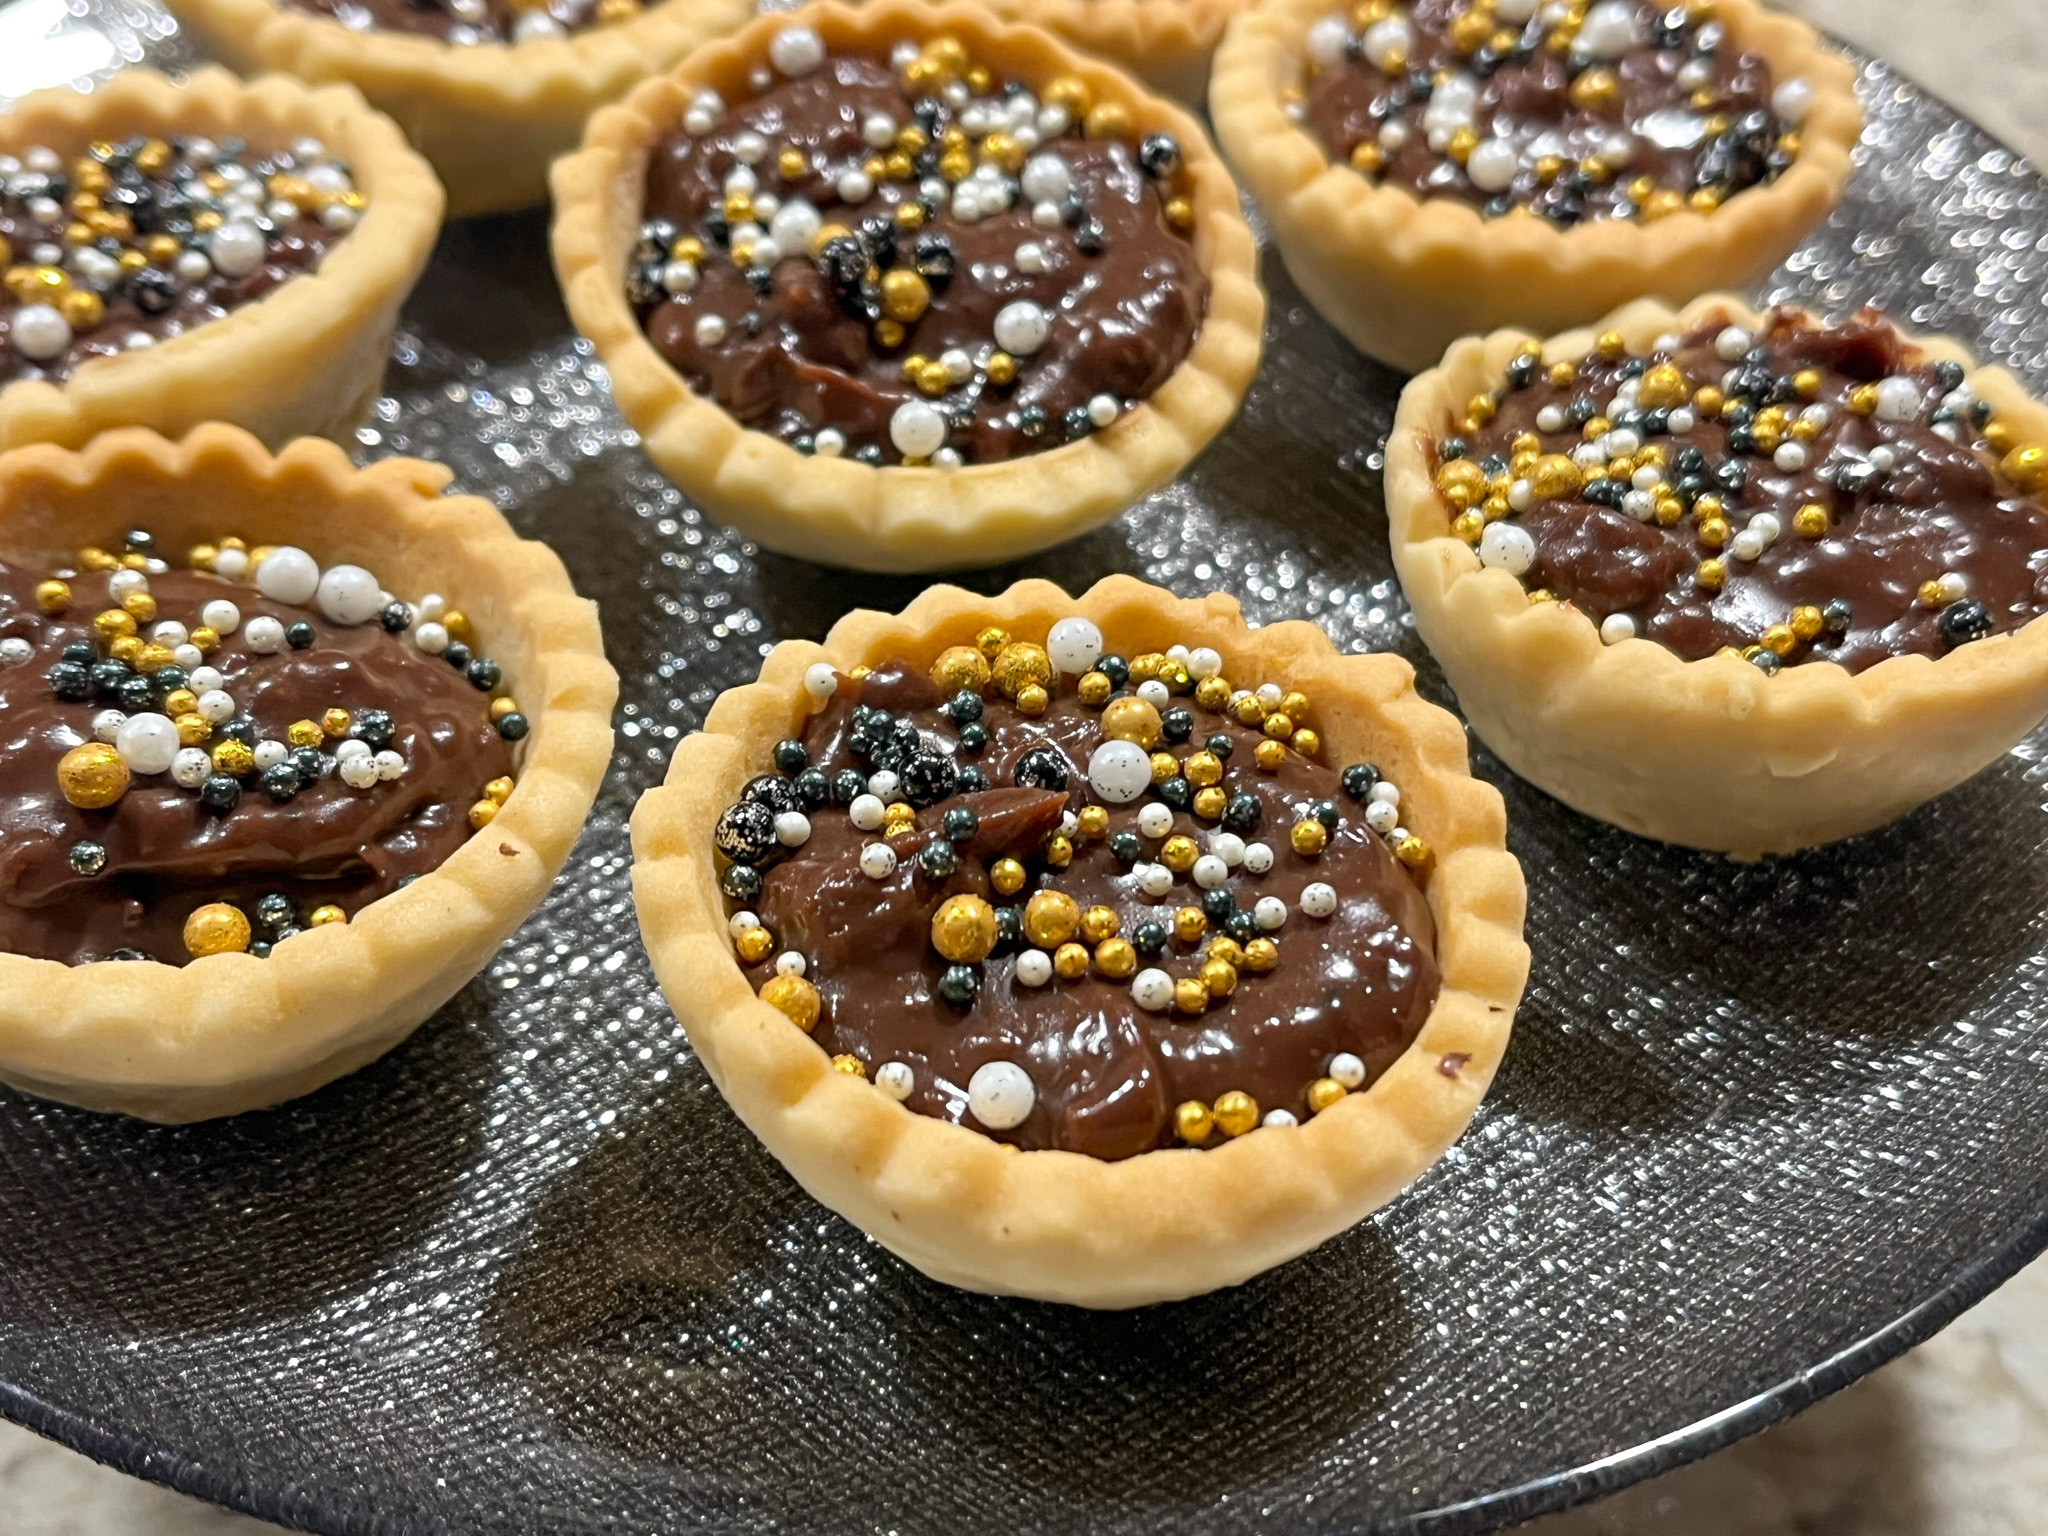
Moving on, a teaser recipe from the book, Chocolate Tartlets, in which she makes the dough in a pretty efficient way, shaping them in the bottom side of muffin tins.

.

That should give you an idea of Winnie’s style of baking. I am totally smitten by her cookbook. So let me take you through a little stroll through her publication… The book is divided in five sections.

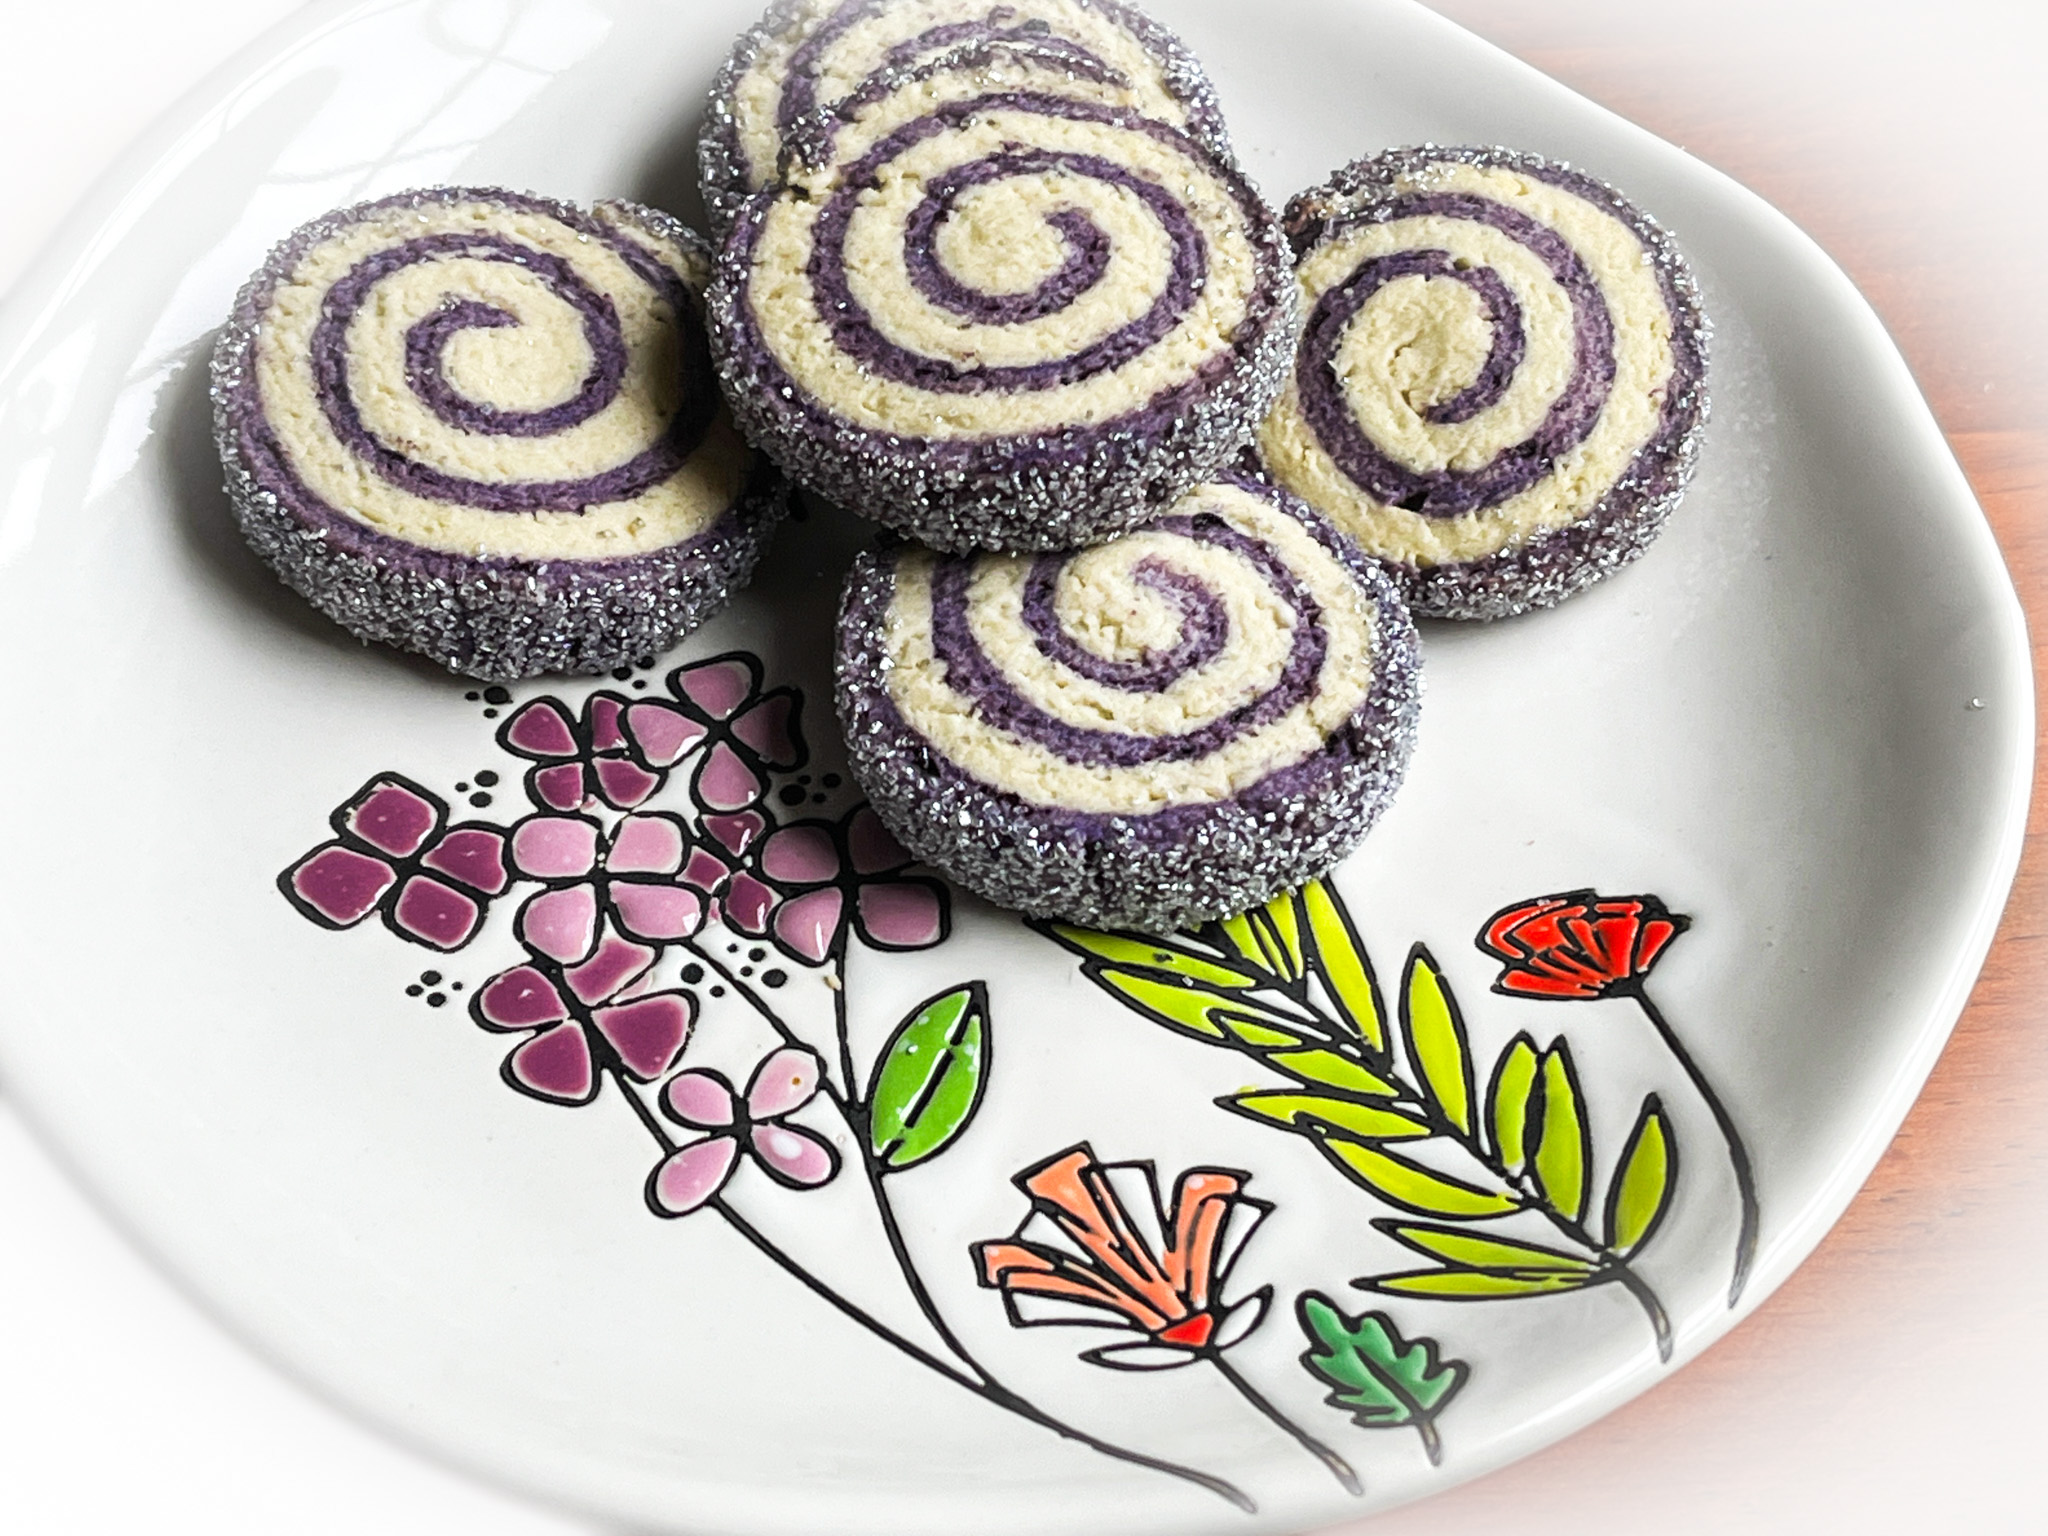
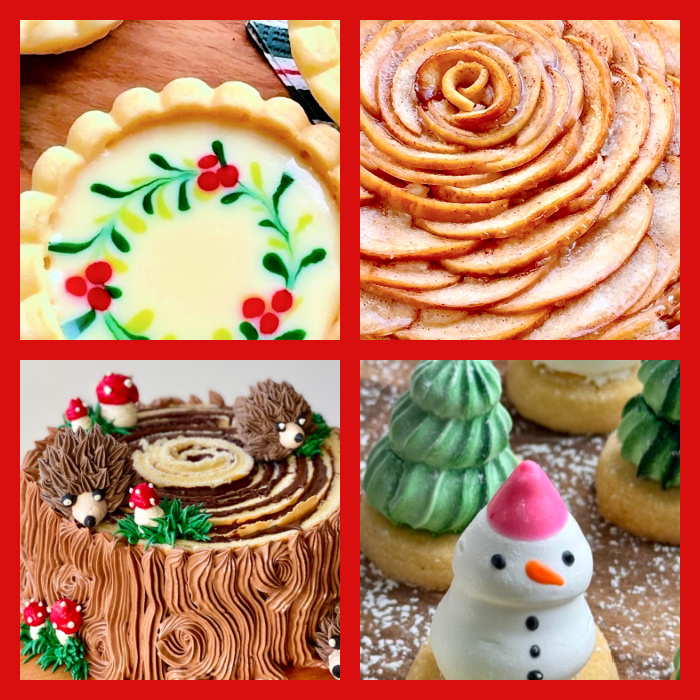
PRETTY FOR SPRING. In this section she shares so many bakes with a floral and overall cute component. She opens the chapter with one incredibly beautiful crostata, perfect lattice and colorful flowers all around the edge, all made with pastry. Truly a masterpiece! Imagine Madeleines decorated with pressed flowers, a Roll cake perfect for Valentine’s with hearts imprinted all over. A complete dream of a chapter.

SUMMER LOVIN’. Again the chapter opens with a showstopper, her Happiness Cake Roll, at some point I simply must make it and take for my donations on Fridays. It is one of the happiest bakes I’ve seen, just gives you a smile. A patterned roll cake topped with all kinds of colorful concoctions made of meringue. Another favorite of mine is her Strawberry Cake, decorated with a white buttercream lattice. Must bake! Adorable Linzer-style cookies are part of this chapter too.

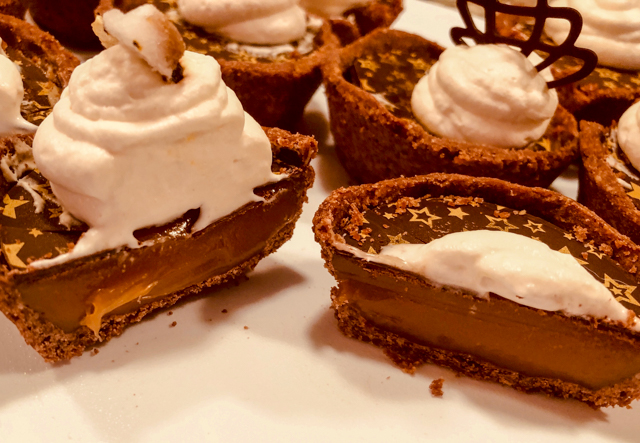
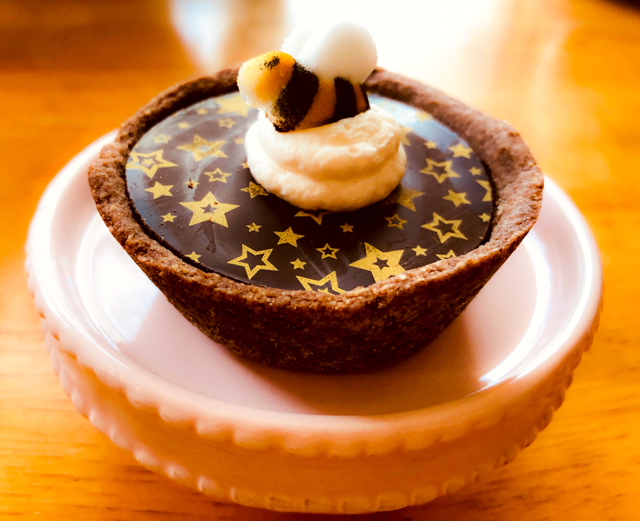
SWEET AND SPOOKY. If you are a Halloween-lover like myself, you will flip for this part of her book, but there is a lot more. It starts with cupcakes decorated as little foxes. It is in this chapter that you will find chocolate tartlets I used as a teaser recipe, although hers are different, the filling is ganache and they are all topped with a fresh raspberry. A Spider Web Cake Roll must be part of my Halloween next year. It is a promise! But my very very favorite? A Woodland Cake Roll which is rolled vertically. I’ve been fascinated with this type of cake for a long time.

MAGICAL CHRISTMAS. I almost made her opening recipe, Gingerbread Man Cake Roll. Yes, she is huge on cake rolls, a kind of bake I love and do not make often enough. That must change… Snowflake Pastries made with puff pastry are on my list also. They look absolutely amazing. Perhaps my favorite of this chapter: Holly Mini Tarts. Incredibly cute!

FROSTINGS AND FILLINGS. In this final chapter she shares some of the basic recipe used throughout the book, so it is very useful, plus you can use those for your own versions of cakes and bakes.

I thank Winnie for allowing me to publish a recipe from her cookbook, she is a very sweet person, quite helpful and interactive in her IG page (click here), so pay her a visit and order a copy of her book for yourself or someone you love…

ONE YEAR AGO: Fall Leaves Panch Puran Sourdough

TWO YEARS AGO: Farro with Chickpeas and Spinach

THREE YEARS AGO: Bison a la Mode de Bourgogne

FOUR YEARS AGO: Masala Mashed Potatoes

FIVE YEARS AGO: Lessons from Tanya: Sugar Cookie Silhouettes

SIX YEARS AGO: Cherry-Chipotle Chicken Thighs

SEVEN YEARS AGO: White Chocolate Mini-Mousse with Sugared Cranberries

EIGHT YEARS AGO: You Say Ebelskiver, I say Falafel

NINE YEARS AGO: Happy Thanksgiving!

TEN YEARS AGO: Two Takes on Raspberries

ELEVEN YEARS AGO: Spice Cake with Blackberry Puree & The Global Pastry Review

TWELVE YEARS AGO: Own Your Kitchen with Cappuccino Panna Cotta

THIRTEEN YEARS AGO: Chicken Parmigiana, the Thriller

FOURTEEN YEARS AGO: Wild Mushroom Risotto

FIFTEEN YEARS AGO: Tartine Bread:  Basic Country Loaf 

SIXTEEN YEARS AGO:  Pugliese Bread

THREE ADORABLE COOKIES

.

COOKIE #1

VANILLA ELDERFLOWER PINWHEEL COOKIES
(from The Bewitching Kitchen)

2¼ cups (282 g) all-purpose flour
¼ teaspoon salt
7 tablespoons (98 g) unsalted butter, room temperature
3/4 cup (80 g) powdered sugar
1 large egg, room temperature
1 tablespoon (12.5 g) vanilla sugar
1 tablespoon elderberry powder (like this one)
tiny amount of purple food gel dye, if needed
white coarse sanding sugar

In a medium bowl, sift together the flour and salt; set aside.

In the bowl of a stand mixer fitted with the paddle attachment, beat the butter and powdered sugar together on medium-high until light and fluffy. With the mixer on low, add the egg and vanilla, mix to combine, and then scrape down the bowl using a rubber spatula. Add the flour mixture and use a rubber spatula to mix until well combined.

Divide the dough in half, add elderberry powder and food gel dye to one half, and mix until fully incorporated. Divide both halves of the dough in half again so you end up with two equal portions of vanilla dough and two equal portions of elderberry dough.

On a lightly floured work surface, roll each portion of dough out to a roughly 8-x-10-inch (20-x-25-cm) rectangle. Place a purple dough rectangle on top of a vanilla rectangle and use a rolling pin to gently press them together. Repeat with the other rectangles of vanilla and elderberry dough. Starting with the shorter side, roll the rectangles of dough into logs. Tightly wrap the two logs in plastic wrap and refrigerate for at least 1 hour and preferably overnight.

Heat the oven to 350°F. Line two baking trays with parchment paper or perforated silicone baking mats. Remove a cookie log from the refrigerator and let it warm up for a few minutes at room temperature. Roll on sanding sugar to coat the surface. Using a sharp knife, cut each log into ¼-inch slices. Place on the prepared baking trays and bake for 10 to 12 minutes, or until golden. Repeat with the remaining dough.

ENJOY!

to print the recipe, click here


Comments: Depending on the brand of your elderberry powder, you might not need the food gel dye. I used a very small amount, delivered with a toothpick. The sanding sugar coating is optional but I think it adds a lot to the overall look of the cookie.

.

TARTLET MOLDED COOKIES
(adapted from The Art of the Cookie)

200g all-purpose flour
1 teaspoon baking powder
½ teaspoon salt
1/2 cup (113g) unsalted butter, at room temperature
150g granulated sugar
1/2 large egg (whisk and add about half, no need to be too precise)
1 teaspoons vanilla extract
1 tablespoon heavy cream
softened butter to coat tins
pink, red and white sanding sugar

In a bowl, whisk together the flour, baking powder, and salt. In a large bowl, using an electric mixer on medium-high speed, beat the butter and sugar until light and fluffy, 2—3 minutes. Add the egg, cream and vanilla and beat on low speed until the egg is completely incorporated. Beating on low speed, slowly add the flour mixture and continue to beat until almost incorporated.

Press the dough into a disc, wrap tightly in plastic wrap, and refrigerate until firm, at least 1 hour or up to overnight.

Coat the tartlet tins of your choice with softened butter using a brush. Shower them with sanding sugar to form a layer at the bottom and edges. Place the tins on a baking sheet. Press a ball of dough in the tin, filling each 3/4 of the volume. Bake at 350F until set but not getting too much color, 15 to 18 minutes. Let the cookies sit in the tartlets for five minutes then remove gently using a small spatula if needed to help. Tapping the tins should work fine. Careful, they stay hot for a while.

ENJOY!

to print the recipe, click here

Comments: Those are just adorable indeed. Best consumed the same day, but if you keep them tightly closed in a container they will be ok next day. Probably any cookie recipe will work, make sure to make it a little softer than usual for cutout cookies, that’s why the heavy cream is a good addition. Chocolate dough could be great, I intend to give it a try soon.

.


CHOCOLATE AND ORANGE PINWHEELS

You’ll get a perfect swirl using Matt Adlard’s technique! I can’t share the recipe, you need to be part of his BAKE IT BETTER club, which is easy to do with a click here. Totally worth it!

ONE YEAR AGO: Ube Sourdough, Two Ways

TWO YEARS AGO: Brown Butter Dulce de Leche Cookie Cups

THREE YEARS AGO: Chicken Poblano Tortilla Soup

FOUR YEARS AGO: Kung Pao Chicken

FIVE YEARS AGO: Galette de Rois

SIX YEARS AGO: Sous-Vide Overnight Oatmeal

SEVEN YEARS AGO: A Valentine’s Day Opera

EIGHT YEARS AGO: Incredibly Simple Times Four

NINE YEARS AGO: Walnut-Cranberry Sourdough Bread

TEN YEARS AGO: Ottolenghi in Brazil?

ELEVEN YEARS AGO: Roasted Winter Vegetables with Miso-Lime Dressing

TWELVE YEARS AGO: 2012 Fitness Report: P90X2

THIRTEEN YEARS AGO: Caramelized Bananas

FOURTEEN YEARS AGO: Roasted Lemon Vinaigrette

FIFTEEN YEARS AGO: Whole Wheat Bread

CHOCOLATE-HAZELNUT TARTLETS

I’ve made this recipe twice, first time I thought they looked pretty nice but the filling was too dry for my taste. So I tweaked the recipe and now share with you the winner. Compared to the first attempt, they baked a little more flat, but the texture and taste were spot on, in my opinion. A big thank you to Matt Adlard, who helped me optimize it. As to the crust, it is my favorite. Very easy to handle, bakes like a dream. It goes in the oven as soon as the filling is piped in, no need to blind bake if using this type of filling. Easy as pie. Or, if you prefer, easy as tartlet.

CHOCOLATE HAZELNUT TARTLETS
(from the Bewitching Kitchen, inspired by Carole Bloom)

makes about 8, depending on the size of your molds

for the shells:
120 g cup all-purpose flour
2 tablespoons granulated sugar
1/8 tsp baking powder
pinch of salt
zest of 1/2 orange
45 g butter, cut in small pieces and very cold
1 egg yolk
1 tablespoon heavy cream (or a little more depending on the final texture of the dough)

for the filling:
100g unsalted butter, softened
100g powdered sugar
75g eggs
12g cornstarch
80g hazelnuts flour
60g mini chocolate chips (the smallest you can find)

to decorate (optional)
drizzle of candy melts or chocolate
sprinkles of your choice

Add to a food processor the flour, sugar, baking powder, salt, and orange zest. Pulse until all is combined and the orange zest very fragrant. Add the chilled butter, pulse a few times until the butter is cut in small pieces. Whisk the egg yolk, and one tablespoon of cream in a little bowl. With the processor running, pour this mixture and wait until the mixture starts to form a dough. If needed, add a little more heavy cream. Shape the dough into a flat disk and place in the fridge for 15 minutes. If you prefer leave it longer, I like to use it while it is still very pliable.

Roll out the dough until it is about 12 inches in diameter, and cut circles that will allow it to fit inside and all the way up your molds. Place the filled molds in the freezer for 20 minutes or longer, as you make the filling and heat your oven to 350F.

Make the filling: Beat the butter and sugar until smooth. I used a handheld mixer. Slowly add the eggs and beat again. Add the cornstarch and hazelnut flour and mix to combine, then finally fold in the chocolate chips. Pipe that mixture into the unbaked, frozen tart shells and then bake until the filling is set, about 25 minutes, but check at 20 minutes.

ENJOY!

to print the recipe, click here

Comments: I am really happy with the way these turned out. The recipe for the shells is definitely my favorite because it is very easy to handle. Plus, the inclusion of orange zest is a nice touch. Most recipes will tell you to chill a pie dough for hours or even overnight. It does not work well for me. I much rather roll the dough while it is still pliable and then freeze before baking. But do what works for you, as I often say… your kitchen, you rules. The combination of hazelnut and chocolate is fantastic and perfect for the Fall and upcoming Thanksgiving. Keep that in mind…

ONE YEAR AGO: Turkey Taco Salad

TWO YEARS AGO: Cheese and Pesto Emmer Roll-ups and Elaine’s Cookbook Review

THREE YEARS AGO: Mango-Hazelnut Entremet Cake

FOUR YEARS AGO: Lebanese Lentil Salad and a Cookbook Review

FIVE YEARS AGO: Cottage Loaf

SIX YEARS AGO: Sourdough Loaf with Cranberries and Walnuts

SEVEN YEARS AGO: Sichuan Pork Stir-Fry in Garlic Sauce

EIGHT YEARS AGO: Our Green Trip to Colorado

NINE YEARS AGO: Ditalini Pasta Salad

TEN YEARS AGO: Celebrate Wednesday with a Thai Seafood Curry

ELEVEN YEARS AGO:  Post-workout Breakfast

TWELVE YEARS AGO: Semolina Barbecue Buns

THIRTEEN YEARS AGO: Lavash Crackers

CHOCOLATE TARTLETS WITH HONEY CARAMEL FILLING

Care to find out what’s my latest obsession? Afternoon Tea Cookbooks. Most are not available as Kindle books, so I tend to be very selective when inviting one into our home. Reviews must be absolutely stellar, and pictures must be included for most (if not all) recipes. One book that made the cut is Afternoon Tea At Home, by Will Torrent. It is absolutely wonderful. As I was browsing through its pages and trying to decide what to make first from it, I had this crazy idea and immediately acted on it. Handed the book to Phil and said “Here, pick a recipe, any recipe, and I’ll make it.”  I call that Self-Inflicted Technical Challenge. He needed less than 2 minutes. Of course, the recipe he chose involved a crust, a caramel filling, tempering chocolate, and using transfer sheets to decorate it. Me and my big mouth. When will I ever learn?

CHOCOLATE TARTLETS WITH HONEY CARAMEL FILLING
(adapted from Afternoon Tea at Home)

for the crust:
200g all-purpose flour
150g butter, cut in pieces, cold
90g powdered sugar
60g almond flour
20g cocoa powder
pinch of salt
4 egg yolks

for the filling:
1 cup (320 g) honey
½ cup (120 ml) heavy cream

¼ cup (60 ml) sweetened condensed milk
¼ cup (85 g) corn syrup
pinch of salt
2 tablespoons unsalted butter 

for the topping:
1 cup heavy cream
3 tablespoons powdered sugar (or to taste)
1 tablespoon skimmed dry milk
100g tempered dark chocolate
12 sugar bees

Make the crust: Put the flour and butter in the bowl of a Kitchen Aid mixer and mix until the butter gets into crumbs, coated by the flour. In a separate bowl mix the sugar, almond flour, cocoa powder and salt. Add this mixture to the butter/flour, mix on very low-speed to combine (you want to avoid developing gluten). When it is almost fully combined, add the egg yolks and again mix very gently.  Form a dough, flatten it, wrap in plastic and place in the fridge for 1 hour.

Turn the dough onto a floured surface and roll out to 1/8 inch thick. Cut 12 rounds that will fit a muffin pan, coming all the way to the sides. Chill in the fridge for at least 30 minutes before blind-baking at 325 F.  I like to use plastic wrap to enclose rice or pie weights, it is safe to bake at this temperature, as long as the plastic does not touch the metal surface of the tin. Bake for 10 minutes, remove the weight, and bake for 5 to 10 more minutes. The tartlets must be fully baked, as no more cooking will take place.  Cool in the pan.

Make the filling: Combine the honey,  cream, condensed milk, corn syrup, and salt in a saucepan. Stir over medium heat until the mixture reaches 240F. Remove from the heat and stir in the butter. Divide among fully blind baked shells and allow to cool to room temperature. 

Make the chocolate decoration. Temper the chocolate according to your favorite method. Spread over the transfer sheet (make sure to use the correct side of the sheet!), let it set for a few minutes, then stamp circles the exact size of the top of the tartlets. Once fully set, gently peel the chocolate off the transfer sheet. Marvel at the design, pat yourself on the back.

Make the whipped cream. Beat the heavy cream with sugar and powdered milk until it forms medium peaks, transfer to a piping bag with a simple round piping tip.

Assemble the tartlets. When the crusts are cold, fill them with the caramel, place in the fridge to speed cooling a bit. Once the surface is set, gently place the chocolate decoration on top. Pipe the whipped cream, and set a little sugar bee on top.

ENJOY!

to print the recipe, click here

Comments: This recipe, originally called Beehive Tarts, comes from David Girard, Head Pastry Chef from The Dorchester. I kept the crust and the chocolate decorations, but changed the filling and the topping. The filling was a honey caramel thickened with gelatin, but I worried that it would not set up enough to be neatly sliced in half. Since I take my bakes to the department, I prefer to offer a larger number of small portions, so more colleagues can enjoy them.  For this reason, I used a caramel adapted from a recipe I made a couple of years ago.  As for the topping, in the book he uses lemon curd (it did give a nice yellow color very cute with the little bee sitting next to it), but I love the combination of chocolate, caramel and whipped cream. I stabilized the whipped cream with powdered milk, a trick I learned from Anna Olson. It does stabilize it very well and is super simple to do, but I prefer the taste of whipped cream stabilized with gelatin (I will talk about it in the very near future).

The chocolate disc decoration… Tempering chocolate is the number one culinary task that gives me hyperventilation. So many failures, it’s not even funny. Somehow this time things worked beautifully in the microwave/seeding method. Two basic changes in my approach: I grated the chocolate finely instead of keeping it in chunks, and used a microwave-safe plastic bowl instead of Pyrex, in very short cycles of heating, not more than 10 seconds at a time. I kept 1/4 of the chocolate grated at room temperature to use as “seed.”  Then I stirred, and stirred, and stirred some more, monitoring the temperature very carefully.  Once the chocolate was tempered, it was spread over the transfer sheet. I tried my best to do it as uniformly as possible.

At that point, I waited for the chocolate to start setting, but did not allow it to fully harden. You have a good window of several minutes to work, no need to panic. You could panic, of course, but it’s not mandatory. Then using a cookie cutter, I pressed into the chocolate, and lifted the disc. That is what I call a rookie’s mistake. If you use this technique, press the cookie cutter, forming the edges as sharply as possible, but do not lift the disc yet. Wait until it is fully set. That will ensure that the pattern will efficiently transfer. My first discs clearly showed some variability in the pattern, weak at some spots, well-defined in others. But for a first time, I am pretty happy with the way it turned out.  The sugar bees? I bought them from amazon.  If you have artistic inclinations, you could make some with fondant, or modeling chocolate. I cringe to imagine what my bees would look like if I attempted to make them from scratch. Rotten mangos? Pineapples after a wild boar stampede?  Neither option would look right.

But the heart of the matter is: can Sally bake without drama? Sometimes yes, but not always. After I took the photos for the post, I placed my cute tartlets in a tray to take them to the fridge, where they would sit until Monday morning. A very unfortunate bump of my hand on the shelf of the fridge, and they slid off the tray, one fell all the way to the floor, some tumbled inside the fridge… Can you feel the pain? At first I thought they were all ruined, but luckily enough most were ok after I shaved off a bit of broken crust  here and there. I had to discard a few bees that were messed up when they got shoved into a puddle of whipped cream. I also had to remove all the cream very carefully, clean the tops and decorate them again. The tartlet that fell to the floor? You can guess who swallowed it before I could do anything to prevent that from happening. Yes, there was chocolate. Yes, he was totally fine and quite pleased with that twist of canine fate.  Never a dull moment, folks. Never a dull moment.

The tartlets are quite decadent, the little bees have a melt in your mouth texture, not hard as rock sugar. I was pleasantly surprised. Obviously you can skip that component, without compromising the dessert. I just felt like going the extra mile, because the person who requested the recipe deserves only the best…

ONE YEAR AGO: Zucchini Soup with Tahini

TWO YEARS AGO: Black Sesame Macarons

THREE YEARS AGO: Fine Tuning Thomas Keller

FOUR YEARS AGO: Cauliflower Tortillas

FIVE YEARS AGO: Majestic Sedona, Take Two

SIX YEARS AGO: Secret Ingredient Turkey Meatballs

SEVEN YEARS AGO: Swedish Meatballs and Egg Noodles

EIGHT YEARS AGO: Italian Easter Pie

NINE YEARS AGO: Black Olive Bialy


CARAMEL CHOCOLATE TARTLETS


With this post I become a life-time member of The Craftsy Cheerleading Club.  Quite likely the oldest member of the organization, but my enthusiasm matches that of a sophomore. This class in particular Pies and Tarts for Every Season, is taught by  Gesine Bullock-Prado. I’m a bit distant from TV (except for binge watching stuff like Broadchurch, Outlander, Black Mirror) so I had no clue she is such a hot commodity in the media. Deservedly so. Teaching is a bit of a performing act. You need to capture the attention of your students and at the same time convey your message in a clear and efficient way. Lightening up a lecture using jokes and funny analogies is a nice way to make sure your audience stays with you. However, balance is everything. There is a delicate line to negotiate between lightness and solid info, and she really shines at it. I learned a lot about pie crusts, how to manipulate each kind, how to choose which crust to bake depending on the type of filling. All in a fun, relaxed way.  I am always amazed at the quality of online classes offered by Craftsy, and the reviews by users are for the most part spot on. Before buying any class, you can browse through to see exactly what you’ll be getting, and the feedback from other users. A win-win situation. Now, for the bit of bad news. I could not get permission to publish the recipe, so if you are interested in the exact formula Gesine used for crust and filling, you’ll have to get it from the site.

OVERVIEW OF THE RECIPE

It all starts with the crust. You have several options. You can make a single larger tart, or shape about 50g of dough per tartlet, using muffin rings or a tartlet pan like I did. Compared to a muffin ring, my tarts were a tad bit bigger, so I used 60g of dough for each one. Her recipe has some cute twists, like using condensed milk in the dough. It gives not only a more intense sweetness, but it browns nicely in the oven.  Following her detailed instructions, I was happy to get all tarts to bake evenly, no soggy bottoms (who wants to have that? not me!), and basically zero shrinkage (scary thought).

I added my own little twist to the preparation by placing the pie weights (and dried beans) into the shells using food grade plastic wrap instead of parchment paper. It does not melt in the oven, as long as you crumble it on top preventing it from touching the metal of the pan, you’ll be fine.  I love the way it allows the beans and ceramic balls to reach the edge of the tart. As long as you don’t bake the shells in a higher than 400F oven, no problem.  After the initial baking with weights, I removed them, got the shells back in a baking sheet and baked with the bottoms up in the air as shown in the photo. I just wanted to prevent any soggy bottom phenomenon (watching Great British Bake Off made me traumatized about those).

For her caramel recipe, she uses a bit of maple syrup in addition to usual suspects. Any caramel recipe you enjoy will do, make sure to cook it to the correct temperature, 240 F, that will provide the perfect texture. No caramel running out when you slice the tartlet, no biting into a rock either.  It hardens very quickly, but I still allowed the filled tartlets to rest at room temperature for a good 45 minutes before adding the chocolate ganache.  Again, any recipe will do, but you need to have it almost cool to room temperature, so that it pipes nicely using a 1/4 inch piping tip.

You can be creative, do swirls, waves, fill it solid and play with the surface using an off-set spatula. Once it’s set, sprinkle Graham cracker crumbs on top, or anything else you might like. A drizzle of white chocolate? Oreo crumbs? Gold leaf in pieces? Or as Gesine does in the video,  top with toasted mini-marshmallows and call them Caramel Smore’s Tarts.   Brilliant!  You can probably see a picture on Craftsy. Adorable stuff.

I had a blast making these… and the taste? Spectacular, even if I say so myself

That’s what you want… A nice layer of caramel in between the crunchy crust and the luscious chocolate ganache. Next time I will use muffin rings, so that the top of the crust will be leveled with the chocolate. If you have muffin rings, give them a try as tartlet containers.

Did I mention these would be amazing on Valentine’s Day?

Gesine, thank you for your helpful comments,
I have quite a few of your projects on my list of stuff to try soon….  

ONE YEAR AGO: Chicken Korma-ish

TWO YEARS AGO: Sunday Gravy with Braciola

THREE YEAR AGO: In My Kitchen, February 2015

FOUR YEARS AGO: Avocado and Orange Salad with Charred Jalapeno Dressing

FIVE YEARS AGO: Green Olive, Walnuts and Pomegranate Salad

SIX YEARS AGO: Romanian Flatbreads

SEVEN YEARS AGO: Ziti with Artichokes and Meyer Lemon Sauce

EIGHT YEARS AGO: Blasted Broccoli, Stove-top version

SaveSave

SaveSave

SaveSave

SaveSave

SaveSave

SaveSave

SaveSave