ONE GIFT, ONE DOUGH, TWO RECIPES

Last month my dear friend Louise sent me a wonderful gift: a box with many (and by many I mean more than 50!) little tartlet tins in several different shapes and sizes. I was speechless, and so touched by her generosity! It is now time to share my first adventure with this special gift. A single dual-purpose dough was used to make little tarts and a modernized version of Linzer cookies. The recipe for the dough comes from Haniela’s blog. She is one of the cookie artists I follow and try to learn from. I suspect it will become my default dough for sweet tarts. The texture is perfect, and I loved the way it is intensely flavored with vanilla.

CHOCOLATE GANACHE MINI-TARTLETS
(dough recipe from Haniela’s)

for the dough:
430g all-purpose-flour
1/8 tsp salt
160g powdered sugar
3 egg yolks
2 tsp vanilla bean paste or vanilla extract
226 g unsalted butter, at room temperature

for the filling:
6oz dark chocolate, cut in small pieces
1/2 cup heavy cream
1/8 tsp orange oil
sprinkles to decorate (optional)

Sift flour and salt. Set aside. In a mixer fitted with a paddle beater, mix butter and powdered sugar until smooth. In a small dish whisk together egg yolks and vanilla. Gradually beat egg yolk mixture into the creamed butter. Scrape the bowl a few times as needed.

On low-speed, gradually add flour mixture to butter mixture. Mix until it starts to come together. If the dough is too crumbly, add 1tsp milk. Do not overwork the dough. Invert the dough onto a clean work surface or into a large bowl and gather dough together with your hands into a ball. Then form the dough into a disk, wrap it in the foil and chill for 1 to 2 hours.

Heat oven to 350F. Place mini tart shell molds onto a baking sheet. Spray with a non-stick spray, set aside. Take out the chilled dough, cut it in half. Let if soften for 5 minutes. Roll it to 1/8 inch rolling. Cut out as many rounds as you can. Gather scraps and re-roll. Shape the tarts and use a fork to prick the bottom of the shells. Bake at 350F for 12-14 minutes until golden around the edges.

Let cool for 10-15 minutes before removing tarts from the molds. Turn the mold upside down and tap it firmly onto your work surface to release the shell. Let the tarts cool before adding a filling.

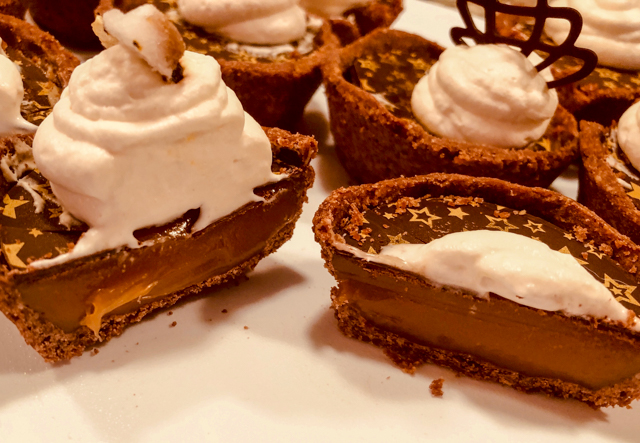
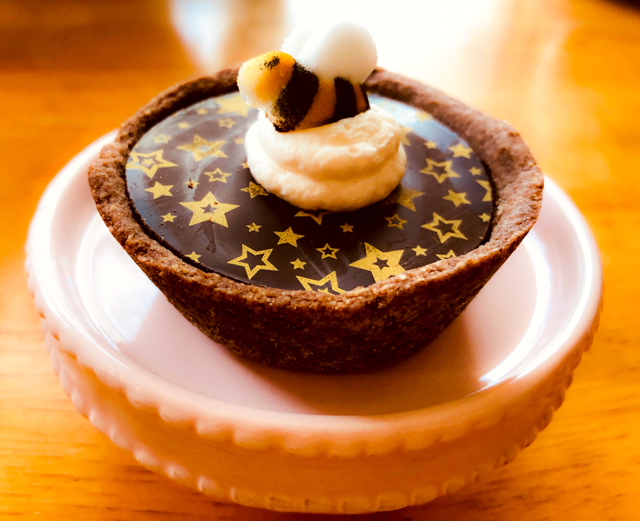
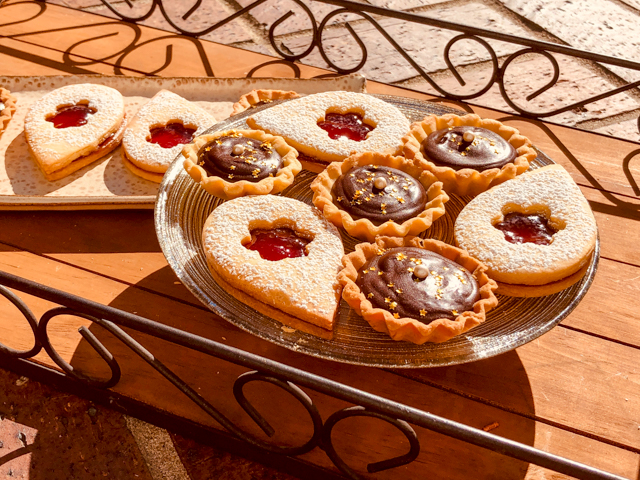
Make the filling: place the chocolate in a bowl, heat the heavy cream to almost boiling, and pour over the chocolate. Wait a few minutes, add the orange oil, and gently stir until fully smooth. Let the ganache cool for about 5 minutes, then place in a piping bag and fill the tartlets, smoothing the top. Decorate with sprinkles, if desired. Place in the fridge to set the ganache for about 30 minutes. Serve at room temperature.

ENJOY!

to print the recipe, click here

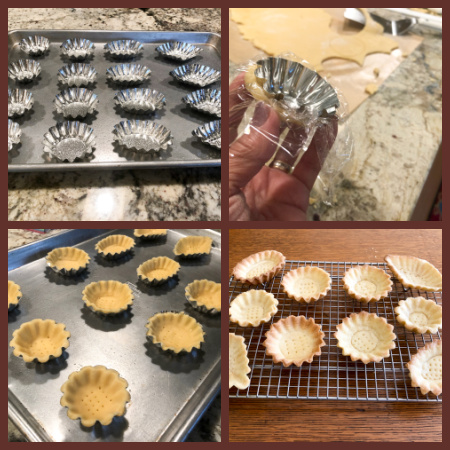
Comments: Check Hani’s site for detailed step-by-step instructions. As she shows, the best way to shape the dough is using an empty tin of the same format to press it in, with a Saran wrap type plastic over the dough to protect it. Works like a charm (check top right picture in composite above). You can make many tartlets and store them in the freezer for a mini-tartlet emergency…

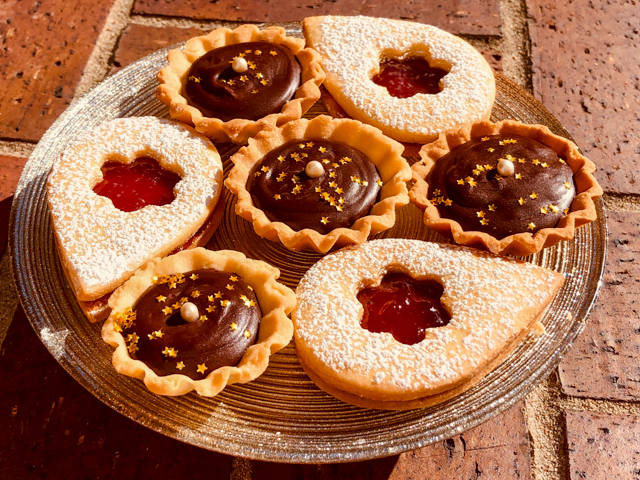
The same exact dough can be rolled and cut into any shape you like to make a Linzer version. I went with a teardrop and cut-out small flower shapes for the top layer.

Simply bake the cookies, let them cool, and spread a thin layer of the jam of your choice. I used seedless raspberry jam for this batch.

A little shower with powdered sugar is optional, but in my opinion, a nice finishing touch.

The dough is wonderful to work with, and as a cutout cookie, it held the shape well. The tartlets puffed up a bit, but midway through baking I pressed them down gently. Perfect texture.

A big thank you to Louise and Haniela!

ONE YEAR AGO: Rocking the Zucchini Boat

TWO YEARS AGO: Polenta Bites with Spicy Tomato Sauce

THREE YEAR AGO: Vague Mousse Cake

FOUR YEARS AGO: Cottage Loaf, my very own technical challenge

FIVE YEARS AGO: Pork Ribs: Sticky, Spicy and Awesome

SIX YEARS AGO: Sobering Peach Sorbet

SEVEN YEARS AGO: Buttermilk-Blueberry Breakfast Cake

EIGHT YEARS AGO: Silky Cauliflower Puree with Almond Milk

NINE YEARS AGO: Beef and Broccoli Stir-fr

TEN YEARS AGO:Wheat Germ and Sage Sourdough Bread

ELEVEN YEARS AGO:Popeye-Pleasing Salad

TWELVE YEARS AGO:Summer’s Finale

CHOCOLATE TARTLETS WITH HONEY CARAMEL FILLING

Care to find out what’s my latest obsession? Afternoon Tea Cookbooks. Most are not available as Kindle books, so I tend to be very selective when inviting one into our home. Reviews must be absolutely stellar, and pictures must be included for most (if not all) recipes. One book that made the cut is Afternoon Tea At Home, by Will Torrent. It is absolutely wonderful. As I was browsing through its pages and trying to decide what to make first from it, I had this crazy idea and immediately acted on it. Handed the book to Phil and said “Here, pick a recipe, any recipe, and I’ll make it.”  I call that Self-Inflicted Technical Challenge. He needed less than 2 minutes. Of course, the recipe he chose involved a crust, a caramel filling, tempering chocolate, and using transfer sheets to decorate it. Me and my big mouth. When will I ever learn?

CHOCOLATE TARTLETS WITH HONEY CARAMEL FILLING
(adapted from Afternoon Tea at Home)

for the crust:
200g all-purpose flour
150g butter, cut in pieces, cold
90g powdered sugar
60g almond flour
20g cocoa powder
pinch of salt
4 egg yolks

for the filling:
1 cup (320 g) honey
½ cup (120 ml) heavy cream

¼ cup (60 ml) sweetened condensed milk
¼ cup (85 g) corn syrup
pinch of salt
2 tablespoons unsalted butter 

for the topping:
1 cup heavy cream
3 tablespoons powdered sugar (or to taste)
1 tablespoon skimmed dry milk
100g tempered dark chocolate
12 sugar bees

Make the crust: Put the flour and butter in the bowl of a Kitchen Aid mixer and mix until the butter gets into crumbs, coated by the flour. In a separate bowl mix the sugar, almond flour, cocoa powder and salt. Add this mixture to the butter/flour, mix on very low-speed to combine (you want to avoid developing gluten). When it is almost fully combined, add the egg yolks and again mix very gently.  Form a dough, flatten it, wrap in plastic and place in the fridge for 1 hour.

Turn the dough onto a floured surface and roll out to 1/8 inch thick. Cut 12 rounds that will fit a muffin pan, coming all the way to the sides. Chill in the fridge for at least 30 minutes before blind-baking at 325 F.  I like to use plastic wrap to enclose rice or pie weights, it is safe to bake at this temperature, as long as the plastic does not touch the metal surface of the tin. Bake for 10 minutes, remove the weight, and bake for 5 to 10 more minutes. The tartlets must be fully baked, as no more cooking will take place.  Cool in the pan.

Make the filling: Combine the honey,  cream, condensed milk, corn syrup, and salt in a saucepan. Stir over medium heat until the mixture reaches 240F. Remove from the heat and stir in the butter. Divide among fully blind baked shells and allow to cool to room temperature. 

Make the chocolate decoration. Temper the chocolate according to your favorite method. Spread over the transfer sheet (make sure to use the correct side of the sheet!), let it set for a few minutes, then stamp circles the exact size of the top of the tartlets. Once fully set, gently peel the chocolate off the transfer sheet. Marvel at the design, pat yourself on the back.

Make the whipped cream. Beat the heavy cream with sugar and powdered milk until it forms medium peaks, transfer to a piping bag with a simple round piping tip.

Assemble the tartlets. When the crusts are cold, fill them with the caramel, place in the fridge to speed cooling a bit. Once the surface is set, gently place the chocolate decoration on top. Pipe the whipped cream, and set a little sugar bee on top.

ENJOY!

to print the recipe, click here

Comments: This recipe, originally called Beehive Tarts, comes from David Girard, Head Pastry Chef from The Dorchester. I kept the crust and the chocolate decorations, but changed the filling and the topping. The filling was a honey caramel thickened with gelatin, but I worried that it would not set up enough to be neatly sliced in half. Since I take my bakes to the department, I prefer to offer a larger number of small portions, so more colleagues can enjoy them.  For this reason, I used a caramel adapted from a recipe I made a couple of years ago.  As for the topping, in the book he uses lemon curd (it did give a nice yellow color very cute with the little bee sitting next to it), but I love the combination of chocolate, caramel and whipped cream. I stabilized the whipped cream with powdered milk, a trick I learned from Anna Olson. It does stabilize it very well and is super simple to do, but I prefer the taste of whipped cream stabilized with gelatin (I will talk about it in the very near future).

The chocolate disc decoration… Tempering chocolate is the number one culinary task that gives me hyperventilation. So many failures, it’s not even funny. Somehow this time things worked beautifully in the microwave/seeding method. Two basic changes in my approach: I grated the chocolate finely instead of keeping it in chunks, and used a microwave-safe plastic bowl instead of Pyrex, in very short cycles of heating, not more than 10 seconds at a time. I kept 1/4 of the chocolate grated at room temperature to use as “seed.”  Then I stirred, and stirred, and stirred some more, monitoring the temperature very carefully.  Once the chocolate was tempered, it was spread over the transfer sheet. I tried my best to do it as uniformly as possible.

At that point, I waited for the chocolate to start setting, but did not allow it to fully harden. You have a good window of several minutes to work, no need to panic. You could panic, of course, but it’s not mandatory. Then using a cookie cutter, I pressed into the chocolate, and lifted the disc. That is what I call a rookie’s mistake. If you use this technique, press the cookie cutter, forming the edges as sharply as possible, but do not lift the disc yet. Wait until it is fully set. That will ensure that the pattern will efficiently transfer. My first discs clearly showed some variability in the pattern, weak at some spots, well-defined in others. But for a first time, I am pretty happy with the way it turned out.  The sugar bees? I bought them from amazon.  If you have artistic inclinations, you could make some with fondant, or modeling chocolate. I cringe to imagine what my bees would look like if I attempted to make them from scratch. Rotten mangos? Pineapples after a wild boar stampede?  Neither option would look right.

But the heart of the matter is: can Sally bake without drama? Sometimes yes, but not always. After I took the photos for the post, I placed my cute tartlets in a tray to take them to the fridge, where they would sit until Monday morning. A very unfortunate bump of my hand on the shelf of the fridge, and they slid off the tray, one fell all the way to the floor, some tumbled inside the fridge… Can you feel the pain? At first I thought they were all ruined, but luckily enough most were ok after I shaved off a bit of broken crust  here and there. I had to discard a few bees that were messed up when they got shoved into a puddle of whipped cream. I also had to remove all the cream very carefully, clean the tops and decorate them again. The tartlet that fell to the floor? You can guess who swallowed it before I could do anything to prevent that from happening. Yes, there was chocolate. Yes, he was totally fine and quite pleased with that twist of canine fate.  Never a dull moment, folks. Never a dull moment.

The tartlets are quite decadent, the little bees have a melt in your mouth texture, not hard as rock sugar. I was pleasantly surprised. Obviously you can skip that component, without compromising the dessert. I just felt like going the extra mile, because the person who requested the recipe deserves only the best…

ONE YEAR AGO: Zucchini Soup with Tahini

TWO YEARS AGO: Black Sesame Macarons

THREE YEARS AGO: Fine Tuning Thomas Keller

FOUR YEARS AGO: Cauliflower Tortillas

FIVE YEARS AGO: Majestic Sedona, Take Two

SIX YEARS AGO: Secret Ingredient Turkey Meatballs

SEVEN YEARS AGO: Swedish Meatballs and Egg Noodles

EIGHT YEARS AGO: Italian Easter Pie

NINE YEARS AGO: Black Olive Bialy