THE BEWITCHING KITCHEN TURNS 13!

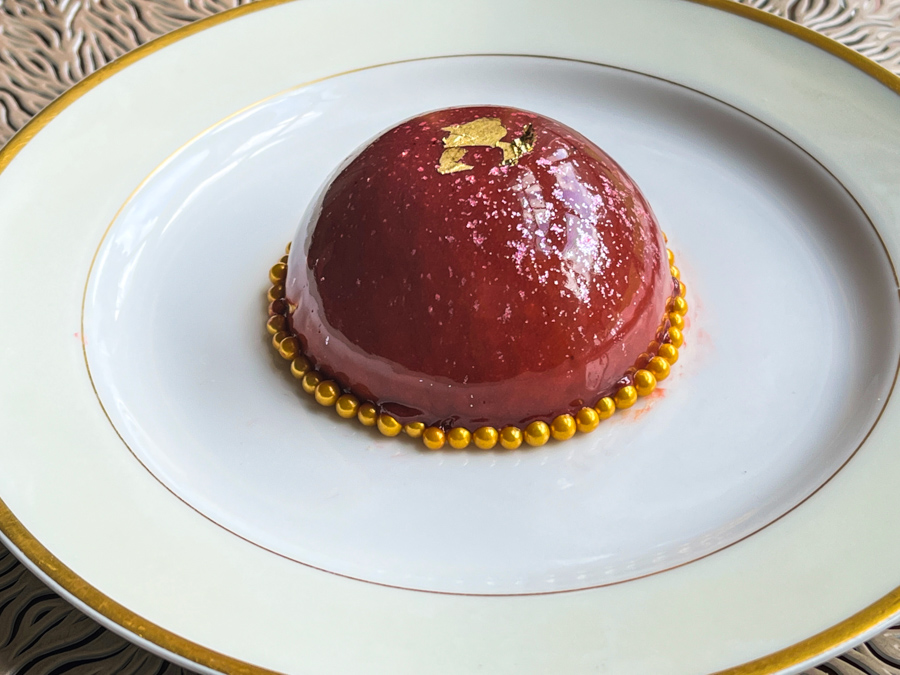
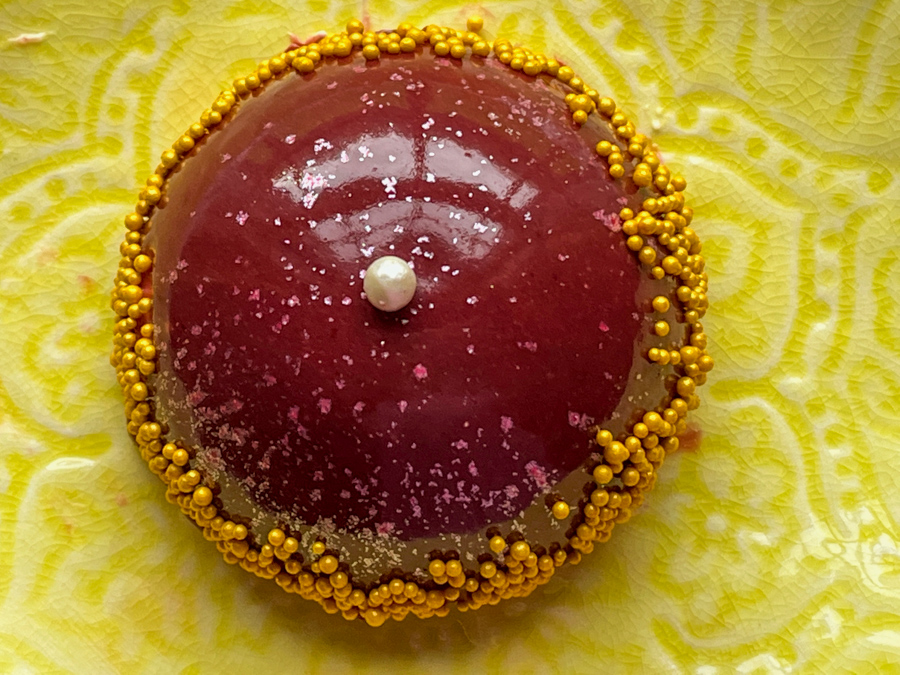
And this virtual spot is now officially a teenager! Thirteen years. One thousand, five hundred and forty-six posts published. Over twenty-nine thousand comments. But how do we measure all the joy I get from keeping this site alive? Impossible. For thirteen years I’ve been doing it with the exact same enthusiasm of the first week. I don’t think I could keep at it, if I was not fully in love with the whole process. To celebrate, I share a little entremet with mirror glaze, the kind of bake I adore, but with the limitations of the pandemics I’ve been unable to do. Since it was just the two of us, I went with individual portions, very small cakes with a combination of cherry, pistachio, and mascarpone. Plus the mandatory bling!

CHERRY AND PISTACHIO MINI-ENTREMET CAKE
(from the Bewitching Kitchen)

for the cherry-pistachio centers:
20 g egg yolk
8 g caster sugar
3 g cornstarch
20 g milk
60 g whipping cream
10 g pistachio paste
4 Amarena cherries in syrup

Heat the oven to 200F (yes, very low temperature). In a small bowl, whisk the egg yolk with the sugar and cornstarch. Put the milk, cream and pistachio paste in a saucepan and heat while whisking. As soon as it boils, pour it over the egg yolk mixture and whisk. Put one cherry in each of 4 holes of a small half-sphere mould (about 1 inch in diameter). Pour over the pistachio mixture. Bake for 30 minutes, or until the center is almost fully set. Cool to room temperature, then freeze for several hours to overnight, to be able to un-mold them.

for the sponge:
70 g icing sugar
70 g almond meal
100 g egg
10 g all-purpose flour
10 g pistachio paste
70g egg white
10g granulated sugar
melted white chocolate for brushing cake circles

Heat the oven to 375F. Using a KitchenAid mixer, whip together the icing sugar, almond meal and the eggs. The mixture should double in volume, so whip it for at least 8 minutes. Reserve.

Make a meringue, gently beating the egg white until soft peaks form. Increase the speed of the mixer and add the sugar, a little bit at a time. Beat until firm peaks form. Fold one-third of the meringue into the whipped egg mixture, followed by the flour. When the mixture is smooth, gently fold in the remaining meringue. Spread the mixture on a half-sheet pan covered with parchment paper, and smooth the surface with an off-set spatula. Bake for about 10 minutes, until dry to the touch. Dust a sheet of baking paper with a little powdered sugar and invert the baked sponge over it. Peel off the parchment paper that it baked on. Using two cookie cutters, cut out 4 discs that will fit inside the mold that will hold the dessert, and 4 discs that will fit inside the little mold used for the cherry inserts. Melt the white chocolate and apply a very thin coat over one side of the larger piece of sponge. Reserve.

for the mascarpone mousse:
6 g Platinum gelatin (3 sheets)
80 ml whipping cream
55 g egg yolks
80 g granulated sugar
160 g mascarpone cheese
1/4 tsp vanilla paste
320 g heavy cream

Bloom the gelatin in cold water for 10 minutes. Combine egg yolks with sugar, whisking well and set aside. In a saucepan, heat 80 ml of cream until it boils. Remove from heat, and slowly pour a bit of the hot liquid into the egg yolk mixture, to temper it gently. Add the rest of the cream and transfer all the mixture to a saucepan.

Over low heat, cook until 180 F stirring constantly. Remove from heat, drain the gelatin, and add to the mixture, stirring until completely dissolved. Let the mixture cool down to around 140 F. Add the mascarpone cheese, mix until the cheese is incorporated. Process with a hand mixer, to emulsify. Add the vanilla paste, and let it cool to around 95 F. Meanwhile, whip the 320 ml of cream to soft peaks. Incorporate the  cream gradually to the mascarpone mixture.

ASSEMBLE THE DESSERTS. Place a small amount of mascarpone mousse inside each of 4 cavities of a semi-sphere silicone mold (3 to 3.2 inches in diameter). Drop the cherry insert inside. Place the small circle of sponge on top. Cover the cavity with mousse, leaving a little space on the top, so you can place the larger circle of sponge on top, with the chocolate painted side facing up. Smooth the surface, adding a little more mousse if needed. Freeze overnight, or for a minimum of 6 hours.

for mirror glaze:
3 sheets Platinum grade sheet gelatin
120ml water
150 g liquid glucose
150 g granulated or caster sugar
1 tsp agar-agar
100 g condensed milk
150 g white chocolate, chopped fairly small
½ tsp titanium oxide (optional, but advisable)
red and purple gel food coloring
Prism powder to sprinkle in the end (optional,I used Tourmaline Pink)

Put the water, sugar, liquid glucose and agar-agar in a small pan and bring to simmering point, stirring occasionally to dissolve the sugar. Remove from the heat and let it stand for about 5 minutes. This is the base syrup for the glaze. Meanwhile, soak the gelatin in some cold water for about 5 minutes. Squeeze out the excess water and stir into the hot water, sugar and liquid glucose mixture to dissolve. Stir in the condensed milk and the titanium oxide.

Put the chocolate in a medium bowl and pour this hot mixture slowly over the chocolate, stirring gently to melt it, avoid making bubbles. Add the red food gel dye. A stick immersion blender works great, but you must keep the blades fully submerged at all times. If bubbles are present, pass the mixture through a fine sieve.

The ideal temperature to glaze is 92 to 94 F. Un-mold the cakes, immediately pour the mirror glaze over the frozen surface. Sprinkle with Prism powder or golden luster powder. Cake should sit in the fridge for a couple of hours before serving.

ENJOY!

to print the recipe, click here

Comments: I love making entremet cakes. They seem complicated but the nature of these cakes pretty much forces you to do everything in steps, over a period of a couple of days. No rushing is advisable, not even feasible. Just take your time and enjoy the ride. This version calls for a baked center. That part of the recipe came from a great cookbook, Patisserie at Home, from Melanie Dupuis. Once that is made (and it can sit in the freezer until you are ready to proceed with the recipe), it is all very straightforward. A sponge bake, some assembling, freezing everything and then my favorite step, mirror glazing!

I used two different ways to present the mini-cakes. In the first version the cake was placed on a small plate and little chocolate covered candy added around the base. A little gold leaf for a final touch on top.

The second version was a little less time-consuming, I just carefully added golden non-pareils around the edge, in a random pattern, and a little white pearl on top.

I imagine you are curious to see the cake cut… So here it is, the different components of this very tasty dessert…

I must say that of all the entremets I’ve made, this ranks very high in the deliciousness level. The cherry, when cooked to make the center, gets a very nice texture and the taste seems concentrated. Lovely. If you make mirror glazes, I want to point out that I add a touch of agar-agar to my recipe. That makes the layer cut more nicely, without slipping, as it is common with gelatin-only formulas. There is no change in taste.

Without further ado, I invite you to step with me
into the 14th year of my blogging adventure!

ONE YEAR AGO: The Bewitching Kitchen Turns 12!

TWO YEARS AGO: The Bewitching Kitchen turns 11!

THREE YEARS AGO: The Bewitching Kitchen Turns 10, and a Giveaway…

FOUR YEAR AGO: The Bewitching Kitchen turns 9!

FIVE YEAR AGO: The Bewitching Kitchen turns eight!

SIX YEARS AGO: The Bewitching Kitchen Turns Seven!

SEVEN YEARS AGO: Bewitching Kitchen Turns Six!

EIGHT YEARS AGO: The Bewitching Kitchen turns Five!

NINE YEARS AGO: The Bewitching Kitchen turns Four!

TEN YEARS AGO: The Bewitching Kitchen Turns Three! 

ELEVEN YEARS AGO:  The Bewitching Kitchen turns Two!

TWELVE YEARS AGO:  Bewitching Birthday!

THIRTEEN YEARS AGO: Welcome to my blog!

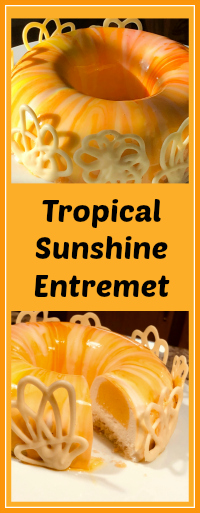
TROPICAL SUNSHINE ENTREMET CAKE

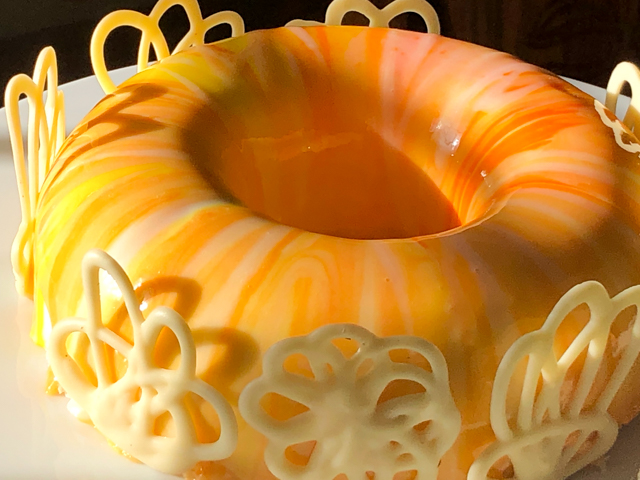
I know, winter is still with us, and it will be for a while. But I cannot resist a shout to what’s to come in a few weeks. This entremet cake celebrates summer in a tropical paradise, any paradise of your choice. Coconut and passion fruit, for a creamy and refreshing mousse cake.

TROPICAL SUNSHINE ENTREMET CAKE
(from the Bewitching Kitchen, adapted from several sources)

Silikomart mold:  Lady Queen

Two days before – make passion fruit insert and freeze.

One day before – make cake layer and coconut  mousse. Assemble cake and freeze. 

Showtime Day – make mirror glaze, glaze cake and defrost before serving

For coconut dacquoise layer
140g egg whites
½ tsp cream of tartar
170g  sugar
80g almond flour
60g desiccated coconut (I used coconut powder, a product from Sri Lanka)
28g  all purpose flour, sifted
20g butter, melted and cooled

In the bowl of a stand mixer fitted with a whisk attachment, place the egg whites, cream of tartar and whisk until foamy and a trail starts to form as the beater goes through the egg whites  Gradually add in the sugar until firm peaks form. Gently fold the almond meal, desiccated coconut and flour into the egg whites in 3-4 additions. Fold some of the mixture into the melted butter before adding back into the rest of the mixture and folding until combined.

Spread into a half Flexipat or a lined baking tray and bake at 400 F°C for about 9 min.  Cool,  freeze for 10 min and cut in the appropriate shape to fit the bottom of the mold. You will have cake leftover.

For passion fruit cremeux:
160g passion fruit juice/pulp
4g gelatin + 20ml cold water
100g sugar
4 egg yolks
20g cornstarch
120g butter, softened
1 teaspoon vanilla extract

Bloom the gelatin in cold water.

Bring the passion fruit juice to the boiling point in a saucepan. In the meantime, mix the egg yolks with sugar until pale. Add the cornstarch and mix well. Pour the hot passion fruit puree over the egg yolk mixture then return back on heat and cook on low just until thickened and it reaches 185 F.

Remove from heat and stir in the gelatin. Allow to cool down to 105F then add the butter and mix well. Pour the cremeux into the smaller mold of the kit Lady Queen.

For coconut mousse:
1 can coconut milk – approx 400ml
10g gelatin + 50ml cold water
2 egg whites
120g granulated sugar
60ml water
1 teaspoon vanilla extract
150ml heavy cream, whipped to consistency of melted ice cream

Bloom the gelatin in cold water.

Heat up the coconut milk just until warm then remove from heat and stir in the gelatin and vanilla. Let it cool while you make an Italian meringue. Boil the sugar and water in a saucepan until it reaches 240 F.

While the sugar syrup cooks, whip the whites until fluffy. Pour the hot syrup over the whipped whites and continue mixing for a few more minutes until glossy and stiff. Fold the whipped cream into the coconut milk mixture then add the meringue.

ASSEMBLE THE CAKE
Place coconut mousse in the large Lady Queen mold filling halfway. Carefully drop the frozen insert. Fill with mousse almost to the top, cover with the cake.

Freeze the whole thing overnight. Un-mold and glaze on the day you want to enjoy the cake.

For mirror glaze:
3 sheets Platinum grade sheet gelatin
120ml water
150 g liquid glucose
150 g granulated or caster sugar
1 tsp agar-agar
100 g condensed milk
150 g white chocolate, chopped fairly small
½ tsp titanium oxide (optional, but advisable)
yellow and orange gel food coloring

Put the water, sugar, liquid glucose and agar-agar in a small pan and bring to simmering point, stirring occasionally to dissolve the sugar. Remove from the heat and let it stand for about 5 minutes. This is the base syrup for the glaze.  Meanwhile, soak the gelatin in some cold water for about 5 minutes. Squeeze out the excess water and stir into the hot water, sugar and liquid glucose mixture to dissolve. Stir in the condensed milk and the titanium oxide.

Put the chocolate in a medium bowl and pour this hot mixture slowly over the chocolate, stirring gently to melt it, avoid making bubbles. A stick immersion blender works great, but you must keep the blades fully submerged at all times. If bubbles are present, pass the mixture through a fine sieve. When the glaze is at around 105 F, separate a small amount to dye yellow and a small amount to dye orange. Add them on top of the white glaze, do not mix too much, just a delicate swirl with a chopstick.

The ideal temperature to glaze is 92 to 94 F. Glaze the frozen cake. Defrost 2 hours in fridge before serving.

ENJOY!

to print the recipe, click here

Comments: I used a Silikomart mold kit called “Lady Queen“, but you can improvise and make it in a circular mold with the insert made in a smaller ring. Or make individual semi-sphere cakes. The amounts I am giving you will leave you with some leftover coconut mousse, which freezes well in small amounts if you’d like to have a simple dessert later. The passionfruit insert is just right for the kit.

I really liked the way this cake turned out. Full disclosure: the chocolate decorations were added to hide some capital sins. I made a few wrong assumptions about the amount of glaze needed. The cake is only 7 inches in diameter, smaller than most cakes I am used to mirror-glazing, so I did a single batch of glaze. It is ok if you use a single color, but to make a white, yellow and orange with enough to cover all sides, it would be better to have about 25% more. However, I do believe you can get by with the exact amount I include in the recipe, IF you pay attention to the glaze as it drips down the sides, to notice right away if there are gaps. I was way too optimistic and careless. When I realized the gaps, it was time for a big adrenaline rush, followed by quickly scraping glaze from the baking sheet, and trying to fix as many boo-boos as possible. Good thing I had some tempered chocolate decorations in the freezer, so I put them to use. I am also quite grateful for the absence of cameras during baking disasters at home. Feels amazing to be able to deal with them without having to channel my inner Lucille Ball.

The dacquoise had a very nice coconut flavor and great texture. I think the mousse was a perfect match for the passionfruit cream, both in color and flavor. The way the mold is designed makes it for a pretty large insert, so it ended up a bit heavy and had a tendency to sink to the bottom. I believe they could have made the insert a tad smaller, but who am I to criticize Silikomart? Pouring less volume in the insert could be a solution, but it will have a higher chance to break as you un-mold it.  Overall, those are minor details and I am ok with the way it all worked.

This Tropical Sunshine Entremet Cake was the first dessert in the Mondays with Sweetness 2020 series. I hope our colleagues enjoyed it.


ONE YEAR AGO: Freekeh with Zucchini and Almonds

TWO YEARS AGO: Salmon a la Wellington, re-visited

THREE YEARS AGO: The Unbearable Unfairness of Cake Baking

FOUR YEARS AGO: Hermit Cookies

FIVE YEARS AGO: Cremini Mushroom Meatloaf

SIX YEARS AGO: Ottolenghi & Tamimi’s Roast Chicken with Clementines

SEVEN YEARS AGO: Eight-Ball Zucchini: The Missing Files

EIGHT YEARS AGO: Grilling Ribbons

NINE YEARS AGO: Peppery Cashew Crunch

TEN YEARS AGO: Ossobuco Milanese: an Italian Classic

HALLOWEEN ENTREMET CAKE

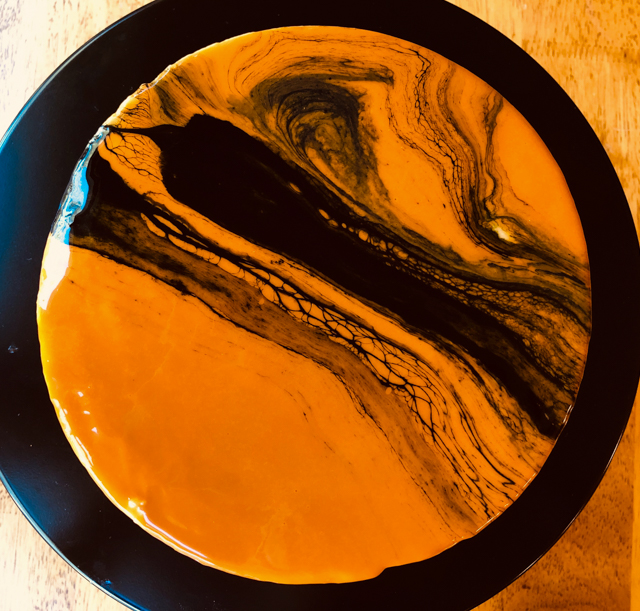
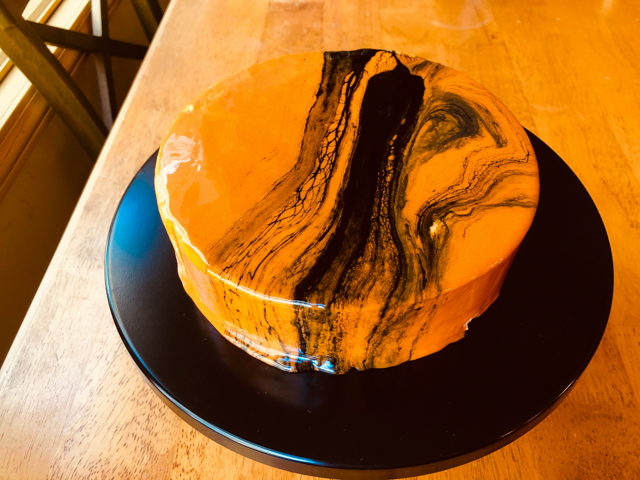
Today I share with you a mousse cake that celebrates the season with the flavors of pumpkin and warm spices, plus the colors of Halloween. The spider effect on the mirror glaze is optional, but in my opinion, oh so very cool…  What do you think?

HALLOWEEN PUMPKIN ENTREMET CAKE
(from the Bewitching Kitchen, inspired by Kirsten Tibbals)

for the almond sponge:
65g powdered sugar
75g almond flour
65g whole eggs
40g egg yolks
140g egg whites
40g caster sugar
25g brown sugar
½ tsp cream of tartar
60g all purpose flour

In the bowl of a stand mixer fitted with a paddle attachment, beat the icing sugar, almond flour, whole eggs and the egg yolks until thick and forming a nice ribbon as you allow the batter to fall from the paddle. This will take around 8 minutes.

In another bowl of a stand mixer fitted with a whisk attachment, whisk the whites with the cream of tartar to medium peak. Gradually add in the caster sugar. Fold in 1/3 of the meringue with the almond base, add the brown sugar and flour then gently fold in the remaining meringue. Spread the sponge evenly into a half sheet pan covered with parchment paper, or use a Flexipat.

Bake for around 10 minutes at 350F.  Remove from the oven and place into the freezer for approximately 30 minutes. Once cool, remove from the Flexipat and use a cutter to cut a disc for the base of the entremet. You will have a little leftover cake that you can freeze for future adventures.

for the pumpkin chocolate insert:
75g canned pumpkin
40g whipping cream
½ tsp cinnamon
½ tsp nutmeg
1 tsp ground ginger
65g milk chocolate, cut in small pieces
1.5g gold gelatin sheets
40g whipping cream, whipped to melted ice cream consistency

Pre-soak the gelatin in a bowl ofcold water. Heat the first amount of cream (40g) to simmering, almost boiling. Add the pumpkin puree and whisk.  Add in the pre-soaked gelatine and combine. Pour the hot mixture over the chocolate cut in small pieces in a bowl. If necessary, use an immersion blender to make it smooth.  Place into a bowl and once it cools to 98F or below, fold through the whipped cream using a spatula.

Pour the  mixture inside a suitable ring (or silicone mold) smaller than the ring used for the entremet. If using a ring, cover the bottom with plastic film bringing it up to the sides. Freeze overnight.

for the caramel mousse:
7 g gelatine
37 ml water
150 g sugar
52 g glucose or corn syrup
67 ml water
¼ tsp salt
190 g  + 375 g heavy cream
2 egg yolks

In a small bowl, mix gelatin and water (37ml) together and leave for 5 to 10 minutes until set. Meanwhile, in a sauce pan, mix together sugar, glucose (or corn syrup), water (67ml) and salt. Cook on medium high heat until you achieve a caramel syrup with deep amber color. Do not allow it to smoke or burn. Meanwhile, in another sauce pan, slightly the heat the 190 grams heavy cream, so when the caramel is done you can pour the cream right away. Carefully pour it in and mix well until fully combined.

In another bowl, whisk the egg yolks. Then add a third of the caramel to the beaten yolks and beat quickly together to temper the yolks. Pour the mixture back into the caramel and stir well to combine. Continue stirring until it reaches 180-182 °F. Heat the gelatin in the microwave for 20 seconds until melted (do not boil it, if needed reduce the power of your microwave to 70% or so) and mix into the caramel cream. Pass the cream through a fine mesh strainer, and set it aside to cool to 113 F.  When cooled, whisk the remaining heavy cream (375 g) into a melted ice cream consistency. Then fold it in two additions into the caramel cream, until well combined.

Prepare a 20cm ring (7+3/4 to 8 inch) by covering the bottom with plastic film and lining the inside with acetate film. Pour 1/2 of the mousse inside, carefully drop the frozen pumpkin-chocolate insert and cover with mousse. Smooth the surface with an off-set spatula then cover with the reserved almond sponge.  Smooth the surface again and freeze overnight.

for the mirror glaze:
3 sheets of Platinum grade sheet gelatin
120ml water
150 g liquid glucose
150 g granulated or caster sugar
100 g condensed milk
150 g white chocolate, chopped fairly small
gel food coloring (orange and brown 4:1)

Put the water, sugar and liquid glucose in a small pan and bring to simmering point, stirring occasionally to dissolve the sugar. Remove from the heat and let it stand for about 5 minutes. This is the base syrup for the glaze.  Meanwhile, soak the gelatin in some cold water for about 5 minutes. Squeeze out the excess water and stir into the hot water, sugar and liquid glucose mixture to dissolve. Stir in the condensed milk and the gel colors (orange and brown 4:1)

Put the white chocolate in a medium bowl and pour this hot mixture slowly over the chocolate, stirring gently to melt it, avoid making bubbles. A stick immersion blender works great, but you must keep the blades fully submerged at all times. If bubbles are present, pass the mixture through a fine sieve.

Leave the glaze uncovered for an hour at room temperature for the glaze to cooled and be slightly thickened: if it is too runny you will get too thin a layer on top, colours will not blend well and less glaze will cling to the sides of the cake. The ideal temperature to pour the glaze is 92 to 94 F. Once it is slightly above that (around 97 F), remove a small portion and add dark brown gel color to it, mixing well. Pour the un-dyed portion in a large measuring glass with a spout, add the dark brown mixture to it, mix with a chopstick just barely.  Make sure it is at the correct pouring temperature. Remove the cake from the freezer, place on a rack over a baking sheet. If you like to make it easier to save leftover glaze, cover the baking sheet with plastic wrap, so that you can lift it and pour easily into a container.

Pour the glaze in a circular motion, starting at the center, making sure it flows homogeneously on all sides. Tap the rack gently to settle the glaze, and very gently and quickly run an off-set spatula on top of the cake to force excess glaze to run down the sides. Do that just once, or you will ruin the marble effect.

for the spider web effect:
2 tablespoons neutral glaze
black food dye

Heat the neutral glaze to 150 F.  The easiest way to quickly reach 150F is to add 2 Tbs neutral glaze to a small bowl and microwave to boiling. Quickly add a small amount (2 tsp or so) of room temperature neutral glaze and the black dye. Mix well. Keep hot until needed, with a hot spatula ready to go. As soon as the mirror glaze is poured, add a small amount of black glaze at 150 F to the spatula and run over the surface. The contrast of temperature and composition (fat versus water based suspensions) will create a natural web effect. The less you mess with it, the better!

Place cake in fridge to defrost for 2 hours before serving.

ENJOY!

to print the recipe, click here

Comments: The idea for this cake started from a class online offered by the one and only Kirsten Tibbals. She made the most amazing Pumpkin Petit Gateau that included green stems shaped with chocolate. Way beyond my skill level, so from that idea I just borrowed the pumpkin-chocolate insert. Then I coupled it with one of my favorite mousses for entremet cakes, quite simple to prepare and with delicate flavor. The base of the cake was an almond sponge, and I used the traditional mirror glaze in the mandatory orange color to lock the spirit of the season. It had been a while since I last attempted a spider web effect, and Halloween quickly approaching seemed appropriate for another stroll in that territory.

My only issue with the cake was the size of the pumpkin-chocolate insert. I am giving you a slightly reduced amount than I used, because my insert was too heavy and it sunk to the bottom of the mousse. It still tasted very good and had the desired texture, but I was hoping for a centered insert surrounded by the caramel mousse. Instead, it turned out as a two layer cake. No major harm done, but not quite the way I planned.

I loved the texture of the almond sponge, and the way the mousse allowed the more assertive taste of the pumpkin-chocolate to shine. As to the spider effect, I am getting more confident about it, I remember my first attempt was quite nerve-wracking, but now I got a good system to get the temperature correctly.

Allow me to share one more picture of my Halloween cake, because I thought the effect of the light bulb shining on the glaze turned out pretty interesting…

Liked the post? Grab a pin and make Sally happy…


ONE YEAR AGO: Pork with Prunes, Olives and Capers

TWO YEARS AGO: Kansas Corn Chowder

THREE YEARS AGO: Impossibly Cute Bacon and Egg Cups

FOUR YEARS AGO: Pulling Under Pressure

FIVE YEARS AGO: Cooking Sous-vide: Two takes on Chicken Thighs

SIX YEARS AGO: Miso Soup: A Japanese Classic

SEVEN YEARS AGO: On my desk

EIGHT YEARS AGO: A must-make veggie puree

NINE YEARS AGO: Vegetarian Lasagna

TEN YEARS AGO:  Brazilian Pão de Queijo

MANGO HAZELNUT ENTREMET CAKE

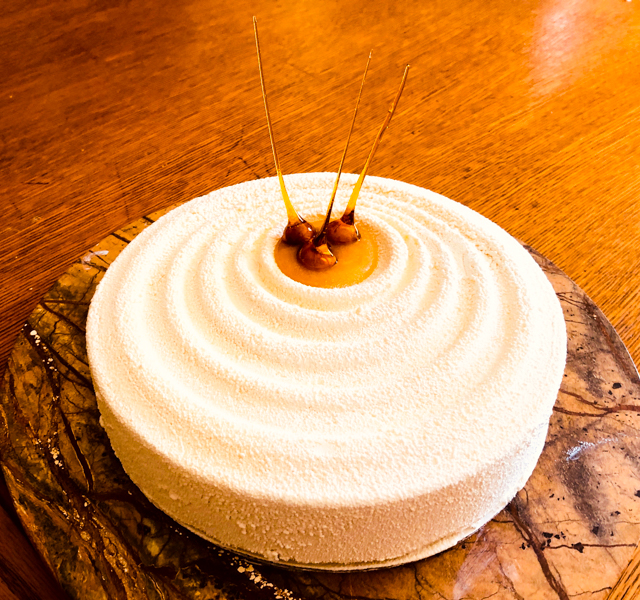
It’s been a while since I made what is probably my favorite type of dessert. As far as entremet goes, this is a reasonably simple example, with a single insert in the center (mango gelée) and only two components in the base, a hazelnut dacquoise and a crunchy chocolate layer. I used the Silikomart Vague mold, I love its design and how easy it is to remove the frozen cake for final decoration, which involved chocolate spray and a few caramel-coated hazelnuts.

MANGO HAZELNUT ENTREMET CAKE
(from the Bewitching Kitchen)

For the hazelnut dacquoise:
75 g egg whites, at room temperature
50 g sugar
70 g hazelnut flour (I processed toasted hazelnuts)
50 g sugar
20 g all-purpose flour

Heat oven to 350F.

Beat the egg whites (with whisk attachment) until you can see a trail forming as the beater moves through them. Add the sugar slowly and beat until firm peaks form, but do not overbeat or it will get grainy (and ruined).  Add the hazelnut flour mixed with remaining 50 g of sugar and the flour, folding delicately. Pour or pipe the mixture in a circle about 8-in diameter over parchment paper. Cook for about 10 minutes, let it cool on a rack, while still a bit warm cut a circle of the exact dimension of the mold you’ll use to make the dessert (if using Vague mold, that will be 20 cm or 7 and 3/4 in).

For the mango insert:
150 g mango puree (I used frozen mango chunks)
25 g sugar
5 g gelatin in sheets (230 Bloom)

Soak the gelatine cut into pieces in cold water for 10 minutes.

Bring the puree together with the sugar to 120F, add the drained gelatin, mix and pour in a 6-inch ring, covered on the bottom with film and placed on a tray. Remove a small amount (about 2 tablespoons) for the decoration on top.

for the chocolate-crisp:
113 g Lindt milk chocolate with hazelnuts
10 g pistachio paste (or add 2 tsp coconut oil)
10 g puffed quinoa (or rice crisps cereal, or crumbled corn flakes)

Toast the puffed quinoa in a 350F oven for a few minutes, until fragrant. Melt the chocolate gently and mix it with the toasted quinoa and the pistachio paste. Spread as a thin circle on parchment paper, with dimensions a bit bigger than the bottom of the dessert mold.  Once it cools slightly,  cut it to fit exactly on top of the hazelnut dacquoise (20cm or 7 and 3/4 in).

For the white chocolate mousse:
175 g whole milk
35 g sugar
70 g egg yolks
7 g gelatin in sheets
175 g white chocolate
1/4 tsp vanilla paste
350 g cream

Soak the gelatin in cold water for 10 minutes. Break up the chocolate and place it in a bowl with the vanilla paste.

Bring the milk to a simmer in a saucepan. Whisk the egg yolks and sugar by hand in a bowl, pour over a bit of the simmering milk to temper it, then transfer the whole mixture to the pan and bring the temperature to 180F. Remove from heat, add the squeezed gelatin, pour into the bowl with the chocolate and emulsify using an immersion blender or a whisk. Make sure it is all very well combined and smooth. Allow it to cool.

Meanwhile whip the heavy cream to a consistency of melted ice cream. When the custard is around body temperature or just a bit warmer, fold the cream into it. Pour about 1/3 of the mixture into the Vague mold , place the frozen mango insert, pour chocolate mousse almost to the top, allowing just enough room for the crunchy chocolate layer and the dacquoise.  Add them, and fill any gaps on the sides with mousse. Wrap with plastic and freeze overnight.

for the chocolate spray:
300 g white chocolate
200 g cocoa butter

Melt together and place in sprayer at 90 F (I use a normal paint sprayer dedicated to chocolate only).

Turn out the frozen cake and spray immediately with a light coating of white chocolate suspension.  Melt the reserved mango gelatin very gently, and spoon some in the center of the mold. Keep in the fridge for at least 4 hours before serving. Decorate with caramel-coated hazelnuts.

ENJOY!

to print the recipe, click here

Comments: I am very happy with the flavors and textures of this baby. The tricky part of this type of dessert is assembling it, because it’s a process that is a bit “in the dark”, so to speak. With a regular layered cake, you can visualize the layers well, because you either bake them individually or cut slices from a bigger cake. As the cake is assembled, it is also easier to judge how much filling to add so that the layers end up as uniform as you want them to be. In mousse cakes like this one, it becomes a bit of a guessing game. For instance, how much to allow the insert to sink in, how to make sure it is properly leveled,  how to prevent large air bubbles to form, or to make sure the sides are smooth.  Small details can go wrong, but you may not realize until unmolding the frozen cake next day. Talk about cake-anxiety…  😉

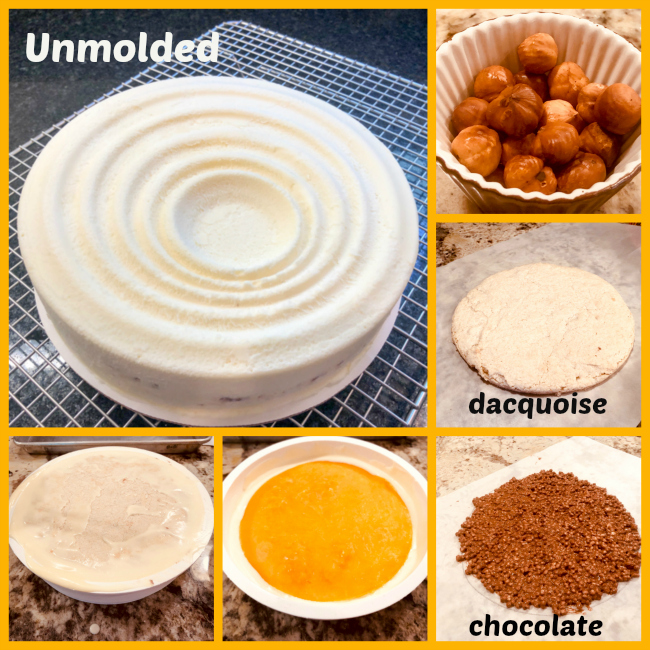
You can see that part of the mango insert got a little wavy. That happened because when I first made the insert and set it in the fridge overnight, the pan got a bit tilted and I had to melt the layer again and re-freeze it, not an ideal situation. Lesson learned.  It is crucial to have space in your freezer that allows all components to lay flat and absolutely leveled.

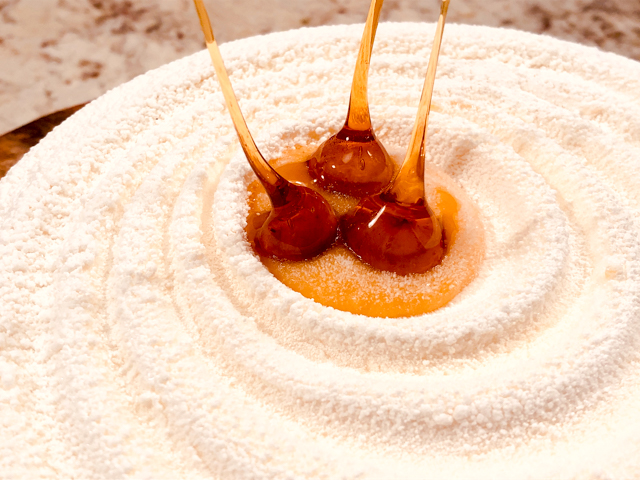
The most fun part? Making the hazelnut with the pointy caramel bits. I followed the method described in Martha Stewart’s site, and it worked like a charm. My only advice is that you make more hazelnuts than you need. Some end up cracking as you stick the skewer, so it’s better to start with more. Also, some might roll a bit as the caramel drips compromising the shape of the drip. It is very important to let the caramel rest before coating the hazelnuts, but once it reaches the right viscosity, you must work fast. It is possible to re-warm the caramel briefly to continue using it, but it’s a bit of a hassle. I prefer to hit that magical point and work with it right away.

Finally, don’t let the lack of a Silikomart mold stop you from making this dessert. A simple ring or springform pan will work, as long as you have a second ring with smaller diameter to form the insert. And the velvet coating is also optional (although you can also buy a spray can with the suspension ready to use; be ready for sticker shock!). The surface is very smooth to start with (see the large photo in the composite picture), so you could leave it as it is, or melt some white chocolate and drizzle it all over the top, in a Pollock-manner.  You could dye the chocolate orange and then add the hazelnuts here and there.

ONE YEAR AGO: Lebanese Lentil Salad and a Cookbook Review

TWO YEARS AGO: Cottage Loaf

THREE YEARS AGO: Sourdough Loaf with Cranberries and Walnuts

FOUR YEAR AGO: Sichuan Pork Stir-Fry in Garlic Sauce

FIVE YEARS AGO: Our Green Trip to Colorado

SIX YEARS AGO: Ditalini Pasta Salad

SEVEN YEARS AGO: Celebrate Wednesday with a Thai Seafood Curry

EIGHT YEARS AGO:  Post-workout Breakfast

NINE YEARS AGO: Semolina Barbecue Buns

TEN YEARS AGO: Lavash Crackers


SAKURA BUCHE DU PRINTEMPS

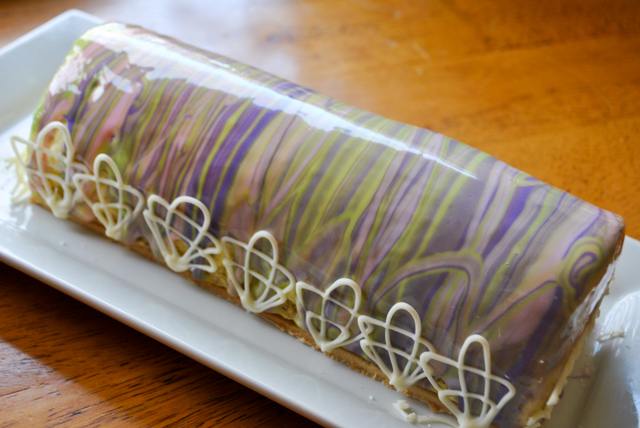
This past winter was so hard that I intend to keep celebrating the arrival of spring for as long as I can get away with it. Clearly, nothing says spring better than cherry blossoms. In this cake, my goal was to have a creamy sakura-flavored mousse involving a fruity center, as a red fruit compote. For the base of the dessert, I made a crusty layer with puffed quinoa, the new (to me) ingredient I mentioned in my last post. To finalize, a pastel-colored mirror glaze action, in pink, purple and green.  Why the French name?  Because it is irresistibly poetic, that’s why.

SAKURA BUCHE DU PRINTEMPS
(from the Bewitching Kitchen, inspired by many sources)

for the biscuit layer:
125 g eggs
90 g powdered sugar (I used Bakewell cherry flavored)
90 g almond flour
30 g flour
20 g melted butter
180 g egg whites
40 g sugar (superfine if available)

for the berry compote:
300 g pure of cherries and red berries
2 whole eggs
140 g honey
140 g whipping cream
6 g gelatin in sheets
60 g butter, at room temperature

for the quinoa-crisp:
113 g white chocolate
20 g pistachio paste
20 g puffed quinoa

for the Sakura mousse:
210 g milk
1/8 tsp sakura leaf powder (optional)
1/8 tsp cherry blossom essence
100 g egg yolks
110 g sugar
8 g gelatin sheets
210 g whipping cream

for the mirror glaze:
150 g glucose
150 g granulated sugar
150 g white chocolate, cut in small pieces
75 g water
100 g condensed, sweetened milk
9 g gelatin in sheets
1/2 tsp titanium oxide (optional, but worth it)
pink, purple, and bright green gel food dye

Two days before serving, make the biscuit and the cherry compote.

For the biscuit: In the bowl of a Kitchen Aid mixer fitted with the leaf blade, beat the eggs, sugar an almond flour together for 4 to 5 minutes. Transfer to a mixing bowl, and after thoroughly cleaning the bowl of the Kitchen Aid, whisk the egg whites until you can see if forming a trail as the whisk goes through them. At this point, slowly rain the fine sugar to form a soft-peak meringue.  Add the meringue to the egg-sugar-almond mixture previously made. Mix gently with a spatula. Add the flour gently, sifting it over the mixture. Finally, add a bit of the mixture to the melted butter, make a smooth emulsion with it, and pour it into the batter. Mix as gently as possible.

Spread the batter on a baking sheet lined with parchment paper as a layer a little over 1/2 inch thick, and bake for 12 minutes at 380 F.  Once the biscuit is cool, cut the rectangle needed to fit the smaller buche. While the biscuit cools, make the compote.

For the compote: Soak the gelatin sheets in a bowl of cold water for at least 10 minutes. Place the eggs, honey, fruit puree and heavy cream in a bowl and whisk with an immersion blender (or use a regular blender if you prefer). Pour the mixture in a saucepan and bring the temperature to 180 F, stirring constantly and never using too high heat. Remove the pan from the stove, add the drained gelatin, and mix. Let it cool for about 10 minutes and add the softened butter, mixing again until well incorporated. Pour into the mold, then gently add the biscuit on top, pressing gently. You don’t want it to submerge, just float on the surface. Wrap the top of the mold with plastic and freeze overnight.

Make the quinoa-crisp. Bake the puffed quinoa in a 325 F oven for 10 minutes.  Meanwhile, melt the white chocolate in a microwave very gently. Mix the melted chocolate with the pistachio paste.  Add the quinoa and spread  in a 4 mm (1/8 inch) thickness in between two sheets of parchment paper. It will be a little sticky, try to level it as best as you can. When it is cooled down a bit, cut the exact dimension of the bigger mold you will use for the dessert. Reserve.

Make the Sakura mousse. Soak the gelatin sheets in cold water for at least 10 minutes. Bring the milk to almost boiling and add the sakura leaf powder, mixing well to dissolve. Let it sit covered for 10 minutes.  In a small bowl, whisk the egg yolks with the sugar. Slowly add the hot milk infused with the sakura powder, whisking constantly. Transfer back to the pan and heat gently to 180 F. Do not let it go over or you will scramble the egg yolks. Transfer to a bowl, let it cool for a couple of minutes and add the drained gelatin and the Sakura extract. Reserve.

Whip the cold heavy cream to very soft peaks, do not over whip it. When the sakura custard is barely warm to the touch, add the whipped cream to form the final mousse, fold with a spatula until smooth. Pour the mousse into the large Buche mold up to 1/3 of its volume. Add the frozen insert made the day before, with the biscuit layer up. Complete the mold with mousse almost to the top, place the quinoa crisp on top, pressing gently. Wrap with plastic and freeze overnight.

Make the mirror glaze. Place the gelatin sheets inside a bowl with cold water for 10 minutes as you prepare the other ingredients. In a sauce pan, heat the glucose, sugar and water until boiling. Make sure the sugar is fully dissolved. Let it cool slightly, and add to a bowl with the white chocolate in small pieces. After a few minutes, use a spatula to dissolve the chocolate. Add the gelatin and the condensed milk, and mix gently, try to avoid incorporating air bubbles. Add the titanium oxide and emulsify the mixture with an immersion blender to get rid of bubbles. Divide the mixture in three bowls. Eyeballing is fine. Add the color and mix very gently with a spatula, do not use a whisk to avoid incorporating bubbles. Cover with plastic touching the surface and place in the fridge overnight.

To glaze, warm up the mixtures in the microwave for 30 to 40 seconds. Pass them each through a fine sieve to remove any residual bubbles. When the mixtures are at 98 F you can pour them in a tall pitcher, one color at a time, working fast so that the temperature does not drop too much. Glaze the frozen dessert allowing all colors to mix and mingle.  Thaw the cake in the fridge for a couple of hours before serving. Decorate the sides if you like, with tempered white chocolate or candy melts.

ENJOY!

to print the recipe, click here

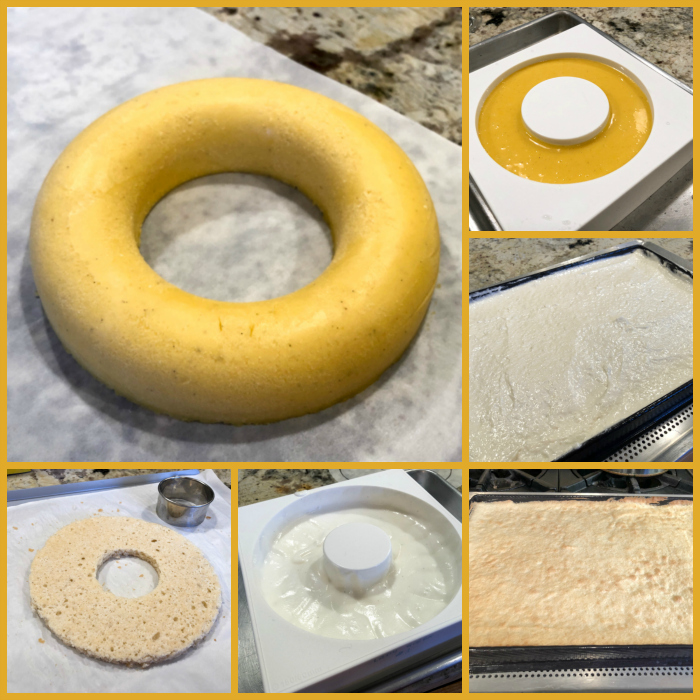
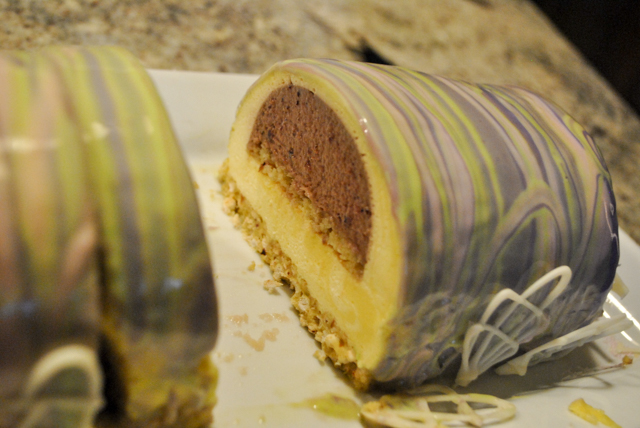
Comments: The dessert was assembled in a set of Silikomart molds called “Buche.” They can be used either separately, or together in a way that the smaller mold makes a component that goes inserted in the bigger one.  When planning a dessert using two molds, the first thing to consider is the volume needed, keeping in mind that a great deal of space will be occupied in the larger mold by the insert previously made. The amounts I shared work well with the Buche set. The composite photo above shows the overall preparation of the insert (compote + biscuit), that I made on a Friday evening, and left to freeze until next day. You can use any type of freezer-safe container you want, as long as it allows for easy un-molding later. The biscuit recipe makes more than needed for the base, so I cut a few rounds to freeze for a future adventure.

Saturday morning I made the crusty layer using puffed quinoa. To do so, I drew a precise template of the bigger Silikomart mold, and used a sharp paring knife to cut it. It is easier to cut  while it’s still just a tad warm. While the layer cooled completely, I prepared the Sakura mousse.

The mousse is poured inside the larger buche mold, then the frozen insert carefully placed in the center, with the biscuit layer facing up. More mousse is used to fill the mold almost to the top, then the  crusty layer is gently pressed on top. It is important to wrap the mold in plastic wrap so that when the mousse freezes it gets nicely compacted around the insert and the quinoa top (which will become the bottom in the final presentation).

Mirror glazing is definitely the most exciting part, although still a bit nerve-wracking for me. Things can go wrong in this final step for two main reasons:  first, you can pour too fast and lose track of how much glaze is being used, how much is left to finish coating; second, the temperature might be slightly off, so either the glaze slides off the cake without sticking, or it might set too fast and compromise the beautiful, super smooth surface that is the goal. When using more than one color, it gets even trickier. All components have to be just right in consistency and temperature. The glazes are best made the day before, so I made them on Saturday, kept them all in the fridge.  A 30 to 40 seconds encounter with the microwave puts all glazes at around 110F. At that point they went inside my bread proofing box set at 98F, and the waiting game started. You must be patient, and remember that whisking a mirror glaze suspension is a capital sin in patisserie. Bubbles must be minimized at all cost. Allow the different colors to equilibrate to the same temperature, get your frozen dessert ready, and let your inner Monet fly.

So there you have it, the Sakura Buche du Printemps ready to be enjoyed!  The cherry blossom flavor is very unique, floral (obviously) but not overpowering, as long as you exercise caution when you add it. A little too much and the mousse will be ruined. I really liked the texture of the crunchy quinoa, an idea that I cannot take credit for. I found it in this blog post and simply “borrowed” it. I will be using it again and again. It is sturdy enough to support the mousse, but easy to cut without making a huge mess on the plate. The biscuit layer could conceivably be omitted to simplify preparation, but it does add a different texture in a sea of mousse and creamy fruit. I think it makes the dessert considerably more interesting.

Before you leave, grab a pin…

ONE YEAR AGO: Clay Pot Roast Chicken

TWO YEARS AGO: In My Kitchen, April 2017

THREE YEARS AGO: Secret Recipe Club: Chicken Korma and a Bonus Recipe

FOUR YEARS AGO: Josey Baker’s Olive Bread

FIVE YEARS AGO: Almonds, A Cookbook Review

SIX  YEARS AGO: Pomegranate-Molasses Glazed Carrots

SEVEN YEARS AGO: Codruta’s Rolled Oat Sourdough Bread

EIGHT YEARS AGO: Roasted Corn and Tomato Risotto

NINE YEARS AGO: Light Rye Bread