A GOLDEN SANDWICH BREAD

The past couple years of sourdough baking turned me into a wild yeast purist, to the point that using commercial yeast feels like cheating. So, it’s time for a confession: I cheated last weekend and used commercial yeast to bake my bread. However, instead of penance, I got a beautiful, golden loaf to enjoy the rest of the week! 😉

SEMOLINA SANDWICH LOAF
(from Daniel Leader, Local Breads)

300 grams water (1 + 1/2 cups)   at 70 to 78  F
5 grams instant yeast (1 tsp)
500 grams fine semolina (durum) flour (3 + 1/4 cup)
15 grams granulated sugar (1 Tbs)
50 grams extra-virgin olive oil (1/4 cup)
10 grams sea salt (1 + 1/2 tsp)

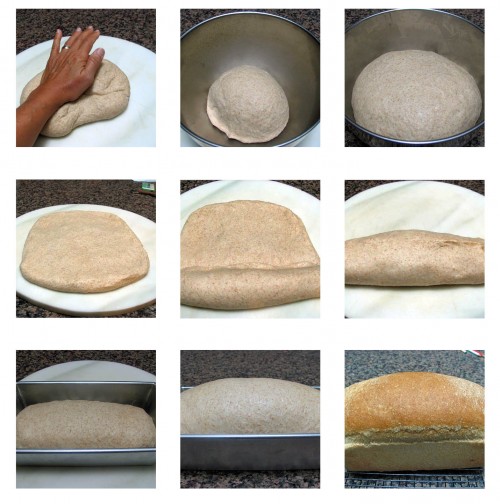
Pour the water into the bowl of a stand mixer. Add the yeast, flour, sugar, olive oil and salt and stir just until a rough dough forms.

Use the dough hook and mix the dough on medium speed (4 on a KitchenAid type mixer) until it is very smooth and elastic, about 9 minutes. Transfer the dough to a lightly oiled container, cover and leave to rise at room temperature until it doubles (1.5  to 2 hours).

Optional: go for a run during this time and come back to find out that 1 hour and 10 minutes later your dough is about to walk out the door to greet you).


Grease a loaf pan (8 1/2 x 4 1/2) with oil. Lightly dust the counter with semolina flour, place the dough on it, and shape it as a loaf. Insert it into the pan, with the seam side down. Dust the top lightly with semolina flour, and cover the pan. Let the loaf rise at room temperature (70 to 75 degrees) until it crowns just above the rim of the pan, 1 to 1 1/2 hours. (my loaf got there in only 45 minutes – must be the phase of the moon 😉

Bake in a 375 F oven until the loaf pulls away from the sides of the pan, and the crust is golden brown – 35 to 45 minutes.

Carefully remove the bread from the pan, and cool it over a rack for at least one hour before slicing it. Marvel at the beautiful, golden crumb, and…..

ENJOY!

to print the recipe, click here

Comments: I highly recommend this recipe if you are new to bread making.  The dough handles very well, and has impressive oven spring, baking into a gorgeous loaf that rises way above the pan. The semolina flour allows the  bread to last slightly longer than most homemade breads would – just store it at room temperature, inside a paper bag. Slightly toasted slices are delicious as part of a sandwich or just spread with jam or butter.

I am submitting this post to Susan’s Yeastspotting… make sure you stop by on Friday to see her weekly collection of breads.

ONE YEAR AGO: Tomato Confit with Arugula and Zucchini

Add to FacebookAdd to DiggAdd to Del.icio.usAdd to StumbleuponAdd to RedditAdd to BlinklistAdd to TwitterAdd to TechnoratiAdd to Yahoo BuzzAdd to Newsvine

PIERRE NURY’S RUSTIC LIGHT RYE: BOUGNAT

I’ve browsed the pages of Leader’s “Local Breads” countless times over the past year, but taking part in “The Bread Baker’s Apprentice” challenge prevented me from indulging in many other bread books. Once the  challenge finished, I felt excited to attack other projects, but also somewhat paralyzed.   Not anymore: last weekend I dove into my first Local Breads recipe, a three-day project that led to a couple of delicious loaves of a rustic, toothsome bread.

PIERRE NURY’s RUSTIC LIGHT RYE
(from Local Breads)

Levain (sourdough starter)

45 g firm sourdough starter
50 g water
95 g bread flour
5 g whole wheat flour

Mix all the ingredients until they form a stiff dough, trying to incorporate all the flour into it. Place the dough in a container, marking its level with a tape or pen. Allow it to ferment at room temperature for 8 to 12 hours, until it doubles in volume. This recipe will make more levain than used in the bread.

Bread dough

400 g water
450 g bread flour
50 g rye flour
125 g levain
10 g salt

Pour the water into the bowl of a Kitchen Aid type mixer. Add the bread and rye flours, stir with a spatula until it begins to form a dough. Cover the bowl and let stand at room temperature for 20 minutes.

Uncover the bowl, add the levain (only 125 g of it) and the salt, and start kneading with the dough hook on medium speed for 12-14 minutes, or until you have good gluten development (do a windowpane test). Transfer the dough to a slightly oiled bowl and keep it at room temperature for 1 hour. Scrape the dough into a floured surface and fold it a couple of times to induce gluten development. You can see how to fold the dough by clicking here. Repeat the folding again after 1 more hour. After the second folding cycle, let the dough rise for 1 to 2 hours at room temperature until doubled in volume. Transfer to the refrigerator for 12 to 24 hours.

After 14 hours, my dough looked like this….

“Shaping” and baking
Remove the dough from the fridge 3 hours before baking. Heat the oven to 450F and place a baking stone (or tiles) on the middle rack.

Heavily dust the counter with flour, scrape the dough onto the counter, and open it gently into a 10 inch square shape, trying not to deflate it too much. I like to mark the dimensions on the flour, to have an idea of how much to open the dough.

Transfer each piece to a rimless baking sheet covered with parchment paper, stretching the dough to about 12 inches long. Let it fall naturally, without worrying about a precise shape. If baking both loaves at the same time, separate them by at least 2 inches.

Bake with initial steam for 20 to 30 minutes, until a dark walnut color develops on the crust. Let the loaves cool on a rack for at least an hour before slicing.

ENJOY!

to print the recipe, click here

for a detailed discussion on this particular bread, visit this link

Comments: The recipe was quite involved and challenging, but the gods of Bread were on my side and things went smoothly.  A dough with this much water (in baker’s terms it’s called a high hydration ratio) is tricky to deal with, but extra flour on the work surface helps. As some of the bakers in The Fresh Loaf put it “it feels like you’re making pancakes” when transferring the “bread” to the baking sheet. It’s impossible to shape it, so don’t even try. Lift it, gently stretch it  (it will almost stretch itself as it’s lifted), place it on the baking sheet and transfer it to the oven.   It’s a delight to witness its impressive oven spring (yet another fancy term to indicate that the dough rises a lot during baking).

The crumb almost made me shed a few tears… I know, I know… it’s pathetic, but bread make’s me emotional!  (In a good way.)  😉

I am submitting this post to Yeastspotting….

Add to FacebookAdd to DiggAdd to Del.icio.usAdd to StumbleuponAdd to RedditAdd to BlinklistAdd to TwitterAdd to TechnoratiAdd to Yahoo BuzzAdd to Newsvine