LA BUCHE DE NOEL

Not my first time making it, but in the past I was not fully happy with the results. I show you two ways to decorate it, but will share only the most recent recipe, cake portion courtesy of Helen Fletcher, my beloved virtual mentor!

BUCHE DE NOEL
(adapted from Helen Fletcher’s Pastrieslikeapro)

for the chocolate spongecake:
¾ cup sifted cake flour (75 grams)
¼ cup sifted cocoa (25 grams)
¼ teaspoon baking powder
6 eggs separated
⅔ cup sugar, divided (140 grams)
1 teaspoon vanilla

for the filling:
1 cup unsalted butter softened (226g)
3 cups confectioners’ sugar (380g) or more if needed
1 teaspoon pure vanilla extract
1/4 cup 60-80ml heavy cream (60mL) or more if needed
1/3 cup black cherry jam or other jam of your choice

for the ganache coating:
170g semi-sweet chocolate, finely chopped
3/4 cup (180ml) heavy cream

Heat the oven to 350. Spray the bottom of ½ sheet pan (11×17 inches) with cooking spray. Line with parchment paper and spray the paper. Do not spray sides of pan. Set aside.

Whisk together the flour, cocoa and baking powder, mixing well. Set aside. Combine the egg yolks, ⅓ cup sugar and vanilla in a mixing bowl fitted with the whisk attachment. Beat until very thick and very pale yellow.

In a clean mixing bowl with a clean whisk, beat the egg whites until soft peaks form. Slowly add the remaining ⅓ cup sugar and beat until fairly stiff. Place the egg yolks over the egg whites and sift half the flour/cocoa mixture over the beaten eggs. Fold together. Fold in the remaining flour/cocoa. Gently pour into the prepared pan and spread out evenly. Bake 10 to 12 minutes. The top will spring back when lightly touched. Immediately cover directly with foil and place on a rack to cool completely. When ready to assemble, it will roll out easily.

Make the filling: In a stand mixer fitted with the paddle attachment, mix together the butter and confectioners’ sugar. Begin on low speed until crumbly, and then increase to high and beat for 3 minutes.
Add vanilla extract and beat again for another minute. Add heavy cream 2 tablespoons at a time while mixing on high until the mixture is light and fluffy. Transfer the frosting to a piping bag.

Make the ganache: Place chopped chocolate in a medium bowl. Heat the cream in a small saucepan until it begins to simmer. Pour over chocolate, then let it sit for 2-3 minutes to gently soften the chocolate. Slowly stir until completely combined and chocolate has melted. Refrigerate, uncovered, for about 1 hour to thicken.

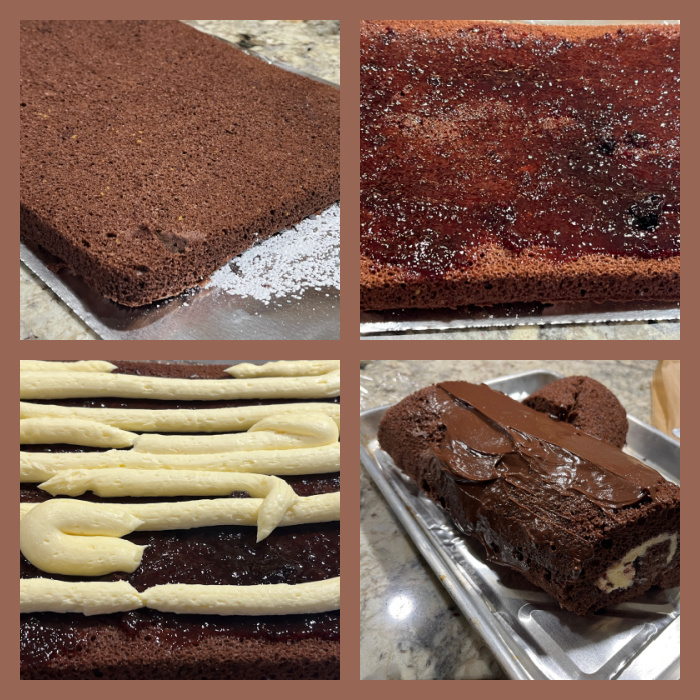
ASSEMBLE THE CAKE: Lay a large piece of aluminum foil and dust it with powdered sugar. Remove the foil on top of the cake and go around the edges of the pan with a spatula. Pick the spongecake up by the parchment and turn it out onto the powdered sugar lined foil. Remove the parchment paper. Spread the jam over the surface of the cake, then the buttercream, starting by piping large stripes of the cream over the surface (see my composite photo after the recipe). Using the foil as an assist, roll up the spongecake jelly roll style. The last roll should put the spongecake on the board. Cut the ends of the cake at a diagonal and use one or both cut pieces to make branches sitting next to the main log. 

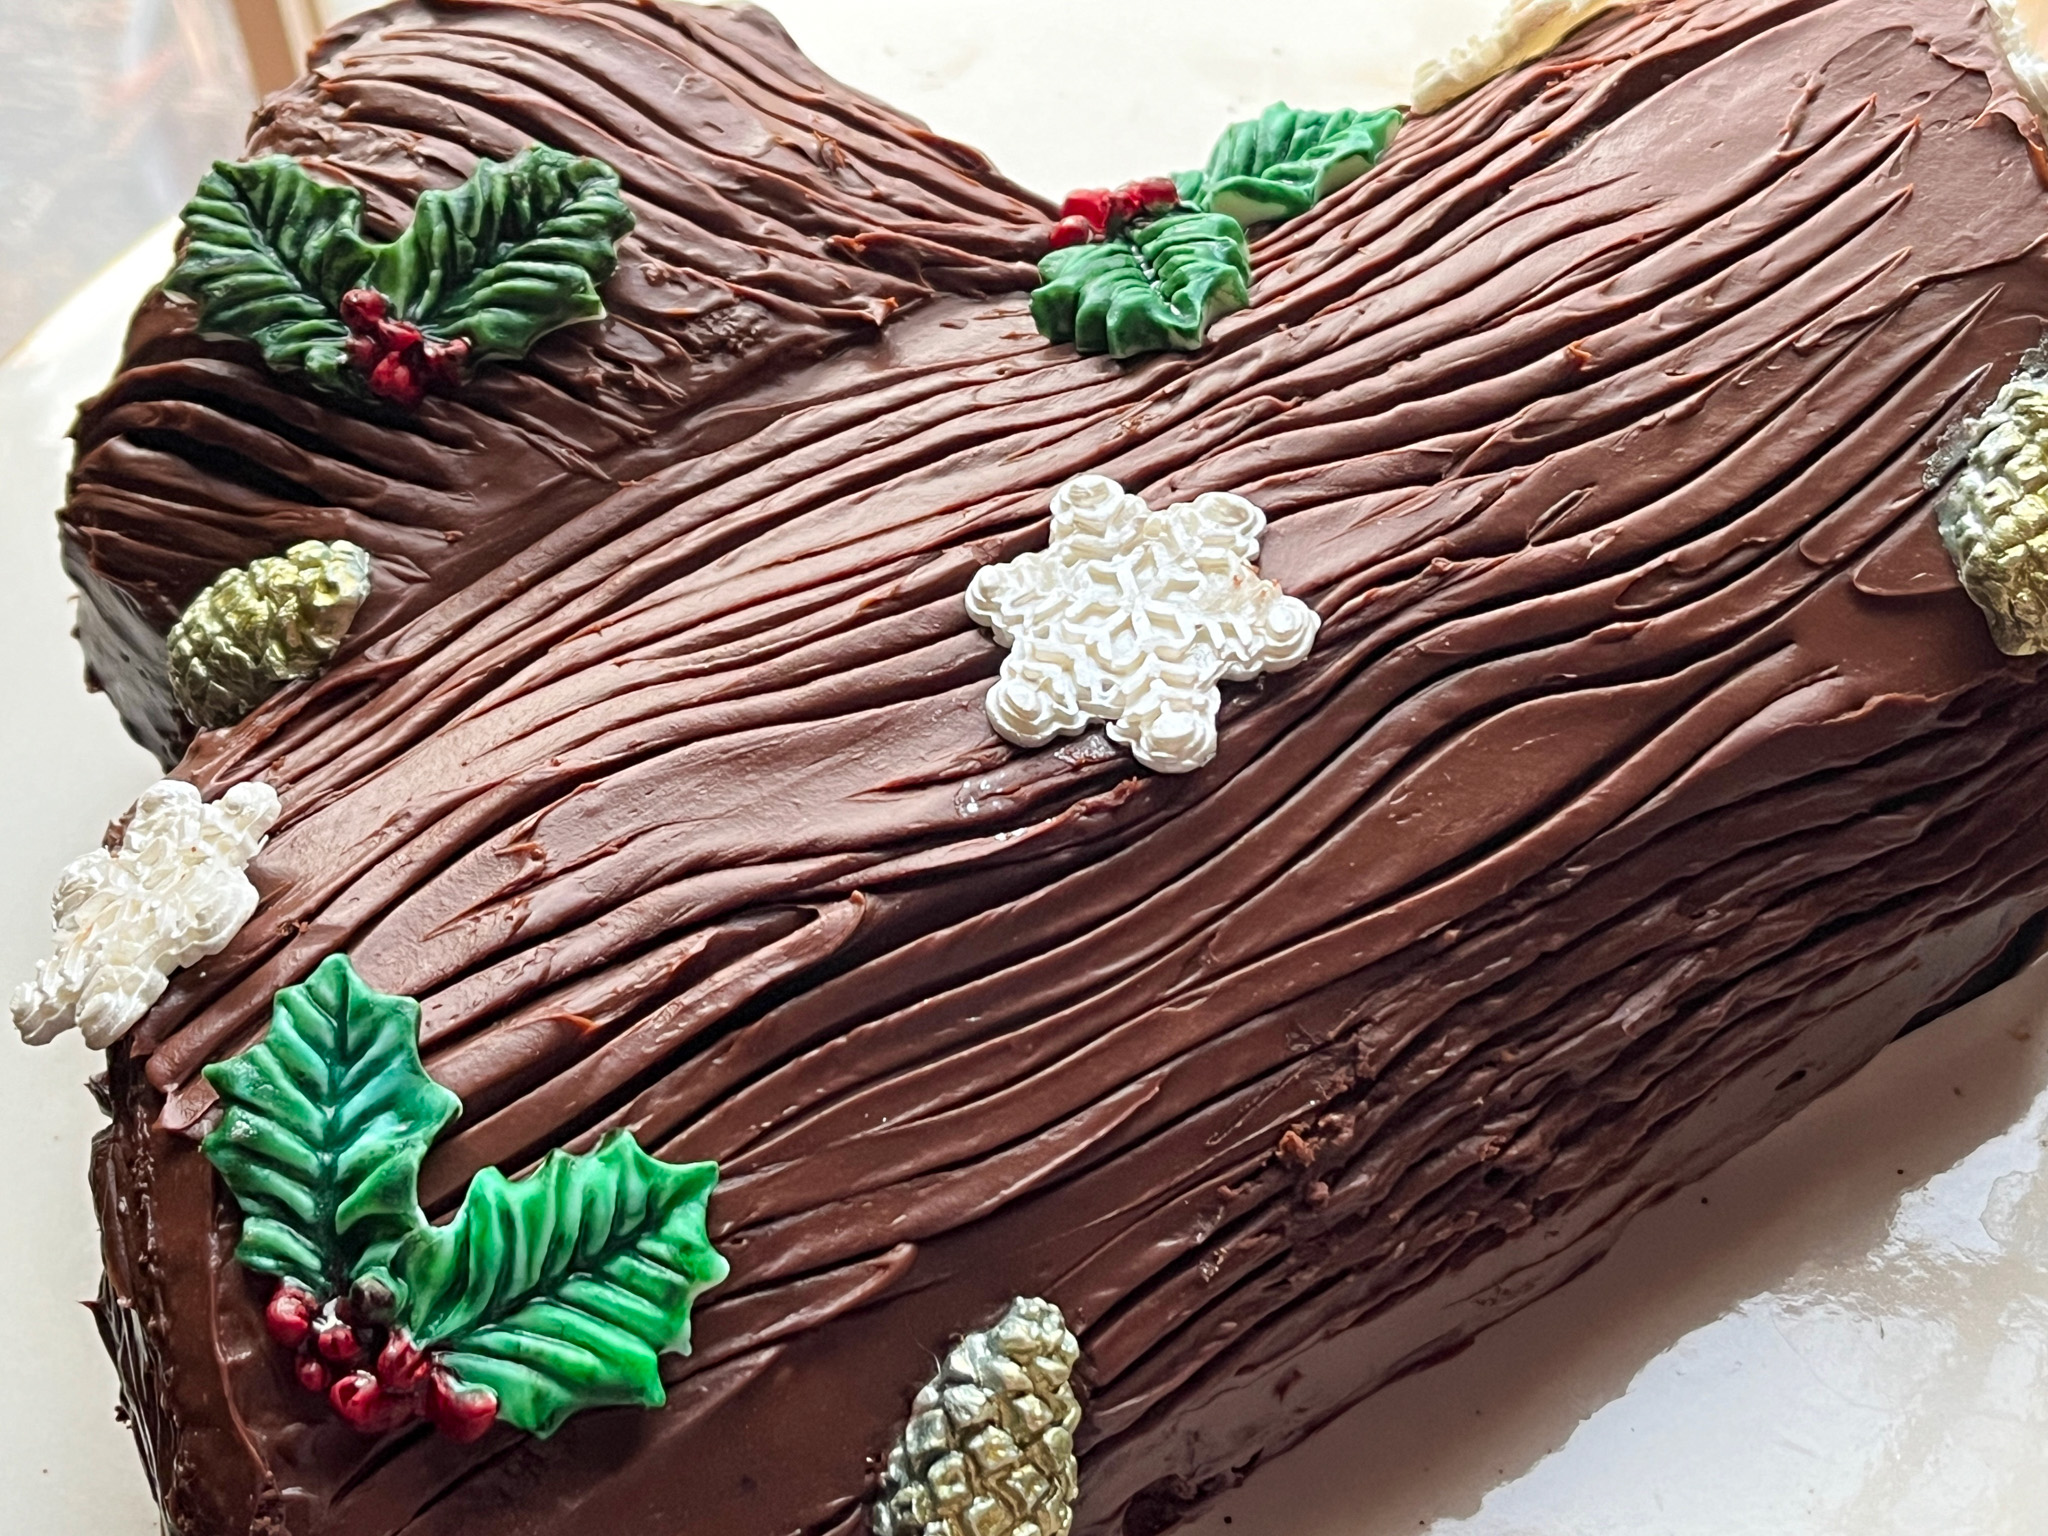
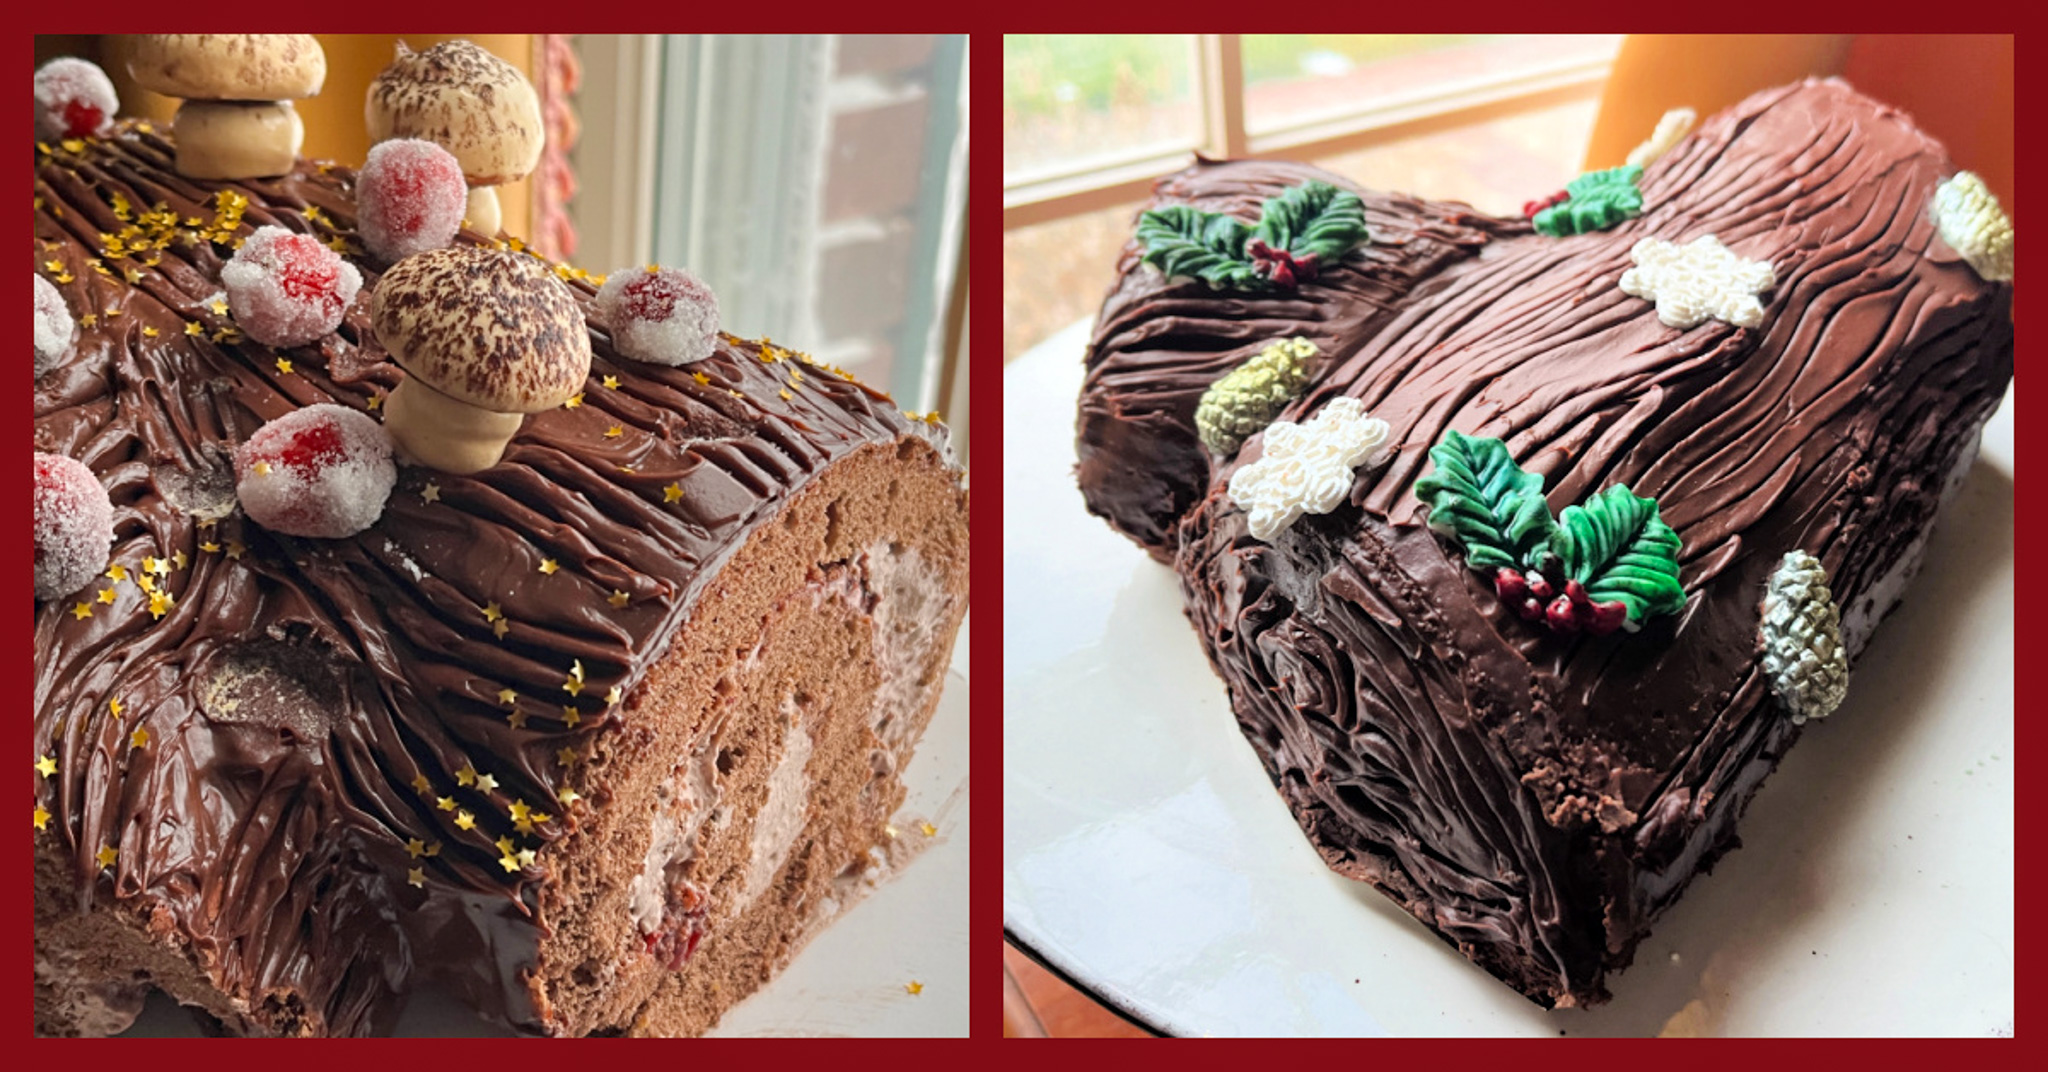
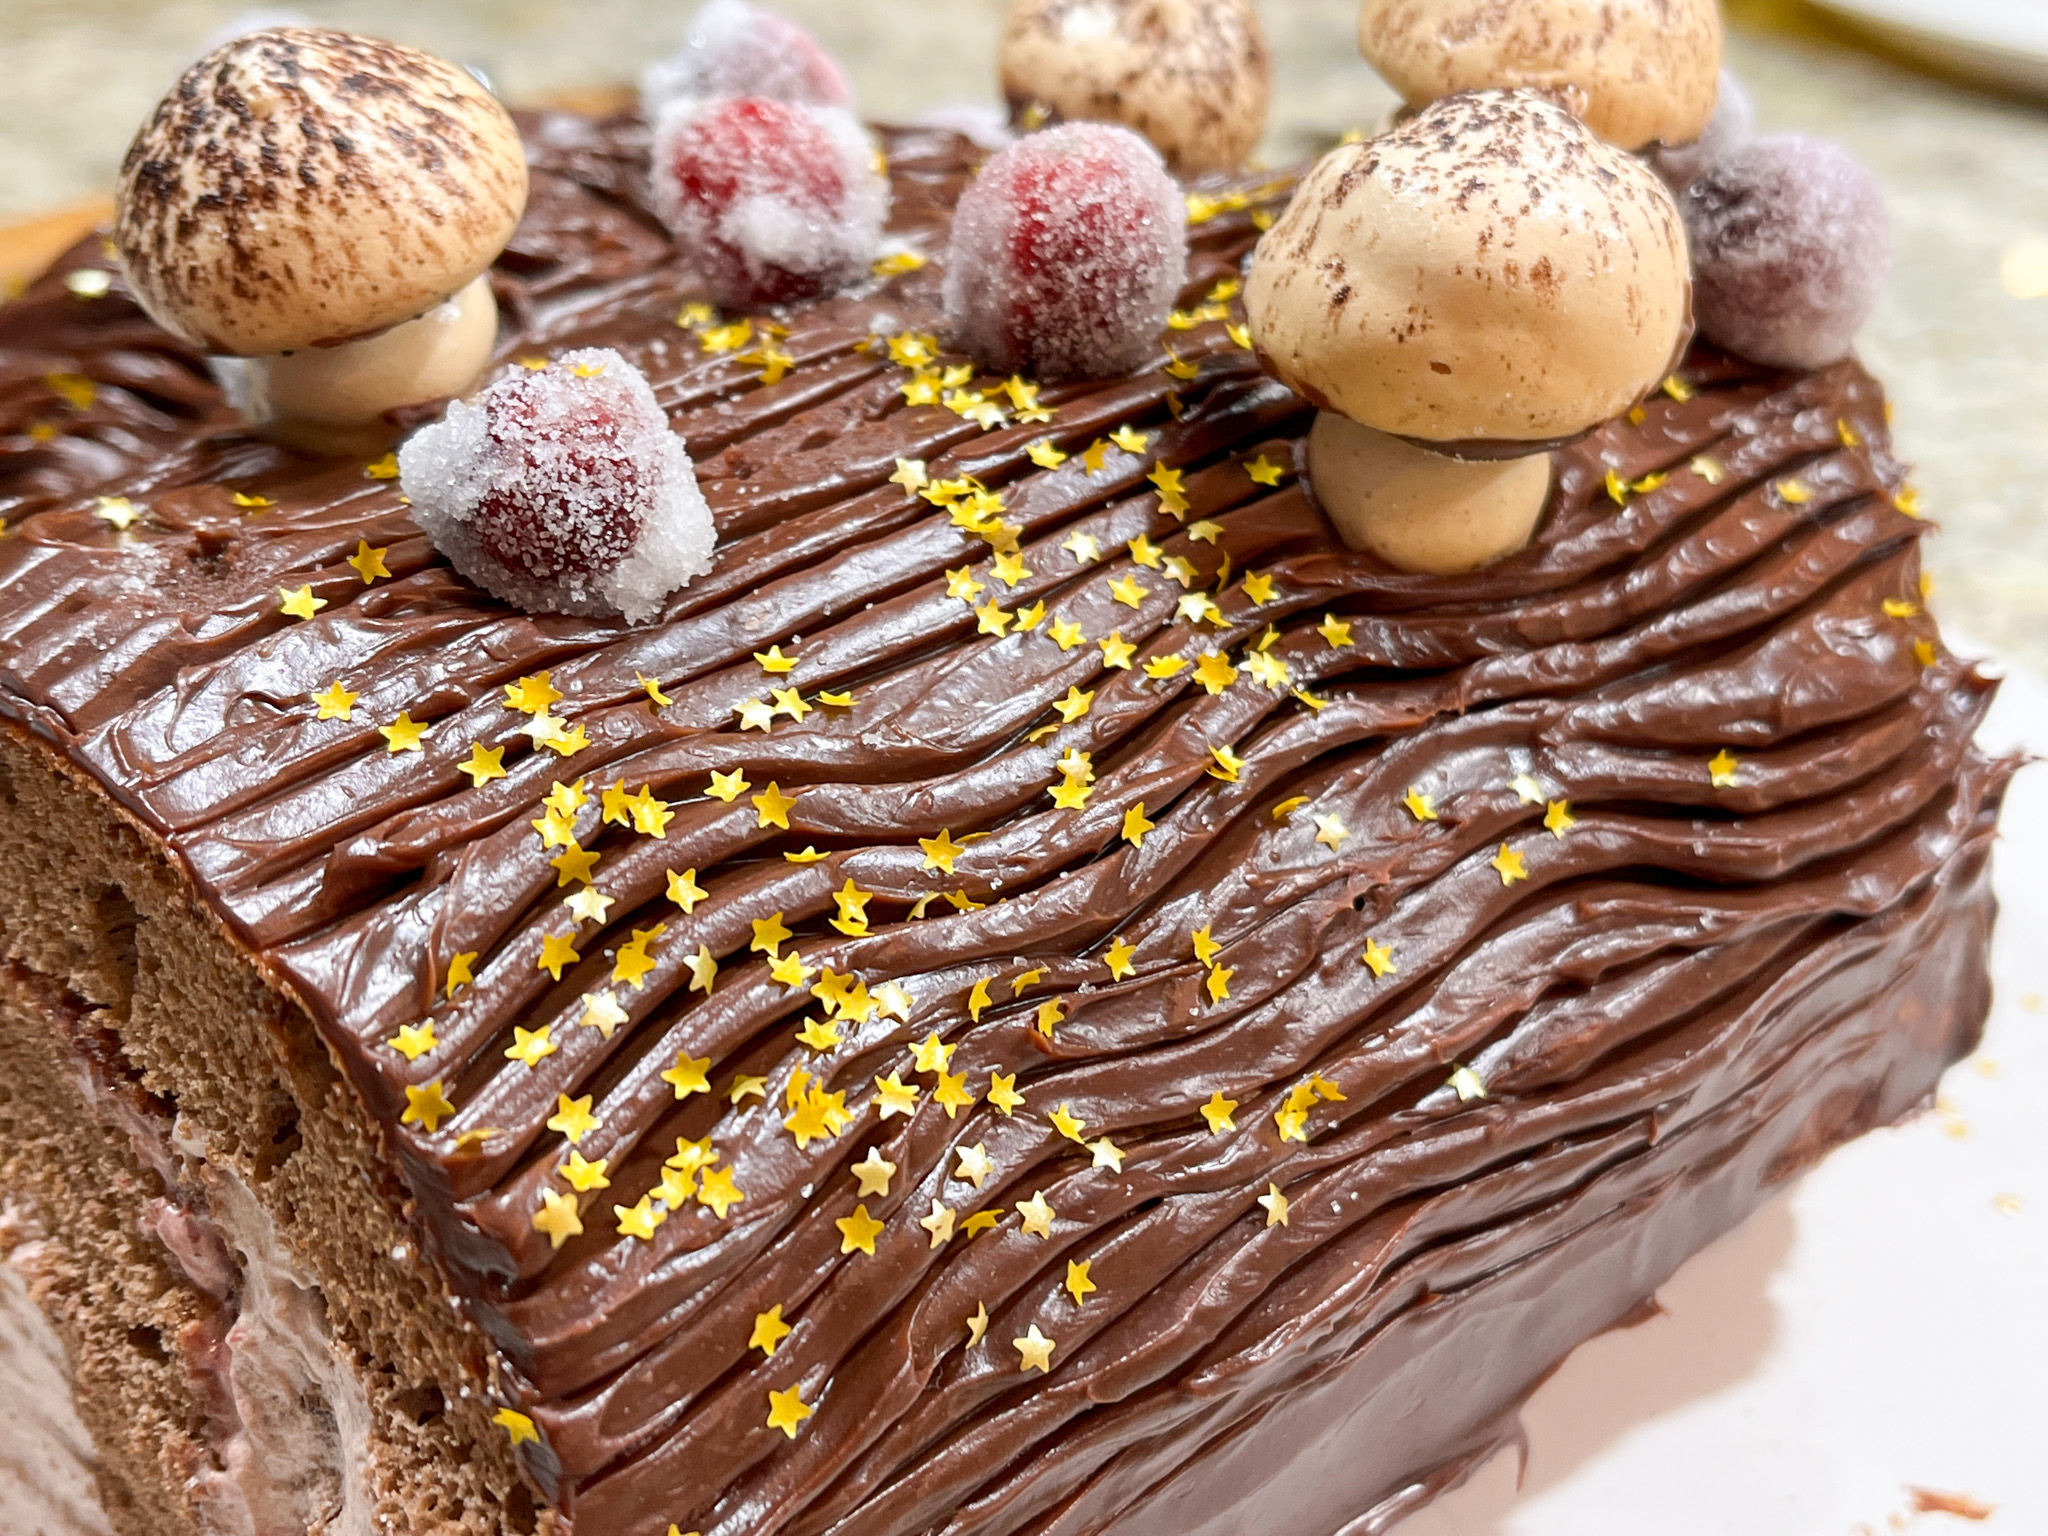
Cover the log with ganache, making a design on top with the tines of fork. Decorate with fondant pieces or meringue mushrooms, sugared cranberries, chocolate leaves, whatever you desire. Refrigerate for a few hours before serving, and allow to come to room temperature before cutting your first slice.

ENJOY!

to print the recipe, click here

Comments: I advise you to go to Helen’s site to get all the details of making her cake. She uses a different method to deal with the sponge cake, and it does work like a dream. The cake is covered with aluminum foil as soon as it gets baked, and is allowed to cool like that. As a result, it steams during cooling and becomes very flexible. No harm to the texture of the cake in the finished product.

I have made a Buche de Noel in the past using a different recipe for the cake, but I am much happier with Helen’s version, that calls for a classic sponge cake. You can also find in her blog post a detailed recipe for the meringue mushrooms, which I did not use this time. They are fun to make, for sure.

I love making fondant pieces, so that is what I went with… I cannot show you a picture of the cut cake because I donated it whole, but I got very nice feedback about it, and that of course made me super happy!

I wish you a wonderful 2024!

ONE YEAR AGO: Incredibly Simple Apple Carpaccio

TWO YEARS AGO: Chocolate-Cherry Miroir Cake, A Vegan Showstopper

THREE YEARS AGO: Bee Happy Honey Macarons

FOUR YEARS AGO: Episode 7 of Great American Baking Show, Canapes, Opera Cake and Running out of Gas

FIVE YEARS AGO: Raspberry Ganache Macarons

SIX YEARS AGO: Pain au Chocolat

SEVEN YEARS AGO: Two Unusual Takes on Roasted Veggies

EIGHT YEARS AGO: Kadoo Boranee: Butternut Squash Perfection

NINE YEARS AGO: Creamy Broccoli Soup with Toasted Almonds

TEN YEARS AGO:
 Fennel and Cheddar Cheese Crackers

ELEVEN YEARS AGO: A Festive Pomegranate Dessert

TWELVE YEARS AGO: My First Award!

THIRTEEN YEARS AGO: A Message from WordPress

FOURTEEN YEARS AGO: Turkish Chicken Kebabs


OREOS DRESSED FOR THE HOLIDAY SEASON

Yes, the Bewitching Kitchen is in full festive mode! Today the Oreo cookie, brought home from a humble shelf in the grocery store, gets dressed up for major party time… Several ideas for you, but I will start with maybe my favorite, as it gives me a chance to talk about a new product I recently tried.


All my Oreos are made the same way, with compound chocolate (Wilton melting wafers, or other brands available at the grocery store or online). I also have very good luck with Almond Bark, which tends to dry super shiny. If you have issues melting the compound chocolate smoothly, just add a teaspoon or two of oil (refined coconut works great and has no coconut taste). Pour some in the Oreo mold, add the cookie, and cover with melted chocolate. But the possibilities to decorate are endless. For the red ones, I started dividing the white chocolate in two, leaving one portion white and one portion dyed with red fat-soluble color. I poured the two colors in a measuring cup and did not mix them completely, to try to get a marbled effect.

Once the chocolate set, I used this new trick, that turns any gel color into a fat-soluble product, so that all the big collection of gel dyes you own can be used to color chocolate. Isn’t that cool? It is a product by Americolor called FLO-COAT. You can find it here. Just a small amount, maybe 1/4 tsp and a couple of drops of your gel color, mix well and add to the melted chocolate. 

That is how I made the green used for the details, then added sprinkles.

For those I used dark chocolate to make the molds, then drizzled white chocolate with a piping bag, and glued small gold confetti sprinkles on some of the intersecting lines. 

The metallic effect was luster power mixed with vodka, applied with a fan brush…

Finally, a few more designs relying on chocolate transfer sheets. You just cut circles, add to the bottom of the mold and pour the melted chocolate. Remember to peel off the plastic once you un-mold them!

There you have it, many ideas to make the Oreo cookie shine! Keep in mind that you can use golden oreos (lemon flavor), or red velvet to make the cookie complement better the surrounding shell. Have fun with it!

ONE YEAR AGO: Peppermint Wreath Macarons

TWO YEARSAGO: Cornish Hens with Yogurt-Mace Marinade

THREE YEARS AGO: Cookies for the Holidays – Gingerbread

FOUR YEARS AGO: Incredibly Simple Times Four

FIVE YEARS AGO: White Chocolate and Raspberry Mousse Cake

SIX YEAR AGO: Panettone Time!

SEVEN YEARS AGO: Pistachio Creme Brulee

EIGHT YEARS AGO: Fast and Furious Bison Chili

NINE YEARS AGO: In My Kitchen, December 2014

TEN YEARS AGO: Braised Fennel with Saffron and Tomato

ELEVEN YEARS AGO: Revenge of the Two Derelicts

TWELVE YEARS AGO: Grilling Ribbons

THIRTEEN YEARS AGO: Peppery Cashew Crunch

FOURTEEN YEARS AGO: Baked Shrimp and Feta Pasta

TWO FESTIVE CAKES, PART TWO

Another great option for the holidays, this time the most intense chocolate hit in cake form for those chocaholics out there…


CHOCOLATE BUNDT CAKE
(from Two Peas and Their Pod)

for the cake:
1 cup unsalted butter (226g)
1/3 cup cocoa powder (35g)
1 teaspoon kosher salt
1 cup water
2 cups all-purpose flour (240g)
1 + 3/4 cups granulated sugar (350g)
1 + 1/2 teaspoons baking soda
2 large eggs
1/2 cup sour cream
1 teaspoon pure vanilla extract

for the chocolate glaze:
4 ounces bittersweet chocolate finely chopped
1 tablespoon corn syrup
1/2 cup heavy cream
1 + 1/2 tablespoons granulated sugar
sprinkles to decorate

Heat oven to 350F. Prepare your Bundt pan by spraying it with cooking spray or coating with butter and flour.

In a small saucepan, combine the butter, cocoa powder, salt, and water and place over medium heat. Cook, stirring, just until melted and combined. Remove from the heat and set aside.

In a large bowl, whisk together the flour, sugar, and baking soda. Add half of the melted butter mixture and whisk until completely blended. Add the remaining butter mixture and whisk until combined. Add the eggs, one at a time, whisking until completely blended. Whisk in the sour cream and the vanilla extract. Whisk until smooth.

Scrape the batter into the prepared pan and bake until a toothpick inserted into the center of the cake comes out clean, 45 to 50 minutes. Let the cake cool in the pan for 15 minutes and then invert onto a rack. Let cool completely before glazing.

While the cake is cooling, make the chocolate glaze. Place the chopped chocolate and corn syrup in a medium bowl and set aside. Combine the heavy cream and sugar in a small saucepan and put over medium heat. Stir until the cream is hot and the sugar is dissolved. Pour the hot cream over the chocolate and whisk until smooth. Generously drizzle the glaze over the cooled cake, allowing it to drip down the sides. Decorate with sprinkles while still soft.

ENJOY!

to print the recipe, click here


Comments: This classic Nordicware pan will always have a warm spot in my heart, as that was the very first pan I used in the tent in the Great American Baking adventure of years back. I remember the thrill when the cake un-molded beautifully in front of the cameras, and I always have the same smile when it un-molds at home (the thrill is not as intense, but still there!).

Once again it was a cake I did not get to taste, as it was donated whole. But I got real nice feedback about it, it cut very nicely in thin slices so that lots of people could get to taste it. Everybody loved it, the flavor of chocolate is intense and the ganache coating a perfect complement for it. I hope you give it a try!

ONE YEAR AGO: Peppermint Wreath Macarons

TWO YEARSAGO: Cornish Hens with Yogurt-Mace Marinade

THREE YEARS AGO: Cookies for the Holidays – Gingerbread

FOUR YEARS AGO: Incredibly Simple Times Four

FIVE YEARS AGO: White Chocolate and Raspberry Mousse Cake

SIX YEAR AGO: Panettone Time!

SEVEN YEARS AGO: Pistachio Creme Brulee

EIGHT YEARS AGO: Fast and Furious Bison Chili

NINE YEARS AGO: In My Kitchen, December 2014

TEN YEARS AGO: Braised Fennel with Saffron and Tomato

ELEVEN YEARS AGO: Revenge of the Two Derelicts

TWELVE YEARS AGO: Grilling Ribbons

THIRTEEN YEARS AGO: Peppery Cashew Crunch

FOURTEEN YEARS AGO: Baked Shrimp and Feta Pasta

STAR-SHAPED SUNDRIED TOMATO BREAD

This is a type of bread we see often this time of the year, because it looks so festive, but it is actually quite simple to make. The filling can be sweet (think Nutella, caramel, raspberry jam) or savory. My version used sundried-tomato and cheese. You can take it in different directions, and it will always turned out great, with that visual impact we love so much, particularly during the holiday season.

STAR-SHAPED SUNDRIED TOMATO BREAD
(adapted from King Arthur Flour)

for the dough:
3/4 cup lukewarm milk
2 teaspoons active dry or instant yeast
360g all-purpose flour, divided
1 large egg
3 tablespoons olive oil
1 teaspoon salt

for the filling:
¾ cup shredded mozzarella
½ cup oil-packed sun-dried tomatoes
1/2 tsp herbes de Provence
½ teaspoon salt

1 egg for egg wash

To make the dough, place the milk, yeast, and 120g all-purpose flour in a large mixing bowl and stir to combine. Cover and let rest for 15 minutes.

Add the egg, olive oil, salt, and the rest of the all-purpose flour. Mix to make a soft dough, then knead for 6 to 8 minutes, until smooth and supple. Place in an oiled bowl, cover, and let rise for about 1 hour, until doubled.

Mix together minced sun-dried tomatoes, salt and herbes de Provence. Reserve.

Divide the dough into four pieces and shape into balls. Cover and let rest for 10 minutes.

Place one piece of dough on a piece of parchment. Roll it into a 10″ circle. Spread ⅓ of the sun-dried tomato mixture on the first layer of dough in an even layer. Sprinkle ⅓ of the cheese, leaving ½” around the outside edge uncovered. Roll out the second ball of dough to the same size as the first. Place it on top of the first circle and repeat the three layers of filling. Again, repeat with the third ball of dough and the last ⅓ of filling. Roll out the last ball of dough and place it on top.

Place a 2″ round biscuit cutter or drinking glass in the center of the dough to serve as a guide. Using a sharp knife, cut the larger circle into 16 equal strips, from the outside edge to the cutter/glass in the center, through all the layers. Using two hands, pick up two adjacent strips of dough and twist them away from each other twice, so the top side is facing up again. Repeat with the remaining strips of dough all the way around the circle. Remove the cutter/glass.

Pinch the ends of adjacent strips together all the way around the bread to create eight star-like points. Transfer the star on the parchment to a baking sheet. Cover with plastic wrap and let rise for about 45 minutes. Dough should look expanded and airy.

Heat the oven to 400F. Remove the plastic wrap and brush the star with a thin coat of the egg wash. Bake for 25 to 30 minutes, until nicely golden. Remove the bread from the oven and cool for 10 minutes before serving.

ENJOY!

to print the recipe, click here

Comments: This is a very rich dough, and a pleasure to work with. Even if you are a beginner at bread baking, the whole process is pretty forgiving. The circles of dough do not have to match precisely, it is all going to get twisted and any little gaps won’t affect the final product.

There are many videos available on youtube to show you how to shape the bread, like this one.

If you are still searching for a nice bread as a centerpiece for your holiday festivities, this is truly a great option…

ONE YEAR AGO: Cranberry White Chocolate Tart

TWO YEARS AGO: I dream of Madeleines and a Tower of Cheesecakes

THREE YEARS AGO: Dominique Ansel’s Chocolate Mousse Cake

FOUR YEARS AGO: Slow-Roasted Eye of the Round Beef

FIVE YEARS AGO: Steam-Roasted Indian-Spiced Cauliflower

SIX YEARS AGO: Creamy Zucchini-Mushroom Soup

SEVEN YEARS AGO: Ken Forkish’s Pain au Bacon

EIGHT YEARS AGO: Carrot and Cumin Hamburger Buns

NINE YEARS AGO: Potato Galettes a l’Alsacienne & Book Review

TEN YEARS AGO: Caramelized Carrot Soup

ELEVEN YEARS AGO: Miso-Grilled Shrimp

TWELVE YEARS AGO: Pain Poilane

CRANBERRY WHITE CHOCOLATE TART

I cannot think of a better dessert for Christmas or New Year’s Eve. Cranberries and white chocolate go very well together, as the former is so tart and the latter is often accused of excessive sweetness. Join to this pair a crust made from what is essentially a gingerbread cookie, and as you savor it, all thoughts of pandemics and politics and whatever else troubled 2020 will vanish in thin air. I promise you.

CRANBERRY AND WHITE CHOCOLATE TART
(recipe published with permission from Chef Eve)

for gingerbread crust:
178g all-purpose flour
2 Tablespoons brown sugar
113g cold, cubed, unsalted butter (1 stick)
1 tsp. ground cinnamon
1/2 tsp. ground ginger
1⁄4 tsp. ground allspice
A pinch ground cloves
1⁄2 tsp. salt
1 tbsp. molasses
1⁄2 tsp. vanilla extract
2 Tbsp cold water

for white chocolate ganache:
340g white chocolate
170g (3/4 cup) heavy cream
2 tbsp. room-temperature unsalted butter, cubed
pinch of salt

for cranberry jelly:
3 cups (340g) whole cranberries, washed and picked through
1 medium-sized apple, peeled and grated
200g granulated sugar
1/2 cup water
pinch of salt
1 tsp. vanilla extract
shaved white chocolate and sprinkles for decoration (optional)

for a 9-inch tart pan

Mix dry ingredients together in the bowl of a stand mixer fitted with the paddle. Add in cold, cubed butter and ginger, and mix until crumbly, and butter is no larger than pea-sized. Mix together cold water, molasses, and vanilla, then stream into pie dough and mix just until dough starts to come together and no dry flour remains in the bottom of the bowl. Do not overmix. Chill the dough for 30 minutes, then roll into a 1⁄8-inch thick round. Use the tart pan to make sure the dough is big enough to come up the sides of the pan with a little overhand. Chill 30 minutes more (the dough is very soft, it needs the extra time in the fridge), then line the tart mold. Chill in the freezer for 10 minutes, then trim the edges of the pie dough using a paring knife. Reserve dough scraps in case you need to patch any cracks that form as the tart bakes.

Line the tart crust with a sheet of parchment paper (or plastic wrap, which is what I do) and fill with baking weights that come up to the edge of the tart. If using a plastic wrap, make sure to fold it over the top of the beans, so that the plastic won’t touch the metal pan. Bake at 350°F for 15 minutes, then carefully remove the pie weights and bake another 10-15 minutes, until the crust is golden brown at the edges, and the center of the tart dough is completely baked. Cool to room temperature.

Make the chocolate ganache. Bring cream to a simmer. Put chocolate and salt in a food processor and pulse to break up into small pieces. When cream simmers, pour over chocolate and let sit one minute to start melting the chocolate. Pulse until smooth. When the chocolate is fully melted, add in butter cubes, and blend to incorporate. Pour into the cooled pie crust. Chill in the freezer to set for about 1 hour as you make the jelly. Make sure the tart is sitting nicely leveled.

Make the cranberry jelly. Put all ingredients except vanilla in a saucepan. Bring to a boil, then lower to a simmer. Cook until all of the cranberries explode, stirring occasionally, about 10 minutes. Remove from heat, add vanilla, and press through a mesh strainer. Cool for 30 minutes at room temperature, then carefully pour over the very cold from the freezer white chocolate layer. Chill at least 30 minutes in the fridge for the layer to set.

Optional decoration: shave some white chocolate on half of the surface, add sprinkles and sugared cranberries on top.

ENJOY!

to print the recipe, click here

Comments: As some of you may have already noticed, this year there won’t be a Great American Baking Show. They could not make it happen with all the restrictions due to the pandemics. It was tough enough to produce the British show, but the American production had to be canceled. The producers decided that this month they would feature on their Instagram page holiday-inspired bakes from contestants of previous seasons. This was my contribution. You can browse through all the entries from other tent-bakers clicking here. Be ready to be amazed…

Back to the tart .The combination of cranberry jelly and chocolate ganache is superb but not the only thing I loved about this dessert. The crust is just perfect and quite different from any other tart I’ve ever made. Lastly, for my taste the proportion of crust and topping also hit the jackpot. When I make it again, I might use some gelatin to get the top layer a little more set, so that the sliced piece would have more defined layers, but it’s more a cosmetic point, not really that big a deal.

Chef Eve, thank you so much for allowing me to share your delicious recipe!

ONE YEAR AGO: I dream of Madeleines and a Tower of Cheesecakes

TWO YEARS AGO: Dominique Ansel’s Chocolate Mousse Cake

THREE YEARS AGO: Slow-Roasted Eye of the Round Beef

FOUR YEARS AGO: Steam-Roasted Indian-Spiced Cauliflower

FIVE YEARS AGO: Creamy Zucchini-Mushroom Soup

SIX YEARS AGO: Ken Forkish’s Pain au Bacon

SEVEN YEARS AGO: Carrot and Cumin Hamburger Buns

EIGHT YEARS AGO: Potato Galettes a l’Alsacienne & Book Review

NINE YEARS AGO: Caramelized Carrot Soup

TEN YEARS AGO: Miso-Grilled Shrimp

ELEVEN YEARS AGO: Pain Poilane