COCONUT CUPCAKES GET FROSTY

Several components needed for this bake, but isn’t it all worth it? I cannot take credit for the idea, I saw it by total accident in this Instagram page and fell in love with it. I adapted to use my own cupcake recipe and Tanya – tent-baker-extraordinaire and amazing friend – helped me with a frosting that holds well at room-temperature.

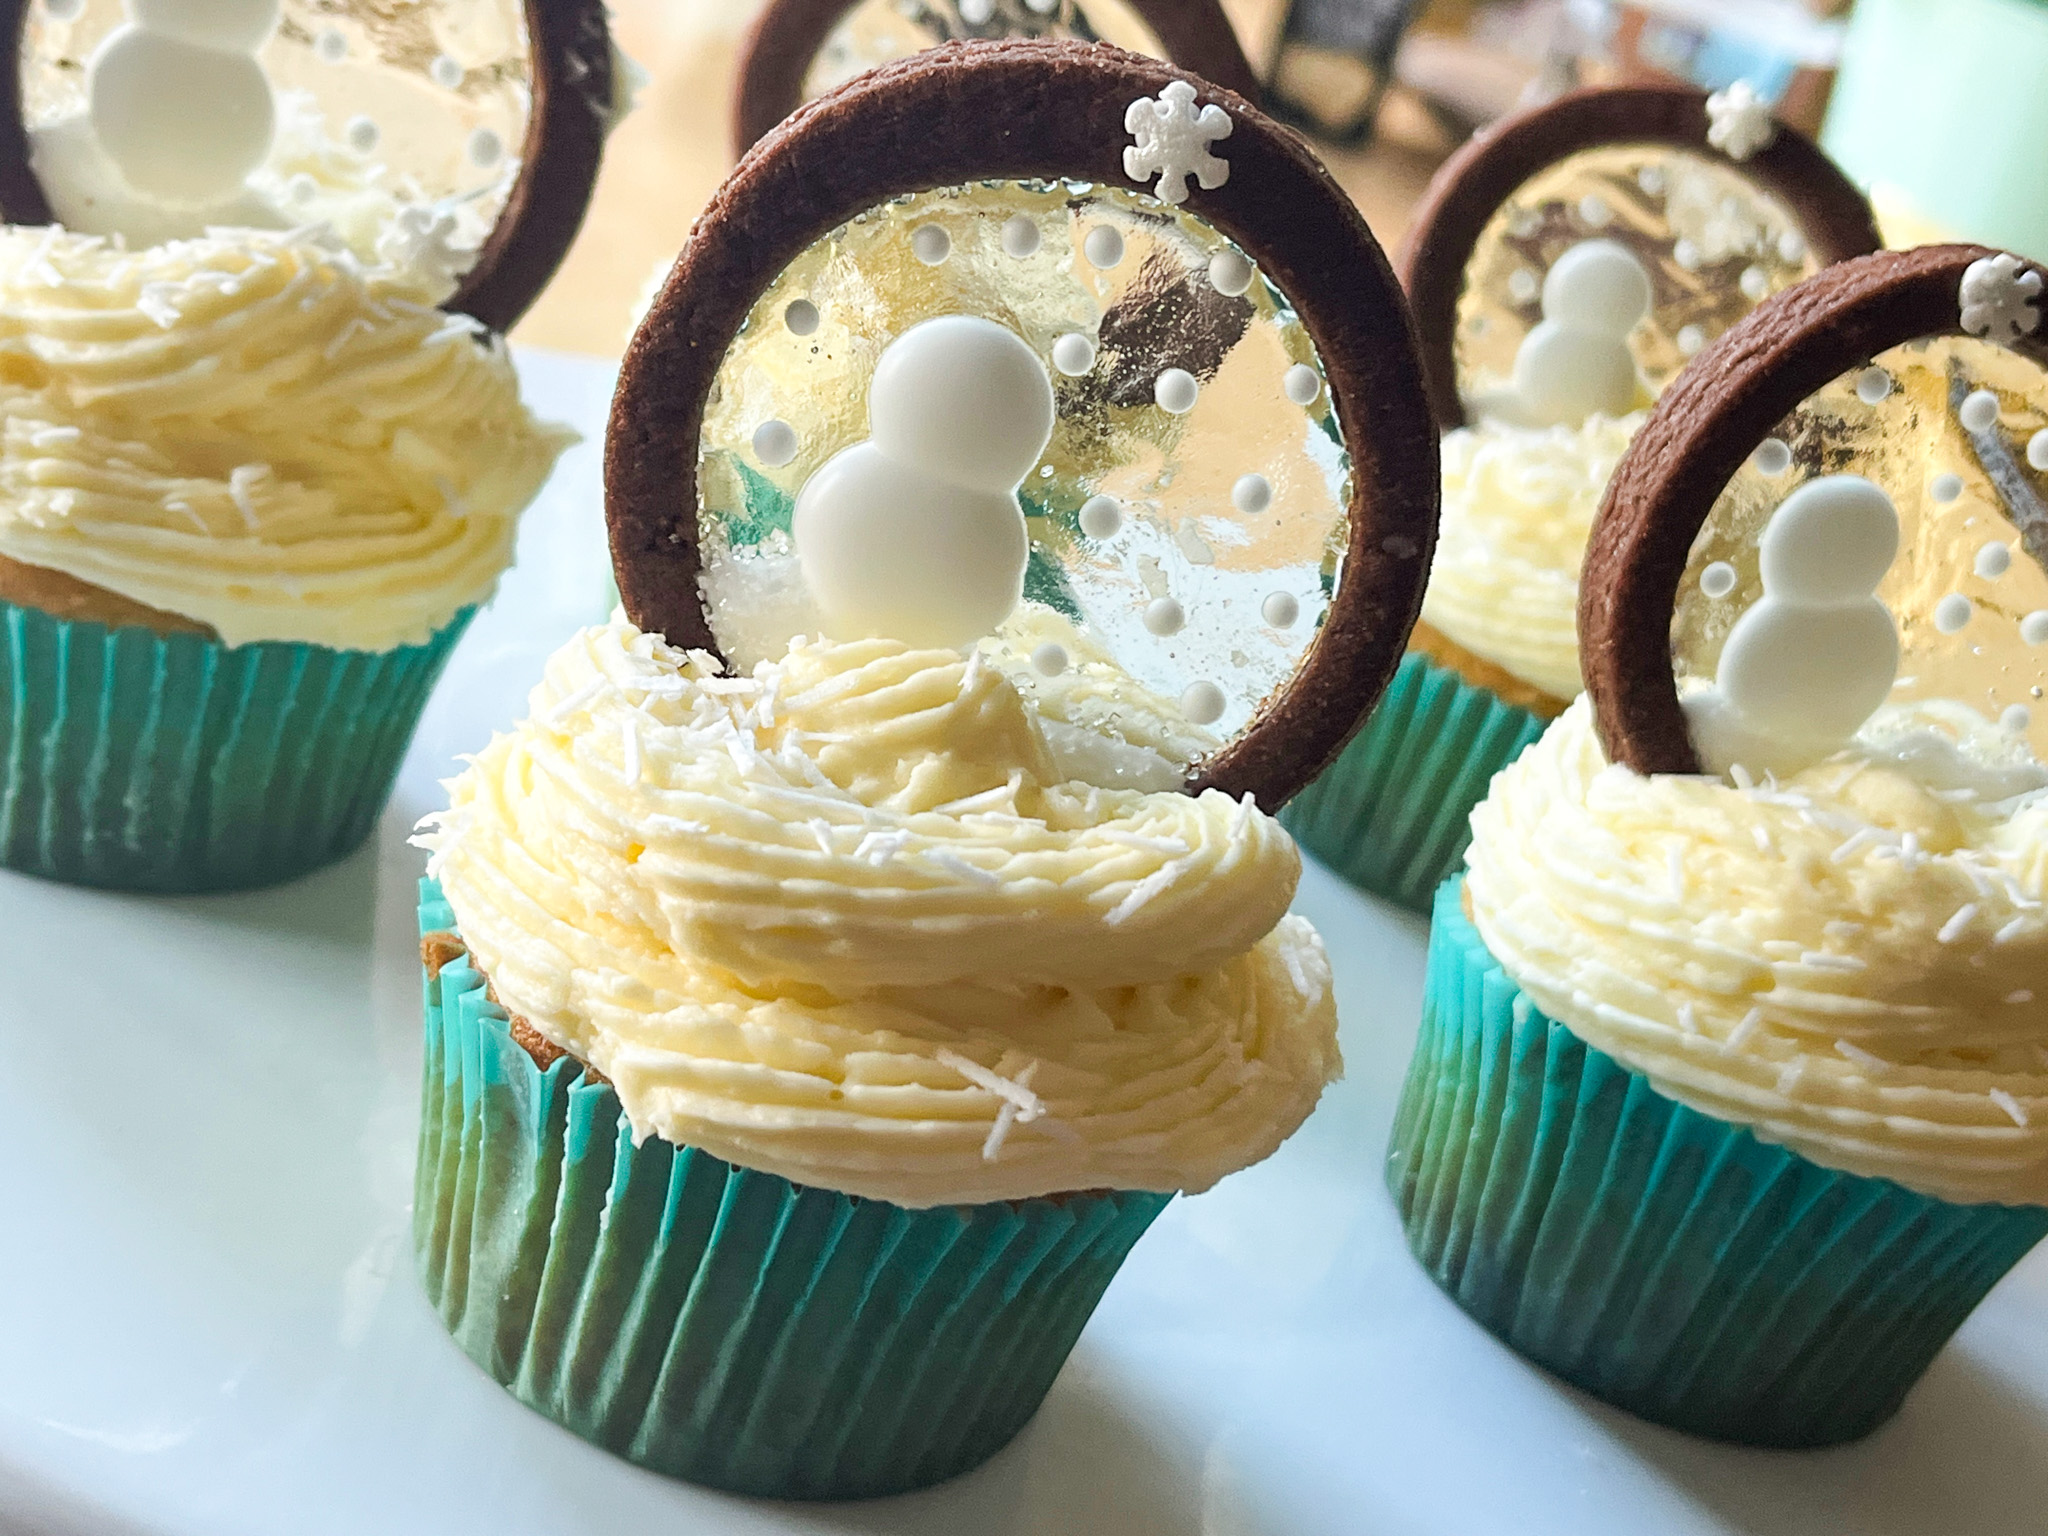
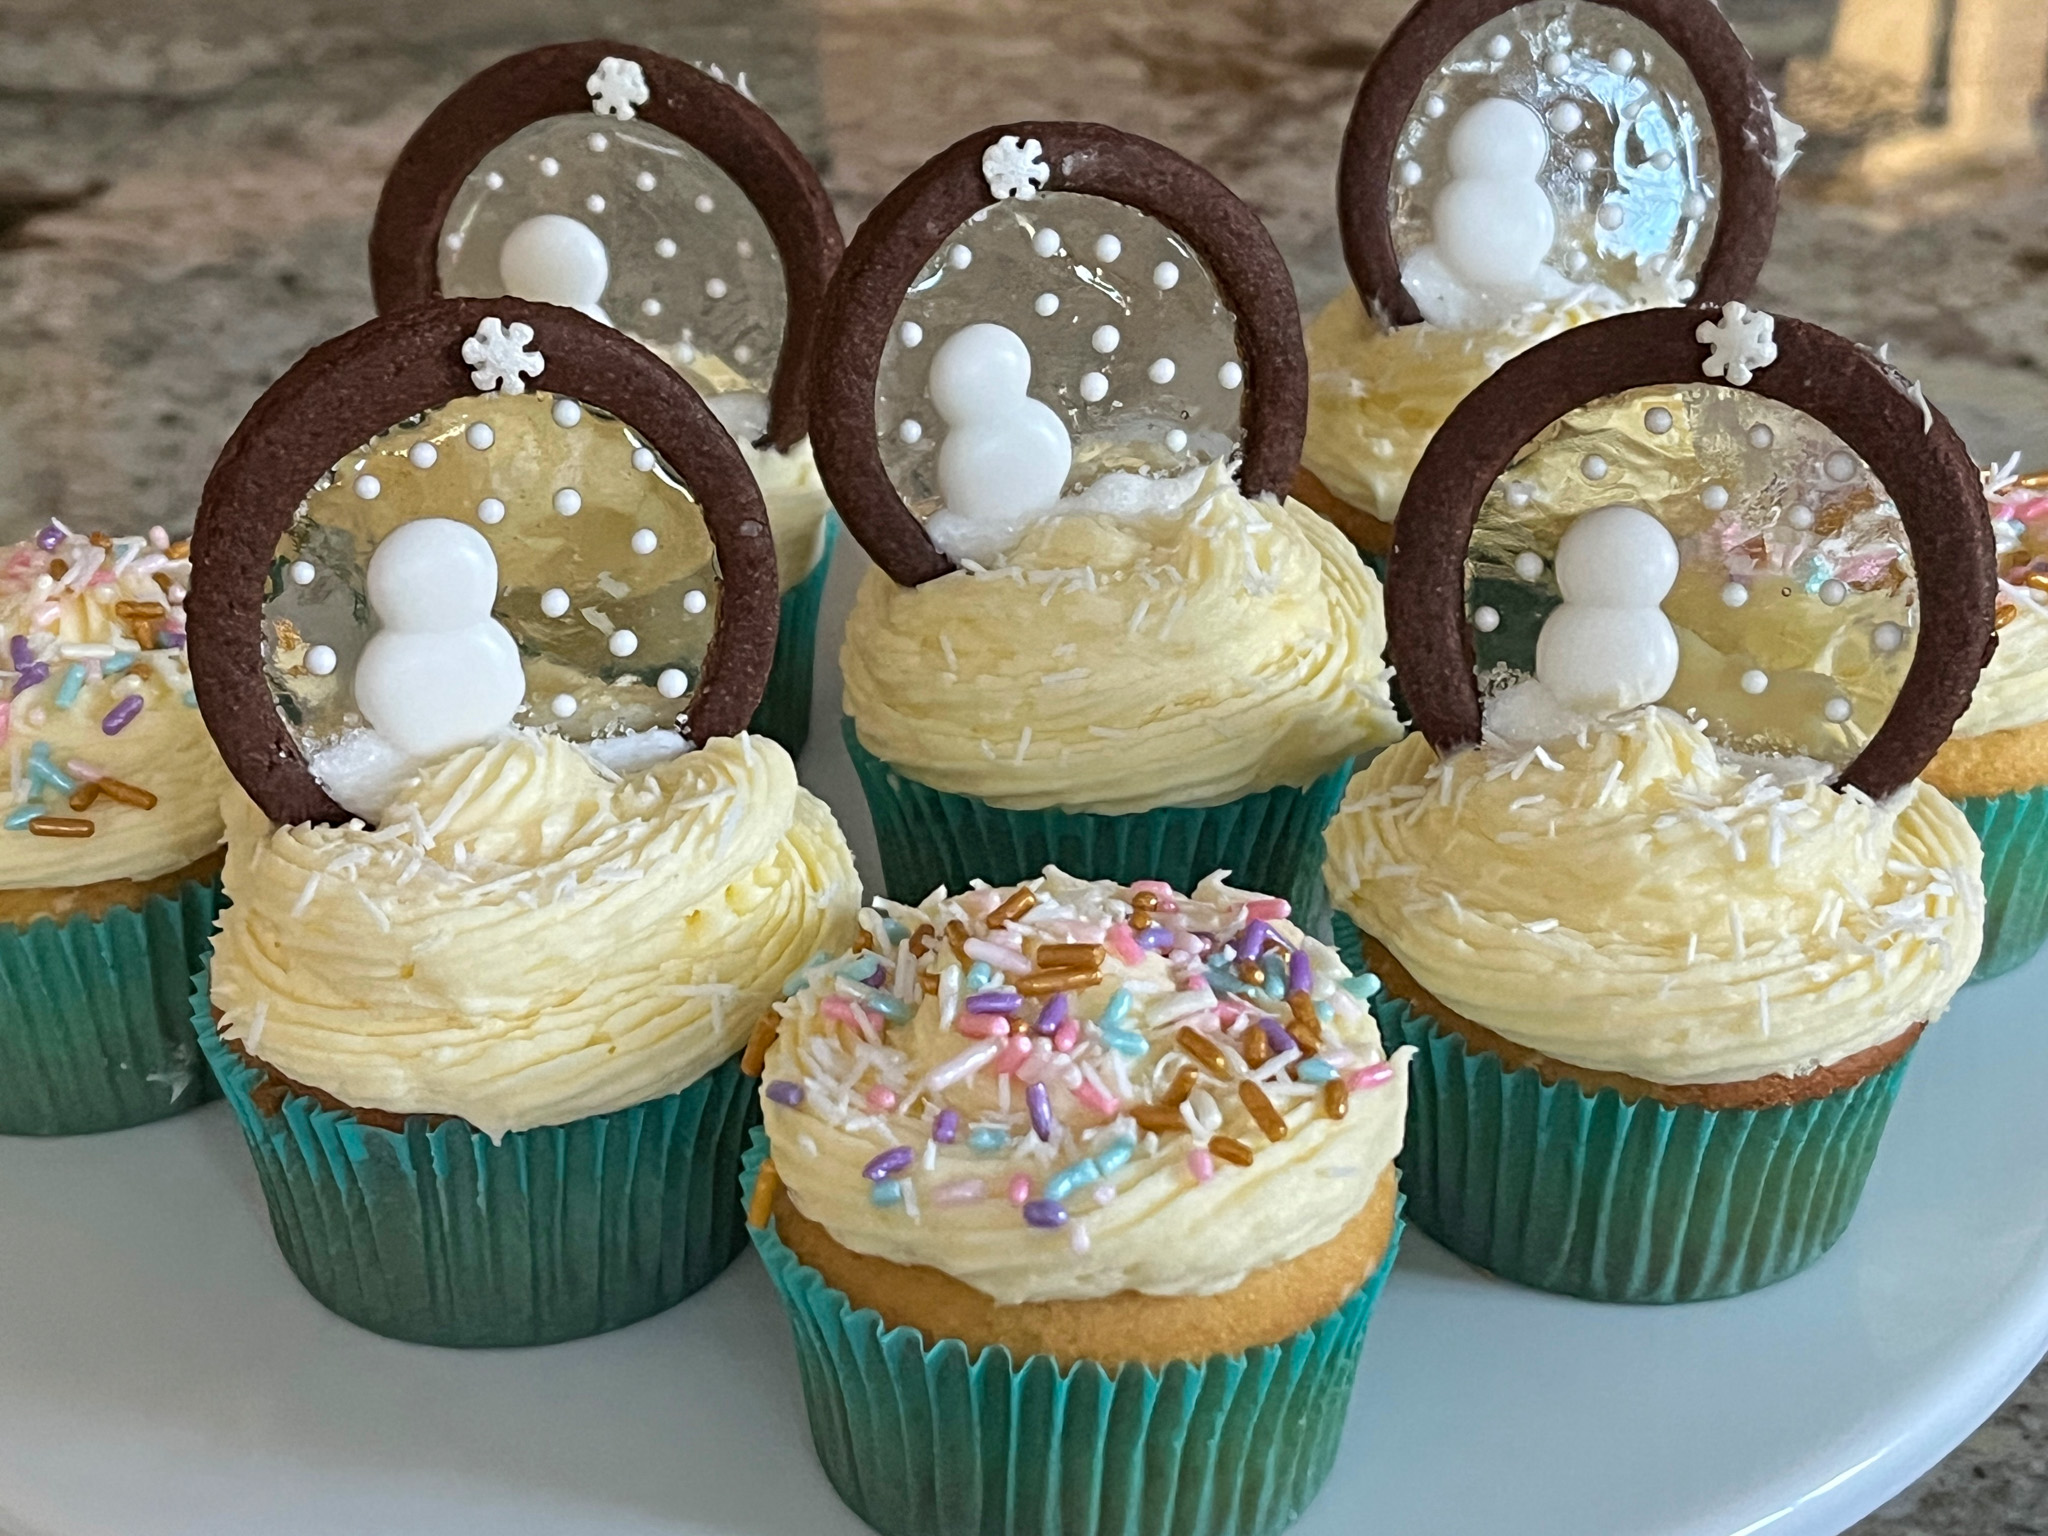
FROSTED COCONUT CUPCAKES WITH SNOWMAN COOKIE DECORATION
(adapted from several sources, inspired by Constellation Inspiration)

For the cupcakes (makes 12):
170g cake flour
1 tsp baking powder
1/4 tsp baking soda
1/4 tsp salt
113g butter at room temperature
200g sugar
1 tsp vanilla extract or paste
80g egg whites
90g sour cream
85g coconut milk

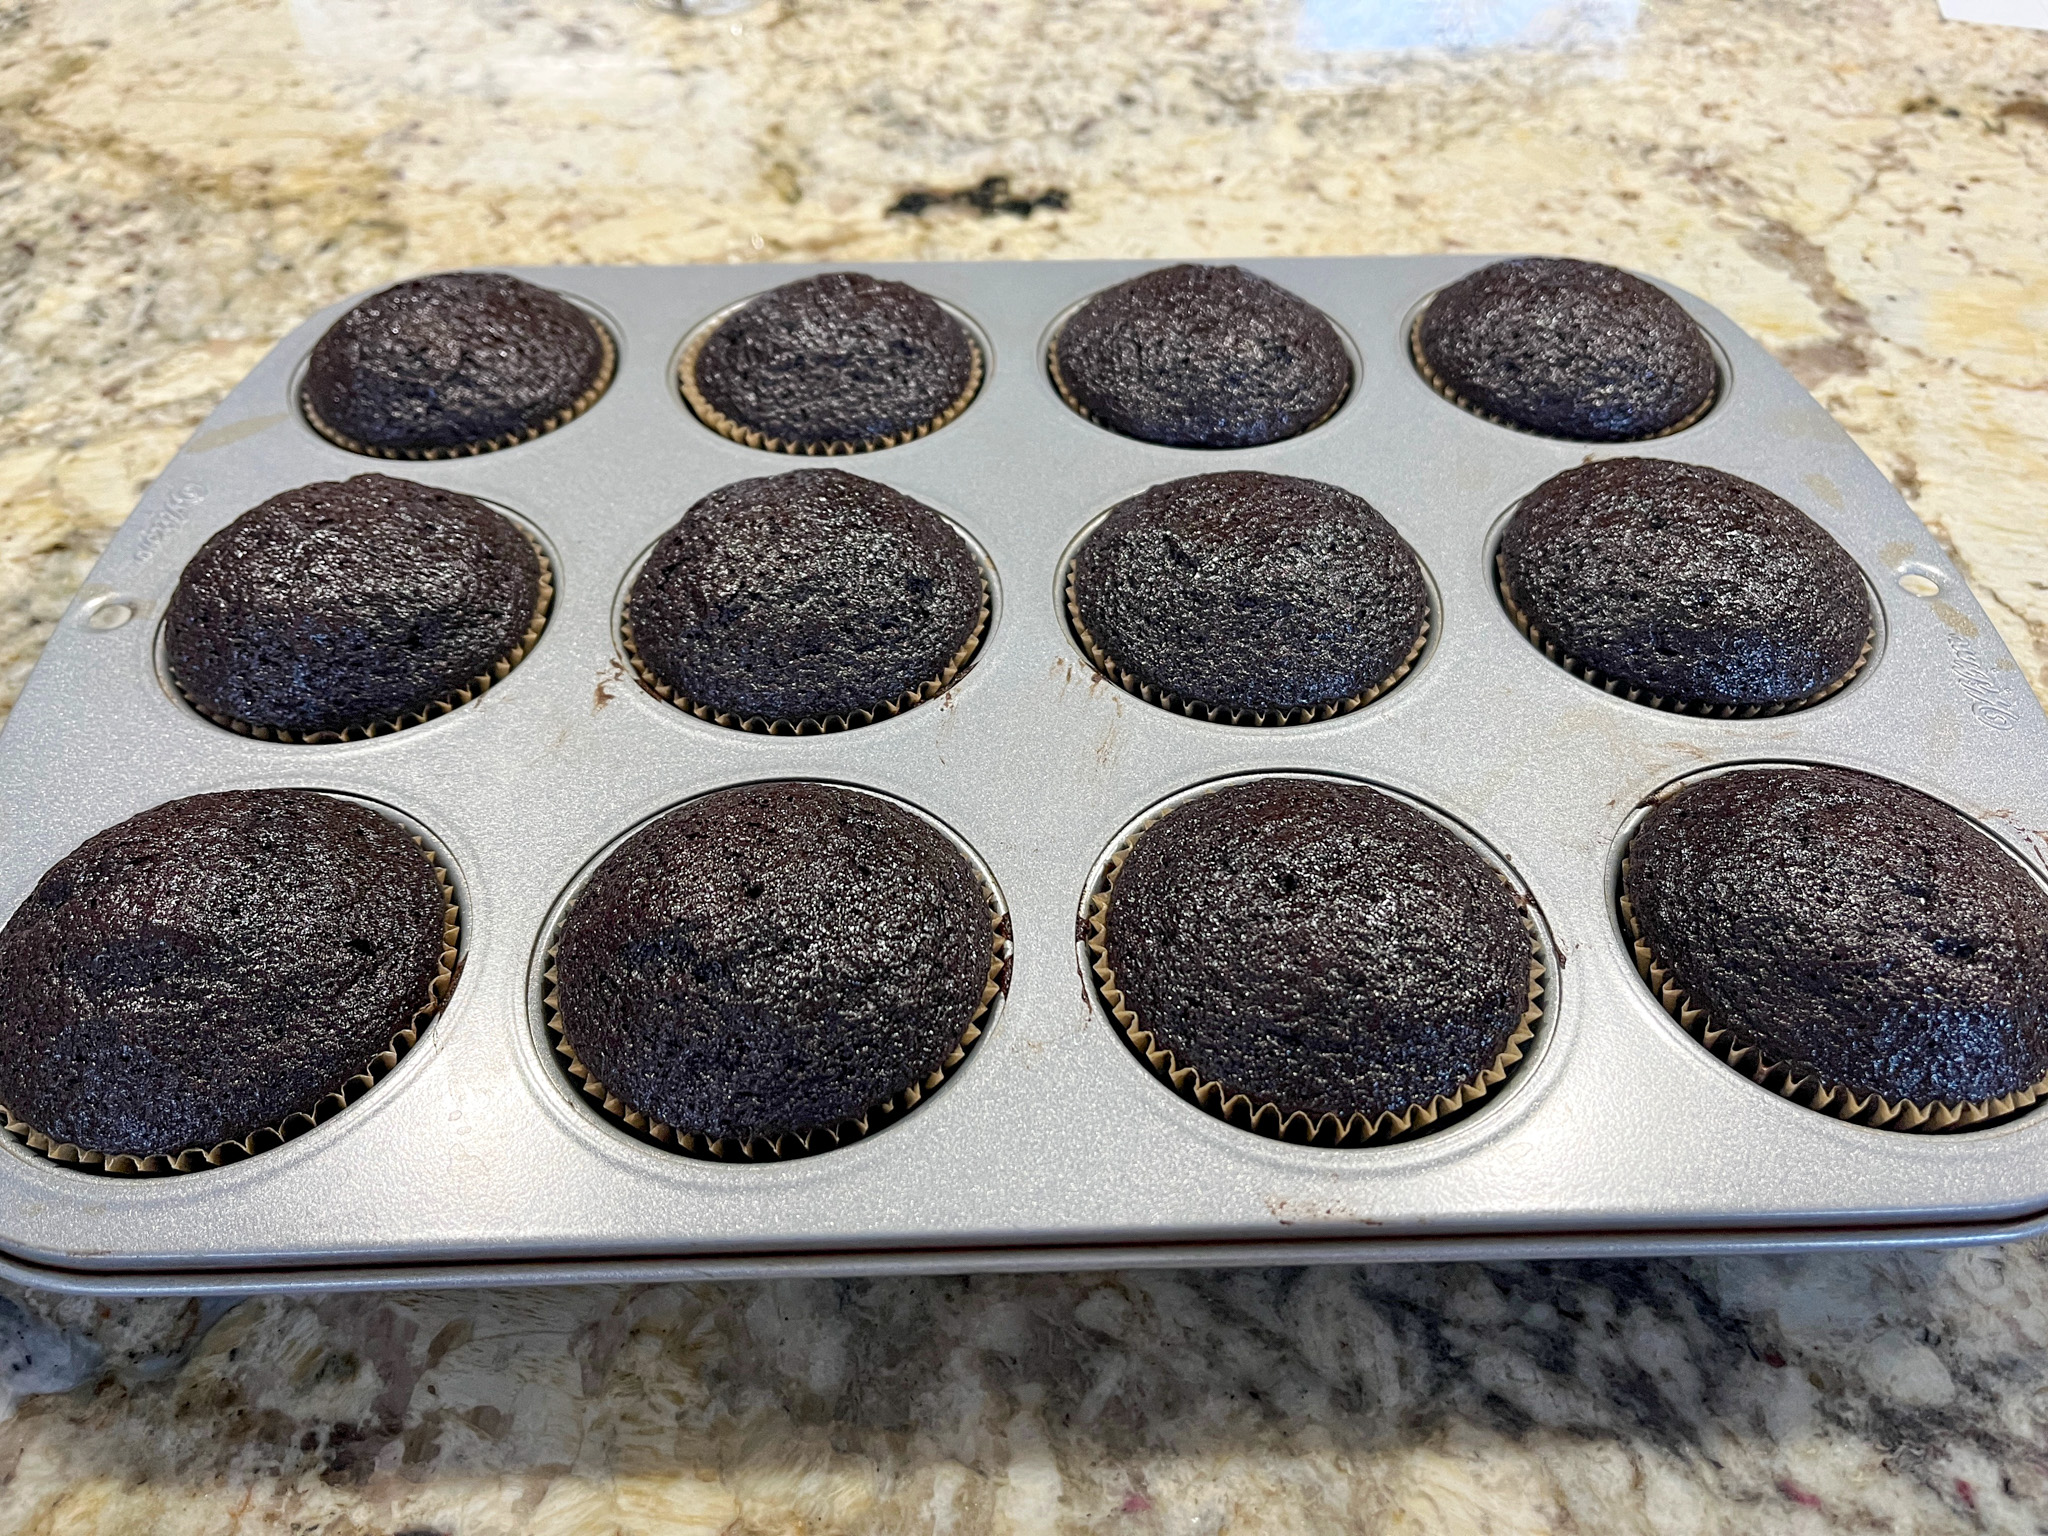
Heat oven to 350F. Make sure that the butter, egg whites, coconut milk and sour cream are at room temperature. Fill a cupcake pan with paper liners. Reserve.

Sift the cake flour baking powder, baking soda and salt. Reserve. Cream butter and sugar with the paddle attachment of a KitchenAid type mixer for about 5 minutes. Add vanilla to the egg whites and slowly pour into the creamed butter/sugar, continuing to mix and medium-low speed. Mix the coconut milk with the sour cream, then add to the mixer 1/3 of the reserved dry ingredients, 1/2 of the milk/sourcream, followed by 1/3 of the dry, 1/2 liquids, and finally the remaining amount of dry ingredients.

Place in the lined cupcake pan. Bake for 22 to 25 minutes, until a toothpick inserted in the center comes out clean. Allow the cupcakes to cool completely before frosting.

COCONUT BUTTERCREAM
(from Tanya Ott)

1 cup butter, softened
3 cups powdered sugar
1/4 cup coconut milk

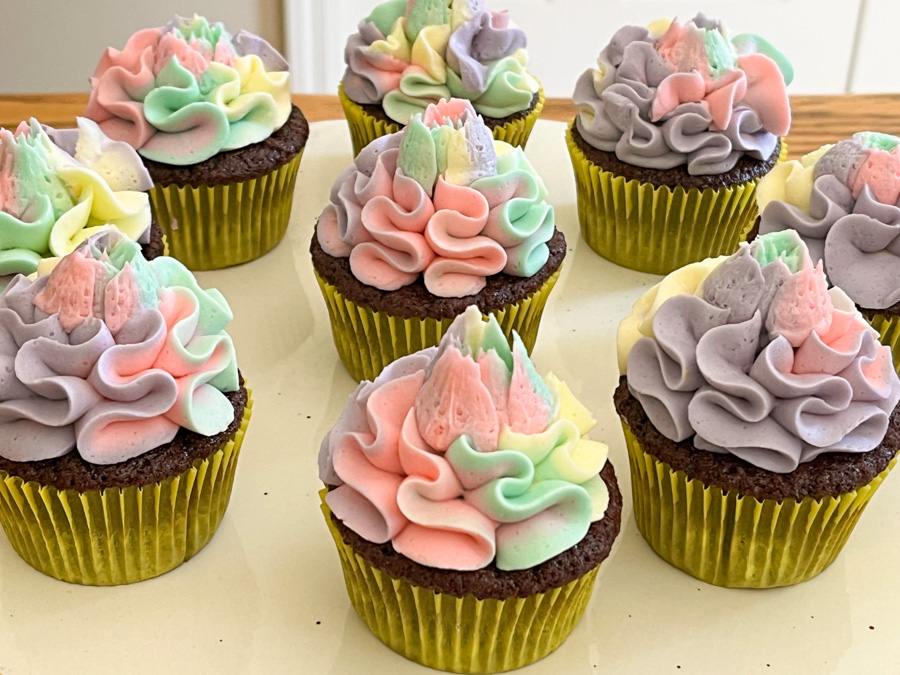
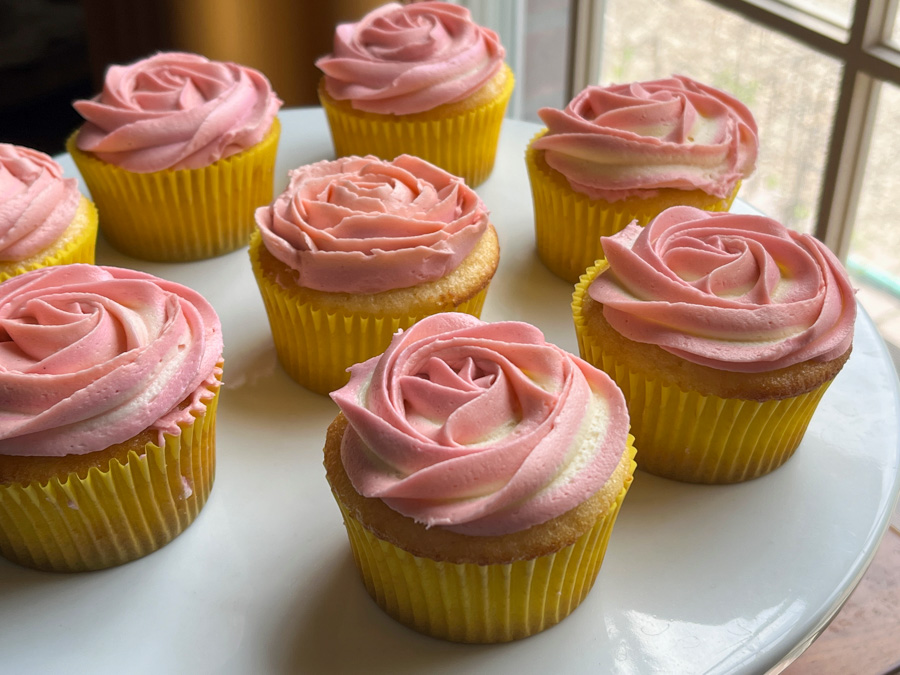
Whisk the butter with a Kitchen Aid type mixer and the paddle attachment for about 4 minutes. Add the powdered sugar in three batches, continue beating in medium-speed. Add the coconut milk, beat at medium-high for 2 minutes or so. Adjust consistency with powdered sugar if needed. Frost the cupcakes once they are at room temperature and immediately stick a snowman cookie on top.

SNOWMAN DECORATION

Bake rings of chocolate cookie dough small enough to fit over the cupcake. They will be fragile. Try to make them smaller than the ones I made, so they will have an easier time standing up on the frosted cake.

Once the rings are baked, use this recipe (minus the food gel color) to make the stained glass component. Pour inside the rings, let them set. Use Royal icing to create a snowy scene with a snowman.

ENJOY!

to print the recipe, click here

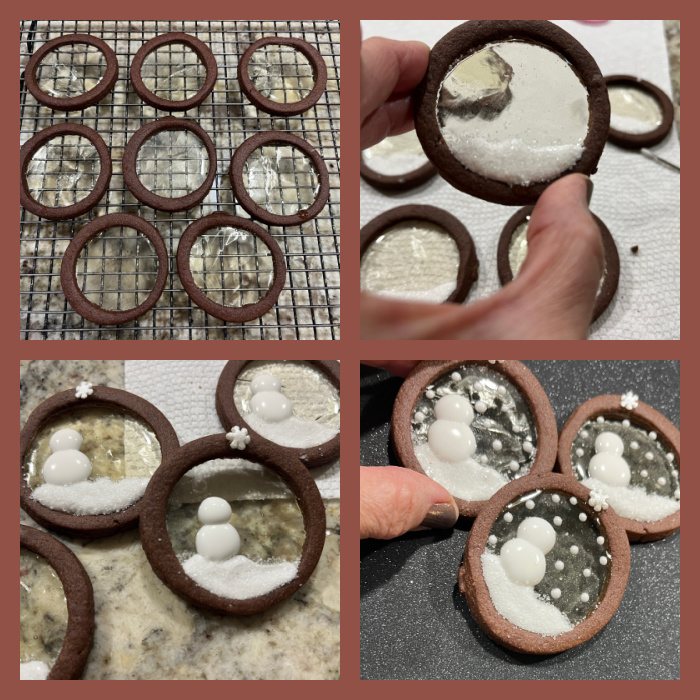
Comments: I absolutely loved making the stained-glass component with the snowman. You can do that a couple of days in advance, store at room temperature. They hold well. I made mine slightly too big, and at first I thought they would never stand up, but with “a little bit extra frosting” they did stay happily up. Consider decreasing the size a bit. Or, if you don’t mind the extra frosting, just go big!

The decorations matched very well our current situation in Manhattan, Kansas, aka The Little Apple.

We expect that by this weekend the snow will finally melt in our surroundings. It’s been a tough month of January. For too many reasons. Baking is keeping me reasonably sane. Or so everyone arounds me hopes.

ONE YEAR AGO: Mexican Bolillos

TWO YEARS AGO: Brazilian Style Banana Cake

THREE YEARS AGO: Tiger Shrimp in Chili Sauce

FOUR YEARS AGO: Tangzhong Hamburger Buns

FIVE YEARS AGO: Potato Soup with Spicy Shrimp

SIX YEARS AGO: Rose-Harissa Chicken Thighs

SEVEN YEARS AGO: Caramel-Chocolate Tartlets

EIGHT YEARS AGO: Chicken Korma-ish

NINE YEARS AGO: Sunday Gravy with Braciola

TEN YEARS AGO: In My Kitchen, February 2015

ELEVEN YEARS AGO: Avocado and Orange Salad with Charred Jalapeno Dressing

TWELVE YEARS AGO: Green Olive, Walnuts and Pomegranate Salad

THIRTEEN YEARS AGO: Romanian Flatbreads

FOURTEEN YEARS AGO: Ziti with Artichokes and Meyer Lemon Sauce

FIFTEEN YEARS AGO: Blasted Broccoli, Stove-top version

CHOCOLATE CUPCAKES WITH PEANUT BUTTER FROSTING

Such a classic bake, and so simple!

CHOCOLATE CUPCAKES WITH PEANUT BUTTER FROSTING
(from The Bewitching Kitchen)

120 grams (1 cup) all-purpose flour
50 grams (1/2 cup + 2 Tablespoons) natural cocoa powder
225 grams (1 + 1/8 cups) granulated sugar
1 teaspoons baking powder
1/2 teaspoon baking soda
1/2 tsp Kosher salt
85 grams (about 1/2 cup) grapeseed oil
2 large eggs, room temperature
2 teaspoons vanilla extract
75 grams (1/3 cup) milk, room temperature
170 grams (3/4 cup) very hot water

Makes 12 cupcakes. Use paper liners in your pan.

Heat oven to 350F.

In a large mixing bowl, add the flour, cocoa powder, granulated sugar, baking powder, baking soda and salt. Whisk very well to fully combine the dry ingredients.

Add the oil into the mixing bowl and mix on medium speed with a hand mixer until well combined. Add the eggs and vanilla extract to the bowl and continue mixing until smooth.

With the mixer still running, slowly pour in the milk and then the hot water. Continue mixing until everything is evenly incorporated, the batter will be super thin, do not worry about it. Place the batter in cupcake pan and bake until toothpick inserted in the center comes clean. This will take 20 to 25 minutes, but check a couple of minutes earlier. Cool completely before frosting.

PEANUT BUTTER FROSTING

113 grams (1/2 cup) unsalted butter, room temperature
175 grams (1/2 cup) smooth peanut butter (Jiffy works great)
210 grams (1 + 3/4 cup) powdered sugar
1 teaspoons vanilla extract
1/4 teaspoon kosher salt
2 to 3 tablespoons of milk to adjust consistency

In the bowl of a stand mixer fitted with a paddle attachment, beat the butter and peanut butter on medium speed for about a few minutes, until fluffy. Scrape down the sides and bottom of the bowl.

Add the powdered sugar and salt into the mixing bowl and start mixing on low until the sugar starts to combine with the butter. Turn the mixing speed up to medium-high and beat for about 3 minutes until the mixture is light and fluffy. Mix in the vanilla extract. Add milk to adjust the consistency. If not using immediately you can refrigerate for several days. Bring back to room temperature and whip again before using to frost the cakes.

Use a piping tip like Wilton 1M if you like to make a rose pattern on top. Spraying gold is optional but nice…

ENJOY!

to print the recipe, click here


Comments: I love this cake recipe so much because it is simple, straightforward and always works. You can use hot coffee instead of hot water, but I tend to simplify it and just grab water from the tap, as hot as I can get it. I know many people prefer Swiss buttercream frosting but I donate the cupcakes and not knowing how long they will sit waiting, I rather use a sturdier buttercream, which is also much simpler to prepare. If you are a peanut butter/chocolate lover, this cupcake is for you!

ONE YEAR AGO: Incredibly Simple, Times Four

TWO YEARS AGO: Zucchini-Prosciuto Parcels

THREE YEARS AGO: Double Peanut Sourdough Loaf

FOUR YEARS AGO: Fennel-Rubbed Shrimp in Light Coconut Sauce

FIVE YEARS AGO: Puff Bread Balls, Two Salads and a Cookbook Review

SIX YEARS AGO: Pistachio-Caramel and Apple Mousse Cakes

SEVEN YEARS AGO: La Couronne Bordelaise

EIGHT YEARS AGO: A Special Birthday Dinner

NINE YEARS AGO: Duck Confit for a Special Occasion

TEN YEARS AGO: Tuscan Grilled Chicken and Sausage Skewers

ELEVEN YEARS AGO: Celebrate Wednesday with Pork Tenderloin & Apples

TWELVE YEARS AGO: Salmon Wellington

THIRTEEN YEARS AGO: The Green Chip Alternative

FOURTEEN YEARS AGO: Weekend Pita Project

FIFTEEN YEARS AGO: Let it snow, let it snow, eggs in snow

ROLLED BUTTERCREAM

I am super excited to share this recipe, something I had never tried before and it is great not just for cupcakes, but also for cookie decorating. In fact, I have a post right now in my cookie blog using this exact recipe in several different ways. I would love a visit, so if interested, click here.

ROLLED BUTTERCREAM
(slightly modified from recipe and detailed video tutorial available here)

2 sticks (1 cup), soft butter
3 TBS. cornsyrup
1 tsp vanilla extract
1/4 tsp lemon extract
1 tsp. white gel color
2 lbs. powdered sugar

Beat all ingredients together in a KitchenAid type mixer with a paddle attachment until it comes away clean from the sides of the bowl. It should feel like soft play dough. Turn out and wrap with plastic wrap. Let rest or use right away. Store unused dough wrapped in the fridge(up to 3weeks). Freeze for 3 months. It warms immediately in your hands as you work with it.

Roll out in the thickness you need, and place a mat with any kind of design over it, rolling gently with a rolling pin to get the impression on the buttercream. You can dust it lightly with cornstarch if needed. Cut to fit the top of your cupcakes. Place o the cupcake with a little bit of buttercream or a light brushing with simple syrup as glue.

ENJOY!

to print the recipe, click here

Comments: This rolled buttercream feels a lot like fondant as you work with it, but it tastes much better, and in some ways I believe it handles better too. Fondant can crack easily if it gets too dry, I felt rolled buttercream to be more forgiving. You can roll it thin and simply cover the cupcake, bringing the edges all the way to the sides, but I liked the look of the layer sitting on top with the edges cut flush with the cake. See which way you prefer.


For these cupcakes, I sprayed the surface of the buttercream with PME luster. You can also paint it or color it as you would a normal buttercream or fondant. In my cookie post, you will be able to see several ways to work with it, and they can all be adapted to cupcakes.

If you visit Pam Kennedy’s youtube channel, you’ll see that she has many video tutorials and recipes for cookies, icings, and cookie decoration techniques. Fantastic source of information, I recommend you start following her. All her videos can be found here at Pam Kennedy Bakes.


ONE YEAR AGO: Miso-Ginger Turkey Meatballs with Cabbage “Noodles”

TWO YEARS AGO: Smoked Shrimp Tacos with Roasted Jalapeño Salsa

THREE YEARS AGO: Corn Fritters

FOUR YEARS AGO: Minnie Macarons

FIVE YEARS AGO: Air-Fried Mexican Meatloaf

SIX YEARS AGO: Mimi’s Sticky Chicken, a Call from my Past

SEVEN YEARS AGO: Perfect Soy-Grilled Steak

EIGHT YEARS AGO: The Devil’s Bread

NINE YEARS AGO: Heart of Palm Salad Skewers

TEN YEARS AGO: Potluck Frittata and Lavoisier

ELEVEN YEARS AGO: Home-made Corn Tortillas

TWELVE YEARS AGO: Whole-Wheat Spaghetti with Peanut Sauce

THIRTEEN YEARS AGO: Brigadeiros: A Brazilian Party!

FOURTEEN YEARS AGO: Lemony Asparagus

HELLO THERE, CUPCAKE!

For several months now I’ve been including cupcakes in my weekly box of donations. I try to vary the buttercream component and come up with different styles and colors each Friday. Because variety is the spice of life, right?

.

You can find my buttercream recipe with a click here. I used it for all cupcakes, except the Chocolate Cardamon with Espresso Icing.

.

RUSSIAN ICING TIPS

A long, long time ago I tried my hands at these funky looking icing tips, and promised that I would never touch them again. But trust Marlyn from @montrealconfections to make me change my mind. She had a nice video from years ago showing exactly how to use them, and I could not resist giving it a second chance (check it out here). She demonstrated two ways to using them, and I tried them both. First, the usual piping of flowers by dropping little blobs of two-color icing. If the consistency is just right, it works like a charm…

For these I used two color buttercream icing, half dyed pink, half left with no added color. The Russian tip was used to drop 6 tiny roses to the cupcake. A little buttercream dyed green added the final touch, which is of course optional.

This fun ruffled look is also given by a Russian ball-tip, piping and twisting the cake from one side to the other. Check Marlyn’s video to see exactly how it is done. The central portion is then filled with a drop flower as in the previous cake.

.

SIMPLE ROSES


Probably one of the simplest designs to pipe but with a nice visual effect, the 1M tip never disappoints. It looks nice when used with two tones of icing, but as you cam see below, it will work as a single color also.

The cupcakes above used a wonderful recipe from my friend Caroline, which you can find in her blog with a click here. Chocolate Cardamon Cupcake with Espresso Icing (OMG!). I added a little chocolate flower, made by painting tempered chocolate over a real leaf and then dusting with golden powder.

.

OPEN STAR TIP

For this look I used the Ateco 865 tip, but any open star should work. Just make a swirl starting from the center. It will give a more flat top that is nice coupled with any decorations you’d like. Above I used tempered chocolate painted on transfer sheets to add a design, and cut into small circles.

The same type of frosting will also go well with meringue sticks, in this case leftover from a cake of my recent past.

These cupcakes are Pink Lemonade flavor, and I used this recipe from Food Network (I made only half which was more than enough for 12 cupcakes).

.

SPRINGTIME FLOWERS

For the cupcakes above, I used either a petal tip or a Wilton tip #81, as shown in this video (around 19 minutes).

.

Petal tips such as 102, 103 or 104 can also make beautiful flowers by laying them more flat on the surface. I like the simple elegance of a fully white flower.

I hope you’ve found some inspiration in case you need to bake a batch of cupcakes to share with friends, family, or co-workers.

ONE YEAR AGO: Two Deliciously Refreshing Cucumber Salads

TWO YEARS AGO: Grilled Shrimp with Parsley Oil over Black Rice Noodles 

THREE YEARS AGO: Chicken Shawarma, the Easiest Way

FOUR YEARS AGO: Marshmallow Macarons

FIVE YEARS AGO: Mango-Lime Macarons

SIX YEARS AGO: Honey-Glazed Sriracha Meatballs

SEVEN YEARS AGO: Slow-cooker Braised Lamb Shanks

EIGHT YEARS AGO: How about some coffee with your steak?

NINE YEARS AGO: Celebrate Wednesday with a Spiral Kick

TEN YEARS AGO: Carrot Flan with Greens and Lemon Vinaigrette

ELEVEN YEARS AGO: Granola Bars

TWELVE YEARS AGO:  Awesome Broccolini

THIRTEEN YEARS AGO:  A Twist on Pesto

FOURTEEN YEARS AGO: Ciabatta: Judging a bread by its holes

FIESTA BAKES FOR CINCO DE MAYO

A small collection of goodies, all inspired by a Mexican fiesta… Cupcakes, Chocolate-Chipotle Cookies, Macarons (filled with Mexican chocolate ganache), and Chocolate-covered Oreos.

FIESTA CUPCAKES

Any vanilla cupcake recipe (or chocolate) will work. Refer to this post for the buttercream, which was divided in two unequal portions: a larger portion dyed pink, and a smaller portion dyed orange. Then, a petal tip like 102 was used to add the icing in layers, as shown below. Any combination of colors will work, this one seemed appropriate for the Cinco de Mayo theme.


CHOCOLATE-CHIPOTLE COOKIES

I am so smitten by these! Not at all complicated to put together, start with your favorite chocolate cookie recipe (mine is definitely this one), paint with Americolor white before baking to get the crackled effect. Then use Royal icing dyed with flesh tone or ivory to pipe a round for the face. Use any colors you want to make the wavy decorations. Once that sets, you can paint the face and hair, add the arms, and you are done. You can see the steps below.

They make for a real fun set, and will please those who prefer a modest amount of icing on their cookies.

Many colors will work, and I also made a batch with sugar cookies instead of chocolate, with a pink and orange skirt.


MEXICAN CHOCOLATE MACARONS

For these macs, I used my default French meringue method (recipe here), divided the batter into three portions, a large pink, a medium size yellow, and a smaller orange. Piped a circle of pink, went with yellow in the center, then orange to form three concentric circles. Baked the shells and decorated with Royal icing. The ganache was made with


4 oz semisweet chocolate
1/4 cup heavy cream
1/2 tsp cinnamon
a pinch of cayenne pepper


Once the ganache cooled, I whipped it with a handheld mixer for a minute or so. You cannot go too long or the whole thing will turn grainy. You just want to incorporate some air into the ganache.


FIESTA CHOCOLATE COVERED OREOS

These are so much fun to make! I used chocolate transfer sheets cut to fit the inside of the mold, as described in this post. I love this colorful pattern, that would look good also on a white chocolate background.

HAPPY CINCO DE MAYO!

ONE YEAR AGO: Thai-Meatballs Over Wilted Bok-Choy

TWO YEARS AGO: Asparagus with Gunpowder Masala

THREE YEARS AGO: The Home Bakers Collective, April Project

FOUR YEARS AGO: Asian-Style Eggplant Meatballs

FIVE YEAR AGO: Uzbek Flatbread

SIX YEARS AGO: First Monday Favorite – Black Sesame FOUR

SEVEN YEARS AGO: Chocolate Orange Mini-Cakes

EIGHT YEARS AGO: In My Kitchen, May 2015

NINE YEARS AGO: P90X3, a Review of Tony Horton’s Latest Fitness Program 

TEN YEARS AGO: Pasta and Mussels in Saffron Broth

ELEVEN YEARS AGO: Triple Chocolate Brownies

TWELVE YEARS AGO: Shanghai Soup Dumplings

THIRTEEN YEARS AGO: Bite-sized Chocolate Pleasure