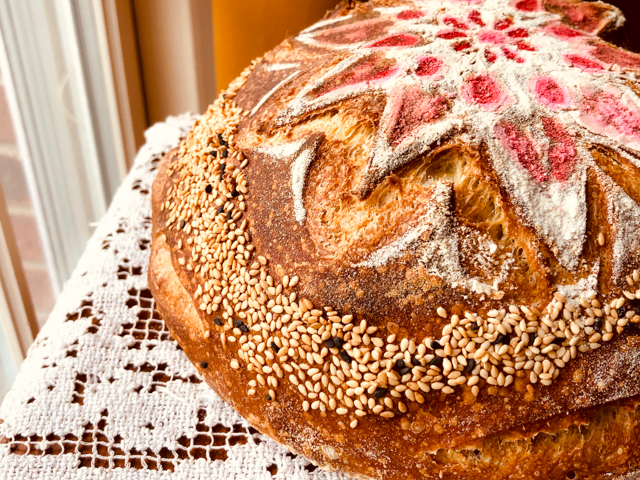
Vadouvan Curry once again joined our sourdough bread. This time I went a little crazy and tried two new things in the same loaf. Inspired by amazing stuff I see on Instagram, I decided to use a stencil, some luster powder, a razor blade, and a little edge decoration with sesame seeds.
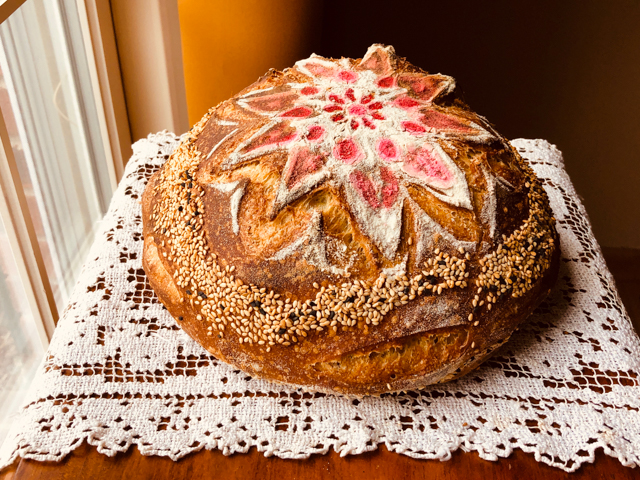
PAINTED CURRY SOURDOUGH WITH SESAME SEEDS
(from the Bewitching Kitchen)
385g white bread flour
16g spelt flour
1/2 tsp Vadouvan curry (or any curry you like)
8g salt
280g water
65g sourdough starter at 100% hydration
optional for decoration:
egg white + a little water (egg wash)
sesame seeds (I used a mixture of white and black)
luster powder + vodka
Make the levain mixture about 6 hours before you plan to mix the dough. It should be very bubbly and active.
When you are ready to make the final dough, place the water in the bowl of a KitchenAid type mixer and dissolve the starter in it, mixing with a spatula briefly, then add the two types of flour, the curry and the salt. Turn the mixer on with the hook attachment and knead the dough for 4 minutes at low-speed all the time. If the dough is too sticky, add 1/4 cup flour, you want the dough to start clearing the sides of the bowl, but still be sticky at the bottom.
Remove from the machine, and transfer to a container lightly coated with oil, cover lightly with plastic wrap and allow it to ferment for 4 hours, folding every 45 minutes or so. After four hours bulk fermentation, shape the dough as a ball, and place, seam side up, in a lightly floured banetton. Leave at room temperature one hour, and then place in the fridge overnight, from 8 to 12 hours.
Next morning, heat the oven to 450F. Invert the dough over parchment paper, place your chosen stencil over it, and rub gently white flour on the design. Paint the details with a bright color using luster powder diluted with vodka. You need it to be a bit on the thick side, and don’t worry about precision, it will more or less mix with any flour bits around it. Do not worry. Paint a band around the perimeter of the bread with egg wash and gently press sesame seeds all over it. Slash quickly with a razor blade according to the design of your stencil, so that when it expands in the oven it won’t affect too much the design.
Bake at 450F for 45 minutes, preferably covered for the first 30 minutes to retain steam. Cool completely over a rack before slicing.
ENJOY!
to print the recipe, click here
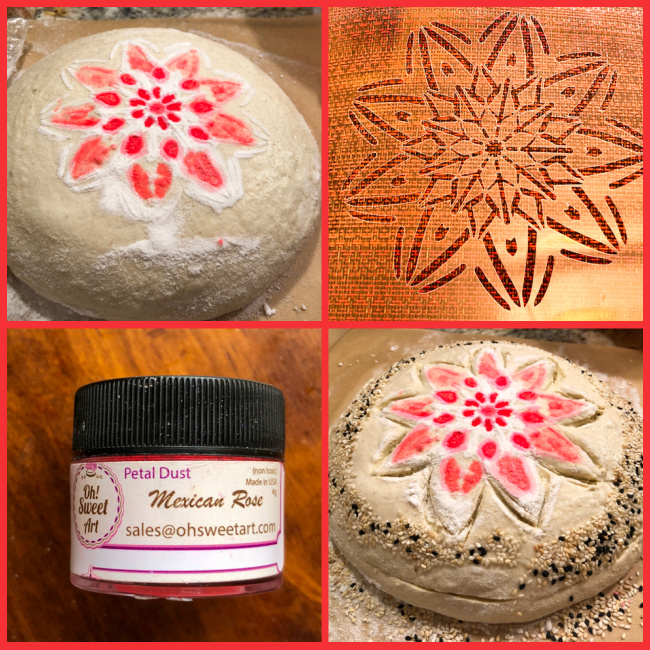
Comments: The trick about painting the surface of the bread is keeping in mind the color will considerably change during baking. If you start with a brown, soft red, or golden, chances are they will almost disappear once the bread bakes. So if you like some contrast, pick something that will be super bright to start with. I used a luster powder called Mexican Rose, and it is wild. But it did bake to a shade I liked and very visible in the bread. Water alone won’ t be enough to stick the sesame seeds in a defined pattern, so use egg white instead.
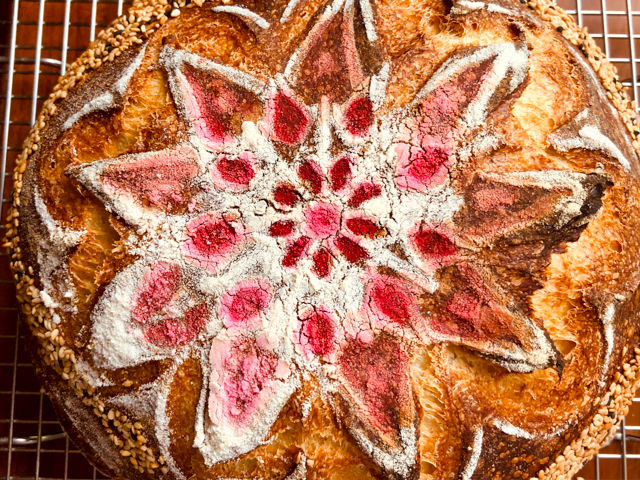
Next I want to try a simple design made with a razor blade and couple it with the luster powder. It was a little tricky to join the stencil (with the required extra amount of flour on the surface) with the paint. But I am still pretty happy with the way it turned out for a first time.
ONE YEAR AGO: Chocolate-Crusted Passion Fruit Tart
TWO YEARS AGO: Lemony Shredded Brussels Sprouts with Almonds
THREE YEAR AGO: Savory Oatmeal with Bacon and Cheddar
FOUR YEARS AGO: Air-Fried Carrots, Two Ways (most popular post on my blog!)
FIVE YEARS AGO: Five Minutes in L.I.T (a tour of our laboratory!)
SIX YEARS AGO: Chicken Thighs with Artichokes and Capers
SEVEN YEARS AGO: Pea Pancakes with Herbed Yogurt
EIGHT YEARS AGO: Mushroom Stroganoff
NINE YEARS AGO: Tomato Sourdough
TEN YEARS AGO: Gamberetti con rucola e pomodori
ELEVEN YEARS AGO: Flirting with Orzo