CHOCOLATE CHERRY MIROIR CAKE: A VEGAN SHOWSTOPPER

Please, do not allow the vegan word to scare you away. This was one of the tastiest cakes I’ve ever made, and I simply cannot BELIEVE it is vegan. The recipe comes from Fran Costigan’s cookbook: Vegan Chocolate, Unapologetically Luscious and Decadent Dairy-free Chocolate Desserts. Ms. Costigan has decades of experience creating dairy-free cakes and concoctions that do not rely on margarine and tofu like most do. As she points out in the introduction of the book, you can always taste margarine in the icing, and tofu will never fail to make a cake heavy. This cake – included in her “Showstoppers” chapter – is a bit involved to make, but one of the things I love about her cookbook is that she lays out a timetable suggesting how you can break the process in stages in a smooth and efficient way. I made the cake, the vanilla custard cream, and the chocolate decorations two days before. Made the mousse, assembled the cake and covered with the glaze the day before showtime. Basically, the cake was ready and waiting in the fridge before we had to take it to a get-together with friends. All that was left to do was add the chocolate decorations. Piece of (vegan) cake!


CHERRY CHOCOLATE MIROIR CAKE
(from Fran Costigan’s Vegan Chocolate)

RECIPE OVERVIEW

1 recipe for Chocolate Torte to Live For (click here), baked in a 9-inch round pan and cooled
(can be made a couple of days in advance)

Other components

Soaked dry cherries

Vanilla Custard Cream: based on cashew cream and coconut milk, thickened with agar-agar

Magic Chocolate Mousse: water-ganache with a touch of olive oil, very interesting and quite tasty version

Mirror glaze: Cherry juice, coconut milk, cocoa, chocolate, agar-agar

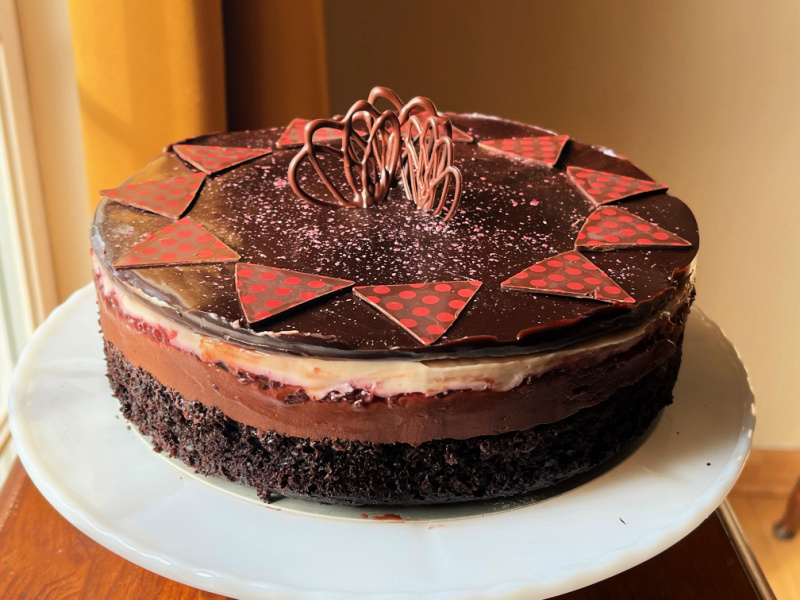
Comments: Vegan baking is not simple. Fran’s book takes that challenge and turns it into art. I don’t think it is right to publish the full recipe for such a complex cake, when so much work and effort went into its design and optimization. But the cake component, which by the way, stands beautifully on its own, can be made according to the recipe she published in her website (click here). In that version, the cake is covered with a vegan ganache and ends up very elegant in its simplicity. It remains as one of her most popular cakes, and having made it, I can understand why.

For the decorations, I tempered chocolate and used some of it to pipe designs on acetate sheet. The remaining I spread over transfer sheets (I get mine usually at bakedeco.com) and before it was fully set I cut small triangles. Fran’s version in the cookbook used fresh cherries covered in tempered chocolate, but they are not in season at the present time, so I went with my Plan B.

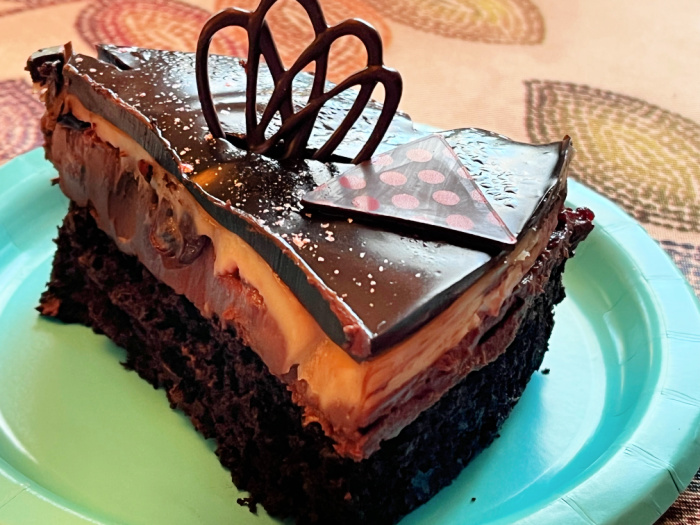
Everything works perfectly well in this cake, I would not change a thing. The cake is intensely chocolate-y, the two mousse components soften the overall taste. I really like the texture of glazes made with agar-agar instead of gelatin, find it a lot easier to work with and more reproducible. Gelatin-based glazes tend to get a bit slimy, particularly if sitting at room temperature for a while.

To get Fran’s cookbook – a must-have if you are into baking adventures – follow this link to amazon.

ONE YEAR AGO: Bee Happy Honey Macarons

TWO YEARS AGO: Episode 7 of Great American Baking Show, Canapes, Opera Cake and Running out of Gas

THREE YEARS AGO: Raspberry Ganache Macarons

FOUR YEARS AGO: Pain au Chocolat

FIVE YEARS AGO: Two Unusual Takes on Roasted Veggies

SIX YEARS AGO: Kadoo Boranee: Butternut Squash Perfection

SEVEN YEARS AGO: Creamy Broccoli Soup with Toasted Almonds

EIGHT YEARS AGO:
 Fennel and Cheddar Cheese Crackers

NINE YEARS AGO: A Festive Pomegranate Dessert

TEN YEARS AGO: My First Award!

ELEVEN YEARS AGO: A Message from WordPress

TWELVE YEARS AGO: Turkish Chicken Kebabs

HAPPY NEW YEAR IN MY KITCHEN!

In My Kitchen posts are hosted by Sherry, from  Sherry’s Pickings. Please visit her site to see what everybody else is sharing this month. I join four times each year, on the first day of January, April, July and October. If you are a food blogger, considering taking part of this fun event. It is chance to share those little things you bought or received as gifts and that make your life in the kitchen easier. 

Starting with gifts… 

From my niece Raquel, all the way from Brazil…

A beautiful pie plate, with incredible blue color! So touched by this gift.

From my future daughter-in-law Courtnie…

A very unique ceramic bowl from an artist in New York, so delicate and elegant! Thank you so much…

From Phil…

A Cricut Air Explorer 2 cutter, which I will use exclusively for stencils to use in my cookies… I’ve been flirting with the idea of getting one for the longest time, so now it is time to face that learning curve and play with it. I have already used it for some cookies recently featured on my cookie blog (see here and here).

From my dear friend Jill…

I cannot think of a better pair of earrings for me! MACARONS! Can you see my big smile when I opened the package? Thank you thank you thank you!

From my dear friend Ines…

We are both quite fond of his show, and I was already planning to get this book, but Ines beat me to it… thank you so much! She also sent us Panforte, the delicacy from Siena, but we destroyed the beauty of it so quickly I could not snap a good picture. That stuff is just amazing!

From my dear friend Christine…

Every year she sends me an AMAZING Christmas card… makes me feel so special… thank you a million times, much appreciated!

From our dear friends Pat and Bill…

A gorgeous plate with the most beautiful painted cardinal, my favorite bird! And a couple of placemats with the same pattern, that matches our dinner plates so very well! Thank you, thank you, thank YOU!

And now, moving on to acquisitions from the past 3 months…

In our kitchen…

This beautiful wooden stand was all alone at Marshalls, and I could not resist rescuing it… Love the patterns and the cream & white motif.

In our kitchen…

Not for the faint at heart, a hot hot hot flavored salt from Spice House, called quite appropriately Vulcan Salt… use sparingly… or NOT! 😉

In our kitchen…

These are smaller than the mini-chips you can normally find in grocery stores. They are perfect to incorporate in cookie dough (I mean in the cookie dough itself before rolling it out). Stay tuned for more on this important subject later.

In our kitchen…

Perfect Palate, a powder flavoring agent I heard about from professional “cookiers” in groups I follow. I decided to give them a try and was very pleasantly surprised. I’ve used all three in buttercream fillings for macarons. A little bit gives a ton of flavor, with no artificial “feel” to it.

In our kitchen…

A new cutter I could not resist, so I could make a festive New Year inspired cookie. Inspired by Haniela, by the way.

In our kitchen…

Two new colors for luster powder, from The Sugar Art. Really lover their products, and with Springerle season starting, I need the right tools for the job…

In our kitchen…

Speaking of color, this was the gift I gave myself for Christmas…. a set of watercolors from Sugarprism, a product released just this past month… So easy to use, you wet the brush and get the colors going. I’ve used exclusively on Royal icing but if you follow Michelle’s Facebook page, you will see many other uses for it, and be able to follow her many free tutorials. She is just amazing.

Here are my first cookies painted with Sugarprism watercolor (I am no Van Gogh, let’s keep that in mind)…

And now, it’s time to introduce a few changes in the In My Kitchen posts.

THE DOG DAYS ARE OVER!!!!!

No more sharing MY spotlight with ingrate canines. All they do is induce chaos, mess, disorganization and grievance. They can get their own blog going. 2022 is the year of change!

FREEDOM FOR THE BEWITCHING KITCHEN!

Perhaps they know me too well. I do have a set of three soft spots in my heart… So yes, I will – reluctantly – allow them to bark their piece. Let’s see what they’ve been up to lately…

First for some big news! BogeyQuitThatTM had his virtual wedding to the lovely Margaret, who barks all the way from California, and – it goes without saying – has a very discriminating taste as far as partners go.

There they are, happy in their virtual honeymoon to Arizona, to visit family. BogeyQT is very big on going bye bye in pickup trucks.

Oscar was a bit jealous, but once he heard he could be what is called “The Best Dog” in that virtual party, he thought justice had been done. Because who else could play that part?

Bogey has a few thoughts on the matter to share with his brother…

As you may remember, Buck has lost most of his hearing, and that changed a bit his personality and the way he interacts with the other pups.

One of the things we need to pay attention is the fact that if Oscar growls at him, he won’t hear, so he does not realize the danger. He has a few scars from altercations with the younger brother, nothing too serious, but we have to be always vigilant.

But even his hearing loss is not enough to guarantee a peaceful night’s sleep in our household….

Buck and Bogey for the most part are best buddies. Quite often they get in a similar wavelength, enjoying a snooze together in almost identical position.

And every once in a while, one of their humans might join the fun…

They are of course also partners in begging…

Whereas Oscar prefers to act solo…

Although, as far as gastronomy is concerned, he has some idiosyncrasies…

Buck prefers food with more political substance….

Speaking of Oscar…

Mr. Burr Magnet strikes again. Arrow points at a region with about 109 needles stuck to his very sexy beard. Of course, cleaning that all up makes us at risk of getting a visit from the Animal Protection Agency, as neighbors 1 mile away will definitely hear his screaming.

That’s all for now, folks… the gang at the Bewitching Kitchen is marching together to embrace the new year that starts, so we take this opportunity to we wish you all..

ONE YEAR AGO: Happy New Year in My Kitchen!

TWO YEARS AGO: Happy 2020 In My Kitchen!

THREE YEARS AGO: Happy 2019 In My Kitchen!

FOUR YEARS AGO: Happy New Year In My Kitchen!

FIVE YEARS AGO: Happy New Year In My Kitchen!

SIX YEARS AGO: In My Kitchen: Happy New Year!

SEVEN YEARS AGO: And another year starts…

EIGHT YEARS AGO: In My Kitchen: January 2014

NINE YEARS AGO: Tacos with Pork in Green Sauce

TEN YEARS AGO:  Maui New Year!

ELEVEN YEARS AGO: Natural Beauty

TWELVE YEARS AGO: Sunflower Seed Rye

CUCCIDATI, FROM TINA TO YOU

Remember Tina, the winner of The Great American Baking Show, season 4? She is still baking up a storm, doing TV cooking demos, sharing recipes on her blog, and interacting with her fans online. She is not only a superb baker, but a wonderful person! One of the great things about that “tent adventure” is that I got to interact with several of the previous contestants, both in the American and the British show. I think once you go through that experience, a surprising bonding takes place. But I digress. Today I share one of Tina’s many Italian recipes from the holiday season: Cuccidati. They are delicious bar cookies, but can you believe that she forgot to add one important step in the recipe? Do not try the filling before using. You may not have enough left…

CUCCIDATI BAR COOKIES
(very slightly modified from Augustina Zaccardi)

Pasta Frolla Dough:
260 Grams of All-Purpose Flour
60 Grams of Granulated Sugar
1/2 Teaspoon of Baking Powder
1/2 Teaspoon of Kosher Salt
114 Grams of Cold Unsalted Butter
2 Large Eggs

Filling:
1/4 Cup of Toasted Almonds
2 Tablespoons of Toasted Pine Nuts (I used sunflower seeds)
1 Cup of Diced Dried Figs (stems removed)
2 Teaspoons of Orange Zest
1/2 Teaspoon of Ground Cinnamon
1/4 Cup of Mini Semi-Sweet Chocolate Chips
2 Tablespoons of Honey
2 Tablespoons of Apricot Preserves
2 Tablespoons of Water
1/2 Teaspoon Rum Extract

Icing:
3/4 Cup of Powdered Sugar
3-4 Teaspoons of Milk
2-3 Tablespoons of multicolored sprinkles

Heat oven to 350 degrees Fahrenheit.

Place the flour, sugar, baking powder and salt into a food processor and pulse about 5 times until combined. Cut the butter into 6 pieces and add to the flour. Pulse 10-15 times until the butter is incorporated and the mixture looks powdery or sandy. Add the eggs and pulse until the dough comes together. Dump the dough out onto a lightly floured surface and knead 5-6 times to form a smooth dough. Divide the dough in half and roll each piece between 2 pieces of parchment paper to an approximately 8” square. The thickness should be about 3/16”. Place both pieces on a cookie sheet and place in the freezer for about 15-20 minutes.

Make the filling: Place the almonds in a food processor and pulse until they are coarsely chopped. Add the remaining ingredients and process until all the ingredients are combined and the mixture is a paste but with still some visible pieces of chocolate and almonds. Set aside. AVOID SAMPLING IT.

Assemble the cookies: Spread the filling as a 8 inch square over plastic wrap over a cookie sheet. Place in the fridge as you prepare the cookie component. Line the bottom of an 8” square pan with parchment paper so that some of the paper overhangs the sides. Remove one piece of the dough from the freezer and trim it into an 8” square or the size of the bottom of your pan. Place it in the bottom of the pan. If the dough softens a bit place it back in the freezer. You want the dough to firm when you spread the filling or it could tear. Carefully lay the filling over the dough, using the plastic wrap to help you out. Gently spread the filling to the edges with a spatula. Remove the second piece of dough from the freezer and trim it to the size of the pan and place it on top of the filling and gently press.

Bake for 23-25 minutes or until the top is a light golden brown.

Remove from the oven and place the pan on a rack to cool. When completely cool, remove the bars form the pan, peel off the parchment paper and place on a board. Mix together the powdered sugar and milk until smooth. Pour the icing on top of the bars and spread with an offset spatula. Scatter the sprinkles over the top. When fully set, cut in diamond shapes or any other shape you prefer.

ENJOY!

to print the recipe, click here

Comments: I tell you one thing, the filling is spectacular. I envision it in small tartlets, bite-size, in a future adventure. It is sweet, nutty, complex. This was my first time making cuccidati, so I was not quite sure if the amount of filling was too much but I am glad with the way it turned out. I used the full amount for the 8-inch square pan. These are cookies perfect for the holiday season, but if you change the color of the sprinkles, it will be a Birthday-Easter-4th of July-Valentine’s-whatever you feel like it cookie. It is that good!

Tina, thank you for the constant inspiration!

ONE YEAR AGO: Festive Macarons to Welcome 2021!

TWO YEARS AGO: Episode 6, Cookies in The Great American Baking Show

THREE YEARS AGO: Brazilian Chicken and Heart of Palm Pie

FOUR YEARS AGO: Roasted Butternut Squash with Walnuts and Tahini Sauce

FIVE YEARS AGO: The Complicit Conspiracy of Alcohol

SIX YEARS AGO: Candy Cane Cookies

SEVEN YEARS AGO: Macarons: Much better with a friend

EIGHT YEARS AGO: Our Mexican Holiday Dinner 

NINE YEARS AGO: The Ultimate Cranberry Sauce

TEN YEARS AGO: Edamame Dip

ELEVEN YEARS AGO: Gougeres

TWELVE YEARS AGO: Beef Wellington on a Special Night

MERRY CHRISTMAS!

I invite you to visit my baby blog for a series of Christmas cookies that close the season…

(CLICK HERE)

STAR-SHAPED SUNDRIED TOMATO BREAD

This is a type of bread we see often this time of the year, because it looks so festive, but it is actually quite simple to make. The filling can be sweet (think Nutella, caramel, raspberry jam) or savory. My version used sundried-tomato and cheese. You can take it in different directions, and it will always turned out great, with that visual impact we love so much, particularly during the holiday season.

STAR-SHAPED SUNDRIED TOMATO BREAD
(adapted from King Arthur Flour)

for the dough:
3/4 cup lukewarm milk
2 teaspoons active dry or instant yeast
360g all-purpose flour, divided
1 large egg
3 tablespoons olive oil
1 teaspoon salt

for the filling:
¾ cup shredded mozzarella
½ cup oil-packed sun-dried tomatoes
1/2 tsp herbes de Provence
½ teaspoon salt

1 egg for egg wash

To make the dough, place the milk, yeast, and 120g all-purpose flour in a large mixing bowl and stir to combine. Cover and let rest for 15 minutes.

Add the egg, olive oil, salt, and the rest of the all-purpose flour. Mix to make a soft dough, then knead for 6 to 8 minutes, until smooth and supple. Place in an oiled bowl, cover, and let rise for about 1 hour, until doubled.

Mix together minced sun-dried tomatoes, salt and herbes de Provence. Reserve.

Divide the dough into four pieces and shape into balls. Cover and let rest for 10 minutes.

Place one piece of dough on a piece of parchment. Roll it into a 10″ circle. Spread ⅓ of the sun-dried tomato mixture on the first layer of dough in an even layer. Sprinkle ⅓ of the cheese, leaving ½” around the outside edge uncovered. Roll out the second ball of dough to the same size as the first. Place it on top of the first circle and repeat the three layers of filling. Again, repeat with the third ball of dough and the last ⅓ of filling. Roll out the last ball of dough and place it on top.

Place a 2″ round biscuit cutter or drinking glass in the center of the dough to serve as a guide. Using a sharp knife, cut the larger circle into 16 equal strips, from the outside edge to the cutter/glass in the center, through all the layers. Using two hands, pick up two adjacent strips of dough and twist them away from each other twice, so the top side is facing up again. Repeat with the remaining strips of dough all the way around the circle. Remove the cutter/glass.

Pinch the ends of adjacent strips together all the way around the bread to create eight star-like points. Transfer the star on the parchment to a baking sheet. Cover with plastic wrap and let rise for about 45 minutes. Dough should look expanded and airy.

Heat the oven to 400F. Remove the plastic wrap and brush the star with a thin coat of the egg wash. Bake for 25 to 30 minutes, until nicely golden. Remove the bread from the oven and cool for 10 minutes before serving.

ENJOY!

to print the recipe, click here

Comments: This is a very rich dough, and a pleasure to work with. Even if you are a beginner at bread baking, the whole process is pretty forgiving. The circles of dough do not have to match precisely, it is all going to get twisted and any little gaps won’t affect the final product.

There are many videos available on youtube to show you how to shape the bread, like this one.

If you are still searching for a nice bread as a centerpiece for your holiday festivities, this is truly a great option…

ONE YEAR AGO: Cranberry White Chocolate Tart

TWO YEARS AGO: I dream of Madeleines and a Tower of Cheesecakes

THREE YEARS AGO: Dominique Ansel’s Chocolate Mousse Cake

FOUR YEARS AGO: Slow-Roasted Eye of the Round Beef

FIVE YEARS AGO: Steam-Roasted Indian-Spiced Cauliflower

SIX YEARS AGO: Creamy Zucchini-Mushroom Soup

SEVEN YEARS AGO: Ken Forkish’s Pain au Bacon

EIGHT YEARS AGO: Carrot and Cumin Hamburger Buns

NINE YEARS AGO: Potato Galettes a l’Alsacienne & Book Review

TEN YEARS AGO: Caramelized Carrot Soup

ELEVEN YEARS AGO: Miso-Grilled Shrimp

TWELVE YEARS AGO: Pain Poilane