BAJRA DOSA

I consider this a work in progress… This was my second attempt, the first was quite catastrophic, if I am to be honest. The recipe, as well as a very detailed video, is available at Naturally Nidhi, a blog I love and always teases me into expanding my cooking horizons. You will need millet flour, and a special skillet - tava is the real thing – but I used a non-stick crepe pan. I loved the flavor and the texture, even if my dosa did not look nearly as perfect and gorgeous as Nidhi’s.

INSTANT BAJRA DOSA
(slightly modified from Naturally Nidhi)

1/2 cup bajra (pearl millet) flour
1/2 cup water
Batter:
1/2 carrot , grated
1 tbsp cilantro , finely chopped
1 green chili , finely chopped
1/4 tsp cumin seeds
1/2 tsp salt , adjust to taste
1 cup water
oil or ghee to drizzle over the dosas while cooking


Mix together the bajra flour and 1/2 cup water. Let this rest covered on the countertop for about an hour. This will help the bajra flour soak up the water and ensure the dosa doesn’t have any cracks. Once soaked, add in the remaining water, vegetables, and spices. Mix well. The consistency of the batter should be thin and runny. Make sure you only add the salt once you’re ready to make the dosas.
Heat a nonstick pan until it is very hot. To check if the temperature is right, sprinkle some water on it and it should sizzle immediately.


Wipe off the water from the tava or crepe pan. Stir the dosa batter to ensure it doesn’t settle, make sure to do this everytime before you transfer it to the pan. Pour about 1/4 cup of the water in a circular motion from about 8 inches above the surface of the pan. You should immediately see a net shape form. If there’s large holes, you can pour a little extra batter to fill the big gaps.


Turn the gas to medium-low flame, pour a tsp of oil or ghee over the dosa, and be patient as you let it become golden brown and crisp. Once you see brown spots on the top of the netting, the dosa is ready. Carefully scrape it from all sides and fold gently.

ENJOY!

to print the recipe, click here
Comments: I first made it with Bob Mill’s millet flour, and that did not work very well, so I tried it again with a different type of flour and had better results. I ordered it here. The pan needs to be very hot when you first add the watery batter, but then, if you are using a crepe pan, make sure to reduce the heat and be patient. Cook it until it is looking dry all the way from edges to center. That will ensure the dosa won’t be doughy and uncooked in the center. And it will fold nicely when you use a spatula to do so. I feel that I need to practice more, but I am a lot more confident after my first failed attempt. Make sure to watch Nidhi’s video that shows exactly how to pour the batter, so that you get a lacy pattern as it cooks. It is not easy to cook something you’ve never had and that is also quite different from the food you grew up with. But I love the challenge!

Make sure to visit Nidhi’s blog, it is a fascinating source of recipes and information…

ONE YEAR AGO: Pecan Sourdough Dressed Up for Party

TWO YEARS AGO: Tiramisu Tart

THREE YEARS AGO: Joy Cookie Club: Valentine’s Day

FOUR YEARS AGO: Uttapam, White Lentil and Rice Flatbread

FIVE YEARS AGO: Valentine’s Day Sweetheart Cookies

SIX YEARS AGO: Fesenjan, Fast-Food Style

SEVEN YEARS AGO: Lavender Macarons with White Chocolate Ganache

EIGHT YEARS AGO: Raspberry Chocolate Truffles

NINE YEARS AGO: Red Velvet Cupcakes

TEN YEARS AGO: Happy Valentine’s Day!

ELEVEN YEARS AGO:  A Few Blogging Issues

TWELVE YEARS AGO: Dan Dan Noodles

THIRTEEN YEARS AGO:  Sophie Grigson’s Parmesan Cake

FOURTEEN YEARS AGO: Antibiotics and Food

GOING BEYOND GUACAMOLE

We consume a lot of avocados, often in guacamole format, but sometimes just sliced with a squirt of lemon, salt and pepper. Last weekend I was relaxing a bit browsing through stuff I had saved in our TiVo, and went on a binge watch of Molly Yeh’s Girl Meets Farm. Her cooking style is different from mine, but I love her baking ideas, and her warm, fun personality. In one of the episodes she made avocado salsa with a definite Asian feel, and I had to try it myself. Verdict? I loved it. Hubby still prefers avocado in guacamole shape, but agreed that it is definitely “blog-worthy”. So here we are.


SESAME AVOCADO SALSA
(from Molly Yeh’s Girl Meets Farm)

4 teaspoons soy sauce
1 tablespoon toasted sesame oil
1 teaspoon grated fresh ginger
Juice of 1 lime
Sriracha or other hot sauce, as desired
4 avocados, chopped
1/2 bunch fresh cilantro, chopped
black or toasted sesame seeds, for topping

Whisk together the soy sauce, sesame oil, ginger, lime and some hot sauce in a large bowl. Add the avocados and toss to coat, mashing some of the avocados a little bit to bring everything together. Taste and adjust as desired, I added more lime juice. Top with the chopped cilantro and sesame seeds.

ENJOY!

to print the recipe, click here

Comments: I am on a sesame oil kick lately, and find that it gives many dishes a wonderful taste, if you don’t add too much you cannot quite tell what it is, but it is, to quote Martha Stewart, “a good thing”. We had leftovers and although it got slightly darker, flavor and texture were not compromised. If you are serving to company, definitely prepare it right before you intend to enjoy it, although keeping it in the fridge for 30 minutes or so does not hurt at all.

ONE YEAR AGO: A Trio of Superstars

TWO YEARS AGO: Turkey Meatloaf

THREE YEARS AGO: Prue Leith’s Smoked Salmon and Beetroot Blinis

FOUR YEARS AGO: Mandioca Frita 101

FIVE YEARS AGO: White Chocolate Raspberry Dome Cake

SIX YEARS AGO: Blueberry Crumble Coffee Cake

SEVEN YEARS AGO: Pickled Red Onions

EIGHT YEARS AGO: Strawberry Chocolate Chip Cake

NINE YEARS AGO: Mini-Chocolate Cheesecake Bites

TEN YEARS AGO: Whole-Wheat Spaghetti with Grated Tomato Sauce

ELEVEN YEARS AGO: A Taste of Yellow to Honor Barbara

TWELVE YEARS AGO: Gratin of Beefsteak Tomatoes

THIRTEEN YEARS AGO: Tour de France Final Stage: PARIS

FOURTEEN YEARS AGO: Snickerdoodles with a Twist

ZUCCHINI-CHICKPEA BAKED BITES

Yet another recipe that won’t win many votes in a beauty contest, but is so tasty and simple to prepare, I had to share with you. It happens to be vegan-friendly, because contrary to similar preparations, this one takes no eggs. All binding is given by processed chickpeas, straight from a can. It came from a Brazilian blog, but I modified it slightly to reduce the amount of carbs. Thank you to my niece Raquel for sending it to me, saying that the recipe “had my name written all over it.” I think she is right!


ZUCCHINI-CHICKPEA BAKED BITES
(inspired by this post)

200 g zucchini (1 large or 2 medium), grated on a large-hole grater
250 g canned chickpeas, well-rinsed and drained
basil leaves to taste
1/2 tsp salt + more to sprinkle on zucchini
1/2 tsp smoked paprika
1/8 cup almond flour
1/8 cup all-purpose flour
panko bread crumbs
olive oil spray

Heat oven to 420F.

Salt the grated zucchini lightly and allow it to sit on a colander for 10 minutes. Squeeze the zucchini dry preferably using a towel.
Add to a food processor together with the chickpeas, salt, paprika and basil. Process until fully smooth, stopping to clean the bowl with a spatula once. Add the two flours and process just to bind it all.

Form small patties, cover with panko bread crumbs on both sides. Place them separated over aluminum foil and spray the surface with olive oil. Bake for 10 minutes, turn them gently, spray more olive oil on the top. Bake for 10 to 15 minutes longer, until golden brown. Serve with you favorite sauce or plain.

ENJOY!

to print the recipe, click here

Comments: I was a bit skeptical that the little morsels would hold shape without the help of an egg, but although very fragile, I did not have problems. Just be gentle. If you want to fry them, you could still keep them vegan by using the liquid from the chickpea can to make a whipped “egg white substitute”, coat them with that and add bread crumbs. But I tend to avoid frying because I dislike dealing with the leftover oil. Air-frying could be also a good option but our fryer has a small basket and I would have to fry in batches, so I went with the baking option.

A bit of tomato sauce and grated Parmigiano is also a nice way to serve them, although obviously not vegan anymore. I will definitely make them again, and pair with a tahini sauce which I think will be another great serving idea.

ONE YEAR AGO: Slow-Cooker Hoisin Pulled Pork

TWO YEARS AGO: I Will Cracker you Up

THREE YEARS AGO: Pickling Ribbons

FOUR  YEARS AGO: Green Beans and Carrots with Spicy Almonds

FIVE YEARS AGO: Quiche 101

SIX YEARS AGO: Persian Butternut Squash Soup

SEVEN YEARS AGO: Walnut Cranberry Sourdough Bread

EIGHT YEARS AGO: Ottolenghi in Brazil?

NINE YEARS AGO: Roasted Winter Vegetables with Miso-Lime Dressing

TEN YEARS AGO: 2012 Fitness Report: P90X2

ELEVEN YEARS AGO: Caramelized Bananas

TWELVE YEARS AGO: Roasted Lemon Vinaigrette

THIRTEEN YEARS AGO: Whole Wheat Bread

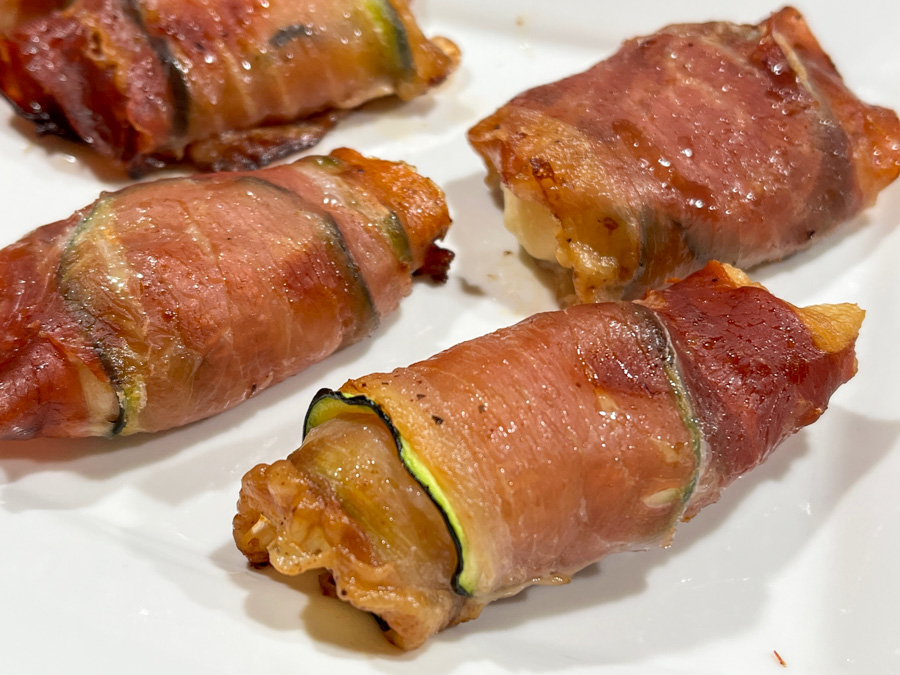
ZUCCHINI-PROSCIUTTO PARCELS

Two ways to make these delicious little morsels, perfect as a little appetizer or even as a side-dish, which is how we served them. You can use a creamy cheese, such as ricotta, perhaps mixing a bit of egg yolk for added structure, but I opted for halloumi cheese, that retains its texture quite well during baking. The first method requires a mandolin to slice the zucchini, as you need really thin slices so that they bend. You could slice it thicker and blanch them before forming the parcels, but I prefer to skip that additional step.


ZUCCHINI-PROSCIUTTO PARCELS
(from The Bewitching Kitchen)

1 or 2 large zucchini
prosciutto slices, one per appetizer
1/4 cup olive oil
juice of half a lemon
salt and pepper to taste
halloumi cheese cut in pieces, one per roll

Whisk the olive oil with lemon juice, season with salt and pepper. Reserve.

If using ribbons, cut the zucchini in very thin slices, as thin as your mandolin will go. If using zucchini pieces, cut them in squares of a size similar to the cheese. Brush the zucchini with the emulsified oil-lemon. Assemble each little package, either rolling or stacking.

Place over aluminum foil on a baking sheet and bake at 400F util the prosciutto is golden brown (about 25 minutes, depending on size). The zucchini will release a lot of juice during baking but it will dry out as it continues roasting. Do not panic, it will look a little hopeless before it looks great…

Serve while warm.

ENJOY!

to print the recipe, click here

Comments: I don’t know which version I prefer. The one with very thin zucchini slices looks a little more elegant but the zucchini pretty much disappears as far as taste and texture are concerned. The second way to do it makes the zucchini more prominent, but it does not look as good, so it’s really a matter of deciding which path you want to take. I do like the use of halloumi. If you go with a melting cheese, definitely do the zucchini ribbons to wrap the whole thing better.

ONE YEAR AGO: Double Peanut Sourdough Loaf

TWO YEARS AGO: Fennel-Rubbed Shrimp in Light Coconut Sauce

THREE YEARS AGO: Puff Bread Balls, Two Salads and a Cookbook Review

FOUR YEARS AGO: Pistachio-Caramel and Apple Mousse Cakes

FIVE YEARS AGO: La Couronne Bordelaise

SIX YEARS AGO: A Special Birthday Dinner

SEVEN YEARS AGO: Duck Confit for a Special Occasion

EIGHT YEARS AGO: Tuscan Grilled Chicken and Sausage Skewers

NINE YEARS AGO: Celebrate Wednesday with Pork Tenderloin & Apples

TEN YEARS AGO: Salmon Wellington

ELEVEN YEARS AGO: The Green Chip Alternative

TWELVE YEARS AGO: Weekend Pita Project

THIRTEEN YEARS AGO: Let it snow, let it snow, eggs in snow

CAULIFLOWER TACOS WITH CHIPOTLE ROMESCO SAUCE

I debated whether to insert the “V” word into the title, but yes, this is vegan. And delicious with a big “D.” The sauce packs a huge hit of flavor. I used the smallest recommended amount of chipotle pepper in Adobo sauce, if you are a braver soul, go for the kill and add more. Obviously, you can use meat instead of cauliflower and please all the omnivores at your table. But whatever your gastronomic inclination, MAKE THE SAUCE.


VEGAN CAULIFLOWER TACOS WITH CHIPOTLE ROMESCO SAUCE
(adapted from Minimalist Baker)

for the cauliflower:
1 large cauliflower head, cut in small pieces
2 Tbsp canola oil
1 tsp ground cumin
1 tsp chili powder
1 tsp smoked paprika
1 tsp salt

for the sauce:
1/4 cup raw almonds
1 15-ounce can fire-roasted tomatoes (drained)
2 Tbsp olive oil
1 medium lime, juiced
1/4 tsp smoked paprika
1/2 tsp cumin
1/4 tsp sea salt (plus more to taste)
1 Tbsp maple syrup (plus more to taste)
1-2 whole chipotle peppers in adobo sauce (more for spicier sauce)

for serving:
corn tortillas
Lime juice / wedges
Fresh cilantro (optional)
shredded cheese (vegan, if you prefer)

Coat the cauliflower pieces with the oil and the spices. Either roast it in a 400F oven, or air-fry it for 15 minutes. Reserve.

Toast the almonds in a dry non-stick skillet until they start to get fragrant and get a bit of color, but do not move away from the stove and move them constantly to prevent them from burning. Add them to a blender (Vitamix works best) together with all other ingredients for the sauce. Blend until very smooth. Taste and adjust seasoning with salt, or maple syrup, depending on your preference.

To serve, warm up tortillas, add the sauce and the warm cauliflower on top, then more sauce, and any toppings you like.

ENJOY!

to print the recipe, click here

Comments: This sauce will definitely show up in our kitchen regularly because it is so easy to make, and absolutely perfect for our taste. When I first made it I thought it was too spicy, but it is not, it mellows down as you add it to the other components, and matches all sorts of protein or veggies. I enjoyed it next day with some leftover grilled chicken breasts.


ONE YEAR AGO: One gift, one dough, two recipes

TWO YEARS AGO: Rocking the Zucchini Boat

THREE YEARS AGO: Polenta Bites with Spicy Tomato Sauce

FOUR YEARS AGO: Vague Mousse Cake

FIVE YEARS AGO: Cottage Loaf, my very own technical challenge

SIX YEARS AGO: Pork Ribs: Sticky, Spicy and Awesome

SEVEN YEARS AGO: Sobering Peach Sorbet

EIGHT YEARS AGO: Buttermilk-Blueberry Breakfast Cake

NINE YEARS AGO: Silky Cauliflower Puree with Almond Milk

TEN YEARS AGO: Beef and Broccoli Stir-fr

ELEVEN YEARS AGO:Wheat Germ and Sage Sourdough Bread

TWELVE YEARS AGO:Popeye-Pleasing Salad

THIRTEEN YEARS AGO:Summer’s Finale