ZUCCHINI FRITTATA

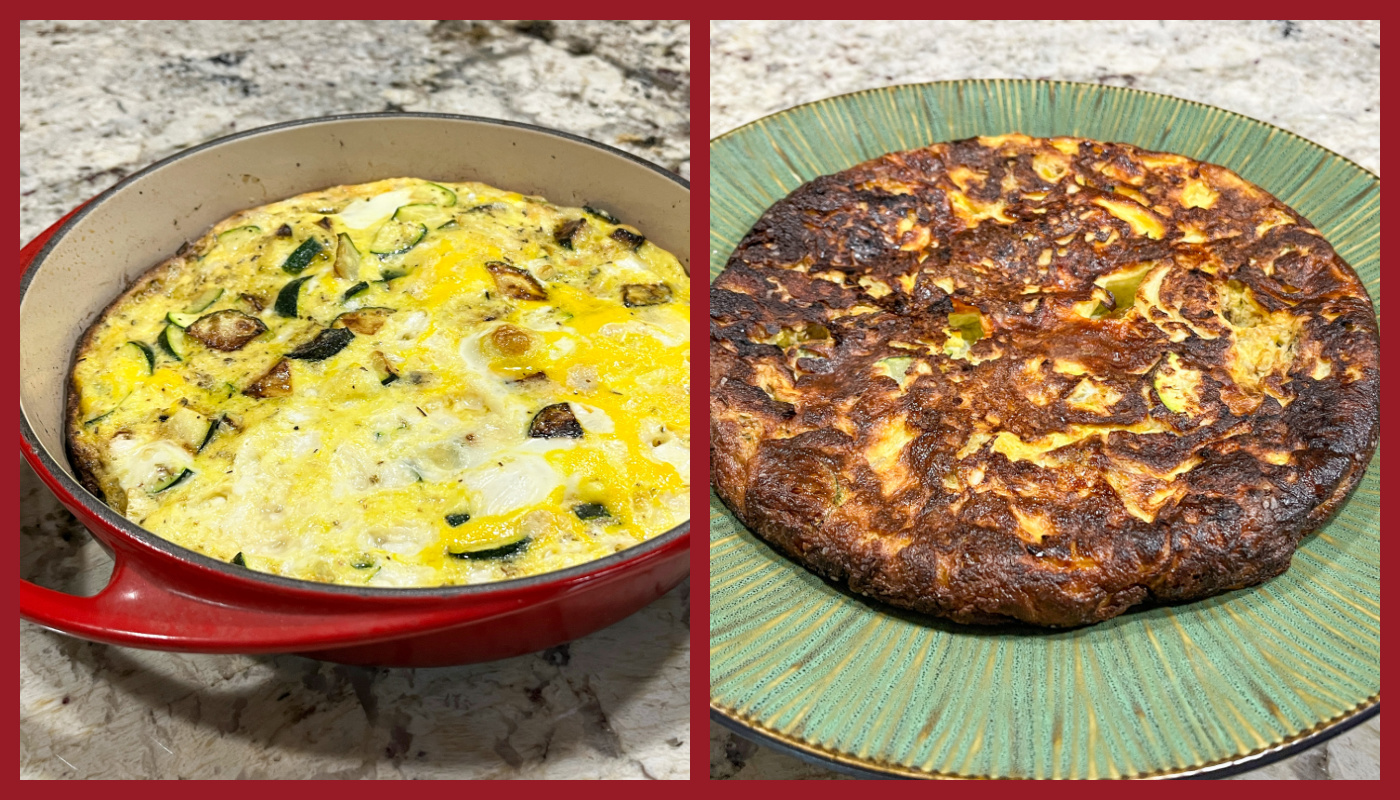
I might be on a roll concerning special gadgets. Case in point, I have a pan that is designed to make Tarte Tatin (!!!), but today I am incredibly proud to show you how to use it to make a nice frittata. Do you need that pan? No. But are you going to be the coolest cook in town if you use it? YES, YOU ARE.

ZUCCHINI FRITTATA
(from The Bewitching Kitchen)

2 Tbsp. olive oil or unsalted butter
2 shallots, minced
2 medium zucchini, sliced and each slice quartered
4 large eggs
1/4 cup whole milk
4-6 pieces of fresh mozzarella
1/2 tsp salt
1/2 tsp Herbes de Provence
¼ tsp. freshly ground black pepper

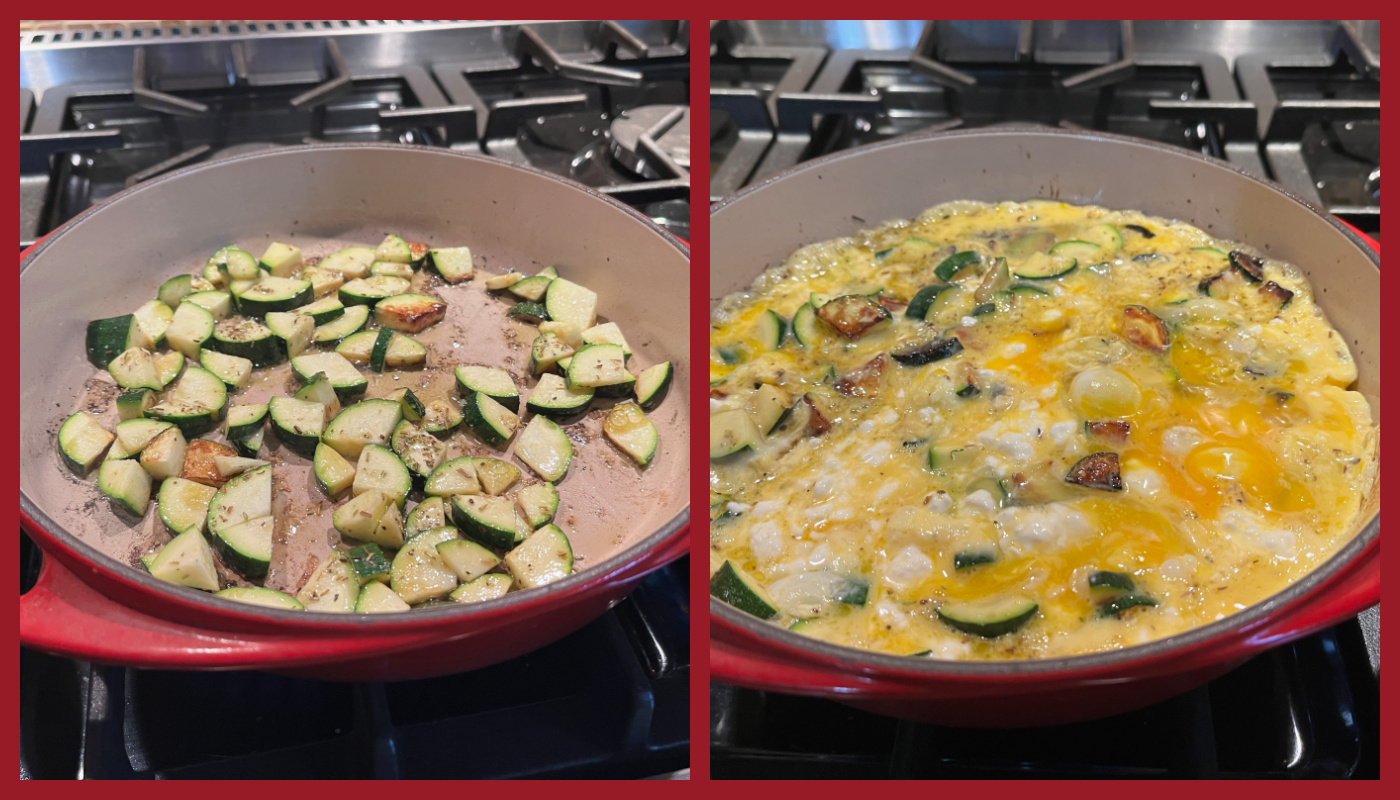
Place rack in middle of oven; heat oven to 350°. Heat 2 Tbsp. olive oil or unsalted butter in an oven-proof skillet. Add the shallots and zucchini, sauté, stirring occasionally, until softened, about 5 minutes. Meanwhile, whisk the large eggs in a medium bowl with the milk, salt, pepper and spices mix.

Pour egg mixture into the skillet. Add the pieces of mozzarella. Cook, stirring occasionally, just until edges pull away from sides of pan, about 5 minutes. Transfer skillet to oven and bake until set, 10–15 minutes. Serve immediately or at room temperature within an hour or so.

ENJOY!

to print the recipe, click here

Comments: You can flip the frittata off the pan and serve it with the brown side up, or cut it straight in the pan, anything works. It turned out creamy, light and fluffy. The pan makes it a breeze to invert and flip the frittata onto a serving plate. We will be enjoying this type of meal in many variations on a regular basis… Mushrooms, red bell peppers, maybe even some smoked salmon in the mix.

ONE YEAR AGO: Chocolate-Covered Oreos Strike Again

TWO YEARS AGO: Sesame-Miso Yakitori

THREE YEARS AGO: Marinated Chickpeas with Slow-Roasted Red Peppers

FOUR YEARS AGO: Mini-Pullman Sourdough Bread

FIVE YEARS AGO: Gibassier

SIX YEARS AGO: Sundried Tomato Twist Bread

SEVEN YEAR AGO: And now for something completely different….

EIGHT YEARS AGO: Parsnip, Coconut, and Lemongrass Soup

NINE YEARS AGO: In My Kitchen, October 2016

TEN YEARS AGO: Paleo Moussaka

ELEVEN YEARS AGO: In My Kitchen, October 2014

TWELVE YEARS AGO: In My Kitchen, October 2013

THIRTEEN YEARS AGO: Crimson and Cream Turkey Chili

FOURTEEN YEARS AGO: Taking a break from the nano-kitchen

FIFTEEN YEARS AGO: Chocolate Chip Cookies

CORNBREAD ÆBLESKIVER

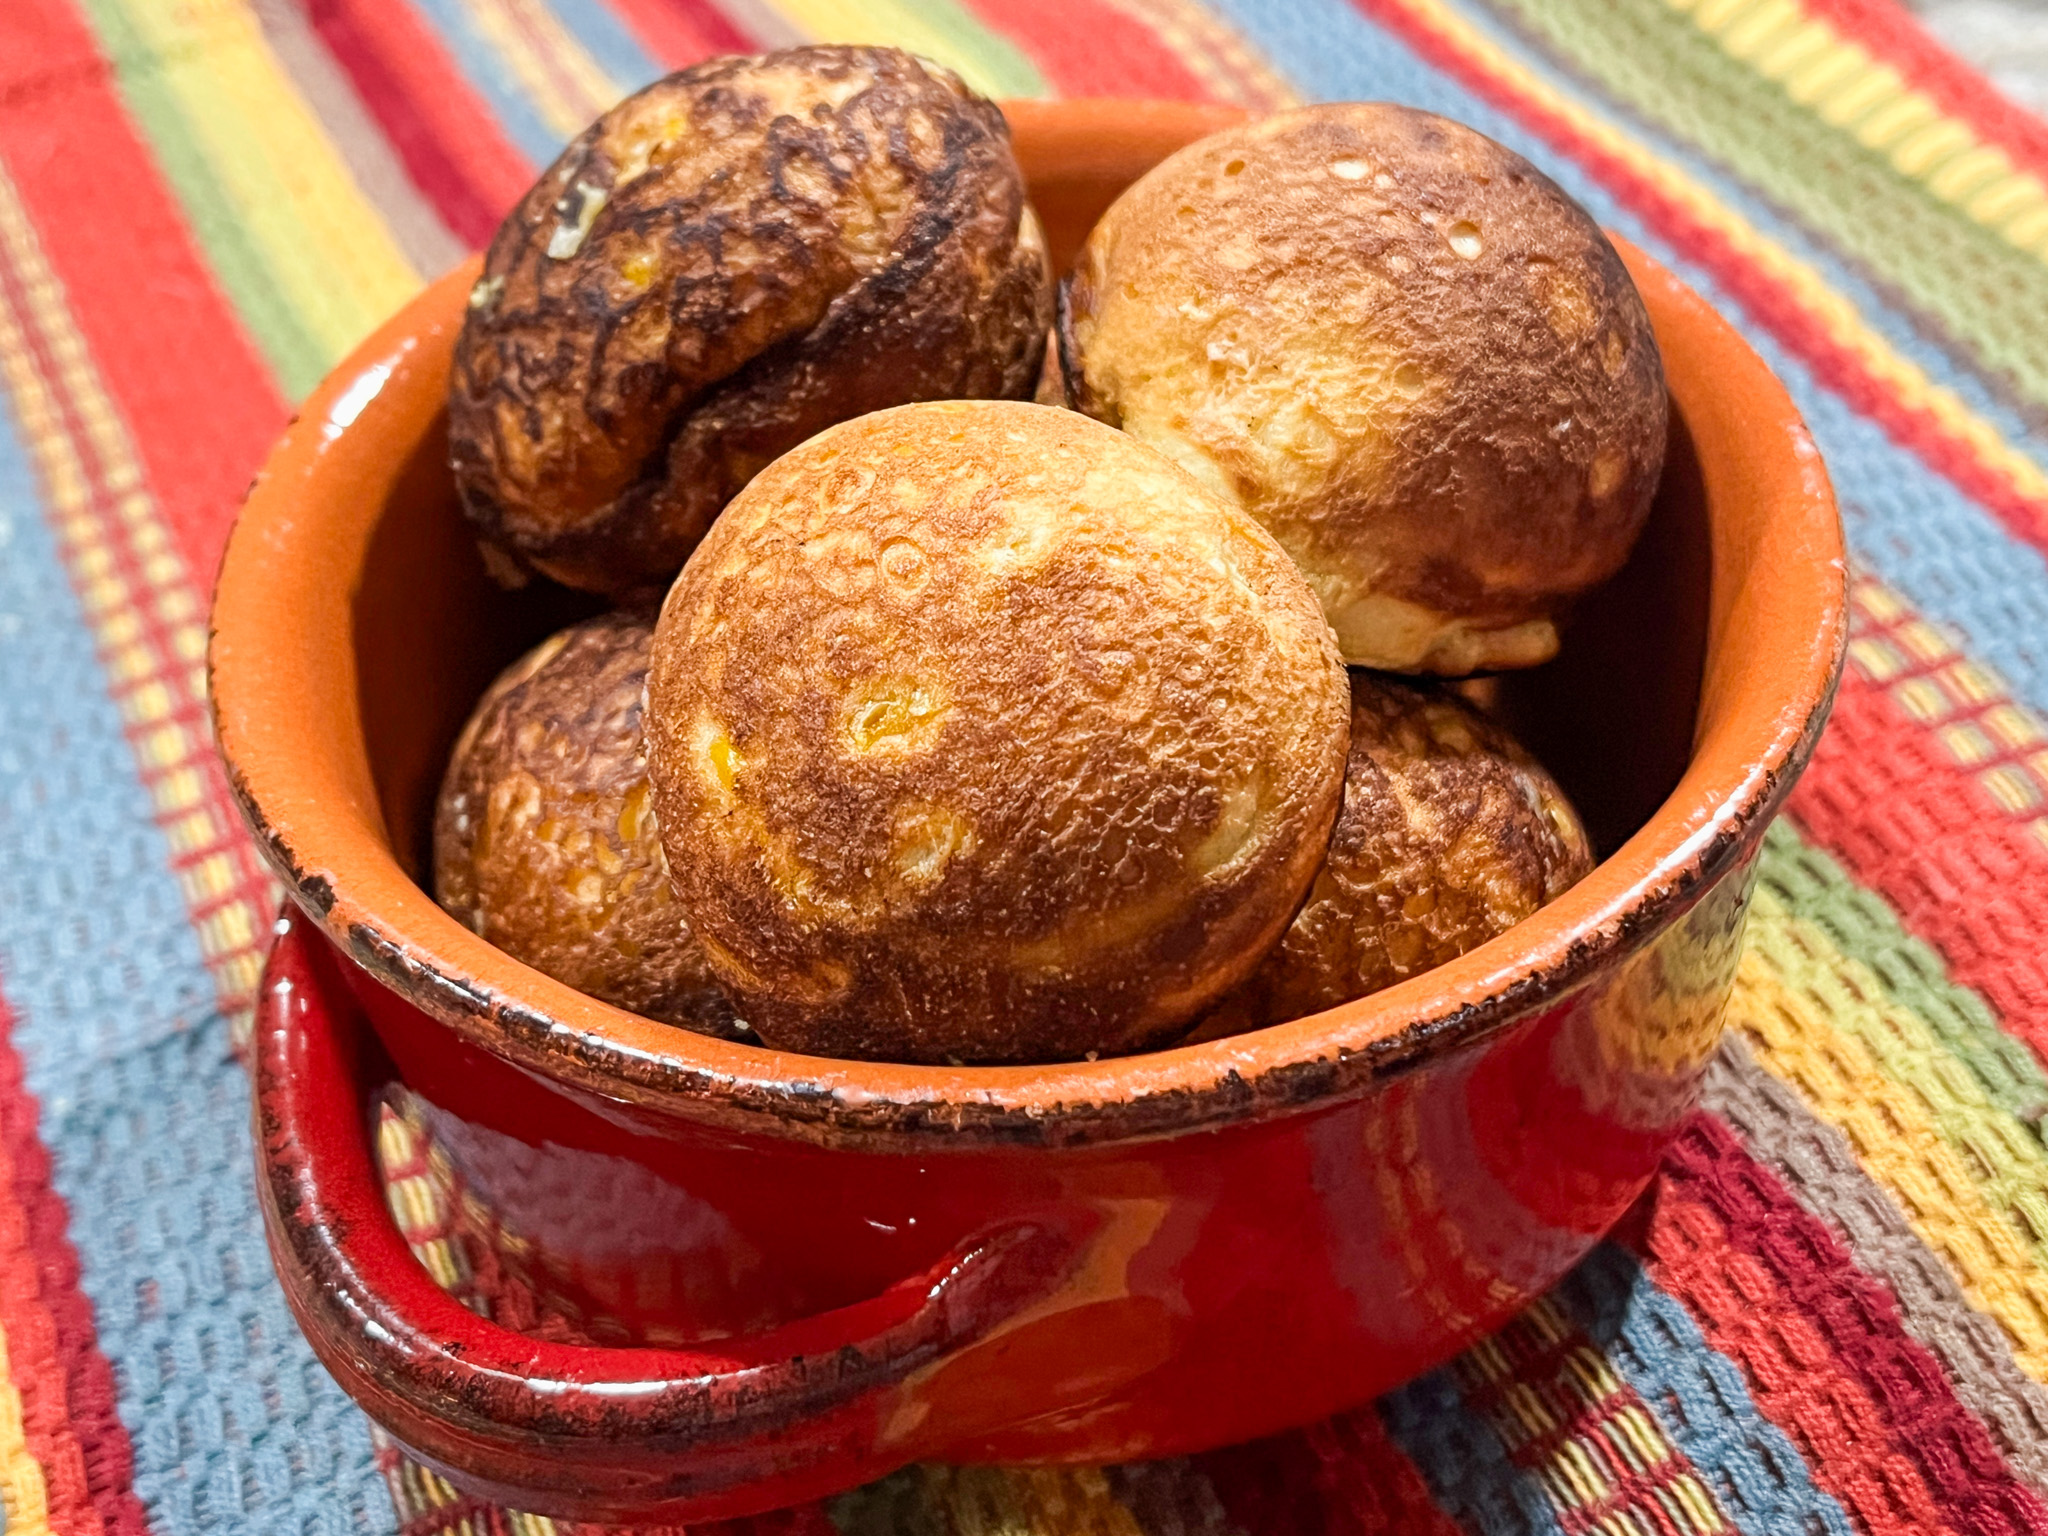
As I mentioned recently, I do love gadgets, and this pan has been sitting and waiting for too long. However, the moment I saw Karen’s post on this cool recipe, I grabbed it to play!

CORNBREAD ÆBLESKIVER
(slightly adapted from Karen’s Kitchen Stories)

140 grams (1 cup) all purpose flour
70 grams (1/2 cup) medium grind cornmeal
70 grams (1/3 cup + 1 tbs) sugar
1 tablespoon baking powder
1/2 teaspoon salt
1 cup buttermilk
2 large eggs
100 grams canned corn kernels
olive oil spray for the pan

Whisk together all of the dry ingredients in a large bowl. In another bowl, mix the wet ingredients, plus corn kernels with a fork. Pour the wet ingredients over the dry ingredients, and mix until just combined.

Heat your aebleskiver pan on medium low and spray each cavity with olive oil.
Using an ice cream scoop, fill each cavity almost to the top with the batter. Cook until the bottom begins to brown. Using a thin skewer turn the aebleskiver part way and continue to cook. Be sure to push any overflow back into the wells.

After that, add a little more batter to top them off before “closing” them, moving the opening to the bottom of the pan. Continue to cook until evenly golden brown and the center is cooked through. Serve right away or keep warm in a 200 degree F oven.

ENJOY!

to print the recipe, click here

Comments: First things first, I highly recommend this cookbook if you want to expand your Æbleskiver horizons… My main modification of the recipe was cutting the sugar by a bit more than half, and using canned corn because I had some in the pantry and got lazy to scrape fresh corn off the cob. Using the pan takes a bit of practice, I filled the cavities too much in my first batch, but the second half was perfect. I still need to perfect moving the little fritters to cook the second side, but they turned out very tasty.

.

Karen, thanks so much for inspiring me to finally make something with my pan…

.

ONE YEAR AGO: Lemon Ganache Macarons

TWO YEARS AGO: Fresh Dill and Feta Sourdough

THREE YEARS AGO: Marinated Chickpeas with Slow-Roasted Red Peppers

FOUR YEARS AGO: Passionfruit Millionaire’s Shortbread

FIVE YEARS AGO: Chai-Mango Rosette Macarons

SIX YEARS AGO: Common Table, Something New in My Life

SEVEN YEARS AGO: The Daisy, a Bread with Brioche Alter-Ego

EIGHT YEARS AGO: Pork Tenderloin, Braciole Style

NINE YEARS AGO: Raspberry Buckle

TEN YEARS AGO: Seafood Gratin for a Special Dinner

ELEVEN YEARS AGO: Cooking Sous-Vide: Sweet and Spicy Asian Pork Loin

TWELVE YEARS AGO:  Farewell to a Bewitching Kitchen

THIRTEEN YEARS AGO: In My Kitchen. June 2012

FOURTEEN YEARS AGO: Goodbye L.A.

FIFTEEN YEARS AGO: 7-6-5 Pork Tenderloin

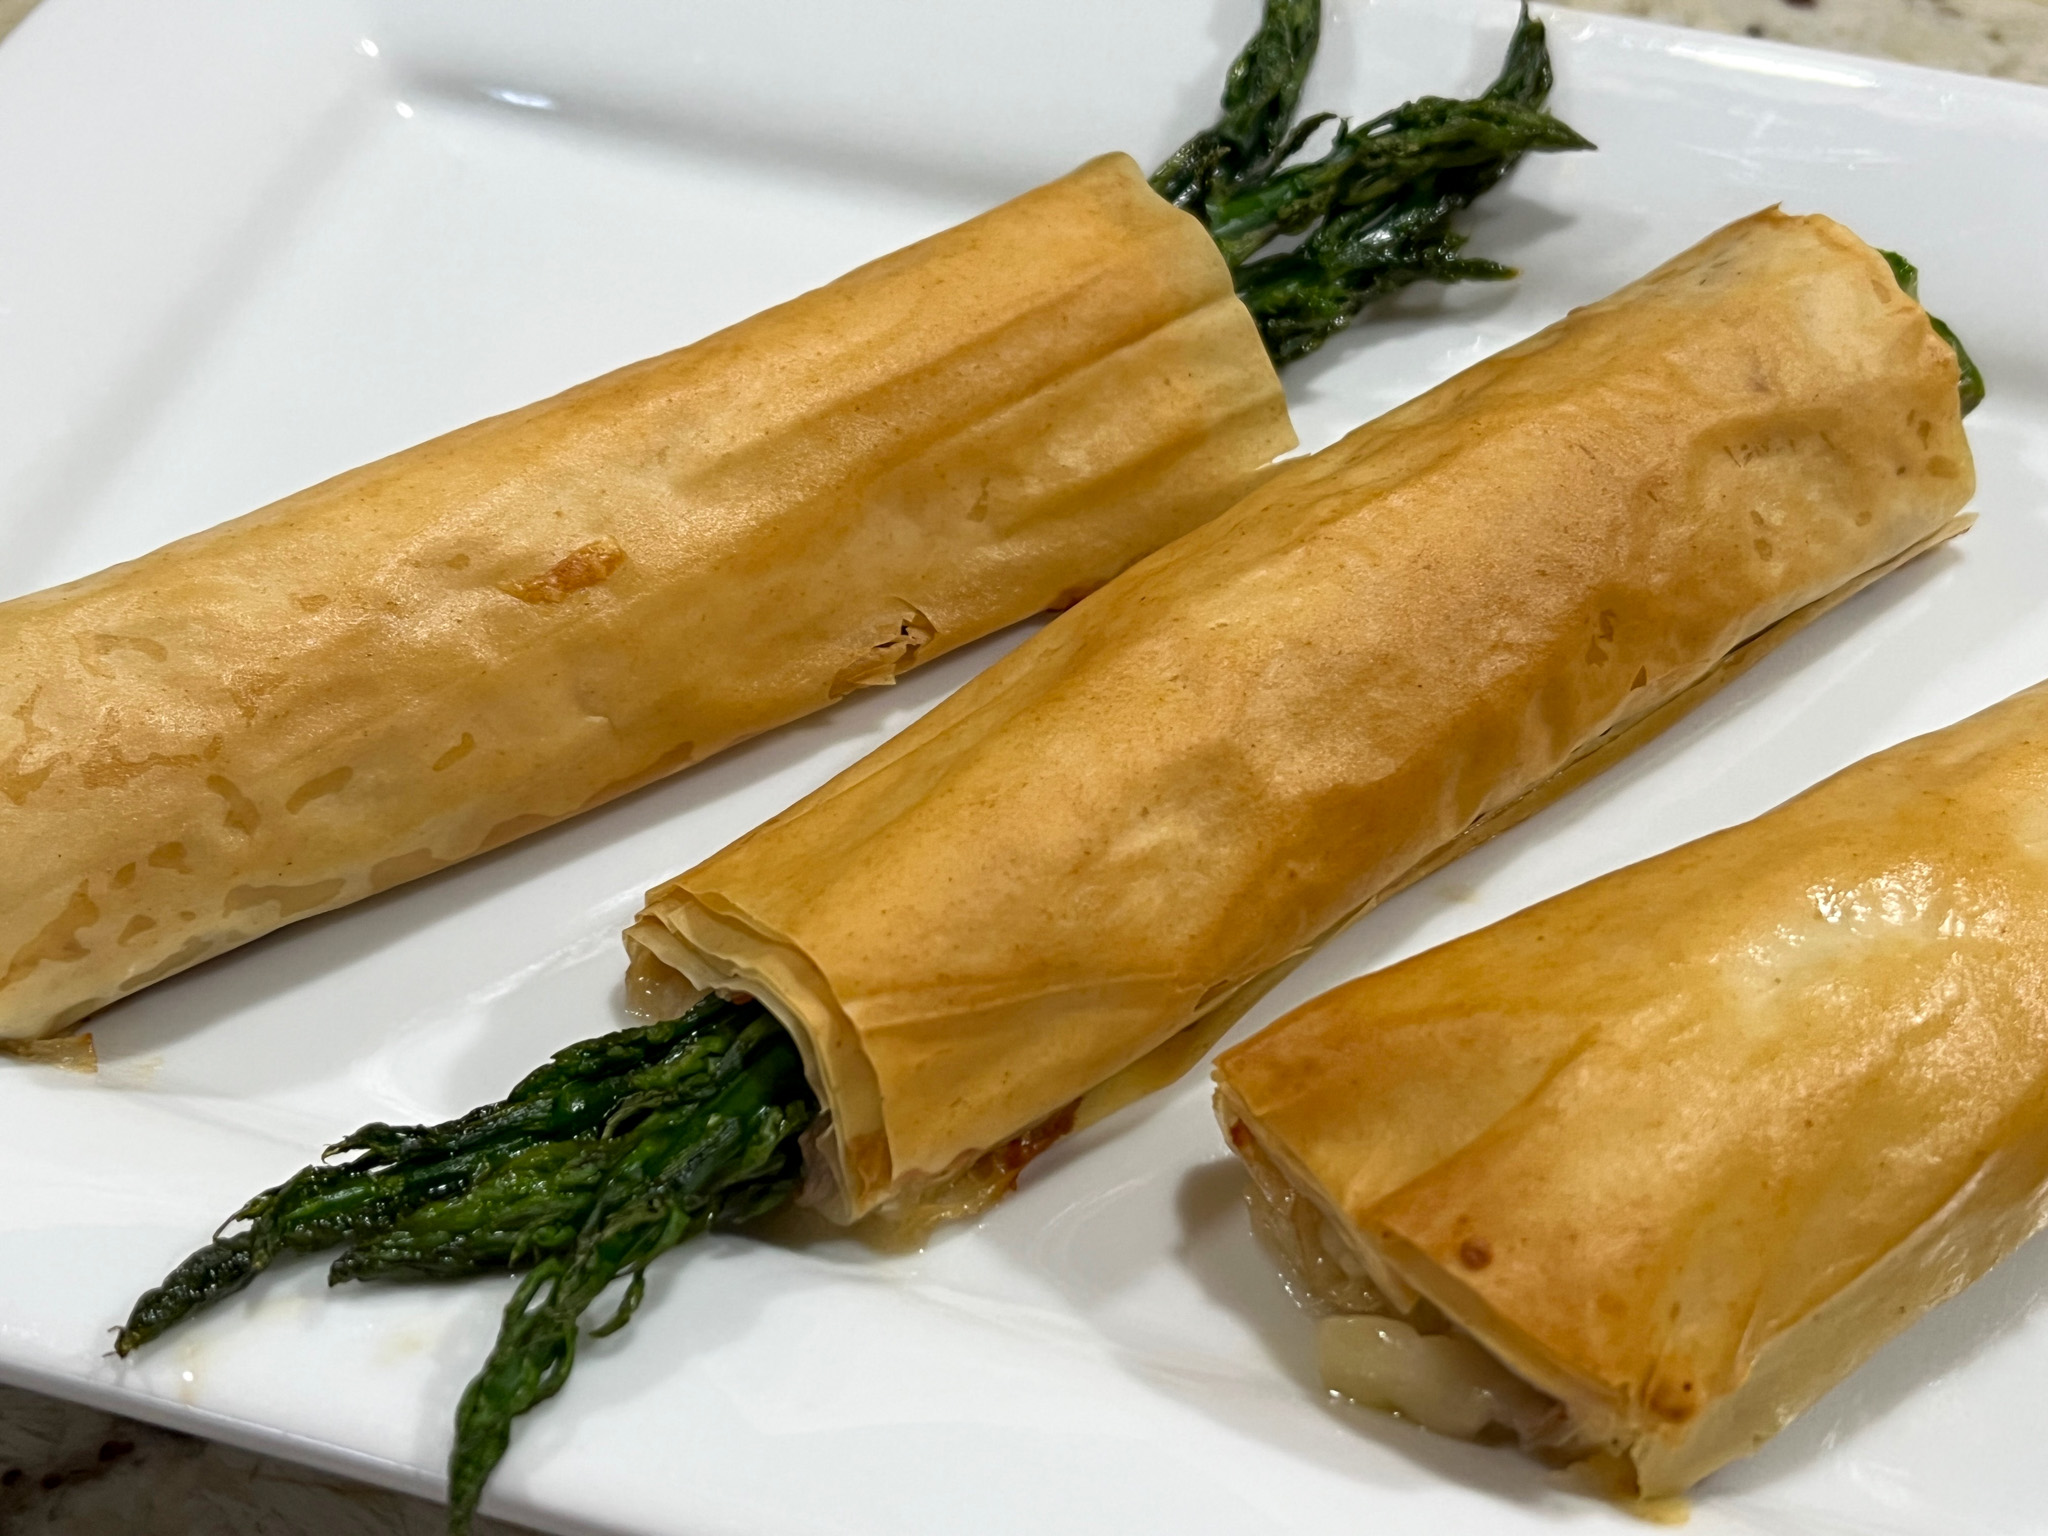
ASPARAGUS AND PROSCIUTTO PHYLLO ROLLS

This is easy but so elegant and tasty, hard to come up with a better idea to impress guests or just enjoy a beautiful side dish on a warm Spring evening. I caught the recipe during a recent episode of TheKitchen, courtesy of Alex Guarnaschelli.

ASPARAGUS AND PROSCIUTTO PHYLLO ROLLS
(very slightly modified from FoodTV Network)

Kosher salt
18 medium stalks asparagus, ends trimmed
24 to 28 sheets phyllo dough, defrosted
olive oil spray
1 cup finely grated Parmesan
12 thin slices prosciutto

Prepare an ice bath with a medium bowl half filled with water and ice cubes.
In a large pot, bring 4 quarts water to a rolling boil. Add salt until it tastes like mild seawater. Layer a baking sheet with a clean kitchen towel. Drop the asparagus into the boiling water and cook until slightly tender when pierced with the tip of a knife, 2 to 3 minutes. Use a large slotted spoon to remove the asparagus from the water, transferring them immediately to the ice bath so that they cool down and don’t continue cooking. Let chill 5 minutes, then drain the asparagus and spread them on the baking sheet with the towel.


Heat the oven to 375 degrees F.

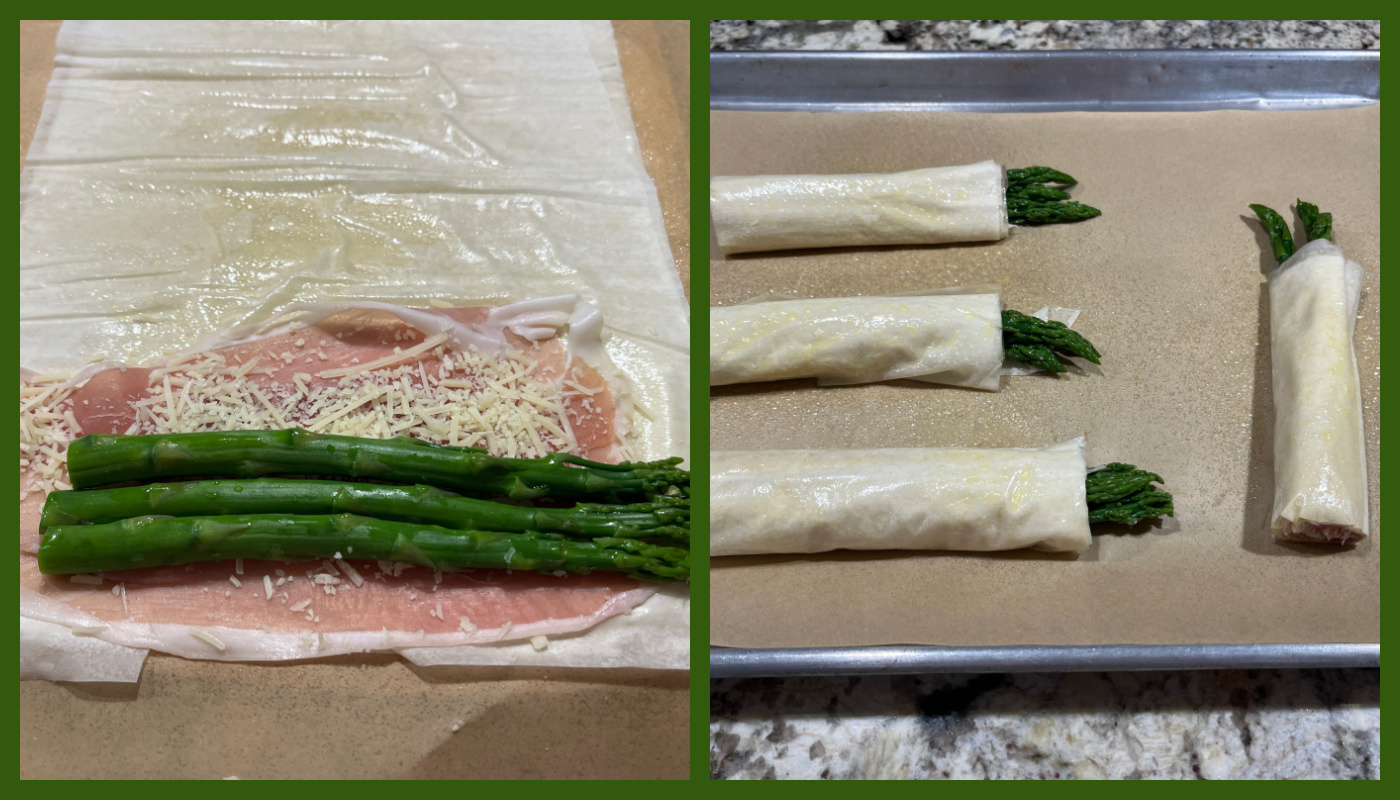
Place one sheet of phyllo on a flat surface with the short end closest to you. Spray the phyllo with olive oil. Sprinkle with a little of the Parmesan. Place another sheet of phyllo directly on top. Brush with additional butter and sprinkle with Parmesan.

Arrange 2 slices prosciutto in a single layer closest to you on the phyllo. Place 2 to 3 stalks of asparagus in bunches along the short side of the phyllo on top of the prosciutto and tightly roll the asparagus up in the prosciutto and phyllo to form a log. Trim the ends of the phyllo to fit the asparagus perfectly. As you make the asparagus rolls, arrange them on a baking sheet with distance between each so that they brown when baking. Spray their tops with olive oil right before baking.

Place the baking sheet in the center of the oven and bake until golden brown on the outside, 20 to 25 minutes. Sprinkle with salt.

ENJOY!

to print the recipe, click here

Comments: I wrote the recipe as published, except for the use of olive oil instead of melted butter. Amounts are really going to be flexible, I only made four rolls for us, we had three at dinner and one was my lunch next day, still delicious. I never go through the trouble of making the ice bath, I just rinse the blanched asparagus in running very cold water in a colander, and call it a day. But do as it pleases you, your kitchen, your rules. I have stopped brushing phyllo with butter a long time ago – the olive oil spray is amazingly easy, never hurts the sheets and gives enough flakiness without the extra saturated fat. We love the taste also, so it is a win-win situation for us.

I hope you give this super easy recipe a try, it is wonderful! And if you want to go the vegetarian route, maybe a little black olive tapenade or red bell pepper pesto could be nice instead of the prosciutto.

ONE YEAR AGO: Beet-Pickled Deviled Eggs

TWO YEARS AGO: My Cookie Blog Turns Two!

THREE YEARS AGO: Masala Shrimp

FOUR YEARS AGO: Victoria Sponge Mini-Cakes

FIVE YEARS AGO: Red Beet Sourdough

SIX YEARS AGO: A Modern Take on Tarte Tatin

SEVEN YEARS AGO: Minnie-Macarons, a Fun Project with a Happy Ending

EIGHT YEARS AGO: Nigella Lawson in the Bewitching Kitchen

NINE YEARS AGO: Walnut-Raisin Bran Muffins

TEN YEARS AGO: Gingersnaps with White Chocolate Chips

ELEVEN YEARS AGO: Turkey Chili with Almond Butter

TWELVE YEARS AGO: Secret Recipe Club: Leek and Cheese Tart

THIRTEEN YEARS AGO: Secret Recipe Club; Triple Chocolate Brownies

FOURTEEN YEARS AGO: Shaved Asparagus Salad

FIFTEEN YEARS AGO: Indonesian Ginger Chicken

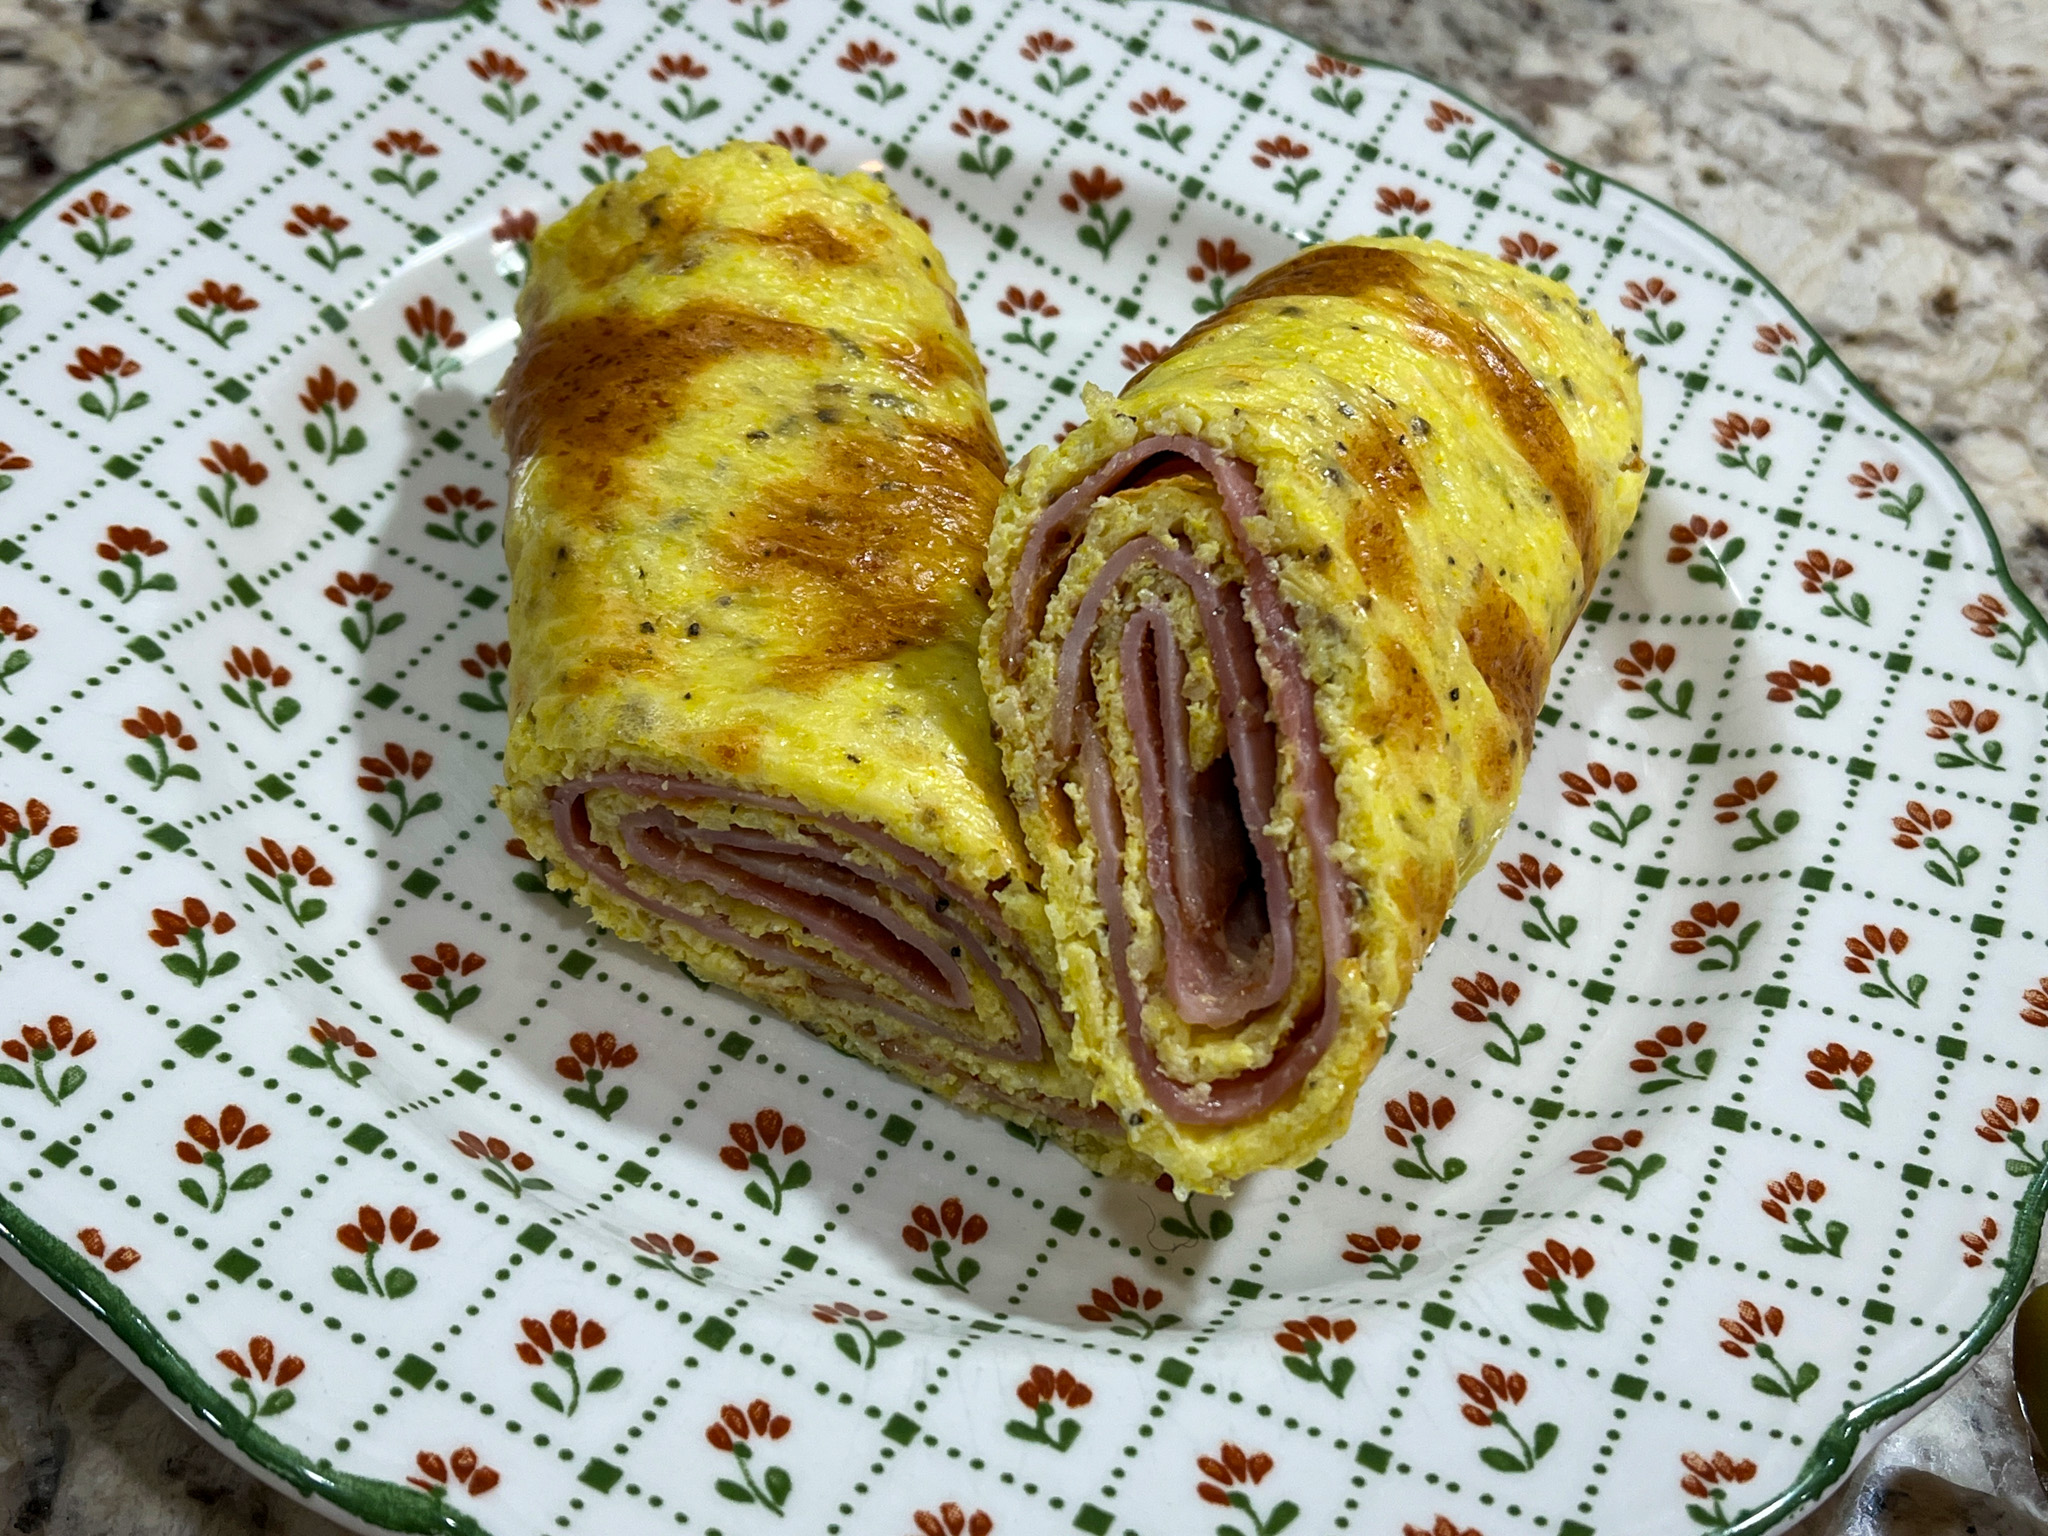
COTTAGE CHEESE WRAP

I almost never try “cute” recipes that go viral. To be honest, my last attempt was a certain zucchini flower that ended up as one of the greatest disasters that took place in the Bewitching Kitchen. So I stayed away from the recent fever involving cottage cheese and keto / low-carb / high-protein vibes. That all ended after catching a recent FoodTV The Kitchen episode. Kathy Lee was raving about it. She made some and they all tasted it. Jeff Mauro compared it to a certain Cloud Bread that is also supposed to be low-carb and a good replacement for bread, but it is way too “eggy”. Exactly what I thought, which explains why you’ve never seen me blog about it. This wrap, according to Jeff Mauro, tastes neutral and has perfect texture. I was sold. And wow, I really really loved it!

COTTAGE CHEESE WRAP
(from everywhere in the internet)

Nonstick cooking spray, for greasing
1 + 1/4 cups whole-milk cottage cheese (also works with low-fat)
1/4 teaspoon Herbs the Provence
1/8 teaspoon ground turmeric
1/8 teaspoon black pepper
Pinch kosher salt (optional, cottage cheese is already a bit salty)
1 large egg

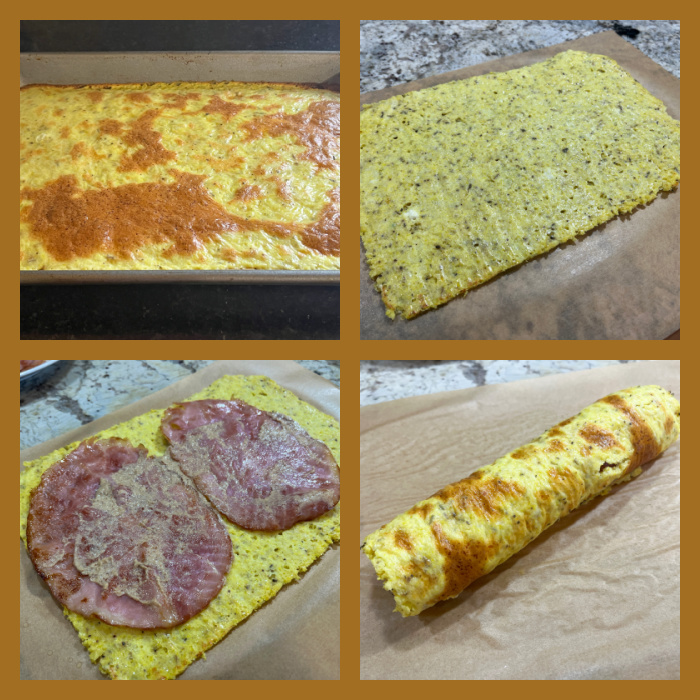
Heat the oven to 350 degrees F. Line a quarter-sheet pan (9-by-13-inch) with parchment paper and grease with cooking spray. Make sure to add oil to the sides of the pan to facilitate removal.

In a blender or food processor fitted with the blade attachment, add the cottage cheese and all other ingredients. Blend until very smooth, 15 to 20 seconds. Evenly spread on the prepared sheet pan using a rubber or offset spatula into a thin even layer to the edges of the pan.


Bake until cooked through and lightly browned, 30 to 35 minutes. Allow the wrap to cool for 5 to 10 minutes. Remove it from the pan, inverting on a board, lift the paper from the bottom of the wrap. Fill with your choice of goodies, roll, slice in half and…

ENJOY!

to print the recipe, click here

Comments: For my first time making it, I used only ham and mustard inside. I was surprised by how filling the wrap turned out. If you can believe it, I only had half for my lunch, had to save the rest. For something that does not contain any flour, it is quite substantial. It does taste very “neutral”, the texture is pleasing, not eggy at all. You can also bake the wrap and save in the fridge for later, with parchment paper on top, separating several wraps. I will definitely explore the concept further, using different fillings. Now that I am not twisting my nose at the alternate uses for cottage cheese, I have a couple more recipes to try. Stay tuned!

ONE YEAR AGO: Nutella Shamrock Macarons

TWO YEARS AGO: Air-Fryer Corn Ribs

THREE YEARS AGO: Lemony Chicken Thighs with Artichokes and Olives

FOUR YEARS AGO: Farari Bateta

FIVE YEARS AGO: Covid-19, Keeping yourself safe

SIX YEARS AGO: Carrot Cake Macarons

SEVEN YEARS AGO: Soup Saturday: Say Goodbye to Winter

EIGHT YEARS AGO: Manchego and Poblano Soup

NINE YEARS AGO: A Smashing Pair

TEN YEARS AGO: Spinach and Mushroom Stuffed Pork Tenderloin

ELEVEN YEARS AGO: Crispy Chickpea and Caper Spaghetti

TWELVE YEARS AGO: Spring has Sprung!

THIRTEEN YEARS AGO: Chickpea and Fire Roasted Tomato Soup

FOURTEEN YEARS AGO: Double Asparagus Delight

FIFTEEN YEARS AGO:  Sun-dried Tomato and Feta Cheese Torte

BEET-PICKLED DEVILED EGGS

Totally smitten by this recipe, because… color! It was inspired by a version I saw on Molly Yeh’s show Girl Meets Farm, but I made a few modifications.

BEET-PICKLED DEVILED EGGS
(adapted from Molly Yeh’s recipe)

3 cups of water
1 medium beet, peeled and cut in half
1/4 cup balsamic vinegar
1 tablespoon light brown sugar
2 tsp whole black peppercorns
3/4 cup apple cider vinegar
1 tablespoon salt

6 hard-boiled eggs, peeled
1/4 cup yogurt
1 tablespoons Dijon mustard
1 avocado, mashed
Tajin seasoning to taste
salt to taste

Put the beet in a medium saucepan and add the water, balsamic vinegar, brown sugar, peppercorns, cider vinegar and salt. Bring to a boil until the sugar is dissolved. Add the peeled boiled eggs to the pan, cover and refrigerate for at least 4 hours, preferably overnight for the most intense color.


Cut the eggs in half, then scoop out the yolks and place them in a medium bowl. Put the egg white halves on a serving platter. To the yolks, mix all other ingredients, making a paste. Adjust with more yogurt if needed. Pipe the mixture into the holes of the egg whites, sprinkle additional Tajin all over.

ENJOY!

to print the recipe, click here

Comments: Have you ever seen more beautiful color in a boiled egg? Now, the texture of the egg will be slightly different from that of a regular deviled egg due to the pickling step. It is going to be firmer and have a more assertive taste. Phil is not usually too fond of brined/pickled concoctions, but he loved these eggs, so if you are over-the-fence about it, don’t let it scare you. We don’t eat mayonnaise ever, but if you prefer the more authentic version, use it in place of yogurt. These were great as appetizer but also fantastic as my lunch next day. I will be re-visiting this recipe often… Such mesmerizing color!

ONE YEAR AGO: My Cookie Blog Turns Two!

TWO YEARS AGO: Masala Shrimp

THREE YEARS AGO: Victoria Sponge Mini-Cakes

FOUR YEARS AGO: Red Beet Sourdough

FIVE YEARS AGO: A Modern Take on Tarte Tatin

SIX YEARS AGO: Minnie-Macarons, a Fun Project with a Happy Ending

SEVEN YEARS AGO: Nigella Lawson in the Bewitching Kitchen

EIGHT YEARS AGO: Walnut-Raisin Bran Muffins

NINE YEARS AGO: Gingersnaps with White Chocolate Chips

TEN YEARS AGO: Turkey Chili with Almond Butter

ELEVEN YEARS AGO: Secret Recipe Club: Leek and Cheese Tart

TWELVE YEARS AGO: Secret Recipe Club; Triple Chocolate Brownies

THIRTEEN YEARS AGO: Shaved Asparagus Salad

FOURTEEN YEARS AGO: Indonesian Ginger Chicken