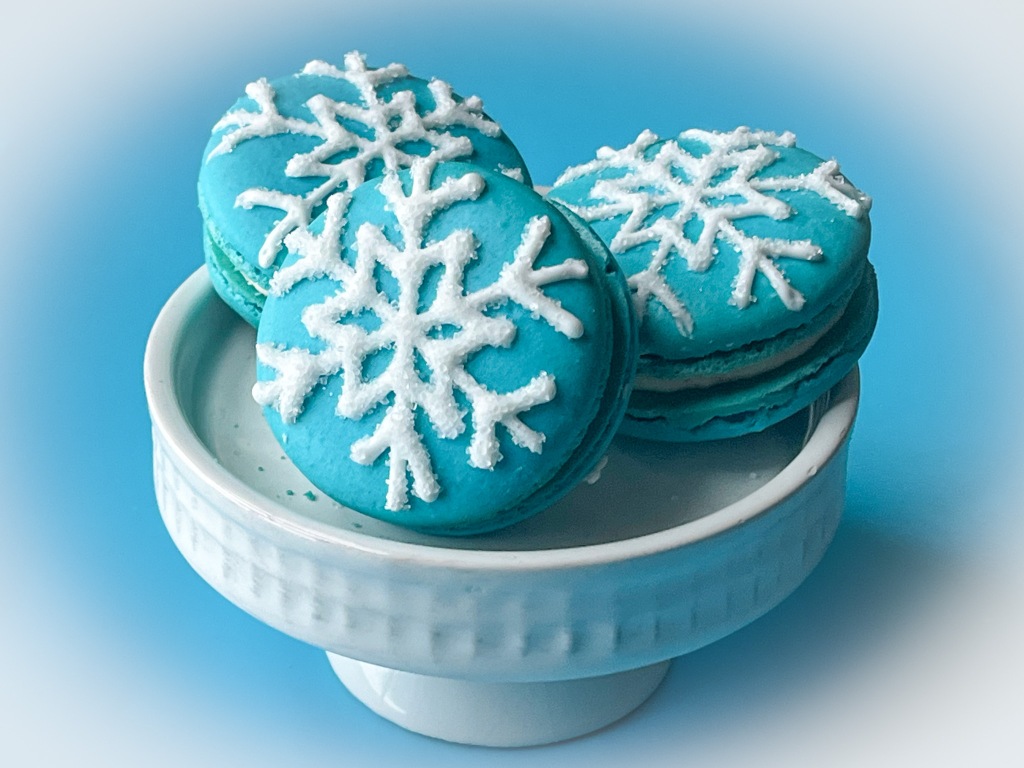
PEPPERMINT DUST MACARONS

Embracing winter, one macaron at a time…


PEPPERMINT DUST MACARONS
(from The Bewitching Kitchen)

For the shells:
200g Icing/powdered sugar (1 ⅔ cups)
115 g Almond Meal (1 + scant ¼ cup)
115 g egg whites at room temperature (approx. 4 eggs)
1/8 tsp of cream of tartar (optional)
100 g granulated sugar (½ cup)
1/8 tsp vanilla extract
light blue food gel (I used Colour Mill Baby Blue)

Line 3 heavy baking sheets with parchment/baking paper or Silpat mats. Layer the powdered/icing sugar and ground almonds/almond meal in a food processor. Pulse until the mixture looks like fine meal, about 12 pulses. Pass through a sieve and transfer to a small bowl or to a sheet of parchment/baking paper. Set aside.

Place the egg whites and cream of tartar in the bowl of a stand mixer fitted with the whisk attachment. Make sure that the bowl and the whisk are impeccably clean. Starting on medium speed, whip the whites with the cream of tartar until they look like light foam. The whites should not appear liquid. The foam will be light and should not have any structure.

Slowly rain in the granulated sugar in five additions, trying to aim the stream between the whisk and the side of the bowl. Turn the speed up to high. Continue to whip the meringue until it is soft and shiny. It should look like marshmallow creme (marshmallow fluff). Add the vanilla and food gel color. Whip the egg whites until the mixture begins to dull and the lines of the whisk are visible on the surface of the meringue. Check the peak. It should be firm. Transfer the whites to a medium bowl.

Fold in the ground almond/almond meal mixture in two increments. Paint the mixture halfway up the side of the bowl, using the flat side of a spatula. Scrape the mixture down to the center of the bowl. Repeat two or three times, then check to see if the mixture slides slowly down the side of the bowl. Add drops of gel color and mix them briefly with a toothpick. Put the mixture in a piping bag fitted with your choice of piping tip (round, ¼ or ½ inch in diameter or 6 – 12 mm). If you don’t have a macaron mat, draw circles on baking/parchment paper about 2inches/5cm in diameter & turn the paper over before placing on the baking sheets. Pipe shells, I like to count numbers in my head and use the same count for each shell so they end up similar in size.

Slam each sheet hard four to six times on the counter/worktop. Let the unbaked macarons dry until they look dull but not overly dry. Drying time depends on humidity. In a dry climate, the macarons can dry in 15 to 20 minutes; in a humid climate, it can take 35 to 40 minutes.

While the macarons are drying, heat the oven to 300 F (150 C/130C Fan oven/Gas Mark 2). Bake one sheet at a time on the middle rack. Check in 11 minutes. If the tops slide or move (independently of the ‘feet’ when you gently twist the top), then bake for 2 to 3 more minutes. Check one or two. If they move when gently touched, put them back in the oven for 1 to 2 more minutes until they don’t move when touched. Let the macaroons cool for 10 minutes before removing from the pan. The macarons should release without sticking.

Assemble the macarons: find two macarons similar in size and add a good amount of filling to the bottom of one of them. Place the other on top and squeeze gently to take the filling all the way to the edge. Store in the fridge for 24 hours for perfect texture.

For the filling:

PEPPERMINT BUTTERCREAM
1 + 1/3 cups powdered sugar
4 tbsp unsalted butter softened
1/2 tsp vanilla extract
a couple tablespoons peppermint dust (I got mine on Marshall’s, similar to this)
1/2 -1 tbsp milk to adjust consistency, if needed

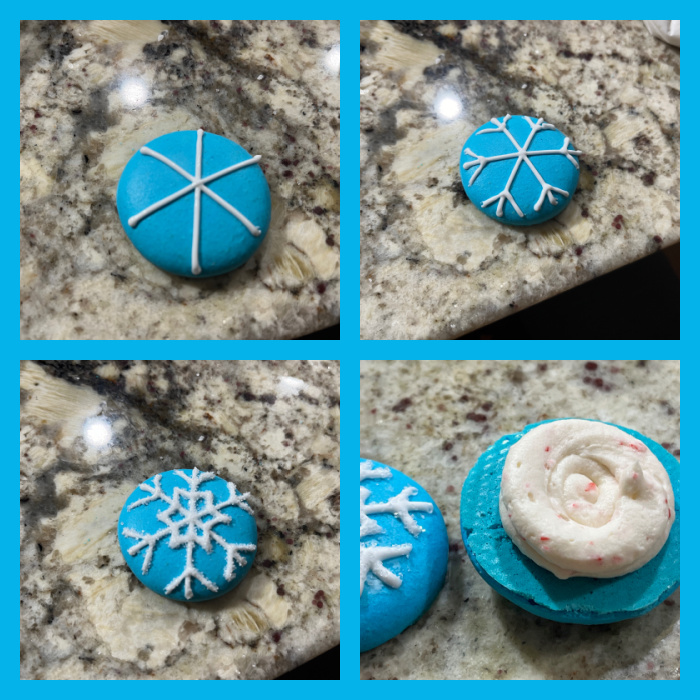
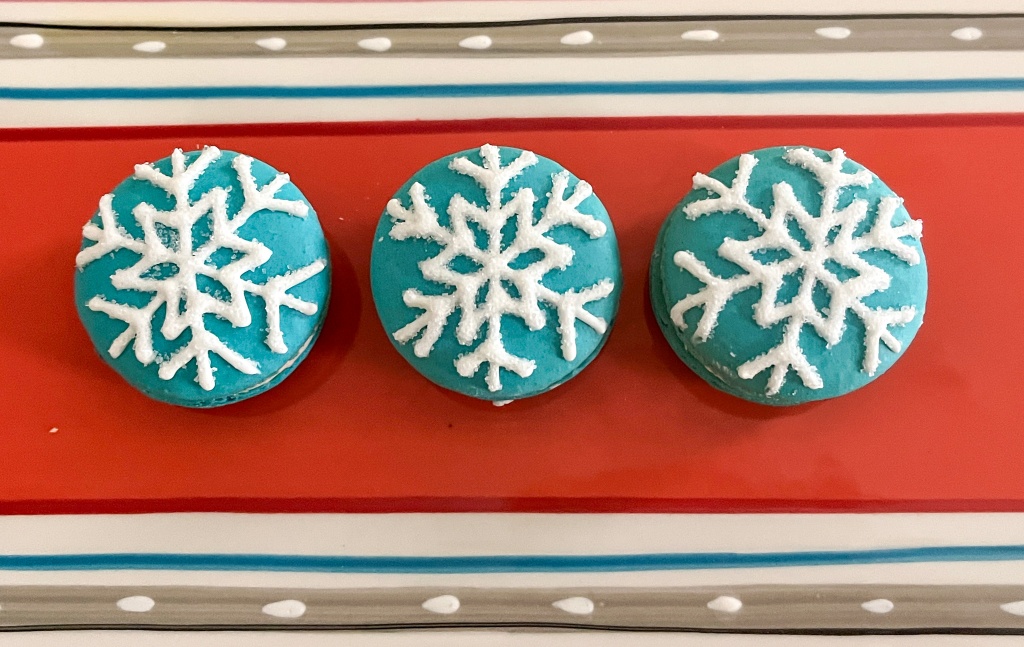
Whisk butter, powdered sugar and vanilla extract until light and fluffy. Mix gently the peppermint dust, adjust consistency with milk, if needed. Transfer to a piping bag fitted with a round tip. Match similar sized macaron shells with each other, fill and sandwich the cookies. Decorate the top with Royal icing in the shape of a snowflake and sanding sugar, if so desired, or leave them plain. Keep in the fridge for 24 hours for perfect texture.

ENJOY!

to print the recipe click here

Comments: After the incredibly amazing macaron masterpiece I shared with you, maybe this post should be named “Down to Earth Macarons”…. I am still in complete awe of Veronika’s talent. But moving on to my little babies: normally I would add peppermint extract or peppermint oil to the buttercream, but this time I omitted and just incorporated some of the peppermint dust. I find that it is very easy to add too much of the extract, and get into “Toothpaste Territory”. I liked the more subtle flavor of the pulverized candy. As to the decoration, piping consistency Royal icing and sanding sugar did the job.

From what I learned browsing around, peppermint “dust” is sold in many versions, some quite fine, some pretty coarse. I don’ think it makes much of a difference in taste, so use what you are able to find, and if all else fails, you can always crush some candy yourself and incorporate it in your buttercream. It is a flavor that helps fight the cold outside. Macarons, a little hot chocolate, and a fireplace going! 

ONE YEAR AGO: Valentine’s Sourdough, Three Ways

TWO YEARS AGO: Embossed Chocolate-Cherry Sourdough Loaf

THREE YEARS AGO: Springerle Painting 101

FOUR YEARS AGO: Mincemeat Pies, when the third time is a charm

FIVE YEARS AGO: Shibari Bread]

SIX YEARS AGO: Incredibly Simple Times Four – January 2018 

SEVEN YEARS AGO: Two Salads and a Blog Award!

EIGHT YEARS AGO: When Three is Better than Two

NINE YEARS AGO: Somebody Stop Me!

TEN YEARS AGO: Zucchini Pasta with Cilantro-Cashew Pesto

ELEVEN YEARS AGO: Bran Muffins, Take Two

TWELVE YEARS AGO: Brown Butter Chocolate Chip Cookies

THIRTEEN YEARS AGO: Mogo Mojo

FOURTEEN YEARS AGO: Slow-Roasted Chicken Thighs: an Ice-Breaker

PEPPERMINT WREATH MACARONS

With this post, I share a new take on buttercream which I recently found by accident on a scroll around Youtube University. I could not wait to give it a try. You can watch her video and full explanation of the rationale behind it with a click here. If the subject appeals to you, it will be worth the few minutes of your time, I promise. And it is also a new way to pipe shells, but I cannot take credit for it, I saw some pictures on Pinterest and decided to give it a try.


PEPPERMINT WREATH MACARONS
(from The Bewitching Kitchen)

for the macaron shells, use THIS RECIPE
add green gel food dye

for the buttercream mint filling:
170g unsalted butter, softened
104g light corn syrup
60g powdered sugar
1/8 tsp salt
1/2 tsp vanilla
1/2 tsp mint extract (adjust amount to your liking)

Whip the butter with the WHISK attachment in medium speed until fluffy and lighter in color. With the machine running, slowly add the corn syrup. Increase speed to high and whip for 2 to 3 minutes. Add the vanilla and mint extract, whisk to combine and then add the powdered sugar. Whisk until combined and then switch to the paddle attachment, mixing for 30 seconds or so, to remove air bubbles.

Make the shells. Stop the macaronage before it gets fully smooth, and place half the batter in a piping bag fitted with a closed star tip (I used Wilton #25). Pipe as shown in the composite photo below. The leftover batter can be mixed further to make smoother shells, and then piped as circles of the same dimension of the wreath. If you prefer, you can use two wreath shapes to form a macaron. Add sprinkles as soon as you pipe the shells.

Bake as directed in the original recipe. Pipe the mint buttercream filling, close the shells, and allow to mature in the fridge overnight before serving.

ENJOY!

to print the recipe, click here

Comments: These macarons turned out a little bigger than I expected, so next time I might use a smaller tip to make them a little more delicate. But the most important thing is that they hold the shape well and there were no explosions during baking. I also made smaller versions piping a sort of swirl with the same tip, pairing with a regular round shell. The buttercream worked very well, and I can tell that I’ll be using it often in the future. It has a wonderful texture and it is definitely less cloying than the traditional American version. Give a try, and you might love it too…

ONE YEAR AGO: Cornish Hens with Yogurt-Mace Marinade

TWO YEARS AGO: Cookies for the Holidays – Gingerbread

THREE YEARS AGO: Incredibly Simple Times Four

FOUR YEARS AGO: White Chocolate and Raspberry Mousse Cake

FIVE YEAR AGO: Panettone Time!

SIX YEARS AGO: Pistachio Creme Brulee

SEVEN YEARS AGO: Fast and Furious Bison Chili

EIGHT YEARS AGO: In My Kitchen, December 2014

NINE YEARS AGO: Braised Fennel with Saffron and Tomato

TEN YEARS AGO: Revenge of the Two Derelicts

ELEVEN YEARS AGO: Grilling Ribbons

TWELVE YEARS AGO: Peppery Cashew Crunch

THIRTEEN YEARS AGO: Baked Shrimp and Feta Pasta

WHEN OREOS FALL IN LOVE

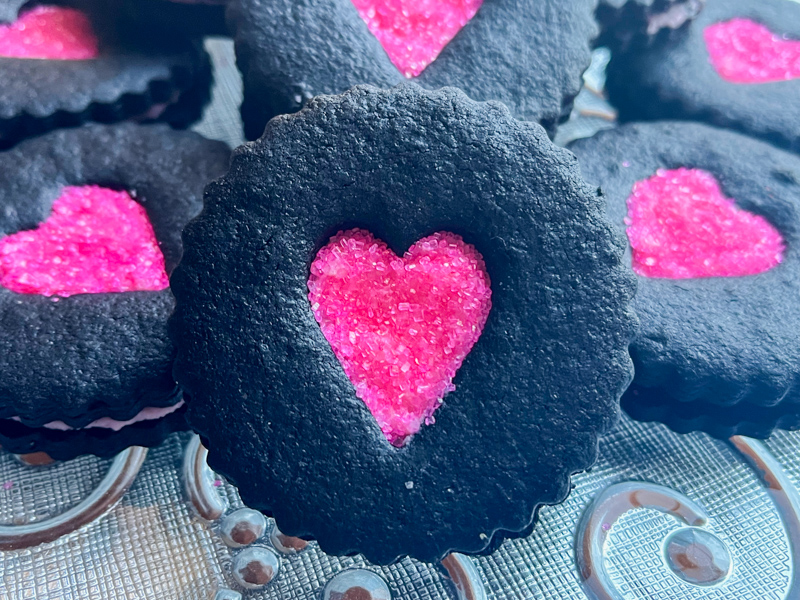
Yes, I do have a cookie blog, but when I try a new recipe, it will be here in my Bewitching Kitchen site. These cookies are a marriage of Oreos with Linzer, perfect for Valentine’s Day. They have a wonderful peppermint flavor, both in the cookie and the filling. Simply omit if you are not fond of it. I actually modified the filling a bit, because using the hard candy takes it too much into toothpaste-territory for my taste. Check the original recipe, you might prefer to follow that path. Remember, your kitchen, your cookies!

CHOCOLATE-PEPPERMINT COOKIES
(slightly modified from purewow.com)

for the filling:
1 bag of Moroccan mint tea
½ cup (115g) heavy cream
200g finely chopped white chocolate
Pinch of fine sea salt
pink gel food coloring

for the cookies:
10 tablespoons (142g) unsalted butter, at room temperature
135g granulated sugar
53g brown sugar
1 large egg, at room temperature
1 large egg yolk, at room temperature
1 teaspoon vanilla extract
¼ teaspoon peppermint extract
240g all-purpose flour
45g black cocoa powder
¼ teaspoon baking powder
½ teaspoon fine sea salt
pink sanding sugar to decorate

Place the tea bag and heavy cream in a small saucepan. Heat until simmering, close the pan and let it infuse for 5 minutes. Remove the tea bag, squeezing it hard. Re-heat the cream and when it is almost boiling, add to a bowl with the white chocolate, together with a pinch of salt. Let sit for a minute, then stir gently until fully dissolved. Add a tiny drop of pink gel food coloring (optional). Transfer to the fridge for several hours. When ready to use, whip it with a handheld blender but do not over-whip or the ganache might seize up.

Make the cookie dough: In the bowl of an electric mixer fitted with the paddle attachment, cream the butter, granulated sugar and brown sugar until light and fluffy, about 5 minutes. Add the egg and egg yolk; mix well to combine. Thoroughly scrape down the side of the bowl, then add the vanilla and peppermint extracts and mix to combine.

In a small bowl, whisk together the flour, cocoa powder, baking powder and salt; add to the mixer and mix until just incorporated. Scrape down the side of the bowl, then mix again briefly on low speed to make sure everything is combined. Divide the dough in half and form each half into a 1-inch-thick disk. Wrap each disk tightly in plastic wrap and refrigerate for at least 1 hour (and up to overnight).

Heat the oven to 325 F.

On a lightly floured surface, roll out one portion of dough to ⅛ inch thick. Use a 2-inch round cookie cutter to cut the dough and then transfer each round to one of the prepared baking sheets. Repeat with the second disk of dough. Use a mini cookie cutter to cut a shape from the center of each cookie on the second tray; remove the cutouts. Bake until the cookies are set at the edges, 8 to 10 minutes, rotating the trays between racks halfway through baking. Cool completely.

Assemble the cookies: Flip the cookies without cutouts over, then pipe the filling into the center of each cookie, leaving a ¼-inch border. Place one of the cookies with a cutout on top and press down slightly until the filling reaches the edge of the cookies. Sprinkle sanding sugar on the opening. Let set for 30 minutes before serving. They keep well at room temperature for several days.

ENJOY!

to print the recipe, click here

Comments: I used a small heart-shape cutter for the opening. You can use a simple round or another shape of your choice. I recommend using black cocoa if you really want to take those into the Oreo world. And the peppermint flavor was a nice twist. I visualize those with a Christmas aura, making the center as a round, or a star-shape and using red, white, and green non-pareils to decorate the center.

The cookie itself is very flavorful and I baked some in small little rounds, then decorated the top with dots of Royal icing I had leftover from another cookie adventure. That is of course totally optional, but oh so very cute, right?

If you like Oreos, I hope you give this version a try.

ONE YEAR AGO: Slow-Roasted Sweet Potatoes in Tomato Cardamon Sauce

TWO YEARS AGO: Sweet Potatoes in Tahini Sauce

THREE YEARS AGO: 30-Hour Leg of Lamb with Mashed Sweet Potatoes

FOUR YEARS AGO: Maple-Grilled Pork Tenderloin over Lemony Zucchini

FIVE YEARS AGO: Danish Rye Bread

SIX YEARS AGO: The Best Sourdough Recipe

SEVEN YEARS AGO: Mini-Quiches with Duxelles and Baby Broccoli

EIGHT YEARS AGO: Quinoa and Sweet Potato Cakes

NINE YEARS AGO: Pumpkin Bolo de Fuba’ Cremoso

TEN YEARS AGO: Citrus-crusted Tilapia Filets

ELEVEN YEARS AGO: Bran Muffins, not just for Hippies

TWELVE YEARS AGO: Flourless Chocolate Cake

MACARONS FOR THE HOLIDAY SEASON


One recipe, two colors, four different ways to decorate, from simple to a little more time-consuming. It is definitely the reason why I adore macarons. You can dress them up for party or keep them simple, and play with filling flavors that match any season. For these Christmas-inspired versions, I filled some with raspberry jam and others with white chocolate-mint ganache.

CHRISTMAS MACARONS
(from the Bewitching Kitchen, adapted from Colette Christian)

for the shells:
200 g powdered sugar
115 g almond meal
115 g egg whites at room temperature
a pinch of cream of tartar
100 g granulated sugar
Red or Green gel color from Artisan Accents
1/4 tsp vanilla paste

for the filling:
Raspberry jam
or
240g white chocolate, chopped
5 Tablespoons heavy cream
1/4 to 1/2 tsp peppermint extract
1/8 cup mini mint chocolate chips (optional)

to decorate:
white candy melts
red food color
gold dust dissolved in lemon extract or vodka
sprinkles of your choice
or
Royal Icing:
40 g egg whites
210 g powdered sugar
lemon juice

Line 2 or 3 heavy baking sheets with Silpat mats. Layer the powdered sugar and almond meal in a food processor. Pulse until the mixture looks like fine meal, about 15 seconds. Pass through a sieve and transfer to a small bowl. Set aside.

Place the egg whites and pinch of cream of tartar in the bowl of a stand mixer fitted with the whisk attachment. Make sure that the bowl and the whisk are impeccably clean. Starting on medium speed, whip the whites with the cream of tartar until they look like light foam. The whites should not appear liquid. The foam will be light and should not have any structure.

Slowly rain in the granulated sugar, trying to aim the stream between the whisk and the side of the bowl. Turn the speed up to medium-high. Continue to whip the meringue until it is soft and shiny. It should look like marshmallow creme. Add the gel color and the vanilla. Staying at medium-high speed, whip the egg whites until the mixture begins to dull and the lines of the whisk are visible on the surface of the meringue. Check the peak. It should be firm. Transfer the whites to a medium bowl.

Fold in the almond meal mixture in three increments. Paint the mixture halfway up the side of the bowl, using the flat side of a spatula. Scrape the mixture down to the center of the bowl. Repeat two or three times, then check to see if the mixture slides slowly down the side of the bowl. Put the mixture in a piping bag fitted with one of the tips listed above. Pipe on the prepared baking sheets.

Slam each sheet hard four to six times on the counter. Let the unbaked macarons dry until they look dull, 30 to 40 minutes.

While the macarons are drying, heat the oven to 300 F.  Bake one sheet at a time on the middle rack. Check in 11 minutes. If the tops slide, then bake for 2 to 3 more minutes. Let the macaroons cool for 10 minutes before removing from the pan.

Make the filling:  Melt the white chocolate with the mint chips (if using) in a double boiler or microwave, very gently. Add the heavy cream and stir until smooth. Add the peppermint extract. Allow it to cool to almost room temperature and whisk with a hand-held mixer to achieve piping consistency. Do not over-whip or the ganache will go grainy. Use to fill shells.

Decorate with melted Candy melts and sprinkles. For the brush effect, use a fan brush on a mixture of gold dust with lemon extract. To make the Royal Icing mix all ingredients in a Kitchen Aid type mixer for 5 minutes, adjust consistency with lemon juice or powdered sugar.

Store macarons in the fridge for 24 hours before serving.

ENJOY!

to print the recipe, click here


These shells were decorated with Royal Icing using either a very fine piping tip (Wilton number 1), or a slightly bigger tip (Wilton number 3). Sanding sugar was sprinkled on some macarons while still wet and allowed to dry.  They were filled with White Chocolate Ganache, and tasted amazing!


The filling for this batch was a simple, store-bought raspberry jam, decorated with white candy melts dyed red.

Raspberry Jam filling once again, with a drizzle of white candy melts and sprinkles…

They really make it for a nice, festive presentation that screams Christmas! I made them when I had a special interview at home for our evening news… If you’d like to see it, click here


But the simplest of all to decorate might be one of my favorites… I love the contrast of gold with green… Red and gold could be wonderful too, I might bake another batch before saying goodbye to 2019.

ONE YEAR AGO: Apple and Sobacha Caramel Dome Cake 

TWO YEARS AGO: White Chocolate Peppermint Macarons (serendipity?)

THREE YEARS AGO: Shrubs, a fun alternative to alcoholic drinks

FOUR YEARS AGO: Date Truffles 

FIVE YEARS AGO: Mascarpone Mousse from Baking Chez Moi

SIX YEARS AGO: Pumpkin Brigadeiros

SEVEN YEARS AGO: Pumpkin Espresso Loaf

EIGHT YEARS AGO: Caramelized Carrot Soup

NINE YEARS AGO: Miso-Grilled Shrimp

TEN YEARS AGO: A Special Holiday Fruitcake