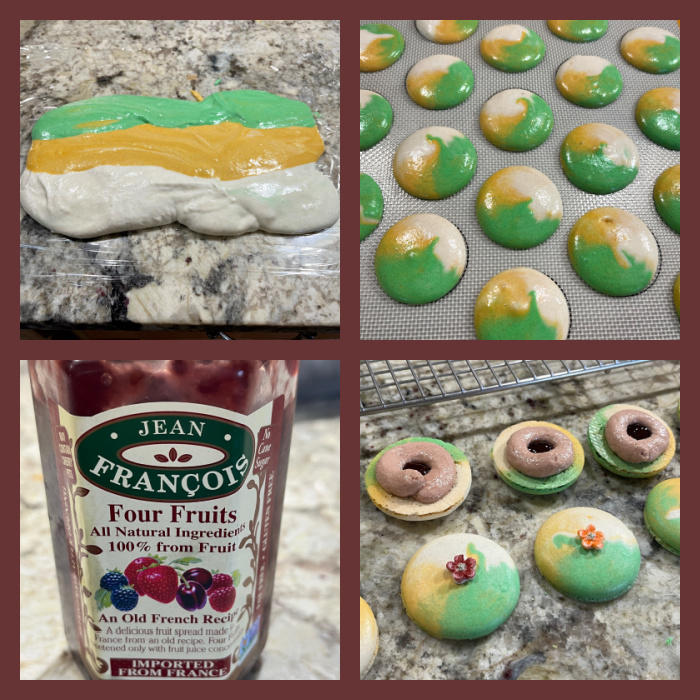
The recipe used for the shells is my default that you can find here. Simply divide the batter in three portions and use the colors of your choice. For the Ruby Red Ganache Macarons, I used yellow, green and plain batter. For the Neapolitan Version I used brown, pink and plain. I added a small amount of cocoa powder to the brown component. Decorations were all made with fondant and a silicone mold, later painted with luster powder and vodka.
RUBY RED GANACHE AND JAM MACARONS
220g ruby red chocolate 80g heavy cream pinch of salt mixed fruit jam (store bought is fine)
Heat the cream in a small saucepan until bubbles form around the edges. Pour over the chocolate, add a pinch of salt, cover and let sit for five minutes. Whisk gently at first, continue whisking until the chocolate is fully dissolved. If necessary, place in the microwave at 50% power for a minute. Reserve at room temperature for 1 hour or place in the fridge for 30 minutes before using.
Fill the shells with a small dollop of jam and a circle of ganache around it. Proceed as normally, keeping macarons overnight in the fridge to mature.
The jam is a nice contrast with the sweetness of the ganache and the shells. We love this brand of jam, or I should say Phil loves it, I don’t eat jam that much, prefer to use it in recipes such as this one…
.
Moving on…
STRAWBERRY GANACHE MACARONS
230g white chocolate, finely chopped 80g heavy cream 1/4 tsp strawberry natural flavor (I used Olivenation) a drop of pink food color 1 tbs strawberry jam (store bought is fine)
Heat the cream in a small saucepan until bubbles form around the edges. Pour over the chocolate, cover and let sit for five minutes. Whisk gently at first, continue whisking until the chocolate is fully dissolved, then add the jam. If necessary, place the bowl in the microwave at 50% power for a minute. Reserve at room temperature for 1 hour or place in the fridge for 30 minutes before using.
Fill the shells with a small dollop of ganache and keep the macarons overnight in the fridge to mature.
Adding a little drop of pink food gel is a good idea, otherwise the ganache tends to have a pale brownish color. Ganache fillings pair well with fruit, so both recipes today take this approach, and they are perfect for Springtime.
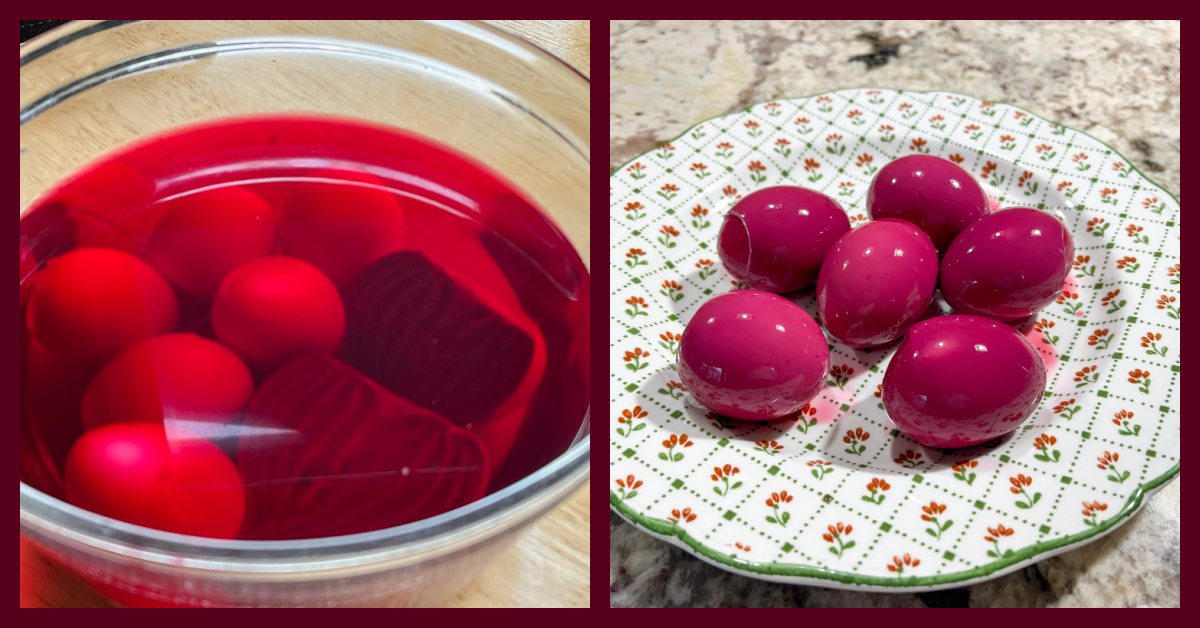
Totally smitten by this recipe, because… color! It was inspired by a version I saw on Molly Yeh’s show Girl Meets Farm, but I made a few modifications.
3 cups of water 1 medium beet, peeled and cut in half 1/4 cup balsamic vinegar 1 tablespoon light brown sugar 2 tsp whole black peppercorns 3/4 cup apple cider vinegar 1 tablespoon salt
6 hard-boiled eggs, peeled 1/4 cup yogurt 1 tablespoons Dijon mustard 1 avocado, mashed Tajin seasoning to taste salt to taste
Put the beet in a medium saucepan and add the water, balsamic vinegar, brown sugar, peppercorns, cider vinegar and salt. Bring to a boil until the sugar is dissolved. Add the peeled boiled eggs to the pan, cover and refrigerate for at least 4 hours, preferably overnight for the most intense color.
Cut the eggs in half, then scoop out the yolks and place them in a medium bowl. Put the egg white halves on a serving platter. To the yolks, mix all other ingredients, making a paste. Adjust with more yogurt if needed. Pipe the mixture into the holes of the egg whites, sprinkle additional Tajin all over.
Comments: Have you ever seen more beautiful color in a boiled egg? Now, the texture of the egg will be slightly different from that of a regular deviled egg due to the pickling step. It is going to be firmer and have a more assertive taste. Phil is not usually too fond of brined/pickled concoctions, but he loved these eggs, so if you are over-the-fence about it, don’t let it scare you. We don’t eat mayonnaise ever, but if you prefer the more authentic version, use it in place of yogurt. These were great as appetizer but also fantastic as my lunch next day. I will be re-visiting this recipe often… Such mesmerizing color!
Thrilled to share that my little baby cookie blog turns THREE YEARS OLD TODAY! Three years, three hundred and thirty cookie posts published… Would love if you pay me a visit (click here)
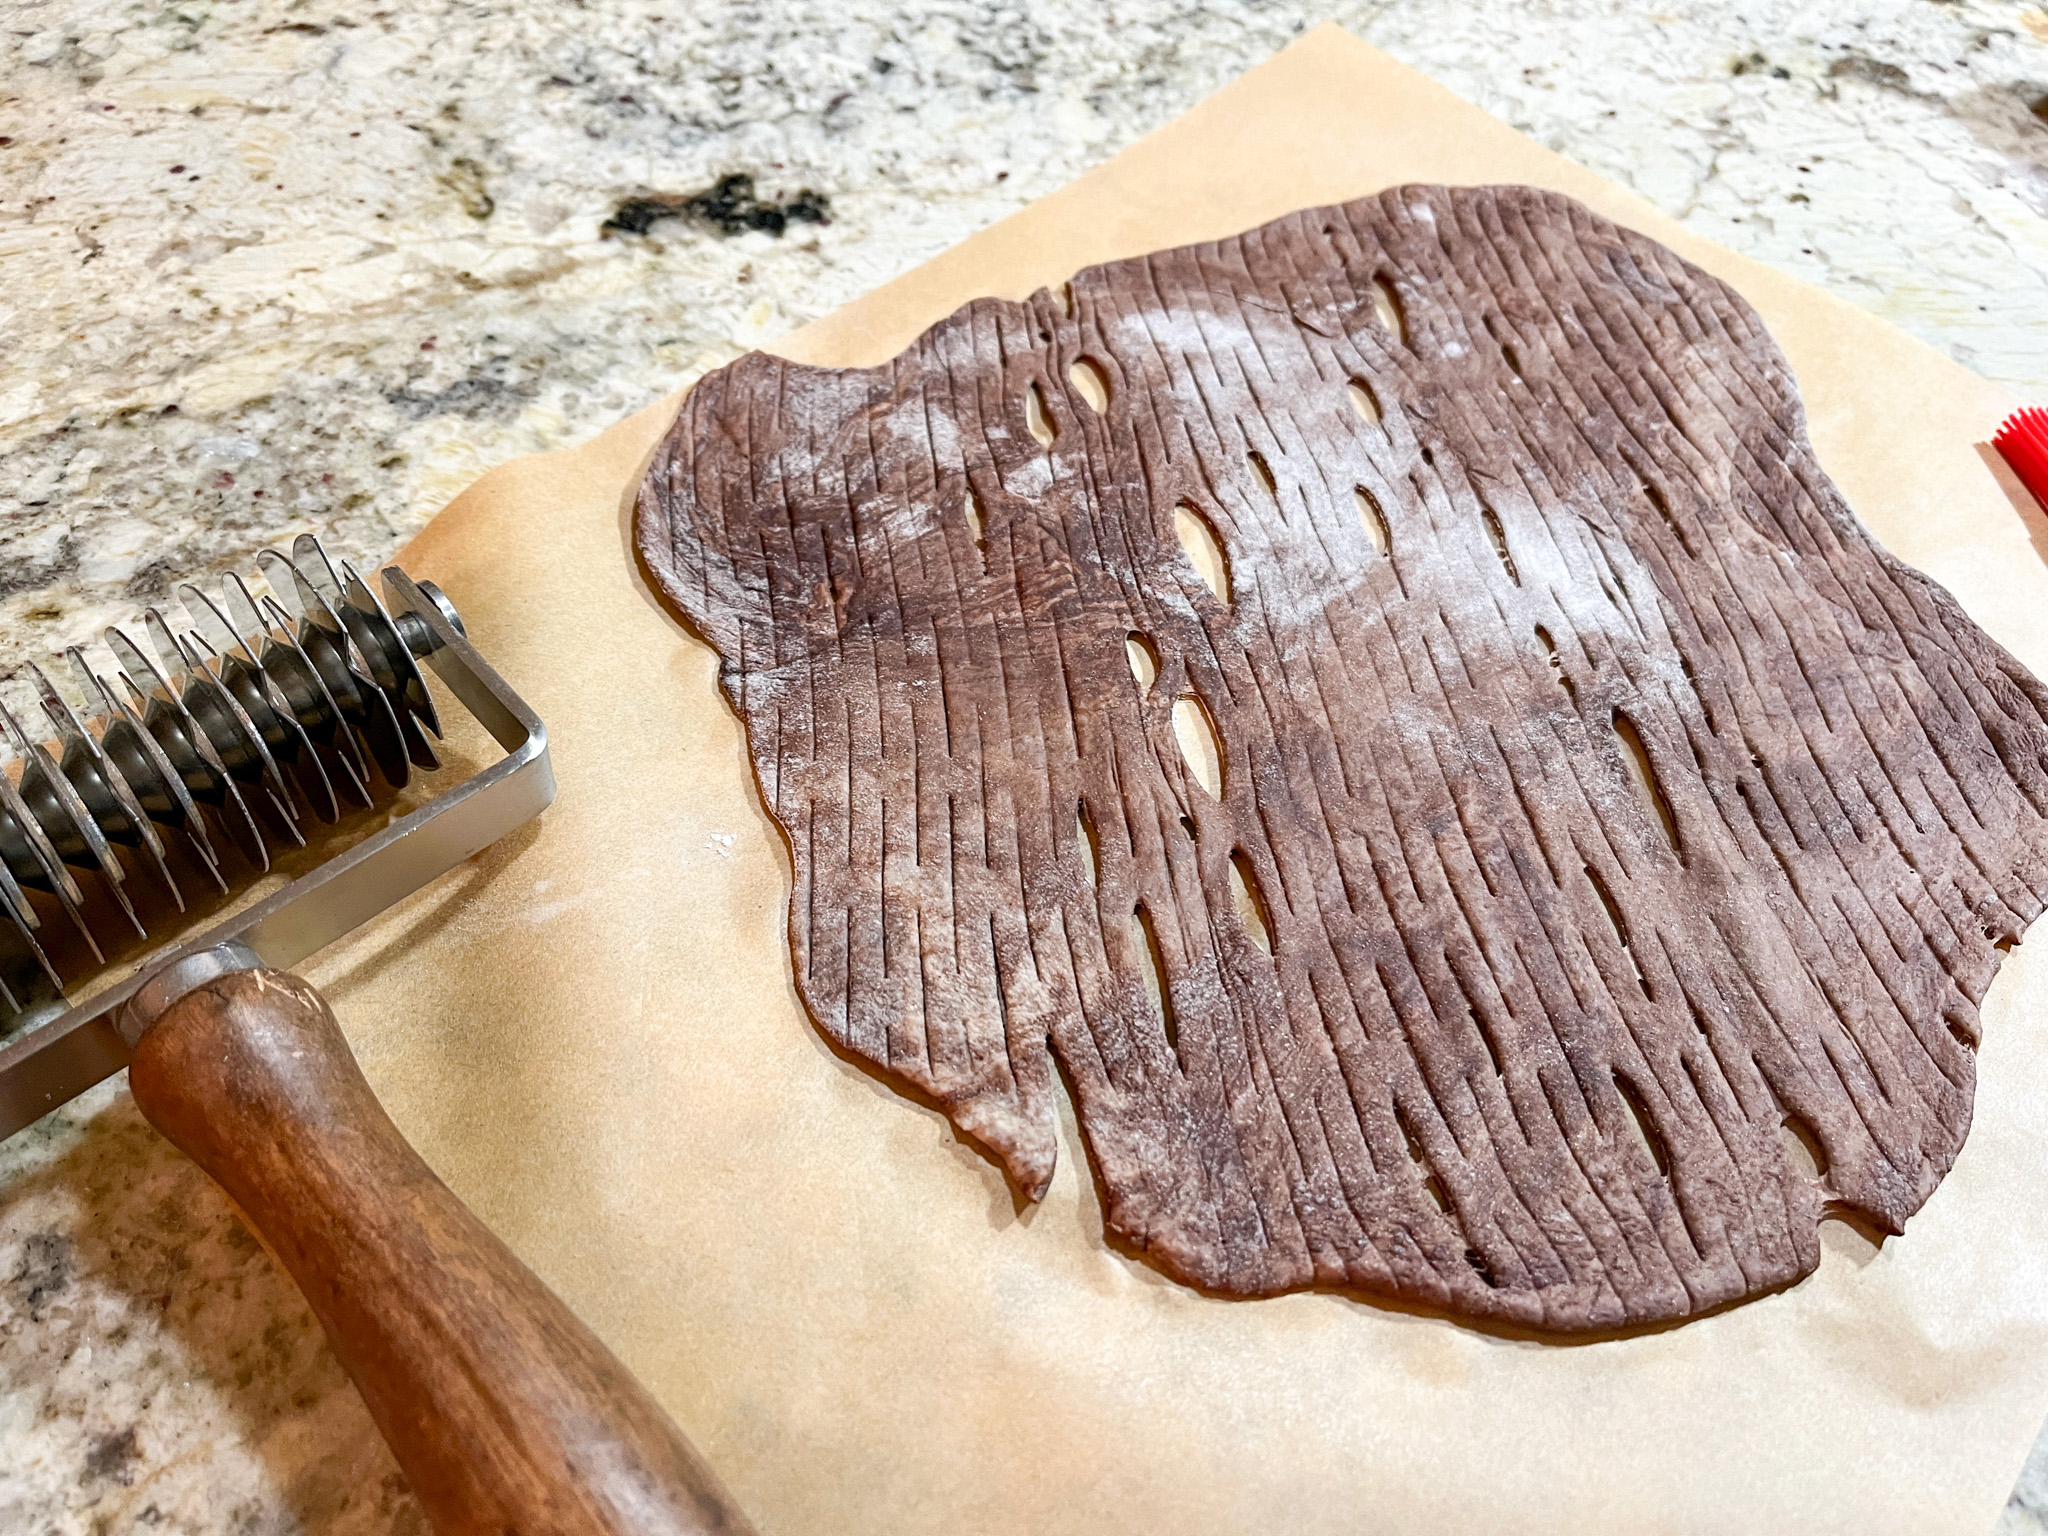
I consider this a work in progress, but for a first time using this technique, I am happy with it. You can use pretty much any formula you like, but go for a minimum of 500g total flour, as you will be removing 150g of dough to make the lattice. To cut the lattice, consider getting this gadget. You can always try to cut it by hand, but I imagine that would be quite tricky… at least for me!
COCOA LATTICE SOURDOUGH (from The Bewitching Kitchen)
400g white bread flour 150g whole wheat 80g sourdough starter at 100% hydration 9 g salt 360g water (I had to add flour as I mixed the dough, it was too sticky) 30g cocoa powder (see comments about it in the method description)
After mixing the dough in the Kitchen Aid for 4 to 5 minutes as I normally do, I went through a series of folding/kneading at 45 minutes intervals for a total of 5 cycles. At that point, I removed 150g of the dough and added the cocoa powder, kneading it into the dough, as best as I could. Not all the amount was incorporated, but the dough was dark enough.
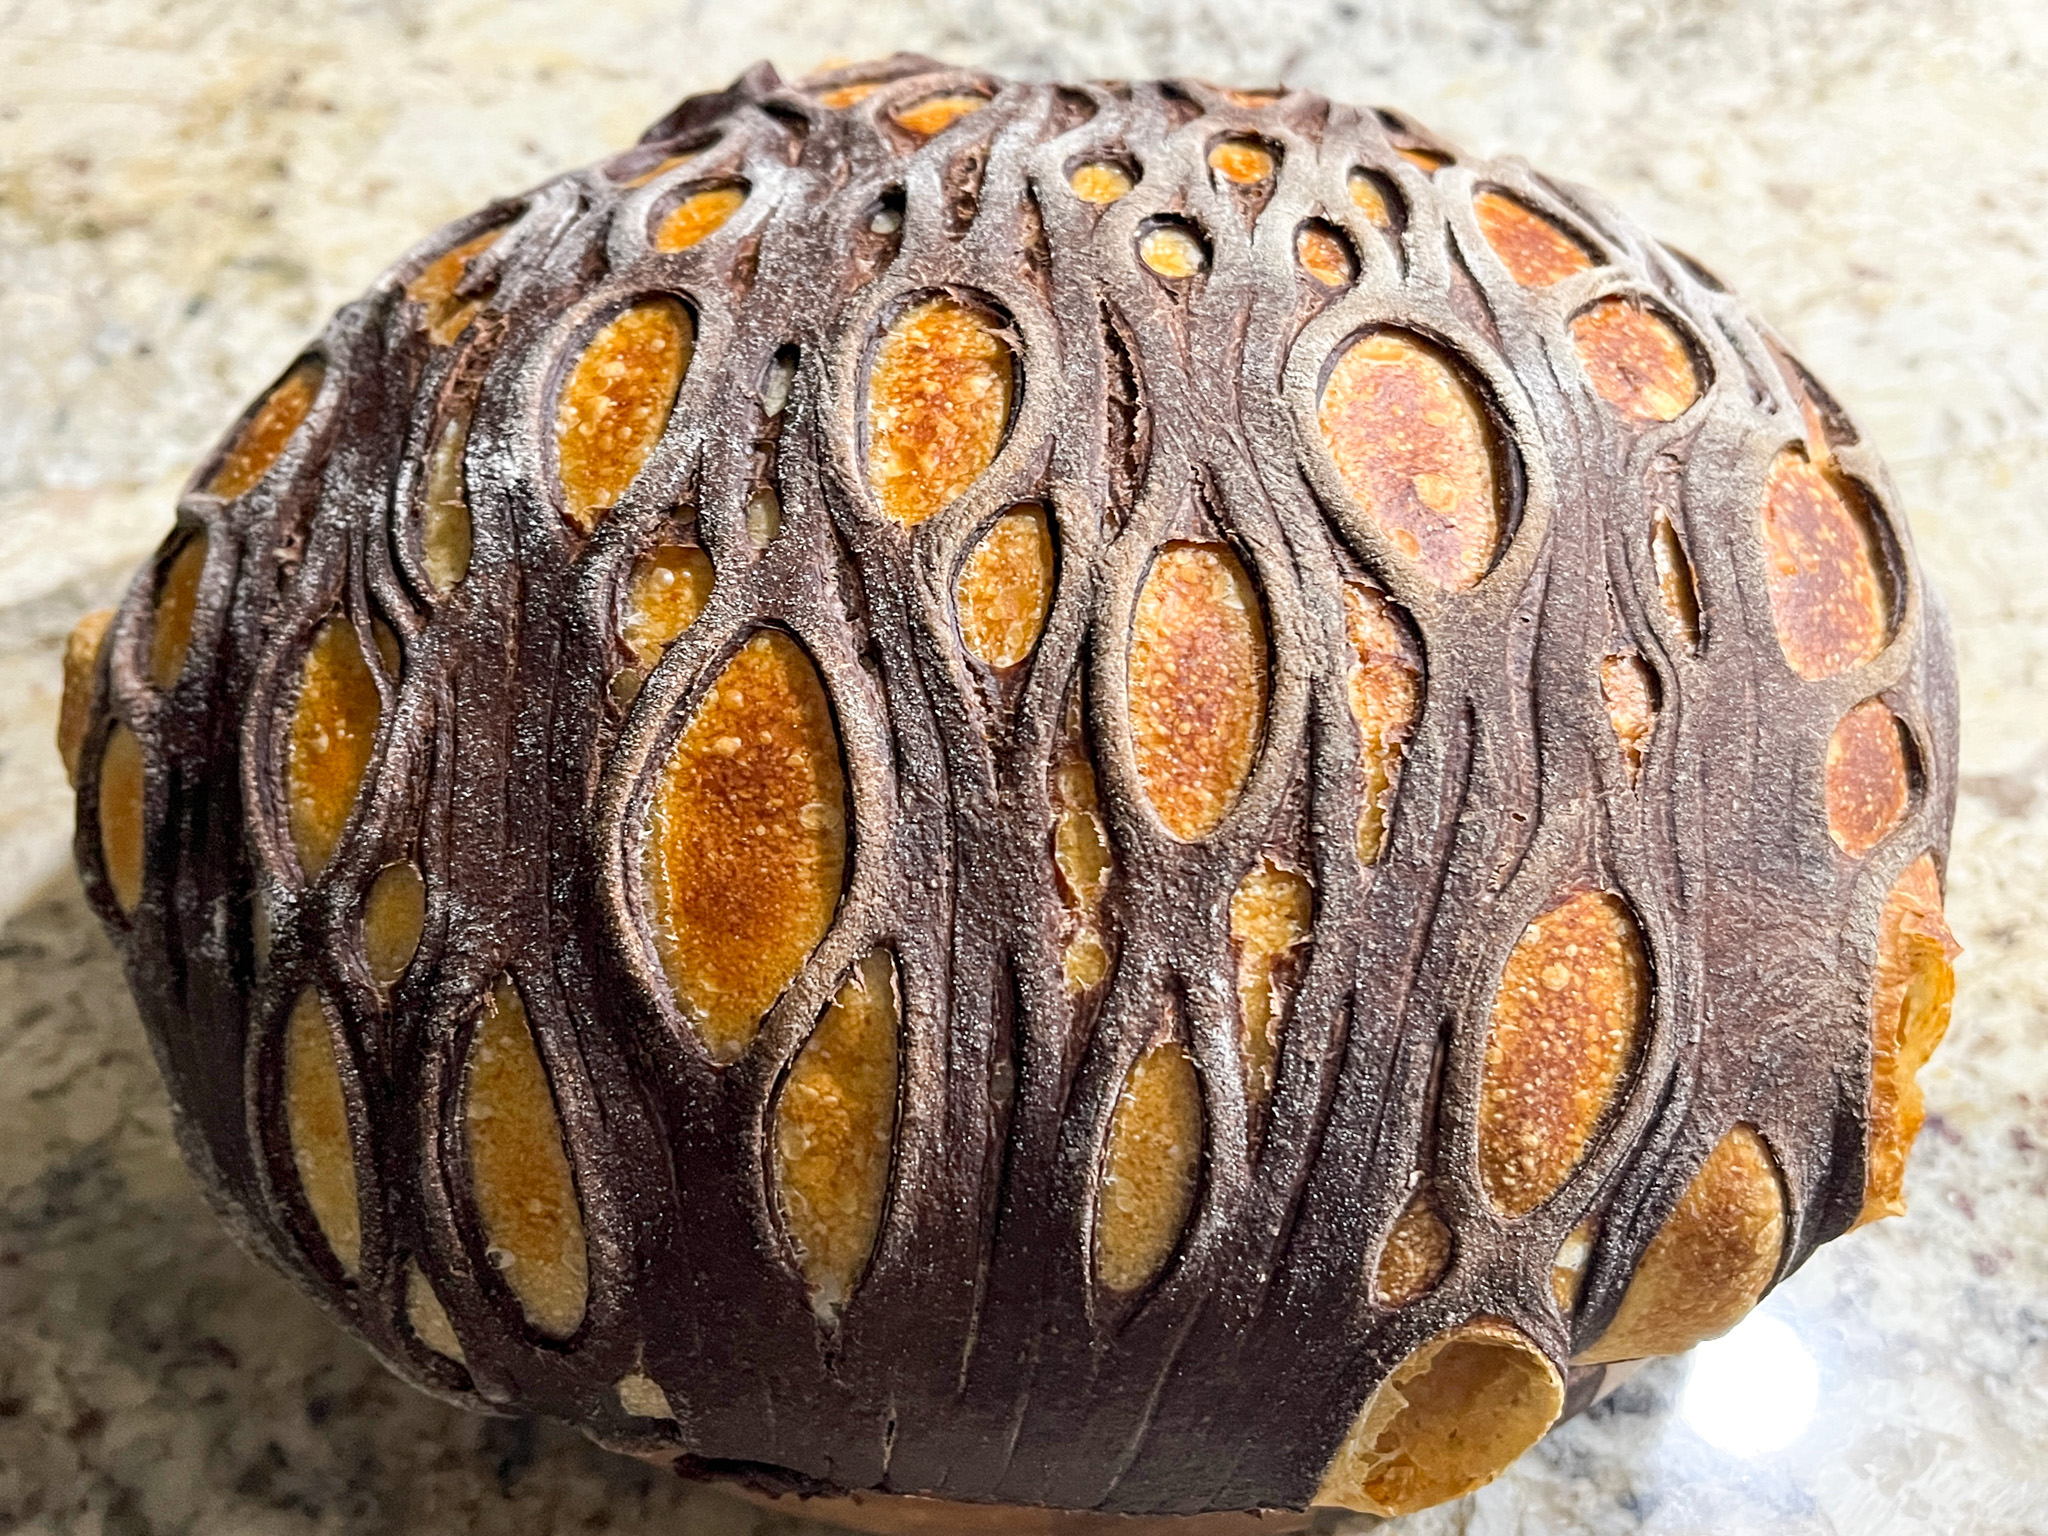
The main dough was shaped as a boule and placed in the fridge overnight. The dark, smaller portion was covered with plastic wrap and also placed in the fridge. Next morning the dark dough was rolled as thinly as possible and cut with the pie lattice gadget. That was carefully placed on top of the main dough right before baking. Keep in mind that the moment the lattice touches the dough you won’t be able to move it and adjust it.
The bread was baked at 450F for 30 minutes covered, and 15 minutes without a lid. Slice after completely cool.
Comments: The picture above was my first attempt at rolling the lattice, and it was too thick, it barely opened at some parts. So I gathered that dough and rolled it again. Try to go as thinly as possible, which was not very easy, the gluten tends to put up a fight. I definitely want to do it again, using other colors, but mainly making sure to roll the lattice thinner. Wish me luck! Why don’t you try it also and let me know how it goes for you? 😉
We did not detect any particular cocoa taste on the bread. The dark part gets a different texture, almost like a cracker. We both loved it… Stay tuned for more lattice adventures in the bread world! .
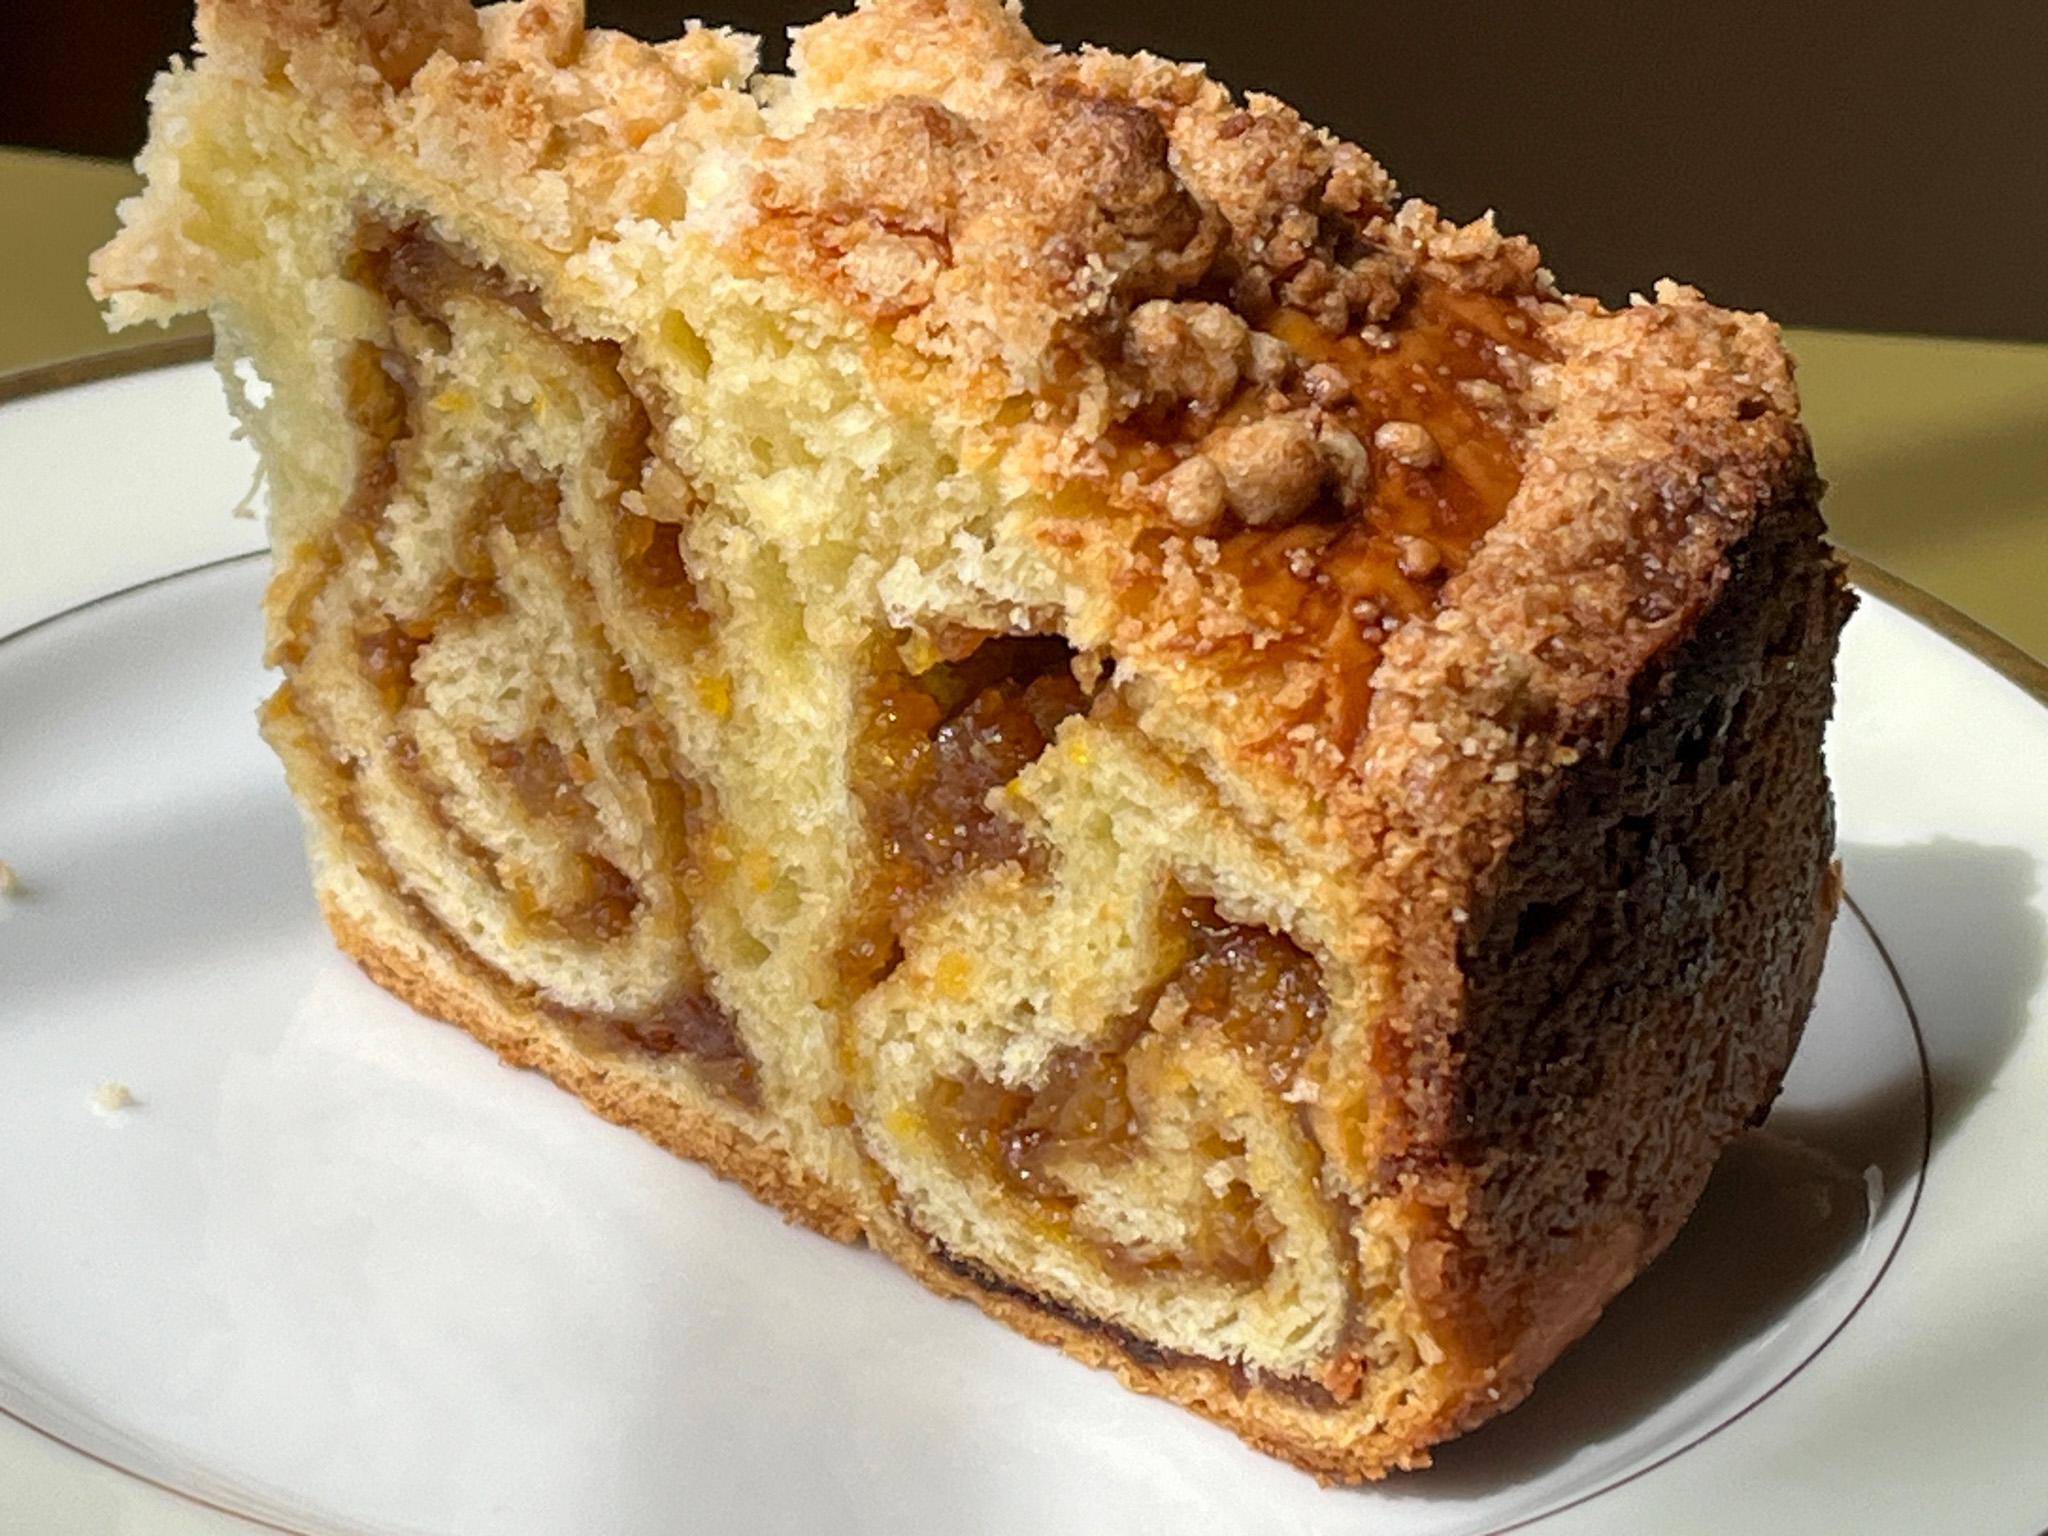
Is it a cake? Is it a sweet bread? Is it heaven on a plate? Yes to all! Another amazing recipe from Helen Fletcher, this is a bit involved but absolutely worth it… Slicing through it to reveal the coiled pattern inside is just too cool!
¾ cup unsalted butter (170 grams) 1 teaspoon active dry yeast 3 tablespoons warm water Pinch granulated sugar 2 ¼ cup bread flour (315 grams) 1 ½ tablespoons granulated sugar ½ teaspoon salt 3 large eggs, room temperature ¼ cup half and half (or heavy cream)
Filling ¾ pound dried apricots 1 cup water 5 tablespoons butter (75 grams) ½ cup powdered sugar (65 grams) 1 ½ teapoons vanilla 2 teaspoons cocoa
Almond Paste Crumb Topping 1 cup cake flour (125 grams) ½ cup almond paste (125 grams) ⅔ cup granulated sugar (130 grams) ½ cup unsalted butter (114 grams)
Assembly 1 large egg, well beaten
Make the brioche dough: Cut the butter into small pieces by cutting the stick in half lengthwise, the cutting it into half inch pieces. Place it back in the refrigerator to keep cold. Make a sponge by dissolving the yeast and pinch of granulated sugar in the 3 tablespoons warm water. Add 3 tablespoons flour from the measured amount of 2 ¼ cups flour. Stir together to completely mix the ingredients. Cover with film and set aside to double or more while preparing the rest of the ingredients.
In the processor bowl fitted with the steel blade, place the remaining flour, salt and sugar. Process 5 seconds to mix. Place the cold butter in a circle over the flour. Process the butter until it is indistinguishable, about 20 seconds. Scrape down and process about 5 seconds more. Place the eggs in a circle over the dry ingredients, pour the half and half or cream over the eggs, and add the sponge, also in a circle. Process approximately 20 to 25 seconds until the ball which initially forms breaks down into a creamy, evenly dispersed batter in the processor bowl. Do not stop processing until the batter is formed, as the motor may stall when you try to restart it. If the ball doesn’t break down, that’s fine as long as everything is mixed well.
Remove from the processor bowl and place in an ungreased bowl. Cover securely with plastic wrap and allow to rise until double in bulk about 2 to 2 ½ hours. Stir down and refrigerate overnight. Punch down and use as directed. It can stay in the refrigerator for up to 3 days before using.
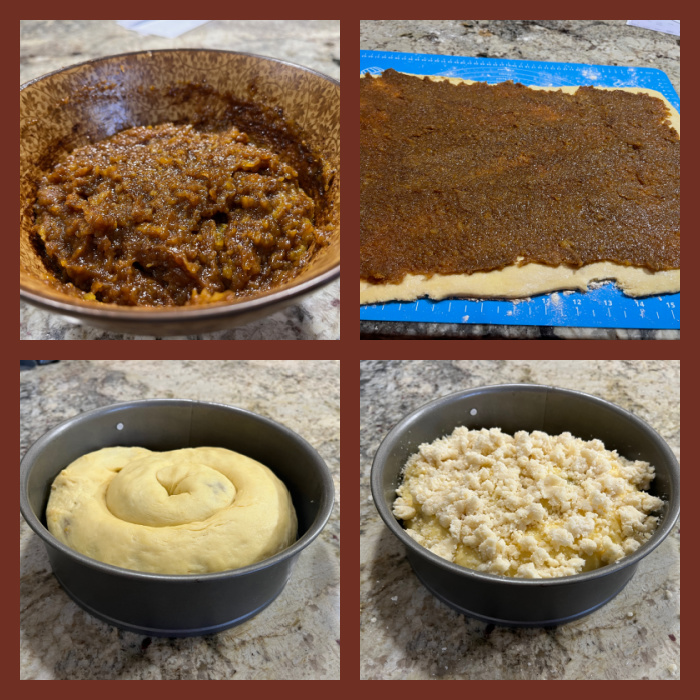
for the filling: Place the apricots and water in a small saucepan and bring to a boil. Reduce to a simmer and, stir frequently until most of the water is gone. Place the apricots and remaining ingredients, except the cocoa, in a processor bowl and process until smooth. Set aside to cool. Stir the cocoa in. This may be made a week ahead and stored in the refrigerator. Remove to room temperature before using.
for the crumb topping: Place the flour and almond paste (either home made or bought) in the bowl of a processor. Process until the almond paste is indistinguishable. Add the sugar and butter and process until it begins to form crumbs. Switch to pulses and pulse only until large crumbs form. Remove them to a bowl and refrigerate until needed.
To assemble the coffee cake: Spray a 9×3″ cheesecake or springform pan with a non-stick baking spray. Set aside. Remove the brioche from the refrigerator, punch down, pat into a rectangle on a lightly floured surface and roll into a 20×11 inch rectangle so the long horizontally in front of you to make rolling up easier. Spread the filling evenly over the brioche within ½” of the edges. Roll up tightly from the 20″side and pinch the seam securely together. Roll and gently stretch it until it is 30″ long. If it is very soft at this time, coil it up on a parchment line baking sheet and chill to firm up. Do not let it freeze.
Starting in the middle of the pan, coil the roll around towards the outer edge of the pan. Press it down to flatten and fill the pan. Cover with a towel and let rise until doubled in bulk. Because everything is cold, this could take 4 to 4 ½ hours to rise.
Heat the oven to 375F. When the coffee cake is full risen, brush it with the beaten egg and distribute the almond paste crumbs evenly over the brioche. Bake for 45 to 55 minutes until the top is browned. A tester is difficult here because the filling stays moist and clings to the tester. If the top begins to brown too quickly, tent it with foil. Cool until barely warm and release the cake. Dust with powdered sugar to serve.
Comments: Helen’s method to make a brioche in the food processor is something I’ve been meaning to try for the longest time, and it works so well, I will keep it as my method of choice from now on. It considerably speeds up the preparation of the dough, and you cannot beat the texture. A pleasure to work with. I could have done a better job keeping the coil leveled on all sides of the pan, if you look at the bottom left photo of the composite above, you’ll see that my coil got a bit lopsided. Other than that, no issues. I highly recommend you visit Helen’s site (click here) because she goes over every little step with pictures and you get a better idea of what to expect as you make this recipe.
The crumb topping is irresistible, so I advise you to stop nibbling on it and use it exclusively to top the cake. I made my own almond paste, following Helen’s detailed recipe, and it turned out perfect! I used her simple syrup method. You can read her post about it clicking here. My little concoction looked exactly like hers – or the ones you can buy at the store – but my picture was badly out of focus, so you will have to take my word for it. I loved making this crumb cake, now I dream of variations, maybe some black sesame paste in the filling could be fantastic also!