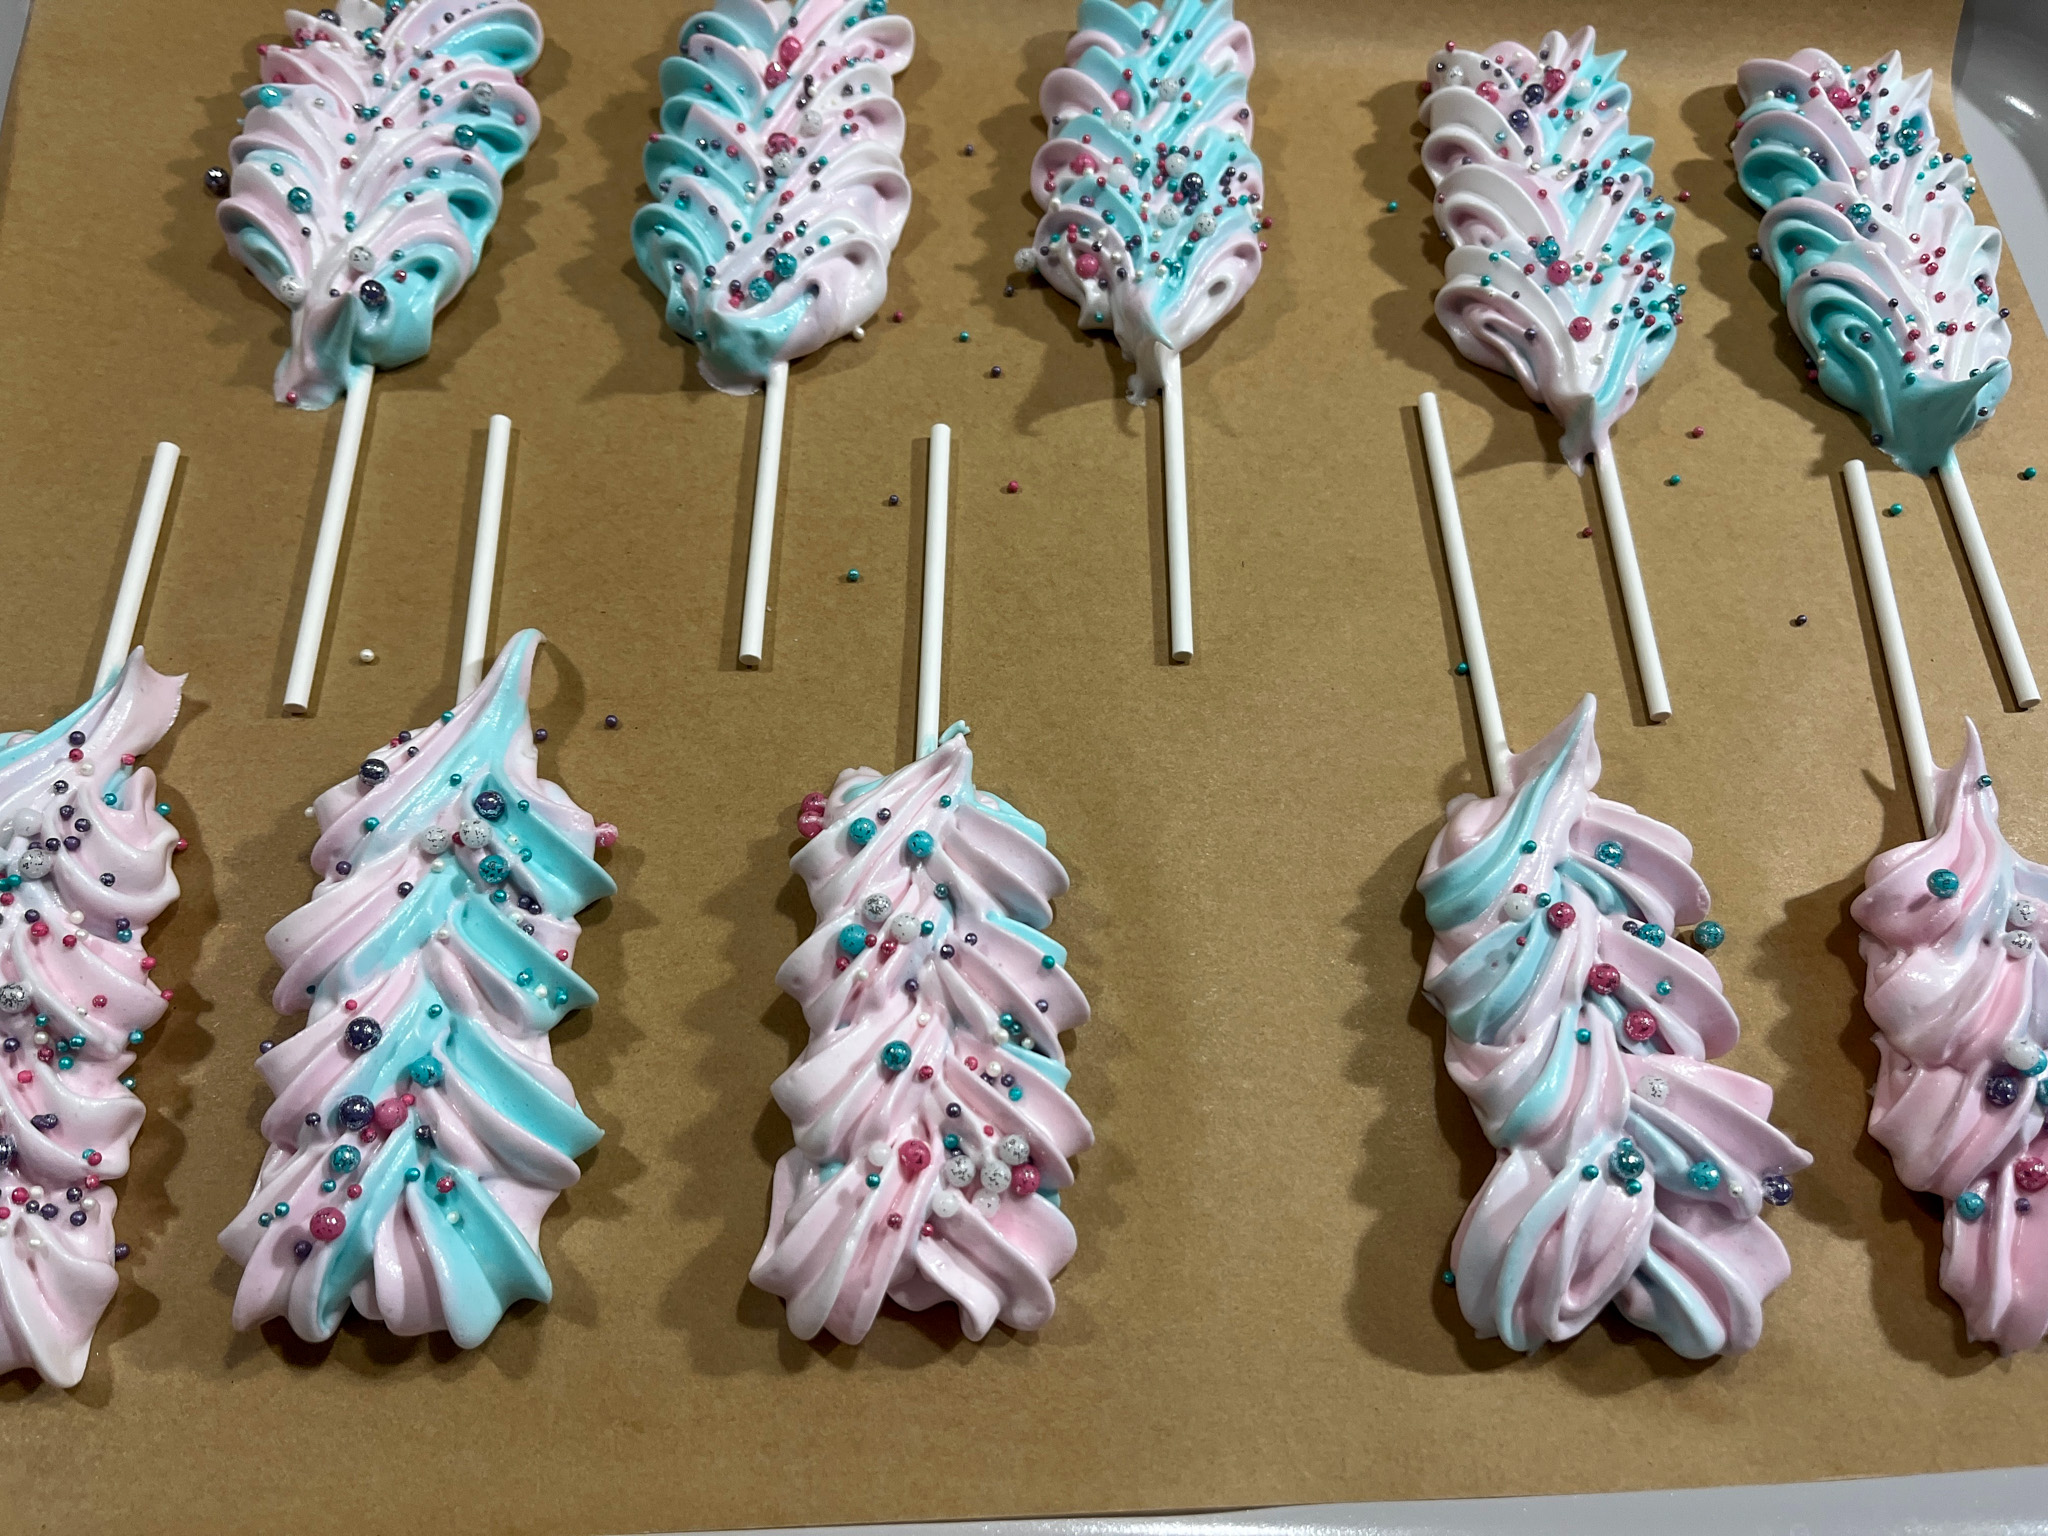
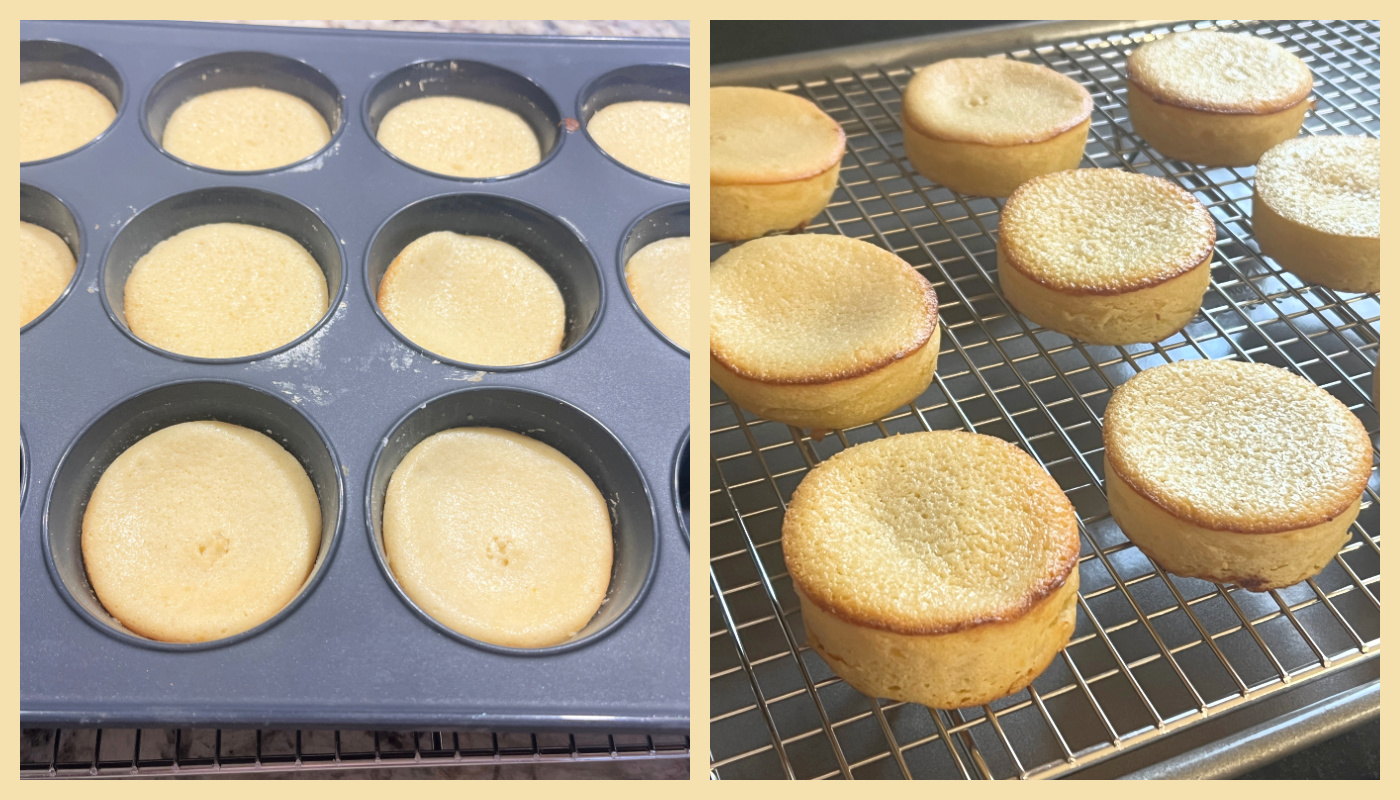
These could easily fit into the Incredibly Simple category, but the outcome will make you seem like the most accomplished baker ever!
MERINGUE LOLLIPOPS (from The Bewitching Kitchen)
2 large egg whites 1/8 teaspoon cream of tartar Pinch of salt 1/2 cup granulated sugar (100g) 1 teaspoon vanilla extract pink and turquoise gel color
Position two oven racks towards the center of the oven and heat the oven to 200ºF. Cover a large baking sheets with parchment paper aside.
To the bowl of a stand mixer fitted with a whisk attachment, add the egg whites, cream of tartar, and salt. Begin mixing on low speed gradually increasing to medium. Once the egg whites start to become frothy, about 30 seconds, slowly add the granulated sugar in three portions, continuing to whisk. Once all the sugar is incorporated, add the vanilla.
The meringue is done once the sugar has fully dissolved and it has a thick texture that holds a nice peak, about 10 to 15 minutes. Separate the batter in three portions, dye 1/3 pink, 1/3 turquoise, leave 1/3 plain. You are aiming for a pastel tone, so use just a small amount, preferably adding the color with the tip of a toothpick.
Transfer the meringue as three lines side by side on a plastic wrap. Roll the wrap like a sausage and insert into a large piping bag fitted with 1M tip. Lay small sticks (oven-safe) on the parchment paper and pipe swirls over the sticks. Immediately add decorative sprinkles.
Bake for 1 hour to 1h and 30 minutes. Turn the heat off and leave the lollipops in the oven for another hour to fully dry. They will lift easily from the paper once they are fully cool.
Comments: Meringue recipes are a lot more forgiving than many people imagine. The ratio of sugar to egg whites will determine how dry the meringue will turn out, but also the amount of time you bake it influences that outcome. You can start – if you want to do it by weight – with 1 part of egg whites to 2 parts of sugar – although my version used slightly higher amount of sugar. It all works in the end. If you prefer a softer bite, use less sugar and bake for a shorter amount of time. It is important to dry them fully so that they can be handled without any sticky moisture on the surface.
And the cuteness level of meringue on a stick? Impossible to beat!
Not sure what is happening but I am getting more and more into eating lentils. I used to think they tasted a bit too “earthy” but now I find lentils, particularly the green, small ones, very delicious. This started as a salad, to be enjoyed cold, obviously. But I had leftovers for two days and on the second I warmed the lentils briefly in the microwave and served with a fried egg, for a very satisfying lunch. The carrots do not suffer from the heating, and if you keep it to a real brief passage in the microwave, the cucumber pieces will be fine. Just don’t try to make it piping hot.
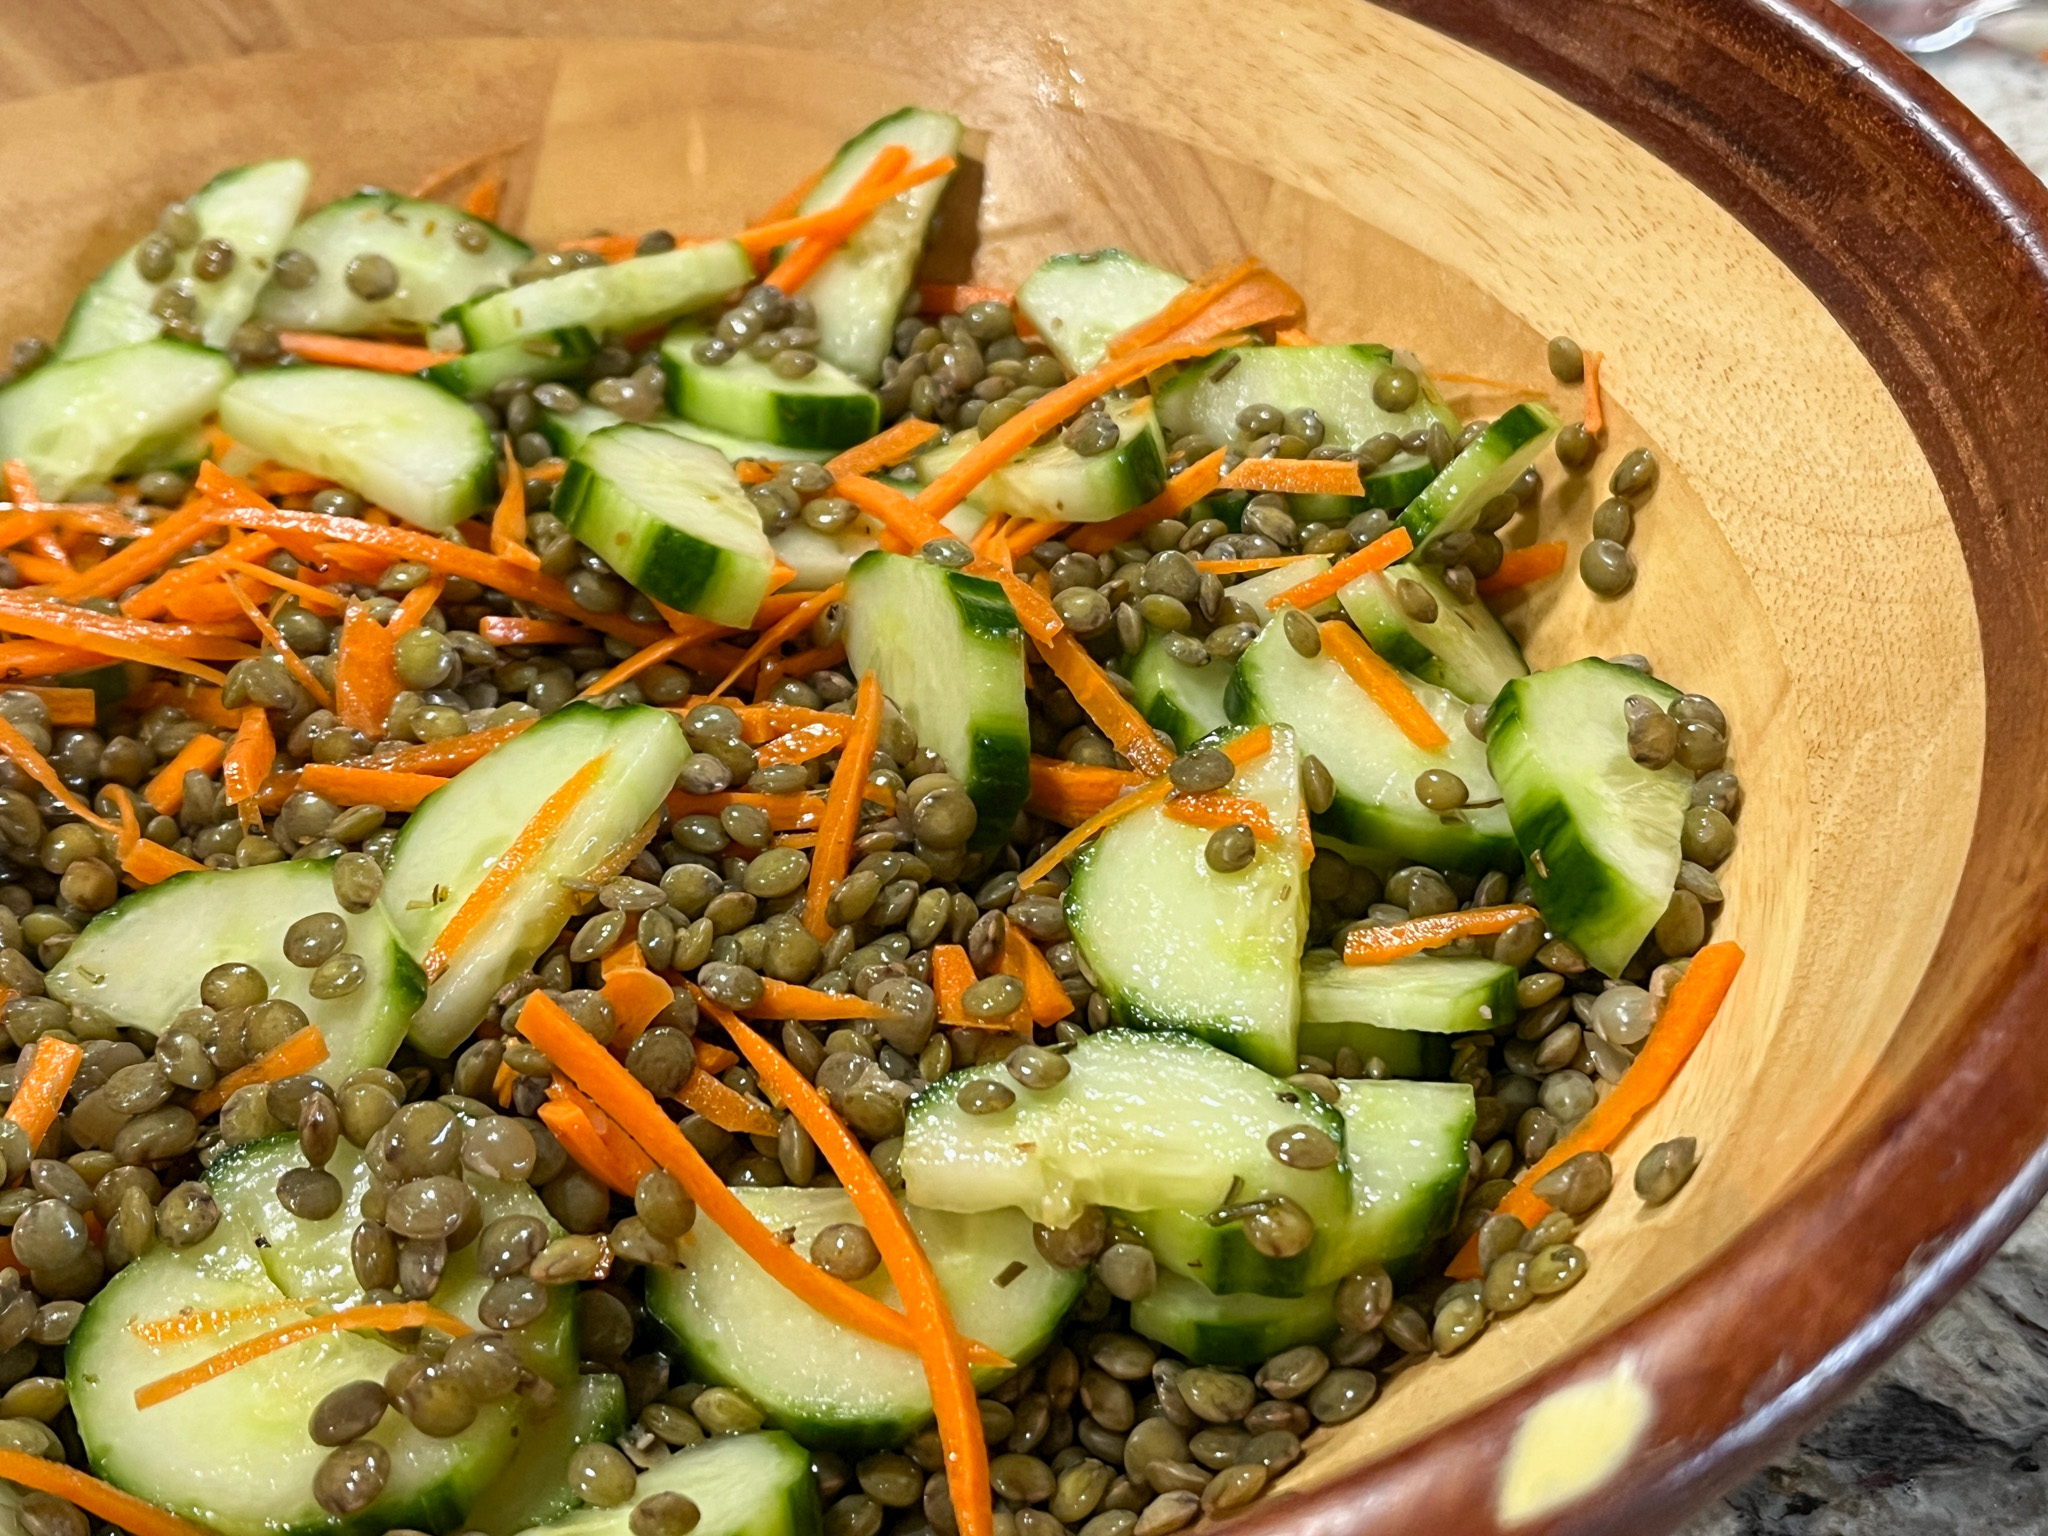
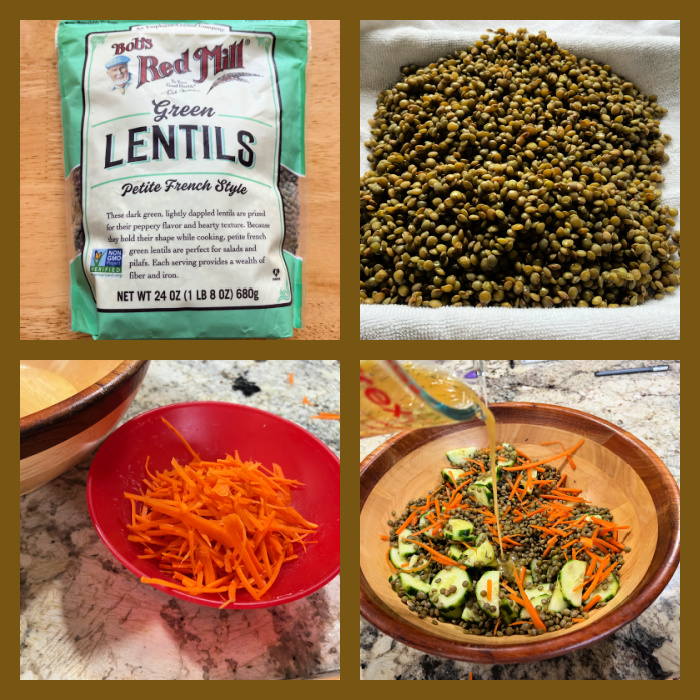
LENTIL SALAD WITH CARROTS AND CUCUMBERS (from The Bewitching Kitchen)
1 cup dried green lentils 2 fresh bay leaves ¼ cup red wine vinegar 3 tablespoons extra-virgin olive oil, plus more to taste 1 tablespoon Dijon mustard 1 tsp salt 2 teaspoons agave nectar 1 large lemon, zested and juiced ground black pepper to taste 3 medium carrots, julienned 1 small cucumber, sliced thin
Sort through lentils, removing any small pebbles or stones, then rinse them well. Add lentils and bay leaves to a large pot and add enough water to cover by 2 inches. Bring to a boil on high then reduce heat to maintain a simmer. Cover and simmer until lentils are tender, 15 to 20 minutes. Discard the bay leaves. Drain the lentils and rinse with cold water. Line a sheet pan with a towel and pour lentils out evenly onto the pan to dry and cool.
While the lentils cook, prepare the vinaigrette: in a large bowl, combine vinegar, olive oil, mustard, agave nectar, half the lemon juice, salt and pepper. Whisk well. Stir in the carrots and cucumber to coat, then add the cooled lentils and toss again. Taste and adjust the seasonings for salt and pepper. Finish with a drizzle of olive oil, more lemon juice to taste and the lemon zest.
Comments: This salad really benefits from a lot of acidity, so do not skimp on the vinegar and lemon juice. Make sure not to over-cook the lentils so that they retain a nice texture. Although it was lovely as a salad, I have to say I enjoyed it even more when gently warmed and served with a fried egg on top. Delicious simple lunch!
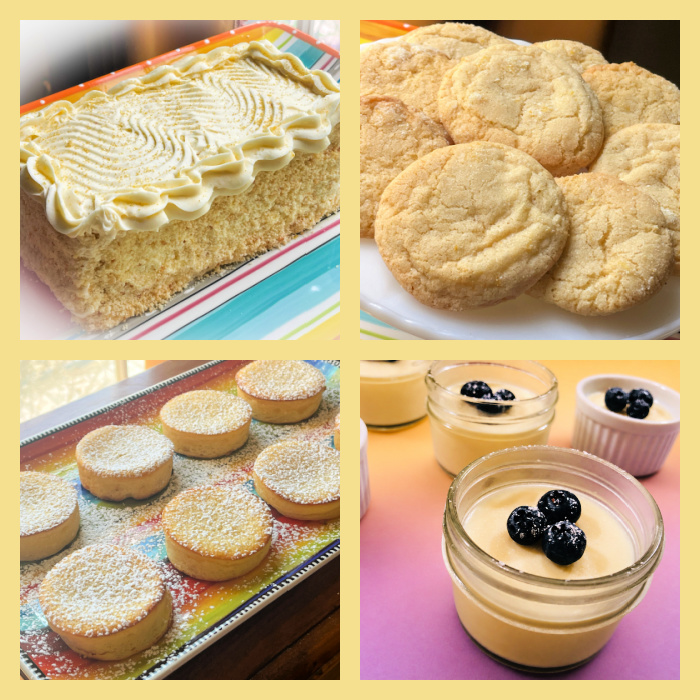
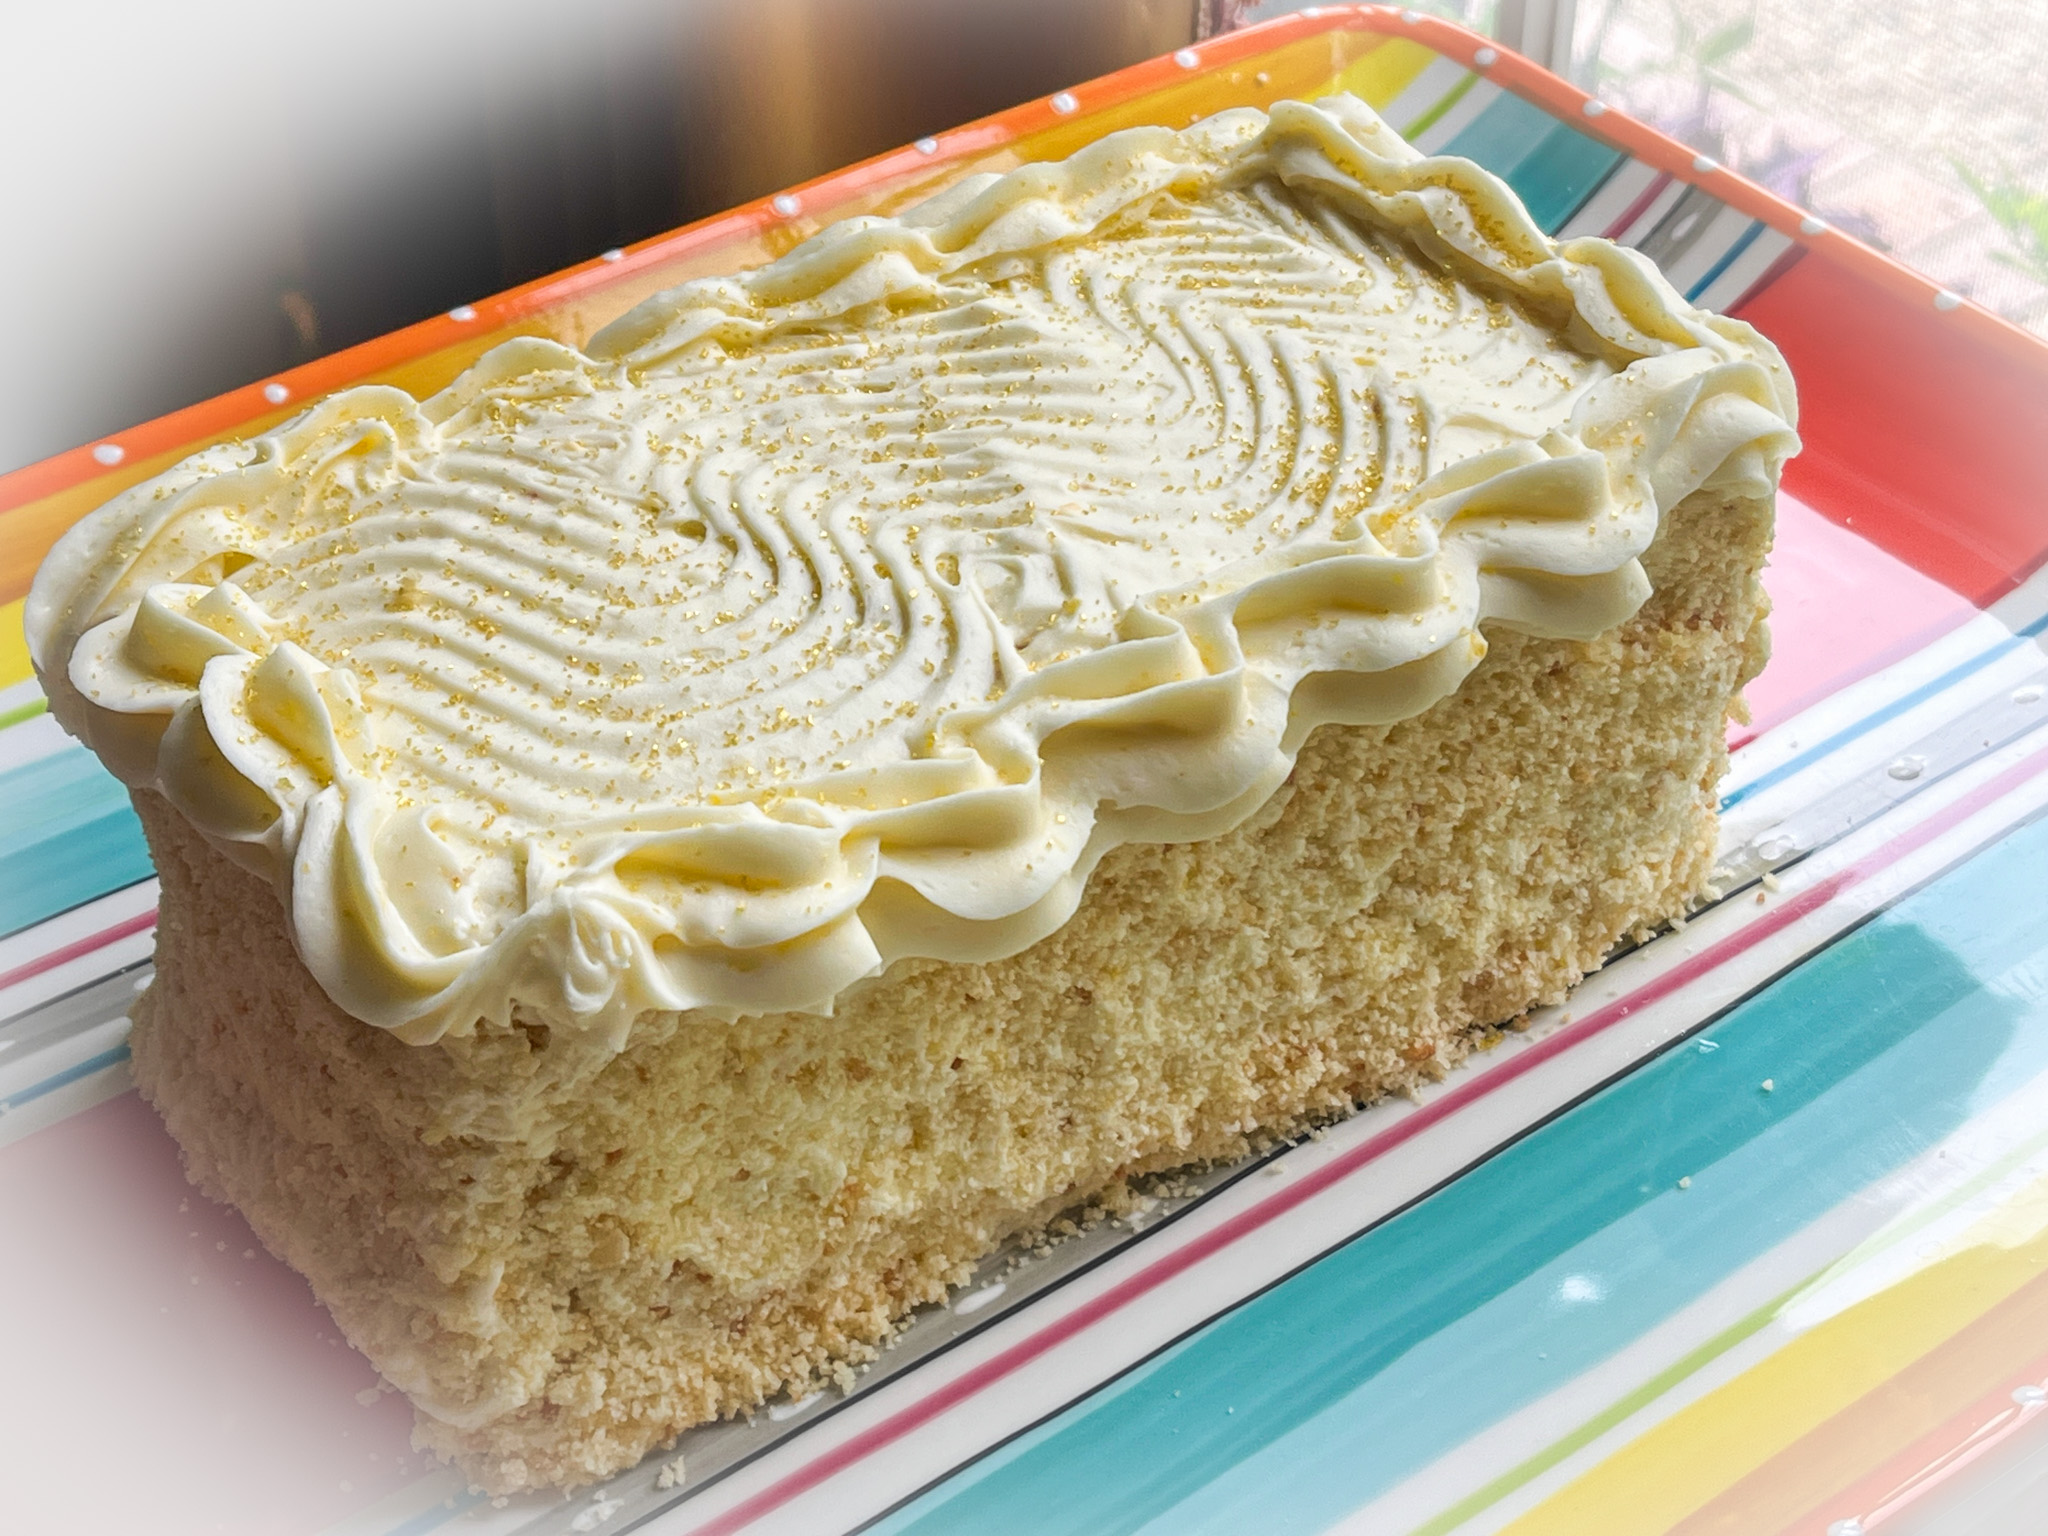
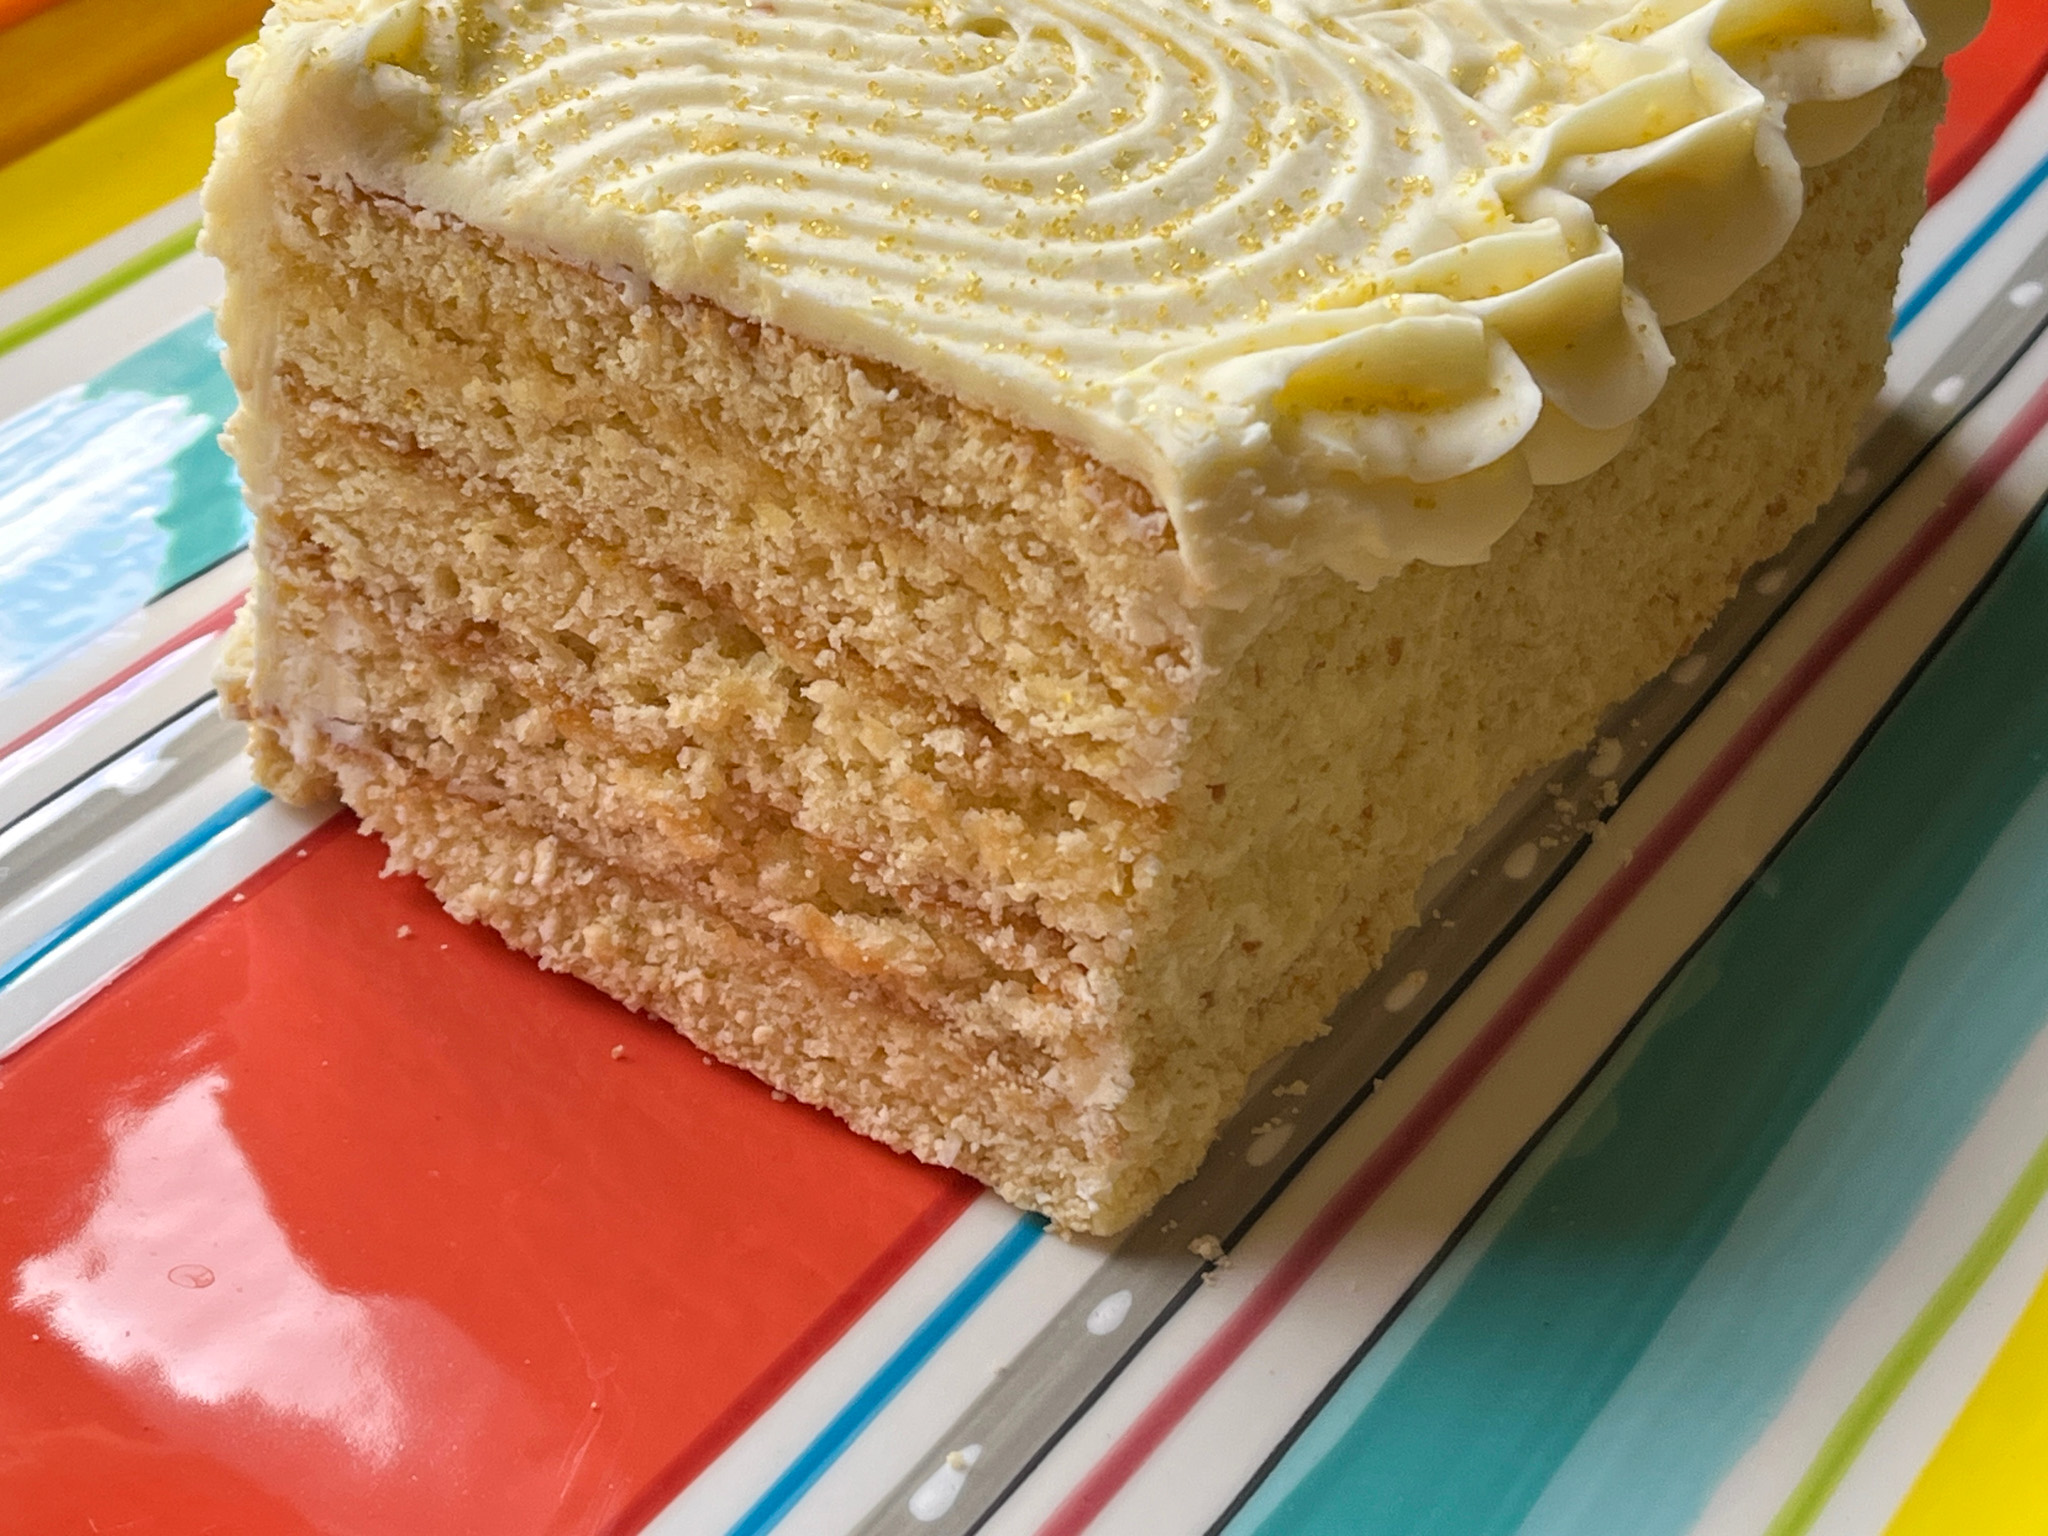
If you are a lemon lover, this post is for you. A fantastic five-layer cake, deliciously chewy cookies, baby little “pies”, and a posset. Let’s start with the cake, maybe my favorite of this series, courtesy of Helen Fetcher, my beloved baking guru…
for the lemon filling, to be made the day before: 4 large egg yolks 1 ¼ cups water 1 ¼ cups granulated sugar (250 grams) ⅓ cup cornstarch (45 grams) ½ teaspoon table salt 3 tablespoons unsalted butter (45 grams) 1 tablespoons lemon zest (from 1 large lemon)
for the cake: 3 large egg yolks 1 cup sour cream (225 grams) 1 teaspoon vanilla extract 3 cups sifted cake flour (300 grams) 1 ½ cups granulated sugar (300 grams) 1 tablespoon 1 teaspoon baking powder 2 tablespoons lemon zest (from 2 large lemons) ¾ cup unsalted butter, softened (170 grams)
for the lemon buttercream: 1 pound powdered sugar 1 cup lemon fillng ¼ cup butter, softened (60 grams or 4 tablespoons)
Make the lemon filling: Whisk everything together in a medium size sauce pan. Stirring constantly, bring to a boil and boil for 1 minute. Transfer to a storage container, cover the top of the filling with plastic wrap and let come to room temperature. Store in the fridge for 2 days. or at least overnight to firm up.
Make the cake: Heat the oven to 350°F. Line a half sheet pan with parchment paper and spray the paper only. Try not to spray the sides. If you do, wipe them with a paper towel. Set aside.
In a small bowl, whisk together the egg yolks, ¼ cup sour cream and vanilla. In the bowl of a mixer, combine the dry ingredients and mix on low for 30 seconds to blend. Add the softened butter and remaining ¾ cup sour cream. Mix on low until moistened. Then increase the speed to medium and beat for 1 ½ minutes. Add the egg mixture in three additions, beating on medium 30 seconds each time, scraping down as necessary.
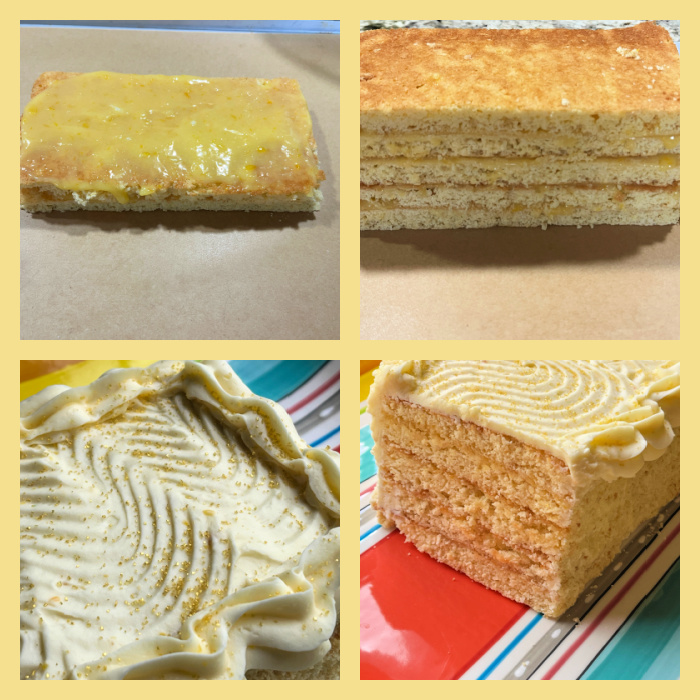
Dollop the batter in the half sheet pan. Using and offset spatula, spread it out evenly. Bake for 20 to 22 minutes until a tester comes out clean. Place on a cooling rack until cold. At this point, it can be frozen in its pan well wrapped. Or you can refrigerate and continue assembling the cake later. It is easier to deal with layered cakes when they are very cold, so keep that in mind.
Make the lemon buttercream: Add all the ingredients to a mixing bow. Beat on low to bring together. Raise the speed to medium and beat until smooth. Raise it again to high and beat for 5 or more minutes until light and smooth with no grittiness from the powdered sugar.
Visit Helen’s site for a clear visualization on how to cut the cake to obtain 5 equal layers and one extra that will be processed for crumbs. You will use 1/4 cup of lemon filling spread over the layers, and then frost the cake with the buttercream, glueing cake crumbs to the sides and making a pattern with a cake comb on top. If desired, add some piped buttercream with a 1M tip or another one of your preference. Allow the cake to to sit in the fridge for a few hours before slicing.
Comments: I urge you to visit Helen’s site to get the detailed step-by-step photos. Helen makes the most complex bakes feel simple and approachable. This cake is spectacular, and the use of cake crumbs glued to the sides makes frosting a lot less stressful. It is incredibly lemony. Thank you, Helen!
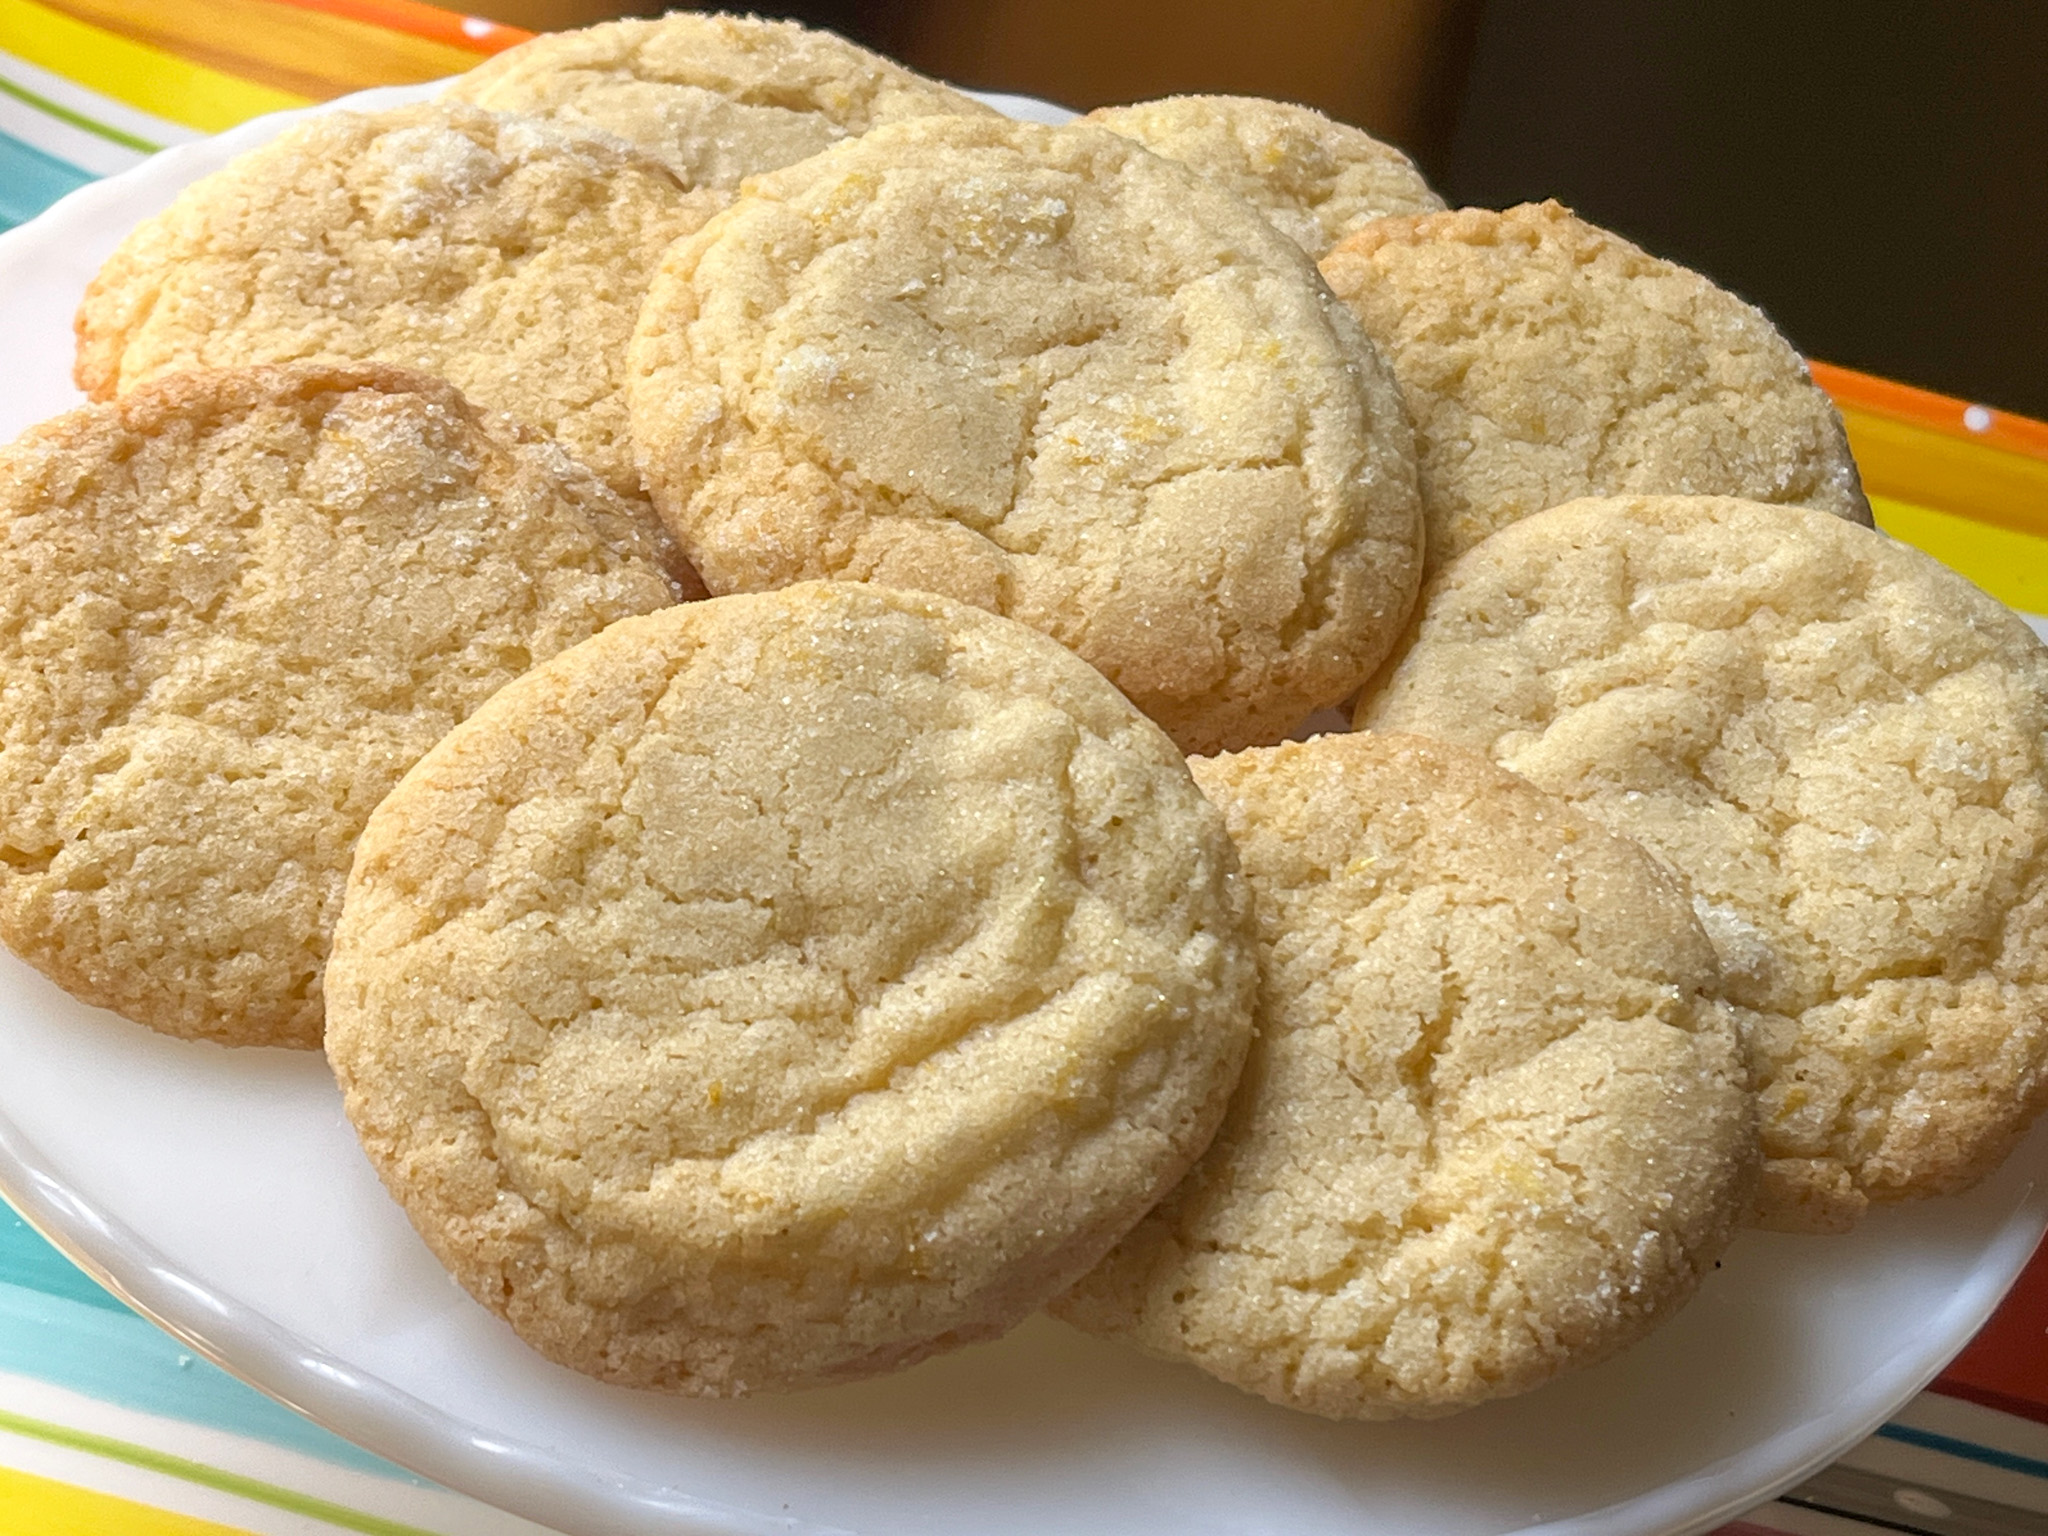
⅔ cup (150g) salted butter, softened 1 cup plus 2 tbsp (225g) granulated sugar 2 tablespoon lemon zest 1 large egg room temperature 1 large egg yolk room temperature 1 tablespoon (15ml) lemon juice 1 teaspoon (5ml) pure vanilla extract 2 cups (284g) all-purpose flour ¾ teaspoon baking soda ½ teaspoon baking powder ee notes in above FAQ section for baking powder quantity alternatives) ¼ teaspoon salt
Combine soft butter, sugar and lemon zest in a large bowl and use a stand mixer fitted with the paddle attachment, scraping down the sides of the bowl as needed.
Scrape down the sides and bottom of the bowl, then add the egg and mix until well incorporated. Add egg yolk, vanilla and lemon juice then mix until smooth and creamy.
Combine flour, baking soda, baking powder and salt in a medium bowl and whisk to blend evenly. Add the dry ingredients to the bowl with the butter mixture and fold it in until evenly incorporated. The dough will be soft but not sticky at this point.
Cover the bowl and refrigerate the dough for 2 hours.
Heat the oven to 350°F. Line two large cookie sheets with parchment paper. Make the lemon sugar. Combine sugar and lemon zest in a small bowl and rub it together until the sugar smells fragrant.
Use a cookie scoop to portion dough and roll into smooth balls. Roll the balls of dough in the sugar so they are evenly coated.
Place dough balls on the lined baking trays spacing them 3 inches apart and bake for 9-11 minutes until lightly golden on the edges and still slightly soft in the middle.
Comments: These cookies are addictive, they have a super clean and bright citric flavor, and perfect texture. I made them on a Wednesday and donated two days later, so I tried one to make sure it was still ok, and had to exercise self-control to keep my taste-test to a single cookie. Make them, and you can thank me later!
x
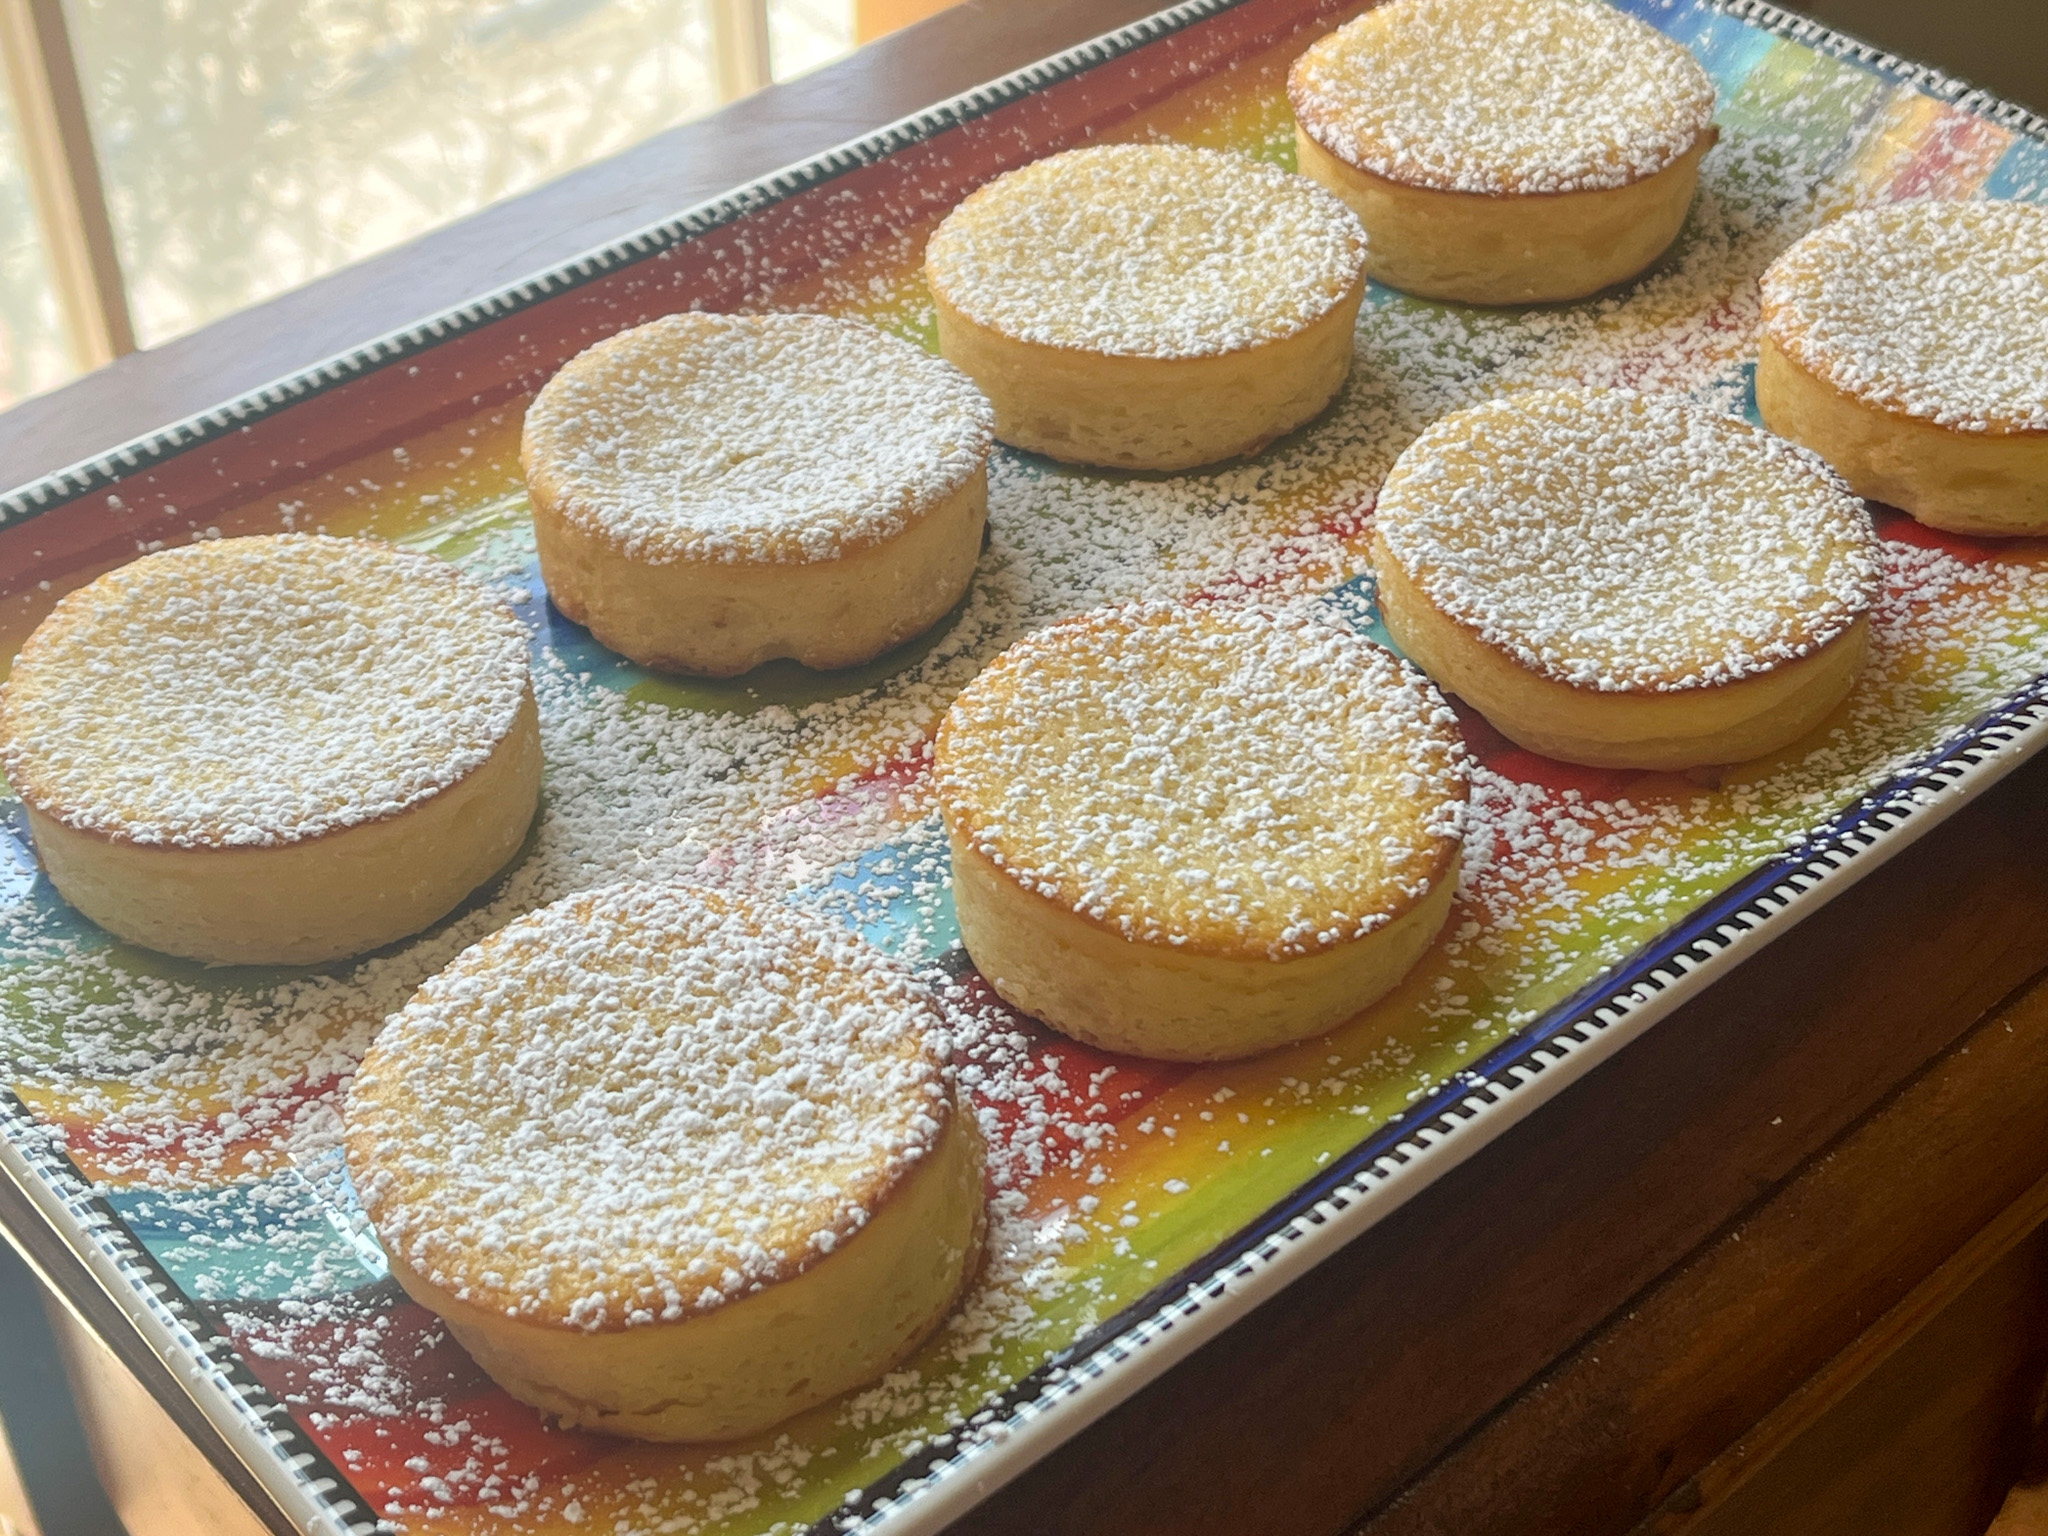
BABY LEMON IMPOSSIBLE PIES recipe can be found here
Those are simple to make, and a lot of fun to serve and enjoy… Not quite sure why they are called “pies” but whatever you call them, they won’t disappoint.
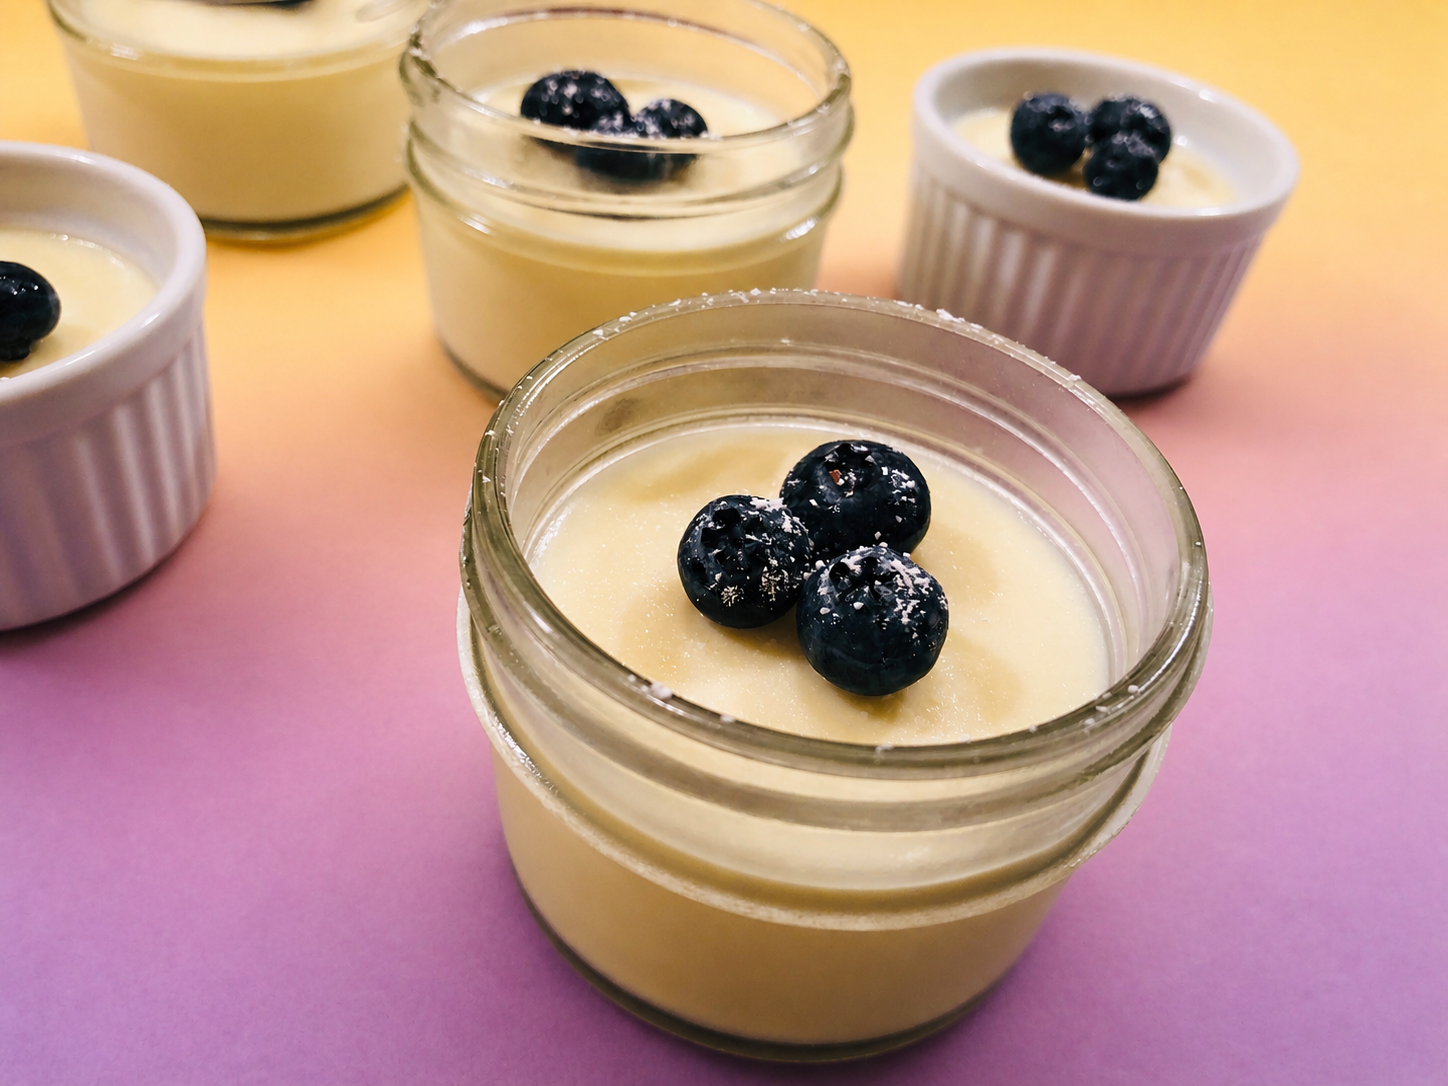
LEMON POSSET
LEMON POSSET (from The Bewitching Kitchen)
2 cups heavy whipping cream 2/3 cup granulated sugar 5 Tbsp lemon juice blueberries, optional for serving
In a small saucepan, heat the cream and sugar, stirring to dissolve the sugar. Bring to a boil, then adjust the heat so it doesn’t boil over and keep it at a medium boil for 5 minutes.
Remove the pan from the heat and stir in the lemon juice, then set aside to cool for 15 minutes. Strain the mixture through a fine mesh sieve set over a large measuring cup with a pouring lip. Divide the mixture between 6 ramekins, filling them about 3/4 of the volume.
Refrigerate for at least 4 hours or until fully set, then top with blueberries, if you like.
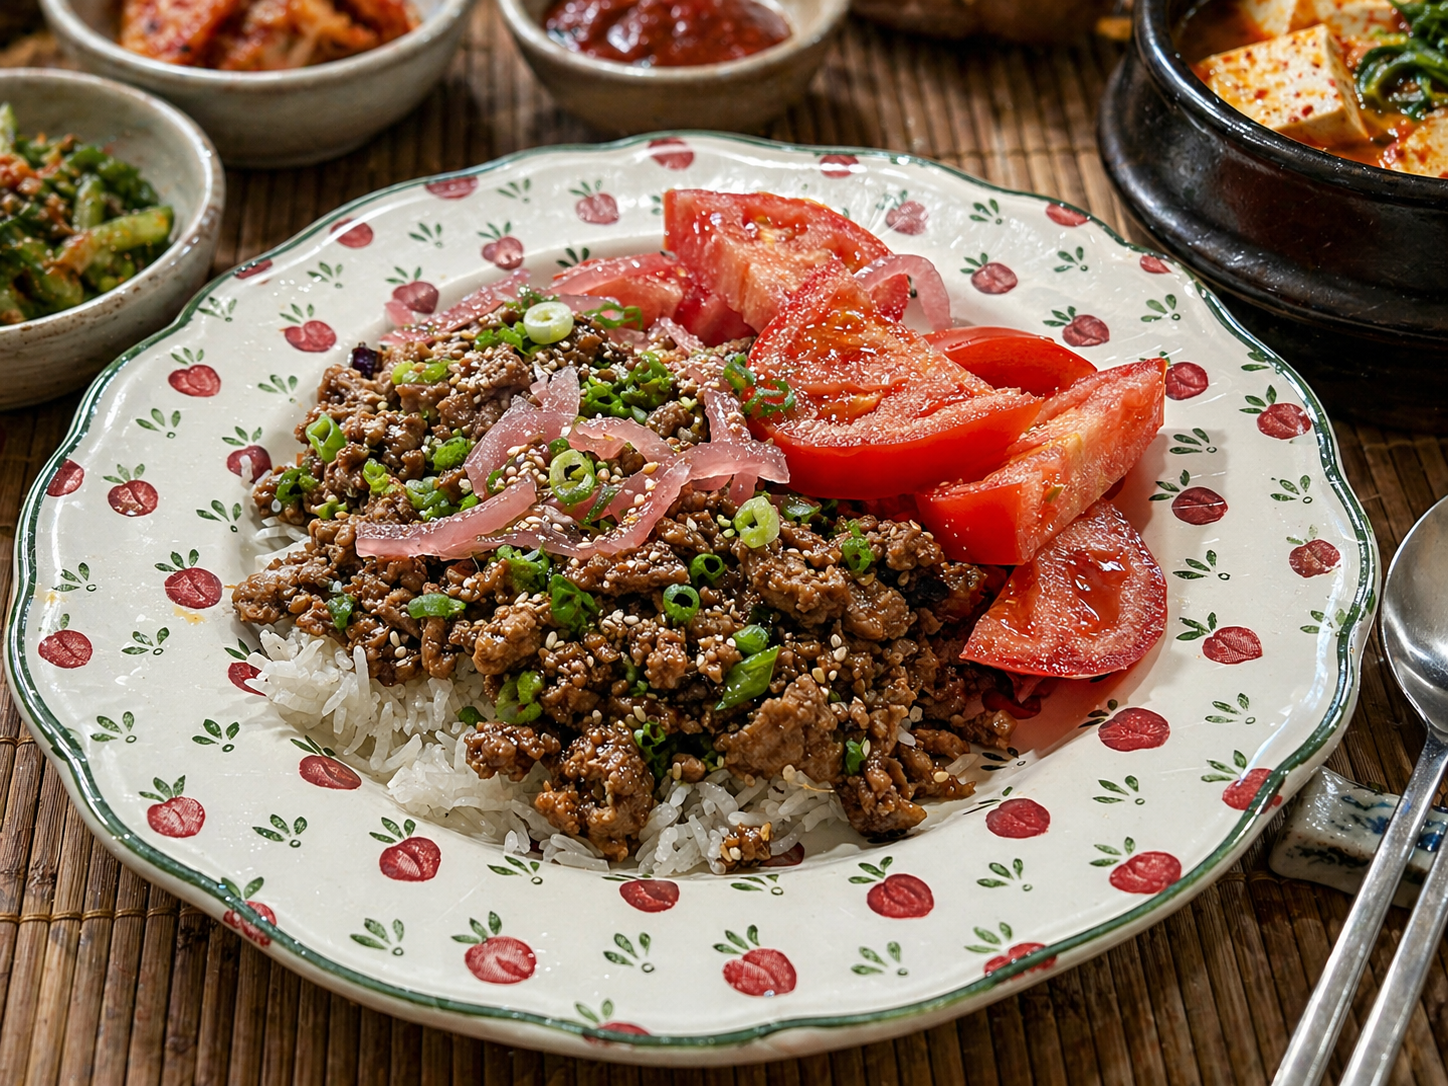
Yet another recipe that exemplifies my favorite type of lunch: high in protein, low in carbs and with bold flavor. Of course, it is best enjoyed over rice, to make it even more satisfying. Make it cauliflower rice if you want to lighten it up.
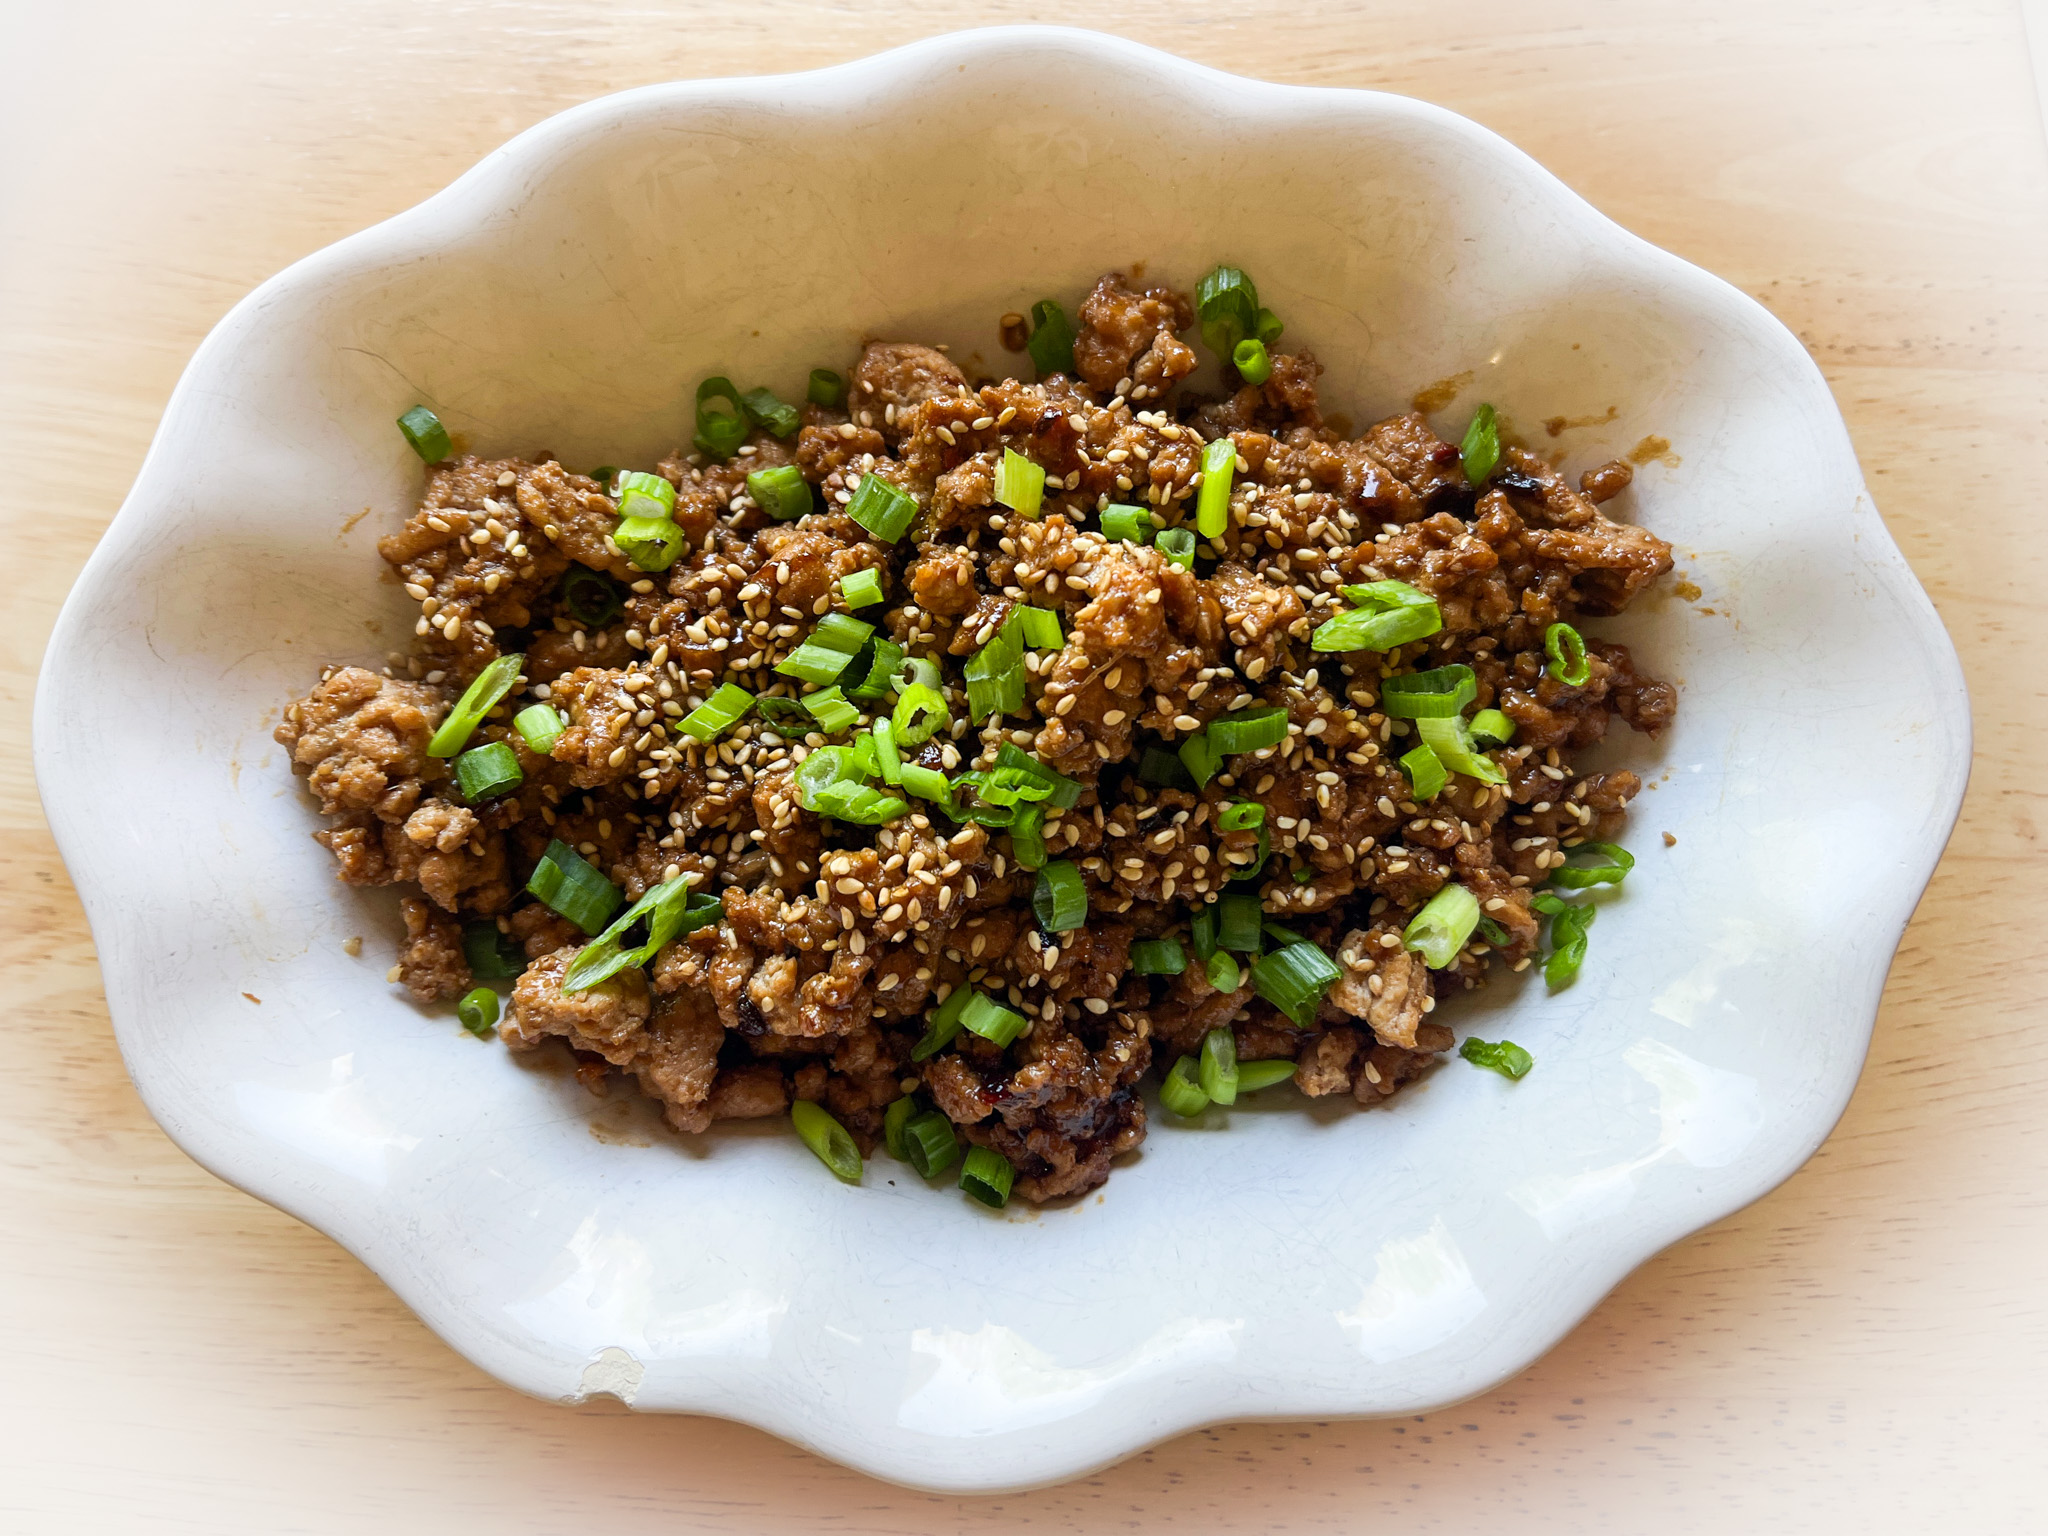
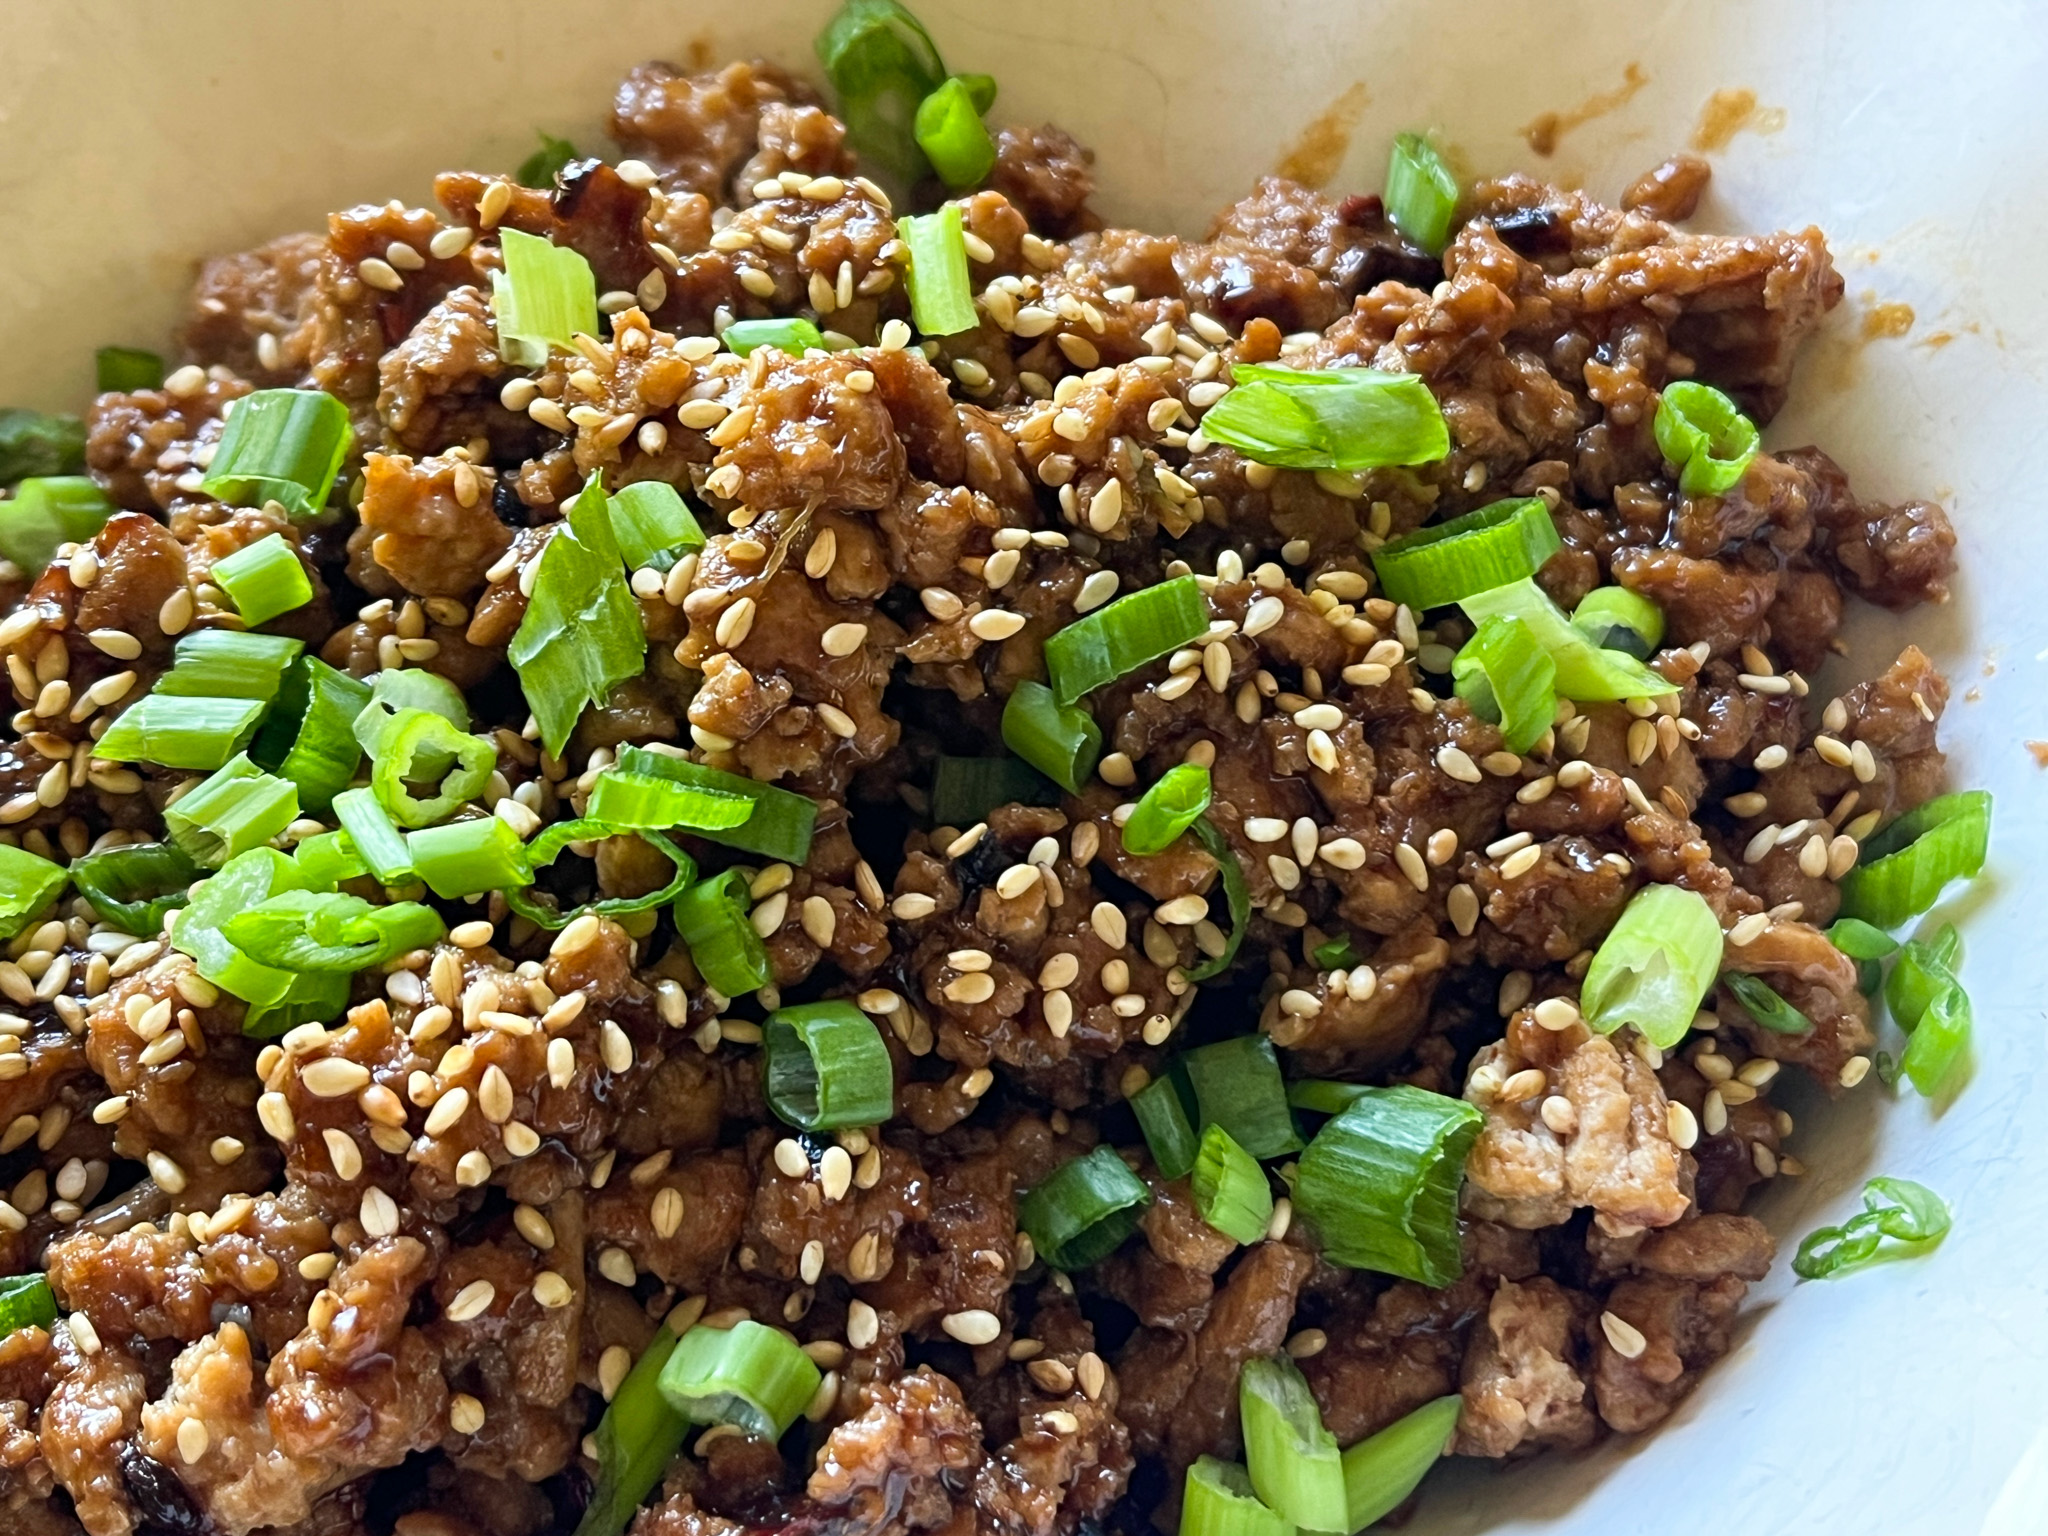
KOREAN-STYLE GROUND BEEF (from The Bewitching Kitchen)
1 lb (450g) ground beef (I used ground bison) 1 tablespoon sesame oil 1 tablespoon grape seed oil 1 tablespoon fresh ginger, grated ¼ cup soy sauce 2 teaspoons cornstarch 1 tablespoon brown sugar 1 teaspoon spicy chili crisp (or more to taste) green onions, thinly sliced, and sesame seeds for garnish
Mix soy sauce, cornstarch, brown sugar, and chili flakes in a small bowl. Set aside.
Heat sesame oil and grape seed oil in a skillet over medium heat. Add ginger, sauté for 30 seconds, then add the ground beef. Cook for 5-7 minutes, breaking it into crumbles.
Pour the sauce over the meat, stir well, and simmer for a few minutes until thickened.
Stir in chopped green onions, sprinkle with sesame seeds, and serve hot over rice, cauliflower rice, or in lettuce wraps.
Comments: You can make this recipe with ground turkey if you prefer, in fact I made that the following week and intend to repeat, alternating beef and turkey for fun. It is indeed one of my favorite types of lunch. I know that Koren food has nothing to do with Mexico, but I admit that I used this filling on corn tortillas and my crime has to be forgiven by the universe because I enjoyed it. Immensely. But on a more traditional route, here it is, over rice, with some pickled red onions (store-bought) and fresh tomatoes. Pure heaven.
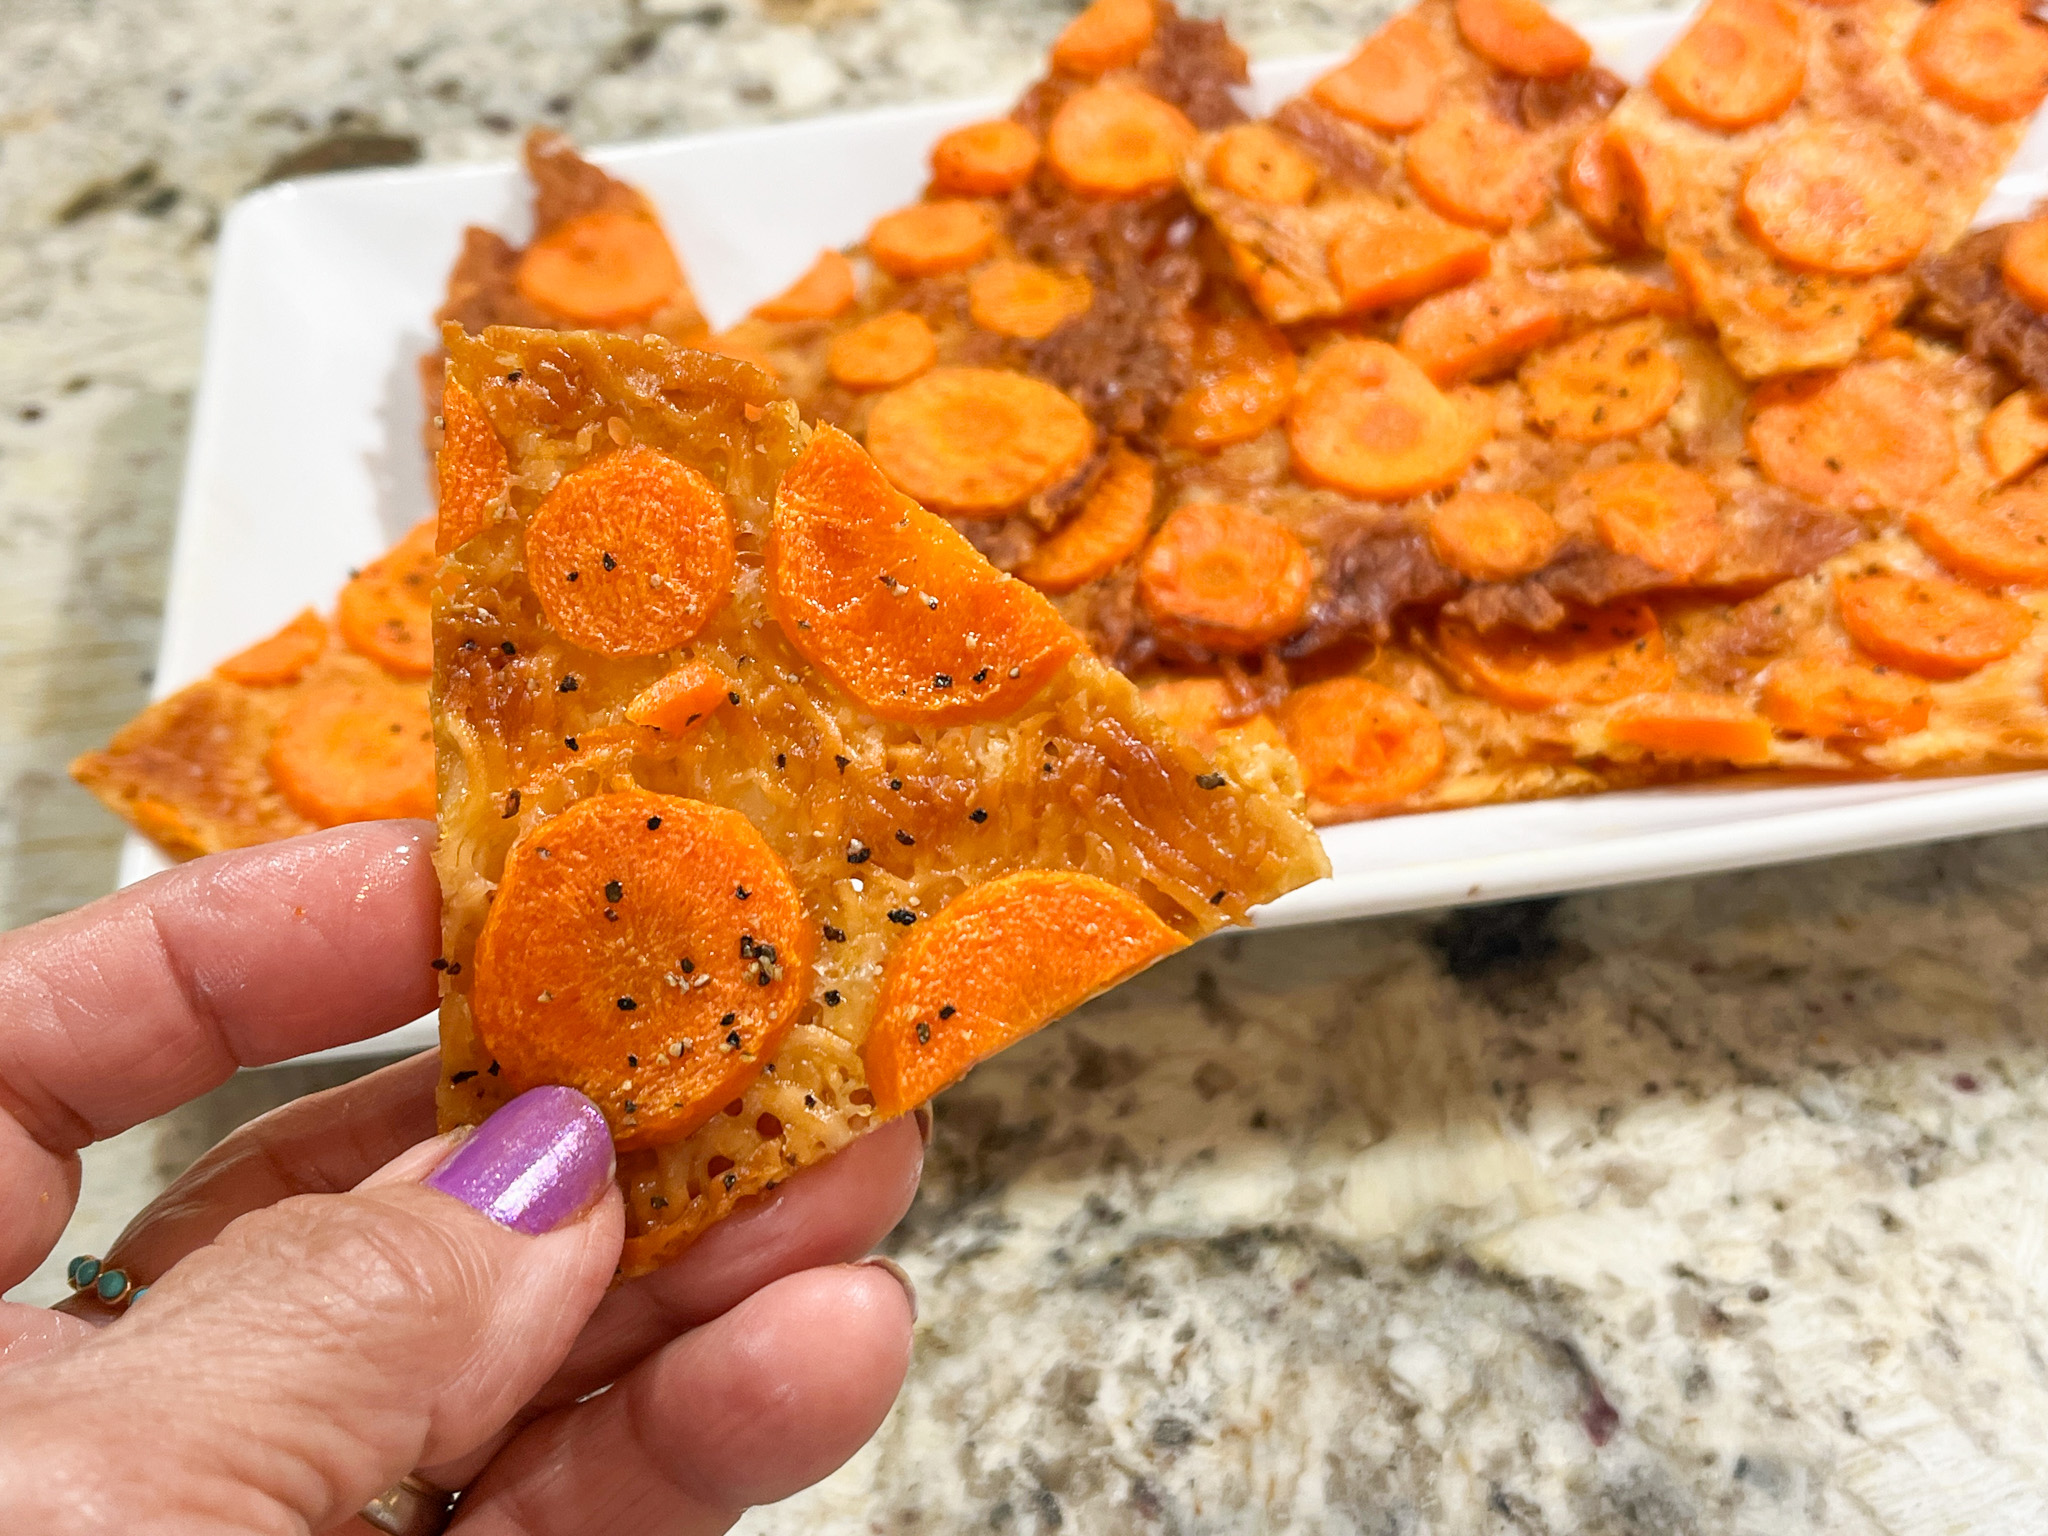
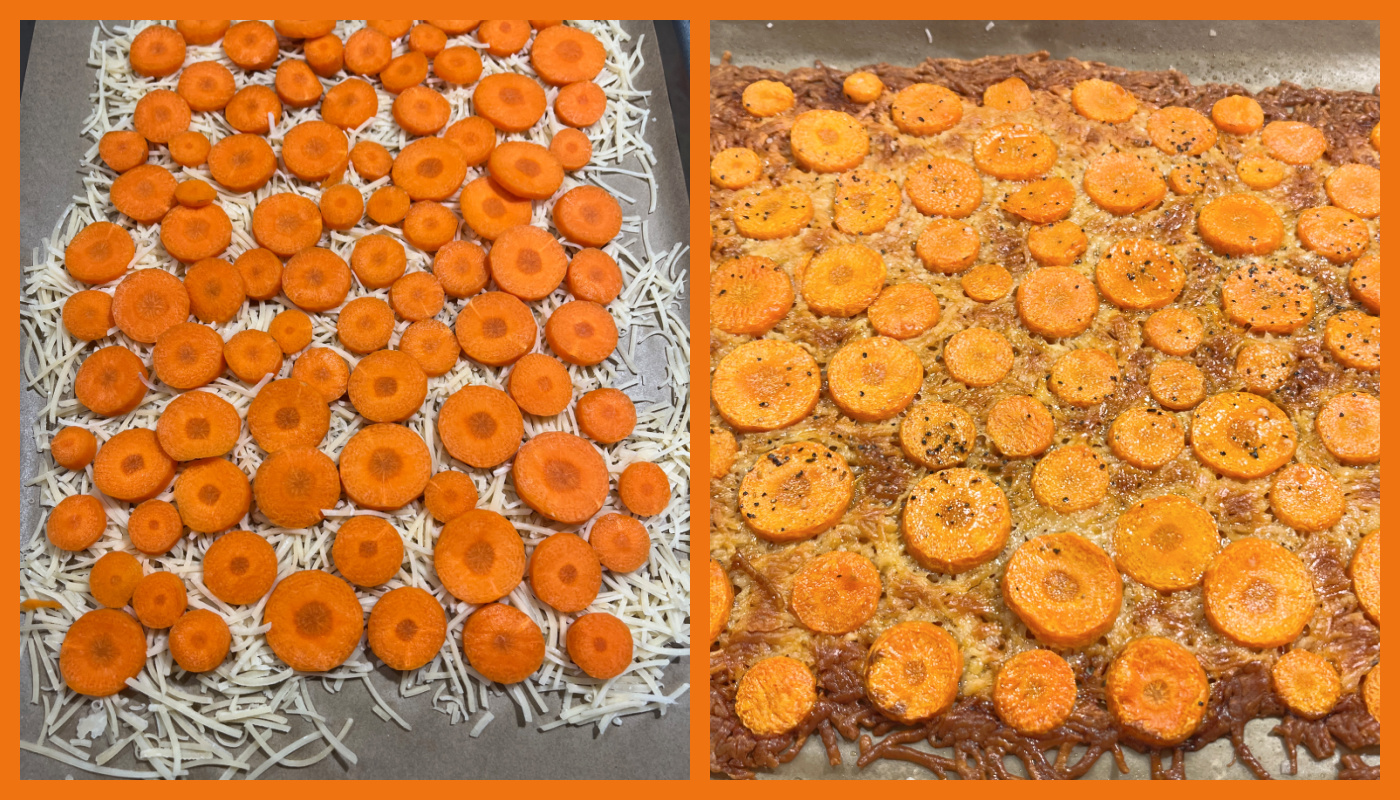
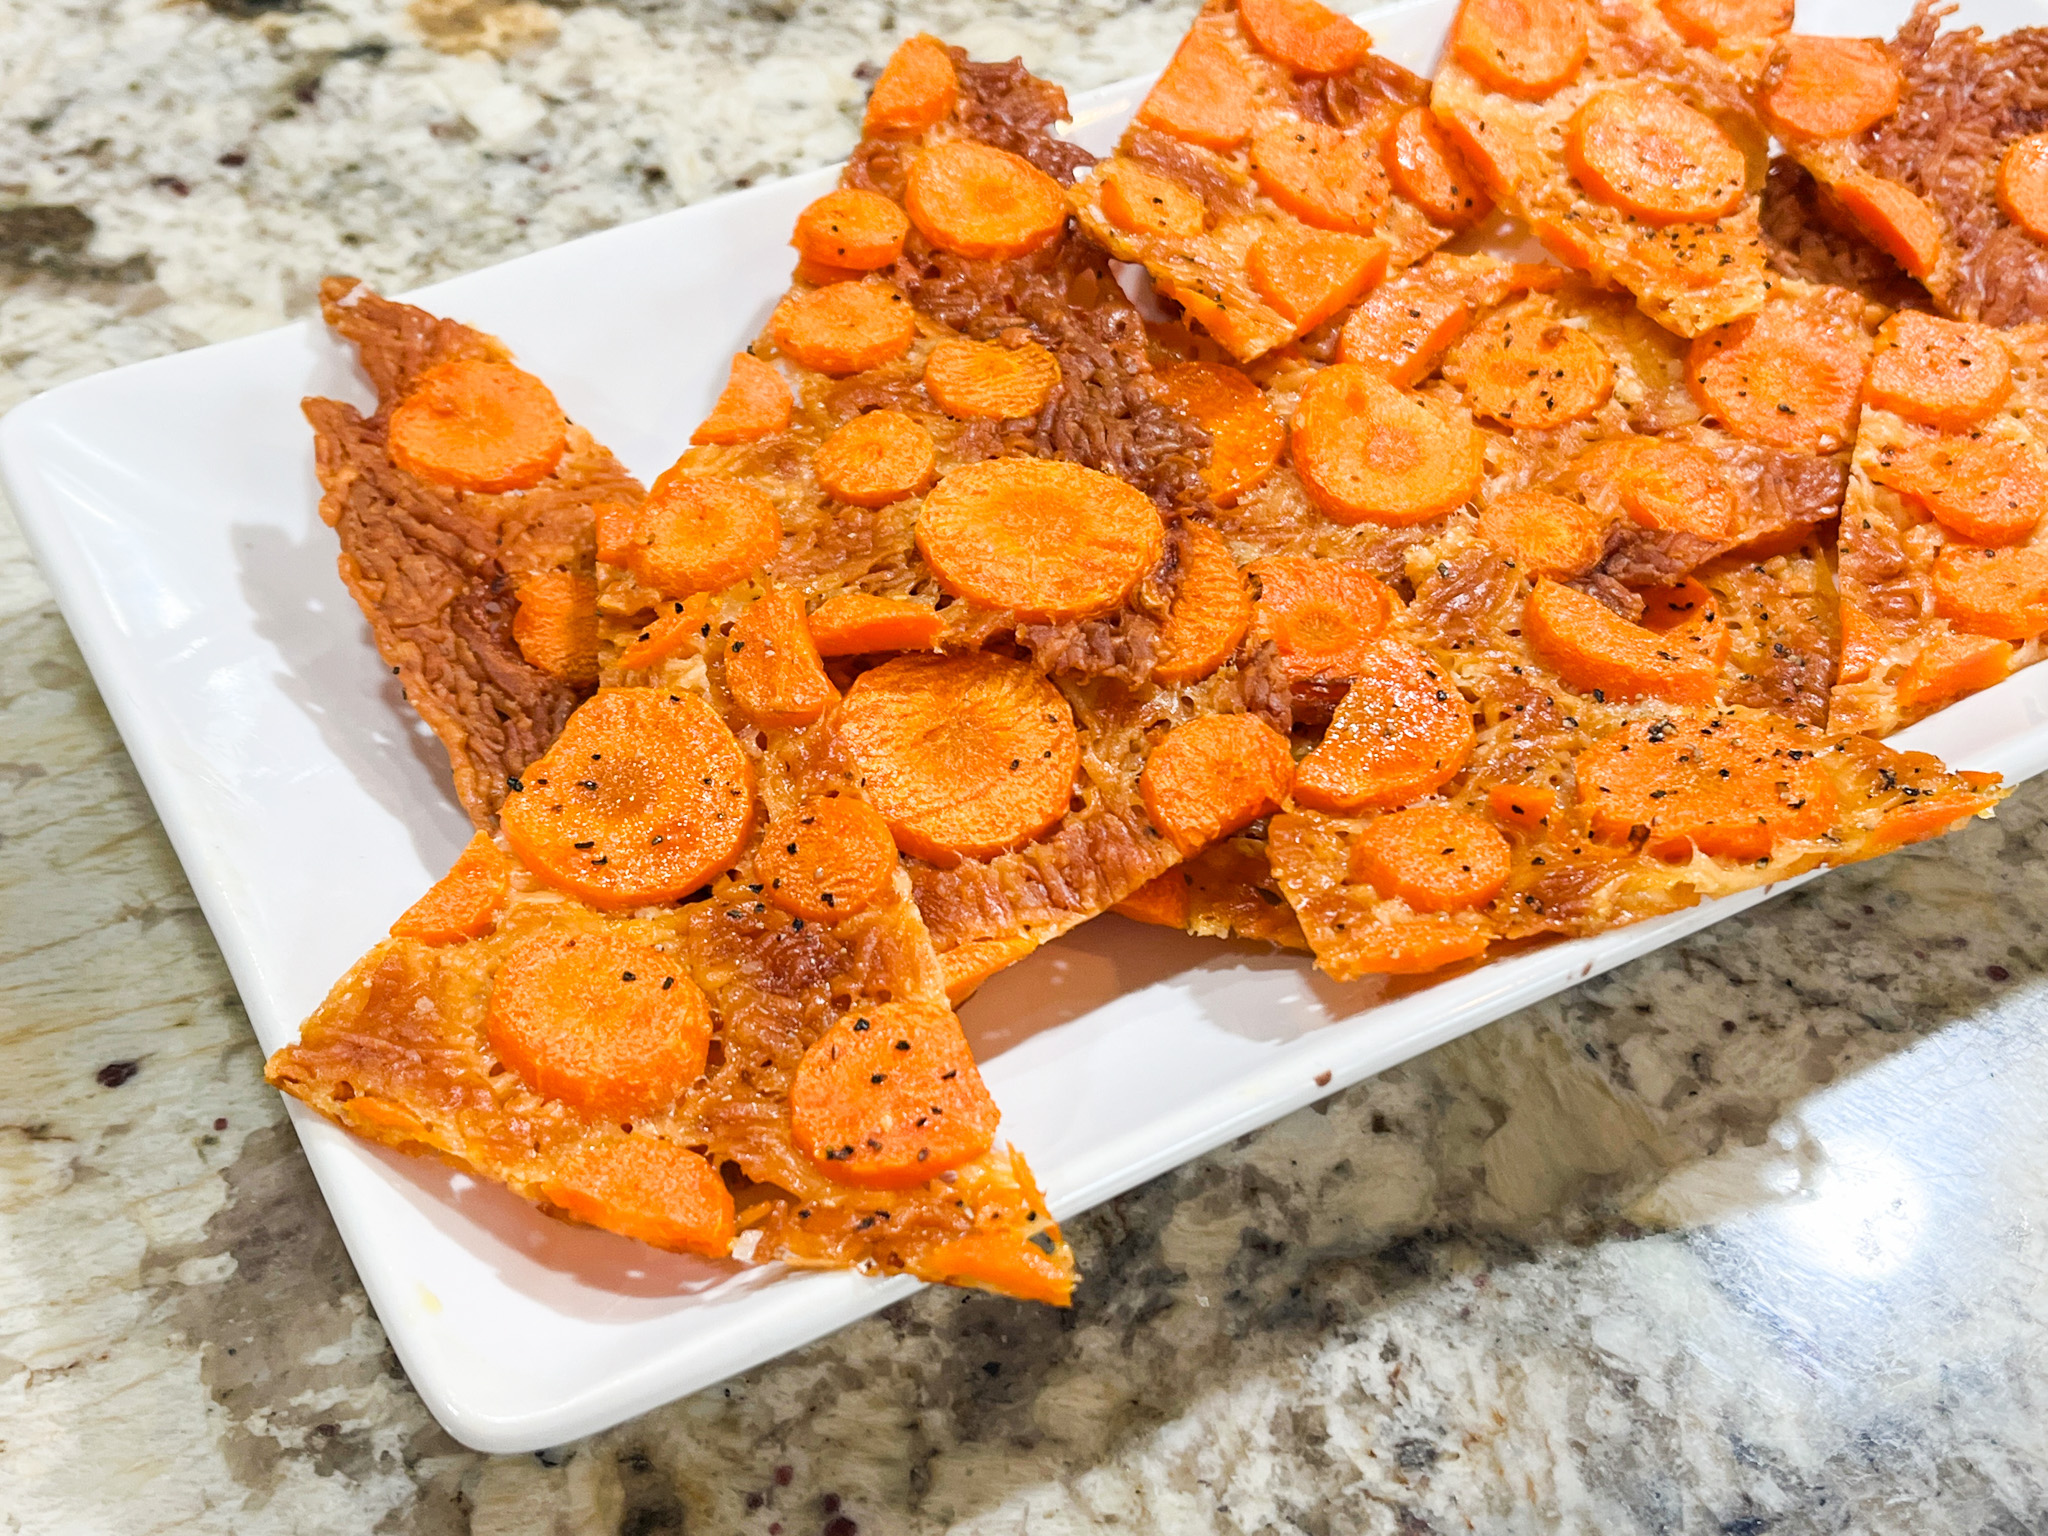
Ready for a totally crazy recipe that seems like a disaster in the making but… it is actually pretty delicious? I cannot take any credit for it, first saw it in the fun blog Hungry Happens. I made a few adjustments and share with you my version.
6 oz shredded parmesan cheese 3 large carrots, peeled olive oil spray or 1 tablespoon olive oil salt and paprika to taste
Heat your oven to 400℉. Line a half-baking sheet with parchment paper.
Sprinkle the parmesan cheese on the paper to form an even layer. Slice your carrot into medium thickness coins, around 1/8 inch thick. Place them on top of the parmesan cheese to form a uniform layer. It is best if they touch and you have just a little space between the pieces. LIGHTLY brush the tops with olive oil (or use olive spray, see my comments) and season with salt and paprika to taste. Bake for 20 minutes or until the edges are mostly brown and the middle is golden brown. Allow to cool for a few minutes and tear into chips using scissors.
Comments: In our grocery store, we find pre-shredded Parmigiano cheese in 6 oz bags, so that’s what I opted to use in this recipe. But let me advise you to grate your own instead, which is not that hard and as Eha mentioned in her comment, a healthier option! Do as I say, not as I did….. In the original Hungry Happens version, she brushes the top of the carrots with olive oil and I thought it would be too much work, so I used a spray. I now believe that it might be best either to do as she recommended, or lightly spraying the slices of carrots before laying them on the cheese layer. Spraying the olive oil all over made the cheese component a bit greasy. So consider that. I will be making it again, but was so excited about this recipe, I decided to share it right away.
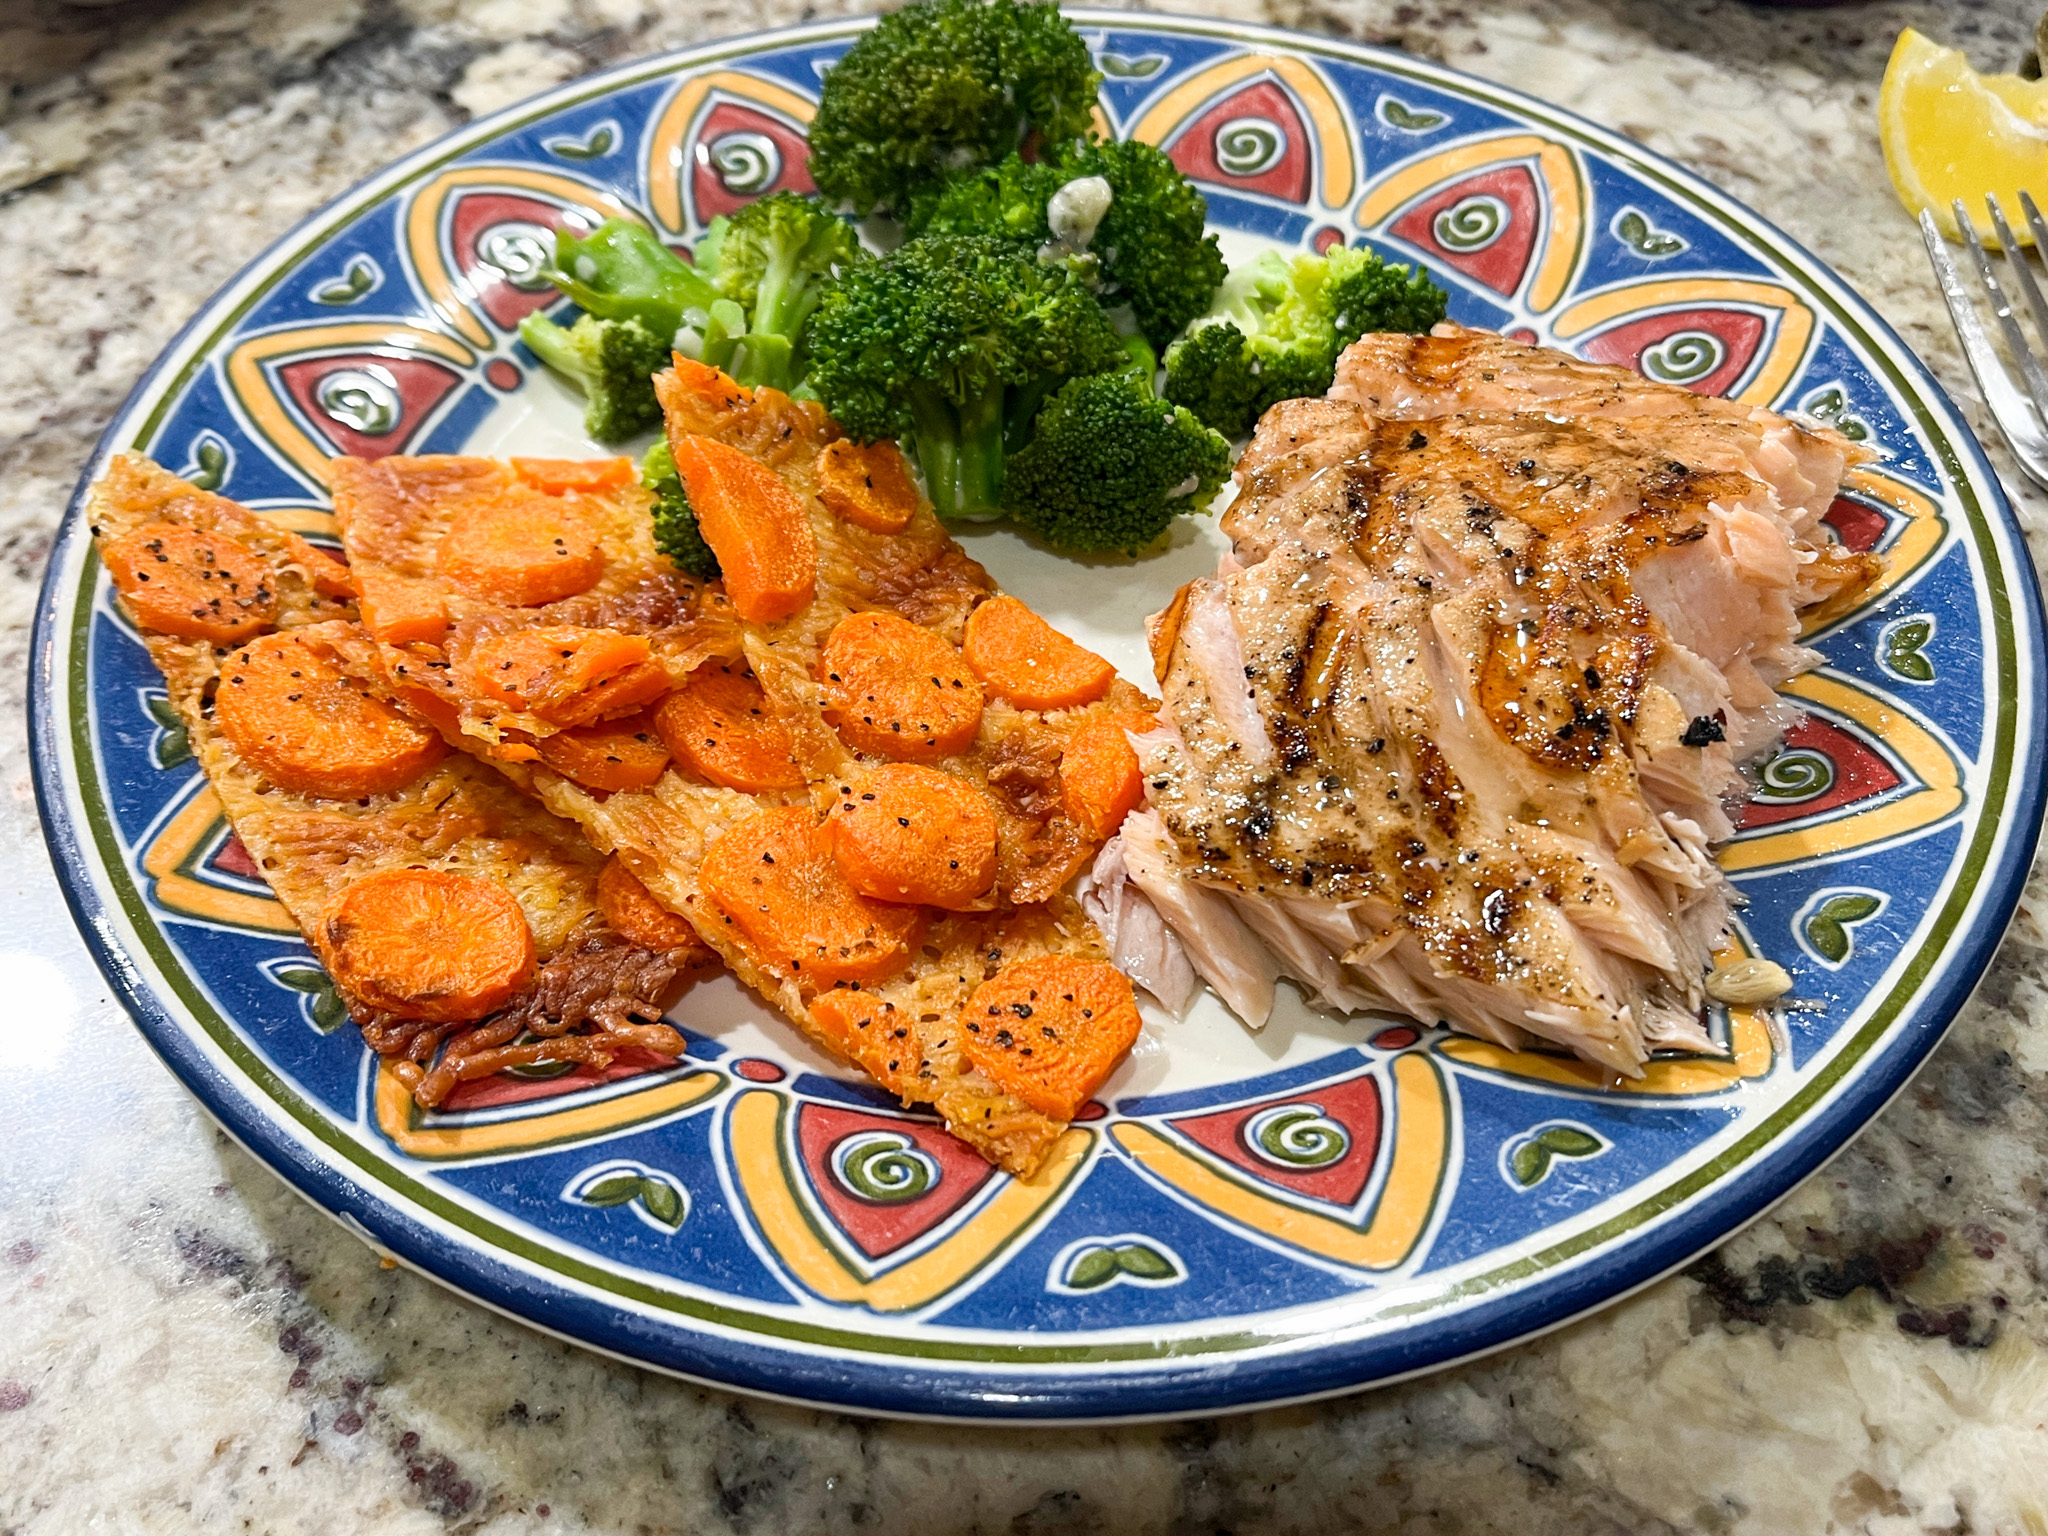
The cheese layer, if left unprotected by carrots, will darken quickly. Use as many carrots as you can to cover it all to the edges. I used scissors to cut the “chips” and like the way that looked. Super unusual recipe indeed, but I am sold! We had it alongside grilled salmon, courtesy of the husband, and steamed broccoli. Now, do you want to know something truly amazing? Leftovers were great enjoyed FROM THE FRIDGE, standing up. I am not even remotely ashamed.