SOURDOUGH MINI-ROLLS

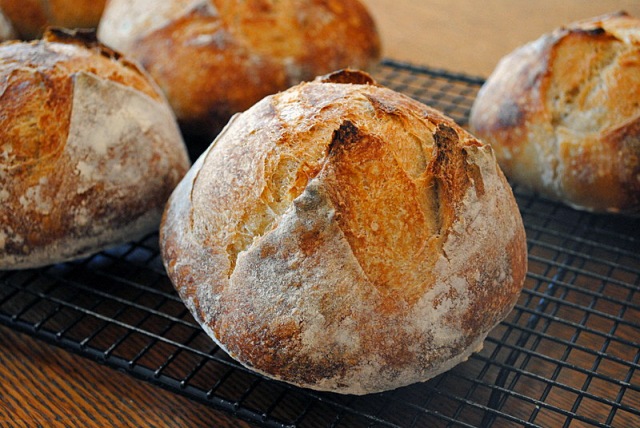
Those who follow my baking adventures know that my favorite type of bread is a sourdough boule, medium to large size.  For some odd reason, when I want to bake small rolls, I always opt for recipes that use  commercial yeast, and result in a softer, more buttery bread.  That is now changed.  I used one of my favorite basic sourdough recipes to bake 6 small rolls, shaped exactly like a large one, and similarly scored.   They turned out so good, I might switch to this type of format for a while. Plus, each roll can be frozen for later, brought to room temperature for a few minutes, then placed in a very low oven (250 F) for 15 minutes or so.  Perfect bread whenever you feel like it!  😉
mini1

SOURDOUGH MINI-ROLLS
(adapted from Hamelman’s Bread)

for starter mixture (make 12 hours in advance)
100 g bread flour
80 g rye flour
110 g water
40 g active sourdough starter (at 100% hydration)

for the bread:
all sourdough made as above
700 g bread flour
20 g rye flour
470 g water
15 g salt

Prepare your sourdough mixture about 12 hours before making the dough.  Heat the water slightly in a microwave until it is lukewarm, and place it in the bowl of a KitchenAid type mixer.  Add the sourdough into the water and mix with your hands to dissolve it. Add both flours, and mix at low-speed until the ingredients form a shaggy mass.

Cover the bowl and let the dough rest for 20 minutes.   Sprinkle the salt over, turn the mixer back on low-speed and knead for about 4 minutes.  Transfer the dough to an oiled bowl and let it rise for about 2 and a half hours, folding the dough every 50 minutes. For a more detailed explanation on folding, click here. You will do a first folding cycle at 50 minutes, another one at 1 hour and 40 minutes, then leave it undisturbed for additional 50 minutes, for a total of 2 and a half hours fermentation.

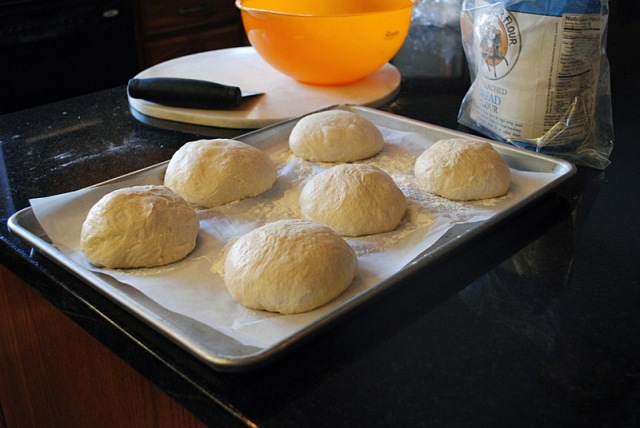
Heat your oven to 450 F. Divide the dough in 6 equal pieces.   Shape each one as a small boule.  Place over floured parchment paper on a baking sheet, flour the surface lightly and cover.  Allow the rolls to proof for 45 minutes.  Score the surface,  and bake for 25 minutes (with initial steam) or until golden brown and the internal temperature over 205 F.   Cool completely on a rack.

ENJOY!

to print the recipe, click here

risingComments:  Depending on the method of steam you use for your oven, these rolls can be a breeze to bake.  I decided to use my usual method of inverting a damp roasting pan over the rolls, and to do that I needed to bake three rolls at a time.  Let’s say it was a bit too convoluted and the second batch was slightly over-proofed.  Next time I might just go for a less complicated method, and use a baking pan with hot water at the bottom of the oven.  Whatever method you choose, the steam provides a nicer crust.

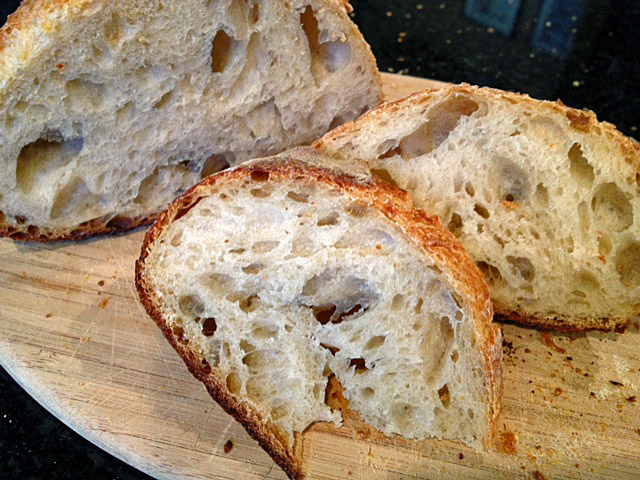
The crumb was moist and creamy, the way we like it, and the crust reminded us of the fantastic baguettes we used to enjoy while living in Paris…  What’s not to like?   😉
crumb

I am submitting this post to Susan’s Yeastspotting

ONE YEAR AGO: Do you eat your books?

TWO YEARS AGO: Mediterranean Skewers

THREE YEARS AGO Fettuccine with Shrimp, Swiss Chard, and Tomatoes

CHICKEN PARMIGIANA, THE THRILLER

Phil doesn’t like to mess with a classic.  He’s got his favorite pancake recipe,  the oven-fried chicken with buttermilk biscuits and gravy, the Thanksgiving turkey, and the potato dumplings that his Grandma used to make.  And, he is also adamant about my chicken parmigiana, which he professes to be “the best he’s ever had”. That’s why it took me so long to try Giada’s version, a streamlined, lightened up approach to this American-Italian goodie.  I tried to hide my game, but he saw some of the regular actors in the plot: chicken breast filets, mozzarella cheese, and my tomato sauce simmering on top of the stove.  He opened his brightest smile: “We are having chicken Parmigiana! YEAAAAH!”    I  replied with a sheepish smile:  “Well, sort of, it’s a kind of Parmigiana, yes, but not really, maybe almost Parmigiana, but not quite.  We’ll see if we like it.”   Silence.  A slight shudder of the shoulder, which I could not help but notice.  His body language went more or less like “Why would she do this to me?”  Why? For the simple thrill of it, of course! 😉

First, you must make your own tomato sauce, using good quality canned tomatoes.  I saute’ a little shallot in olive oil until fragrant, season with salt and red pepper flakes, add the tomatoes and some dried thyme, and simmer for about 20 minutes. Then I use an immersion blender to turn it into a smooth sauce.

Next, you need to make a little seasoned oil.  I used thyme from my friend Cindy’s garden (yet another gift from my very thoughtful friend), and rosemary from our own plant here in Manhattan. Chop them finely, and add to the oil with a little salt. And freshly ground black pepper.

Brush the chicken cutlets on both sides with the oil, keep in the fridge for half an hour or so, if you have the time. If not, move on to the next step.

Sautee the cutlets in a very hot skillet with just a tiny coating of olive oil.  Once both sides are nicely golden, pour some  tomato sauce around and over the chicken.  Cover the pan and simmer gently for a few minutes.  Uncover, add grated mozzarella cheese on top of the meat, cover the pan again and bake on a 400F oven for 10 minutes.
Open the lid, turn the broiler on for a little while if you like your cheese to get a nice tan. It’s not mandatory, though… at this point, you have already reached the desired level of yumminess.

Serve with some spaghetti with your home-made tomato sauce, sprinkle Parmigiano cheese on top, and   ENJOY!

For Giada’s recipe, follow this link…

Comments:  When I make my own version of this dish,  I often omit the cheese in some pieces.  I tried it with this recipe (you might be able to notice one small piece of cheese-less chicken on the first photo), but I advise against it. In this particular preparation, the cheese will act as an important blanket for the cutlets that otherwise will be a bit dry.  What I love the most about this recipe is how easy it was to make it.  No need to have those three trays with breadcrumbs, flour, eggwash, and the result is quite a bit lighter but still delicious.  The herb oil adds a lot of flavor, don’t omit this step, and feel free to experiment with other spices and flavorings. Will it be the default Parmigiana in our home?  I doubt it, but it’s definitely a great option for those evenings that pop up right at the end of a hectic day at work.  😉

One more thing before I forget:  the pan I use is a Giada cast iron dish sold by Target.  I cannot believe I’m saying this, but I like it better than Le Creuset.  It is a lot cheaper, it works just as well, and the cleanup is a breeze!  My Le Creusets got stained from the first use, and never cleaned well, even using diluted bleach.  Giada’s pan still looks brand new, after many  encounters with tomatoes, red wine, and soy based sauces.  No, I don’t work for Target, and have no personal links to Giada.  In fact, I have never accepted  freebies from companies to write a review.  I only endorse stuff I love.  And I love, love, love this pan!  😉

ONE YEAR AGO: Wild Mushroom Risotto

TWO YEARS AGO: Tartine Bread:  Basic Country Loaf
(one of my most popular posts!)

THREE YEARS AGO:  Pugliese Bread

THE SECRET RECIPE CLUB: CHOCOLATE ORANGE DRIZZLE CAKE

Last Monday of the month, and it’s Secret Recipe Reveal Day for my group. For those not familiar with it, the SRC is a monthly event in which food bloggers are paired in secret, and after stalking the assigned blog for a couple of weeks, they cook and blog on a chosen recipe. I was paired with royalty this month:  Lavender and Lovage is a great food blog that I’ve known long before I  joined the group.  Karen, the host, has lived in many different places, teaches cooking classes in the Southwest of France, and does a lot of research on British cooking. In fact, she is writing a cookbook about it! Her About Me page is a must read.   I had four recipes high on my list of possible choices, but finally decided to bake a cake. And one that takes creaming the butter with sugar, which proves I am a very daring person.  😉

CHOCOLATE ORANGE DRIZZLE CAKE
(from Lavender and Lovage)

for the cake:
6 oz (150 g) softened butter
6 oz (150 g) superfine sugar
6 oz (150 g) self-raising flour
3 large eggs, beaten
grated rind from 2 oranges
2 tablespoons milk
(7″ to 8″ round cake pan ~ greased and lined)

for the drizzle:
Juice from 2 oranges
2 oz (50 g) sugar
2 oz (50 g) 85% chocolate

Heat oven to 170C/350F.  Beat the butter and sugar together until
light and fluffy. Gradually add the beaten eggs and flour,
alternately, mixing well in between. Add the grated orange rind and
mix well before adding the milk to make a soft dropping consistency.

Pour the cake mixture into a greased and lined pan and bake for 35 to
40 minutes, until risen and light golden brown; test the center of the
cake with a skewer, if it comes out clean, the cake is ready. Cool in the pan.

Make the orange drizzle by gently heating the orange juice and sugar
together in a pan until the sugar has dissolved. When the cake has
cooled, pour the orange drizzle over the cake in the tin. When the
cake is completely cold, take it out of the tin and place it on a
serving plate.

Heat the chocolate in a saucepan over a low heat, do not allow to
boil, and as soon as it has melted, drizzle the chocolate over the
cake, using a fork to make patterns.

ENJOY!

to print the recipe, click here

This cake was delicious, and Karen’s description of it was spot on:  some cakes that are drizzled with syrup after baking will end up soggy and overly sweet.  Not this one.  She coated it with a full layer of chocolate and decorated it with chocolate swirls, I stayed with a humble drizzle, as  my chocolate reserves in the pantry were  unexpectedly low.  One wonders why.   😉

To see what my fellow bloggers from group D cooked up this month,  click on the smily frog below.  To see who got my blog and the recipe chosen (it’s delicious!)  click here for Avril’s siteThe Secret Recipe Club will take a break in the month of December, but we’ll be back in full swing next year!

Karen, it was great to spend time stalking your blog!
I hope you are having fun on your Reveal Day…  

ONE YEAR AGO: Turkey Day, Tryptophan, and Fluorescence

TWO YEARS AGO:  The Ultimate Apple Cake

THREE YEARS AGO: Trouble-Free Pizza Dough


BEETROOT SOURDOUGH FOR THE HOLIDAYS

This gem of a recipe comes from one of my favorite bread books, which I reviewed in a not too distant past: How to Make Bread. Such a simple and straightforward title, but it says all that matters.  You will learn how to make great bread following the careful instructions of Emmanuel Hadjiandreou.    This bread is perfect for the holiday season, its crumb decorated with intensely red dots of beets, that are coarsely grated and incorporated raw in the dough.

You may wonder if the bread turns out too sweet or with a strong flavor of beets?  Not really. It is a sourdough still, but with a background of sweetness that is just enough to surprise your palate and act as the perfect supporting actor for a slice of Roquefort cheese.  Sharp cheeses,  eggplant relishes, anything with a nice bite and some saltiness will go extremely well with this bread.  I happen to like it all by itself, slightly toasted.

For this large boule I used two beets, one medium, one small.  One of the things I loved about this dough was the change in color as the dough proofed, starting with a gorgeous, intense purple, and getting more and more subtle as the fermentation went on.

The recipe for beetroot sourdough is very similar to the one I published with Emmanuel’s permission last May, except for the inclusion of grated, raw beets in the dough.  But a more detailed step by step photos of the full process of making this bread can be found with a quick jump to Garlic Buddha blog, a nice virtual spot!

I like a plain and simple sourdough, but every once in a while it is nice to explore different flavors and stretch the horizons a little.  Beets… who would imagine? 😉

I am submitting this post to Susan’s Yeastspotting

ONE YEAR AGO: Cod Filet with Mustard Tarragon Crust

TWO YEARS AGO: Soba Noodles: Light and Healthy

THREE YEARS AGO: Potato-Rosemary Bread

HAPPY THANKSGIVING!

Growing up, I knew nothing about Thanksgiving.   I had no idea one day I would be living here and calling the US my new home.  Of all American holidays, Thanksgiving is my favorite.  It is a time to just be together with family and friends, being grateful for the good things we have.  On that note, I wish Black Fridays did not exist. Or that they could be placed somewhere far apart in time from this special holiday.   Still, what matters the most is that we all have things to be grateful for, and I hope your day will focus on that.

For our first Thanksgiving in the Little Apple, we will have a joint party, two labs together, celebrating with all the graduate students who stayed here working hard during the break from classes.  It will be a fun evening, I am sure!  Phil will be in charge of the turkey, and I’ll be his sous chef.   All I have to do is mashed potatoes… I got the easy job this  year.

And here is a shot taken a couple of days ago in our street.  One would imagine that with Thanksgiving right at the corner, those guys would be a little more careful!  😉

HAPPY THANKSGIVING!