RIDICULOUSLY GOOD COCONUT BRIGADEIROS

A note to subscribers: Google Reader will shutdown on July 1st, 2013. If you have a subscription to this blog through Google Reader, please sign up for email notifications, or switch to another reader. I recommend Feedly or Bloglovin. They will automatically retrieve all your Google reader subscriptions.

platter1Originally, this post would have a simple and straightforward title:  “Coconut Brigadeiros”.  I made them late on a Sunday evening to take to our department next day.  Phil tried one, and was silent for a while. Then, he said “Sally, these are ridiculously good”.  And that, my friends, is how a new title for my post was born.  I could not let that one pass… 😉

Those of you who do not know what is a “brigadeiro” are invited to jump here and read a post I made a couple of years ago.  It explains everything you need to know about the most traditional sweet served at Brazilians parties and kids’  birthdays (particularly kids younger than 91 years old).   Coconut brigadeiros are simply a variation on a classic, but wow… they ARE ridiculously good.   Make a batch. And you will be hooked.

closeup

COCONUT BRIGADEIROS
(adapted from Fine Cooking magazine, original recipe from Leticia Moreinos Schwartz)

1 can sweetened condensed milk (14 oz)
1/2 cup coconut milk
2 tablespoons unsalted butter
2 teaspoons light corn syrup
2 cups shredded unsweetened coconut (divided)

Add the condensed milk, coconut milk, unsalted butter, corn syrup, and 1/2 cup of shredded coconut to a heavy saucepan and bring to a boil over medium heat. Turn the heat down to medium low and cook, stirring constantly with a wooden spoon, until the mixture thickens.  Depending on your stove, it should take 15 minutes or a little more.  If the mixture boils too furiously, lower the heat.   Keep stirring at all times or you might end up with brigadeiros that are not totally smooth. The mixture is ready when you can see the bottom of the saucepan as you stir.   Slide the mixture out into a bowl, avoid scraping the stuff that glued to the pan. Let the mixture cool completely or until it is cool enough to handle.

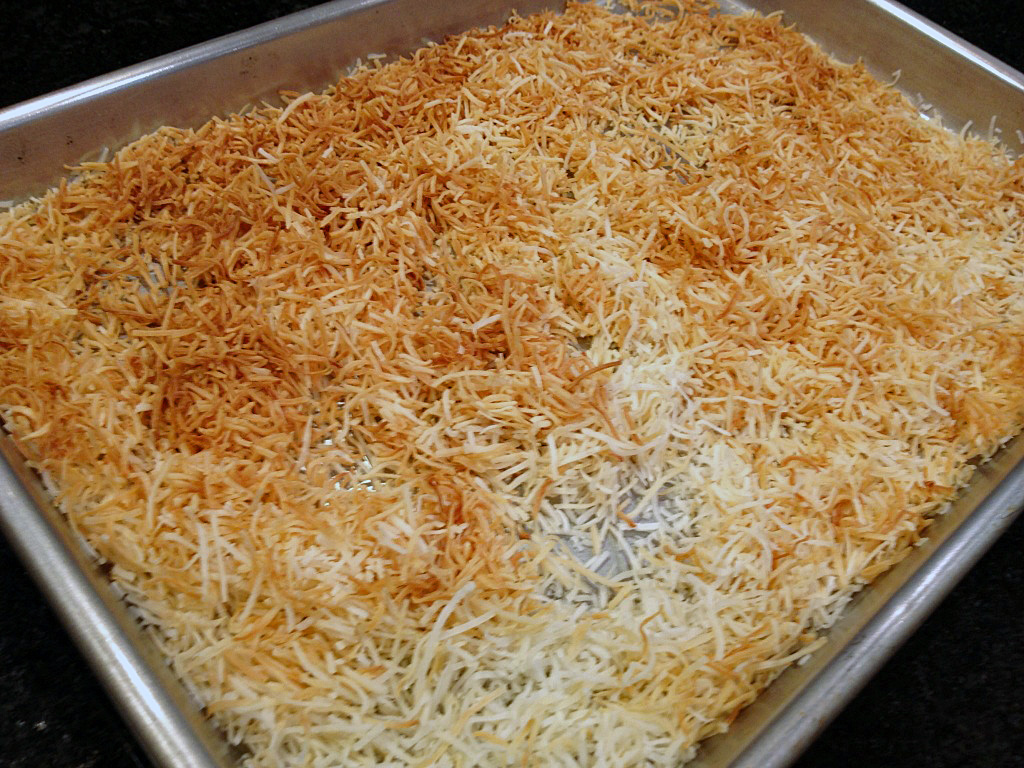
Spread the remaining 1 + 1/2 cups of the shredded coconut out onto a rimmed baking sheet and toast in a 350 degree oven for 10-15 minutes, stirring every 5 minutes to ensure even browning. Remove from the oven when most of the coconut is golden brown. Place into a bowl and let cool.

Scoop the coconut mixture with a small spoon (it helps to wet the palm of your hand with cold water) and roll into 3/4″ diameter balls. Drop each ball into the shredded coconut and toss gently to coat.  Serve right away at room temperature, or chill until ready to serve.

This recipe will make 26 to 36 brigadeiros. I tend to like them a little bigger, so I normally end with less than 30.  The recipe can be doubled.   For a different take, roll the coconut brigadeiros in chocolate sprinkles.

ENJOY!

to print the recipe, click here
toasted

Comments:  A friend of mine from Brazil goes to the extent of sautéing the shredded coconut in butter for the coating.  I think toasting in the oven is good enough.  Sometimes you can find shredded coconut in smaller pieces than the ones I used. It will work fine too.

Brigadeiros can be served at room temperature, or straight from the fridge. They will have a different texture, some people (me included) prefer the soft, room temperature version.  While we were in Brazil a couple of months ago, my niece Raquel  served us a variation on brigadeiros that might very well be my favorite: brigadeiros de cupuaçú.

Now, I don’t expect too many Americans (or Europeans for the matter) to know what I’m talking about.  Cupuaçú is a fruit native of the North of Brazil, the same region where açaí grows and where my Dad was born back in 1920.  He absolutely loved both fruits! It has a very unique taste, sweet and sour at the same time. In São Paulo you can easily find cupuaçú pulp  in frozen form, which is what Raquel used for her  brigadeiros.  One of the best things I’ve ever had!  Here in the US I settle for coconut, so you can make it too…   😉

Love Brazilian cooking?  Consider getting Leticia Schwartz book, The Brazilian Kitchen.  For my review of her book, click here.

ONE YEAR AGO:  A bewitching move ahead… (from OK to KS!)

TWO YEARS AGO: Double-hydration focaccia

THREE YEARS AGO: Pierre Nury’s Rustic Light Rye: Bougnat

BEST THING I EVER MADE SERIES: MUSHROOM STROGANOFF

As I mentioned before, one of the few shows I still enjoy in the FoodTV Network is the series “Best Thing I Ever Made“.  The list of dishes I’d like to make from that show is shamelessly long,  but I keep tuning in and making the list longer.  This meatless take on stroganoff is another great recipe by Alton Brown, featured in the episode “Updated Classics“.   Heads up: the fact that it is meatless does not make it a light meal!  The sauce is very rich with cream and goat cheese, the Portobello mushrooms play the meat part better than I expected.

served

MUSHROOM STROGANOFF WITH GOAT CHEESE
(from Alton Brown, Best Thing I Ever Made)

12 ounces extra-wide egg noodles
3 tablespoons unsalted butter
5 Portobello mushrooms, stems removed and sliced
1 teaspoon kosher salt
1 bunch green onions, sliced and white bottoms and green tops separated
1 tablespoon all-purpose flour
14 ounces beef broth
8 ounces sour cream
4 ounces fresh goat cheese
1/2 teaspoon ground black pepper
fresh parsley leaves, minced, to taste
.
Cook the noodles al dente, according to package instructions. Melt the butter in a 12-inch straight-sided saute pan set over medium-high heat. Increase the heat to high, add the mushrooms and sprinkle with salt. Saute until they darken in color, soften and give off their liquid, 5 to 6 minutes. Add the white parts of the green onions and saute 2 to 3 minutes.Sprinkle in the flour and stir to combine. Cook until the flour disappears and the fond on the bottom of the pan turns dark brown, about 1 minute.
Deglaze with the beef broth. Bring to a simmer and decrease the heat to medium-low. Cook for 10 to 12 minutes, and then add the sour cream, goat cheese and black pepper. Stir to combine, and then partially cover and bring to a simmer to warm through, 2 to 4 minutes.Drain the noodles, add to the pan and stir to combine. Garnish with the parsley. Serve immediately.
.
ENJOY!
.
to print the recipe, click here
.

cooking

Comments:  I had no idea that one could find some episodes of FoodTV on the net, without interruption for commercials. If you want to see Alton in action, click here.   He used an interesting method to cook the pasta, starting it in COLD water. I wanted to try it, but completely forgot about it and cooked my noodles the normal way.   Check the link for the recipe in the FoodTV site for his version, or watch the episode in which he explains the rationale for doing it this way.

This was a very substantial and filling pasta. It could be a vegetarian-friendly entrée if you skipped the beef broth and used a veggie broth instead, but I don’t think it would be nearly as good.  I used home-made beef broth from our freezer. I actually like to call it “liquid gold”.  It’s labor-intensive to prepare, but it does shine in a recipe like this one.   It gave amazing depth of flavor to the Portobello mushrooms.   This would be a wonderful dish for a dinner party, by the way.  The sauce can be made in advance, all you have to do is cook the noodles and awe your guests…   😉

ONE YEAR AGO: Tomato Sourdough

TWO YEARS AGO: Gamberetti con rucola e pomodori

THREE YEARS AGO: Flirting with Orzo

QUINOA WITH CIDER-GLAZED CARROTS

A note to subscribers:  Google Reader will shutdown on July 1st, 2013. If you have a subscription to this blog through Google Reader, please sign up for email notifications, or switch to another reader. I recommend Feedly or Bloglovin.  They will automatically retrieve all your Google reader subscriptions. 

I’ ve had plenty of versions of quinoa in the past, but this one takes the number one spot. The carrots added a sweet-sour note, the thinly sliced almonds a delicious crunch, and the quinoa married them together with its light and refreshing nature. Cannot praise this dish enough. I was inspired by this recipe from Bon Appetit, and decided to come up with a version to be served hot instead of cold, but with similar flavors. If you are searching for a recipe to please vegetarians or a perfect side dish for pork, poultry,  perhaps a thick slab of grilled salmon, look no further. This is perfect!

served22

QUINOA WITH CIDER-GLAZED CARROTS AND ALMONDS
(from the Bewitching Kitchen, inspired by Bon Appetit)

1 cup quinoa, very well rinsed and drained
salt
3 medium carrots, thinly sliced at an angle
2 Tbsp apple cider
2 Tbsp agave nectar
1/4 cup sliced almonds
2 Tbsp olive oil, divided
1 Tbsp cider vinegar
2 Tbsp lemon juice
zest of 1 lemon

Heat oven to 450°. Bring quinoa and 4 cups lightly salted water to a boil in a medium saucepan. Cover, reduce heat, and simmer until quinoa is tender, 10-15 minutes. Drain; return quinoa mixture to saucepan, cover, and let sit for 10 minutes. Fluff with a fork and transfer to a large bowl; let cool.

Meanwhile, lightly coat a large rimmed baking sheet with oil (or cover it with parchment paper). Whisk cider and honey in a large bowl to blend; season with salt and pepper. Add carrots and toss to coat. Transfer to prepared baking sheet and roast until tender, 15-20 minutes. Let cool.

Heat 1 tablespoon of olive oil in a small skillet. Add the almonds and cook over low heat until fragrant.  Set aside, keeping it warm.

Whisk vinegar, lemon zest, lemon juice, and remaining tablespoon of olive oil in a small bowl.  Season with salt and pepper.

Add carrots and almonds to quinoa mixture and toss to coat. Drizzle the vinegar & lemon mixture and mix well tp combine all ingredients.  Adjust seasoning if needed.

ENJOY!

to print the recipe, click here

Comments: If you are new to cooking the seeds of Chenopodium quinoa, please remember to rinse them extensively.  The seeds  have a natural coating of saponins that taste very bitter.  Processing the seeds for sale includes pre-washing, but you will notice that the water still foams slightly once you soak the seeds.  A couple of years ago, I read somewhere that quinoa goes rancid very easily, so the advice given was to store it for  no more than 6 months (or freeze it).   I tried to find a source for this information,  but now I find plenty of sites stating that it lasts for several years in the pantry.  Oh, well. I guess one can always open the bag and do a sniff test.

Cooked quinoa freezes very well, so you can prepare a full bag and portion it in the freezer for later. I actually cooked it on a Saturday and made this recipe for our dinner on Tuesday.  Pork tenderloin kebabs completed the meal, but the truth is we both raved about the quinoa a lot more.  Bonus:  we got our intake of carrots all taken care of!  😉

ONE YEAR AGO: Celebrate Wednesday: Heirloom Tomatoes Steal the Show

TWO YEARS AGO: Pain de Provence

THREE YEARS AGO: Golspie Loaf, from the Scottish Highlands

CELEBRATE WEDNESDAY WITH PASTA AND MUSSELS IN SAFFRON BROTH

For some reason I had “issues” about cooking mussels at home. Maybe that whole de-bearding thing sounded too wild for my delicate self.  😉  But we love mussels and it’s  sad to only have them in restaurants, or even worse, only when we go to Paris and visit one of those widespread “Leon de Bruxelles” places.  Anyway, our grocery store in the Little Apple carries farmed mussels. They have no beard to worry about. Therefore, most of the cleaning process is done. They cook quickly, and certainly make a humble plate of pasta (and a rainy Wednesday evening) shine…

served1

PASTA WITH MUSSELS IN SAFFRON SAUCE
(adapted from Food and Wine magazine)

2 cups dry white wine
4 bay leaves
4 pounds small mussels, scrubbed and de-bearded
Pinch of saffron threads
1 tablespoon unsalted butter, melted
1 tablespoon olive oil
1 garlic clove, thinly sliced
1/2 teaspoon crushed red pepper
2 tablespoons fresh lemon juice
linguine
Salt and freshly ground pepper
minced parsley, to taste

In a large pot, combine the wine with the bay leaves and bring to a boil. Add the mussels, cover and cook over high heat, shaking the pan a few times, until the mussels open, about 5 minutes. Drain the mussels in a colander set over a medium bowl. Pour the mussel broth into a glass measure. Crumble the saffron into the hot mussel broth. Reserve.

Discard any unopened mussels. Remove the mussels from their shells and place in a separate bowl. Pour the melted butter over the mussels and toss to coat. Cover with plastic wrap.

Heat the olive oil in a large skillet. Add the thinly sliced garlic and cook over low heat just it gets some color. If you prefer, remove the garlic, if not, leave it in, and add the crushed red pepper, cooking together for one minute.   Slowly pour in the reserved mussel broth, stopping when you reach the grit at the bottom of the glass measure. Add the lemon juice and simmer over moderately high heat until the sauce is reduced to about 1 cup, about 8 minutes.

In a large pot of boiling, salted water, cook the pasta just until al dente. Drain the pasta well. Add the buttered mussels and the hot spaghetti to the mussel sauce and toss over low heat until the pasta is uniformly coated. Season with salt and pepper. Sprinkle with parsley and serve.

ENJOY!

to print the recipe, click here

composite1

Comments:  Glad to inform my fear of mussels is a thing of the past.  I probably discarded more mussels than needed,  as I rather be safe than sorry, and was a bit insecure preparing them for the first time.  This is a delicious pasta! Of course, having great quality saffron adds a lot to it…  😉   Now that I am not afraid of cooking mussels, we will have them at our dinner table on a regular basis,  brightening up our Wednesdays, as we slowly move towards the weekend.

ONE YEAR AGO: Triple Chocolate Brownies

TWO YEARS AGO: Shanghai Soup Dumplings

THREE YEARS AGO: Bite-sized Chocolate Pleasure

SECRET RECIPE CLUB: LEEK AND CHEESE TART

tart1

One more month flew by us! Last Monday of April, first Secret Recipe Club of a favorite season, Spring!  I was paired with the blog Food Baby Life, and had a blast browsing Susan’s site. She has a well-organized index which makes life a lot easier for the stalker.  Being a busy mom, many of her recipes are compatible with our own life style. You know, that life style in which the day doesn’t seem to have enough hours, and each night we ask ourselves “why isn’t tomorrow Saturday instead of Tuesday?”   😉    I had quite a few recipes on a list of favorites to choose from, including her  Spiced Meatball Wrap, but settled on this tart because of the unusual crust: instead of butter, olive oil. Instead of white flour, a combination of 50/50 white and whole-wheat. A few modifications of my own for reasons specified in the comments, and there you have it: a Leek and Kale Tart with Olive Oil Crust!

LEEK AND KALE TART WITH OLIVE OIL CRUST
(adapted from Food Baby Life) 

for the filling:
2 large leeks, washed and sliced thinly
1 small bunch kale, sliced thinly
1 tbsp olive oil
1 clove garlic, crushed
dash of nutmeg
salt and pepper to taste
4 eggs
1 cup (250ml) evaporated milk
125g cheddar cheese, grated (see comments)
for the crust:
125g plain flour
125g whole -wheat flour
1 ts salt
60 ml olive oil
100-120ml cold water
Lightly grease a 28cm (11 inch) tart dish, preferably one with a removable bottom, but a Pyrex type will work too.  Heat  the oven to 390 F  (200 degrees Celsius).
To make the pastry, place the flours and salt in a large bowl and whisk to combine. Pour in the oil and stir with a fork. Add the water and continue to stir with a fork until it is just absorbed then start to knead with your hand, until the dough forms a ball and comes away from the sides of the bowl.

Turn the dough out onto a floured surface and roll out to fit the tart pan. Transfer the dough to the pan, trim the edges and place in the fridge for 30 minutes.

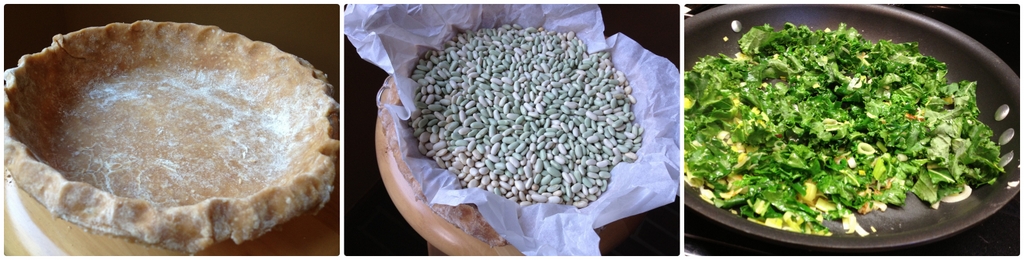
While the pastry is chilling, make your filling. Melt the olive oil in a large saucepan over medium heat. Add the leeks and garlic and cook, stirring often for about 10 minutes, then add the kale and cook for a few minutes more, until wilted. Season with nutmeg and remove from the heat and allow to cool for 10 minutes or so. In a separate bowl whisk together the eggs and milk along with salt and pepper to taste.

Blind bake the pastry for 10 minutes lining it with parchment paper and filling it with beans. Remove the beans and paper and bake for a further 10-15 minutes or until the edges are golden and the base is totally dry to the touch. Remove and allow to cool for 10 minutes.

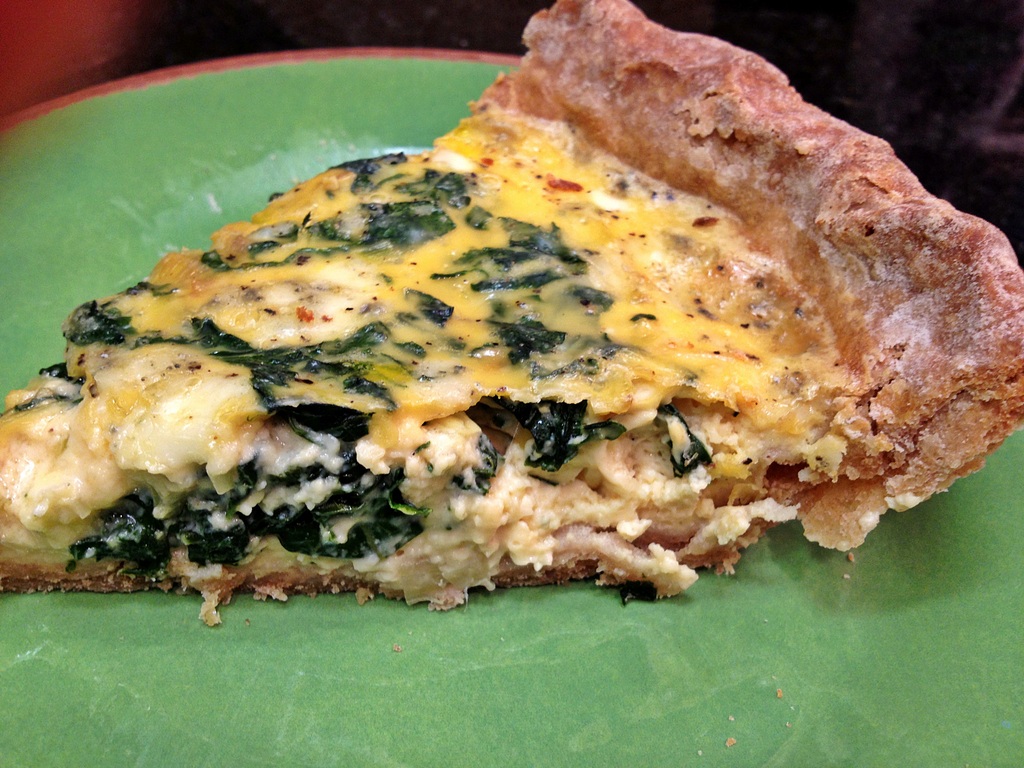
To assemble the tart, fill the pastry shell with the cooked leek and kale mixture, sprinkle over the cheese and then pour over the egg mixture. Bake for approximately 25 minutes. The filling should be just set and the edges of the pastry a deep golden brown. Cool for at least 15 minutes before serving.

ENJOY!

to print the recipe, click here

composite
Comments:
What’s life without a little adrenaline rush? You would think that by staying away from cakes I’d be safe, right?  Not so fast.  Things were going quite well up to the moment of adding evaporated milk to the game. I grabbed my can opener, a little gadget that works like a charm, smooth, graceful, leaving no sharp edges. It usually performs a little magic around the edges, so that you cannot quite tell the can is open, but it is.  Or is it really?  Something about the edge of the can of evaporated milk simply would not cooperate and it refused to open.  I had a second can in the pantry, tried to work on it,  again no luck. I searched everywhere for an old-fashioned type can opener, but apparently ours was lost during the move.  A few slammed doors and drawers, a few words not fit to print, I finally had the brilliant idea of pairing an oyster knife with a hammer.  Punched a square hole on top of the can, and back in business I was.  (BTW, I don’t recommend doing that, it is both messy and dangerous).

IMG_1627
To add a little more emotion to the day, I forgot to buy Cheddar cheese for the recipe!  I had no cheese around, except for three little triangles of “Laughing Cow Light Original Swiss Cheese”.   I ended up mixing it as well as I could to the evaporated milk, and that was that. Finally, If you followed the original link to Baby. Food. Life, you will notice that she removed the excess dough after covering her tart pan, for a very polished look. I don’t know what I was thinking, but obviously I went into a different direction.  Oh, well…   What matters is that this crust might very well become my default recipe from now on.  We both absolutely loved it, it does have a more rustic quality thanks to the whole-wheat flour and the olive oil.  Plus, making it in a bowl using just a fork and your hands was awesome!

Susan, it was great to meet you and your blog through The Secret Recipe Club, we loved this recipe, enjoyed it three days in a row, it only got better and better!

slice

For those who want to see what my fellow friends from group D cooked up this month, don’t be shy, just click on the blue frog at the very end of my post, and happy browsing!  And those who are curious to see which recipe was chosen from my blog, and who had it, jump here for a fantastic article by Fran!  She made a favorite of ours, Vietnamese Spring Rolls.

ONE YEAR AGO: Secret Recipe Club; Triple Chocolate Brownies

TWO YEARS AGO: Shaved Asparagus Salad

THREE YEARS AGO: Indonesian Ginger Chicken