ARE YOU AFRAID OF CELERY ROOT?

If I had to choose a word to define my childhood and even teenage years, fear would be it. To name a few of my fears: darkness, sleeping alone, mirrors, clowns, dolls, sleepovers,  odd numbers (don’t ask), heights, cockroaches. There were many more, but let’s keep it simple, shall we? Glad to report that just as my pickiness to eat, those fears are a thing of the past. Except heights and cockroaches. The former I still try to work on, cockroaches are out of question. I am talking about the tropical kind, with their scary dimensions and uncanny ability to fly across a room. I shiver just to think about them. Growing up, I don’t remember ever seeing  celery root in our home, but being the easily scared self I was,  I bet I would be afraid of it too. It does look like a large potato under the spell of black magic. Something that belongs in the setting of Hansel and Gretel’s tale (which as a matter of fact gave me nightmares for months after reading it as a child).

ingredients
But, don’t let celery root (aka celeriac) looks prevent you from enjoying it. Under that harsh appearance, lies a beautiful white entity, with a flavor vaguely reminiscent of celery, but much more complex.  Yes, it is a bit hard to peel, and if you are not careful a finger or two could be hurt in the process, but keep calm, peel on, and make soup before the weather gets too hot.  Too hot. What a silly statement. Sorry, sometimes I make no sense.

Parsnip&CeleriacSoupCELERIAC AND PARSNIP SOUP WITH TOASTED COCONUT
(from the Bewitching Kitchen)

1 tablespoon olive oil
1 medium celery rib, diced
1 shallot, minced
1 large celeriac, peeled and cut in chunks
3 to 4 medium-sized parsnips, peeled and cut in chunks
salt and black pepper
dash of nutmeg
4 cups water
lemon juice to taste

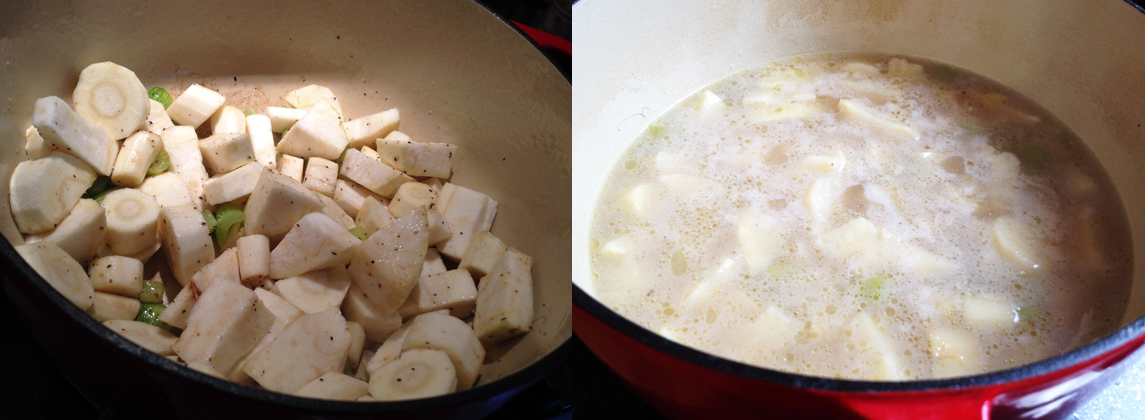
Heat the olive oil in a pan large enough to accommodate all ingredients. Sautee the shallot with the celery until fragrant and shallots become translucent. Season lightly with salt and pepper.  Add the pieces of parsnips and celeriac, saute for a few minutes, moving them around.

Add water, making sure it cover the veggies. Bring to a boil, cook until parsnips and celeriac pieces are tender, 20 to 30 minutes. Transfer the veggies with some of the water to a blender or food processor, blend until smooth. You might need to do it in two batches, being careful while processing hot liquids (using a blender keep the lid open and cover the top with a kitchen cloth).  Use only enough water to get the consistency you like.

Return the processed soup to the pan on low heat, adjust consistency with the reserved water if needed. Season with nutmeg, add a squeeze of lemon juice, taste and adjust seasoning.

Serve with coconut flakes (unsweetened) sautéed in olive oil or butter, lightly seasoned with salt, or with any other topping you like.

ENJOY!

to print the recipe, click here

composite
This was a delicious soup, the lemon juice at the end does that citric magic I am very fond of. If I had a dollar bill for every time I use lemon juice in my cooking, I’d be rich. You can make this soup a bit more luscious adding a touch of cream if you want, or using chicken stock instead of water, but I often like to keep things simple and let the flavor of the veggies take the spotlight.  I am not quite sure about the nutmeg. I love nutmeg with cauliflower and in bechamel sauce, but I might omit it in this soup next time. Maybe I used too heavy a hand, I thought the flavor was a bit too strong. Anyway, if you make it, go easy with it and taste it.

Before I say goodbye, here is a small collection of recipes to help you lose any residual fear of celery root… just in case you need it  😉

SWEET AND SOUR CELERIAC SEPHARDIC STYLE, from Tasty Eats

CELERY ROOT, APPLE AND WALNUT SALAD from Cooking and Traveling in Italy and Beyond

CELERY ROOT LETTUCE WRAPS from The Wimpy Vegetarian

CELERY ROOT REMOULADE, from Kitchen Riffs

FRENCH LENTILS WITH CARAMELIZED CELERY ROOT, from Martha Stewart

POACHED EGGS OVER CELERY ROOT LATKES, from Fresh Start

POTATO AND CELERY ROOT ROSTI, from Martha Stewart

I hope you enjoyed this small tour on celeriac possibilities, and if you are a celeriac virgin, you will give it a try in the near future. Nothing to fear, I promise!

**********************************************************************************

ONE YEAR AGO: Prime Rib Roast, Mexican Style

TWO YEARS AGO: Sourdough Bread with Walnuts and Dates

THREE YEARS AGO: Braised Brisket with Bourbon-Apricot Glaze

FOUR YEARS AGO: The Real Vodka Sauce

FIVE YEARS AGO: Pork Tenderloin and Blue Cheese


SECRET RECIPE CLUB: GLUTEN-FREE & VEGAN RASPBERRY BARS

Last Monday of March, a month that makes me happy for several reasons. I was born in March, Phil and I got married 15 years ago in March, and the month also welcomes the beginning of Spring.  Can you fully grasp the unmeasurable joy associated with it? It means I survived another winter, and here I am, alive and kicking to share with you one more adventure as part of The Secret Recipe Club.   You know, that event that pairs two food bloggers in secret, and then the whole group posts about their chosen dish at exactly the same time. My assignment this month was the blog Without Adornment, hosted by Bean. She has a degree in Chemical Engineering, and her hobbies are cooking/baking, and photography, so of course her blog is a perfect venue to showcase her talent.  I was thrilled by this assignment, because Bean is a very accomplished baker who must make exclusively gluten-free recipes. Those of you who have gluten allergies know how tricky it can be to try and mimic the delicious cookies, breads, pies, and muffins that rely on gluten for perfect texture and taste. Browsing her blog really opened my horizons and the list of goodies I wanted to try was extensive.  To name a few, I was inclined to bake a batch of her White Chocolate Oatmeal Cookies with Cranberries,  then almost chose her Gluten-Free Pear Clafoutis, Another amazing option that I will bake soon: Dairy Free Creme Brulée (using coconut milk, how sweet is that?). As usual, savory stuff appeals a lot to me, so I also saved her Vegan Walnut Zucchini Crackers for final consideration. After a little bit of a mental struggle,  I went with her Raspberry Bars, in part because they use quinoa flakes and I had a box sitting in my pantry begging to come out and play.  I could not miss the opportunity…

RasberryBars

GLUTEN FREE VEGAN RASPBERRY SQUARES
(from Without Adornment)

1/2 cup almond flour
1/2 cup brown rice flour
1/4 cup tapioca starch
1/4 cup coconut flour
1 tsp. baking powder
1/4 tsp. salt
1 cup oats
1/2 cup quinoa flakes
3 tbsp. palm sugar
1/2 – 2/3 c. coconut oil
3 cup thawed raspberries, with as much of the liquid drained as you can.
3 – 4 tbsp. honey
1 tsp. cinnamon
1/2 tsp. nutmeg
1/2 tsp. cardamom
1/2 tsp. pure vanilla extract

Heat oven to 350F.

Whisk together flours, baking powder and salt. Add oats, quinoa flakes and palm sugar and mix until evenly distributed. Add in unmelted coconut oil. Using your fingers, work the coconut oil into the flour mixture until there are no lumps remaining and the mixture is crumbly.

In a separate bowl, stir together raspberries, honey and spices. Add more sweetener to reach desired sweetness. Press over half of the crumb mixture into a greased 8″ square pan. Scoop the raspberries onto the pressed bar mixture and distribute evenly. Sprinkle the remaining crumb mixture on top of the raspberries and pat lightly.

Bake for 30 – 40 minutes or until topping is light brown.

Cool completely before cutting into squares.

ENJOY!

to print the recipe, click here

composite1

Comments:  I changed the recipe slightly by using a mixture of raspberries and blueberries, as the price tag on the raspberries was a little high. I don’t think it hurt anything, it just made the color of the filling darker than Bean’s concoction, and also a bit more chunky, as the blueberries retain their shape. The cute box of quinoa flakes was one of those classic impulse buys that I am often a victim of. But I knew the flakes would come in handy, and was glad to be able to use them in this recipe.

composite2

Gluten-free baking is really a huge challenge, because without gluten to provide that nice, elastic structure, baked goods tend to be dry, and much less pleasant to eat. However, using the right mixture of flours and grains, one can get close enough to the “real thing” and these bars are a perfect success story.  I took the squares to the department and did not mention they were gluten-free. Nobody seemed to notice, and they were inhaled in a little over one hour.  I call it a success story indeed.

Bean, I hope you had as much fun with your assignment as I had with mine!  And for those reading my blog, make sure to click on the blue amphibian smiling at you at the very end.  She (or he, who knows?) will take you to a new page showing all the tasty concoctions made by my virtual friends of The Secret Recipe Club.  Enjoy the collection!

ONE YEAR AGO: Lasserre, a French Classic

TWO YEARS AGO: Sourdough Bread with Walnuts and Dates

THREE YEARS AGO: Braised Brisket with Bourbon-Apricot Glaze

FOUR YEARS AGO: The Real Vodka Sauce

FIVE YEARS AGO: Pork Tenderloin and Blue Cheese

SPINACH AND MUSHROOM STUFFED PORK TENDERLOIN

The pi day last week made me realize that for a blog that is almost 6 years old, I have very few pies to share. Not the type of stuff we make that often, and of course, it reflects on their limited presence in the site. On the opposite side of the spectrum we have pork tenderloin, by far one of the types of meat I make the most. This version is a little more dressed-up than usual, and perfect for a weekend dinner. The recipe comes from Fine Cooking magazine, and for those who care to know nutritional details, it is Paleo-friendly (if you omit the cream sauce) and low-carb. It is also elegant, and flavorful, which is what really matters 😉

StuffedPorkTenderloinSPINACH AND MUSHROOM STUFFED PORK TENDERLOIN
(slightly modified from Fine Cooking)

5 Tbs. extra-virgin olive oil
3-1/2 oz. cremini mushrooms, thinly sliced (1-1/2 cups)
1/2 cup sun-dried tomatoes, packed in oil, drained and diced
salt and freshly ground black pepper
6 oz. baby spinach (5 lightly packed cups)
1 large pork tenderloin (about 1-1/4 lb.)
zest of one large lemon
2 tsp of lemon juice
1 large shallot, finely diced
3/4 cup low-salt canned chicken broth
2-1/2 Tbs. sherry vinegar
2 Tbs. heavy cream

Set a rack in the center of the oven and heat the oven to 450°F. Heat 2 Tbs. of the oil in a heavy, ovenproof 12-inch skillet over medium-high heat until shimmering hot. Add the mushrooms, sprinkle with 1/2 tsp. each of salt and pepper, and cook, stirring, until browned and tender, about 3 minutes. Stir in the spinach and sun-dried tomatoes, sprinkle with salt, and cook, tossing well with tongs, until the spinach is wilted, about 2 minutes. Transfer the mixture to a colander and set the skillet aside.

Butterfly the tenderloin by making a horizontal slice lengthwise through the meat almost all the way to the other side. Open the meat flat, like a book. Cover with plastic wrap, and using a meat mallet, a small, heavy skillet, or the heel of your hand, lightly pound the pork so that it’s 1/4 inch thick. Rub the pork all over with 1 Tbs. of the oil, the lemon juice, and sprinkle all over the zest of the lemon and about 1/2 tsp. each of salt and pepper.

Squeeze any excess liquid from the spinach and mushrooms. Spread over the pork, leaving bare a 2-inch border along one long edge. Starting with the long side that’s covered with filling, roll the stuffed tenderloin toward the bare-border side so that it forms a cylinder, and tie it with kitchen twine.

Wipe the skillet clean if necessary. Heat the remaining 2 Tbs. oil in the skillet over medium-high heat until shimmering hot. Sear the pork on all three non-seam sides until well browned, about 6 minutes total. Flip onto the seam side, then transfer the skillet to the oven. Cook until an instant-read thermometer inserted into the thickest part of the roast registers 140ºF, 15 to 20 minutes.

Transfer the meat to a clean cutting board, tent with aluminum foil, and let rest for 10 minutes. Meanwhile, return the skillet to the stove over medium-high heat (be careful; the skillet’s handle will be hot). Add the shallots, season with 1/4 teaspoon salt, and cook, stirring, until the shallots soften and brown, about 2 minutes. Add the chicken broth, sherry vinegar, and simmer briskly until the mixture reduces by a bit more than half, about 4 minutes. Stir in the cream and season with salt and pepper to taste.

Slice the pork into 1/2-inch-thick slices and serve with the sauce.

ENJOY!

to print the recipe, click here

composite1
Comments: The only problem when cooking pork tenderloin is the delicate nature of this meat, and its tendency to dry during roasting because it has such low-fat content. By filling it with the sautéed mixture of veggies, you won’t run such risk.  I prepared the filling, rolled the meat, wrapped it in plastic and left it in the fridge for several hours, then finished it all up for our dinner on a Saturday evening, back in January.

You can serve it with any type of starchy side you’d like, pasta, rice, mashed root veggies, but in this particular dinner I went with a much lighter option, and enjoyed it with a side of grated carrots lightly seasoned with lemon juice & olive oil.  I like to keep it in the fridge for an hour or so, then add salt and pepper right before serving. It is amazing what a touch of lemon juice can do to grated carrots.  I first read about it on Leite’s Culinaria, after a tip from our friend Cindy. Try it sometime, nothing could be simpler, but you’ll find yourself making it again and again.

served11


ONE YEAR AGO: Crispy Chickpea and Caper Spaghetti

TWO YEARS AGO: Spring has Sprung!

THREE YEARS AGO: Chickpea and Fire Roasted Tomato Soup

FOUR YEARS AGO: Double Asparagus Delight

FIVE YEARS AGO:  Sun-dried Tomato and Feta Cheese Torte

FOCACCIA WITH CHILE AND COTIJA CHEESE

A while ago – June 2013, to be precise – I made a type of Italy-meets-Mexico-focaccia using a sauce with tomatillos. It turned out so tasty that I wanted to re-visit the same type of fusion cuisine again. It took me a while, but here is my second take on the subject.  I used my default recipe for the dough, topped with a mixture of olive oil, avocado oil, New Mexico chiles, and Cotija cheese. Some sun-dried tomatoes for a bit of concentrated sweetness, and voilà…

IMG_6521FOCACCIA WITH CHILE AND COTIJA CHEESE
(from the Bewitching Kitchen)

1 recipe of focaccia dough
Green New Mexico chiles, thinly sliced
Cotija cheese, crumbled (you can use feta, or even Mozzarella)
sun-dried tomatoes
olive oil
avocado oil
salt & pepper

Open the dough on a well-oiled baking dish, stretching with your hands, and making plenty of dimples all over its surface.

Add a good coating of olive and avocado oil, mixed about 50:50. Distribute the slices of chile, cheese, and sun-dried tomatoes all over the dough.  Season with salt and pepper.

Bake as directed in the original foccacia post.

Cut in slices and serve.

ENJOY!

I am not offering a printable version, since the main recipe for the dough is from a previous post. The toppings don’t really need any type of precise measurement, so add as much or as little of each component you feel like. Black olives could be wonderful too, by the way…

prebaked
For the chiles, I used the brand featured in this post, a gift from our friends V & K. They have amazing flavor, and of course go very well with Cotija cheese, one of those matches made in heaven.  Like V & K.

♥♥♥♥♥♥♥♥♥♥♥♥♥♥

The focaccia squares freeze well, I like to wrap 3 to 4 squares in small packages and enjoy them for weeks. Simply remove from the freezer 30 minutes before your meal, and heat them in a low oven until warm and fragrant.

I am submitting this post to Susan’s Yeastspotting event…

ONE YEAR AGO: Crispy Chickpea and Caper Spaghetti 

TWO YEARS AGO: Leaving on a jet plane

THREE YEARS AGO: Crispy Herb-Crusted Halibut

FOUR YEARS AGO: Almond Butter Cake

FIVE YEARS AGO: Bonjour!

THE PIE OF THE CENTURY

The number π (pi) is the ratio between the circle’s circumference and its diameter, a value approximated as 3.14159. March 14th, 2015 becomes the closest match to the value of pi so lots of people will be making and/or enjoying some type of pie to celebrate a special day that only happens every 100 years! In my humble opinion, the real day should be celebrated in 2016, as if you were to approximate the value of pi to four decimal points, 3.14159 would turn into 3.1416. But, who am I to swim against such a strong current? I rather join the fun. And maybe have a pi encore next year 😉

We will be enjoying a Cherry Pie made by special friends… sorry, no recipe.

unnamed-10


But to compensate for the lack of recipe, I am sharing a few pies of my past…
ENJOY!

baked1

Carriage House Walnut Apple Pie

pieces

Italian Easter Pie

slicePumpkin Pie

4thofjulypieA Pie for the 4th of July

baked1-2Asparagus Quiche
(
maybe a stretch on the pie concept, but too delicious to pass)

HAVE A WONDERFUL PI DAY!

Add to FacebookAdd to DiggAdd to Del.icio.usAdd to StumbleuponAdd to RedditAdd to BlinklistAdd to TwitterAdd to TechnoratiAdd to Yahoo BuzzAdd to Newsvine