INCREDIBLY EASY TIMES TWO – MAY 2024

I realize that many recipes in the Incredibly Easy folder rely on the air-fryer. What can I say? That is one gadget that makes life easier. Today I share one recipe for carrots and one for eggplant that surpassed my expectations because both were so simple and delivered so much flavor. If you don’t have an air-fryer, you can still make them, but it will be a matter of adjusting oven temperature, size of baking sheet, how often to move things around… all doable, but I cannot quite give you the precise method.

AIR-FRIED CARROTS WITH ORANGE AND CARDAMON
(from The Bewitching Kitchen)

5 medium carrots, peeled, cut in half crosswise, then in half lengthwise
1 tablespoon butter, melted
drizzle of olive oil
salt and pepper to taste
2 tablespoons orange juice (I used blood orange)
drizzle of agave nectar
1/4 tsp ground cardamon

Melt the butter, add the drizzle of olive oil, and al other ingredients. Whisk well. Pour the mixture over the carrots, move them to coat as thoroughly as possible, immediately add to the air-fryer set at 400F or as high as your machine will go.

Cook for about 12 minutes, shaking the pan every once in a while. When they get nicely brown at the edges and cooked through (test with a fork), serve and…

ENJOY!

to print the recipe, click here


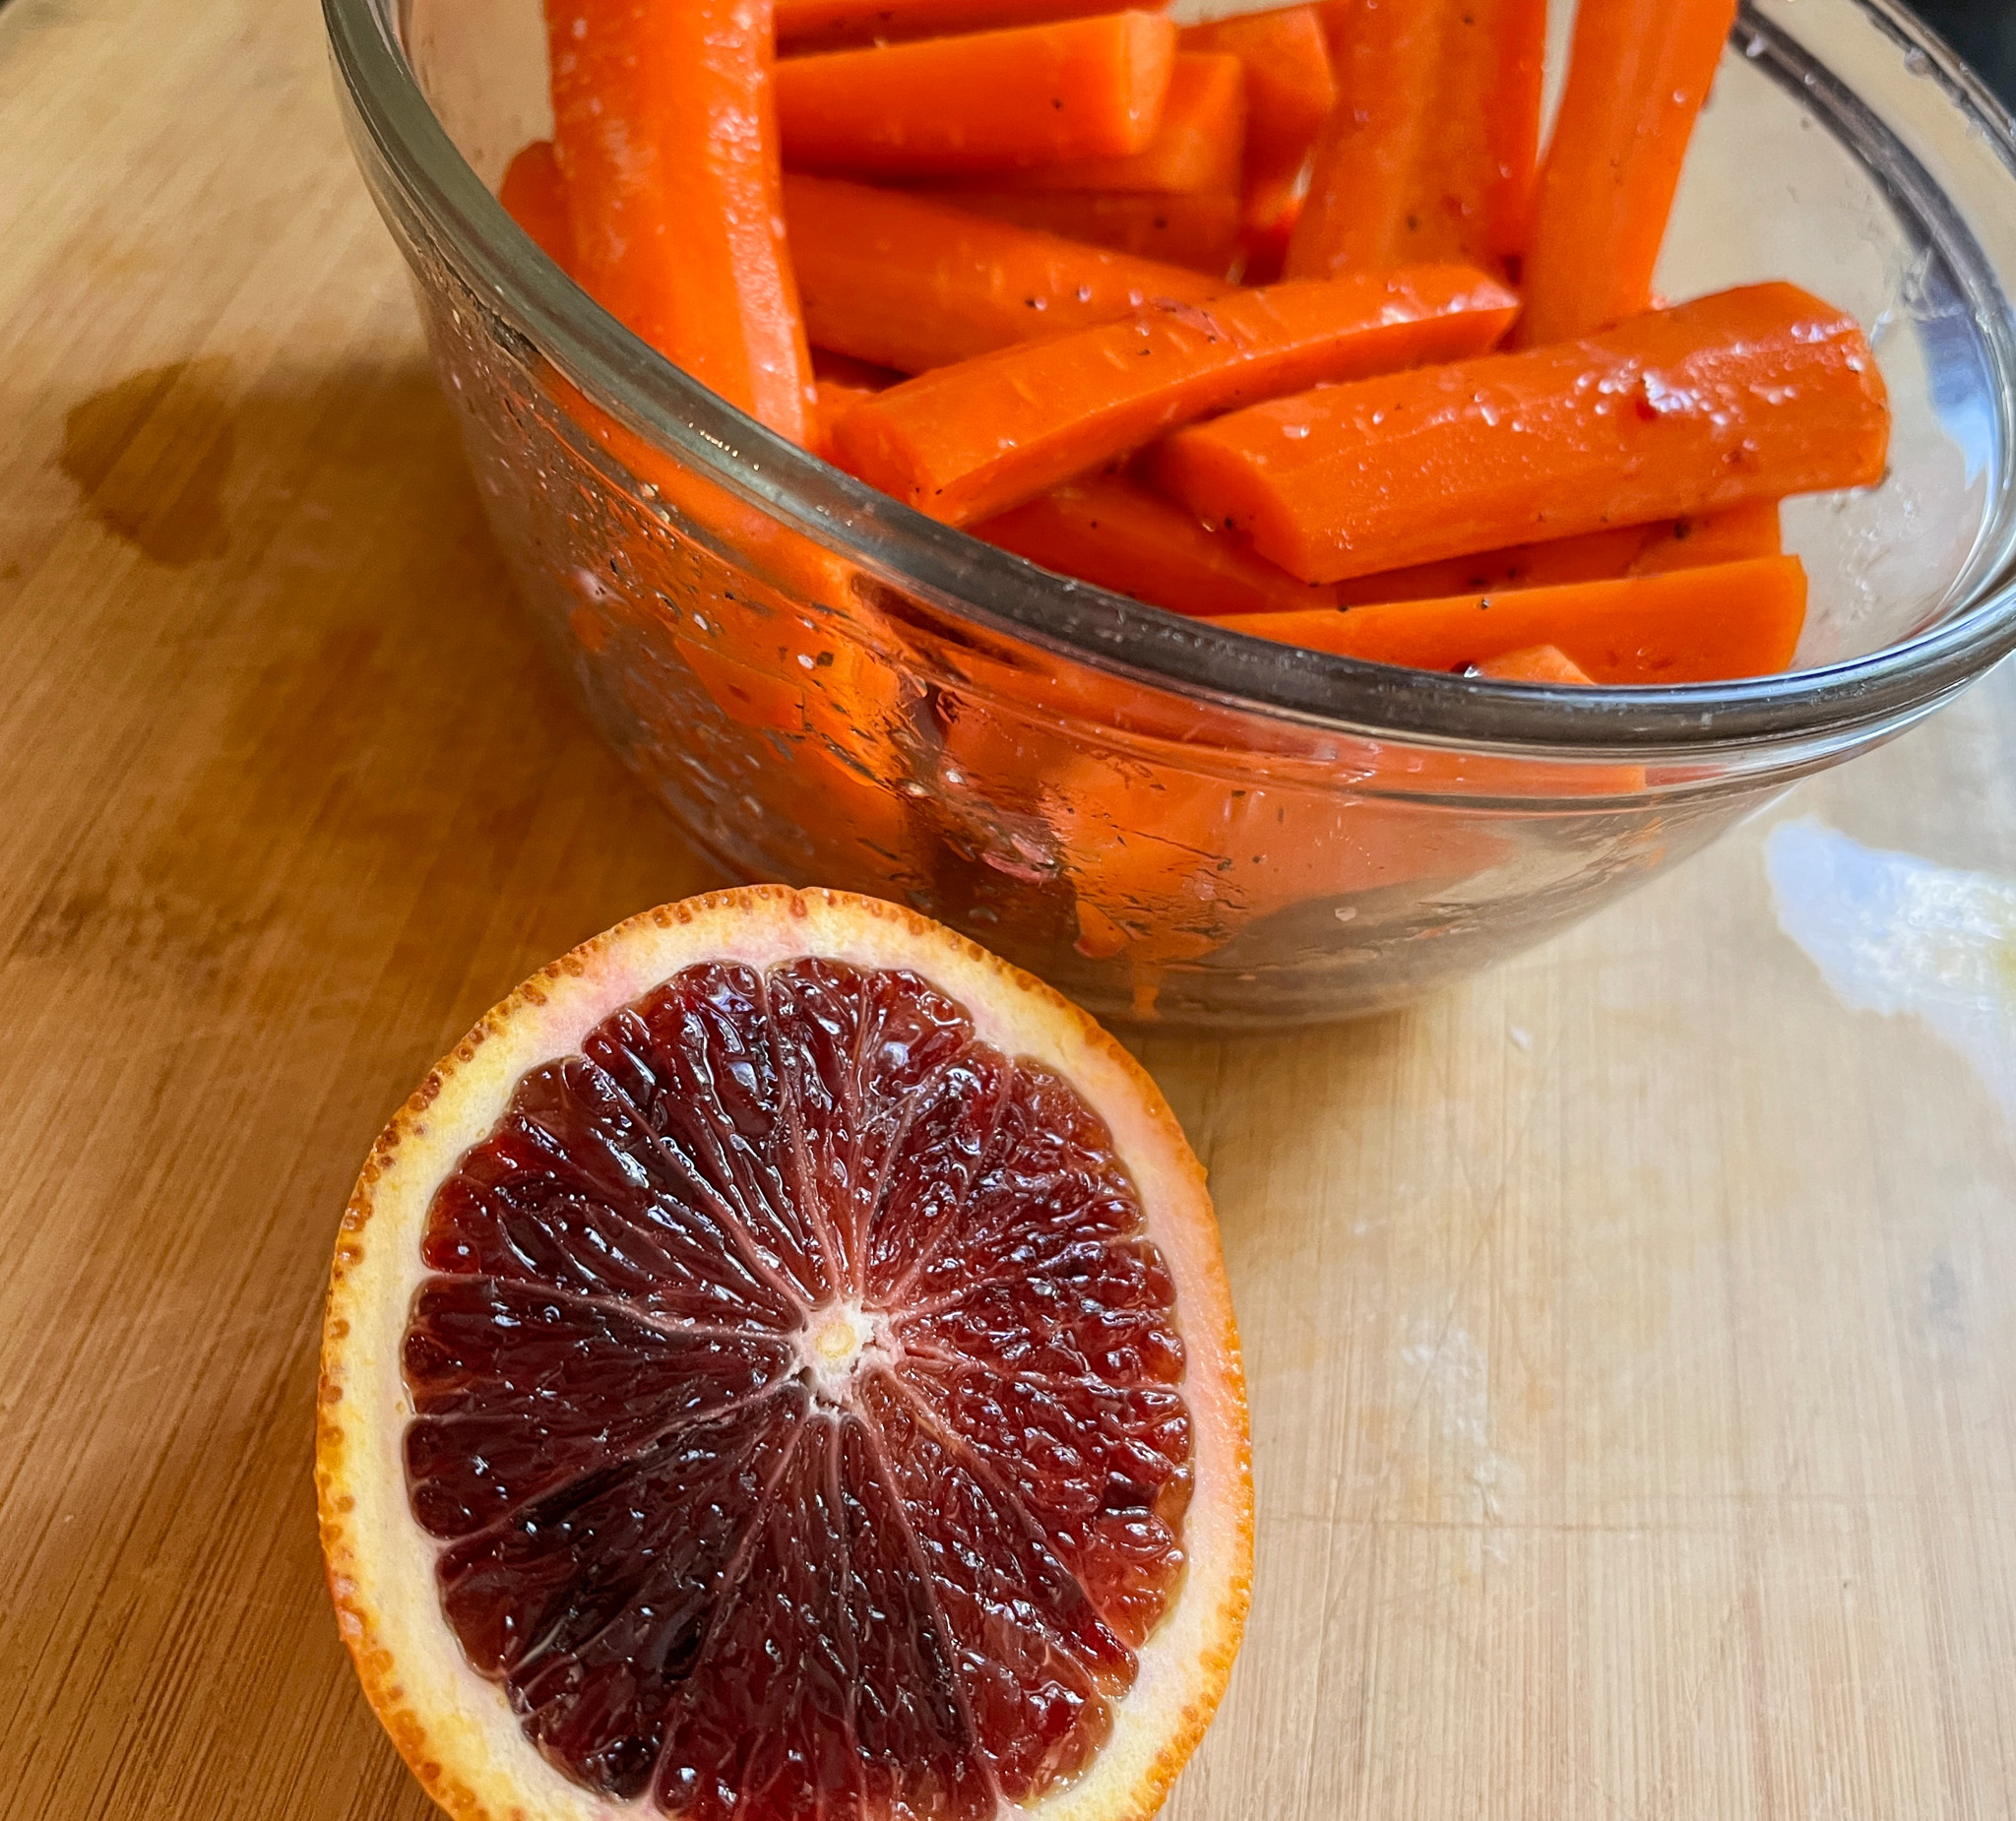
Comments: I normally avoid cooking with butter, but the small amount used here made it really nice. I have made it exclusively with olive oil and it is still good but I believe the water in the butter helps tenderizing the carrot and contributes for better texture. Whenever I use the air-fryer, I don’t worry too much about timing the end of cooking time with serving the meal, especially if I am cooking other things. I cook until ready, turn the machine off. When we are about to eat, I turn it on for 1 minute. Works like a charm!

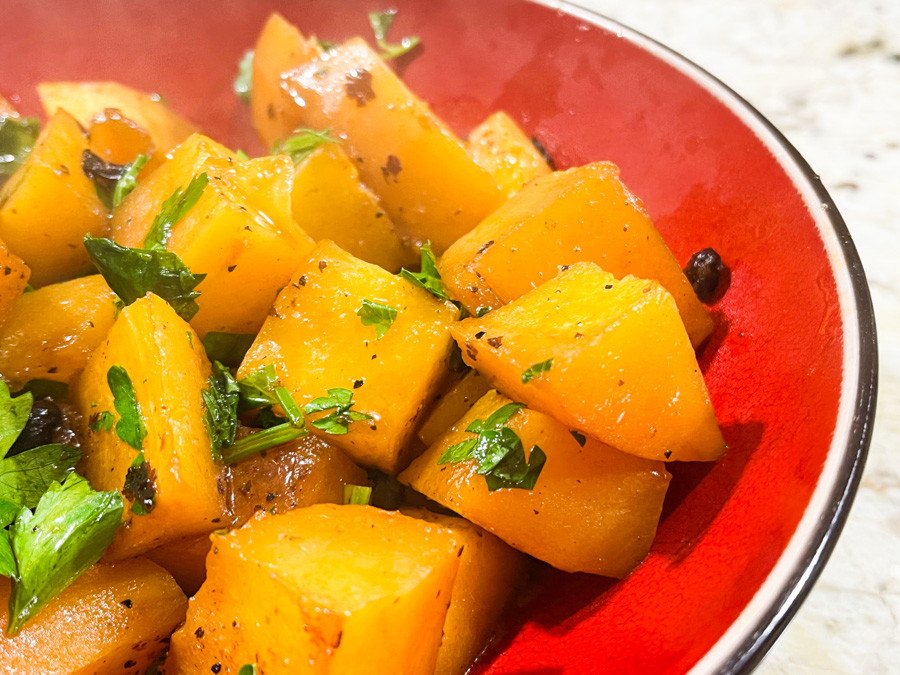
AIR-FRIED EGGPLANT BITES
(inspired by my niece’s Raquel)

1 eggplant, large, cut in small cubes, no need to peel
olive oil to coat
drizzle of balsamic vinegar
salt and pepper to taste

Coat the eggplant cubes with olive oil, no need to use a heavy hand. Add the balsamic, season with salt and pepper.

Transfer to the basket of the air-fryer and cook at 400F until done.

ENJOY!

to print the recipe, click here

Comments: The eggplant bites can be used in so many ways! Added to salads, pasta sauces, enjoyed as a simple side dish, incorporated in food bowls with an Asian flair. A squeeze of lemon juice right before serving, while still warm, is a nice touch too. Keep that in mind. I tell you one thing, the air-fryer is a great addition to any kitchen.

ONE YEAR AGO: Lobster Risotto with Mushrooms and Tarragon

TWO YEARS AGO: Air-Fried Cauliflower with Pomegranate Seeds and Tahini Sauce

THREE YEARS AGO: Pistachio-Rose Donuts

FOUR YEARS AGO: Smoked Chocolate Macarons

FIVE YEARS AGO: Chocolate Celebration Cake

SIX YEARS AGO: Incredibly Simple Times Four, May 2018

SEVEN YEARS AGO: Tangential Quiche with Asparagus and Fennel

EIGHT YEARS AGO: Fakebouleh

NINE YEARS AGO: Yellow Squash Soup

TEN YEARS AGO: Grilled Chicken with Tamarind and Coconut Glaze

ELEVEN YEARS AGO: Chicken-Apricot Skewers

TWELVE YEARS AGO:Asparagus Quiche

THIRTEEN YEARS AGO: Two-stage Pea and Prosciutto Risotto

FOURTEEN YEARS AGO: Mellow Bakers: Corn Bread


INCREDIBLY SIMPLE TIMES THREE

It’s been a few months since I blogged on super simple stuff, so here I am… I will start with a pretty unusual and kind of cute take on the humble broccoli. I am sure you are familiar with smashed potatoes, but in this version, broccoli is the one getting smashed and baked. Delicious, and oh so simple!

SMASHED BROCCOLI

Here’s what you do: cook broccoli florets – as many as will fit in a baking sheet – until just tender, don’t let it get all mushy. Drain, run through very cold water to stop the cooking. Add the pieces to a parchment-lined baking sheet, smash them flat with the bottom of a measuring cup, drizzle a good amount of olive oil, salt and pepper and a bit of cheese on top. You can load it with cheese if you want, or use restraint like we did. You can use mozzarella, Gruyere, Mexican cheese, whatever you feel like. Bake at 425F until the cheese is melted, bubbly, getting dark on the edges. ENJOY!

Inspiration for this recipe came from an Instagram post that my friend Elaine shared with me. You can find it here. She goes heavily on the cheese, and next time I might do the same, at least in some pieces. Mouth-watering stuff!

BUTTERNUT SQUASH SLICES

Usually I resort to bags of cut butternut squash because I despise having to prep it myself. However, recently I used this trick that is a game changer: microwave the butternut squash for 4 minutes. No need to poke holes, nothing. Just microwave, allow it to cool a bit until you can handle it, and it will peel like a dream! Then just slice it, coat the slices with olive oil, add salt and pepper, and roast or air-fry it.


If you find a butternut squash with super long neck, go for it. More slices for you!

BRITISH-STYLE JACKED POTATOES

Phil and I make these ALL THE TIME. I was sure it was on the blog already, then he asked me for the link to send to a friend and I had one of those big “palm-to-forehead” moments. No blog post to be found. Better late than never, here’s what you do: get very large Russet potatoes, wash, scrub them and make two deep cuts in a cross. Season lightly with salt. Place in a 400F oven for TWO HOURS. That is it. Ten minutes before the two hours are up, go with a knife and cut the cross slits a little deeper, squeeze the potatoes (wearing gloves) to open the flesh a bit. Drizzle a touch of olive oil and bake for the additional ten minutes or until they start to get all golden. DONE. You can eat the skin and all, it will be crunchy, the flesh very smooth and flavorful. You can read all the details about it here.

I hope you give these simple recipes a try. Sometimes simple is all you need…

ONE YEAR AGO: Chile Rellenos

TWO YEARS AGO: Vietnamese “Pizza”

THREE YEARS AGO:  Chocolate Bonbons with Mango-Ganache Filling

FOUR YEARS AGO:  Giant Cookie Meets Mousse

FIVE YEARS AGO: The Brazilian Battenberg

SIX YEARS AGO: Salzburg Sourdough

SEVEN YEARS AGO: If I had One Hour

EIGHT YEARS AGO: Apple Cinnamon Oatmeal Cake

NINE YEARS AGO: Sourdough Rye Bread with Flaxseeds and Oats

TEN YEARS AGO: Apricot-Raspberry Sorbet: A farewell to Summer

ELEVEN YEARS AGO: Marcela’s Salpicon

TWELVE YEARS AGO: Pork Kebabs

THIRTEEN YEARS AGO: Fondant au Chocolat

FOURTEEN YEARS AGOGot Spinach? Have a salad!

PEANUT-GINGER PORK WITH CELERY SLAW

This is a sous-vide preparation, but you can change to regular cooking in any way you like to make pork tenderloin. The recipe was adapted from Melissa Clark, via The New York Times (click here for original post). I usually increase the cooking temperature because we dislike pork that is still pink in the center, no matter what the “experts” say. If you prefer it less done, set your sous-vide to 135F to 140F.

SOUS-VIDE PEANUT-GINGER PORK WITH CELERY SLAW
(adapted from The New York Times)

for the pork:
3 tablespoons smooth peanut butter
2 tablespoons sesame oil
2 tablespoons soy sauce
2 tablespoons fresh lime juice
1 tablespoon finely grated ginger
2 teaspoons dark brown sugar
2 teaspoons Sriracha or chile-garlic paste
1½ teaspoons fish sauce
2 (1-pound) pork tenderloins, trimmed
Extra-virgin olive oil, as needed


for the celery slaw:
2 teaspoons toasted sesame oil
2 teaspoons rice vinegar
½ teaspoon freshly ground black pepper
¼ teaspoon fine sea salt
2 small celery stalks, cut crosswise into thirds, then very thinly sliced lengthwise
1 cup thinly sliced fennel bulb
fresh cilantro leaves
Chopped roasted peanuts, for garnish
sesame seeds for garnish

Fill a pot with water, add the sous-vide machine and set the temperature to 150 degrees.

Meanwhile, prepare the sauce: In a small bowl, whisk together peanut butter, sesame oil, soy sauce, lime juice, ginger, sugar, Sriracha, and fish sauce. Place pork in a sous-vide bag, then pour sauce all over meat. Lower bag into heated water, weighing the bag down if necessary, and cook pork for 3 hours.
Heat broiler and place a rack 4 inches from heating element. Remove pork from sous-vide bag and transfer to a rimmed baking sheet. Pour remaining cooking liquid into a small saucepan. Bring sauce to a simmer over high and let cook until slightly thickened, about 2 minutes. Cover to keep warm, and set aside.

Drizzle pork with olive oil and broil until charred in spots, 2 to 3 minutes. Transfer to a cutting board and let rest, 5 minutes.

Make the celery salad: In a large bowl, whisk together sesame oil, rice vinegar, pepper and salt. Toss with celery, fennel and cilantro. Taste and add more salt, sesame oil and rice vinegar if needed.
To serve, slice pork and drizzle with sauce. Top with celery salad, and peanuts. Garnish with cilantro leaves, and sesame seeds if you like.

ENJOY!

to print the recipe, click here

Comments: The sauce is absolutely delicious, I am quite fond of peanut butter in savory preparations, in this particular case it goes well with the ginger and all other flavors. The way the recipe was published it called for 135F for 2 hours, but there is no way that would work for us. Do what you think is best. Whatever method you go for, make sure to incorporate the sauce reduction in the end and drizzle it over the meat. It takes the dish to a whole higher level. The slaw was good in terms of flavor, but the texture of the celery was a bit harsh, so next time I might just do the “microwave blanch”, in which I cook the veggie with a tiny bit of moisture (often just a damp paper towel will do) for 10 seconds or so. It is enough to just kill the raw texture. Plus, since it will be slightly warm it will incorporate the dressing even better. I don’t mind the raw fennel at all, so I would not “blanch” it.

ONE YEAR AGO: Cauliflower Tacos with Chipotle Romesco Sauce

TWO YEARS AGO: One gift, one dough, two recipes

THREE YEARS AGO: Rocking the Zucchini Boat

FOUR YEARS AGO: Polenta Bites with Spicy Tomato Sauce

FIVE YEARS AGO: Vague Mousse Cake

SIX YEARS AGO: Cottage Loaf, my very own technical challenge

SEVEN YEARS AGO: Pork Ribs: Sticky, Spicy and Awesome

EIGHT YEARS AGO: Sobering Peach Sorbet

NINE YEARS AGO: Buttermilk-Blueberry Breakfast Cake

TEN YEARS AGO: Silky Cauliflower Puree with Almond Milk

ELEVEN YEARS AGO: Beef and Broccoli Stir-fr

TWELVE YEARS AGO:Wheat Germ and Sage Sourdough Bread

THIRTEEN YEARS AGO:Popeye-Pleasing Salad

FOURTEEN YEARS AGO:Summer’s Finale

GOING BEYOND GUACAMOLE

We consume a lot of avocados, often in guacamole format, but sometimes just sliced with a squirt of lemon, salt and pepper. Last weekend I was relaxing a bit browsing through stuff I had saved in our TiVo, and went on a binge watch of Molly Yeh’s Girl Meets Farm. Her cooking style is different from mine, but I love her baking ideas, and her warm, fun personality. In one of the episodes she made avocado salsa with a definite Asian feel, and I had to try it myself. Verdict? I loved it. Hubby still prefers avocado in guacamole shape, but agreed that it is definitely “blog-worthy”. So here we are.


SESAME AVOCADO SALSA
(from Molly Yeh’s Girl Meets Farm)

4 teaspoons soy sauce
1 tablespoon toasted sesame oil
1 teaspoon grated fresh ginger
Juice of 1 lime
Sriracha or other hot sauce, as desired
4 avocados, chopped
1/2 bunch fresh cilantro, chopped
black or toasted sesame seeds, for topping

Whisk together the soy sauce, sesame oil, ginger, lime and some hot sauce in a large bowl. Add the avocados and toss to coat, mashing some of the avocados a little bit to bring everything together. Taste and adjust as desired, I added more lime juice. Top with the chopped cilantro and sesame seeds.

ENJOY!

to print the recipe, click here

Comments: I am on a sesame oil kick lately, and find that it gives many dishes a wonderful taste, if you don’t add too much you cannot quite tell what it is, but it is, to quote Martha Stewart, “a good thing”. We had leftovers and although it got slightly darker, flavor and texture were not compromised. If you are serving to company, definitely prepare it right before you intend to enjoy it, although keeping it in the fridge for 30 minutes or so does not hurt at all.

ONE YEAR AGO: A Trio of Superstars

TWO YEARS AGO: Turkey Meatloaf

THREE YEARS AGO: Prue Leith’s Smoked Salmon and Beetroot Blinis

FOUR YEARS AGO: Mandioca Frita 101

FIVE YEARS AGO: White Chocolate Raspberry Dome Cake

SIX YEARS AGO: Blueberry Crumble Coffee Cake

SEVEN YEARS AGO: Pickled Red Onions

EIGHT YEARS AGO: Strawberry Chocolate Chip Cake

NINE YEARS AGO: Mini-Chocolate Cheesecake Bites

TEN YEARS AGO: Whole-Wheat Spaghetti with Grated Tomato Sauce

ELEVEN YEARS AGO: A Taste of Yellow to Honor Barbara

TWELVE YEARS AGO: Gratin of Beefsteak Tomatoes

THIRTEEN YEARS AGO: Tour de France Final Stage: PARIS

FOURTEEN YEARS AGO: Snickerdoodles with a Twist

BUTTERNUT SQUASH WITH FERMENTED BLACK BEANS

No need to run away, I promise you this is a very flavorful way to cook butternut squash. Simple, fast, and perfect to go with roast chicken or grilled salmon. The black beans provide a salty, sharp flavor that complements well the squash. I have made it with the beans as they come from the package, and a second time I minced them. I prefer them minced, the flavor will be more pronounced in the final dish, but if it is your first time trying this ingredient, use them whole and see how you like it.

BUTTERNUT SQUASH WITH FERMENTED BLACK BEANS
(adapted from The Vegan Chinese Kitchen)

1 pound butternut squash, cut in big chunks 
2 tablespoons grapeseed oil 
1 tablespoon Rose Harissa (or any pepper mix you like)
1 tablespoon fermented black beans, coarsely chopped
1 teaspoon sugar
salt to taste
1 cup water
drizzle of sesame seed oil 
cilantro leaves

Heat a wok over high heat and add the oil, swirling to coat the sides. Add the harissa, the fermented beans, and leet them sizzle for a few seconds until fragrant. Add the butternut squash pieces, stir them well to coat with the oil, sprinkle the sugar on top. Pour the water and season with a little salt. Cover, reduce to simmer for about 10 minutes until tender. 

If there is still water, you can drain it a bit or reduce by boiling, as long as the squash is not too tender. Add the cilantro and sesame oil right before serving. 

ENJOY!

to print the recipe, click here

Comments: I normally roast or air-fry butternut squash, but it was really easy and fast to braise it. Leftovers were even better, the flavor intensified a bit, and it never got mushy, even after a brief encounter with microwaves. This will go into our rotation for sure. If you don’t have and won’t be getting fermented black beans to play with, maybe a drizzle with sweet soy sauce and a tiny bit of fish sauce will be a nice move.

ONE YEAR AGO: Karen’s Braided Lemon Bread with Blackberries

TWO YEARS AGO: Bulgur-Pork Tomatillo Platter

THREE YEARS AGO: Baking through the blogosphere

FOUR YEARS AGO: Chickpea Burgers, Vegan and Delicious

FIVE YEARS AGO: Macarons with Ganache Noisette

SIX YEARS AGO: Quiche with Asparagus and Fennel

SEVEN YEARS AGO: Fakebouleh

EIGHT YEARS AGO: Yellow Squash Soup

NINE YEARS AGO: Grilled Chicken with Tamarind and Coconut Glaze

TEN YEARS AGO: Chicken-Apricot Skewers

ELEVEN YEARS AGO:  Asparagus Quiche

TWELVE YEARS AGO: Two-stage Pea and Prosciutto Risotto

THIRTEEN YEARS AGO: Mellow Bakers: Corn Bread