ACCORDION POTATOES

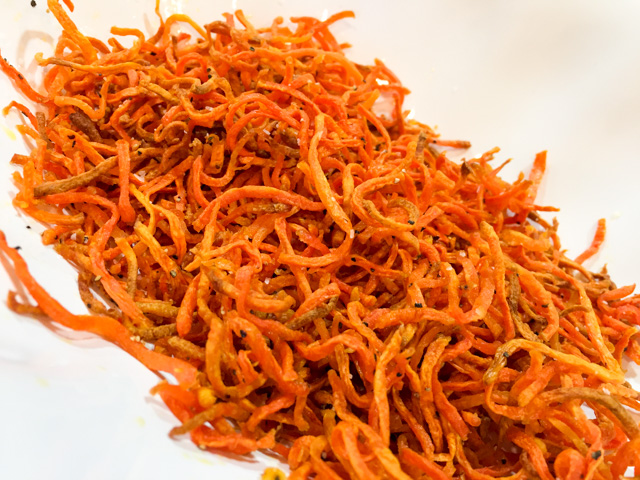
I am not a fan of tiktok, but apparently this method to cut the potatoes was a huge hit a while ago, everybody doing, sharing videos, raving about it. I was intrigued, decided to give it a try. Super cool technique, and if you don’t need to make too many of those, the air-fryer does a great job. I made three, which fit well in the basket of our fryer. Most people deep fry the potatoes, but I almost never choose that path. I suppose you could use a very hot oven too, but I haven’t try it, so feel free to experiment. If you want to see how to cut the potatoes, this video explains it in detail.

ACCORDION POTATOES
(from the Bewitching Kitchen)

3 large Russet potatoes
olive oil
salt and pepper

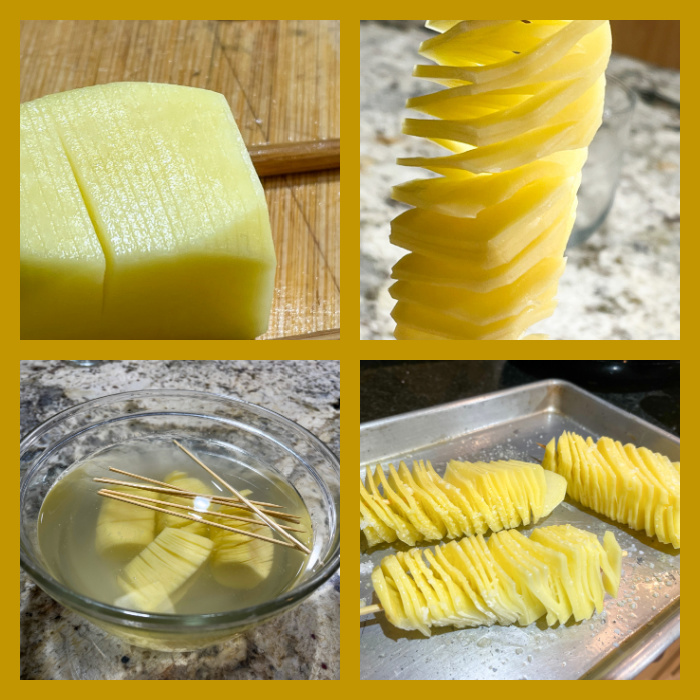
Peel the potatoes and trim them to form a nice rectangle shape. Place the trimmed potato over a cutting board, nudged between two chopsticks that will prevent your knife blade from cutting the potato all the way through. Make very thin slices – around 1mm thick. Turn the potato over, and make the same type of cut, but diagonally (check the video if you need clarification).

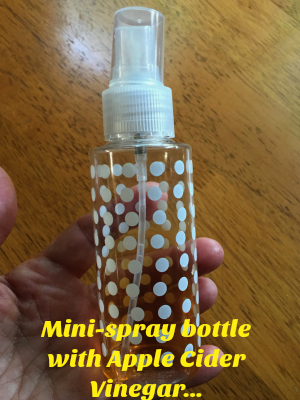
Thread a wooden skewer in the center of the cut potato and carefully open it like an accordion. Soak the potatoes and skewers in cold water for 30 minutes or so. Dry very well. Spray olive oil, season with salt and pepper and air-fry until golden brown, flipping the pieces every 5 minutes or so. Time will vary, depending on the power of your air-fryer and size of the potato.

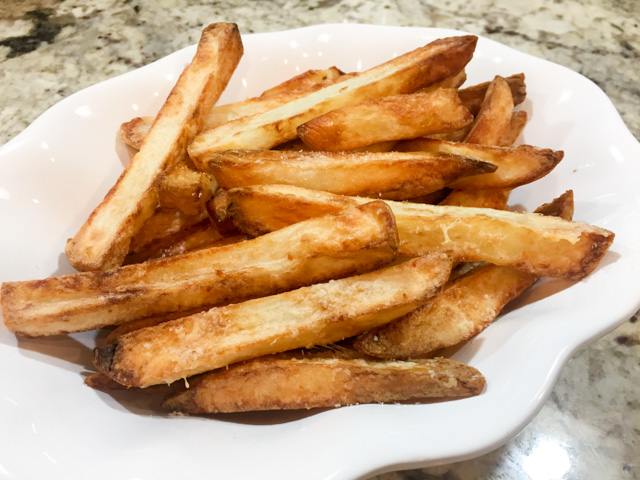
You can deep fry if you prefer. Season with additional before serving.

ENJOY!

to print the recipe, click here

Comments: It is hard to understand how to cut the potato without watching a video, so I advise you to either watch the one I linked in the post, or search the many options available on youtube. The most important thing is to cut the slices thin, or you won’t have the accordion effect. I sometimes wish we had a larger air-fryer, and this was definitely one recipe that would benefit from it. But for the two of us, three accordion slabs are enough, so no need to invest in a bigger machine.

.

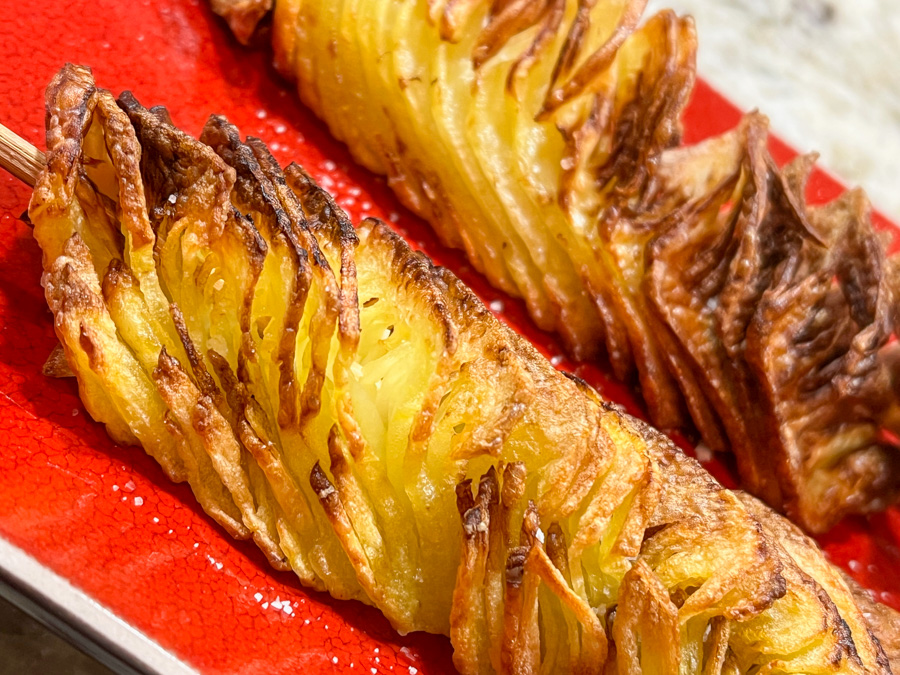
The best part is the crispy edge, but the center will be cooked nicely, very creamy. Even if you mess up and cut the slices a bit thick, it will work, but might take a little longer and not be so crispy. Experiment with it, we made it three times already. I intend to try with sweet potatoes soon…

ONE YEAR AGO: Braised Lamb Shanks in Clay Pot

TWO YEAR AGO: Cookies with a Smile

THREE YEARS AGO: Pearled Farro with Asparagus Coins

FOUR YEARS AGO: Pistachio Caramel and Apple Mousse Cake

FIVE YEARS AGO: Someone turns 70 today!

SIX YEARS AGO: Carioca Cake, the Final Chapter

SEVEN YEARS AGO: Duck Confit for a Special Occasion

EIGHT YEARS AGO: Ken Forkish’s Warm Spot Sourdough 

NINE YEARS AGO: Bran Muffins, Rainbows, and a wonderful surprise!

TEN YEARS AGO: Salmon Wellington

ELEVEN YEARS AGO: The Green Chip Alternative

TWELVE YEARS AGO: Weekend Pita Project

THIRTEEN YEARS AGO: Let it snow, let it snow, eggs in snow

CAULIFLOWER WITH SUN-DRIED TOMATOES AND OLIVES

This is cauliflower that deserves a spot at your table when you have special guests for dinner. Amazing that we can now write such a phrase after a couple of years of social isolation. I go as far as saying that even cauliflower haters will be pleasantly surprised. The sun-dried tomatoes add richness and the olives and balsamic vinegar that acidity that lightens things up. Absolutely delicious. And, by the way, it is vegan-friendly.

CAULIFLOWER WITH SUN-DRIED TOMATOES AND OLIVES
(inspired by Crossroads)

1 head cauliflower, florets only, chopped in pieces
2 tablespoons olive oil (for oven roasting) or olive oil spray for air-frying
Kosher salt and freshly ground black pepper to taste
2 celery stalks, thinly sliced
1 shallot, minced
1/2 cup Castelvetrano olives, pitted and coarsely chopped
8 sun-dried tomatoes in oil, drained and coarsely chopped
2 tablespoons capers
1 tablespoon balsamic vinegar
zest and juice of 1/2 lemon
slivered almonds, slightly toasted, to taste

If roasting the cauliflower in an oven, drizzle the florets with olive oil, season with salt and pepper and roast in 425F oven for about 30 minutes. If using the air-fryer, spray the florets with olive oil, season with salt and pepper and air-fry for 15 to 20 minutes, until golden. Reserve. The cauliflower can be roasted hours in advance or even the day before.

Put a large saute pan over medium-heat and add 1 tablespoon olive oil. Add the celery and shallots, season lightly with salt and pepper. Cook for a couple of minutes, add the olives, sun-dried tomatoes, and capers and cook for a few minutes longer, stirring often. Add the reserved cauliflower, the balsamic vinegar, adjust seasoning. Right before serving, add lemon zest and juice, and top with the toasted slivered almonds.

ENJOY!

to print the recipe, click here

Comments: I don’t know which ingredient elevates this recipe, it is a tight match between the sun-dried tomatoes and the green olives. At any rate, it was an outstanding side dish. I highly recommend it. We enjoyed it with grilled chicken breasts, super simple. Just a marinade with olive oil, Garam masala and salt.

ONE YEAR AGO: Curry Sourdough with Sesame Seeds

TWO YEARS AGO: Chocolate-Crusted Passion Fruit Tart

THREE YEARS AGO: Lemony Shredded Brussels Sprouts with Almonds

FOUR YEAR AGO: Savory Oatmeal with Bacon and Cheddar

FIVE YEARS AGO: Air-Fried Carrots, Two Ways (most popular post on my blog!)

SIX YEARS AGO: Five Minutes in L.I.T (a tour of our laboratory!)

SEVEN YEARS AGO: Chicken Thighs with Artichokes and Capers

EIGHT YEARS AGO: Pea Pancakes with Herbed Yogurt

NINE YEARS AGO: Mushroom Stroganoff

TEN YEARS AGO: Tomato Sourdough

ELEVEN YEARS AGO: Gamberetti con rucola e pomodori

TWELVE YEARS AGO: Flirting with Orzo

GUATEMALAN CHILE RELLENOS

I love a nice Chile Relleno but talk about a heavy dish! It is basically cheese, more cheese, a coating of egg and flour, and a nice bath in hot oil. I wanted to profit from the beautiful Poblanos from our garden, by making some type of stuffed chile that could act as a full meal. In my world, that calls for meat. Google University showed me that there is a concoction from Guatemala that is not too far from my goal. However, it is loaded with potatoes and I wanted something a little lighter. This version was born. Using the air-fryer made it even lighter. Mission accomplished.

AIR-FRIED “GUATEMALAN” CHILE RELLENOS
(from the Bewitching Kitchen)

6 Poblano chiles
olive oil spray
1 pound ground turkey
8 oz mushrooms, sliced thinly
1 celery stalk
1 clove garlic, minced (optional)
1 tablespoon olive oil
1 tsp salt
1/2 tsp black pepper
1/2 tsp chili pepper
1/2 tsp cumin, ground
1 can (14.5 oz) diced tomatoes, preferably Fire-roasted
fresh cilantro leaves, minced
Panela cheese or another cheese of your choice

Start by making the filling. Heat the olive oil, add mushrooms, celery, garlic (if using), season lightly with salt and pepper. Saute until fragrant in medium-heat, increase the heat to high and add the ground turkey. Add the chili powder, cumin, and the teaspoon of salt. Cook until the meat is golden at spots, at the canned tomatoes with their liquid and simmer for 10 minutes, pan covered, in low-heat. Remove the lid and let the excess moisture evaporate. Add the cilantro. Reserve to cool.

Prepare the poblanos. Cut their tops, carefully scoop out seeds. Spray olive oil and place them in the air-fryer, cut side down. Cook for about 5 minutes at the highest temperature your fryer reaches (mine is 390F). When the skin blisters at points, they are done.

When poblanos and meat are ready and cool enough to handle, fill the poblanos 3/4 of the volume, then add pieces of Panela cheese on top.

Air-fry for about 12 minutes, until cheese is golden brown.

ENJOY!

to print the recipe, click here

Comments: I don’t know if home-grown poblanos might pack more heat than store-bought, but I can tell you that the few little seeds I left in them were spectacularly hot. As you can see from the picture, our air-fryer was not even half full with the filled peppers, I was afraid it would make a mess during cooking, but everything turned out fine. I don’t have any container that would fit in the basket and keep the peppers standing up. It might also be easier with bigger poblanos, we wanted to use the average size from our backyard, and keep them more or less uniform.

It is hard to beat the speed and convenience of the air-fryer for this type of preparation. Everything browns nicely with just a small amount of oil. No frying, no dealing with leftover oil and the messy process of the coating with egg-flour. I admit it is not authentic, and many Mexicans will consider sending me hate mail… but it was really a delicious meal. If you don’t have an air-fryer, just use the oven at 425F, for a slightly longer time.

ONE YEAR AGO: Marbled Tahini Cookies

TWO YEARS AGO: Twice-Baked Goat Cheese Souffle

THREE YEARS AGO: Strawberry-Mango Entremet Cake

FOUR YEARS AGO: Hommage to the Sun

FIVE YEARS AGO: Tomato and Cucumber Salad with Almond Vinaigrette

SIX YEARS AGO: Eggplant Tomato Stacks

SEVEN YEARS AGO: The Couscous that Wasn’t

EIGHT YEARS AGO: Apple-Cinnamon Bread

NINE YEARS AGO: Blueberry Galette

TEN YEARS AGO: In My Kitchen, August 2011

ELEVEN YEARS AGO: Journey to a New Home

TWELVE YEARS AGO: Friday Night Dinner

AIR-FRIED CARROTS, TWO WAYS

No air-fryer? No worries. Both recipes can be prepared without it.

Lolita, the newest member of our gadget family, has been pretty busy these days. I had only one failure: air-frying broccoli, but even that was not a major catastrophic event. It was just a bit tricky to control the cooking of the crowns. Some bits of their external surface got overcooked and ended up with a harsh texture. Maybe a lower temperature would work better. At any rate, that recipe needs tweaking before I share with you. Moving to carrots, I offer two recipes that could not be simpler. First, air-fried carrots with a touch of honey. And then, a batch of shoestring fried carrots that were pretty much inhaled by the two of us. A bit of an argument happened when two lonely strands were left in the bowl. As often happens, the tropical charm spoke louder, and they both went into my belly. Oh, well. By the way, if you don’t have an air-fryer, follow the link to the recipe as shown in The Kitchen, that calls for deep-frying. It will be a bit more caloric, but still less so than the potato version. Plus, I bet kids will love them. One efficient way to deliver veggies to picky eaters.

AIR-FRIED CARROTS WITH HONEY
(from the Bewitching Kitchen)

2 to 3 cups of carrots, cut in 1/2 inch pieces
1 tablespoon olive oil
1 tablespoon honey
tiny drizzle of soy sauce
salt and pepper to taste

Set air-fryer to 390 F.

Place the cut carrots in a bowl, add olive oil, honey and soy, toss gently to coat, trying to cover all surfaces with a bit of oil. Season carrots with salt and ground black pepper. Place in the basket of your air-fryer and cook for about 12 minutes, shaking the pan every once in a while.  Serve right away.

If you don’t have an air-fryer, roast in the oven at 420F until done.

ENJOY!

to print the recipe, click here

Comments: I’ve made these carrots three times. Compared to roasting them in the oven, I would say Lolita is faster, and also gives a different texture, quite pleasing. Leftovers were still very nice with a brief encounter with microwaves. Probably even better warmed up in a regular oven, but when lunch time comes, we opt for the simplest, fastest route to go back to work.

And now for a nice variation on shoestring potato fries. These are much lighter and surprisingly tasty!


SHOESTRING AIR-FRIED CARROTS
(adapted from Food TV The Kitchen)

1 bag (10 ounces) of julienned carrots (sold for cole-slaw)
1 tablespoon olive oil
salt and pepper to taste
apple cider vinegar in a spray bottle
1 teaspoon orange zest

In a medium bowl, mix the carrots with the olive oil, coating them lightly. Try to coat all pieces of carrots. Season with salt and pepper.

Place the carrots in the air-fryer set at 390F. Cook for 13 to 16 minutes, mixing them around every few minutes.

Remove when they start to get nicely brown, watch them closely because pieces might get too dark very quickly. Transfer them to a serving bowl, add orange zest, spray a little apple cider vinegar, adjust seasoning with more salt and pepper if needed. Serve right away.

ENJOY!

to print the recipe, click here

Comments: I will warn you that the air-fryer (at least the model we have) will not hold more than one 10-ounce bag of shredded carrots. And they will shrink A LOT  during frying, as the water content of carrots is pretty high. At first you will see them shrinking, shrinking, getting kind of limp. Until all the water evaporates, they won’t brown.  So you will be left with a small amount of carrots, but perfect for two.  I would say that the main concern with the air-fryer is the amount of food it can handle. For a couple with no kids, it’s a very nice gadget. If you have kids around, you might have to cook food in batches. However, my niece in Brazil has three young kids and she still loves her fryer, so take my comment with a grain of salt.

The idea of using mini-spray bottles for vinegar is pure genius! It allows you to add just a little touch on the food. You can find those for very cheap in grocery stores, sold usually in a bag together with other types of bottles for traveling. I had no use for the spray one, it was hanging around my bathroom, neglected and lonely. Well, it’s now in my pantry, ready to play!

I’ve made these carrots twice already, first time I simply shook the basket every few minutes, and did not notice that the bottom layer was getting very dark and not moving around with my delicate shaking. Second time I used tongs to move the carrot pieces more efficiently. Worked like a charm.  Of course, if you don’t have an air-fryer, you can deep fry them and they will turn out delicious. I just hate dealing with the leftover oil, and find deep-fried food a bit heavy and hard to digest. Bottom line is, Lolita is working quite nicely for us!

Add to FacebookAdd to DiggAdd to Del.icio.usAdd to StumbleuponAdd to RedditAdd to BlinklistAdd to TwitterAdd to TechnoratiAdd to Yahoo BuzzAdd to Newsvine

ONE YEAR AGO: Five Minutes in L.I.T (a tour of our laboratory!)

TWO YEARS AGO: Chicken Thighs with Artichokes and Capers

THREE YEARS AGO: Pea Pancakes with Herbed Yogurt

FOUR YEARS AGO: Mushroom Stroganoff

FIVE YEARS AGO: Tomato Sourdough

SIX YEARS AGO: Gamberetti con rucola e pomodori

SEVEN YEARS AGO: Flirting with Orzo

LOLITA JOINS THE BEWITCHING KITCHEN!

Please allow me to introduce the newest member of the family,
Lolita, our air-fryer!

She arrived last week, after a lot exchanges between me and my niece Raquel in Brazil, who owns the exact same model and had been twisting my arm to get one. Then, my friend Karen joined forces with Raquel, even though they’ve never met. A virtual conspiracy of sorts. Karen brought her air-fryer to play and teased me with drool-inducing chicken wings. Take a look at them here. So, I went back and forth, back and forth, bought a cookbook to help me decide, lost hours of sleep tossing in bed. Turn to the left, I’m going to buy it. Turn to the right, do I really need it?  Of course, Phil was close witness to my personal drama. It is possible that he got a bit tired of some of my evening monologues as I walked around the kitchen, cookbook in hand, reading some of the recipes out loud. Although, seriously, who could get annoyed by that? Right? Anyway, all I know is that one morning he informed me that a Philips air-fryer was on its way. Sorry, ladies, the husband is taken.

First experiment: Russet Potato Fries

This is really a non-recipe.  Get Russet potatoes and cut them in slices, mine were around 1/2 inch, but quite variable. I wanted to see how the fryer behaved and optimize the size for the next time around. To a pot of salted boiling water, add the slices and parboil them for 4 minutes. Drain and dry. Once they are dry, place them in a bag or container and gently toss with a couple of teaspoons of olive oil, a sprinkle of salt (you will add more salt later once they come out of the fryer).  Try to coat each slice with oil, but no need to go crazy with it. Some recipes recommend you shake them in a bag, I was afraid they would start breaking, so I just tossed them with my hands inside a bowl.

Add them to the fryer set at the highest temperature, which in my model is 390F. Set the timer for 25 minutes, place the potato slices in the basket, and fry away. Shake the basket every 5 minutes or so, and keep an eye on them. Depending on the thickness of the slices and the power of your machine, they can take a little more or a little less to get brown and cooked.

Remove the fries to a serving dish, season with more salt and pepper to taste, and ENJOY!

Comments: I was over the moon with these fries, because of course I was worried about my beloved’s investment. They were really good. One thing that becomes evident is how much oil we consume when enjoying “regular”, deep-fried potatoes. These have a nice crust, but the inside feels more like a boiled potato, creamy, no taste of fat. You know how when you grab fries your fingers get all oily, and your lips might end up a bit oily too? None of that happens here. Are they as good as regular fries? That is a tough question. In all honesty, when you have regular fries for some reason it is easy to over-indulge. These are satisfying but don’t make you compulsively inhale them. I made three Russet potatoes into fries, they were not very big, medium size. We had enough for our dinner and offered some to certain four-legged beings that were nearby. Happy tail wagging was observed. Experiment concluded.

Second experiment: Sweet Potato Chips

Or, if you happen to be in Great Britain, Sweep Potato Crisps. I confess I like that name even better…


For this adventure, I enlisted help of another interesting kitchen gadget, the spiralizer. I used the ribbon blade to cut two sweet potatoes. With regular veggies, you’ll end up with long ribbons, perfect to mimic pasta, think of a very large pappardelle. The sweet potato is hard, so the ribbons break and turn into pieces quite suitable for frying.

Of course, you can use your knife skills and cut them uniformly. After slicing, I decided to soak them in cold water. Some recipes skip that step, but it’s clear that doing it results in crisper chips, which was my ultimate goal. I did that on a Sunday afternoon, just placed them in the bowl of water and there they stayed for a few hours. You could do the step of soaking and drying several hours in advance, if pressed for time. Then it’s all a matter of adding the slices to a bowl, coating them with olive oil, seasoning with salt, or any other spices you’d like, smoked paprika, cumin, cayenne, chili. I set the temperature to 360F, which is what I saw recommended in the Phillips manual. They were ready in about 25 minutes, with shaking at several time points, as I could not stop opening the basket and peeking inside.  The photo below gives a glimpse into their frying progression. Loads of fun.


From top to bottom, clockwise… The slices just ready to start air-frying, then after 5 minutes, 10 minutes and 15 minutes (ten minutes left on the timer). They were actually ready before the timer went off, for a total air-frying of 22 minutes. Not bad at all…  If you get your prep work done in advance, sweet potato chips can be enjoyed pretty quickly. And yes, they were very crispy and delicious!  The Philips model heats up very fast, they advise you to wait 2 to 3 minutes before placing the food inside. Experiment concluded. Scientists happy and well-fed.

I have quite a few recipes lined up for future experiments. If you have an air-fryer, I highly recommend this cookbook by Meredith Laurence. it is the one with the best reviews at amazon, and I can understand why. Very creative use of the fryer, with recipes that might surprise you a little. Like Molten Chocolate Almond Cakes… See? I told you!

Add to FacebookAdd to DiggAdd to Del.icio.usAdd to StumbleuponAdd to RedditAdd to BlinklistAdd to TwitterAdd to TechnoratiAdd to Yahoo BuzzAdd to Newsvine

ONE YEAR AGO: Cashew Cream Sauce

TWO YEARS AGO: Blood Orange Margaritas

THREE YEARS AGO: Smoked Salmon Appetizer

FOUR YEARS AGO: Clementine Cake

FIVE YEARS AGO: Springtime Spinach Risotto

SIX YEARS AGO: The end of green bean cruelty

SEVEN YEARS AGO: Torta di Limone e Mandorle

Save

Save

Save

Save

Save