CURRY TURMERIC SOURDOUGH

Bewitching Kitchen is a food blog and I like to keep it focused on the subject with only small detours into two passions of mine: science and fitness. I must say, though that a couple of recent posts by bloggers I follow echoed deeply inside me, so I share them with you. First, I invite you to read A Texan New Yorker’s take on chili. I must make that recipe in honor of a family I admire and already miss immensely. Then, please stop by Cecilia’s site, who just published a post called “I am an immigrant.”  While you are reading it, keep in mind that I am one, one who got her green card and naturalization through long, complex processes several years ago. Her article is a very well-written piece describing the pleasure and pain associated with leaving your home country and starting all over somewhere else. I firmly believe that we are stronger when we are together. That prejudice and divisiveness should be fought against.

earth

When we have friends over, I love to welcome them with a loaf of homemade bread. I did that when our friends Denise and Helio stayed with us over a weekend (see my post here), and last month did it again when our friend Cindy stopped by briefly on her road trip from St Louis to Oklahoma. I made a batch of parsnip hummus and thought that a loaf of sourdough with a subtle hint of Middle Eastern spices could be a good option to enjoy it with it.  I did not want to add anything else to the bread, was hoping for a nice, golden crumb, with no nuts or goodies to distract from the spice components.  I know you cannot judge if I succeeded as far as taste is concerned, but what do you think of its looks?

curry-turmeric-sourdough-2


CURRY TURMERIC SOURDOUGH
(from the Bewitching Kitchen)

200g sourdough starter
325g cold water
450g white bread flour
50g spelt flour
1/2 teaspoon curry
1/4 teaspoon turmeric
1 ½ tsp fine sea salt

In a large bowl, whisk the sourdough starter with the water. Add the flours, spices and salt. Stir until you have a soft, sticky mass. Cover the bowl and leave it for 10 minutes. Perform a series of quick kneads, 10 seconds or so, making sure you incorporate as much of dried bits of flour as possible, but if something remains stuck to the bowl, don’t worry about it.  Leave the dough to rest for 10 minutes.

Remove the dough to a slightly oiled surface. Wash and dry the bowl, Coat it very lightly with oil.  Knead the dough again for a quick 10 second period and put it back in the clean, oiled bowl.  Wait 30 minutes.  Perform another cycle of kneading, or if you prefer, use the folding method, in which you stretch one side of the dough way up in the air, bring it over the full extension of the dough, turn it, repeat it four or five times from all directions.  Wait 1 hour, with the dough covered lightly.  Perform another series of kneading or folding.  Wait one more hour, knead again.  Wait 2 hours, divide the dough in two, and shape each half in a round or oblong shape.

Place in an appropriate containers lightly coated with flour, seam side down. Leave them for a final proof for 4 hours.

Invert the dough on parchment paper, slash the surface, and bake at 435 F with initial steam for a total of 45 minutes. I like to use a Dutch oven covered for the first 25 minutes, then remove the lid and allow the bread to brown uncovered for the final 20 minutes.

Cool the bread on a rack before slicing.

ENJOY!

to print the recipe, click here

compositecurry


Comments: Such a pleasure to work with this dough!  All soft and bubbly, with the delicate scent of curry… I actually made two loaves, and decided to shape one as a batard, a shape I find very tricky to achieve. You can see, there is room for improvement…

siblings

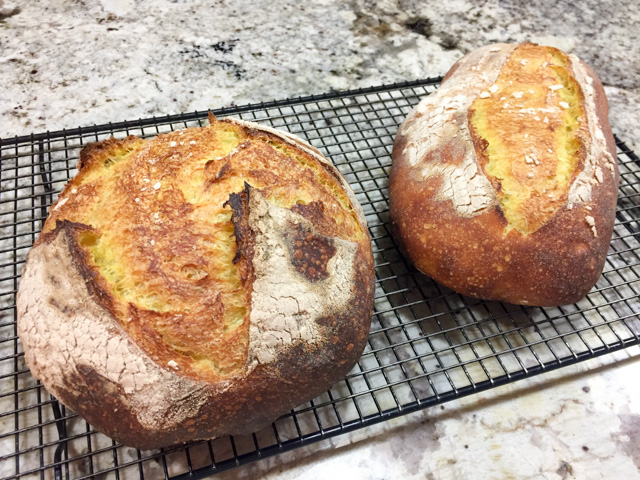
My batard formed a little bulge in one side, and I also would prefer a more pointed edge. Well, gotta keep trying. Still tasted pretty amazing, and as we all know, beauty is skin deep. HA!


crumb

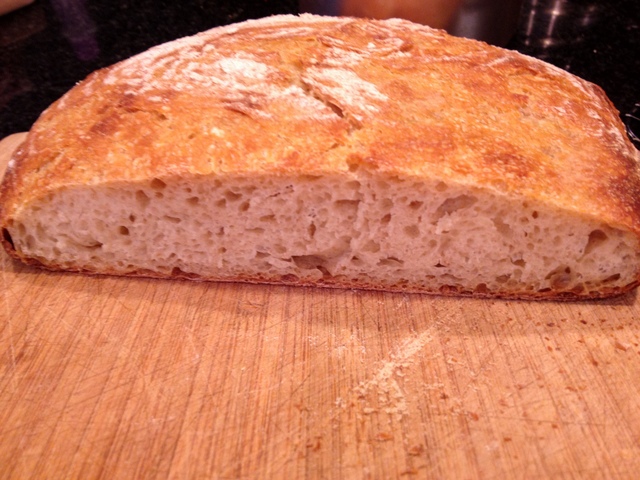
The mandatory crumb shot!  What I love the most about this bread is the smell not only while it baked, but when a slice is gently warmed in the toaster oven next day. The hummus went perfectly well with it, but it was superb as a player in the ultra fashionable avocado toast.  I smashed a slice of ripe avocado over the bread, sprinkled drops of lime juice and a light dust with Tajin. Sorry, no pictures, I think the blogosphere is already crowded with avocado toast photos, no need for me to add yet another one.  But, do try it if you make this bread.

curry-turmeric-sourdough-from-bewitching-kitchen

I am submitting this post to Bread Box Round Up,
hosted by Karen, the Bread Baking Goddess.

Add to FacebookAdd to DiggAdd to Del.icio.usAdd to StumbleuponAdd to RedditAdd to BlinklistAdd to TwitterAdd to TechnoratiAdd to Yahoo BuzzAdd to Newsvine

ONE YEAR AGO: Brigadeiros de Morango

TWO YEARS AGO: Feta-Stuffed Turkey Meatloaf

THREE YEARS AGO: Artichoke-Saffron Souffle

FOUR YEARS AGO: Cinnamon-Wreath
.
FIVE YEARS AGO:
  Yeastspotting 11.11.11
.
SIX YEARS AGO:
 Oven-baked Risotto
.
SEVEN YEARS AGO:
  Potato-Roquefort Cakes with Ripe Pears

Save

Save

SOURDOUGH BLUES

For the past few months the Bewitching Kitchen witnessed my silent struggles with bread baking.  Re-phrasing that, for the past few months the Bewitching Kitchen witnessed a full-fledged bread baking debacle!   Yes,  a few floured banettons flew across the Bewitching Kitchen.   Yes, the lives of several loaves quickly came to a violent end as crouton-material on the chopping board.  Yes, Phil received text messages stating that I would never ever EVER bake sourdough again, and I needed him back home so I could cry on his shoulder.  I was miserable, confused and frustrated, feelings  I normally associate with golf, not bread baking.  Life can be cruel.

The deterioration in my baking happened slowly.  A slightly less plump loaf here, a tighter-than-expected crumb there.   Then, suddenly, no matter what I did my boules became pancakes.   Flat, … they were flat!.  No oven spring to speak of, and scoring the surface was like make-up at the undertaker’s,  … it made no difference in the loaf.  The crumb below was actually one of my better “pancake-loaves.”  Most had a much tighter crumb, leaving me too upset and disgusted to even bother taking a picture.

here

At a  loss,  I posted a message to Dan Lepard’s Appreciation Facebook page, and David W. came to the rescue.  Much like a therapist holding the hand of a patient, he listened to my saga and concluded that the problem related to storing my starter in the fridge.  Slowly, the complex microbial population in the starter had changed, leaving me with a less than ideal mixture to start bread with.  Several people advised me to discard the sourdough and start all over again, but I didn’t want to consider that route.  I’m too attached to Dan, the starter I captured and kept for four  and a half beautiful years.  That explains why I threw a massive fit at Phil when he insisted that a starter “is just flour and water“.  Can you imagine hearing THAT?  I know, it goes beyond insensitive.   But David provided the light at the end of the tunnel, with a  “revival protocol” for my starter.  Guess what happened on my first loaf?

boule1White Levain Sourdough Bread, a classic recipe from Dan Lepard’s Handmade Loaf


SOURDOUGH STARTER RECOVERY

(from David, at Dan Lepard’s Appreciation Facebook page)

For 7-10 days, discard all but a small spoonful of the starter, and feed the starter by adding 70g organic rye flour + 100 g water.  Keep it out in the kitchen, not in the fridge.

After the 7-10 days, reverse the refreshment proportions to form a dough:  175g organic rye flour + 125 g water.   After 12 hours, bake with as much as you need, by either adjusting your bread recipe to compensate for the thicker starter, or refreshing it again at the hydration level called for in the recipe.  Freeze small portions of the thick starter for future use.

You can keep your dough-consistency starter at room temperature, refreshing it weekly, or thaw one of those small portions a couple of days before baking, refreshing it daily (always at room temperature).

_________________________________________________________________________________________________________________________________________________

I was so excited about getting back my “sourdough mojo”, that the following day I baked another loaf, a recipe adapted from Tartine.

_________________________________________________________________________________________________________________________________________________

blacksesamecrumbCan you look at this crumb and not shed a tear or two of pure joy?


BLACK SESAME SOURDOUGH

(adapted from Chad Robertson Tartine)

For the starter:
50g  spelt flour
50g white flour
100g/ml water at 78-80F
1 Tbs active sourdough starter

For the dough:
375g/ml water at approximately 80F (divided in 350g + 25g)
100 g starter (you won’t use the full amount made)
440g white flour (good quality all-purpose is fine)
60g spelt flour
10g salt
1/3 cup black sesame seeds

In a large bowl, mix 350g of warm water with the starter (100g of it), and mix to dissolve. Add both types of flour, mix until all flour is mixed with water, without large dry bits present.  Let the dough rest for 25 to 40 minutes.

Add the salt and the rest of the water (25g), and incorporate by pressing the dough with your fingers. Fold the dough a few times, until if forms a homogeneous mass, but don’t try to knead it.  Leave it in the bowl, folding it again a few times – no need to remove it from the bowl – every 30 minutes, for the first two hours (you will be making 4 series of folds during this period).  Add the sesame seeds to the dough on your first folding, after all the water and salt has been incorporated.  After the last folding cycle, let the dough rest undisturbed for another full hour, for a total of 3 hours of “bulk fermentation.”

Remove the dough from the bowl and shape it gently as a ball, trying to create some surface tension (for a tutorial, click here).  Let it rest for 20 minutes, then do a final shaping, by folding the dough on itself and rotating it.  If you have a banneton, rub it with rice flour, line it with a soft cloth sprinkled with rice flour, and place the dough inside it with the seam-side up. If you don’t have a banneton, any round container – like a colander – will do. Let it rise for 3 to 4 hours at room temperature.  Twenty minutes before baking time, heat the oven to 450F.

Cut a piece of parchment paper that will completely cover a pie baking dish and place it on top of the banneton containing the bread dough.   Carefully invert the banneton  over the parchment paper, using the pie plate to support the dough.  The cloth will probably be sticking to the dough, so carefully peel it off.  Score the bread, and place the pie pan over baking tiles in the pre-heated oven.

Bake for about 45 minutes, covered during the first 20 minutes, remove the cover for the final 25 minutes.

Let the loaf cool completely on a rack before slicing.

ENJOY!

to print the recipe, click here

Comments: I’ve been working with bacteria for 30 years, and one of the things we know too well is not to store it in the fridge.  Some strains of E.coli develop a capsule, a heavy coating of polysaccharides once exposed to cold temperatures, and they become pretty tricky to work with, particularly if you study what we do: their outer membrane proteins.  We tell the students all the time to avoid keeping their plates in the fridge, if a strain is worth preserving it should be immediately frozen at – 70 C.  So, it was ironic that I never thought twice about keeping my sourdough starter in the fridge for years and years, without making a “backup” stock in the freezer.  Never again.

I hope that if you bake with sourdough, this post will help you out in case of problems.  Make a few balls of very thick sourdough starter and store it in the freezer. Label that bag, by the way… you don’t want to look at it months from now and decide it’s some unknown creature that got into your freezer when no one was paying attention.  And then proceed to toss it in the garbage!   😉

I am submitting this post to Susan’s Yeastspotting

ONE  YEAR AGO: Headed to Hawaii

TWO YEARS AGO: A yummy Brazilian cake: Bolo de Fuba’

THREE YEARS AGO:  Hidden Treasure

FOUR YEARS AGO: Avocado Three Ways

SOURDOUGH BREAD WITH WALNUTS AND DATES

Another example of inspiration coming from The Fresh Loaf.  David is a regular contributor to the forum, and every bread he makes is a work of art. He is the type of baker comfortable enough around sourdough starter to  devise his own recipes, having recently come up with a fig and walnut concoction.   David had access to fantastic figs, but when I went to the store I was not particularly impressed with what was available.  Since I am no longer afraid to improvise ;-), I used dates instead.   This bread is perfect to practice mindful eating. Don’t devour it. Instead, savor each bite as slowly as you can. Awesome bread, very complex taste.

crumbSAN FRANCISCO-STYLE SOURDOUGH WITH WALNUTS AND DATES
(adapted from David, at The Fresh Loaf forum)

for the stiff levain
41 g water
66 g sourdough starter
78 g all-purpose flour
4 g rye flour

for the final dough
337 g water
416 g all-purpose flour
46 g whole wheat flour
11 g salt
189 g levain
98 g dates, diced fine
98 g walnuts, diced and lightly toasted

Dissolve the starter in the water. Add the flour and mix thoroughly until the flour has been completely incorporated and moistened. Ferment at room temperature for 16 hours.

In a stand mixer, mix the flour and water at low-speed until it forms a shaggy mass. Cover and autolyse for 30 minutes. Coarsely chop or break apart the walnut pieces and toast them for 8 minutes in a 300ºF oven. Allow to cool. Coarsely chop the dates, rinse in cool water, drain and set aside.

Add the salt and levain to the autolyse, and mix at low-speed for 1-2 minutes, then increase the speed to medium (Speed 2 on a KitchenAid) and mix for 5 minutes. Add flour and water as needed. The dough should clean the sides of the bowl but not the bottom. Add the walnuts and the figs to the dough and mix at low-speed until well-distributed in the dough. (About 2 minutes).

Transfer to a lightly floured board, do a stretch and fold, and form a ball. Place the dough in a lightly oiled bowl and cover tightly. Ferment at 76º F for 2 1/2 to 3 hours with a stretch and fold at 50 and 100 minutes.  Shape as a large ball (or divide the dough in two and shape as two smaller loaves)  and place in banneton. Proof at room temperature (68-70º F) for 1-2 hours. Cold retard the shaped dough overnight.

The next morning, proof the dough at 85º F for 2-3 hours. Heat the oven to 480º F. Score the bread as desired, and bake with initial steam, reducing the oven to 460 F when the bread goes in. Bake for 40 to 45 minutes, and cool completely on a rack before slicing.

ENJOY!

to print the recipe, click here

boule1

I am still having issues with our oven, the temperature shoots up and down, making it hard to control proper baking.  At some point in the future we’ll change our kitchen appliances, but for the time being we dance according to the music. That’s the proper Zen attitude. Or so I am told…  😉

I am submitting this post to Susan’s Yeastspotting.

ONE YEAR AGO: Braised Brisket with Bourbon-Apricot Glaze

TWO YEARS AGO: The Real Vodka Sauce

THREE YEARS AGO: Pork Tenderloin and Blue Cheese

SOURDOUGH MINI-ROLLS

Those who follow my baking adventures know that my favorite type of bread is a sourdough boule, medium to large size.  For some odd reason, when I want to bake small rolls, I always opt for recipes that use  commercial yeast, and result in a softer, more buttery bread.  That is now changed.  I used one of my favorite basic sourdough recipes to bake 6 small rolls, shaped exactly like a large one, and similarly scored.   They turned out so good, I might switch to this type of format for a while. Plus, each roll can be frozen for later, brought to room temperature for a few minutes, then placed in a very low oven (250 F) for 15 minutes or so.  Perfect bread whenever you feel like it!  😉
mini1

SOURDOUGH MINI-ROLLS
(adapted from Hamelman’s Bread)

for starter mixture (make 12 hours in advance)
100 g bread flour
80 g rye flour
110 g water
40 g active sourdough starter (at 100% hydration)

for the bread:
all sourdough made as above
700 g bread flour
20 g rye flour
470 g water
15 g salt

Prepare your sourdough mixture about 12 hours before making the dough.  Heat the water slightly in a microwave until it is lukewarm, and place it in the bowl of a KitchenAid type mixer.  Add the sourdough into the water and mix with your hands to dissolve it. Add both flours, and mix at low-speed until the ingredients form a shaggy mass.

Cover the bowl and let the dough rest for 20 minutes.   Sprinkle the salt over, turn the mixer back on low-speed and knead for about 4 minutes.  Transfer the dough to an oiled bowl and let it rise for about 2 and a half hours, folding the dough every 50 minutes. For a more detailed explanation on folding, click here. You will do a first folding cycle at 50 minutes, another one at 1 hour and 40 minutes, then leave it undisturbed for additional 50 minutes, for a total of 2 and a half hours fermentation.

Heat your oven to 450 F. Divide the dough in 6 equal pieces.   Shape each one as a small boule.  Place over floured parchment paper on a baking sheet, flour the surface lightly and cover.  Allow the rolls to proof for 45 minutes.  Score the surface,  and bake for 25 minutes (with initial steam) or until golden brown and the internal temperature over 205 F.   Cool completely on a rack.

ENJOY!

to print the recipe, click here

rising
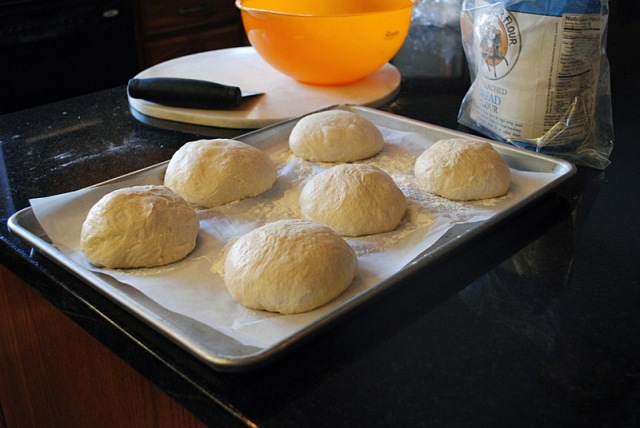
Comments:  Depending on the method of steam you use for your oven, these rolls can be a breeze to bake.  I decided to use my usual method of inverting a damp roasting pan over the rolls, and to do that I needed to bake three rolls at a time.  Let’s say it was a bit too convoluted and the second batch was slightly over-proofed.  Next time I might just go for a less complicated method, and use a baking pan with hot water at the bottom of the oven.  Whatever method you choose, the steam provides a nicer crust.
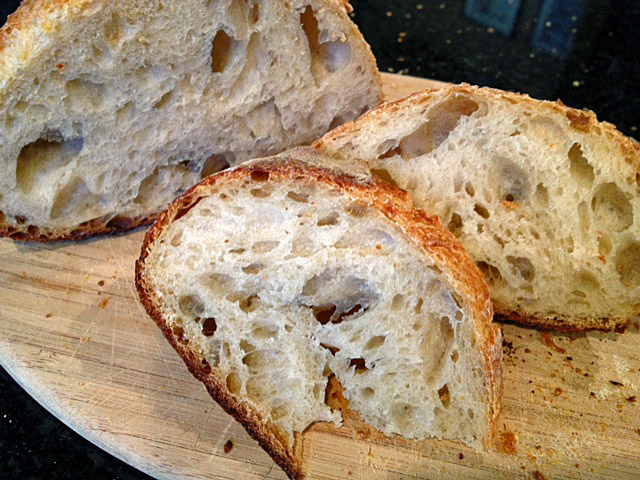
The crumb was moist and creamy, the way we like it, and the crust reminded us of the fantastic baguettes we used to enjoy while living in Paris…  What’s not to like?   😉
crumb

I am submitting this post to Susan’s Yeastspotting

ONE YEAR AGO: Do you eat your books?

TWO YEARS AGO: Mediterranean Skewers

THREE YEARS AGO Fettuccine with Shrimp, Swiss Chard, and Tomatoes

CODRUTA’S ROLLED OAT SOURDOUGH BREAD

I can read Portuguese, English, and French.  Stretching my brains a little I can get by in blogs written in Italian or Spanish, as the grammar and many words are similar to those from my native language.  Reading Romanian is another story altogether, but Codruta’s blog is on my blogroll list and will not be leaving anytime soon! Through Google Translate and a few email exchanges with her, I can profit from the bread masterpieces she regularly posts on “Apa. Faina. Sare”.   Agua. Farinha. Sal.  Water. Flour. Salt.  The basic ingredients for great bread, once you add the magic of wild yeast.

When she posted her own formula for a sourdough bread with flaky oats in the dough, I wanted to make it right away, as it involved a technique new to me: cold fermentation of the starter and dough until final proofing of the shaped bread.  Plus, it combined two different starters, one made with rye flour.  Indeed, not a bread for beginners, but I decided to take a leap of faith and play with the grownups. 😉   What do you think?

CODRUTA’S ROLLED OAT SOURDOUGH
(reprinted with permission, from Apa. Faina. Sare)

Makes one very large loaf or two medium-sized loaves.

for pre-ferment:
50 g very active starter made with regular flour (100% hydration)
50 g very active starter made with rye flour (100% hydration)
100 g bread flour
50 g water

for final dough:
all pre-ferment (250g)
450 g white bread flour
150 g whole wheat flour
130 g rolled oats (rolled thick is better)
470 g cold water
17 g salt

Prepare the pre-ferment by dissolving both types of starters in water, then add the flour. Stir and cover the container, placing it immediately in the refrigerator.  It is better to use a tall and narrow pot, transparent, so you can mark the level of your starter mixture as you place it in the fridge. Let it sit there 18-24 hours, until the yeast bubble grows up. You have a margin of a few hours to use for the yeast bubble will remain within, then begins to collapse.  Ideally, you should catch it when it’s almost doubled in bulk, as you can see in this photo.

When the starter is ready to be used, mix in a bowl the flours, rolled oats and cold water, let it sit 40 to 60 min (the autolyse step). Sprinkle salt on top, add the fermented starter straight from the fridge. Blend all ingredients together. Knead by folding directly into the bowl, a few minutes, until the dough comes off the fingers and the vessel walls. The dough will be quite dense, but do not add more water. Cover the pot, wait 15 minutes, and repeat the kneading by folding (one complete rotation of the vessel is sufficient). Cover and wait 15 minutes.

Transfer the dough in a greased rectangular dish with oil, make a set of stretch and fold (SF), wait 45 minutes, repeat the set of SF and place dough in the refrigerator.  Let dough in refrigerator for 15 to 18 hours.

Remove dough from refrigerator and leave it at room temperature for 1 hour. Divide the dough in two, and shape each half as a round or oval loaf.  Place the shaped loaves in a banetton or another appropriate container, with the seam up. Cover the pot with a light fabric, and then with plastic wrap. Let the dough proof at room temperature for 2 hours and 30 minutes.

Heat your oven 45 minutes before baking time. Have a baking stone inside and your method to generate steam planned. Bake at 460 F  for 45 min, with steam for the initial 15 min. Reduce temp to 440 F  if the bread seems to be browning too much.

Cool it completely before slicing.

ENJOY!

to print the recipe, click here

With this bread, I tried to work on shaping a batard, but next time I will divide the dough in uneven portions, making a slightly smaller batard and bigger “boule”.  I need a bit more practice with this shape of bread, but I feel I’m slowly making progress…  I was hoping for a shorter bread, with more pointed ends.  It will happen.  I know it will…  😉

The bread was absolutely delicious! The oats, although not previously soaked, more or less disappear into the dough, contributing flavor and a very slight hint of texture. Perfect! More and more I lean towards bread with whole wheat flour and grains or seeds inside, I find that they are very satisfying and more flavorful than white bread.

Unfortunately, I had a small problem with my camera – pilot error – and lost all my photos of the crumb.   Mine was not as perfect as Codruta’s bread, but no one who tried the bread seemed to mind…  Make sure to stop by her blog and marvel at the structure of her bread,  with a beautiful pyramidal shape, which is a sign of perfect handling of the dough.

Codruta, thanks for a great recipe,  I now only have about 8 others from your blog waiting in line!   😉

I am submitting this post to Susan’s Yeastspotting event…

ONE YEAR AGO:  Roasted Corn and Tomato Risotto

TWO YEARS AGO: Light Rye Bread

Add to FacebookAdd to DiggAdd to Del.icio.usAdd to StumbleuponAdd to RedditAdd to BlinklistAdd to TwitterAdd to TechnoratiAdd to Yahoo BuzzAdd to Newsvine