YOGURT AND PISTACHIO SOURDOUGH

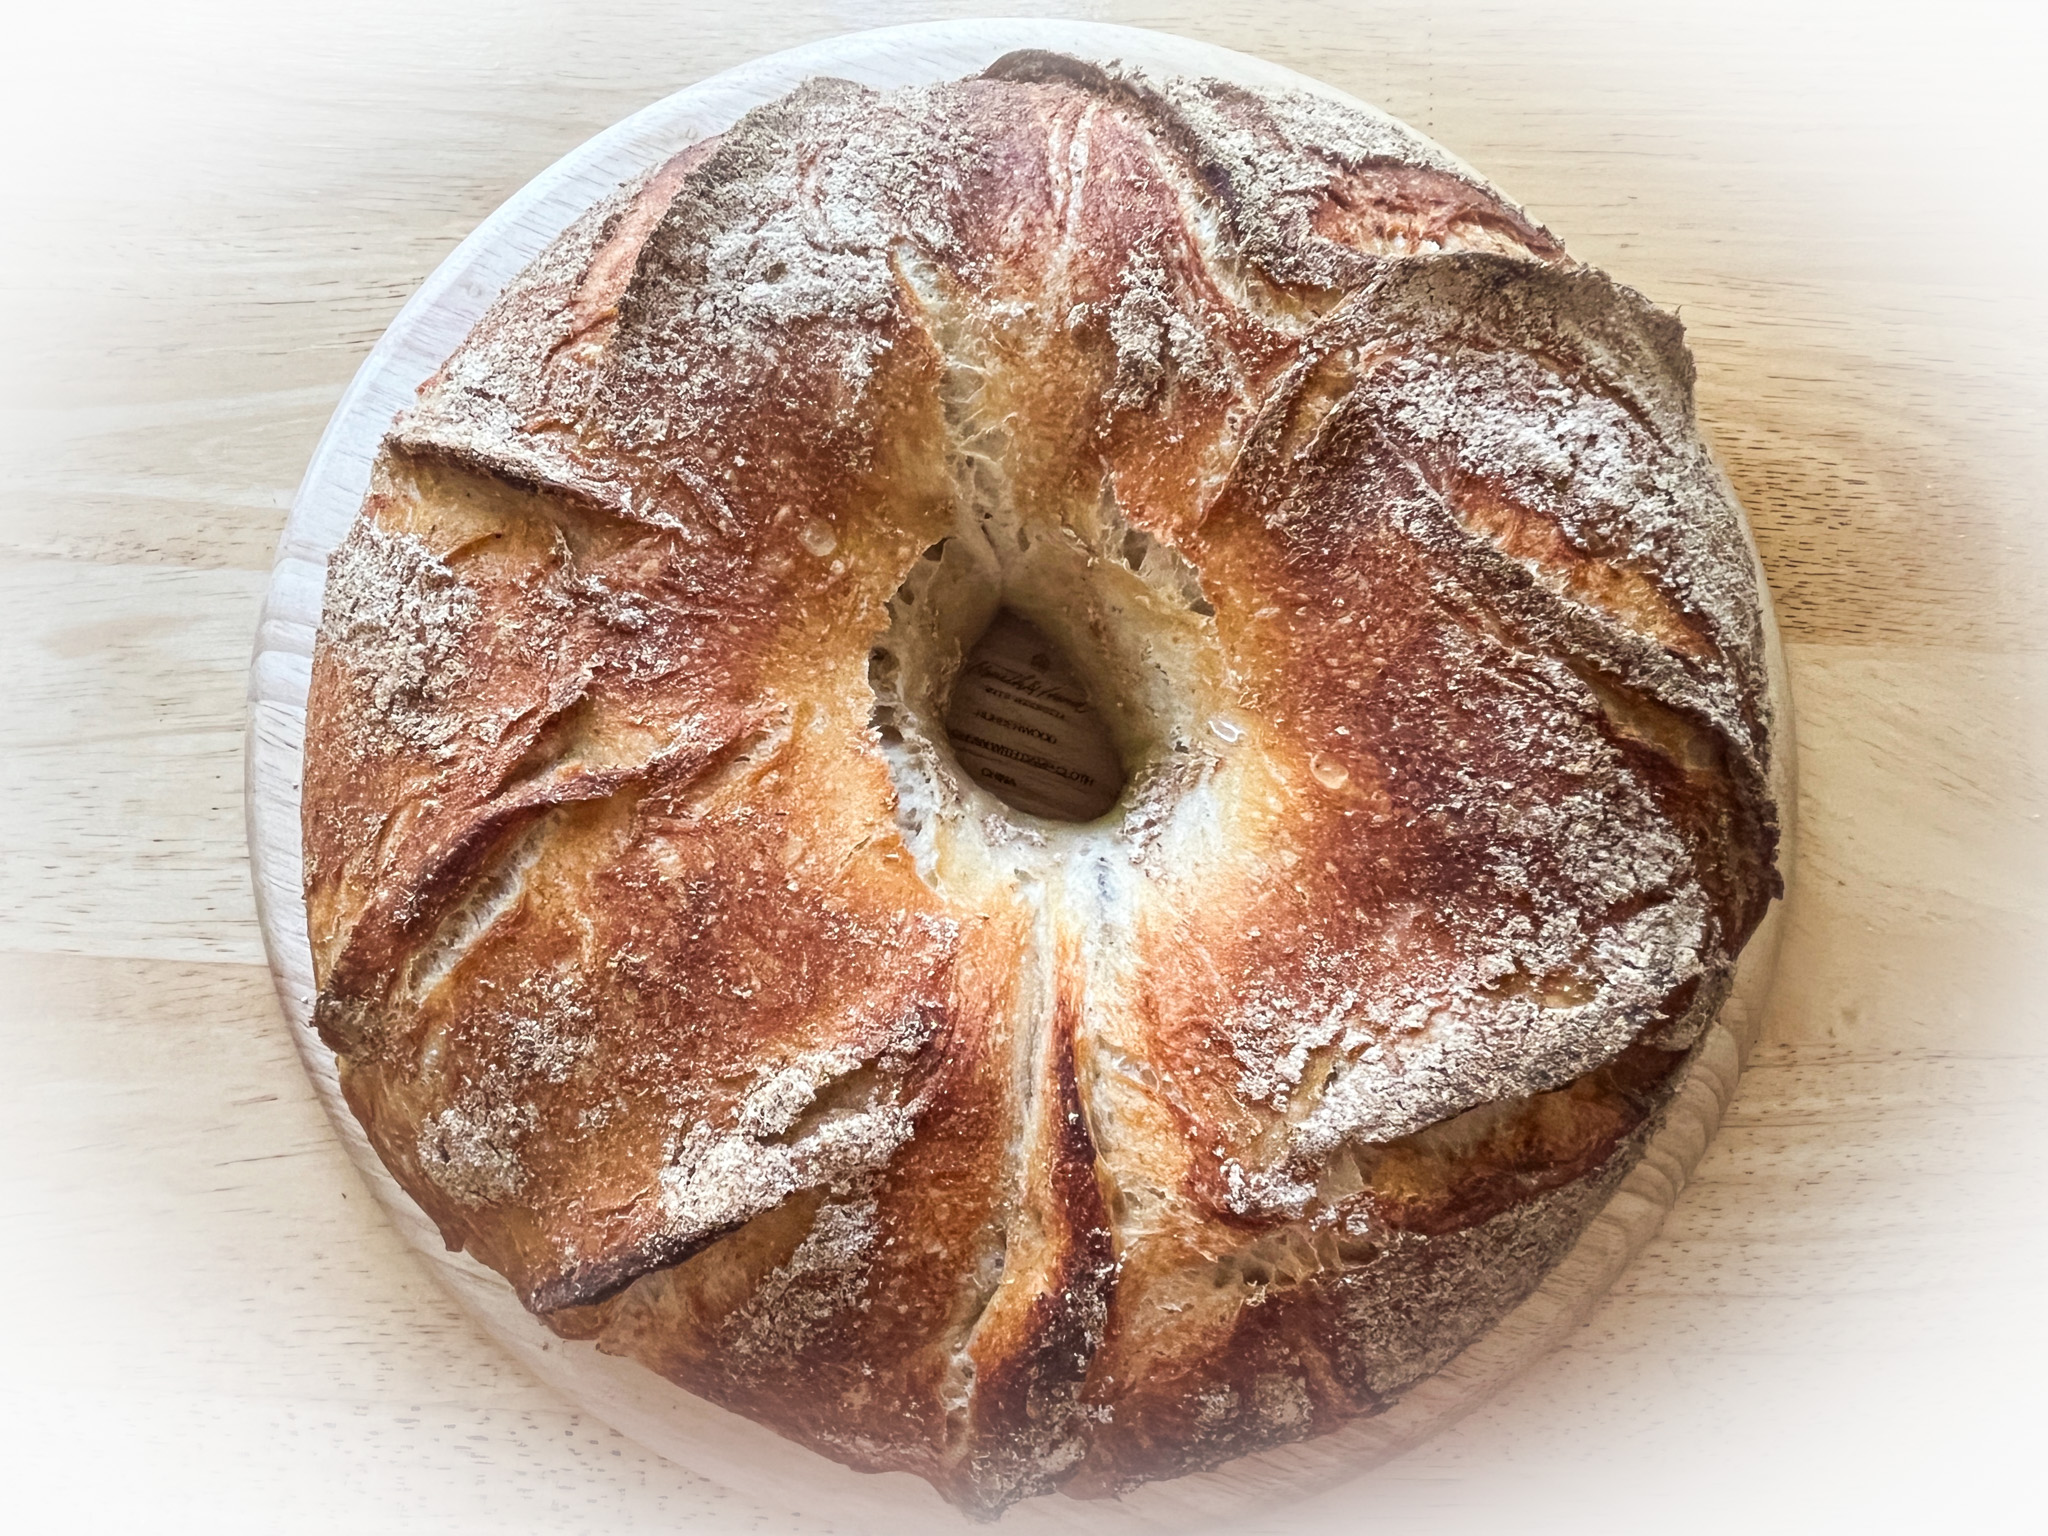
Inspiration for this delicious bread came from the one and only Elaine Boddy, through her book called EVERYDAY SOURDOUGH which you can find here. I made just a few modifications in the formula (she used walnuts, I wanted to incorporate pistachios), and the method, because I always leave the dough in the fridge overnight and bake first thing in the morning. Her book is absolutely full of great ideas, and I have reviewed it right after publication (check it out in this post).

YOGURT AND PISTACHIO SOURDOUGH
(slightly modified from Everyday Sourdough)

75 g sourdough starter at 100% hydration
240g water
125 g low-fat yogurt
500 g white bread flour
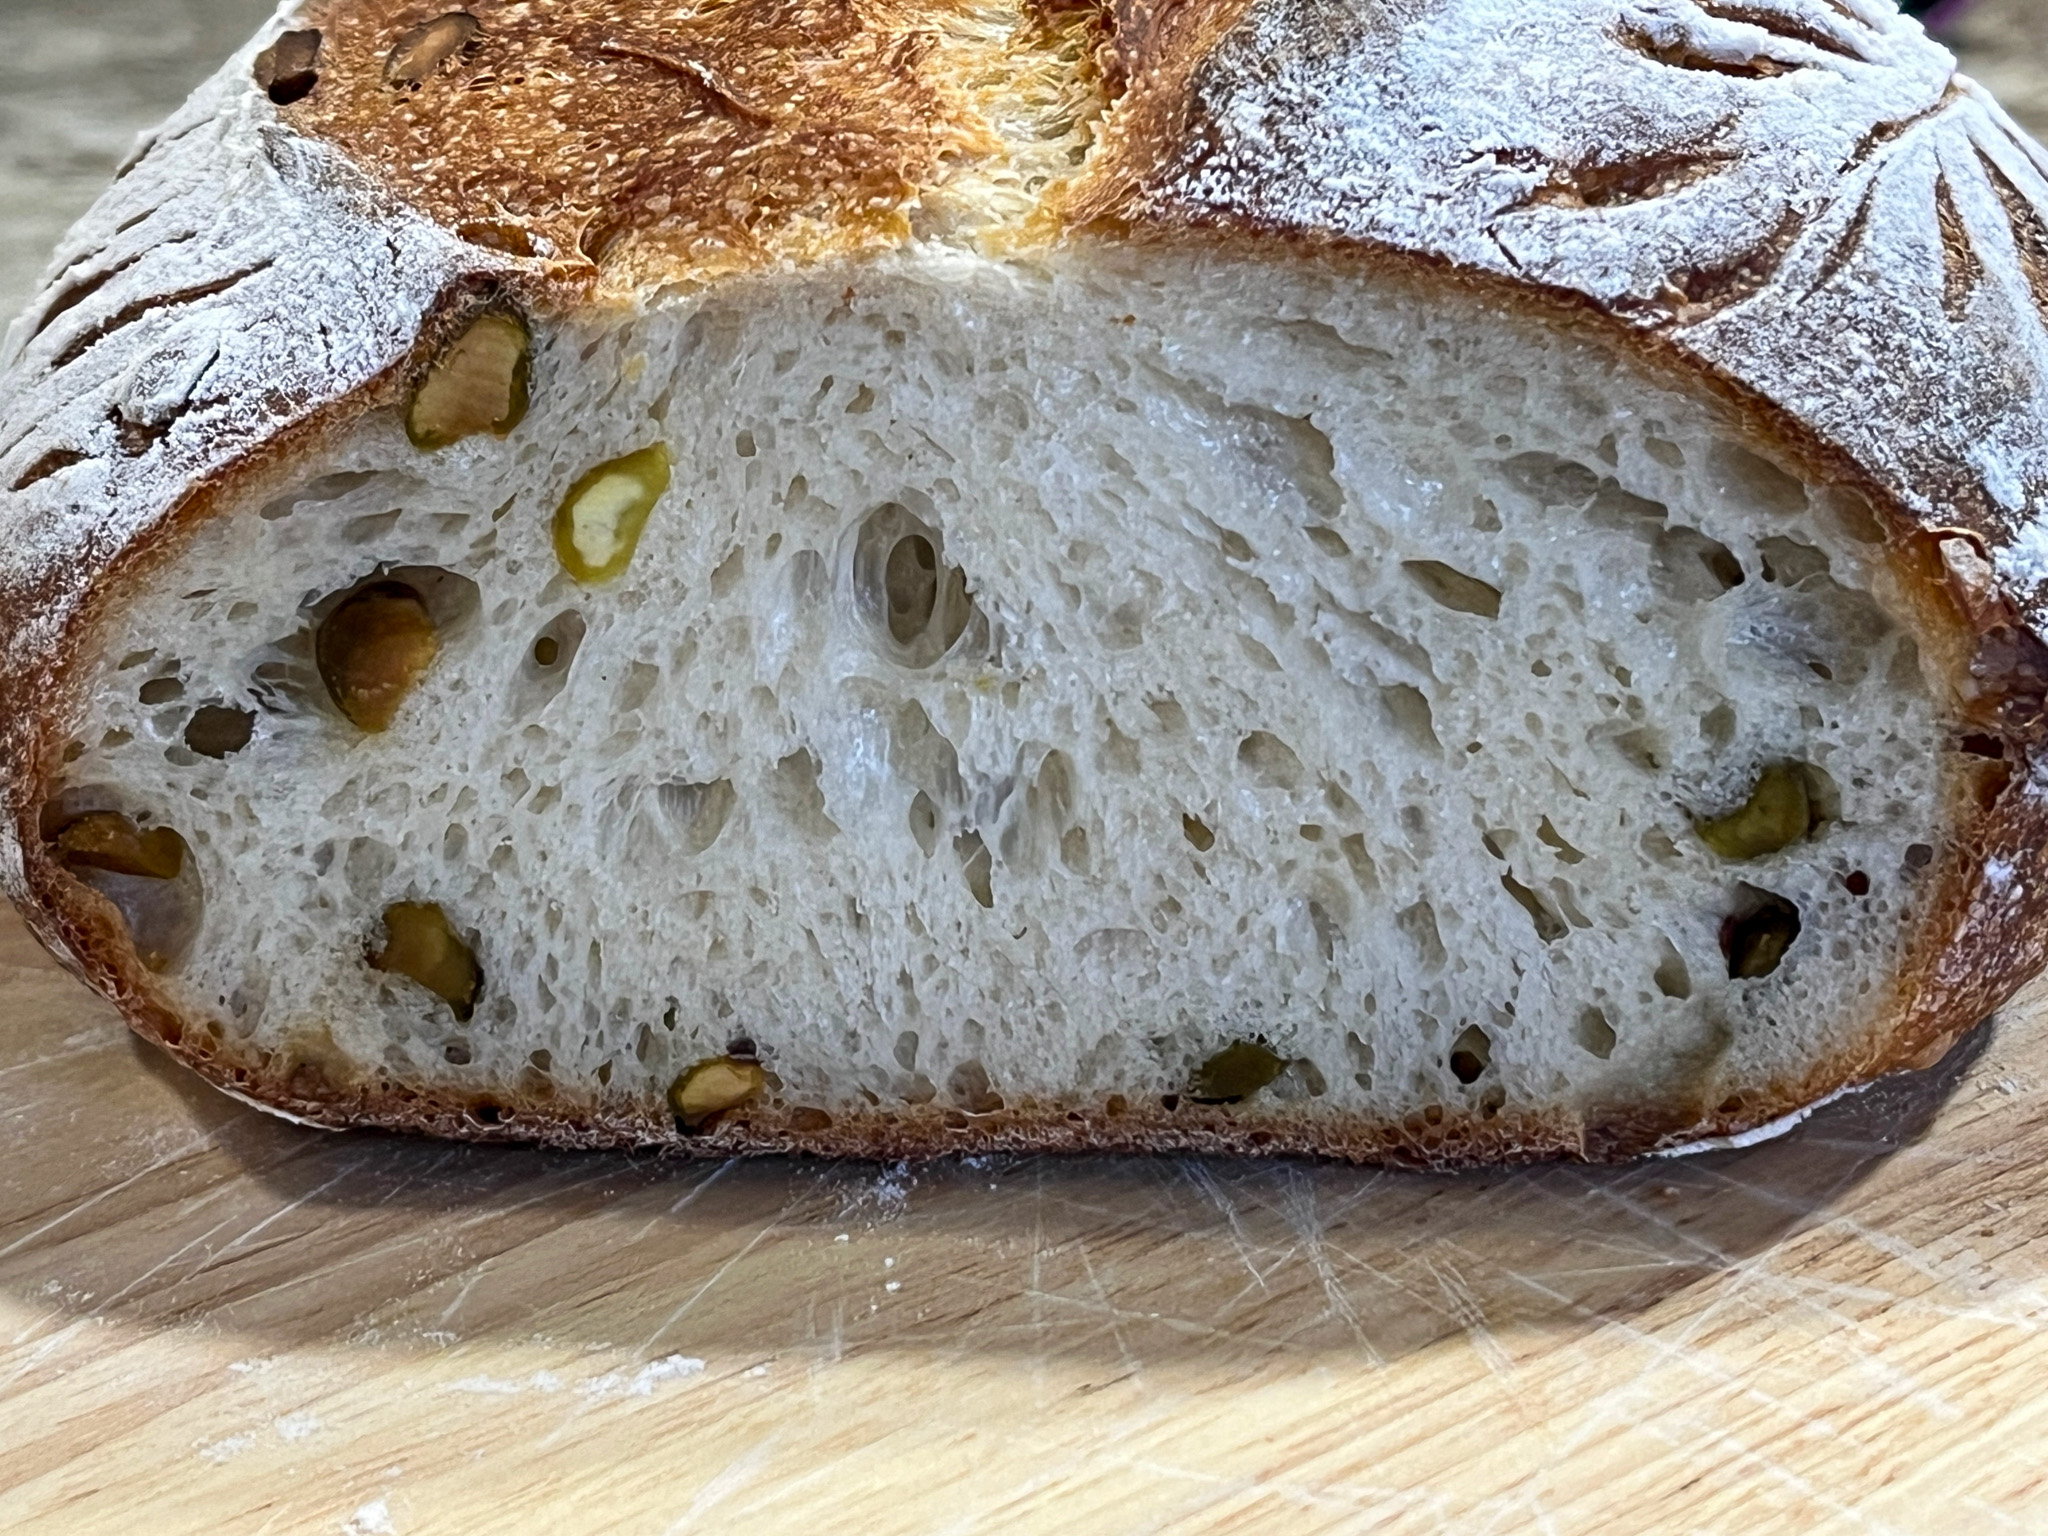
50 g pistachios, coarsely chopped
10 g salt

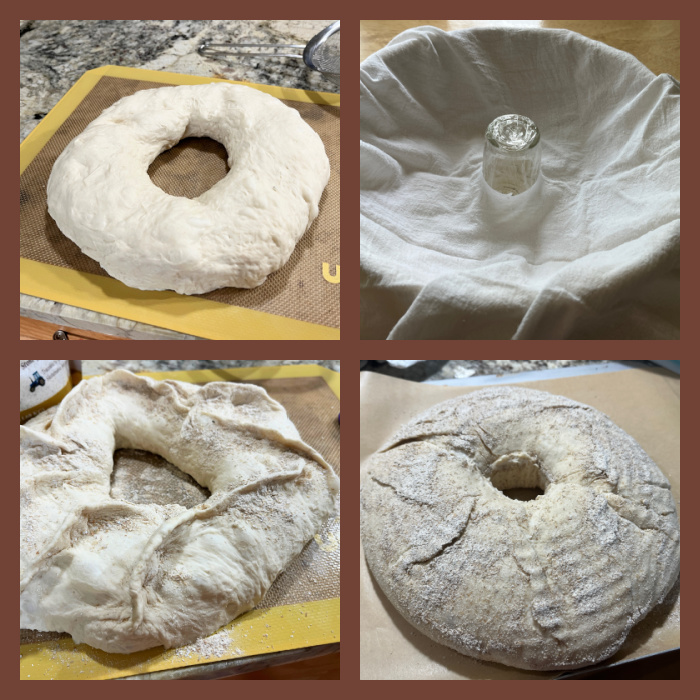
Mix all ingredients in the bowl of a KitchenAid type mixer fitted with the dough hook. Knead on low speed for about 4 minutes. Transfer to an oiled bowl and let proof at room temperature for 4 and a half hours, with folds every 45 minute or so, no need to be precise.

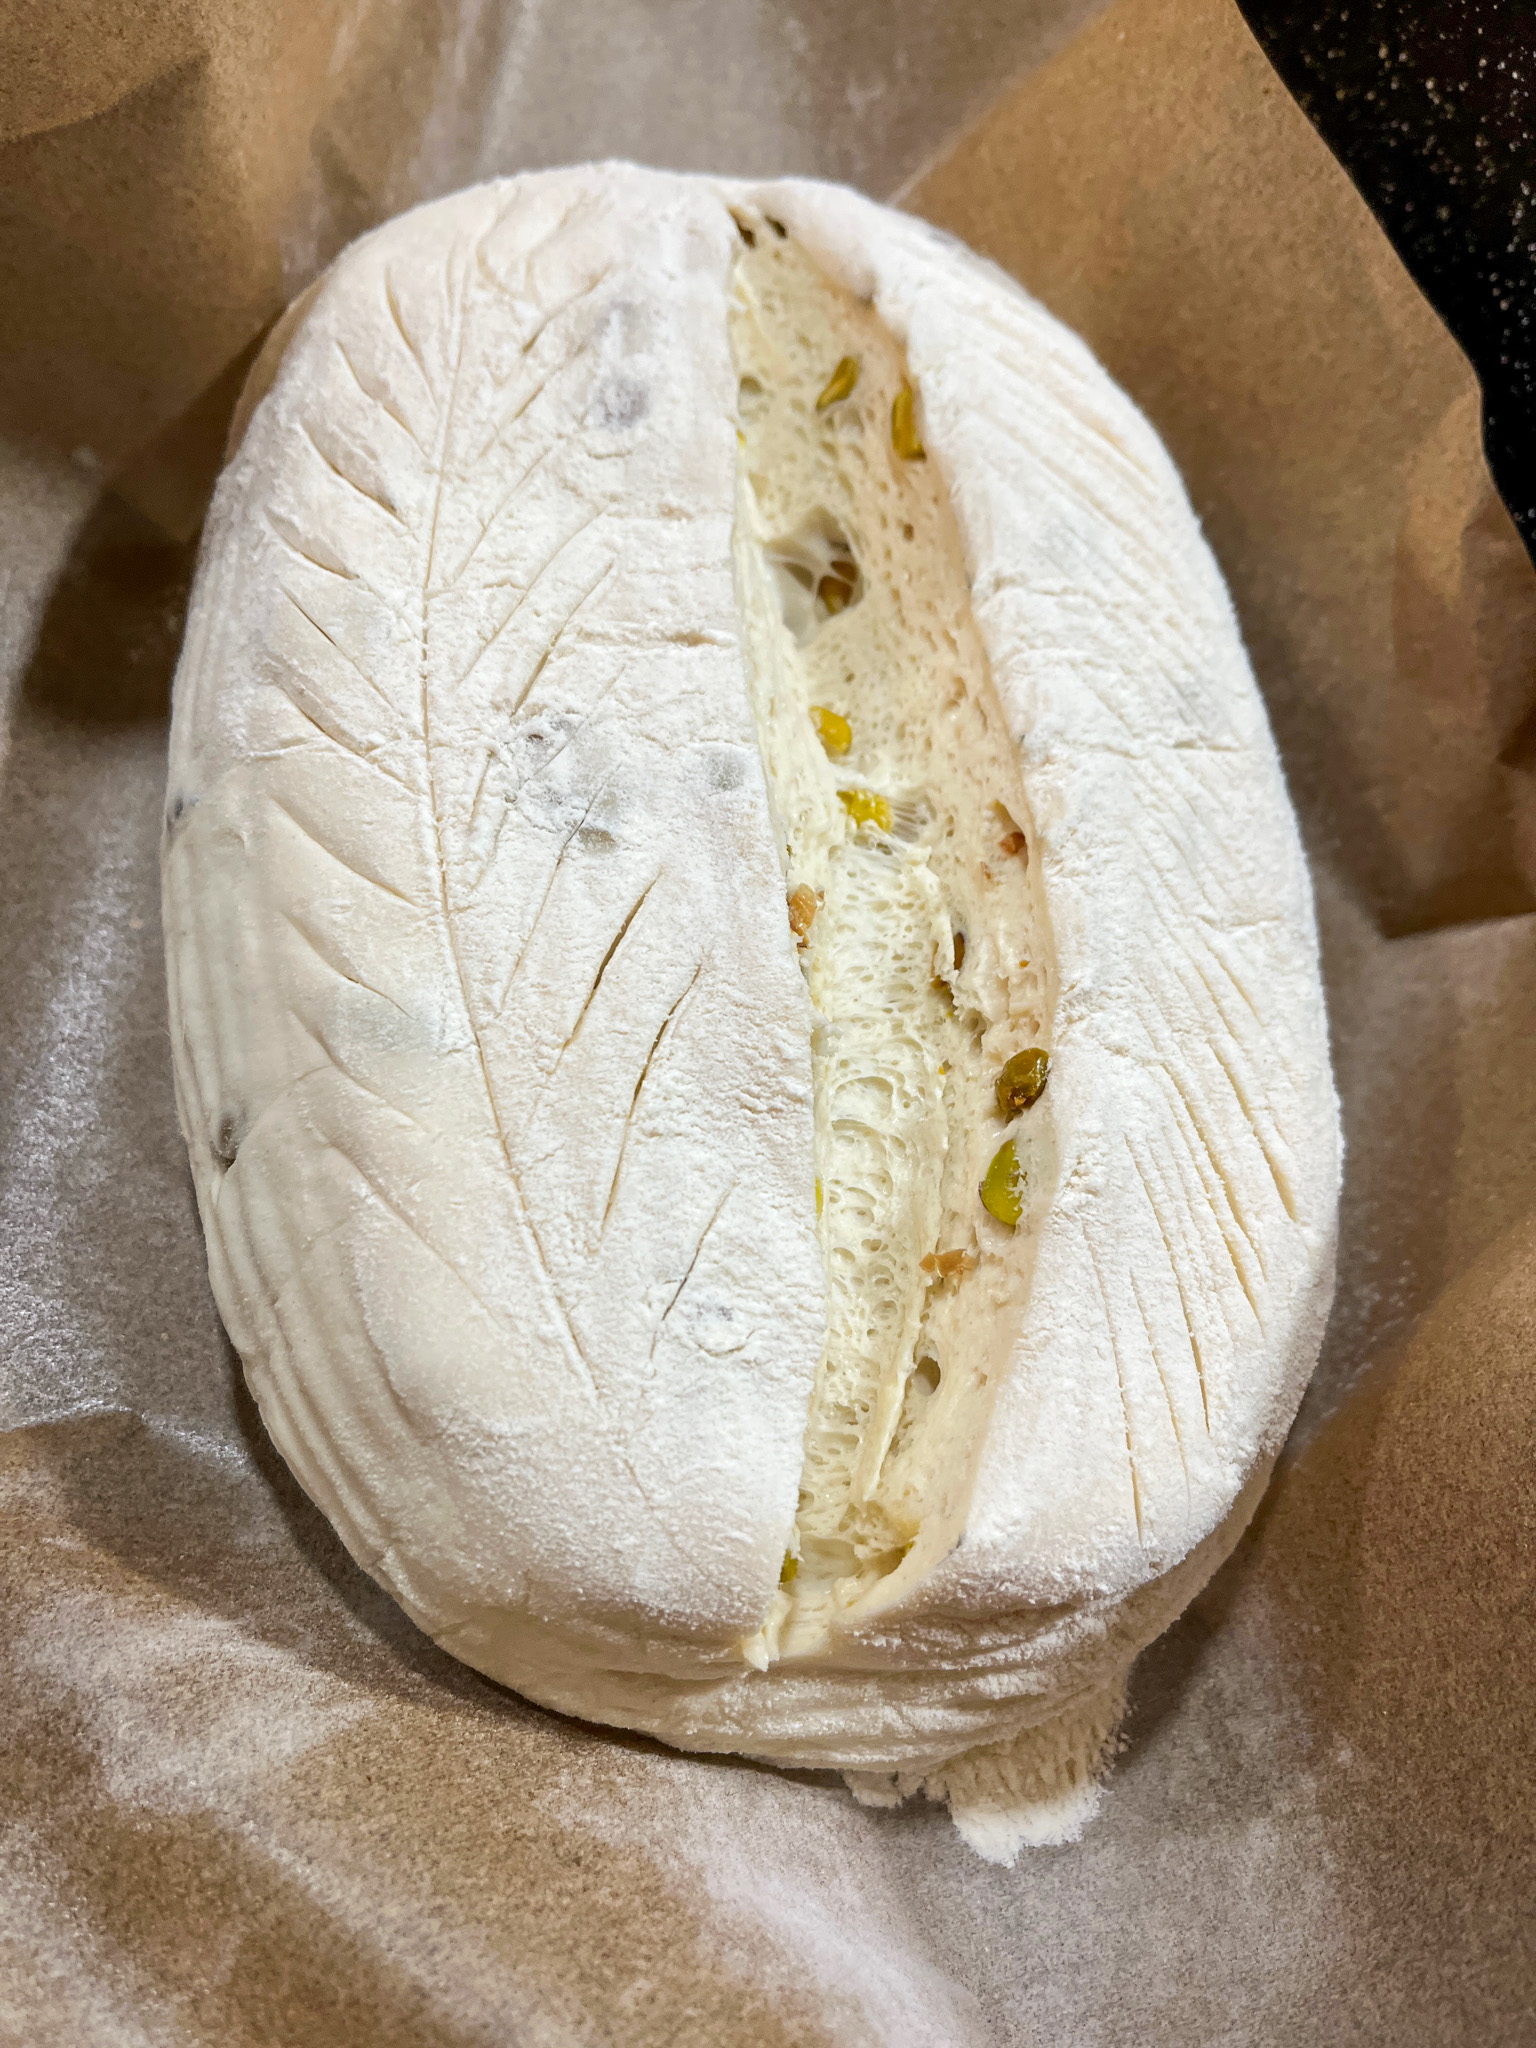
After the last fold, keep it at room temperature for a full hour, shape as a round boule or batard, and place in a banetton. Leave for another hour at room temperature, then retard it in the fridge.

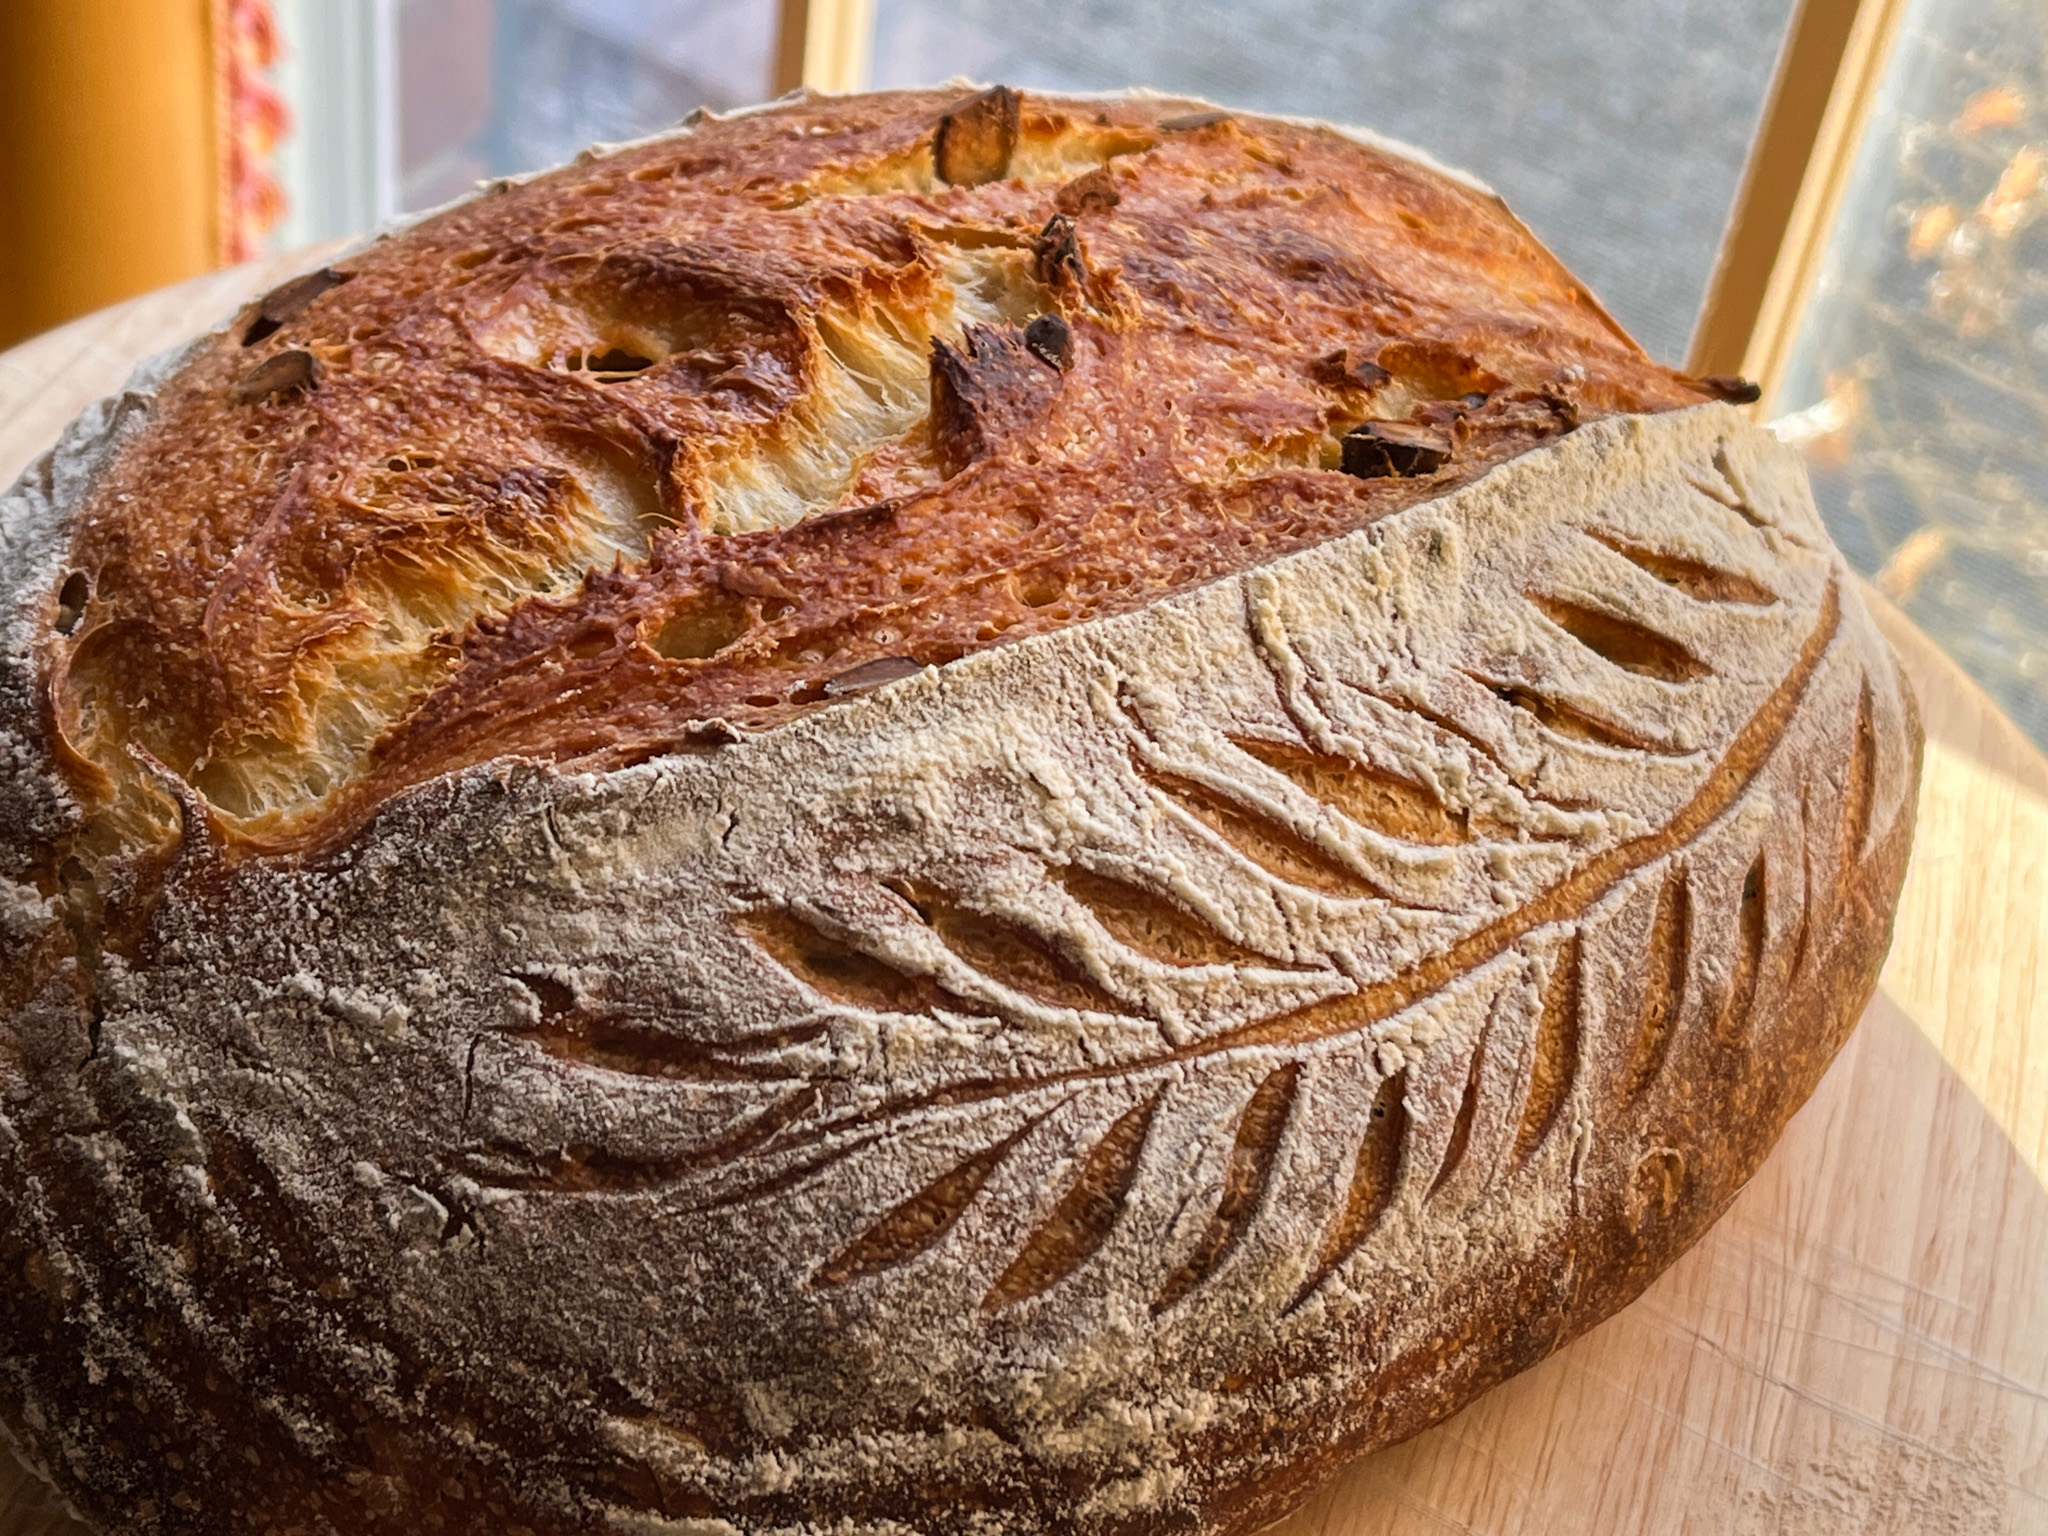
Next morning, bake at 450F straight from the fridge, slashing right before baking. Bake covered for 30 minutes, remove lid and bake for 15 minutes more. Allow to cool completely before slicing.

ENJOY!

to print the recipe, click here

Comments: This is one tasty bread! The yogurt makes the crumb softer, with a nice taste that goes well with the pistachios. Husband adored it, and so did I… Huge thank you, Elaine, for allowing me to publish this little variation of your recipe!

ONE YEAR AGO: Chinese-Style Orange Chicken goes Light

TWO YEARS AGO: Roasted Cauliflower with Chickpeas and Quinoa

THREE YEARS AGO: A Savory Phyllo Pie

FOUR YEARS AGO: Nut-Free Lady Grey Macarons

FIVE YEARS AGO: Mini-Heart Cakes for your Valentine

SIX YEARS AGO: Blue Moon Milk

SEVEN YEARS AGO: Slow-Cooked Chicken Meatballs

EIGHT YEARS AGO: Zesty Flourless Chocolate Cake

NINE YEARS AGO: Maple Pumpkin Pecan Snacking Cake

TEN YEARS AGOSilky Gingered Zucchini Soup

ELEVEN YEARS AGO: Sweet Fifteen!

TWELVE YEARS AGO: Sesame and Flaxseed Sourdough

THIRTEEN YEARS AGO: Green Beans with Miso and Almonds

FOURTEEN YEARS AGO: Saturday Morning Scones

FIFTEEN YEARS AGO: White Bread

AIR-FRIED SOURDOUGH BREAD

When your oven dies and you won’t have another one delivered for a couple of weeks, but your freezer is running out of sourdough slices, what can you do? Desperate times call for desperate moves. You turn to the air-fryer. I am actually quite pleased with the way the bread turned out, although the crust is not nearly as crisp as a “normal” sourdough bread. But if you like to experiment in the kitchen, give it a try…

AIR-FRIED SOURDOUGH
(from the Bewitching Kitchen)

250g bread flour
50 g sourdough starter at 100% hydration
180g water
5 g salt

Make the levain mixture about 6 hours before you plan to mix the dough. It should be very bubbly and active.

When you are ready to make the final dough, place the water in the bowl of a KitchenAid type mixer and dissolve the starter in it, mixing with a spatula briefly, then add the flour, and salt. Turn the mixer on with the hook attachment and knead the dough for 4 minutes at low-speed all the time.

Remove from the machine, and transfer to a container lightly coated with oil, cover lightly with plastic wrap and allow it to ferment for 4 hours, folding every 45 minutes or so. Because the dough is already a bit developed from the initial time in the mixer, you should get very good structure after 3 and a half hours, or even sooner than that.
After four hours bulk fermentation, shape the dough as a ball, and place, seam side up, in a lightly floured banetton. Leave at room temperature one hour, and then place in the fridge overnight, from 8 to 12 hours.

Next morning, turn your air-fryer to 400F and leave it on for 5 minutes at that temperature. Invert the bread on a piece of parchment paper, and cut it so that very little paper is outside the perimeter of the dough. Score if you want. Place the bread in the air-fryer with ice cubes around it.

Air-fry for 25 minutes, remove the paper and check the internal temperature. If it is over 205F, and the crust has good color, invert the bread and inspect the bottom. If a bit soggy and pale, place the bread in the fryer with the bottom up, and continue roasting it for another 5 minutes or so. Remove from the fryer and let it cool completely before slicing.

ENJOY!

to print the recipe, click here

Comments: The air-fryer will never be my choice to make sourdough bread, but I was pleasantly surprised by how well things turned out. Let’s suppose you are on a road trip and still want to bake some bread while away from home, maybe you can take your fryer with you… Just a thought! I do like to experiment, so this was actually pretty cool. I painted the surface with Sugarprism green after baking.

ONE YEAR AGO: Ube Macarons

TWO YEARS AGO: Christmas Sourdough

THREE YEARS AGO: Star-Shaped Sun-dried Tomato Bread

FOUR YEARS AGO: Cranberry White Chocolate Tart

FIVE YEARS AGO: I dream of Madeleines and a Tower of Cheesecakes

SIX YEARS AGO: Dominique Ansel’s Chocolate Mousse Cake

SEVEN YEARS AGO: Slow-Roasted Eye of the Round Beef

EIGHT YEARS AGO: Steam-Roasted Indian-Spiced Cauliflower

NINE YEARS AGO: Creamy Zucchini-Mushroom Soup

TEN YEARS AGO: Ken Forkish’s Pain au Bacon

ELEVEN YEARS AGO: Carrot and Cumin Hamburger Buns

TWELVE YEARS AGO: Potato Galettes a l’Alsacienne & Book Review

THIRTEEN YEARS AGO: Caramelized Carrot Soup

FOURTEEN YEARS AGO: Miso-Grilled Shrimp

FIFTEEN YEARS AGO: Pain Poilane

LA COURONNE LYONNAISE, TWO WAYS

This bread originates in Lyon, and is shaped as a crown, therefore the name “couronne”. However, there are several ways to gild this lily. I am sharing two methods, the first one worked exactly the way I hoped, the second I consider a work in progress. So, yes, I will be back, hopefully with improvements on the second version…

.

METHOD ONE
A SIMPLE COURONNE


LA COURONNE LYONNAISE
(adapted from Henri-Luc’s blog)

530g bread flour
10g salt
160g sourdough starter at 100% hydratioin
300g water
rye flour for dusting

Mix sourdough starter in water and whisk to distribute well. Add bread flour and salt, incorporate either by hand or with a KitchenAid type mixer fitted with a hook dough for a few minutes. Proof at room temperature for 4 to 5 hours with folds at every 45 minutes.

Prepare your round banetton to proof a crown, by placing a small glass or plastic container in the center. Cover with a cloth and flour it lightly with rye flour.

Pre-shape the dough as a round ball. Allow it to relax for 15 minutes. Make a hole in the center (traditionally bakers use their elbow, do what you feel is right…). Enlarge the whole until you get to the size of your round banetton. Now grab some rye flour with your fingers and pinch a series of alternating straight lines on the surface. Pinch the dough well to make a super sharp line of dough raising up. Then flour the surface lightly again and invert the dough on the banetton. Side with the ridges should go down. Proof at room temperature for 2 hours. Place a parchment paper on top, invert the bread over it and slide into the hot oven right away.

Bake at 450F over a stone with steam for 20 minutes, then remove the steam (I used a large roasting pan inverted over the stone as a lid). Bake for 20 to 25 minutes longer. If the bread darkens too much cover it with foil. Internal temperature should be around 210F.

Cool completely before slicing.

ENJOY!

to print the recipe, click here

Comments: This was such a fun bread baking adventure! I loved making the ridges and the way they gave the bread that incredibly nice rustic look once it baked. Make sure to use rye flour to dust the surface, it is going to make a big difference if you skip it. White flour won’t have the same effect.

.

METHOD TWO
COURONNE WITH FLAPS

The flaps were a big flop. What can I say? The real beautiful version would have them all lifted up from the surface of the bread, mine stayed more or less glued to the surface. This was my second attempt, the first one was worse, so you won’t be seeing that (wink, wink). The shaping is quite a bit more elaborate. You form pieces of dough that are about 200g in weight, then roll a flap coming out of it, and roll the ball into it. Place to proof with the flap down, open side to the edge of the banetton. Before closing the flap over the ball of dough, a little olive oil is used to brush the edge, so the dough won’t stick and will instead lift during baking. Pictures below give you a general idea of the shaping method.

I had several issues, including the fact that 200g per ball of dough was probably too much. I will revise the whole thing and try again, because I really REALLY want to make it work right. I love the stencil decoration made right before baking (I will share info on the stencil and banetton in my upcoming In My Kitchen post, on October 1st).

I hope you enjoyed this post, and maybe you can give this method a try. If you get your flaps not to flop, let me know your secret!

ONE YEAR AGO: Have a Heart

TWO YEARS AGO: Chocolate-Hazelnut Tartlets

THREE YEARS AGO: Turkey Taco Salad

FOUR YEARS AGO: Cheese and Pesto Emmer Roll-ups and Elaine’s Cookbook Review

FIVE YEARS AGO: Mango-Hazelnut Entremet Cake

SIX YEARS AGO: Lebanese Lentil Salad and a Cookbook Review

SEVEN YEARS AGO: Cottage Loaf

EIGHT YEARS AGO: Sourdough Loaf with Cranberries and Walnuts

NINE YEARS AGO: Sichuan Pork Stir-Fry in Garlic Sauce

TEN YEARS AGO: Our Green Trip to Colorado

ELEVEN YEARS AGO: Ditalini Pasta Salad

TWELVE YEARS AGO: Celebrate Wednesday with a Thai Seafood Curry

THIRTEEN YEARS AGO:  Post-workout Breakfast

FOURTEEN YEARS AGO: Semolina Barbecue Buns

FIFTEEN YEARS AGO: Lavash Crackers

FOR THE LOVE OF GAUDI

We just came back from a 2-week trip to France and my first time ever in Spain. We drove from Avignon to Arles and then to Barcelona and stayed there for a few days enjoying the company of great friends… Although I was familiar with Gaudi’s work, visiting Basilica de la Sagrada Familia and Casa Batlló were two experiences I will never ever forget. Today I celebrate Gaudi with a little sourdough bread.

GAUDI-LOVE SOURDOUGH BREAD
(from The Bewitching Kitchen)

Basic formula:
475g bread flour
25g rye flour
10g salt
1/2 tsp Baharat spice mix
75g sourdough starter at 100% hydration
350g water

Make the levain mixture about 6 hours before you plan to mix the dough. It should be very bubbly and active.

When you are ready to make the final dough, place the water in the bowl of a KitchenAid type mixer and dissolve the starter in it, mixing with a spatula briefly, then add the two types of flour, salt and spices. Turn the mixer on with the hook attachment and knead the dough for 4 minutes at low-speed all the time. You will notice the dough will gain quite a bit of structure even with just 4 minutes in the mixer. Remove from the machine, and transfer to a container lightly coated with oil, cover lightly with plastic wrap and allow it to ferment for 4 hours, folding every 45 minutes or so. Because the dough is already a bit developed from the initial time in the mixer, you should get very good structure after 3 and a half hours, or even sooner than that.

After four hours bulk fermentation, shape the dough as a ball, and place, seam side up, in a lightly floured banetton. Leave at room temperature one hour, and then place in the fridge overnight, from 8 to 12 hours.

Next morning, heat the oven to 450F.

Place a parchment paper on top of the dough, a flat baking sheet, and invert the dough, flipping it out of the banneton. Slightly wet the top of the dough and place your wafer paper decoration on top. Flour the surface and score a little pattern with a razor blade.

Bake at 450F for 45 minutes, preferably covered for the first 30 minutes to retain steam. Cool completely over a rack before slicing.

ENJOY!

to print the recipe, click here

Comments: The picture above shows the inspiration for the design, artwork he included as a decorative panel above a door in Casa Batlló. I used wafer paper and food safe pens in metallic tones to make a similar design. I hope Gaudi would not get too mad at me…

After baking, I thought the colors of the design faded slightly, so I painted them again once the bread cooled completely.

Wafer paper is fast becoming my favorite way to decorate bread… To see a couple of examples from my past, click here (butterfly) and here (polka dot).

ONE YEAR AGO: Hello There, Cupcake!

TWO YEARS AGO: Two Deliciously Refreshing Cucumber Salads

THREE YEARS AGO: Grilled Shrimp with Parsley Oil over Black Rice Noodles 

FOUR YEARS AGO: Chicken Shawarma, the Easiest Way

FIVE YEARS AGO: Marshmallow Macarons

SIX YEARS AGO: Mango-Lime Macarons

SEVEN YEARS AGO: Honey-Glazed Sriracha Meatballs

EIGHT YEARS AGO: Slow-cooker Braised Lamb Shanks

NINE YEARS AGO: How about some coffee with your steak?

TEN YEARS AGO: Celebrate Wednesday with a Spiral Kick

ELEVEN YEARS AGO: Carrot Flan with Greens and Lemon Vinaigrette

TWELVE YEARS AGO: Granola Bars

THIRTEEN YEARS AGO:  Awesome Broccolini

FOURTEEN YEARS AGO:  A Twist on Pesto

FIFTEEN YEARS AGO: Ciabatta: Judging a bread by its holes

UBE SOURDOUGH, TWO WAYS


Back in December last year I had a lot of fun playing with ube, the Filipino ingredient that was new to me. Today I share two ways to make sourdough bread incorporating ube. The basic recipe is the same, but in the first version I substituted some of the flour with ube powder. The second version incorporates 1/4 tsp ube extract in the dough. The one with the ube powder got a super light purple tone and the texture and structure of the bread was slightly different from a regular sourdough. If you are looking for color impact, definitely go with ube extract. A little goes a long way, and the taste is very mild.

UBE SOURDOUGH, TWO WAYS
(from the Bewitching Kitchen)

480g white bread flour
20g ube powder
10g salt
350g water
75-90g sourdough starter at 100% hydration

Make the levain mixture about 6 hours before you plan to mix the dough. It should be very bubbly and active.

When you are ready to make the final dough, place the water in the bowl of a KitchenAid type mixer and dissolve the starter in it, mixing with a spatula briefly, then add the flour, ,ube powder and salt. Turn the mixer on with the hook attachment and knead the dough for 4 minutes at low-speed all the time. You will notice the dough will gain quite a bit of structure even with just 4 minutes in the mixer. Remove from the machine, and transfer to a container lightly coated with oil, cover lightly with plastic wrap and allow it to ferment for 4 hours, folding every 45 minutes or so. Because the dough is already a bit developed from the initial time in the mixer, you should get very good structure after 3 and a half hours, or even sooner than that.

After four hours bulk fermentation, shape the dough as a ball, and place, seam side up, in a lightly floured banetton. Leave at room temperature one hour, and then place in the fridge overnight, from 8 to 12 hours.

Next morning, heat the oven to 450F.

Place a parchment paper on top of the dough, a flat baking sheet, and invert the dough, flipping it out of the banneton. Flour the surface of the dough, add the stencil and air-brush if so desired. Score with a razor blade.

Bake at 450F for 45 minutes, preferably covered for the first 30 minutes to retain steam. Cool completely over a rack before slicing.

FOR VERSION #2
Use 500g bread flour and add 1/4 tsp ube extract to the dough, following the same method to prepare and bake the bread.

ENJOY!

to print the recipe, click here

Comments: You will notice that the crumb is tighter than usual for a sourdough, and also the color purple is super subtle, quite light.  Version #2, with ube extract got a lot more color.


I used a different method to decorate it, with oats to form little flowers and black sesame seeds in the center. Just wet the surface of the dough a little bit and that acts like a glue.

It was a bit time-consuming to do, so I ended up forming just 4 little flowers. Maybe next time I can go for full-coverage…

The crumb was open and super purple!

So, if you like to play with this ingredient, I would recommend the extract, because I felt the dough was quite affected in its structure when some of the flour (therefore gluten) was removed and replaced with the powder. Also, the color that the extract provides is quite spectacular and stayed unchanged with baking. Flavor is very subtle.

ONE YEAR AGO: Brown Butter Dulce de Leche Cookie Cups

TWO YEARS AGO: Chicken Poblano Tortilla Soup

THREE YEARS AGO: Kung Pao Chicken

FOUR YEARS AGO: Galette de Rois

FIVE YEARS AGO: Sous-Vide Overnight Oatmeal

SIX YEARS AGO: A Valentine’s Day Opera

SEVEN YEARS AGO: Incredibly Simple Times Four

EIGHT YEARS AGO: Walnut-Cranberry Sourdough Bread

NINE YEARS AGO: Ottolenghi in Brazil?

TEN YEARS AGO: Roasted Winter Vegetables with Miso-Lime Dressing

ELEVEN YEARS AGO: 2012 Fitness Report: P90X2

TWELVE YEARS AGO: Caramelized Bananas

THIRTEEN YEARS AGO: Roasted Lemon Vinaigrette

FOURTEEN YEARS AGO: Whole Wheat Bread