MINI-HEART CAKES FOR YOUR VALENTINE


Valentine’s Day is so commercial. Who needs a special day to celebrate love and friendship? No one. We should all just ignore it. With that in mind, let me say I have no problem with a special day to shower all those special persons in your life with attention and affection. A partner, a special friend, that family member you look up to and adore. Today I share a recipe that seems a bit involved, but when you break it down into its components, it is quite simple. Trust me. I almost always speak the truth.

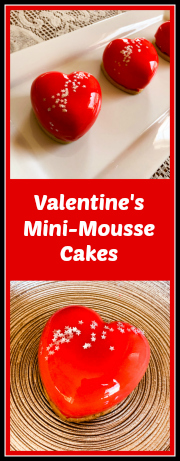
VALENTINE’S MINI-HEARTS MOUSSE CAKES
(inspired from many sources)

for the sable base:
120 g cold butter, cut in pieces
65 g powdered sugar
260 g all-purpose flour
30 g almond flour
pinch of salt
1 egg

Heat oven to 375 F.

Add the sugar, flour, almond flour and salt to the bowl of a KitchenAid type mixer fitted with the paddle attachment. Mix at low speed for about 30 seconds just to incorporate the ingredients together. Add the cold butter and process until the butter gets in small pieces, a bit smaller than pea-size. Add the egg and mix just until it starts to glue together as a dough, but stop before it all gets into a single mass to avoid gluten formation.  Gather the dough on a piece of plastic wrap and gently form it as a disk with your hand.

Roll the pastry between plastic or parchment paper to a 3mm thickness. Cut heart or round shapes. Place over parchment paper on a baking sheet and freeze for 10 minutes.  Bake for about 10 minutes until it starts to get golden around the edges.  Reserve.

for the quinoa-crisp:
115 g white chocolate
20 g pistachio paste (or almond butter)
20 g puffed quinoa (or rice Krispies)
for home-made puffed quinoa, click here

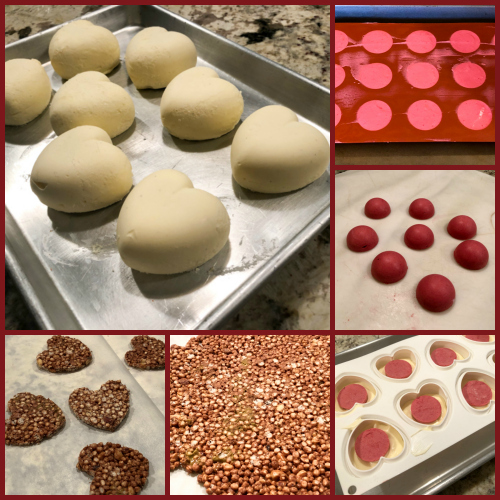
Bake the puffed quinoa in a 325 F oven for 10 minutes.  Meanwhile, melt the white chocolate in a microwave very gently. Mix the melted chocolate with the pistachio paste.  Add the quinoa and spread  in a 4 mm (1/8 inch) thickness in between two sheets of parchment paper. It will be a little sticky, try to level it as best as you can. When it is cooled down a bit, cut the exact dimension of the bigger mold you will use for the dessert. Reserve in freezer until  needed.

For the Raspberry Mousse insert:
2 g of Platinum gelatin (1 sheet)
100 g mashed raspberries (fresh or frozen), seeds sieved out
20 g granulated sugar
100 g whipping cream, cold

First, put the gelatin leaves, in a bowl with very cold water to bloom for 10 minutes.  In a small saucepan, heat the raspberry puree until it boils. Remove from heat, wait 5 minutes, drain the gelatin and add to the mixture. Mix until completely dissolved. Let cool to about 95 F.

Meanwhile, whip the cream to soft peaks. Gradually incorporate the cream into the raspberry mixture. Place the mousse in the semi-spheres and freeze overnight.

For the mascarpone mousse:
6 g Platinum gelatin (3 sheets)
80 ml whipping cream
55 g egg yolks
80 g granulated sugar
160 g mascarpone cheese
1/4 tsp vanilla paste
320 g heavy cream

Bloom the gelatin in cold water for 10 minutes. Combine egg yolks with sugar, whisking well and set aside. In a saucepan, heat 80 ml of cream until it boils. Remove from heat, and slowly pour a bit of the hot liquid into the egg yolk mixture, to temper it gently. Add the rest of the cream and transfer all the mixture to a saucepan.

Over low heat, cook until 180 F stirring constantly. Remove from heat, drain the gelatin, and add to the mixture, stirring until completely dissolved. Let the mixture cool down to around 140 F. Add the mascarpone cheese, mix until the cheese is incorporated. Process with a hand mixer, to emulsify. Add the vanilla paste, and let it cool to around 95 F.

Meanwhile, whip the 320 ml of cream to soft peaks. Incorporate the  cream gradually to the mascarpone mixture. Place in the mini-hearts mold, 1/2 to the volume, spread gently with a spoon around the sides to avoid air bubble.  Drop the frozen raspberry inserts, cover with mousse almost to the top, place the crunchy quinoa layer on top, press gently and freeze overnight.

For mirror glaze:
3 sheets Platinum grade sheet gelatin
120ml water
150 g liquid glucose
150 g granulated or caster sugar
1 tsp agar-agar
100 g condensed milk
150 g white chocolate, chopped fairly small
½ tsp titanium oxide (optional, but advisable)
red gel food coloring

Put the water, sugar, liquid glucose and agar-agar in a small pan and bring to simmering point, stirring occasionally to dissolve the sugar. Remove from the heat and let it stand for about 5 minutes. This is the base syrup for the glaze.  Meanwhile, soak the gelatin in some cold water for about 5 minutes. Squeeze out the excess water and stir into the hot water, sugar and liquid glucose mixture to dissolve. Stir in the condensed milk and the titanium oxide.

Put the chocolate in a medium bowl and pour this hot mixture slowly over the chocolate, stirring gently to melt it, avoid making bubbles. Add the red food gel dye. A stick immersion blender works great, but you must keep the blades fully submerged at all times. If bubbles are present, pass the mixture through a fine sieve.

The ideal temperature to glaze is 92 to 94 F. Glaze the frozen mousse cakes, decorate with sprinkles if desired.

Defrost 2 hours in fridge before serving.

 ENJOY!

to print the recipe, click here

Comments: For this dessert I used a mini-heart mold from Silikomart and a mini-half-sphere mold. The mini-heart mold I bought came with a cookie cutter with the exact dimension to made a cookie base. I am not sure every single mold sold comes with the cutter (I got mine at ebay a while ago), but any heart-shaped cookie cutter will work, if the dimensions are approximately right.

Start your preparation two days before serving, by making the raspberry centers. In this case I used a mousse, which tones down the sharpness of the raspberry a bit. If you prefer a sharper, more intense taste, consider using just the puree thickened with gelatin, like I shared in this post. You can also make the crunchy base with puffed quinoa (or rice Krispies) and the sable base two days in advance. Or even earlier. Stick the crunchy layer in the freezer, keep the sable at room temperature.

The day before serving make the mascarpone mousse and assemble the little cakes. Freeze everything and if you want to make your life very easy on serving day, prepare the mirror glaze emulsion and store it in the fridge.

On serving day, glaze those babies and keep in the fridge to defrost for a couple of hours. It is a process I love making, no matter how many times I do the mirror glaze thing, I am always in awe…

I had to add sprinkles because that’s how I roll… Also, they work wonders if you have a small boo-boo here and there on the glaze. Just drop a silver star on it, and call it a day.

You could omit the crunchy later with puffed quinoa but it is so simple to make and it does add a lot to the dessert. You can buy puffed quinoa or quickly make some, following the instructions here. If you don’t have  pistachio paste, use a bit of almond butter softened in the microwave just to make it a tad more spreadable. It won’t be exactly the same, but it will work.

I am pretty happy with the way these little hearts turned out. Both mousses combined well in flavor and texture. If you don’t have the hear-shaped mold, use large half-spheres. You can also go for dessert rings and make the insert as a smaller component with any shape that is convenient for you. Just keep in mind the volumes you will need. Every component can be scaled up easily if necessary, but the raspberry mousse already makes more than you’ll need for 8 mini-cakes. I had enough for 15 inserts and only used 8.  Leftovers are in the freezer, patiently waiting for a next opportunity to play.

Finally, when you pour the mirror glaze, do it over a baking sheet lined with Saran wrap, so you can easily store leftovers. They freeze well and if you accumulate several colors you can go Pollock on your next dessert…

ONE YEAR AGO: Blue Moon Milk

TWO YEARS AGO: Slow-Cooked Chicken Meatballs

THREE YEARS AGO: Zesty Flourless Chocolate Cake

FOUR YEARS AGO: Maple Pumpkin Pecan Snacking Cake

FIVE YEARS AGOSilky Gingered Zucchini Soup

SIX YEARS AGO: Sweet Fifteen!

SEVEN YEARS AGO: Sesame and Flaxseed Sourdough

EIGHT YEARS AGO: Green Beans with Miso and Almonds

NINE YEARS AGO: Saturday Morning Scones

TEN YEARS AGO: White Bread


TROPICAL SUNSHINE ENTREMET CAKE

I know, winter is still with us, and it will be for a while. But I cannot resist a shout to what’s to come in a few weeks. This entremet cake celebrates summer in a tropical paradise, any paradise of your choice. Coconut and passion fruit, for a creamy and refreshing mousse cake.

TROPICAL SUNSHINE ENTREMET CAKE
(from the Bewitching Kitchen, adapted from several sources)

Silikomart mold:  Lady Queen

Two days before – make passion fruit insert and freeze.

One day before – make cake layer and coconut  mousse. Assemble cake and freeze. 

Showtime Day – make mirror glaze, glaze cake and defrost before serving

For coconut dacquoise layer
140g egg whites
½ tsp cream of tartar
170g  sugar
80g almond flour
60g desiccated coconut (I used coconut powder, a product from Sri Lanka)
28g  all purpose flour, sifted
20g butter, melted and cooled

In the bowl of a stand mixer fitted with a whisk attachment, place the egg whites, cream of tartar and whisk until foamy and a trail starts to form as the beater goes through the egg whites  Gradually add in the sugar until firm peaks form. Gently fold the almond meal, desiccated coconut and flour into the egg whites in 3-4 additions. Fold some of the mixture into the melted butter before adding back into the rest of the mixture and folding until combined.

Spread into a half Flexipat or a lined baking tray and bake at 400 F°C for about 9 min.  Cool,  freeze for 10 min and cut in the appropriate shape to fit the bottom of the mold. You will have cake leftover.

For passion fruit cremeux:
160g passion fruit juice/pulp
4g gelatin + 20ml cold water
100g sugar
4 egg yolks
20g cornstarch
120g butter, softened
1 teaspoon vanilla extract

Bloom the gelatin in cold water.

Bring the passion fruit juice to the boiling point in a saucepan. In the meantime, mix the egg yolks with sugar until pale. Add the cornstarch and mix well. Pour the hot passion fruit puree over the egg yolk mixture then return back on heat and cook on low just until thickened and it reaches 185 F.

Remove from heat and stir in the gelatin. Allow to cool down to 105F then add the butter and mix well. Pour the cremeux into the smaller mold of the kit Lady Queen.

For coconut mousse:
1 can coconut milk – approx 400ml
10g gelatin + 50ml cold water
2 egg whites
120g granulated sugar
60ml water
1 teaspoon vanilla extract
150ml heavy cream, whipped to consistency of melted ice cream

Bloom the gelatin in cold water.

Heat up the coconut milk just until warm then remove from heat and stir in the gelatin and vanilla. Let it cool while you make an Italian meringue. Boil the sugar and water in a saucepan until it reaches 240 F.

While the sugar syrup cooks, whip the whites until fluffy. Pour the hot syrup over the whipped whites and continue mixing for a few more minutes until glossy and stiff. Fold the whipped cream into the coconut milk mixture then add the meringue.

ASSEMBLE THE CAKE
Place coconut mousse in the large Lady Queen mold filling halfway. Carefully drop the frozen insert. Fill with mousse almost to the top, cover with the cake.

Freeze the whole thing overnight. Un-mold and glaze on the day you want to enjoy the cake.

For mirror glaze:
3 sheets Platinum grade sheet gelatin
120ml water
150 g liquid glucose
150 g granulated or caster sugar
1 tsp agar-agar
100 g condensed milk
150 g white chocolate, chopped fairly small
½ tsp titanium oxide (optional, but advisable)
yellow and orange gel food coloring

Put the water, sugar, liquid glucose and agar-agar in a small pan and bring to simmering point, stirring occasionally to dissolve the sugar. Remove from the heat and let it stand for about 5 minutes. This is the base syrup for the glaze.  Meanwhile, soak the gelatin in some cold water for about 5 minutes. Squeeze out the excess water and stir into the hot water, sugar and liquid glucose mixture to dissolve. Stir in the condensed milk and the titanium oxide.

Put the chocolate in a medium bowl and pour this hot mixture slowly over the chocolate, stirring gently to melt it, avoid making bubbles. A stick immersion blender works great, but you must keep the blades fully submerged at all times. If bubbles are present, pass the mixture through a fine sieve. When the glaze is at around 105 F, separate a small amount to dye yellow and a small amount to dye orange. Add them on top of the white glaze, do not mix too much, just a delicate swirl with a chopstick.

The ideal temperature to glaze is 92 to 94 F. Glaze the frozen cake. Defrost 2 hours in fridge before serving.

ENJOY!

to print the recipe, click here

Comments: I used a Silikomart mold kit called “Lady Queen“, but you can improvise and make it in a circular mold with the insert made in a smaller ring. Or make individual semi-sphere cakes. The amounts I am giving you will leave you with some leftover coconut mousse, which freezes well in small amounts if you’d like to have a simple dessert later. The passionfruit insert is just right for the kit.

I really liked the way this cake turned out. Full disclosure: the chocolate decorations were added to hide some capital sins. I made a few wrong assumptions about the amount of glaze needed. The cake is only 7 inches in diameter, smaller than most cakes I am used to mirror-glazing, so I did a single batch of glaze. It is ok if you use a single color, but to make a white, yellow and orange with enough to cover all sides, it would be better to have about 25% more. However, I do believe you can get by with the exact amount I include in the recipe, IF you pay attention to the glaze as it drips down the sides, to notice right away if there are gaps. I was way too optimistic and careless. When I realized the gaps, it was time for a big adrenaline rush, followed by quickly scraping glaze from the baking sheet, and trying to fix as many boo-boos as possible. Good thing I had some tempered chocolate decorations in the freezer, so I put them to use. I am also quite grateful for the absence of cameras during baking disasters at home. Feels amazing to be able to deal with them without having to channel my inner Lucille Ball.

The dacquoise had a very nice coconut flavor and great texture. I think the mousse was a perfect match for the passionfruit cream, both in color and flavor. The way the mold is designed makes it for a pretty large insert, so it ended up a bit heavy and had a tendency to sink to the bottom. I believe they could have made the insert a tad smaller, but who am I to criticize Silikomart? Pouring less volume in the insert could be a solution, but it will have a higher chance to break as you un-mold it.  Overall, those are minor details and I am ok with the way it all worked.

This Tropical Sunshine Entremet Cake was the first dessert in the Mondays with Sweetness 2020 series. I hope our colleagues enjoyed it.


ONE YEAR AGO: Freekeh with Zucchini and Almonds

TWO YEARS AGO: Salmon a la Wellington, re-visited

THREE YEARS AGO: The Unbearable Unfairness of Cake Baking

FOUR YEARS AGO: Hermit Cookies

FIVE YEARS AGO: Cremini Mushroom Meatloaf

SIX YEARS AGO: Ottolenghi & Tamimi’s Roast Chicken with Clementines

SEVEN YEARS AGO: Eight-Ball Zucchini: The Missing Files

EIGHT YEARS AGO: Grilling Ribbons

NINE YEARS AGO: Peppery Cashew Crunch

TEN YEARS AGO: Ossobuco Milanese: an Italian Classic

SANTA HAT MINI-MOUSSE CAKES

In case you’ve missed my big announcement:
7 days to showtime!

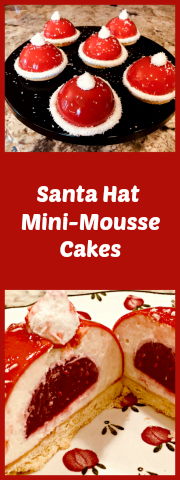
I believe that once Thanksgiving is over, we are allowed to go deep into all sorts of end of the year festivities. Christmas included. Having said that, I am ready to share little mousse cakes I’ve been flirting with for a couple of years. As I stumbled on cute examples on Pinterest, Instagram, and food blogs, I kept telling myself I had to give them a go. My version pairs white chocolate mousse (plus a touch of yogurt) with raspberries. I had a lot of fun making them, and even more fun sharing with our colleagues from the department.

SANTA HAT MINI-MOUSSE CAKES
(adapted from several sources, main inspiration from Lilicakes)

For the sable base:
100g icing sugar
½ tsp vanilla paste
150g unsalted butter
50g egg yolks
50g almond meal
250g all-purpose flour

Place the icing sugar, vanilla bean paste and butter in the bowl of a stand mixer and mix until there are no lumps of butter left. Add in the egg yolks and combine before adding the almond meal and plain flour. Continue beating until it just comes together. Remove the dough from the stand mixer and place on top of a silicone mat, press it gently in a rectangle shape.

Add a very small amount of flour on top of the dough, add a piece of parchment paper on top and roll it to 3mm thickness. Cut circles slightly bigger than the size of your dome cakes.  Freeze for 10 min. Bake in a 350F oven for around 8 minutes, until you get a slight golden color on the edges. Let it cool completely on a rack.  Can be prepared a couple of days in advance.

for the raspberry insert (make the day before assembling):
175g raspberry puree (I used frozen, processed and sieved)
15g maple syrup
3 sheets gelatin (Platinum grade)

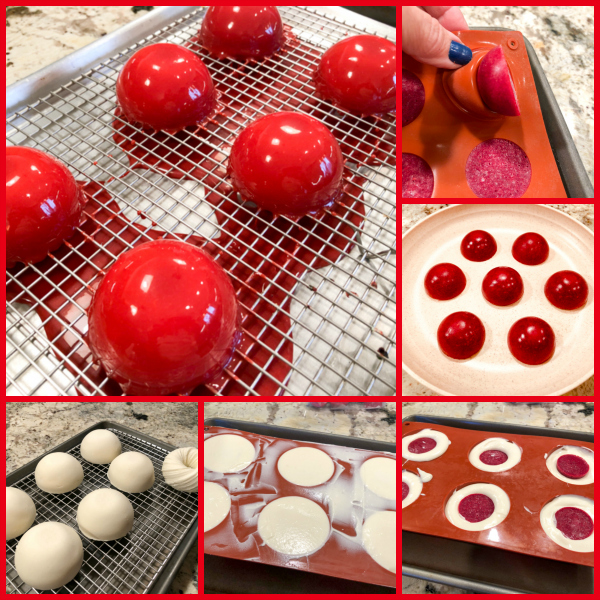
Soak gelatin leaves in cold water for 10 min. Bring the raspberry puree and maple syrup to a gentle boil, remove from heat, let it stand for 5 min to cool down slightly. Add the drained gelatin and mix well. Place the mixture in semi-sphere molds appropriate to place in the center of your dome cakes. Freeze overnight or for at least 4 hours.

for the white chocolate mousse:
110 grams of cream cheese at room temperature
200 grams of Greek yogurt at room temperature
225 grams of white chocolate
6 grams of gelatin leaves
50 grams of milk
180 grams of whipping cream
1 T sugar

Hydrate the gelatin leaves in very cold water for 10 mon. Mix the cream cheese and yogurt with in a KitchenAid type mixer with a paddle attachment until homogeneous. Reserve. In a saucepan boil the milk and add the previously hydrated jelly leaves, mix and add to the yogurt-cream cheese mixture. Mix for a minute or so to disperse the gelatin through.

Melt the white chocolate in the microwave and add to the yogurt mixture. Reserve. Whip the cream until it gets the consistency of melted ice cream. Fold gently into the yogurt mixture.

Assemble the mini-cakes:
Place mousse in six semi-sphere molds, filling a little more than half its volume. Place the frozen raspberry jelly in the center, fill with mousse and level the top with an off-set spatula. Freeze overnight.

for the marshmallow decorations.
9g powdered gelatin (I used fish gelatin, 250 bloom)
50g very cold water
60g egg whites at room temperature
17g  + 165g superfine sugar (divided)
50g water
35g glucose syrup or light corn syrup (light)
1 tsp Chambord (optional)

Bloom the gelatin in cold water for 10 min. It will form a thick paste.

Whisk the egg whites with 17 g of sugar until it foamy. Add the gelatin, whisk for another minute and turn the mixer off.

In a heavy saucepan, bring 50g of water, 165g sugar and glucose to a boil, making sure the sugar dissolves fully. Heat the mixture to 250F, when it gets to that point, turn the mixer on full speed and drizzle the hot syrup on it while whisking. Whisk at full speed for 3 minutes, add Chambord, continue whisking for 2 more minutes.

Add the marshmallow to a piping bag with an 8mm round tip. Pipe lines long enough to circle the diameter of your mold. Pipe little molds for the hats. Sprinkle dessicated coconut all over. Reserve at room temperature for about 3 hours.

For the mirror glaze:
3 sheets Platinum grade sheet gelatine
120ml water
150 g liquid glucose
150 g granulated or caster sugar
1 tsp agar-agar
100 g condensed milk
150 g white chocolate, chopped fairly small
red gel food coloring

Put the water, sugar, liquid glucose and agar-agar in a small pan and bring to simmering point, stirring occasionally to dissolve the sugar. Remove from the heat and let it stand for about 5 minutes. This is the base syrup for the glaze.  Meanwhile, soak the gelatin in some cold water for about 5 minutes. Squeeze out the excess water and stir into the hot water, sugar and liquid glucose mixture to dissolve. Stir in the condensed milk.

Put the chocolate in a medium bowl and pour this hot mixture slowly over the chocolate, stirring gently to melt it, avoid making bubbles. A stick immersion blender works great, but you must keep the blades fully submerged at all times. If bubbles are present, pass the mixture through a fine sieve.

Leave the glaze uncovered for an hour at room temperature for the glaze to cooled and be slightly thickened: if it is too runny you will get too thin a layer on top, colors will not blend well and less glaze will cling to the sides of the cake. The ideal temperature to pour the glaze is 92 to 94 F.

Remove the cake from the freezer, place on a rack over a baking sheet. If you like to make it easier to save leftover glaze, cover the baking sheet with plastic wrap, so that you can lift it and pour easily into a container.

Glaze the cakes, place them over the reserve sable cookies and decorate with the marshmallow.

Defrost in fridge for at least 2 hours before serving.

ENJOY!

to print the recipe, click here

Comments: I know, I know, the recipe is a mile long. Let me focus on a couple of points about it. First, I am kicking rules to the side and confessing to you that I will never chill my sable dough before rolling it out. It is a bit on the soft side once it comes out of the mixer, but trust me, it will be fine. Place it gently over Silpat. Roll it under parchment paper to the thickness you need, in this case 3mm. If you have those plastic pastry rolling guides, now is the perfect time to use them.  The more uniform the thickness, the better they will bake. Roll, cut and freeze. I actually made two batches of bases, one of them pistachio-based, but used the almond, lighter ones for this dessert.

One of the benefits of being in “that show”, is that I had to learn to work very fast and save time at every opportunity. I realized that as long as you protect the pastry dough either with plastic wrap or parchment paper (it truly depends on our goal, for pie crusts plastic wrap is the best way), it rolls pretty nicely as soon as mixed. Much better than cold dough does.  Ten minutes in the freezer is all you need before baking. There, I saved you at least one hour of work!

Second point I want to make: I adore mirror glazes but don’t care for their texture. Colette Christian has a beautiful macaron cookbook in which she advises using a bit of agar together with gelatin for macaron fillings, particularly if they will sit at room temperature for a while. I immediately thought about incorporating that trick into mirror glazes. And I am thrilled to tell you that the texture got a lot better. I will play with it in the near future to optimize it, but if you also like the look of mirror glazes but would prefer a more sturdy texture, think of adding a bit of agar. The only thing is that it needs to be boiled, so add it together with the sugar/glucose mixture.

These cakes turned out exactly the way I wanted them to, the only tricky part was placing the decorations, as marshmallow is super sticky. Just work slowly and keep in mind that wherever it sticks first, that’s where it will be… Be careful with the positioning of the string in the beginning, so that the angle is right to wrap it around keeping it nicely on the same level all the way.

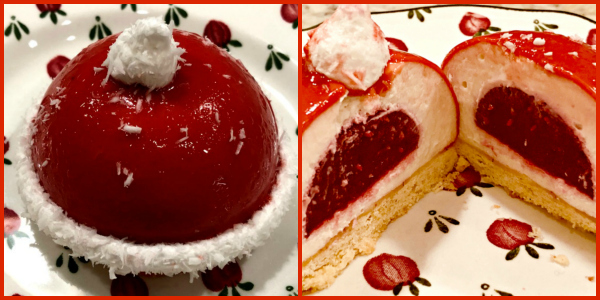
I cannot resist posting one more photo of the little Santa Hats, as the light bulb of my light stand made a cool effect on the mirror glaze…

The inclusion of agar-agar in the mirror glaze did a nice job improving the texture. Since my mousse cakes always sit in the fridge overnight before they are shared with our colleagues, the gelatin-based glaze suffers a bit. Whenever I  slice them, there is some bleeding and sliding of the glaze. This time it behaved a lot better, so thank you Chef Colette!

I hope you consider making some Santa Hats for your holiday get-together. As usual, this type of dessert can be prepared over several days, with very little hands-on work each day. As for the molds I used, the large ones are here, the small ones here. I had a little leftover mousse, which I froze into a pretty cute Silikomart mold, and served over a sable base, with a little spray of white chocolate velvet.

ONE YEAR AGO: Fun with Sourdough

TWO YEARS AGO: Pasteis de Nata

THREE YEARS AGO: New Mexico Pork Chile, Crockpot Version

FOUR YEARS AGO: Chocolate on Chocolate

FIVE YEARS AGO: Double Chocolate and Mint Cookies

SIX YEARS AGO: The Story of my first Creme Brulle’

SEVEN YEARS AGO: Sourdough Mini-rolls

EIGHT YEARS AGO: Focaccia with Sun-dried Tomatoes and Gorgonzola

NINE YEARS AGO: Mediterranean Skewers

TEN YEARS AGO Fettuccine with Shrimp, Swiss Chard, and Tomatoes


GIANT COOKIE MEETS MOUSSE

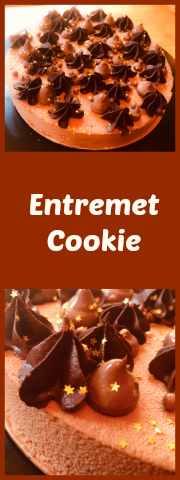
…and the Entremet Cookie is born! I cannot take credit for it, so before I even start talking about this delicious dessert, let me thank Maxime, from Empreintesucree.fr.  She is a professional pâtissière who shares very detailed recipes of her beautiful productions. If you are a bit intimidated by entremet type cakes, this one is an excellent starting point, especially if you simplify the decoration steps (see comments). I guarantee it will still impress your guests.

ENTREMET COOKIE
(slightly modified from Empreintesucree.fr)

for the cookie base:
80 g butter (at room temperature)
65 g muscovado sugar
a pinch of salt
1 egg (55 g)
120 g all purpose flour
2 g baking powder
90 g dark chocolate mini chips

for the chocolate cream:
1 egg yolk
10 g of sugar
100 g heavy whipping cream
38 g dark chocolate (I used Lindt 70%)

for the dark chocolate buttercream:
6 Tablespoons unsalted butter, softened
290 g confectioners’ sugar
90 g unsweetened cocoa powder
1/3 cup whole milk
2 teaspoons vanilla extract
1/4 teaspoon salt

for the chocolate mousse:
180 g Caramelia chocolate (or milk chocolate of  your choice) of milk chocolate
250 g heavy whipping cream

for the chocolate velvet spray (optional)
120 g milk chocolate (I used Caramelia)
80 g of cocoa butter

for decoration:
golden stars
chocolate Crispearls

Suggested timeframe: make cookie two days before serving time and freeze it. The day before serving make the mousse, and the chocolate cream. Assemble the cake and save the cream in fridge until cake is un-molded.  On serving day make the chocolate buttercream, and the chocolate spray suspension (if using).

Make the cookie base. Heat the oven to 350 F. Cover a cookie sheet with parchment paper  and place over it a 20 cm ring. Reserve.

In the bowl of a KitchenAid type mixer, cream the butter with the brown sugar and salt. Add the egg and mix again, then sift the flour with the baking powder and mix gently.  Add the mini chocolate chips, and spoon the batter inside the ring. (It is easier to just pour the batter over the parchment paper eye-balling the dimension, then sit the ring on top and use an off-set spatula to carefully spread it uniformly inside the ring).

Bake for about 15 minutes, until the edges start to get some color. Remove from the oven, and – using oven mitts – immediately make circles with the ring, which will make the cookie base shrink a little bit, as it is still hot. You just want to have the cookie a tiny bit smaller than the ring, so that the mousse will cover the edges fully.  Allow the cookie to cool completely before placing it in the freezer.

Make the chocolate cream.  Whisk the sugar and the egg yolk in a small bowl. In parallel, heat the cream in a small saucepan. Pour the cream over the sugar/yolk mixture to temper it, then transfer everything back to the saucepan. Cook the custard over low heat until 180 F.  Pour the cream over the chocolate until it is slightly melted and mix with a spatula.  Place a plastic film in contact with the cream and reserve it in the refrigerator. When ready to assemble, place in piping bag with a plastic adaptor and have two round piping tips ready, of different sizes.

Make the chocolate mousse. Melt the Caramelia chocolate gently in a double boiler.  Bring one third of the cream, about 80 g to a simmer in a saucepan. Pour the hot cream over the melted chocolate and mix with a spatula until fully smooth. Whip the remaining whipping cream until it gets the consistency of melted ice cream.  Pour half of the cream on your milk chocolate mixture and mix gently with a spatula. Add the remaining cream and mix again until you get a perfectly smooth chocolate whipped cream.

Assemble the dessert. Stretch a piece of plastic wrap on the 20cm circle ring, pulling it well to stretch it nicely.  Flip your circle over a baking dish that fits in your freezer and place a strip of acetate film on the inside to facilitate un-molding later. Pour all the mousse into the circle, then smooth roughly. Take the cookie out of the freezer and push it upside down into the foam (the smooth side of the cookie up). The mousse should be flush with the cookie, smooth over what is needed. Reserve the dessert in the freezer overnight.

Make the dark chocolate buttercream. In the bowl of a stand mixer fitted with the paddle attachment, beat the butter on medium speed until it is smooth. Turn the speed to slow, add the icing sugar and cocoa powder and beat until combined. Pour the milk and vanilla extract then add the salt and continue beating until well combined. Increase the speed to high and beat the frosting for a couple of minutes. Place in a piping bag fitted with a 1M tip or another star-shaped tip of your choice.

Make the chocolate suspension for velvet effect.  Melt milk chocolate and cocoa butter in a double-boiler. Filter and place the mixture into the tank of your sprayer. Temperature should be 98 F. Un-mold your dessert and immediately spray the chocolate on it. Ideally, do this inside a dishwasher with racks removed. Decorate the cake with the cream and buttercream, add sprinkles of your choice. Leave in the fridge to thaw for at least one hour before serving.

ENJOY!

to print the recipe, click here

Comments: Well, I do realize that it seems a bit of a stretch to post this recipe as simple and then come up with quite a few components to make it. As I mentioned, you can simplify it quite a bit. For instance, you can skip the two different types of piped decoration and do a drizzle of melted dark chocolate all over it. That would work well. A shower of golden sprinkles for fun and a bit of a dressed up look. The velvet spray is also optional. I find it fun to do, though, and it helps me deal with guilty feelings of having a sprayer sitting in the basement just for my patisserie adventures. It’s nice to put it to use.

On that note, three things are worth mentioning. First, you must strain the melted chocolate + cocoa butter before pouring it in the sprayer. If you look at my photo above, you’ll notice how much stuff gets retained in the sieve. That could conceivably clog the sprayer and you don’t want that at all. Second, if you are using a regular paint sprayer for chocolate work, the container is large, so what works very well is to place a much smaller plastic cup inside, so that you don’t need to make a huge amount of chocolate suspension. I used an empty Benecol container. And third, do the spraying inside an empty dishwasher, because it is a messy process and all you need to do after is turn the dishwasher on.

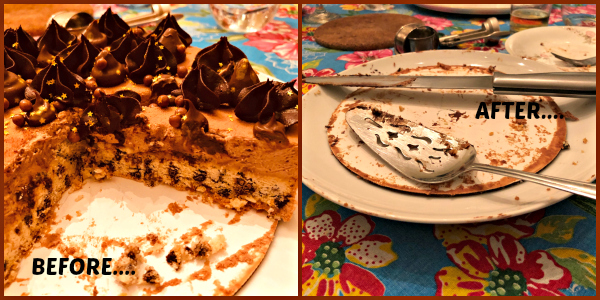
We took this cake to a dinner party at a friend’s home, so I snapped the pictures with my cell phone very quickly. I admit they are not prize-winning shots. At any rate, everybody raved about the dessert. The cookie component goes very well with the creamy mousse, and it had just the right thickness, don’t try to make it thinner because it won’t work the same way. I loved the contrast of the sharp cocoa buttercream with the milk chocolate cream and mousse, but the cake can shine with only one of the piped toppings.

Maxime, thanks for a lovely recipe, I am thinking of many variations in the future.

ONE YEAR AGO: The Brazilian Battenberg

TWO YEARS AGO: Salzburg Sourdough

THREE YEARS AGO: If I had One Hour

FOUR YEARS AGO: Apple Cinnamon Oatmeal Cake

FIVE YEARS AGO: Sourdough Rye Bread with Flaxseeds and Oats

SIX YEARS AGO: Apricot-Raspberry Sorbet: A farewell to Summer

SEVEN YEARS AGO: Marcela’s Salpicon

EIGHT YEARS AGO: Pork Kebabs

NINE YEARS AGO: Fondant au Chocolat

TEN YEARS AGOGot Spinach? Have a salad!


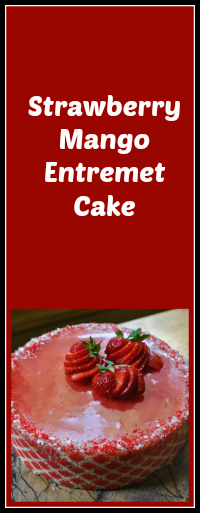
STRAWBERRY-MANGO ENTREMET CAKE

Pushing a little bit the boundaries of my comfort zone, with this cake I practiced making a pattern on the sponge component, baking a mango-flavored meringue, and using a gelatin-based topping. The basic recipe was from the book Modern French Pastry. The cake, called Moulin Rouge, is a looker. I modified the recipe quite a bit, so I share my version with you. Make sure to read my comments, as I consider this cake still a work in preparation.

STRAWBERRY-MANGO ENTREMET CAKE
(adapted from Modern French Pastry)

for the side-decoration:
50 g butter
56 g powdered sugar
60 g egg whites (about 2 eggs)
56 g all-purpose flour
red food coloring

Mix the butter and sugar in a Kitchen Aid type mixer with the paddle attachment until creamy. Add the egg whites very slowly, a little at a time. Clean the sides of the bowl often. Add the flour and gently mix on very low-speed, then add the food dye.  Lay the stencil you intend to use on a Silpat, or if drawing a pattern free-hand, lay the design on parchment paper to make it easier to draw with the batter.  Brush the batter on the stencil, then scrape all excess off with a bench scraper. You will not use all the batter made, but it is easier to work with more than you need.  Gently pull the stencil up. See my composite photo under the recipe.

Freeze the design for an hour or so. You can do this step the day before.  Do not remove from the freezer until you are ready to bake the cake layer.

Joconde Cake Layer
65 g powdered sugar, sifted
36 g pastry flour
65 g almond flour
100 g eggs  (whole eggs, at room temperature)
120 g egg whites (from about 4 eggs)
30 g granulated sugar
75 g unsalted butter, melted and cooled

Heat the oven to 400 F. Add powdered sugar, flour and almond meal to the bowl of a mixer. Mix gently to incorporate them.  Add the eggs and beat on high-speed for about 5 minutes, until very fluffy. Reserve.

Make a meringue with the egg whites and sugar, bringing it to soft peaks. Start with the egg whites in the mixer on low-speed, increase to medium, once you see a trail forming as the mixer is going, start adding the sugar slowly.  Once you get to soft peaks, stop. Over-beating the meringue will make it hard to incorporate it in the cake batter.  Gently fold the meringue on the egg-flour mixture that you reserved.  Add a bit of the mixture to the bowl with melted butter, mix gently. Pour that into the cake batter and gently fold.

Remove the stencil design from the freezer, pour the batter over it, trying to level it as best as you can with an off-set spatula. You want to keep the air incorporated in the batter, so be gentle. Run the spatula just over the surface, you don’t want to risk disturbing the pattern underneath it.

Bake for 12 to 14 minutes. You need to start noticing a little browning on the surface, but not much. If you notice the edges getting crunchy, remove from the oven. Let it cool before proceeding.

Mango-Flavored Meringue
30 g powdered sugar, sifted
30 g pulverized freeze-dried mangos (use a food processor)
80 g egg whites
80 g granulated sugar

Heat the oven to 350 F. Trace two 8 inch circles on parchment paper, and place it over Silpat. Prepare a large piping bag fitted with either a large (1/2 inch) piping tip, or just cut the bag with that dimension.

Mix the powdered sugar with the pulverized mango and reserve.  Make a meringue with the egg whites and sugar as described for the Joconde layer. There is a lot of sugar in this version, so you don’t have to worry about over-beating.  Once you get to stiff peaks, mix the mango-sugar mixture, folding it delicately. 

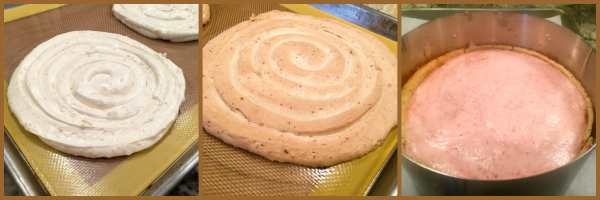
Spoon the mixture in the prepared piping bag, and pipe it on the Silpat, in each of the circles, starting from the center.  Leave a little border empty, as you want the meringue to be smaller than the diameter of the cake. You can see in the central picture of the meringue composite that the pencil drawing is about 0.5 inch larger. You could conceivably draw a smaller circle, but it is easier to see where you are and stop short, then risk going too much over it. Still, do whatever feels better for you.

Bake for 20  to 22 minutes. Meringue should feel dry to the touch and just be starting to brown.

Strawberry Mousse
12 g powdered gelatin
60 g cold water to boom gelatin
350 g strawberry puree (use the food processor)
175 g powdered sugar
350 g heavy cream

Combine gelatin with cold water and allow it to bloom for a few minutes. Place the strawberry puree in a saucepan, add the powdered sugar and mix gently over low-heat until warm.

Whisk the cream in a Kitchen Aid type mixer to soft peaks. Do not over-beat.  Reserve.

Melt the gelatin in a microwave, in very short bursts, keeping a close eye, as you don’t want it to boil, just melt smoothly.  Add some of the strawberry puree to the gelatin to incorporate it in, then pour the mixture into the rest of the puree. Mix gently, but well, you want the gelatin to be fully distributed throughout the fruit.  Add 1/3 of the puree to the whipped cream, fold. Add the remaining of the puree, fold gently. The mousse is now ready to use.

Strawberry Gelatin Topping
5 g powdered gelatin
25 g cold water
75 g soaking syrup (water and sugar in equal weights, dissolved by heating)
75 g strawberry puree (passed through a sieve to remove seeds)
red food dye, just a tiny drop (optional)

Combine the gelatin with water to bloom for a few minutes. Heat the soaking syrup, add the gelatin and stir until fully melted. Slowly stir the strawberry puree, and the food coloring, if using. Refrigerate until needed. When ready to finish the cake, warm it in a microwave in very short bursts of heat, until it’s about 90 F.

ASSEMBLING THE CAKE
Dust the cold Joconde cake with granulated sugar. Place a parchment paper on top, and flip it. Remove the silicone sheet slowly, and marvel at the pattern that you see! Now you need to decide the dimension of the cake strips. In the book he recommends 1.75 inches, but I did about 2 inches. You need two strips of cake with the exact same dimension, and they will go around the perimeter of an 8-inch diameter cake ring.  With what is left of the cake, cut one circle a little smaller than 8-inches in diameter, as it will sit inside the perimeter laid by the cake strips.

Place an acetate strip inside the cake ring. Lay the cake strips with the design facing out, they should fit very snuggly, so it is best to allow them to overlap slightly, then force them into place. Now place one meringue ring at the bottom. Add one-third of the mousse over it. Top the mousse with the cake circle, the design can be facing up or down, it does not matter as you won’t see it.  Add another third of the mousse.  Place the second meringue ring on top, add the rest of the mousse, and spread as flat as you can, trying to make it almost leveled with the top of the cake strips.  Freeze overnight. If needed, you can trim the top of the cake layer with scissors before finishing the cake.

Remove from the freezer, and pour the warmed up strawberry topping. Do it quickly, as it will solidify. Remove the cake from the ring, pushing it from the bottom, gently but with authority… Place it on a serving platter, and decorate with freshly cut strawberries.

ENJOY!

to print the recipe, click here

Comments: You know that thrill of opening the lid of the Dutch oven and getting the first glimpse of the sourdough loaf inside? That is quite similar to the thrill of inverting the cake after baking, and peeling that Silpat to – hopefully – reveal the design. My heart was going at 100 bpm… The stencil I have is really big. I wish they made it in half-sheet size. I’ve been flirting with the idea of cutting it, as I will never need to lay such a huge pattern during my lifetime. Since it is so huge, I had to lay it over the Silpat on my countertop, with the stencil extending way beyond it, and making quite a mess on the granite. No way to avoid it, actually. But the process went more or less smoothly. I had to do it twice because on the first time I lifted the stencil too quickly and messed up the pattern on one of the sides. Live and learn.  Once the pattern is laid and frozen, the rest should go smoothly. The cake batter is poured right over the frozen design before it goes into the oven.

The meringue component was a bit challenging for me, particularly judging when the disk was properly baked. You do not want to have it too dark, because it gets brittle and breaks when moving it around. But under-baking is not a good idea. Mine was slightly over-baked in parts, but not fully baked in the center. I need to get a better “feel” for it, and also practice the piping to get a more uniform surface. Still, since the disk is hidden in the final dessert, any catastrophic events becomes a secret between the baker and the cake. What happens in The Bewitching Kitchen, stays in The Bewitching Kitchen.

I had to modify quite a few details in the recipe, mostly because the texture of my meringue was far from perfect. I strongly advise you to get the book if you enjoy this type of baking challenge, and try their version. Their meringue is flavored with coconut and black pepper (yes, you read that correctly). And they also add another layer of complexity with some jam. I say no more. You must get the book. Which, by the way, has one amazing recipe after another.  Like the one in the cover, yin and yang of mousse and fruits. Can you imagine bringing that to the table after a dinner party?

When I make this cake again, I will substitute the meringue layer for something else. Maybe a genoise with praline on top for texture. I have to agree with my friend Jennifer, that the meringue does not freeze as well as a sponge cake. For this type of entremet that needs to spend hours in the freezer, I think sponge layers work better. I cannot believe I am considering modifying a pretty complex cake recipe but… strange things happen in the universe. We are living in a twilight zone in ways that go beyond politics (wink, wink).

The topping reminded me of a mirror glaze, because you need to exercise patience and wait for it to cool to below body temperature. I actually find it easier to make it the day before, and warm it up for a few seconds at a time in the microwave, with super gently mixing (no whisking!), to avoid bubbles. Then it will be just a matter of minutes until you are done. Well, not actually you, but the cake.

The edges of my cake did not look as perfect as the picture in the book, so I added some sparkling sugar. Nothing like a little sparkle to cover sins. The flavor was spectacularly strawberry-ish, and the mango in the meringue a subtle added tropical bonus. By the way, when I was processing the dried mango to add to the meringue something quite funny happened. As I opened the processor, a fine dust of mango powder hit my nose. I got a severe case of…. Hiccups. Pretty funny. It passed quickly, though, but just in case you process dried mangos, avoid getting a deep sniff of the powder. Or, go for a full sniff and tell me if you get the hiccups too.

I feel I’m getting a little more comfortable with entremet cakes. The layers in this cake were better defined than my previous attempts, and the cake cut very nicely. Still,  there is a lot of room for improvement. One cake at a time, I hope to get there.

ONE YEAR AGO: Hommage to the Sun

TWO YEARS AGO: Tomato and Cucumber Salad with Almond Vinaigrette

THREE YEARS AGO: Eggplant Tomato Stacks

FOUR YEARS AGO: The Couscous that Wasn’t

FIVE YEARS AGO: Apple-Cinnamon Bread

SIX YEARS AGO: Blueberry Galette

SEVEN YEARS AGO: In My Kitchen, August 2011

EIGHT YEARS AGO: Journey to a New Home

NINE YEARS AGO: Friday Night Dinner