
…and the Entremet Cookie is born! I cannot take credit for it, so before I even start talking about this delicious dessert, let me thank Maxime, from Empreintesucree.fr. She is a professional pâtissière who shares very detailed recipes of her beautiful productions. If you are a bit intimidated by entremet type cakes, this one is an excellent starting point, especially if you simplify the decoration steps (see comments). I guarantee it will still impress your guests.
ENTREMET COOKIE
(slightly modified from Empreintesucree.fr)
for the cookie base:
80 g butter (at room temperature)
65 g muscovado sugar
a pinch of salt
1 egg (55 g)
120 g all purpose flour
2 g baking powder
90 g dark chocolate mini chips
for the chocolate cream:
1 egg yolk
10 g of sugar
100 g heavy whipping cream
38 g dark chocolate (I used Lindt 70%)
for the dark chocolate buttercream:
6 Tablespoons unsalted butter, softened
290 g confectioners’ sugar
90 g unsweetened cocoa powder
1/3 cup whole milk
2 teaspoons vanilla extract
1/4 teaspoon salt
for the chocolate mousse:
180 g Caramelia chocolate (or milk chocolate of your choice) of milk chocolate
250 g heavy whipping cream
for the chocolate velvet spray (optional)
120 g milk chocolate (I used Caramelia)
80 g of cocoa butter
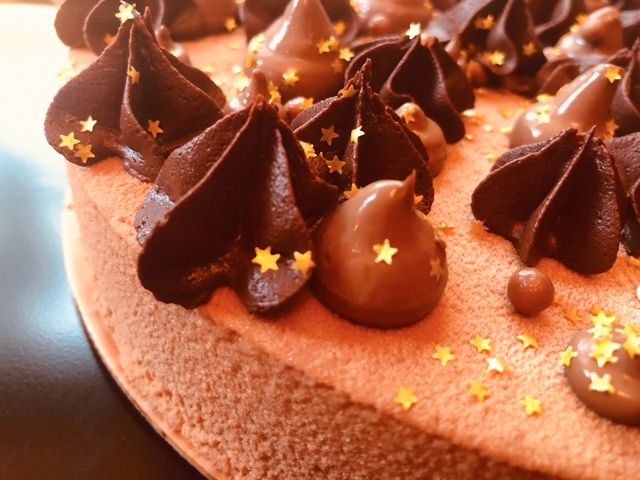
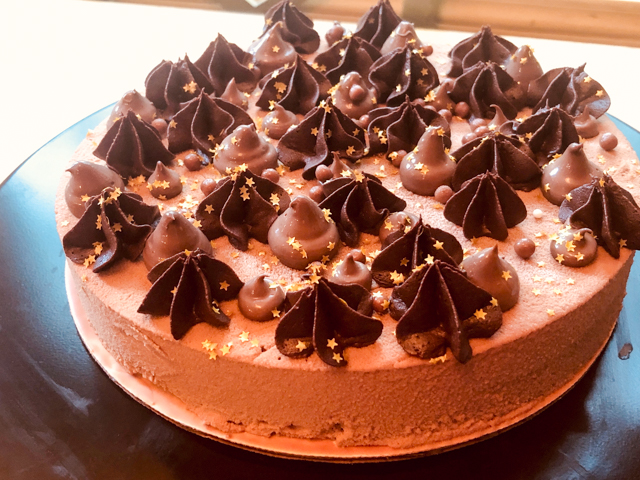
for decoration:
golden stars
chocolate Crispearls
Suggested timeframe: make cookie two days before serving time and freeze it. The day before serving make the mousse, and the chocolate cream. Assemble the cake and save the cream in fridge until cake is un-molded. On serving day make the chocolate buttercream, and the chocolate spray suspension (if using).
Make the cookie base. Heat the oven to 350 F. Cover a cookie sheet with parchment paper and place over it a 20 cm ring. Reserve.
In the bowl of a KitchenAid type mixer, cream the butter with the brown sugar and salt. Add the egg and mix again, then sift the flour with the baking powder and mix gently. Add the mini chocolate chips, and spoon the batter inside the ring. (It is easier to just pour the batter over the parchment paper eye-balling the dimension, then sit the ring on top and use an off-set spatula to carefully spread it uniformly inside the ring).
Bake for about 15 minutes, until the edges start to get some color. Remove from the oven, and – using oven mitts – immediately make circles with the ring, which will make the cookie base shrink a little bit, as it is still hot. You just want to have the cookie a tiny bit smaller than the ring, so that the mousse will cover the edges fully. Allow the cookie to cool completely before placing it in the freezer.
Make the chocolate cream. Whisk the sugar and the egg yolk in a small bowl. In parallel, heat the cream in a small saucepan. Pour the cream over the sugar/yolk mixture to temper it, then transfer everything back to the saucepan. Cook the custard over low heat until 180 F. Pour the cream over the chocolate until it is slightly melted and mix with a spatula. Place a plastic film in contact with the cream and reserve it in the refrigerator. When ready to assemble, place in piping bag with a plastic adaptor and have two round piping tips ready, of different sizes.
Make the chocolate mousse. Melt the Caramelia chocolate gently in a double boiler. Bring one third of the cream, about 80 g to a simmer in a saucepan. Pour the hot cream over the melted chocolate and mix with a spatula until fully smooth. Whip the remaining whipping cream until it gets the consistency of melted ice cream. Pour half of the cream on your milk chocolate mixture and mix gently with a spatula. Add the remaining cream and mix again until you get a perfectly smooth chocolate whipped cream.
Assemble the dessert. Stretch a piece of plastic wrap on the 20cm circle ring, pulling it well to stretch it nicely. Flip your circle over a baking dish that fits in your freezer and place a strip of acetate film on the inside to facilitate un-molding later. Pour all the mousse into the circle, then smooth roughly. Take the cookie out of the freezer and push it upside down into the foam (the smooth side of the cookie up). The mousse should be flush with the cookie, smooth over what is needed. Reserve the dessert in the freezer overnight.
Make the dark chocolate buttercream. In the bowl of a stand mixer fitted with the paddle attachment, beat the butter on medium speed until it is smooth. Turn the speed to slow, add the icing sugar and cocoa powder and beat until combined. Pour the milk and vanilla extract then add the salt and continue beating until well combined. Increase the speed to high and beat the frosting for a couple of minutes. Place in a piping bag fitted with a 1M tip or another star-shaped tip of your choice.
Make the chocolate suspension for velvet effect. Melt milk chocolate and cocoa butter in a double-boiler. Filter and place the mixture into the tank of your sprayer. Temperature should be 98 F. Un-mold your dessert and immediately spray the chocolate on it. Ideally, do this inside a dishwasher with racks removed. Decorate the cake with the cream and buttercream, add sprinkles of your choice. Leave in the fridge to thaw for at least one hour before serving.
ENJOY!
to print the recipe, click here
Comments: Well, I do realize that it seems a bit of a stretch to post this recipe as simple and then come up with quite a few components to make it. As I mentioned, you can simplify it quite a bit. For instance, you can skip the two different types of piped decoration and do a drizzle of melted dark chocolate all over it. That would work well. A shower of golden sprinkles for fun and a bit of a dressed up look. The velvet spray is also optional. I find it fun to do, though, and it helps me deal with guilty feelings of having a sprayer sitting in the basement just for my patisserie adventures. It’s nice to put it to use.
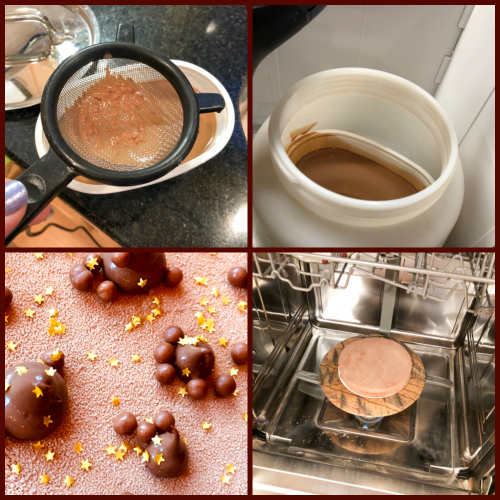
On that note, three things are worth mentioning. First, you must strain the melted chocolate + cocoa butter before pouring it in the sprayer. If you look at my photo above, you’ll notice how much stuff gets retained in the sieve. That could conceivably clog the sprayer and you don’t want that at all. Second, if you are using a regular paint sprayer for chocolate work, the container is large, so what works very well is to place a much smaller plastic cup inside, so that you don’t need to make a huge amount of chocolate suspension. I used an empty Benecol container. And third, do the spraying inside an empty dishwasher, because it is a messy process and all you need to do after is turn the dishwasher on.
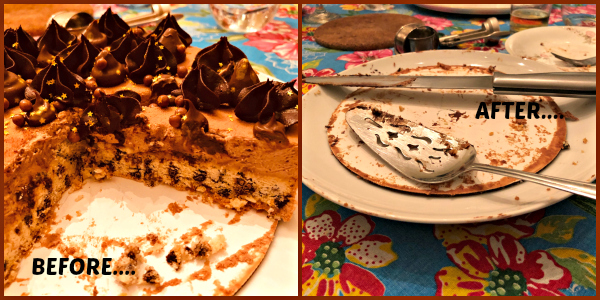
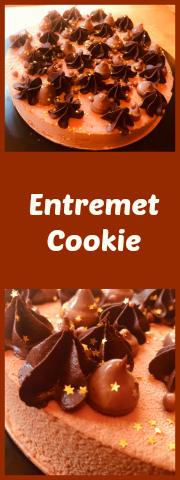
We took this cake to a dinner party at a friend’s home, so I snapped the pictures with my cell phone very quickly. I admit they are not prize-winning shots. At any rate, everybody raved about the dessert. The cookie component goes very well with the creamy mousse, and it had just the right thickness, don’t try to make it thinner because it won’t work the same way. I loved the contrast of the sharp cocoa buttercream with the milk chocolate cream and mousse, but the cake can shine with only one of the piped toppings.
Maxime, thanks for a lovely recipe, I am thinking of many variations in the future.
ONE YEAR AGO: The Brazilian Battenberg
TWO YEARS AGO: Salzburg Sourdough
THREE YEARS AGO: If I had One Hour
FOUR YEARS AGO: Apple Cinnamon Oatmeal Cake
FIVE YEARS AGO: Sourdough Rye Bread with Flaxseeds and Oats
SIX YEARS AGO: Apricot-Raspberry Sorbet: A farewell to Summer
SEVEN YEARS AGO: Marcela’s Salpicon
EIGHT YEARS AGO: Pork Kebabs
NINE YEARS AGO: Fondant au Chocolat
TEN YEARS AGO: Got Spinach? Have a salad!


