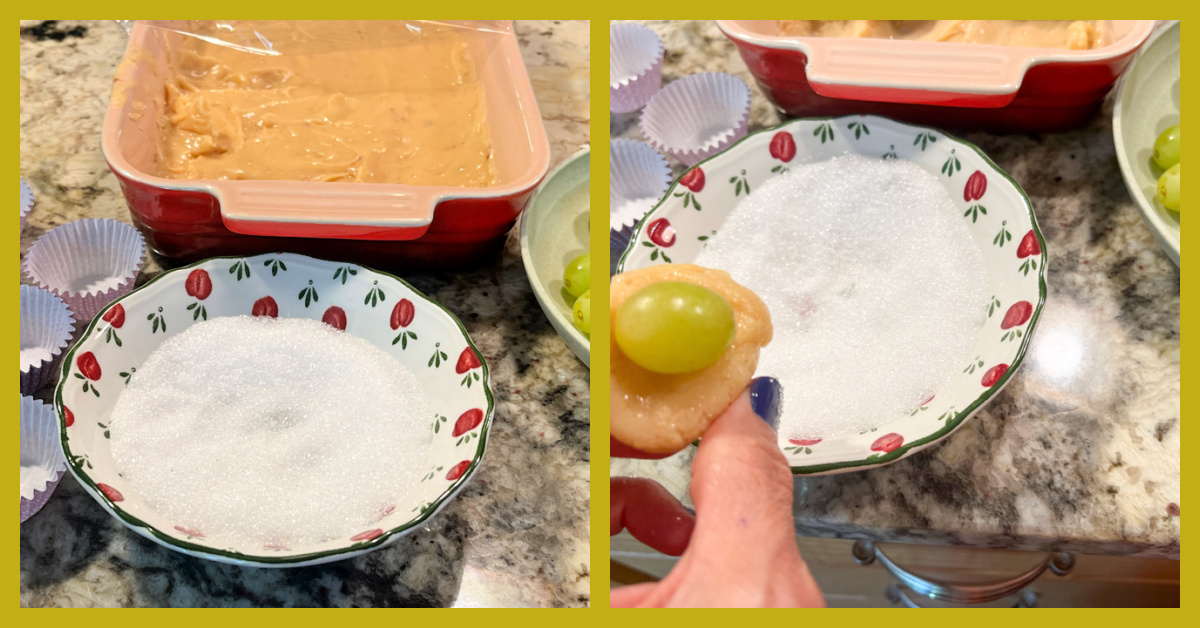
Surpresa de uva means “Grape Surprise”. It is essentially the most traditional of all Brazilian sweets – the brigadeiro – hiding a full grape inside. Everybody back home loves it, but I must admit this was my first time trying one. It was not “a thing” when I was growing up a few years ago (cough, cough). We loved it so much that the husband requested me to work on a “blueberry surprise.” I am on it!
SURPRESA DE UVA (from the Bewitching Kitchen)
1 can condensed milk 1 tablespoon butter 2 tablespoons heavy cream 1/3 cup white chocolate, cut in small pieces pinch of salt 16 to 20 small seedless green grapes sanding sugar to coat sprinkles to decorate (optional)
Add the condensed milk, butter, heavy cream, chocolate and salt to a heavy non-stick pan and cook, stirring constantly over medium to low heat, until bubbly and the mixture starts to release from the sides of the pan. Once that happens, lower the heat as low as it will go, and keep stirring for another couple of minutes.
Remove from heat, transfer to a small baking dish to cool faster. Place in the fridge if you like to speed up the cooling process. Once at room temperature, grab small amounts with a spoon, spread on the palm of your hand and place a grape in the center. Carefully roll the mixture around (wet hands help), enclosing the grape. Roll on sanding sugar. Decorate with a sprinkle, if so desired.
They will keep at room temperature for a day or two, many days in the fridge, and even longer frozen.
Comments: These are sooooo delicious! Brigadeiro is sweet, very sweet. The inclusion of the grape is brilliant, it cuts the sweetness with just the right amount of fresh. I envision a blueberry version in the future, trying to imagine the right flavor of brigadeiro to enclose it with. Stay tuned!
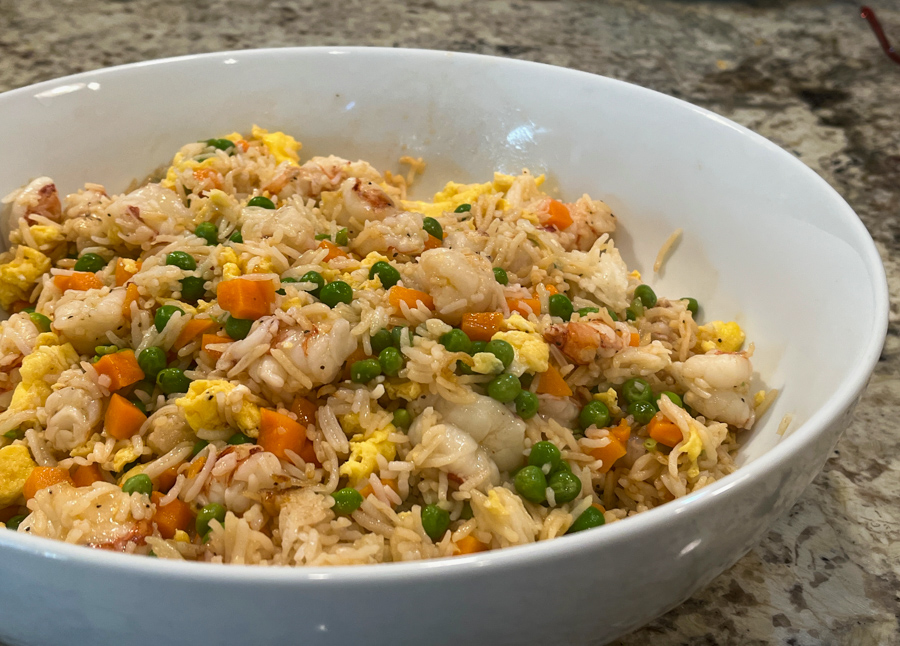
I jumped on this recipe right after I read the blog post in Karen’s site, because I knew we would love it. I modified it just a tiny bit, to adjust to our digestive issues – omitting garlic and onions. Visit her site for the regular version if you like. Fried rice with all kinds of different flavors is a dish I adore but very rarely order in restaurants because it is so heavy. And at the same time so easy to over indulge because one helping is never enough. I find myself going back for another little morsel of egg, another bite of shrimp, or chicken, and of course the rice just tags along… Plus the restaurant versions are normally loaded with too much oil and cornstarch-thickened sauce. Not that there’s anything wrong with it, but for the most part a couple of hours later I am not feeling too perky… This version has all the goodies, but is considerably lighter. Using the shortcuts recommended by Karen turns it into one of the easiest dinners to prepare. Make it, and you can thank her later…
10 ounces jumbo shrimp, cut into thirds 1/4 teaspoon salt 1/8 teaspoon pepper 1/2 teaspoon cornstarch 3 tablespoons neutral oil such as peanut, divided 3 eggs, beaten 1 tablespoon ginger, minced 12 oz microwavable-ready to serve rice 1 package (12 ounces) frozen peas and carrots, thawed 1 tablespoon soy sauce 1 tablespoon rice vinegar 2 teaspoons toasted sesame oil
Toss the shrimp in the salt, pepper, and cornstarch and let marinate for 10 minutes.
Heat a wok or large skillet over medium high heat. When it is hot enough for a bead of water to evaporate instantly, add one tablespoon of the oil and swirl to coat. Add the shrimp and spread it out into a single layer. Let fry, untouched, for 30 seconds. Stir-fry the shrimp for an additional minute, until almost cooked through. Remove the shrimp with a slotted spoon to a plate.
Reheat the pan and add another tablespoon of the oil. Add the eggs and swirl the pan to spread the eggs out to a thin layer. When they are almost cooked through, remove them to the same plate as the shrimp. Cut them into approximately 1 inch pieces.
Add the last tablespoon of oil. Add the ginger, cook for a few seconds, then add the rice and stir to incorporate the ginger. Spread and press the rice over the surface of the wok and let it cook, untouched, for about one minute. Toss the rice, respread it, and let it cook for an additional minute, untouched.
Add the soy sauce and toss with the rice. Add the peas and carrots, the cooked eggs, the almost-cooked shrimp, the rice vinegar, and the sesame oil. Stir fry all of the ingredients together to heat through and completely cook the shrimp. Adjust seasoning with salt and pepper and serve.
Comments: Above you see the rice I used, which was surprisingly tasty. I don’t normally buy this type of product but Karen’s post made me open my horizons. If you are in a hurry, this is the perfect shortcut ingredient. Same goes for the frozen peas and carrots. Leftovers were great next day too. I am a bit picky about seafood leftovers, but the shrimp held up ok. Not sure I would enjoy leftovers with salmon or another type of fish, but maybe your tastebuds are more user-friendly than mine.
I love this type of meal that is one bowl with everything: carbs, veggies, animal protein. Of course, you can make a vegetarian version using mushrooms or seared tofu, the basic mixture will shine no matter what…
Karen, I don’t know how many recipes I’ve made from your blog, including breads, sweets, savory stuff, but this one is another big winner! THANK YOU!
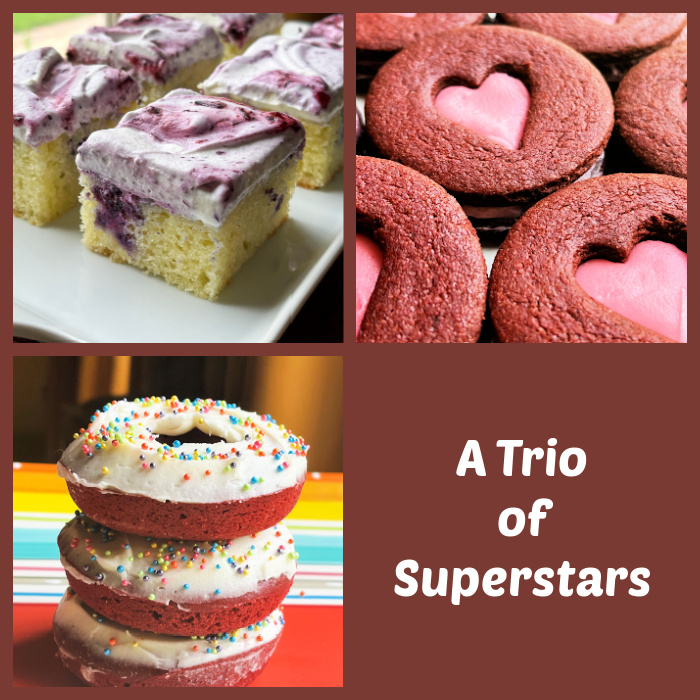
Today my blog pays homage to three amazing bakers who put great effort into each post they compose. Their blog articles end up as detailed tutorials that allow even a beginner baker to tackle what might seem very intimidating at first. I share three recipes, in the chronological order I baked them in the past couple of months.
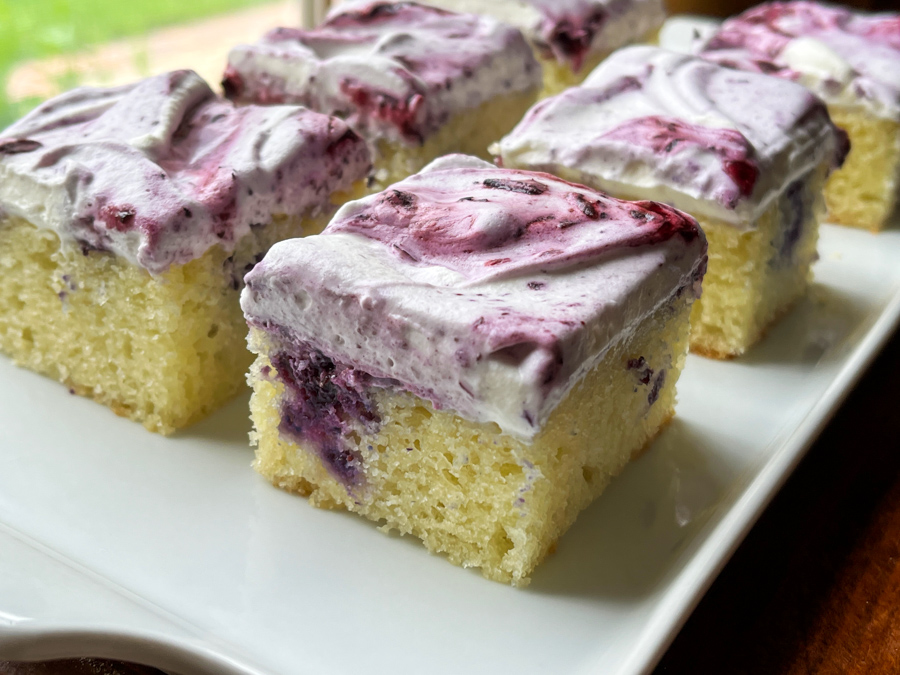
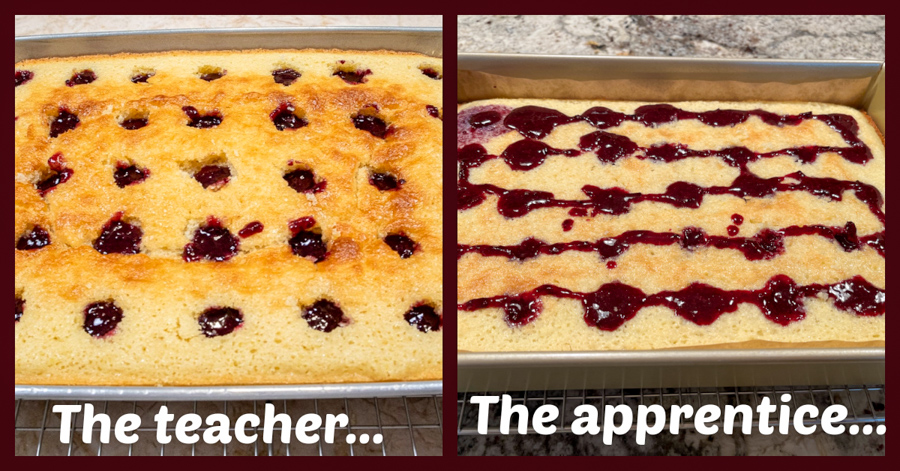
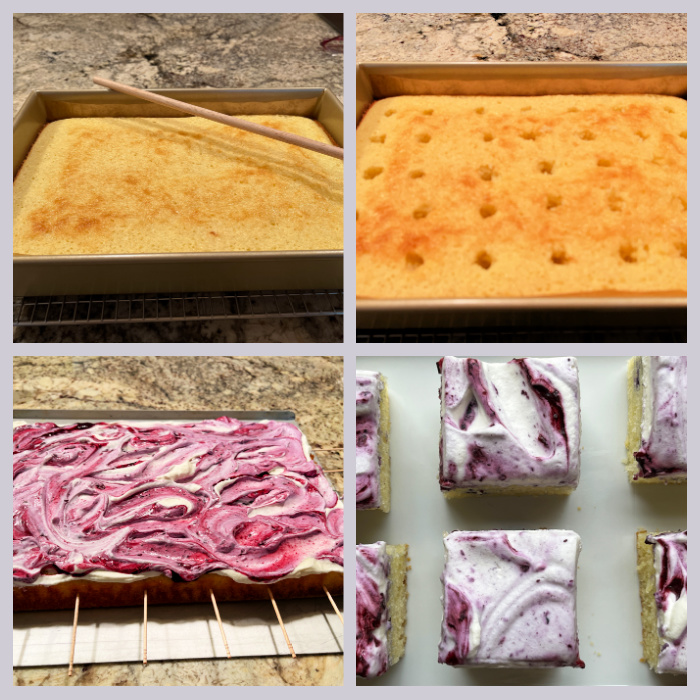
SUPERSTAR BAKER #1 HELEN FLETCHER BLUEBERRY LEMON POKE CAKE
BLUEBERRY LEMON POKE CAKE
One of the tastiest cakes baked in our kitchen, and I am not exaggerating. Moist. Sweet to the perfect level. Luscious. Everything works in this cake. For the recipe and very detailed tutorial, visit Helen’s blog with a click here. You will make a blueberry jam to fill the cake, and I advise you to give enough time to allow it to set a bit, just to make it easier to work with…. Below, a little comparison between Helen’s neat work and yours truly… my jam was still bit too loose. No major harm done, though, I just thought it was funny to share.
Helen’s site and her cookbooks are a constant source of inspiration for me. Plus, she is tremendously helpful and whenever I get into trouble I drop her an email. She has rescued me more than once. A lot more than once (wink, wink).
Every once in a while, Helen offers online classes, and I’ve taken a couple of them. One of my favorites was last year, in which she taught how to make Chocolate Tartlets with a caramel filling. A thing of pure beauty and absolutely decadent! Make sure to subscribe to her blog, so you get notification of upcoming classes.
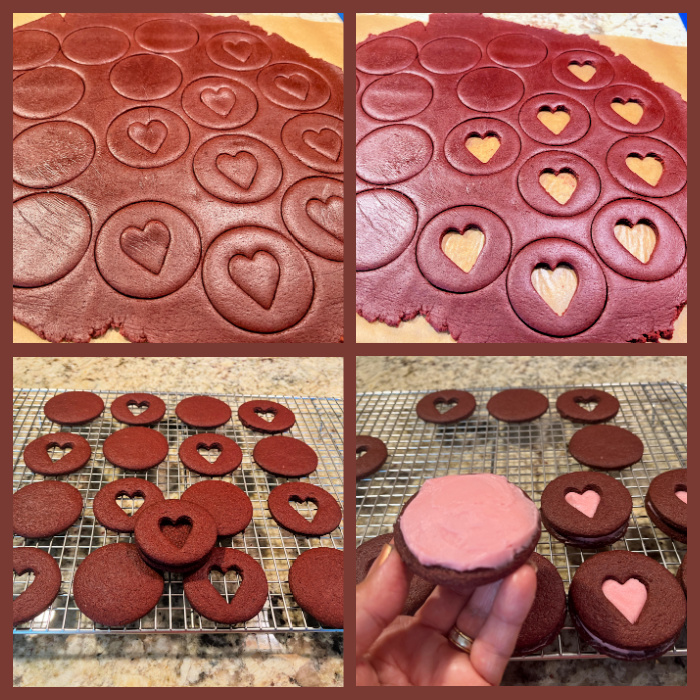
SUPERSTAR BAKER #2 CAROLINE RED VELVET OREO STYLE SANDWICH COOKIES
RED VELVET OREO STYLE SANDWICH COOKIES
Absolutely delicious, you can make them without the cutouts if you’d like to simplify your life, but of course turning them into Linzer territory is not a bad move at all! For the full recipe click here. I made a very slightly modification adding strawberry extract to the filling and a touch of pink gel color. Other than that, I followed her recipe to a T.
You can modify the filling, use jam, or Nutella, the cookies are very flavorful and will be perfect no matter your choice of filling. Caro has countless baking lessons in her site, I highly recommend you pay her a visit and subscribe to be notified of new posts. Caroline is one of the moderators of a Facebook group with almost 18 thousand members, for lovers The Great British Bake Off, and that’s how I got to know her. I don’t know how she manages to do all she does…
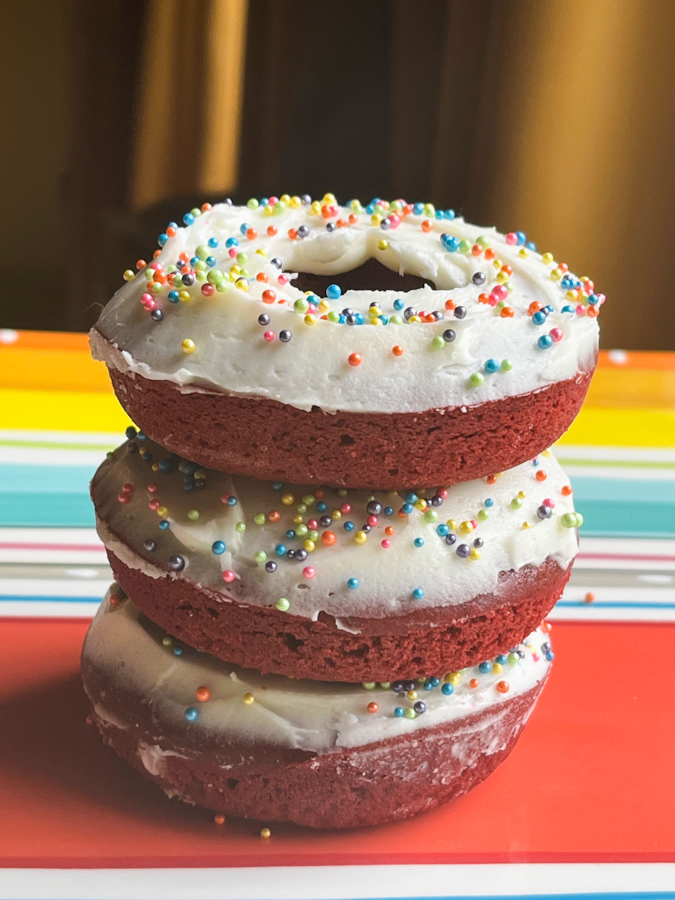
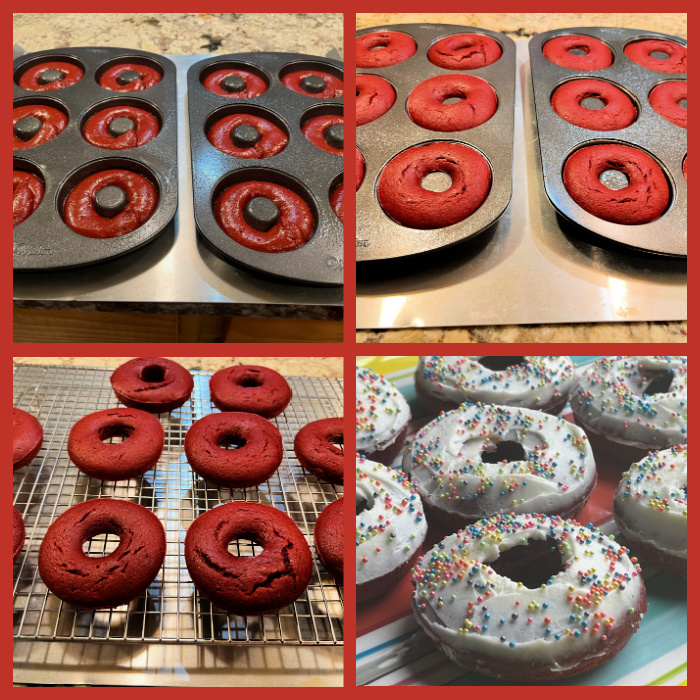
SUPERSTAR BAKER #3 TANYA OTT RED VELVET CAKE DONUTS
As you can see, I’ve been on a red velvet kick lately. These are spectacular and simple to make, especially if you follow the detailed instructions and the very helpful video available in Tanya’s blog. Essentially two bowls, no need for an electric mixer until you get into frosting territory.
Another example of a great baking instructor, Tanya’s articles are always carefully composed, and I am in awe of the amount of work she puts into the making of each of the videos often included in her posts. In case you don’t know, Tanya was one of the contestants in season 5 of The Great American Baking Show, and I shared the tent with her a few times. She even got a handshake from a certain guy with penetrating blue eyes…
That’s all for now, folks! I hope you visit my friends’ sites, and get as inspired by their baking as I do…
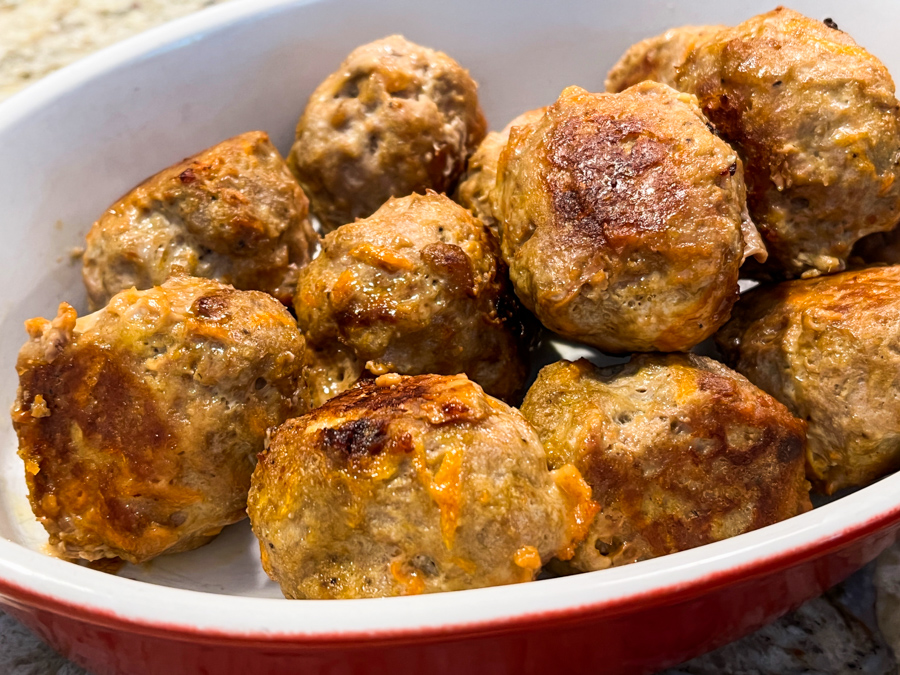
Once again, I share a recipe that will not get any prizes on beauty contests. Brown food, oh so very tricky to get a good-looking picture. But I would never shy away from sharing something tasty, so let’s get to the most important point: how to get this to your table!
MISO-GINGER MEATBALLS WITH CABBAGE “NOODLES” (inspired by Modern Proper)
1 + 1/2 pounds ground turkey 2 tablespoons white miso paste 1 egg 1/2 cup almond flour 1/4 cup finely grated carrot 1 tablespoon minced ginger 1 + 1/2 teaspoon salt 1/4 tsp ground black pepper olive oil spray
for the cabbage: 1 tablespoon grapeseed oil finely sliced green cabbage, amount to taste salt and pepper to taste
to finish the dish: 1/4 cup soy sauce 1 tablespoon white miso paste sesame seeds for serving
Heat oven to 400F.
In a large bowl, stir together the eggs and 1 tablespoon of the miso paste until fully incorporated. Add the ground turkey, almond flour, carrot, ginger, salt, and pepper. Mix well, then with wet hands, form golf ball–size meatballs and place on a sheet pan covered with aluminum foil. Spray the surface of the meatballs with olive oil, and bake for about 20 minutes, turning them midway through baking.
When the meatballs are almost done, start making the cabbage. Heat the oil on a large non-stick skillet until almost smoking. Add the cabbage, season with salt and pepper, and allow it to brown slightly. Move it around, flipping the strands, until cooked through, but don’t let it get mushy. Transfer to a serving dish. To the same skillet, add the soy sauce and miso, whisk until the miso fully dissolves. Add the turkey meatballs to the soy mixture and simmer gently for a few minutes, with the pan covered.
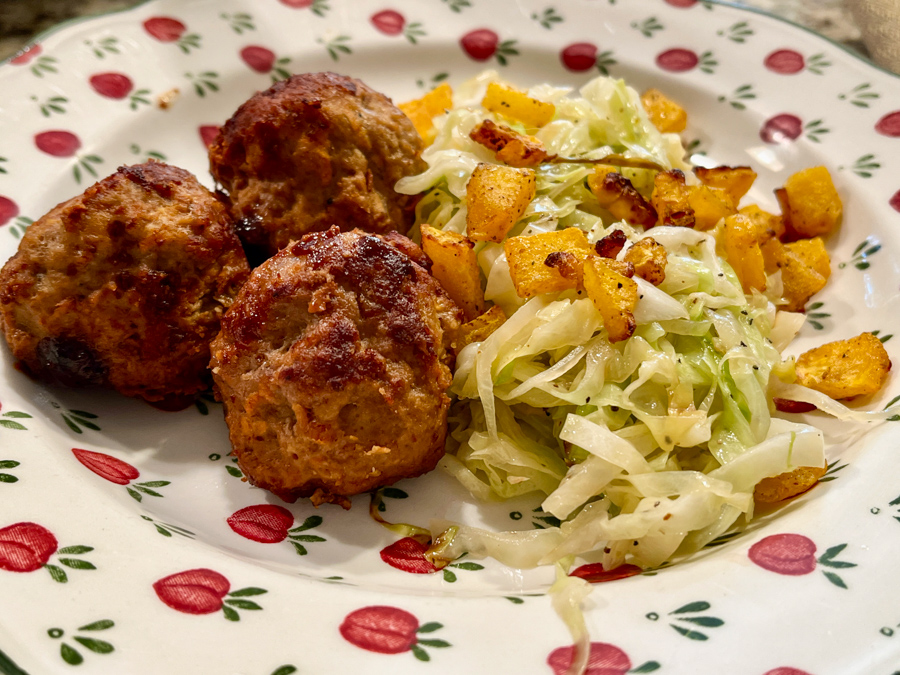
Serve the meatballs with the cabbage noodles, sprinkle with sesame seeds if so desired.
Comments: My friend Tracy a couple of months ago mentioned that cabbage is a great alternative to low-carb “noodles” if you get tired of zucchini. I am a huge fan of zoodles , but decided to give her idea a try, and I can see why she loved her Pad Thai so much when lightened up with thinly sliced cabbage. It absorbs any flavor you use for a sauce, and the texture is quite pleasing. I don’t follow any particular type of diet, but tend to favor lightening the carbs whenever possible. In this case, it matched well the meatballs in their Oriental ways. I served ours with air-fried butternut squash that was leftover from another meal.
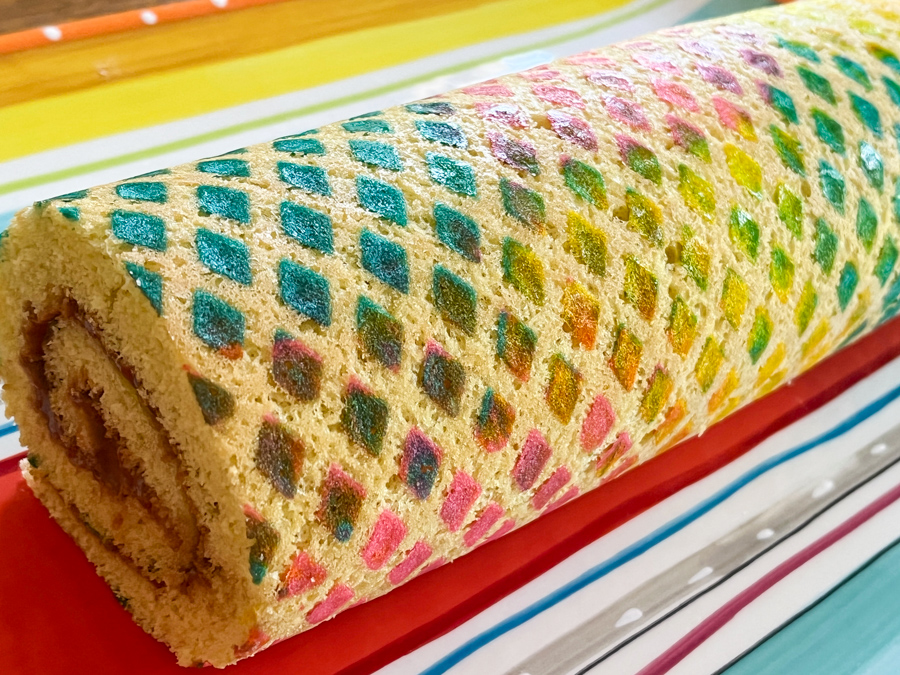
I’ve been on a roll for the past month or so. After a long time – maybe a couple of years – not making this type of cake, I flirted with a few different methods, including some by very reputable sources, but they did not please me for one reason or another. In this post, I share a very simple recipe. Simple in the sense that you don’t have to separate egg whites and yolks, it rolls very well thanks to the addition of a very small amount of melted butter, and the texture is not dry like most versions, again kudos to butter. Plus, you won’t need a special size of baking pan, it works well in a half-sheet, which most people have in their kitchen. You can of course, skip the patterned decoration, but, why would you not go for it?
FESTIVE DIAMOND ROLL CAKE WITH NUTELLA FILLING (from the Bewitching Kitchen)
for the decoration: 50g butter, softened 50g powdered sugar 50g egg whites 50g all-purpose flour pink, yellow and teal gel colors
for the cake: 130g cake flour 1 teaspoon baking powder 5 large eggs, at room temperature 200 g granulated sugar Zest of 1 lemon 1/2 teaspoon lemon extract 1/2 teaspoon vanilla extract ¼ teaspoon kosher salt 2 tablespoons butter, melted and cooled
For the filling: 170g (6 ounces) cream cheese, softened to room temperature ¼ cup heavy whipping cream ½ cup powdered sugar ½ cup Nutella 1 tablespoon cocoa powder
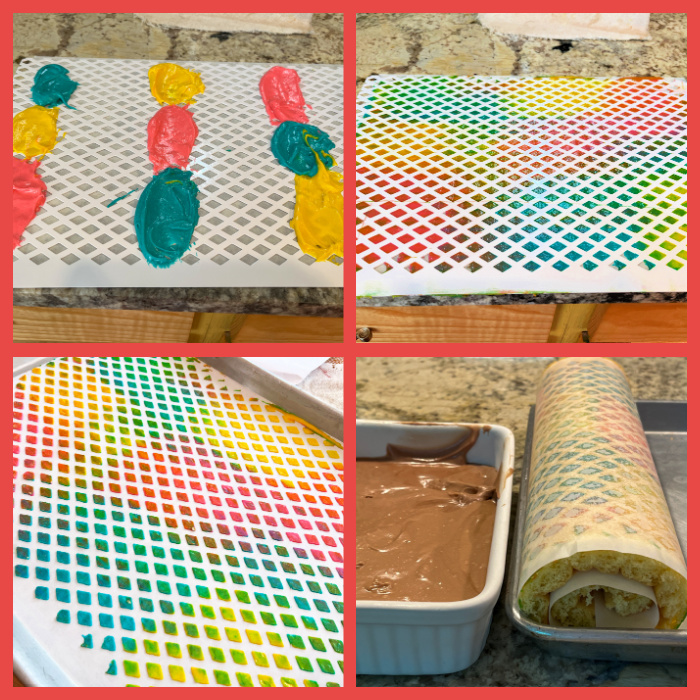
Make the piping decoration by beating the butter with powdered sugar in a small bowl until fully combined. I used a hand-held electric mixer. Add the egg whites and beat for a couple of minutes. Add the flour and mix by hand with a spoon, divide in three portions. Color them pink, yellow and teal.
Place a diamond stencil over a sheet of parchment paper and add small amounts of each color as shown in the composite picture included in my post. Spread the colors in one direction, trying not to move them back, but making sure to cover all the little diamonds. Carefully remove the stencil frame and freeze the parchment for 30 minutes or so.
Heat oven to 375°F. Sift the flour and baking powder into a small bowl. Reserve. Place the eggs and sugar in the bowl of a standing mixer fitted with the paddle attachment. Beat until the mixture form ribbons, about 12 minutes. Add the lemon zest, lemon extract and vanilla. Beat until combined. Sift the flour mixture over the beaten eggs, fold gently. When the flour is mostly incorporated, add a little bit of the mixture to the melted butter, whisk well. Pour that into the cake batter, whisk gently to disperse. Pour over the frozen parchment paper placed in a half baking sheet, and smooth the surface.
Bake the cake until it begins to pull away from the sides, about 12 minutes.
Transfer the pan to a cooling rack, cover the cake with a towel and let it cool fr 10 minutes. Remove the towel, sift a little powdered sugar over the surface and flip it over parchment paper. Gently peel off the paper with the design, flip the cake again over a clean towel. Starting with a short side of the cake, roll the cake gently, using the towel to support the cake as you go. Let the cake cool all rolled up in the towel, seam side down.
While cake cools make filling by using a handheld mixer or standing mixer to beat cream cheese and heavy cream on high until light and fluffy, 3 to 4 minutes. Add ½ cup powdered sugar, Nutella, and cocoa powder. Start the mixer on low and slowly increase speed, beating until the filling is light and fluffy. The filling should be thick and spreadable. Refrigerate for 30 minutes, so that it sets a little.
Carefully unroll the completely cool cake, spread the filling, then roll it again. Wrap the cake in plastic and refrigerate for at least 3 hours, overnight is best. When ready to serve, slice a small piece of each of the ends, so that it looks more polished.
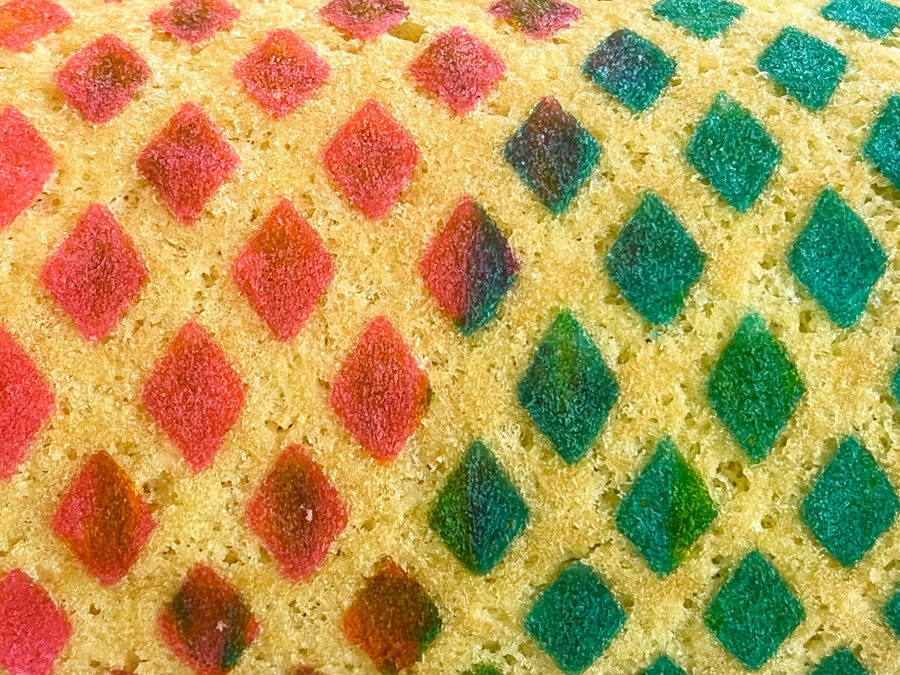
Comments: For this pattern, I used three colors of the paste, and placed them in alternating spots over the large stencil, that covers the whole surface of the half-sheet. The thickness of the stencil determines the amount of paste that gets into the paper. The design transfers very well to the surface of the cake, and does not interfere with rolling it.
I’ve had this stencil frame for many years, bought it on eBay, but could not find it anymore. This one is very similar, in case you are interested.
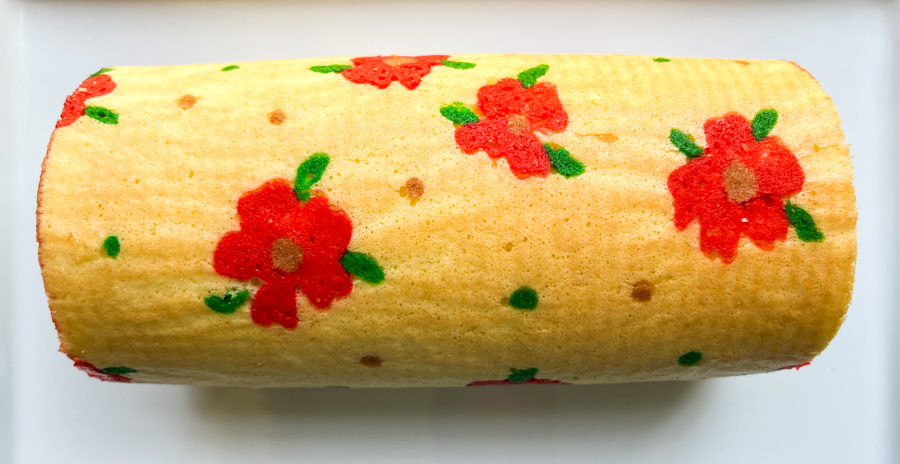
If you don’t have a stencil frame, there are plenty of alternatives to decorate, one of them drawing little flowers on the paper, and pouring the batter on top. Two things are important to remember: first, the design cannot be too large, or it will pull the cake during baking, and might even make a crack in those spots. Second, the layer of the design should be as thin as possible, because it you make it too thick, it might not incorporate well into the cake batter, and pull away during baking. Make sure to use white parchment paper, because it helps keeping the cake layer lighter, giving better contrast with whatever pattern you go for.
The Nutella filling is excellent! I’ve used it to fill macarons a couple of days later. The cream cheese does a little magic to cut the sweetness of Nutella. It has a wonderful spreadable consistency, but the macarons stored in the fridge held up pretty well, once moved to room temperature for 20 minutes or so. I hope you give it a try, either to fill a regular cake, make sandwich cookies, or…. a patterned roll cake!