CHOCOLATE CRUSTED PASSION FRUIT TART AND A COOKBOOK REVIEW

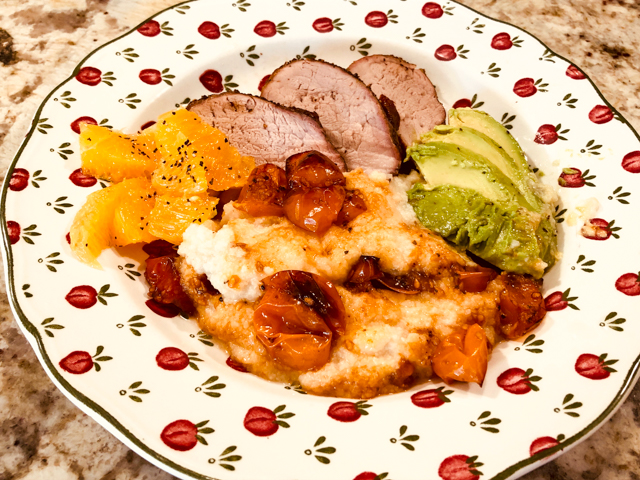
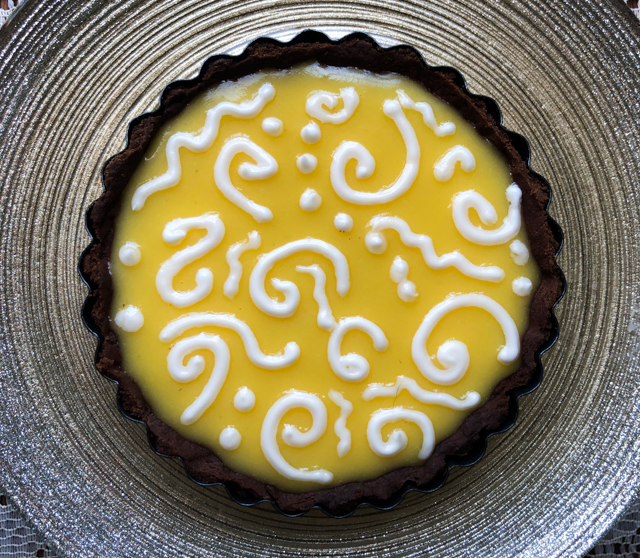
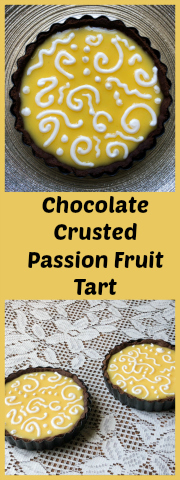
This review is long overdue. I first contacted Nancy Birtwhistle to ask permission to blog on a recipe from her first cookbook, Sizzle and Drizzle, in December last year.  But a lot happened to all of us. Life turned upside down, and it will quite likely never go back to what it used to be. To that normal I suppose we all took for granted. Better late than never, I am sharing today a recipe that feels very special to me. Nancy made it in a certain tent during the Great British Bake Off and I remember falling in love with it the first time I watched that episode. How could I not? It joined chocolate and passion fruit. And she decorated it in a simple yet very elegant way. Instead of making a single, larger tart, I made two individual portions. In isolation times, we have no one to share this type of dessert with, so a smaller portion was the ticket.

CHOCOLATE CRUSTED PASSION FRUIT TART
(from Nancy Birtwhistle’s Sizzle and Drizzle)

1 tart pan, 9 inch (23 cm) in diamater, preferably fluted edges, loose bottom

for the crust:
125g flour
20g cocoa powder
90g salted butter, cold, cut in small dice
30g powdered sugar
1/2 tsp Chinese five-spice mixture (optional)
2 Tablespoons egg yolks, beaten

for the filling:
(use half if making two individual size tarts)
6 eggs
200g granulated sugar
100g softened butter cut into dice
200mL passion fruit juice
5 gelatin leaves (I used Platinum)

for the decoration:
1 egg white
100g powdered sugar, sifted

Heat oven to 400F.

Make the tart crust. Place the flour, cocoa, sugar and spice in the food process and blitz to mix. Add the cold butter and process until everything is combined, this will take just a few pulses. With the motor running, pour the egg yolks and process until it starts to come together. Stop and gather everything over a plastic wrap. Press into a flat disk and refrigerate for 30 minutes.

Roll the pastry very thin (I like to do it over wax paper and with a plastic wrap on top), then use it to cover your tart pan. Freeze for 10 minutes. Cover the bottom with parchment paper and fill with pie weights, beans or rice. Blind bake for 10 minutes, remove the beans and bake for 5 minutes more. Trim the edges with a serrated knife, and allow to cool completely.

Make the filling. Soak the gelatin leaves in cold water. Mix the sugar and passion fruit juice in a sauce pan, heating it gently until it fully dissolved. In a bowl, whisk the egg yolks vigorously, then add the warm juice slowly, whisking non-stop. Put the mixture back in the sauce pan and heat to 185 F (85 Celsius). Be careful and keep whisking, remove from heat if needed for a few seconds to make sure no curdling of egg yolks happen.

Remove from heat, add the drained gelatin sheets, pass it through a sieve. Add the butter, whisk very well to emulsify. Allow the curd to cool slightly then pour into the pastry case all the way to the top. It is better to do this already in the fridge so you don’t have to move the tart around.

When the tart is set, decorate with the Royal icing mixture that you make by whisking the sugar and egg white together for about 4 minutes in a KitchenAid type mixture.  Adjust the consistency to make it right for piping. Serve at room temperature.

ENJOY!

to print the recipe, click here

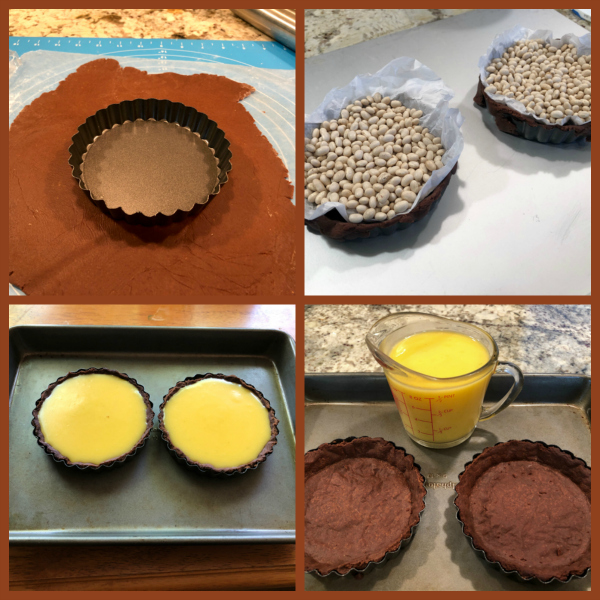
Comments: I used the full amount of dough but made smaller tarts, I find it easier to work with larger amounts and not get into pie dough anxiety as I’m rolling it out and trying to make sure it covers the whole surface of the pan. I halved the amount of filling, so if you are considering making just two small tarts, pay attention to that. Of course, the passion fruit curd is delicious and having some extra hanging around in the fridge is not a bad idea.


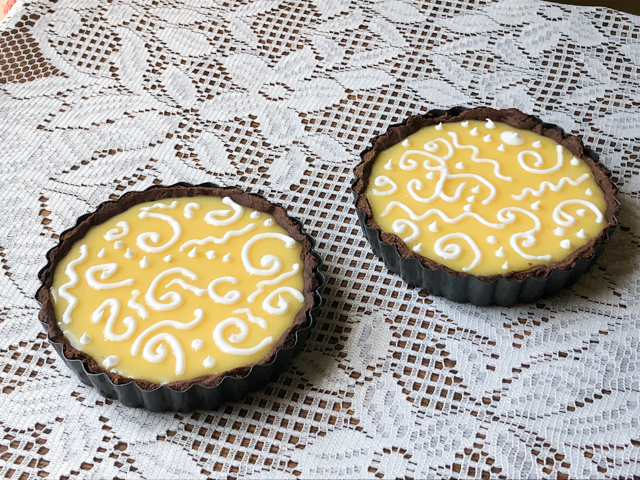
Nancy gives two important tips: roll the pastry thin, as thin as you can do it. And transfer the empty blind-baked shells to the fridge to fill them. That ensures you can fill them to the top and not spill over the side as you try to carry them to the fridge. Small details matter. As I was piping the swirls, I transported my mind back to the tent, and imagined Nancy grabbing the piping bag with the Royal icing, taking a deep breath and knowing she had to do as perfect a job as possible, with the cameras on her, and the shiny surface of the passion fruit curd ready and waiting. She did such a beautiful job! No wonder she went on to win the whole thing!

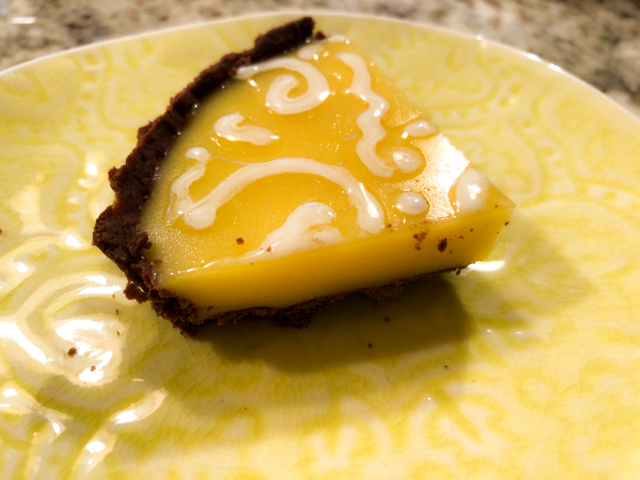
This was absolutely delicious, and I urge you to make it if you have access to passion fruit (you will need 8 to 9 fruits to make the full amount of filling). I have still quite a bit of frozen passion fruit pulp, and it worked well for this purpose.

And now a small overview of Nancy’s book, Sizzle and Drizzle.

If I had to define the book with a simple statement, I would summarize it as “superb baking instruction and tips with Nancy’s personality shinning through the whole book.”  One of the things that was evident from her performance in the show, is that she has  a ton of self-confidence and knowledge. She tested her recipes and was not afraid to stand up to Paul. Just one small example, she defended her method to speed up proofing of an enriched dough using the microwave. To Paul, of all people, the Bread King… And I loved when she was proved right (sorry for the lousy pun).  In the book, she mentioned that her first show-stopping challenge in the Great British Bake Off was making 36 mini-cakes. Everybody had butter over their counters (remember, the recipes are all submitted in advance and they set up the ingredients). Nancy was THE ONLY ONE with margarine. She felt a little “wobble in her confidence” but then said to herself – my cake tastes good. I have nothing to worry about. Guess what? She was Star Baker that week. We should all keep her experience in mind when that inner voice starts nagging us with self-doubt.

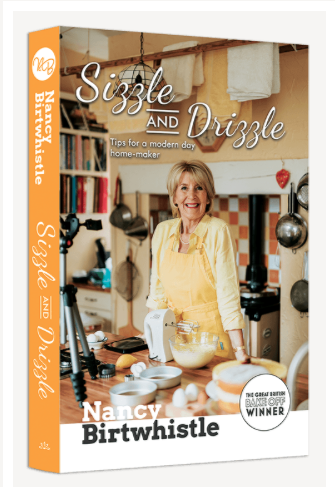
Her cookbook was entirely conceived, written, photographed, and published by her. And it has a very nice feature (she calls it “Let me show you”): you get access to videos in which she demonstrates parts of her recipes, by using your smartphone to decode a little bar printed on the pages. Very VERY cool. Here is an overview chapter by chapter with a few examples from each. Every chapter starts with her top tips for success.

BISCUITS AND SCONES. I pretty much would like to bake every single item of this chapter. Her approach is to use less sugar than most recipes would call for, and also keep the dough a bit on the dry side, rolling always in between plastic sheets.  My favorites would be Lemon Shortbread, Spiced Christmas Shortbreads, Brandy Snaps, Rose and Chocolate Macarons (how can I resist those?), Rye and Fennel Thins, Cherry Bakewell Scones,  and Cheese Scones. Every single recipe has the “Let me show you” link available so you can watch her making it. Just amazing!

BREADS. “It is better to over bake than under bake bread.”  Music to my ears. I see so many pictures that people share online of breads that clearly needed another 10 to 15 minutes in a hot oven to really shine. From this chapter, I want to bake her Crusty Topped Bloomer (remember Tiger Rolls? this is similar), her Hot Cross Buns, Stromboli, and Yorkshire Teacakes (adorable).

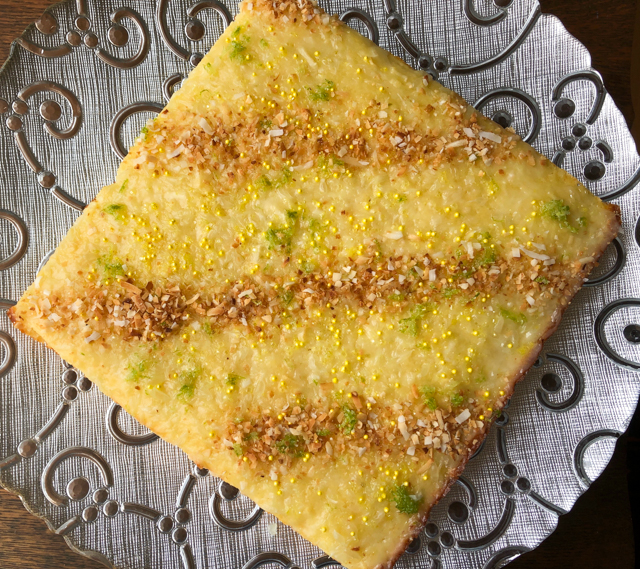
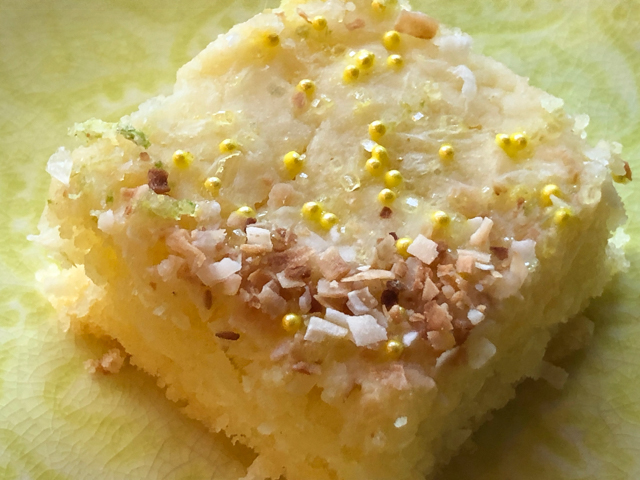
CAKES. “An over baked sponge will have a dark crust on its sides, bottom, and maybe even the top. The perfect sponge should be the same color all over.”  Yes, yes, and YES! Might be my favorite chapter.  Chocolate Fudge Cake (with tips on what to do if your fudge separates), the classic Lemon Drizzle Cake, Pistachio and Raspberry Ripple Swiss Roll, Simnel Cake (on my list to do!), Raspberry Ripple Cupcakes, Gluten-Free Coffee and Walnut Cake (she swears you cannot tell it’s gluten-free), Vegan Lemon Cake. But let me tell you that I baked one of her cakes and will include it here as a teaser. A Coconut and Lime Traybake.  Absolutely delicious!

PASTRY. I lied. This is my favorite chapter. Nancy learned pastry from her Grandma, a huge influence in her life. Her initial description on how to make the perfect shortcrust pastry is worth the whole book, in my opinion. The featured recipe was from this chapter. My other favorites: School Dinners Meat Pie (gorgeous), Courgette Quiche (stunning presentation), Single Serve Whole Apple and Blackberry Pies, Rich Chocolate Tart, Luxury Mince Pies (plenty of tips on how to pull perfect ones, plus her great video tutorial),  Choux Pastry, Puff Pastry, Eclairs, Sausage Rolls

PUDDINGS AND DESSERTS.  This chapter stretched my horizons a bit, as I am not too familiar with some of the UK classics. I am very intrigued by Steamed Treacle Sponge (it does look great), Nancy’s Christmas Pudding, Eve’s Pudding, and obviously at some point I need to make the Queen of Puddings, as it was a technical I missed because a gingerbread sculpture collapsed and I was shown the exit door of a beloved tent (insert discreet tears). Half Sugar Almond Meringues are also calling my name, as well as Summer Lemon and Elderflower Cheesecake, and a stunning Raspberry and White Chocolate Bundt Cake.

HOME TIME. In this closing chapter, she goes over her way of life, growing a lot of the things she eats, preserving things, coming up with clever systems for cleaning that avoid strong chemicals or store-bought products. Everything with the videos ready and waiting for you.

I hope you enjoyed this little review. Her cookbook was clearly a labor of love form page 1 to page 416. Nancy is an author who wants you to succeed in the kitchen, she wants to make sure you can bake every single one of those recipes without issues. I will never forget her last showstopper challenge in the tent, in which she made a Moulin Rouge sculpture with sugar work. To conceive that was amazing, but to pull it all IN THE TENT, with the “male judge” hovering nearby,  just blows my mind.  So I am thrilled that a person with so much talent decided to share it in a cookbook, and we can all profit from it.

Thank you, Nancy, for giving me permission to share the Passion Fruit Tart recipe, and for your support….

ONE YEAR AGO: Lemony Shredded Brussels Sprouts with Almonds

TWO YEAR AGO: Savory Oatmeal with Bacon and Cheddar

THREE YEARS AGO: Air-Fried Carrots, Two Ways (most popular post on my blog!)

FOUR YEARS AGO: Five Minutes in L.I.T (a tour of our laboratory!)

FIVE YEARS AGO: Chicken Thighs with Artichokes and Capers

SIX YEARS AGO: Pea Pancakes with Herbed Yogurt

SEVEN YEARS AGO: Mushroom Stroganoff

EIGHT YEARS AGO: Tomato Sourdough

NINE YEARS AGO: Gamberetti con rucola e pomodori

TEN YEARS AGO: Flirting with Orzo


OLIVE OIL BRIOCHE

Karen from Karen’s Kitchen Stories is a source of endless inspiration for me. Particularly on anything related to bread, she finds the most unusual, exotic, unique recipes, and then bakes them like it’s no big deal at all.  Just to give you a recent example, look at this incredible concoction for which she used 12-ounce empty soda cans wrapped with foil as a baking “pan.”  Amazing, isn’t it? Today I share with you my adventure with her Olive Oil Brioche. I made only half the recipe and still had a ton of dough to play with. Enough for a large loaf and 6 buns. For reasons that will be discussed in the comments, if you make it, be ready to have one loaf and 8 buns. The amount for the loaf pan was a tad too much.

OLIVE OIL BRIOCHE
(slightly modified from Karen’s Kitchen Stories)

for the poolish:
100 grams all purpose flour
100 grams water
1.5 grams instant yeast

Mix the ingredients, cover with plastic wrap, and place in the refrigerator over night.

for the levain (Sourdough)
1 tablespoon starter
110 grams all purpose flour
110 grams water

Mix the ingredients, cover with plastic wrap, and let sit overnight at room temperature until bubbly.

for the final dough: 
200 grams poolish
150 grams levain
500 grams bread flour
12 grams salt
7.5 grams instant yeast
250 grams eggs
120 grams milk
80 grams honey
Zest of one Meyer lemon (optional)
25 grams water
220 grams extra virgin olive oil
For the egg wash: 1 egg plus one tablespoon milk

In a stand mixer, combine the flour, salt, yeast, eggs, milk, levain, poolish, honey, lemon zest, and water and mix on low for about 5 minutes. Cover and let rest for about 20 minutes.

Mix the dough with the spiral hook on medium to high speed for 8 minutes.
With the mixer running on medium,  add the oil slowly, pausing so that the oil is absorbed. I did it in three additions. Incorporation of the oil will take time, so exercise patience.  Add a sprinkle of bread flour to speed incorporation if you so desire, but do it only in the second and third addition. The dough should end up very smooth and not tear when  you stretch it.

Allow the dough to bulk ferment (in a large bowl covered in plastic wrap) for 2 hours at 70 degrees F. Do three stretch and folds during the first 90 minutes, one every thirty minutes.  When the dough is ready, remove three pieces of about 250g each and braid them. Place in a slightly oiled 9 x 5 loaf pan for final proofing. Divide the rest of the dough in 8 portions, shape as buns, and proof.

Heat the oven to 425 degrees F.  After the bread has been proofing for 1 and a half to 2 hours (until doubled), brush with egg wash and bake until golden brown, 30 to 40 minutes, until internal temperature is 200 F. You can sprinkle sesame seeds on the buns if you so desire.

Un-mold the large loaf and cool on a wire rack together with the buns.

ENJOY!

to print the recipe, click here

Comments: I will not lie to you, this is a project. The bread requires a sourdough starter, a poolish (fermented flour using small amount of commercial yeast and prepared the day before), and commercial yeast in the final dough. But it is a total pleasure to work with, rises like a rocket and the texture and taste? You will not miss the butter, that’s for sure. As Karen said, it keeps a lot better than the traditional version. And freezes beautifully too.

When you start adding the olive oil, you will be sure the whole thing is ruined, and might have a few rude thoughts directed at me. It seems impossible for the dough to come together. Have bread faith. And here is a little tip that might help: as you add the olive oil and the mixer is going and going, with a puddle of oil all around and looking hopeless, add just a sprinkle of bread flour on top. It will help things get in shape faster. But just a sprinkle, I say 1 tablespoon or so. If you add the olive oil in three additions, do that in the final two, when the dough will have more trouble incorporating it.

For a 9 x 5 loaf pan, I advise you to make three strands with about 250g of dough in each. Then divide the rest in 8 buns. When you do that, you will be able to let the shaped loaf proof for closer to 2 hours and it will not rip a bit like mine did. I had no choice but to bake after 1 hour and 10 minutes, the dough wanted to leave the pan and explore the kitchen. No bueno. That’s because I used 300g per strand, a bit too much. Don’t be put off by the complexity of this recipe, once you have the starter and the poolish prepared the day before, it is just a matter of weighing all other ingredients and having some fun.

Karen, thank you for the inspiration, I know I tell you this all the time but it’s so true… Your blog is a pleasure to follow!

ONE YEAR AGO: Coconut and Lime Macarons

TWO YEAR AGO: Flank Steak Carnitas

THREE YEARS AGO: Sesame and Poppy Seed Sourdough

FOUR YEARS AGO: Pecan-Crusted Chicken from Southern at Heart

FIVE YEARS AGO: Lamb Shanks en Papillote with Cauliflower-Celeriac Purée

SIX YEARS AGO: Chestnut Brownies and a Blog Award!

SEVEN YEARS AGO: Quinoa with Cider-Glazed Carrots

EIGHT YEARS AGO: Celebrate Wednesday: Heirloom Tomatoes Steal the Show

NINE YEARS AGO: Pain de Provence

TEN YEARS AGO: Golspie Loaf, from the Scottish Highlands

CAULIFLOWER FOR COMPANY? YES, PLEASE!

Let’s imagine for a moment that dinner parties are still “a thing.”  Those days feel like a lifetime away, but I know they will come back at some point. When? I have no idea. But when they do, allow me to offer a recipe for mashed cauliflower as your side dish. I promise you, this one will please every single one of your guests, even those who twist the nose at anything low-carb. The secret is topping the mash with roasted grape tomatoes (you can use yellow or a mixture).  It turns into a luscious, satisfying, flavorful side dish that will go well with pretty much any protein you are featuring as the star of your show.

MASHED CAULIFLOWER WITH ROASTED GRAPE TOMATOES
(from the Bewitching Kitchen)

1 large head of cauliflower
squirt of lemon juice
salt to taste
1/3 cup yogurt (low-fat is ok)
drizzle of olive oil
1 Tablespoon nutritional yeast (or grated parmigiano-reggiano to taste)
smoked paprika to taste
grape tomatoes (yellow or red)
1 Tablespoon olive oil
drizzle of balsamic vinegar
salt and pepper

Start by roasting the tomatoes. Place them as a single layer on a baking dish covered with aluminum foil. Drizzle the olive oil, balsamic vinegar, and season with salt and pepper. Roast at 400 F until they start to get golden brown and release some juices. Reserve.

Cut the cauliflower in florets and cook in slightly salted boiling water with a bit of lemon juice until fork-tender.  Add to a food processor (ok if a bit of water goes with it), and add the yogurt, nutritional yeast, olive oil, and spices. Process until smooth, taste and adjust seasoning, or even a bit more lemon juice if you like. Transfer to a baking dish. Top with the roasted tomatoes, but don’t add too much of the tomato liquid, just a little bit.

Place in the 400 F oven for about 10 minutes to warm everything together. If the mashed cauliflower is looking more on the dry side, you can warm up covered with foil. If it seems a bit loose, warm it with no foil on top.

Serve right away with the main dish of your choice.

ENJOY!

to print the recipe, click here

Comments: This was one delicious meal! The pork tenderloin is very similar to the one I shared recently, made in our smoker, with a bit less pepper. A little avocado and orange on the side, and we were ready to dig in. Felt like a dinner party…

ONE YEAR AGO: Coconut and Lime Macarons

TWO YEAR AGO: Flank Steak Carnitas

THREE YEARS AGO: Sesame and Poppy Seed Sourdough

FOUR YEARS AGO: Pecan-Crusted Chicken from Southern at Heart

FIVE YEARS AGO: Lamb Shanks en Papillote with Cauliflower-Celeriac Purée

SIX YEARS AGO: Chestnut Brownies and a Blog Award!

SEVEN YEARS AGO: Quinoa with Cider-Glazed Carrots

EIGHT YEARS AGO: Celebrate Wednesday: Heirloom Tomatoes Steal the Show

NINE YEARS AGO: Pain de Provence

TEN YEARS AGO: Golspie Loaf, from the Scottish Highlands


THE HOME BAKERS COLLECTIVE: APRIL PROJECT

Here we are, once again, baking together under the same theme, this month designed by Tanya. Doughnuts. Any kind. Baked, fried, yeast-raised, filled, glazed, or as she put it “any doughnut is a good doughnut.”  She is one smart cookie, that Tanya. I went tropical (surprised?).  Mine were flavored with coconut and lime, and they got a mango-glaze. The recipe was based on one from a former contestant of the Great American Baking Show, the lovely Cheryl. One of the positive aspects of passing by a certain tent is that I got to know (virtually at least) several of the former contestants and found out they are  incredibly nice people!

COCONUT AND LIME DOUGHNUTS WITH MANGO GLAZE
(slightly modified from Cheryl’s blog)

for doughnuts:
2 cups (260 grams) all-purpose flour
2 teaspoons baking powder
1 teaspoon kosher salt
2/3 cup (126 grams) granulated sugar
zest of 1 lime
2 large eggs at room-temperature
1 cup coconut milk at room-temperature
1/2 cup (100 grams) coconut oil, melted

for glaze:
1 + 1/2 cup (172 grams) powdered sugar
1 tablespoon coconut milk
1 tablespoon mango Artisan flavor (Amoretti)
sprinkles to decorate

Heat the oven to 400 degrees F.

Mix the sugar with the lime zest, rubbing it well. Let it sit for 5 minutes as you gather the other ingredients. Combine the flour, baking powder and salt in a medium bowl and whisk to combine. Melt the coconut oil and set aside.

In a large bowl mix the sugar-lime, milk and the egg and whisk until the sugar is dissolved. Add the melted coconut oil (which should be cooled but still liquid) to the liquid ingredients in a steady stream and whisk constantly.  Add the dry ingredients and use a spatula to fold the ingredients until you cannot see any bits of flour.

The easiest way to fill the pan is to add the batter into a piping bag, no need to add a piping tip, just cut the end. Add the batter to 12 doughnut wellsand bake for 10-12 minutes. The doughnuts are done when the you press them with your finger, and they spring back. Turn the doughnuts out on a wire rack to cool completely.

While the doughnuts are cooling combine the powdered sugar, coconut milk, mango extract and if needed adjust the consistency with lime juice or water.
Dip the doughnuts into the glaze and swirl to coat the tops and halfway down the sides. Place on a rack or parchment paper. Decorate with sprinkles.

ENJOY!

to print the recipe, click here

Comments: These turned out delicious! The flavor of the coconut was perfect, delicate and subtle, and I had to add some lime zest because I find that combination a classic.  I made them to donate for the Common Table meal, and as usual, I like to think about the things that some people are not too fond of.  I know that shredded coconut is a bit iffy for some, that’s why I did not do the toasted coconut topping (but please see Cheryl’s original post if you want to do it her way). I love Amoretti flavors, and had this mango bottle in my pantry begging to be used. It tastes delicious, and the glaze complemented the doughnuts the way I expected.

If you want to bake along with us, tag us in Instagram with #homebakerscollective. To see what all my baking-buddies did this month, visit our group blog,  The Home Bakers Collective (post might be published later today or tomorrow morning, so keep that in mind)

Before I leave you, here is a picture of my contribution to the Common Table meal a couple of weeks ago.


Chocolate Chip Cookies (recipe from Doubletree Hilton, recently made public),  Almond Tea Cakes with Boysenberry Jam, Springerle Cookies (coming soon to a food blog near you), and the doughnuts from this month’s group project.

Tanya, thank you for the challenge, I had fun planning and making them, and now I look forward to our next adventure…
Cheryl, thank you for a great recipe!

ONE YEAR AGO: Asian-Style Eggplant Meatballs

ONE YEAR AGO: Uzbek Flatbread

TWO YEARS AGO: First Monday Favorite – Black Sesame Macarons

THREE YEARS AGO: Chocolate Orange Mini-Cakes

FOUR YEARS AGO: In My Kitchen, May 2015

FIVE YEARS AGO: P90X3, a Review of Tony Horton’s Latest Fitness Program 

SIX YEARS AGO: Pasta and Mussels in Saffron Broth

SEVEN YEARS AGO: Triple Chocolate Brownies

EIGHT YEARS AGO: Shanghai Soup Dumplings

NINE YEARS AGO: Bite-sized Chocolate Pleasure

THE POWER OF CHEMISTRY: RED BEET SOURDOUGH

I will start by blowing your mind. Below, same exact recipe for sourdough bread, with or without vitamin C added to the formula.

For the past year I’ve been playing with adding beets to bread, both using beet powder and roasted beets, but my experiments failed in the color department. Everything tasted pretty good, but the beautiful red color of beets was consistently lost during baking. I had resigned myself to brownish breads until I remembered using vitamin C to preserve the color of basil for freezing. Works like magic. Sorry, it is actually pure science. Vitamin C is a powerful anti-oxidant, and the browning reaction is simply oxidation of compounds during storage or cooking.  I searched Google University and found out that others had already figured it all out and many bakers use vitamin C in their beet-containing breads.

RED BEET SOURDOUGH
(from the Bewitching Kitchen)

Comments: I was absolutely shocked by the results! You might think that the same outcome could be achieved by using some lemon or orange juice, as those fruits are loaded with vitamin C. It turns out that a whole lemon has about 20mg of vitamin C, so clearly not enough to do the job. I used purified ascorbic acid, borrowed from our lab, but I know home bakers use vitamin C tablets, usually each one contains 500 mg, so one or two tablets will be what you need. I intend to use that in the future and report back.
.

.
Same bread without vitamin C, nothing wrong with it, except that the beautiful red color is lost during baking. Even though, as you see in the composite below, until you put the bread in the oven, all seems totally fine.
.

.
I hope you consider playing with vitamin C if you had issues with your bakes using beets.  It would be interesting to add it to other things that involve color, be it spinach or butterfly pea flower.
.

And let me tell you, Red Beet Sourdough makes amazing croutons!
.

.

.