TOMATO TATIN

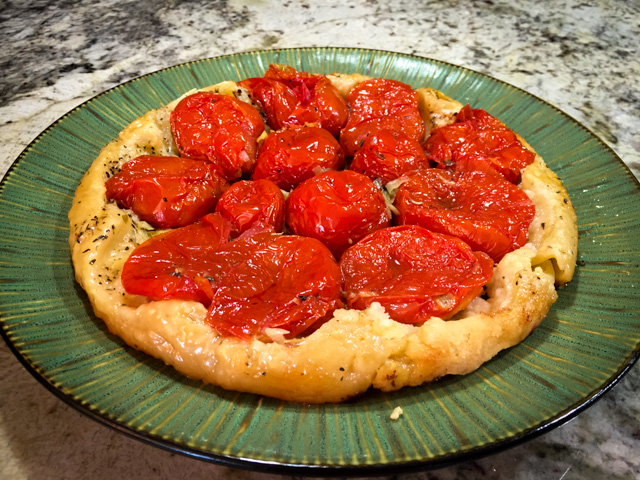
One of my favorite desserts is the classic Tarte Tatin, a delicious upside-down apple pie originated in France in the 1880’s. I made it quite a few times before my blogging days, and often tell myself that I should bake one “for the blog.” You know, I am unselfish that way. But after reading a cooking forum in which people raved about a savory version of the classic, I had to make it. Roasted tomatoes with a touch of herbs and cheese are covered with a buttery dough, baked, and inverted on a platter for a stunning presentation… If some tomatoes  stick to the pan, no need to use crass language, gently scoop them out and coach them into the original position. After all, it is supposed to be rustic, so small boo-boos are forgiven…

Tomato Tatin
TOMATO TATIN
(adapted from Whip +  Click)

for the dough:
205 grams (1+1/3 cup) flour
1/2 teaspoon sea salt
118 grams (8 tablespoons) chilled butter, cut into cubes
1 egg

for the filling:
940 grams (2 pounds) plum tomatoes
olive oil
Herbes de Provence to taste
sea salt and pepper to taste
1 large leek, washed and thinly sliced
grated Parmigiano cheese

Make the dough: Sift the flour into a bowl. Add salt and cubed butter and work into the flour with your fingers until the butter pieces are no bigger than lentil size. Add the egg and mix until just combined. If it is too dry, add cold water one teaspoon at a time. Chill for 30 minutes.

Prepare the leeks. By sautéing the slices in a little olive oil, season with salt and pepper. Cook it in a very low heat, stirring often until golden brown. Reserve.

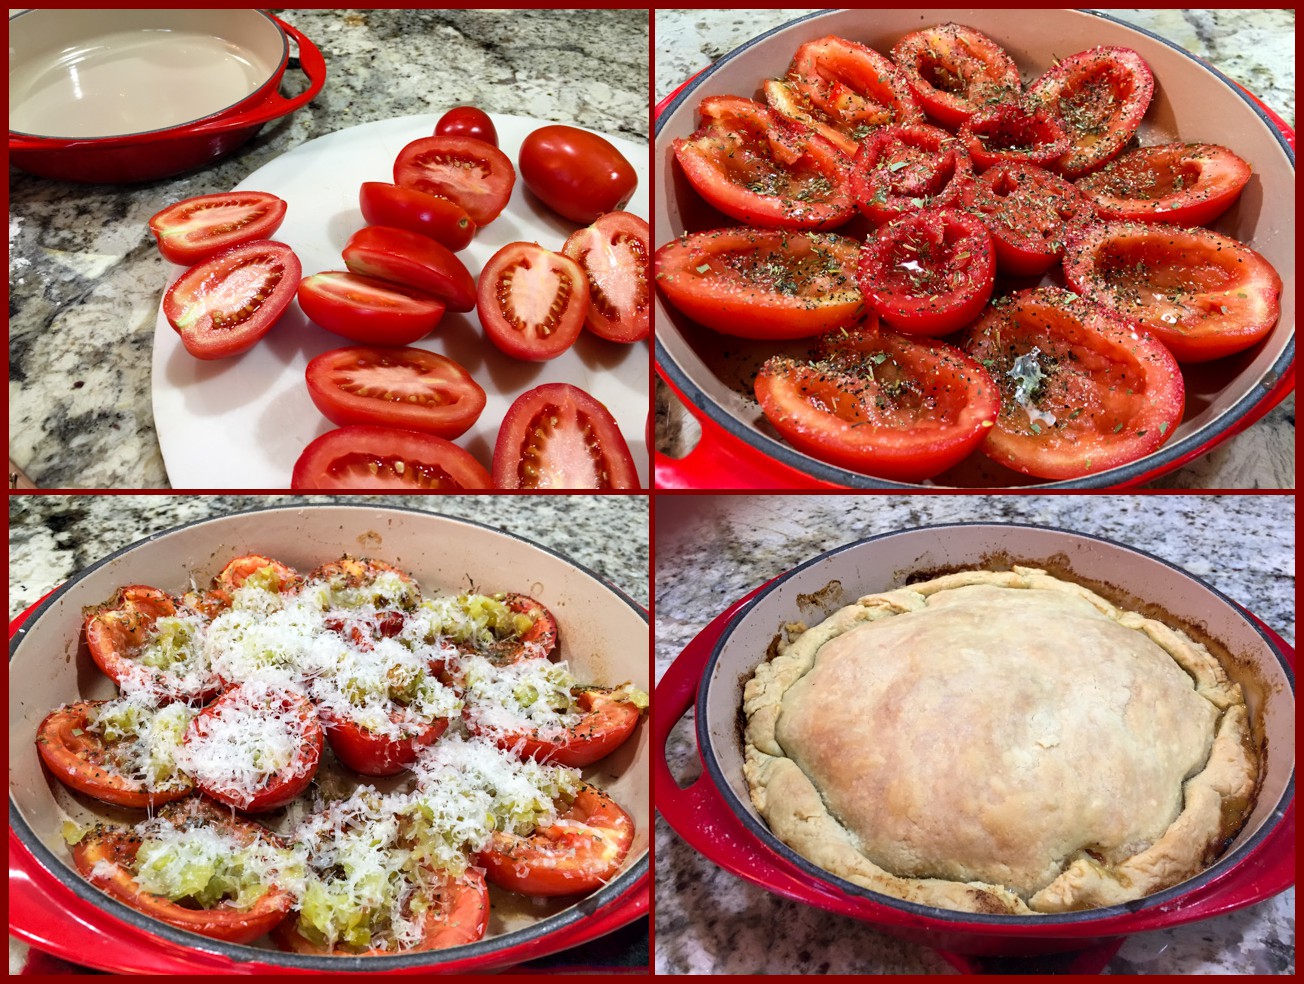
Heat the oven at 350 F. Cut tomatoes in half, core and remove the seeds. Coat the bottom of a 10 inch round dish with olive oil and place the tomatoes skin side down all around the pan. Season with salt, pepper, herbes de Provence and drizzle with olive oil. Bake for approximately 30 minutes or until soft.

Before you take out the tomatoes, roll out your dough to a 10 inch round. Spread the leeks on top of the tomatoes, then add an even layer of grated parmesan. Add the dough on top and tuck the edges in. Bake for another 30 minutes or until the dough is golden brown. To unmold, run a knife around the edges and flip onto a serving dish.

ENJOY!

to print the recipe, click here

composite
Comments: This was my first time making this recipe, and I think there is room for improvement. I added a little bit too much olive oil to the tomatoes before placing the dough on top, and the dough itself turned out a tad too oily for my taste.  I also think that for the size of my pan, one or even two more tomatoes cut up would have been better.  They shrink a little during roasting, keep that in mind when you make it and aim for full coverage of the pan. I hope you do try this recipe, by the way. It is very elegant and quite simple to prepare. Perfect to open a dinner as a first course, or to serve for brunch. It is nice at room temperature too, making it possible to prepare it in advance. My kind of recipe, all the way.  I intend to try a lighter version using phyllo dough just for fun… What do you think?

ONE YEAR AGO: Headed to Colorado!  (and there we are again this year…  😉

TWO YEARS AGO: Farofa Brasileira

THREE  YEARS AGO: Thai-Inspired Pork Tenderloin

FOUR YEARS AGO: A yummy Brazilian cake: Bolo de Fuba’

FIVE YEARS AGO:  Summer’s Tomatoes

SIX YEARS AGO: Leaving on a jet plane… 

THE SECRET RECIPE CLUB: HERBED GOAT CHEESE SOUFFLES


Herbed Goat Cheese Souffle
Last Monday of February, a month that used to be my favorite. Summer in Brazil, carnival (not that I was that much into it, but still, a big break from work in the height of the summer was always well-received). That all changed 23 years ago, when I first moved to France and then, a couple of years later permanently to the US.  February is now a month I do my best to survive. I count the days for it to be over to get some hope of life percolating back into my veins. ANYWAY, I am sure you are not here to read me whine and pout. Instead, you are here for the reward of a revelation: which blog was my assignment for this month’s adventure with The Secret Recipe Club: it was the The Wimpy Vegetarian!  I literally screamed with joy when I got the email notification, because as a regular reader of Susan’s blog, I felt totally at home “stalking” it.  You should visit her “About” page, but let me just say that when she decided to become a vegetarian, or as she put it “to focus more on a plant-based diet“, her husband was not exactly thrilled. He went along with it for a while, but at some point started referring to “farro” as “horse food“. No bueno, folks. But Susan fought back using all the culinary skills accumulated from her classes at Tante Marie Cooking School, and turned veggie dishes (horse food included) into concoctions her husband could not resist. She succeeded big time, and her blog is there to show us how. There were so many dishes I bookmarked as tempting possibilities, but I narrowed them down to these:  Rustic Cauliflower and Tomato Gratin, Arepas Rellenas (I even have the special flour to make them, so I must get to this recipe at some point), Skillet Baked Corn Pudding, Farinata (another recipe I’m always dreaming about), Sweet Potato Biscuit Pillows (excuse me, I need to wipe drool off the side of my mouth), Broccoli-Cheddar Quinoa Casserole Tart. Susan is a fantastic cook and often enters – and wins – cooking contests, so pretty much anything on her site feels quite special.  Pay her a visit, and become a subscriber, even if you are not a strict vegetarian.

For my assignment, I went with very elegant Herbed Goat Cheese souffles. They turned out amazing!

baked

HERBED GOAT CHEESE SOUFFLE
(from The Wimpy Vegetarian)

1/2 teaspoon dried lavender
zest from 1/2 medium lemon
3 tablespoons finely grated Parmesan cheese
pinch of salt
freshly ground black pepper
3 ounces fresh soft goat cheese
1 ounce ricotta cheese
1 tablespoon fresh thyme leaves
1 tablespoon honey
3 eggs, separated
1/4 cup low-fat milk
2 teaspoons all-purpose flour (I used 4)
butter for the ramekins

Heat the oven to 375 degrees F. Prep the ramekins by smearing them with butter and sprinkling grated Parmesan cheese on the bottoms and around the sides. Set aside.

Rub the dried lavender between your fingers to reduce as much as half of the buds to a powder. Combine this with the lemon zest, 1 tablespoon of Parmesan, salt and pepper in a small bowl. Set aside.

In a medium bowl, combine the goat cheese, ricotta, 2 tablespoons of Parmesan cheese, thyme, honey, egg yolks, milk and flour together. Stir well to completely combine. Add to the reserved lavender mixture.

In a small bowl, whip the egg whites just to a firm peak. Be careful not to get them too firm, or they’ll be difficult to fold into the cheese-yolk mixture. Fold the beaten egg whites into the cheese-yolk mixture in thirds using a large spatula. It’s fine to have lumps of egg whites in the mixture – it will not be smooth. Place the ramekins in a baking dish and fill the dish with hot water one-half the way up the sides of the ramekins. Carefully spoon the cheese-egg mixture into the ramekins, filling them 2/3 full.

Bake for 20 minutes, or until browned on top and springy – firm to the touch. Remove and allow to cool in the ramekins for 15 minutes. The souffles will collapse and start to pull away from the sides of the ramekins. Run a knife around their edges and turn the ramekin upside down. The souffle should slide right out.

ENJOY!

to print the recipe, click here

composite1

Comments: What I loved the most about the recipe was the inclusion of lavender. It gave the souffle a sort of unusual component, Phil could not guess what it was, but once I told him it was lavender he could detect it. You need to add just a small amount, it is quite potent, don’t go crazy with it.  I was also surprised by the method of preparing the base, as I always make a bechamel type sauce. For this recipe, you mix it all and do not pre-cook, it goes straight into the oven, in a water-bath environment. Because I was afraid the mixture was a bit too liquid, I added double the amount of flour.  Not sure it was necessary, but they ended up with a very nice texture, and un-molded easily.

served2

This is the type of recipe that would be perfect for entertaining, or for that special dinner for two, candlelight and all… a first date, a first year anniversary, you catch my drift.  Any meal will be special when these are part of the menu!

Susan, it was a great pleasure to indulge a little more deeply into your blog, I hope you also had a blast with your assignment this month…

For my readers, the usual reminder to poke the blue frog at the end of my post. She will take you to plenty of great recipes made by my fellow virtual friends at The Secret Recipe Club.

ONE YEAR AGO: Barley Risotto with Peas

TWO YEARS AGO: Jammin’ Blueberry Sour Milk Pancakes

THREE YEARS AGO: Scallops with Black Pasta in Orange Cream Sauce

FOUR YEARS AGO: Stir-fried Chicken with Creamed Corn

FIVE YEARS AGO: Potato, Cheddar, and Chive Torpedo (one of the best breads I ever made!)


SECRET RECIPE CLUB: MINI-QUICHES WITH DUXELLES AND BABY BROCCOLI

It seems like FOREVER since we’ve had a Reveal Day of The Secret Recipe Club, but finally here we are, having the greatest time together…  My assigned blog for the first month of 2015 has such a cute name, makes me smile:  A Calculated Whisk… Becky, the cook behind the blog is a teacher of English to young Spanish-speaking kids, and next year will be starting to work on her master’s degree in Speech and Language Pathology. Impressive!  Her site focuses on Paleo-friendly recipes, but is  not restricted to them. For those interested in the Paleo life-style,  I recommend reading her series of posts starting in January 1st, 2014, in which she shares her experience doing the Whole30 thing and blogging daily about it. That is endurance on several levels!  😉   Becky has two incredibly cute cats, Cupcake (a butter-addict) and Furpaws (prefers to hang inside the kitchen sink hoping for a sip of water straight from the faucet).  I say we pet lovers have our share of idiosyncratic creatures to deal with…    I am quite fond of Paleo recipes because they are usually moderate in carbs and high in protein, which is my preferred way to eat, so I had no problem finding stuff in her blog that pleased me. In fact, I intend to enjoy in the near future her Chicken Meatballs with Garlic Kale Marinara, her Chickpea Mushroom Spread (this one not Paleo), her Pumpkin and Pecorino Souffle (pretty intriguing gluten-free version), and her Spicy Cocoa Chili.  But this recipe won my heart to share with you today: Mini-Quiches with Duxelles and Broccoli.  As I expected, they were cute and absolutely delicious!

Mini-Quiches2

MINI-QUICHES WITH DUXELLES AND BROCCOLI
(slightly adapted from A Calculated Whisk)

makes 12 mini-quiches

for the duxelles:
2 tablespoons ghee
1 large shallot, minced
1 garlic clove, minced
1 cup minced mushrooms
Salt and freshly ground black pepper to taste

for the mini quiches:
2 cups finely chopped broccoli florets
4 whole eggs
2 egg whites
1/2 cup coconut milk, full fat
1/2 teaspoon sea salt, or to taste
Freshly ground black pepper to taste
olive oil, for greasing the pan

Heat the oven to 350 degrees F, and grease a 12-cup muffin pan with olive oil.

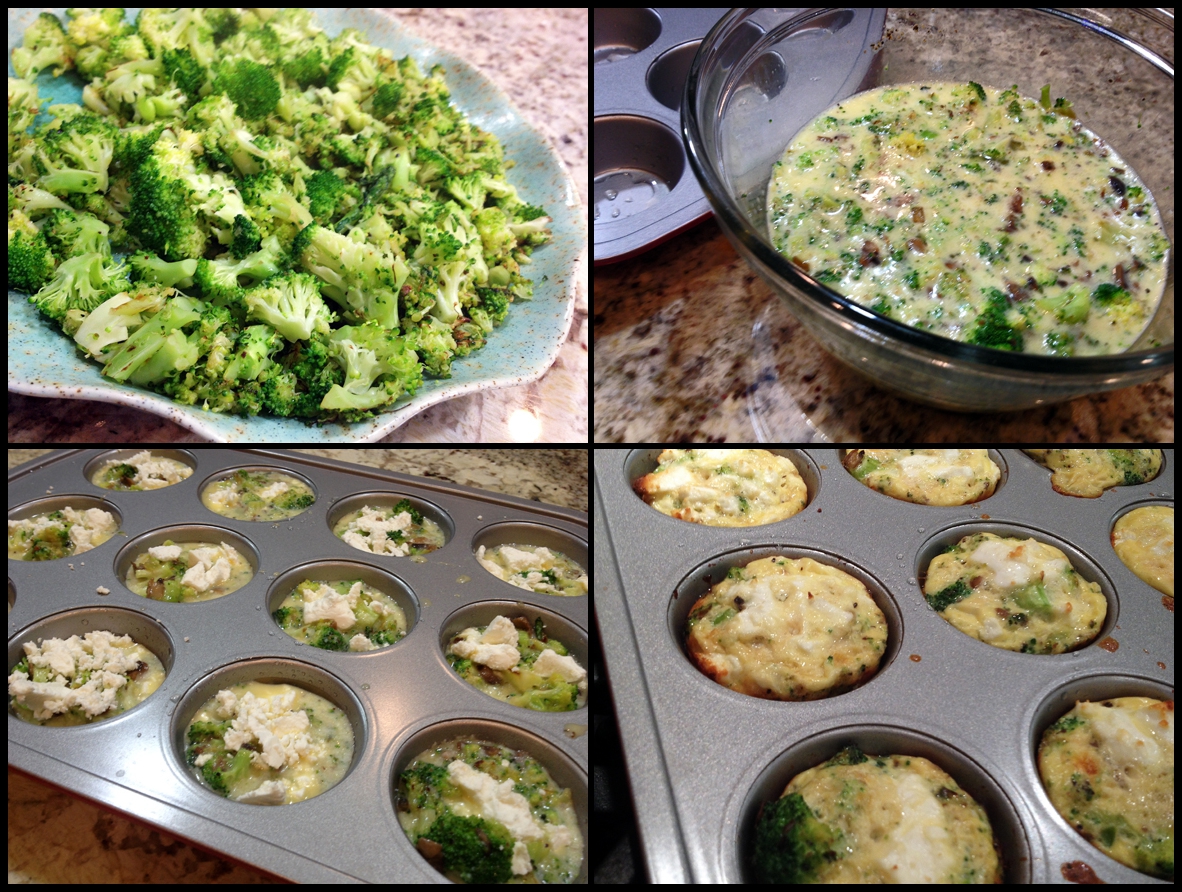
To make the duxelles, melt the ghee in a medium skillet over low heat. Add the shallots and garlic and saute, stirring frequently, until softened but not browned, 3-4 minutes. Add the mushrooms and raise the heat to medium. Cook, stirring frequently, until the mushrooms have released their liquid and most of it is gone, about 10 minutes. Season the duxelles liberally with salt and pepper, then set aside on a plate to cool.

Return the skillet to medium and add the chopped broccoli. Cook, stirring frequently, until bright green and crisp tender, about five minutes. Set aside to cool.

In a large bowl, whisk together the remaining ingredients. Stir in the duxelles and broccoli. Divide the mixture among the 12 greased muffin cups, filling each one about 3/4 full. Bake for 15-20 minutes, or until just set in the middle.

Gently run a knife around the edge of each quiche, and carefully scoop them out with a spoon. Enjoy hot or warm. Leftover quiches can be stored in the fridge for 3-4 days and reheated.

ENJOY!

to print the recipe, click here

composite
Comments:  I turned this recipe into a Neolithic version by adding feta cheese, my apologies to all modern cave men out there.  But some pieces of leftover feta were staring at me from the fridge JUST as I was grabbing the eggs, and they actually screamed when left behind: “Please, take us, take us!”. I could not ignore them, I’m sure Becky will forgive me for the tweak.  Those of you on a strict Paleo kick, simply omit the feta, but adjust the salt accordingly.

These were so tasty and convenient both as a side-dish at dinner or as a snack. Of course, you can think of all types of goodies to add to the mixture, keeping it Paleo with diced roasted butternut squash, shredded zucchini, or stretching a bit its limits with a little Roquefort or other yummy cheese.  However, this version joining broccoli with mushrooms is going to be hard to beat.

Mini-Quiches1

Becky, as soon as this post is public, I am going to subscribe to your blog, as I don’t want to miss any of your future recipes. I truly enjoyed secretively exploring your site, and look forward to more…

As usual, my readers are all invited to go poke a blue frog. There is one waiting for you at the end of the post, and once poked, you will be able to see what all my fellow Secreters have been up to in the first month of 2015! And if you are curious about who had my blog, take a look at this beautiful post by Tara.  She made brigadeiros!  Clever girl!

ONE YEAR AGO: Quinoa and Sweet Potato Cakes

TWO YEARS AGO: Pumpkin Bolo de Fuba’ Cremoso

THREE YEARS AGO: Citrus-crusted Tilapia Filets

FOUR YEARS AGO: Bran Muffins, not just for Hippies

FIVE YEARS AGO: Flourless Chocolate Cake


THE PERFECT BOILED EGG

What food blogger in his or her right mind would make a post on hard-boiled eggs?  If you are about to click away from this page, not without first canceling your subscription to my site, please stick around…  This is a life-changing method, I promise you.

I love hard-boiled eggs, they are often part of my lunch or dinner salads, but I hate when they are hard to peel. I have tried every single method around, including some recommended by cooking pros such as Ina Garten. In fact, her method used to be my default procedure: bring the water with eggs to a boil,  cover the pan, turn the heat off, wait 15 minutes. Let the eggs cool for a couple of minutes, peel and enjoy them.  The egg will be perfectly cooked, no green ring around the yolk, but peeling is another story. Most will be a nightmare to peel, some will behave well. Hit or miss.

Just last month my friend Cindy told me about steaming eggs instead of boiling them. She raved about the method from SeriousEats that she stumbled upon through eGullet. Having nothing to lose, I tried it.  It is AMAZING.  I recommended it in a cooking forum, and one of the members cooked 36 hard-boiled eggs, came back to say that every single one was perfectly cooked AND peeled flawlessly and easily.  Convinced yet?

I used the same method to make soft-boiled eggs, and it worked like a charm.  So here it is, plain and simply how to get Eggxhilaration in the kitchen.

HardBoiled

+++++++++++++++++++++++++++++++++++++++++++++++++++++++++++++++++++++

THE PERFECT BOILED EGG

Pour a couple of inches of water in a double-boiler and bring to a boil.

Carefully place as many eggs as you want from the fridge into the steamer basket, and add them on top of the boiling water, reduce heat to a simmer.

Immediately close the pan and start a timer.

For hard-boiled eggs, steam for 10 to 11 minutes, test to see how you prefer them.

For soft-boiled eggs, steam for 6 minutes. 

Have a bowl of cold water ready, when the time is up, use kitchen tongs to remove the eggs from the steamer, dropping them in the cold water to stop cooking. Store in the fridge to enjoy later, or peel right away.

Have a tissue nearby to wipe your tears of joy. 

+++++++++++++++++++++++++++++++++++++++++++++++++++++++++++++++++++++

What I love about the method is its simplicity.  Bring a little water to boil, place a steamer on top and cook to your level of liking, which is easily found in a couple of trials.  Imagine that you want to make a big batch of deviled eggs and would like them all to be gorgeous. Well, this method will save you a ton of grievance.

Messages to thank me can sent by email at sallybr2008 at gmail dot com.  I promise to share them all with Cindy.  😉

SoftBoiled

Steamed for 6 minutes, peeled and ready for an encounter with an Ak-Mak cracker…


PEA PANCAKES WITH HERBED YOGURT

This recipe was on a recent issue of Food and Wine magazine, and I could not wait to try it, because at our recent rehearsal dinner in Sedona we ordered a batch of pea pancakes as an appetizer course, and they were a big hit.  René Restaurant’s version was gluten-free, this one takes a small amount of all-purpose flour. A very elegant and tasty way to celebrate spring…

PeaPancakes1

PEA PANCAKES WITH HERBED YOGURT
(slightly adapted from Food and Wine magazine)

3/4 cup plain low-fat yogurt
2 tablespoons finely chopped parsley, plus sprigs for garnish
2 tablespoons of finely chopped tarragon, plus sprigs for garnish
1/4 tsp dried mint
Kosher salt and freshly ground black pepper
1 + 1/2 cups frozen peas (8 ounces), thawed, plus more for garnish
1 large egg + 1 large egg yolk
1/4 cup heavy cream
1/4 cup low-fat yogurt
1/4 cup all-purpose flour
1 teaspoon finely grated lemon zest
1/2 teaspoon baking powder
1/4 teaspoon ground cardamom
pinch of cayenne pepper, or more, to taste
olive oil spray, for coating griddle

In a medium bowl, mix the 3/4 cup of yogurt with the chopped parsley, tarragon and mint and season with salt and black pepper. Cover with plastic wrap and refrigerate the herbed yogurt until chilled, at least 15 minutes.

Meanwhile, in a medium saucepan of salted boiling water, blanch the peas until crisp-tender, about 1 minute. Drain well and let cool.

In a food processor, mix cooked peas with egg, egg  yolk, cream and 1/4 cup yogurt, and process until smooth. Add the flour, lemon zest, baking powder, cardamon, and cayenne pepper. Process a minute or so more, stopping to clean the sides of the bowl midway through.

Heat a large cast-iron skillet or griddle. Spray the surface with olive oil, and spoon 1-tablespoon mounds of batter into the skillet and cook over moderate heat until lightly browned on the bottom, about 2 minutes. Flip the pancakes and cook for 1 to 2 minutes longer, until lightly browned and cooked through. Transfer the pancakes to a platter and keep warm.  Repeat with the remaining batter. Serve the warm pancakes topped with the herbed yogurt and garnished with peas and herb sprigs.

ENJOY!

to print the recipe, click here

Griddle-side
Comments:  This recipe was originally designed to make 18 tiny rounds, but  I made 6 medium-sized pancakes.  They were absolutely delicious, great texture, moist, tender, and with that perfectly bright taste of green peas.  The lemon zest, as usual, adds a lot of spark to the flavor.  I loved the herb yogurt, Phil preferred to enjoy his pancakes without adornment, or with a very light smear of butter.  For my taste, the tarragon in the yogurt made this dressing a perfect match to the peas.  Of course, if you are not too fond of tarragon, use another herb, I think fresh dill could be delicious too. I also enjoyed the contrast of the warm pancake with the cold dressing.

If you have a special dinner party coming up, think about these for your appetizer course. They would be amazing served just like small blinis, with some smoked salmon on top. They are very tasty at room temperature too, so play with different toppings and awe your guests!  Probably other types of flour could be used, like almond or coconut, turning these babies into gluten-free entities.

peas

 ONE YEAR AGO: Mushroom Stroganoff

TWO YEARS AGO: Tomato Sourdough

THREE YEARS AGO: Gamberetti con rucola e pomodori

FOUR YEARS AGO: Flirting with Orzo