
I might very well be the last food blogger to try it, but after reading about cauliflower crust pizza for a couple of years, here I am to report on my first attempt at turning a classic into its lighter, gluten-free cousin. First, let me say that I don’t see it as a way to replace the “real deal.” All those glorious characteristics of the authentic pizza crust will always have a place in our kitchen. But, if you are in the mood for something lighter or if you need to cook for someone who suffers from celiac disease, this recipe will please you more than you imagine. I wolfed down a little more than half a pizza (!!!!) and instead of heading straight to the couch to lay down and wait for that carb-induced coma, here I am typing this post to share with you. Behold the power of the cauliflower crust!
(Broiling issues, courtesy of a Jack Russell named Buck)
CAULIFLOWER CRUST PIZZA
(slightly modified from Chef in Disguise)
.
Yield one pizza crust
.
1 small to medium-sized head of cauliflower (about 1 cup after squeezed to remove liquid)
2 egg whites
1/4 teaspoon kosher salt
1 teaspoon dried herbs (I used dried thyme)
1/2 cup shredded cheese (I used 1/4 cup Parmigiano cheese and 1/4 cup mozzarella cheese)
tomato sauce
toppings of your choice
Place a pizza stone in the oven, or turn a baking sheet upside down and use it if you don’t have a pizza stone. Heat oven to 450 degrees. Prepare a large piece of parchment paper and spray it with nonstick cooking oil.
Wash and thoroughly dry the head of cauliflower. Cut the cauliflower into small florets, and process until they are the size of rice. Place the cauliflower rice in a pot and add enough water to fill the pot 2/3 of the way up. Bring the water to a boil, lower the heat and simmer for 3 minutes. Drain the cauliflower. Once cauliflower is cool enough to handle, wrap it up in the dish towel and twist the towel around the cauliflower and wring it. You want to squeeze out as much water as possible. This will ensure you get a pizza like crust.
In a medium bowl, combine the cauliflower, egg whites, cheeses, dried herbs and salt, and mix by hand, you sort of knead the dough together. Transfer the crust to your parchment paper. Press evenly forming a circle. Make sure it is as tight as you can make it. You also don’t want it to be too thin or too thick. With the help of a cutting board, transfer the parchment to the oven. Bake at 450 degrees for 12-15 minutes. Keep an eye on it after the 10 minute mark. When it starts turning golden brown, it’s done.
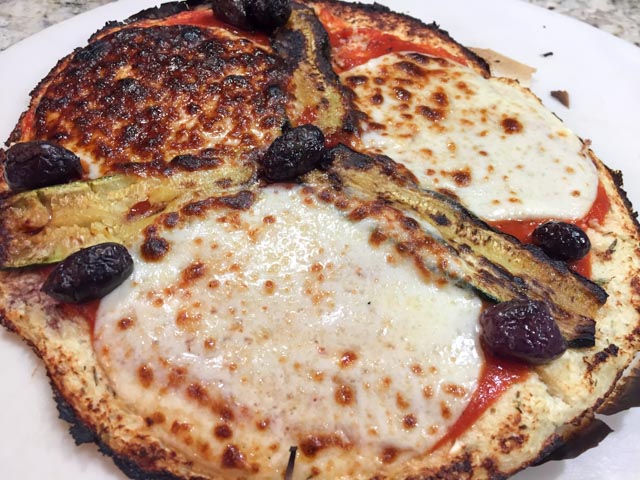
Remove the pan from the oven. Add your sauce, toppings and cheese. Place under a broiler till the cheese melts and bubbles. Watch it carefully or it will bun.
ENJOY!
to print the recipe, click here

Comments: Two things are very important when making pizza crust out of cauliflower. First you absolutely must minimize the amount of water present in the processed cauliflower or the binding agents (egg whites and grated cheese) will not be able to hold it together. When you think you squeezed enough water out, squeeze some more. Made me think of David Rosengarten decades ago when demonstrating a recipe for tabouli. Mince the parsley, when you think you minced it enough, mince some more. You simply cannot over-squeeze the cauliflower. Capisci? Second thing, once you place it under the broiler, watch it like a hawk. Sawsan says clearly in her blog “it will burn quickly.” Which makes you wonder why yours truly would place it under the super powerful broiler of our oven, and then decide that Buck seemed too agitated and needed to go out to the backyard. I said to myself “this will only take a minute.” Indeed. Problem is that it also only took a minute to almost burn part of my beautiful pizza. Lesson learned. Do as I say, not as I did. Watch the pizza, move it around, especially if your broiler is very powerful.

Will I be making it again? No doubt. But probably not as the single item in our dinner, because making one pizza was already quite involved, and it would not be enough for the two of us, since it’s so light. But I can see us having two pizzas, one “authentic” and one cauli-crust version. Or the cauli-pizza and a huge salad with barbecued ribs on the side… (just kidding).
I made this version a couple of days after having our entire lab over for a “regular” pizza party. There was one small pizza leftover, and some toppings like grilled zucchini, cheese and tomato sauce. The leftover pizza was warmed up in the oven and made Phil a happy man. The cauli-crust was embellished with the toppings that were ready and waiting in the fridge, and made Sally a happy woman. Don’t you love happy endings?
Sawsan, thanks for your great tutorial on the pizza crust!
Next time I’ll be a better virtual student…
(sigh)
ONE YEAR AGO: Silky Rutabaga Puree
TWO YEARS AGO: Bon Bon Chicken: Light and Spectacular
THREE YEARS AGO: Red Wine Sourdough Bread with Cranberries
FOUR YEARS AGO: Award-Winning Sourdough Baguettes
FIVE YEARS AGO: Country Rye (Tartine)
SIX YEARS AGO: Penne a la Vechia Bettola
