FAKEBBOULEH

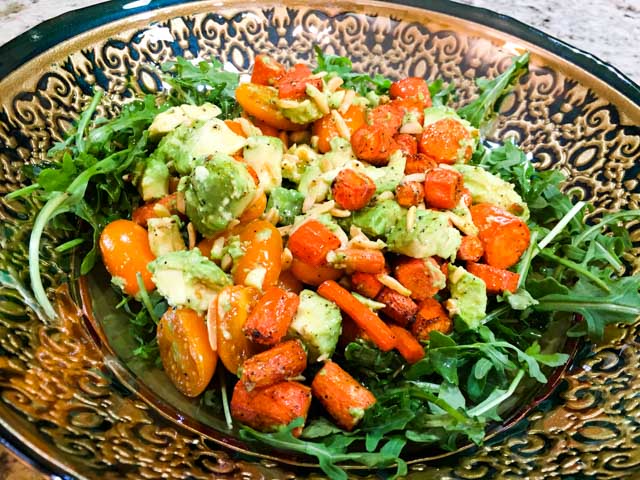
Meet the lighter sibling of tabbouleh. Made with riced cauliflower instead of cracked wheat, it is every bit as delicious, but won’t make  you feel stuffed after going back for seconds. I don’t know about you, but I can never stop at one serving of tabbouleh. I always go back for another helping, or when dining at home just the two of us, I keep visiting the serving bowl with my own fork: a little mindless bit here, another there as we talk about life, the mysterious process of bacterial iron uptake, or which brand of shoes could prevent my ankle from saying nasty things to me during a longer run. You know, real important stuff.

fakebouleh

CAULIFLOWER A LA TABBOULEH
(from the Bewitching Kitchen)

1 head of cauliflower
1 tablespoon coconut oil (or olive oil)
salt and pepper
2 cucumbers, seeded, diced
2 large tomatoes, diced
2 tablespoons fresh mint leaves, minced (or 1/2 teaspoon dried mint)
1/3 cup parsley leaves, minced (or amount to taste)
2 tablespoons olive oil
zest and juice 1/2 lemon

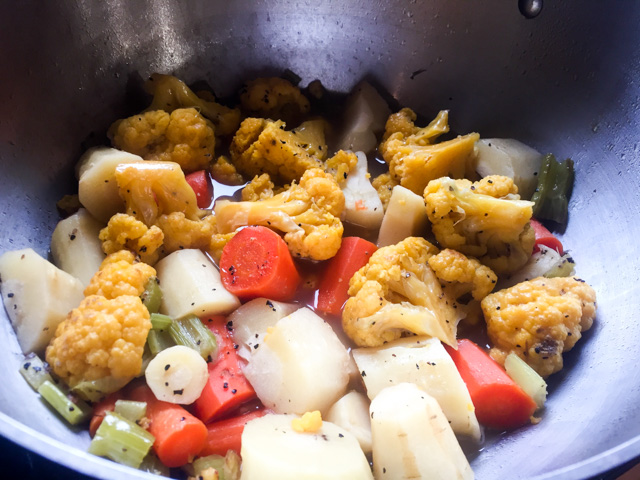
Rice the cauliflower florets in a food processor, blender, or grating box. Heat the coconut oil (or other fat of your choice) on a large skillet, preferably non-stick.  When the oil is hot, add the riced cauliflower, season lightly with salt and pepper, and move it around for a few minutes. Immediately remove from the heat and transfer to a dish to cool. I like to use a baking dish to get the cauli-rice well spread.

Add the cucumber, tomatoes and parsley to a bowl. Don’t be skimpy on the amount of parsley, and mince it very well. If using fresh mint, add it to the bowl too.

Make a quick and simple dressing with the olive oil, lemon juice and zest, add salt and pepper, dried mint if using it.

Add the cooled cauliflower rice to the veggies, pour the dressing on top and mix gently.  It gets better with a little time in the fridge.  Serve at room temperature.

ENJOY!

to print the recipe, click here

dinner

Comments: There are several ways to cook riced cauliflower, each with a slightly different outcome. When I enjoy it as I would real rice, I prefer to bake it. For this type of recipe, I’ve tried three ways: baked, microwaved, and sautéed in oil. I favored the third option because the texture was perfect to mimic cracked wheat.  Baked would be my second choice, the problem is that the grains of cauliflower shrink a lot more in the oven. You can of course use any method you like, just make sure it is all at room temperature when you mix the fakebbouleh. As to the parsley,  next time I will add more to my version. I love it and like my tabbouleh – fake or authentic – to be pretty “herbal.”

Next day leftovers were all I had for lunch. I did squirt a little more lemon juice on top because I believe there is never too much lemon on this type of preparation. It freshens up everything. One last thought before I leave you… I usually add a lot less dressing to salads than most recipes call for, so if you try this recipe, keep that in mind and consider doubling the amount. A touch of Maldon salt flakes right before indulging is not mandatory, but quite pleasant for the taste buds.

dinner-2

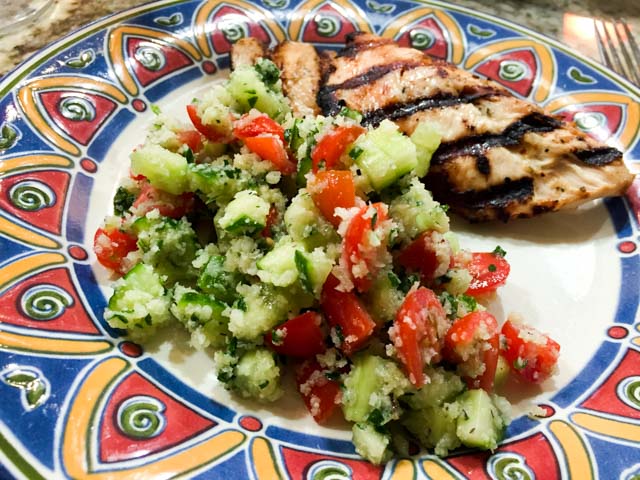
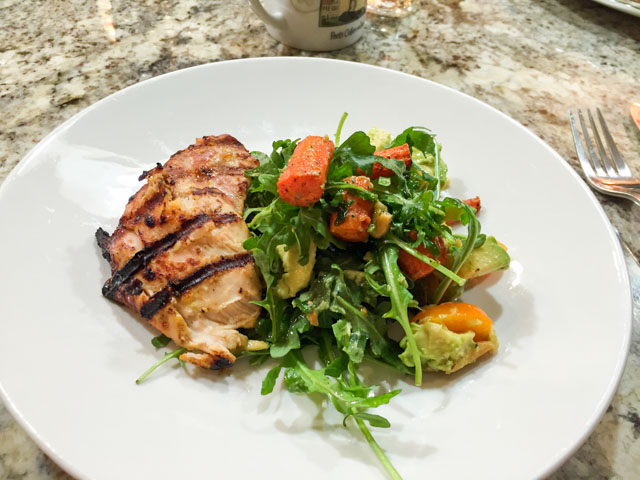
Dinner is served!  Grilled chicken breasts were perfect with my fakebbouleh…

ONE YEAR AGO: Yellow Squash Soup

TWO YEARS AGO: Grilled Chicken with Tamarind and Coconut Glaze

THREE YEARS AGO: Chicken-Apricot Skewers

FOUR YEARS AGO:  Asparagus Quiche

FIVE YEARS AGO: Two-stage Pea and Prosciutto Risotto

SIX YEARS AGO: Mellow Bakers: Corn Bread


CASHEW CREAM SAUCE

You know how every single Paleo-lover food blogger goes on and on about the wonders of cashew cream and how it will replace melted cheese in a way you won’t believe until you try it?  Well, those statements always put me into eye-rolling mode. I cannot help but mentally associate cashew cream sauce with those gluten-free donuts that look like sawdust shaped into rounds and make me want to run away screaming.  Of course, I have the utmost respect for those with non-imaginary gluten allergies. But I doubt they would like those donuts. In some cases, if you cannot have the real thing, better skip it altogether.  But, back to the cashew cream.  I am here to say I was absolutely wrong in my assessment. The stuff is awesome. Awesome. I made it, and could not stop sampling a little teaspoon here and there, I drizzled it over everything. Then, when I considered dunking a chocolate cookie into it, Phil pointed out that maybe I was getting a bit carried away. Fine. My next batch will be divided in two, and one of them will have coconut sugar in it. Or maybe maple syrup. And I shall dunk a cookie into it. You better believe it. Whatever your take on Paleo nutrition, open your gastronomic horizons, and made this sauce.

Cashew Cream

CASHEW CREAM SAUCE
(adapted from many sources)

1 cup raw cashews
Water
1 teaspoons lemon juice
1 teaspoon apple cider vinegar
salt and pepper to taste

Place raw cashews in a bowl and add cold water to cover by 1 inch. Soak cashews at room temperate for 8  to 24 hours. Drain and rinse  very well.

Add drained nuts to a powerful blender with 3/4 cup cold water, the lemon juice and apple cider vinegar. Process until very smooth, about 2 minutes, scraping down sides of bowl as needed. Adjust consistency with extra water if you like. Season with salt, pepper, and extra lemon juice to taste.  Sauce will keep in the fridge for a few days, and it can also be frozen.

ENJOY!  (I know you will…)

to print the recipe, click here

Comments: What can I say?  I regret it took me so long to finally try this recipe. If I have one criticism about it is that cashews can be pricey, but if that was not the case, I would make it regularly.  I can now understand why so many people make fake Alfredo sauce with it. You can find quite a few variations online, some add nutritional yeast to take it on a slightly more “cheesy” path, but I decided to keep it simple. Basically you must soak the cashews for a few hours, discard the water. Process with a slightly acidic ingredient, sometimes a little olive oil is also added, season with salt and you are done. Variations with sugar can be used to drizzle over fresh fruit, and I’m dying to try that soon. For the moment though, I leave you with a photo of a recent lunch which was enjoyed three days in a row. Ground chicken sautéed with mushrooms, green curry paste, garam masala, and ginger. Spooned over butter lettuce leaves. And topped with this magical sauce…

Lettuce Cups

 Cashew Cream Sauce…. It’s been a  pleasure to meet you! 

ONE YEAR AGO: Blood Orange Margaritas

TWO YEARS AGO: Smoked Salmon Appetizer

THREE YEARS AGO: Clementine Cake

FOUR YEARS AGO: Springtime Spinach Risotto

FIVE YEARS AGO: The end of green bean cruelty

SIX YEARS AGO: Torta di Limone e Mandorle

A SMASHING PAIR

No, I am not talking about Phil and I, although the thought crossed my mind…  It is actually a quote from my newest cookbook:

Have you tried roasted carrots and avocados together?
What a smashing pair!

I don’t think I ever thought of mixing carrots with avocados, but the other day a simple email with notification of a new post by Kelly arrived, and I dropped everything I was doing to check it out. She shared the recipe for a gorgeous quinoa concoction found in  “The Clever Cookbook.”  Cute name, almost as cute as the blog hosted by the author, Emilie: The Clever Carrot. I can see you’re smiling now, it’s impossible not to smile at the name. I need another cookbook as I need a third eye, but my will power for certain temptations is non-existent. I don’t even try to put up a fight anymore, just go to amazon and get the job done.  Ordering the Kindle version minimizes the amount of guilt, in case you are wondering how I deal with my weaknesses.

That night I laid in bed for a long time reading the book,  and could not wait to make this salad, because who could resist getting acquainted with a smashing pair? Less than 24 hours later the salad was part of our dinner, and it was a tremendous success!  I urge you to try it too. I modified the recipe a bit, but you can find Emilie’s original in her book,  which by the way is a total delight! You need to have it, so don’t even bother resisting.

Spice Roasted Carrot and Avocado Salad

SPICE-ROASTED CARROT AND AVOCADO SALAD
(adapted from The Clever Cookbook)
printed with permission from Emilie Raffa)

4 medium carrots, peeled and cut into 1-inch pieces
1 tbsp olive oil, plus more for drizzling
1 heaped tsp Southwest spice blend (I used Penzey’s)
1/4 cup slivered almonds
a few yellow grape tomatoes, halved
1 ripe Hass avocado
Juice of ½ lemon
Pinch of salt
arugula leaves

Heat your oven to 425 ° F. Line a rimmed baking sheet with parchment paper. Place the carrots in a large bowl. Add the olive oil and sprinkle with Southwest spice, and a little salt. Toss well to coat. Spread the carrots out on your sheet pan. Roast for about 20 minutes, or until the carrots are caramelized and tender. In the final 5 minutes, add the slivered almonds on top. Remove from the oven, add the tomatoes.  Give it a good stir. Allow the mixture to cool slightly while you dice the avocado and drizzle the pieces with lemon juice to prevent browning.

Add the avocados to the carrots, and toss gently to combine. Place the mixture on top of arugula leaves on a serving bowl, drizzle olive oil and some more lemon juice, adjust seasoning with salt. Toss very gently and serve at room temperature.

ENJOY!

to print the recipe, click here


clevercookbookcomp

Comments: Talk about a delicious dinner! It’s not everyday that a salad draws enthusiastic compliments from my beloved husband. We both went crazy for this one, and Phil in particular thought that the grilled chicken was a perfect match, making the meal worthy of a fancy French style bistrot. On a slight tangent: the chicken was super simple.  I marinated boneless, skinless chicken thighs early in the morning in a mixture of yogurt,  a touch of olive oil, lemon juice, paprika and turmeric. A smidgen of agave nectar just because. When it was time for dinner, I scraped the marinade off, seasoned the meat with salt and pepper, and grilled until done. The combination of sweet roasted carrots, the hint of spice, and the creaminess of the avocado was irresistible!

served
The salad has enough substance to stand proud on a fully vegetarian menu. Maybe paired with a hearty pasta dish, or next to crostini with mushrooms and cheese?  Or you can skip the greens and use the smashing mixture over grains such as farro or quinoa. Your call.

Emilie, thank you for allowing me to publish your recipe…
I must say you are absolutely right, roasted carrots and avocados are “a smashing pair!”

Now, a little bit about the book…

5118l1kcEiL._SX258_BO1,204,203,200_

The book is organized in a slightly unusual way. You won’t find chapters for Main Dishes, Appetizers, or even a particular kind of ingredient. Instead, her approach is to divide the book in strategies that make your life easier in the kitchen. For instance, the first chapter is called “Prep Ahead Vegetables”, and shows how if you invest a little time in prepping veggies they can help you out in many recipes. The chapter includes soups like 30 minute Broccoli and Feta Soup which immediately called my name.  The following chapter, “Back to Basics”  lists her “non-negotiable” items. Stuff that she always has around like toothpaste, chocolate, and the cell phone  (yeah, she is adorably witty). In that chapter, you’ll learn how to make her Triple Duty Chicken Stock, Basic Tomato Sauce, and Master Stir Fry Sauce. Well, you get the gist of it. A little investment of time to make batches of those, and cooking on a daily basis will be a breeze.   But my favorite chapter was one called “Process This.” Clever ways (it is a clever cookbook, after all) to use the food processor. I must try her Banana Cloud Cake included in the chapter, and the user-friendly No-Peel Butternut Squash Soup (sounds like a dream, right?).  Two other chapters that I was quite fond of: “Batch Cooked Grains” and “Freezer Marinades.” The Clever Cookbook is definitely one that will not sit collecting dust in your shelf.  If you are a busy person, with or without kids around, this book is a must-have. To order, follow this link. And while you are around the ordering process, go ahead and subscribe to Emilie’s blog too. I did, because I don’t want to miss her future culinary adventures…

Kelly, thanks for the heads up about Emilie’s cookbook and blog. Loved “meeting” her through you…

😉

ONE YEAR AGO: Spinach and Mushroom Stuffed Pork Tenderloin

TWO YEARS AGO: Crispy Chickpea and Caper Spaghetti

THREE YEARS AGO: Spring has Sprung!

FOUR YEARS AGO: Chickpea and Fire Roasted Tomato Soup

FIVE YEARS AGO: Double Asparagus Delight

SIX YEARS AGO:  Sun-dried Tomato and Feta Cheese Torte


WHEN THREE IS BETTER THAN TWO

Am I talking about the dogs again?
No, this time it’s a veggie thing…

triple

As far as vegetable purees are concerned I tend to be very conservative to allow the main ingredient to shine in all its glory. Yes, I’ve been known to mix two veggies together, for instance Broccoli & Spinach,  Carrot & Sweet Potato , or Cauliflower and Celeriac, but those are exceptions rather than the rule. However, the other day I was staring at the bag of parsnips I got with the intention of roasting them and faced a disappointing state of affairs. You’d think that those bagged creatures would all be more or less similar in size and shape? Don’t get your hopes high! They place one or two gorgeous specimens with a bunch of pencil-thin cousins. Pathetic.  I learned a lesson, of course, will never buy bagged parsnips again. I’ll pick them myself, thank you very much, and they will be all chubby.  But, I digress. I was staring at the parsnips and decided that they could work better in a puree of sorts. Since I did not have enough for a side dish, I also grabbed some carrots. And then, the tiny orange cauliflower winked at me.  So there you have it, not one, not two, but three veggies cooked together in harmony. I must tell you, this turned out much better than I expected, especially considering I kept it very simple. No exotic spices, no garlic confit, not even chicken stock… I let the veggies sing, and the music was gorgeous!

ParsnipCarrotMash

PARSNIP, CARROT AND CAULIFLOWER MASH
(from the Bewitching Kitchen)

1 tablespoon butter + smear of olive oil
3 celery stalks, diced
1 small head of orange cauliflower, florets only
5 parsnips, cut in chunks
4 carrots, cut in chunks
salt and pepper (go heavy on the pepper)
2 cups water

Heat the butter and oil in a large pan, add the diced celery, season lightly with salt and pepper and cook until translucent and fragrant. Add all the other veggies and cook in medium-high heat stirring occasionally for a few minutes. If necessary, add a tiny amount of olive oil to prevent the veggies from scorching.

Add the two cups of water, season with salt and pepper again, and cover the pan. Simmer for 25 minutes in low-heat. When veggies are tender, remove them to a food processor, leaving most of the water behind. Process and add more water if too thick.  Adjust seasoning, and serve right away.

ENJOY!

to print the recipe, click here

ingredients
Comments:
We were both quite impressed by how complex this puree tasted.  I think parsnips adds a lot with their distinctive taste: spicy, peppery, a bit citric almost. They change completely the flavor of the carrots and cauliflower. This mash has great texture and just the right amount of sweetness. Plus, the color is not too shabby either… When processing, don’t go overboard, I think having some chunks here and there add a lot to the dish. You might even skip the processing and mash it all by hand, whatever rocks your boat…

served

Dinner is served!  Simple grille chicken breasts, mashed veggies, and a salad.
Very delicious way to end a busy Monday.


ONE  YEAR AGO: Mini-quiches with Duxelles and Baby Broccoli

TWO YEARS AGO: Quinoa and Sweet Potato Cakes

THREE YEARS AGO: Pumpkin Bolo de Fuba’ Cremoso

FOUR YEARS AGO: Citrus-crusted Tilapia Filets

FIVE YEARS AGO: Bran Muffins, not just for Hippies

SIX YEARS AGO: Flourless Chocolate Cake


CHICKEN THIGHS WITH ARTICHOKES AND CAPERS

If you are into Paleo recipes, make this dish!  If you are not into Paleo recipes, make this dish!  Yes, I am a bit bossy today, as a husband and a few graduate students might have noticed. But it’s all with good intentions, as I know what is good for them, for you, and maybe even for myself.  The inspiration for this recipe was found in one of my Kindle cookbooks, Make it Paleo II, by Hayley Mason and Bill Staley. They also have a food blog, Primal Palate, with great recipes and youtube videos. I always read the good and the bad reviews of a cookbook before buying it, and one of the reviewers at amazon.com said that this recipe alone was worth getting the book. I made it twice, once exactly as written, but in this post I am sharing my take on it, modified not only in flavor but also in the method itself. In their version, it is all made in a single skillet, but I did not want to turn on the big oven, so after browning the meat I transferred the pieces to a baking dish that fits in our Breville.

SkilletChickenThighs

CHICKEN THIGHS WITH ARTICHOKES AND CAPERS
(adapted from Make it Paleo II)

6 skin-on chicken thighs, boneless
Sea salt to taste
1 tsp dried oregano
1/2 tsp za’tar
1/2 tsp freshly ground black pepper
1 (6-oz) jar artichoke hearts, drained and sliced
1/2 cup Kalamata olives, pitted and drained
2 Tbsp capers
1 lemon, sliced into rounds and quartered

Heat the oven to 425°F. Heat a skillet or cast iron pan over medium heat. Pat the chicken thighs dry with a paper towel, removing as much moisture as possible. Season the skin with salt and place them skin side down in the hot skillet. Flip the thighs once they develop a nice brown sear on the skin, which should naturally make them easily release from the pan. Cook the chicken skin side up for 1 minute, then transfer to a baking dish, skin side up.  Season evenly with the oregano, za’tar, and  more black pepper to taste. Add the artichoke hearts, olives, capers, and lemon slices to the skillet. Place the skillet in the oven and roast for 30 to 35 minutes, until the chicken is fully cooked.

ENJOY!

to print the recipe, click here

Comments:  If you never de-boned a chicken thigh yourself, take a deep breath and try it, because it’s a nice skill to acquire in the kitchen. I don’t know what type of chicken meat your grocery store carries, but where we live I can find bone-in, skin-on chicken thighs, and boneless, skinless.  The former I use for roasting all the time, but the skinless I reserve for either braises, stir-fries, or grilling (usually after a nice marinade with yogurt or some citric concoction).  You absolutely need boneless pieces with the skin on for this recipe, so if you cannot find it, roll your sleeves up and get working.  It was a bit of a struggle, but I got better and better as I did it.  I watched some videos on youtube to help me with the technique, but most videos available show professional chefs who handle the knife as if they were born with one in their hands.  Amazing to watch, but when trying to mimic them, my shortcomings became quite evident. I say take your time, put some soothing music on, and practice. By the way, if you don’t have za’tar, don’t worry. But get some, will you?  I must say it’s one of my favorite spice mixtures at the moment. Love it.

Phil is so addicted to my default recipe for chicken thighs, that at first he was disappointed by the different preparation. But, it took him only one bite to say that I should revisit this recipe whenever I feel like it. Two thumbs up!  So there you have it, make this dish because I said so, and Sally knows what’s best for everyone. HA!

😉

ONE YEAR AGO: Pea Pancakes with Herbed Yogurt

TWO YEARS AGO: Mushroom Stroganoff

THREE YEARS AGO: Tomato Sourdough

FOUR YEARS AGO: Gamberetti con rucola e pomodori

FIVE YEARS AGO: Flirting with Orzo