APRICOT LINZER TORTE

Do you know Anna Olson? I don’t remember how I got hooked into her shows, but I think it was one of those suggestions that pop in the amazon page. At any rate, she is big on Canadian Food TV. As far as I can tell, the Canadian food TV is far superior to our own. I watched every single episode I could find online. Basically a full season of “Sugar“, and a full season of “Baking with Anna Olson.”  They are organized by ingredient (chocolate, blueberries, pecans),  or basic component (say, pastry cream, or pie dough), and she usually shares three recipes with increasing level of difficulty.  I like her a lot. She is the type of baker who is clearly talented, but also down to Earth. Some professional bakers make you think that unless you can find the vanilla bean harvested on the Sava region of Madagascar under a moon 100% full, please don’t bother making the recipe. Not the case with Anna. You’ll feel less constrained and even encouraged to try something a little different. Sometimes she might even have a little powdered sugar flying moment in her KitchenAid, which in my mind just makes her even more special.  Of course, that type of moment is not a rare event in the Bewitching Kitchen, quite the opposite (sigh). When I watched her show on apricots, I knew I had to try her Linzer version. I am glad I did…

APRICOT LINZER TORTE
(from Anna Olson)

for filling:
2 cups fresh apricot, washed and pitted
⅔ cup apricot jam
¼ cup sugar
zest of one orange

for dough:
3 hard-boiled egg yolks
1 ¼ cup unsalted butter, room temperature
½ cup icing sugar
dash of vanilla extract
½ cup ground hazelnuts, lightly toasted
¾ tsp salt
¼ tsp baking powder
2 ¼ cups all-purpose flour
1 egg, mixed with 2 tbsp cold water

Cook all ingredients for the filling in a big saucepan until apricots are tender. Remove from heat, puree and cool completely before using.

Push cooked egg yolks through a sieve and set aside. Cream together butter and icing sugar until smooth. Stir in vanilla extract. Add hazelnuts and cooked egg yolks and blend in. Sift together salt, baking powder and flour and add to butter mixture. Blend until dough comes together (it will be quite soft). Divide dough into 2 discs, wrap and chill for at least one hour, until firm.

Heat oven to 350 F.

On a lightly floured surface, roll one disc of dough to 3/4- inch thick. Using the bottom of a 10-inch removable-bottom tart pan as your template, cut out a disc of pastry. Repeat this with the second disc of pastry.

Using the tart pan bottom as a lifter, transfer the first disc of pastry to a parchment-lined baking sheet. Spread the apricot filling over the entire surface of the dough. If the dough is very soft, I like to flash it in the freezer for 5 minutes, to make spreading the filling easier.

Using a 3/4 -inch round cutter cut decorative circles around the dough. Use a slightly smaller cutter to make a second series of smaller openings. While still on the cutting board, brush the top of the disc generously with egg wash. Place gently on top of apricot filling. Place ring of a springform pan around torte to help it hold shape while cooking.

Bake for 35-40 minutes, until a rich golden brown in colour. Allow to cool before cutting. If desired, sprinkle with a dusting of powdered sugar before serving.

ENJOY!

to print the recipe, click here

Comments: It was a lot of fun to make this recipe, it is a real soft though, and I decided to roll it out in between two sheets of parchment paper. Works much better for me that way. The filling is delicious, I had to hold myself back not to use it in macarons next day, it would be great added to some chocolate ganache, I think. Apricot and chocolate are a match made in heaven.

The dough is on the crumbly side as expected for a Linzer concoction. Her use of hazelnuts instead of almonds makes it quite unique and special. Everyone in the department loved this little treat, which brightened up one very summery Monday.


Make Sally happy, grab a pin!


ONE YEAR AGO: A Trio of Air-Fried Goodies

TWO YEARS AGO: Focaccia with Grapes, Roquefort and Truffled Honey

THREE YEARS AGO: Moroccan Carrot Dip Over Cucumber Slices 

FOUR YEARS AGO: White Chocolate Macadamia Nut Cookies

FIVE YEARS AGO: Cilantro-Jalapeno “Hummus”

SIX YEARS AGO: A Moving Odyssey

NINE YEARS AGO:
 Shrimp Moqueca

SaveSave

SaveSave

SaveSave

SaveSave

SaveSave

SaveSave

BRIGADEIROS FOR THE FOURTH OF JULY

Brazil meets USA, big time! A traditional Brazilian delicacy dresses up in American colors for one of the biggest holidays celebrated here, Independence Day. We were invited for dinner and fireworks over at a friend’s home, and on a last-minute move, I prepared these babies to take with us. They are a departure of the classic Brazilian brigadeiros, made with cocoa powder. In this case, I flavored them with a touch of coconut extract, but probably should have added more than I did, the flavor was barely noticeable.


PATRIOTIC BRIGADEIROS
(from Easy and Delish)

2 (14-oz) cans sweetened condensed milk
1 1/2 Tablespoons unsalted butter
1 teaspoon pure vanilla extract (or substitute 1/2 teaspoon coconut extract)
food coloring (Red and Blue)
red/white/blue sprinkles (optional)
white chocolate ganache to drizzle (optional)

Combine sweetened condensed milk with unsalted butter in a wide, no stick pan over medium heat. Cook, stirring constantly, until smooth.
Mixture is ready when it thickens and starts to peel away or show the bottom of the pan when you scrape it with your wood spoon (about 10-15 minutes). The fudge mixture should be thick enough to reveal the bottom of the pan for a couple of seconds before the mixture levels out again.
When the fudge mixture is ready, remove from the stove top and stir in the vanilla or coconut extract. Next, spread 1/3 of the mixture in the center of a half-sheet pan coated with a little butter so that it won’t stick. 
Place another 1/3 of the mixture in a bowl and stir in  blue food coloring.  Place the remaining 1/3 of the fudge mixture in another bowl and stir in red food coloring. Transfer both the blue and red mixtures to the greased baking sheet, spreading them around side by side. Allow to cool completely.
Using a tablespoon as measurement, scoop out one spoon of the white/red/blue mixture (starting from the center to the edge of the plate) and with greased hands, roll out into balls. Place each little ball into a small paper liner  and decorate the way you want.  They can be kept in the fridge until serving time. 
ENJOY!
to print the recipe, click here

Comments: If you’ve never made traditional brigadeiros, or worse yet – have not even heard about them, please read my old blog post to fix this major gap in your culinary knowledge. It’s important. It was really fun to make these, I advise you to use two cans of condensed milk, so that you have enough to play with. With this amount, I made 26 brigadeiros. They are rich and sweet, so one or two is all you’ll need. But they bring me so many nice memories of my home country, I usually have a bit of a hard time stopping at two. So I accept my weakness, and move on. And jog on. Weight lift on. Kickbox on… you get the picture… damage control.

You can definitely use different colors to celebrate your favorite team, your school, your mood. Halloween Black and Orange brigadeiros might be the rage this year (wink, wink).

SaveSave

SaveSave

SaveSave

SaveSave

SaveSave

SaveSave

SaveSave

SaveSave

SaveSave

SaveSave

SaveSave

SPRINKLED MERINGUES

This is a fun recipe to make with kids. So simple! The idea was in a very nice cookbook, called Sweetapolita, which I very highly recommend for those who have been bitten by the Baking Bug. I haven’t asked for permission to share her recipe and method to make meringues (she has a few little tricks up her sleeve), but you can definitely use any meringue recipe out there. The secret is to bake them slow and low, and allow them to dry for a while inside the closed, turned off oven. I used a closed star tip to pipe mine, but you can go with a regular piping tip, or even just use a spoon.

For a classic meringue recipe using the French method click here.

After they are done, you melt some white chocolate, and add your favorite type of sprinkles into a small bowl. Dip the bottoms of the meringues in chocolate, then coat with sprinkles.  It is a bit tricky to get the amount just right, but no matter what you do, they will be a ton of fun to make and eat.

You can customize the color of your sprinkles too, of course. Maybe your favorite team is playing in the World Cup? Or your kid’s team will have a nice baseball match and you are the one in charge of loading them with sugar after?

Any kid will love these!

ONE YEAR AGO: Incredibly Simple Times Three

TWO YEARS AGO: Dan Lepard Simple White Loaf

THREE YEARS AGO: Maureen’s Fabulously Fudgy Brownies

FOUR YEARS AGO: Wheat Berry Caraway Bread

FIVE YEARS AGO: Mexican Focaccia 

SIX YEARS AGOSunny Kamut Salad with Roasted Lemon Vinaigrette

SEVEN YEARS AGO: Pane de Casa & Crostini

EIGHT YEARS AGO: Down-home Dig-in Chili

NINE YEARS AGO:  Cinnamon Rolls

SaveSave

SaveSave

SaveSave

SaveSave

SaveSave

THE BEWITCHING KITCHEN TURNS NINE!!!!

I can hardly believe it. For nine years I’ve been sharing recipes, stories, dog tales, kitchen mishaps, happy and not so happy news in my virtual spot. The thrill of writing it is still with me, in many ways more intense now than ever. The overall atmosphere of my blog might be changing a little because my cooking interests have changed.  I used to be a certified cake-o-phobe, but now I get more excited about concocting a genoise than making an exotic risotto. Go figure. To celebrate my 9th year of food blogging, I wanted to bake a special cake that would push the boundaries of my comfort zone a little. Thanks to help and advice from my friend Jennifer, Patissiere Extraordinaire, I share with you a French classic: Gateau Royal. Chocolate lovers, this is your dream come true in cake form.

GATEAU ROYAL
(based on Il etait une fois la patisserie and Rock the Bretzel)

for the chocolate genoise:
(makes a 9 x 13 cake, you will use only part of it)
70 g butter, melted, warm
90 g cake flour
45 g cocoa powder
6 eggs
200 g sugar
1 tsp vanilla paste

for the pate praline:
125 g hazelnuts
125 g almonds
160 g sugar
5 mL water

for the filling:
40 g milk chocolate
160 g pate praline
80 g Gavottes cookies (or rice Krispies)

for the mousse:
115 g egg yolks (about 6)
100 g syrup (35 mL water + 70 g sugar)
200 g chocolate
400 g heavy cream

for the pouring ganache:
227g chocolate (at least 60% cocoa)
170g heavy cream
28g light corn syrup

Make the genoise. Heat the oven to 350 degrees F. Butter a 9 x 13 inch pan and line the bottom with parchment paper. Sift the flour with the salt and cocoa powder. In a heatproof bowl whisk together the eggs and sugar. Place the bowl over a saucepan of simmering water. Whisking constantly, heat the eggs and sugar until warm to the touch, and the sugar feels dissolved if you test it with your finger. Remove from heat and transfer the mixture to the bowl of your electric mixer, fitted with the whisk attachment.

Beat on high-speed until the egg mixture has cooled, and tripled in volume. It will fall like a ribbon from the beater, and form a distinct pattern on the surface when it drops. Beat in the vanilla extract. Add the flour-cocoa mixture in three increments, mixing gently by folding.  Remove about half a cup of batter and mix with the hot butter. Pour that back into the cake batter and mix gently. 

Pour on the prepared pan and smooth the surface with an offset spatula. Do not be aggressive, the batter is delicate and the air you beat into it is all that will lift the cake. Bake for 18 to 20 minutes. Cool completely before inverting and moving on with the recipe.

Make the pate noisette. Start by placing water and sugar in a skillet or a large saucepan. Heat up to 240 F.  Add the hazelnuts and almonds. Gradually, they will be covered with a white film, that looks like sand.  Cook until the sugar re-dissolves and caramelizes, stirring gently often.  Pour the mixture on a sheet of parchment paper and let cool completely. If you have a Vitamix, use it to process the praline, in about 5 minutes you should have a very nice, flowing paste.  Reserve. You will not use the full amount for the cake. 

Cut the sheet of cake to form an 8-inch circle. Freeze the trimmings for other uses. Center it inside a 9-inch cake pan with removable bottom and tall sides. To make removal easier, place a sheet of acetate film all around the inside of the pan.

Make the praline filling: melt the milk chocolate and allow it to cool slightly. Add to 160g of pate praline, mix well. Crush the required amount of Gavottes or rice crispies and add to the mixture. Immediately spread it over the cake, bringing it to the edges in a layer as uniform as possible. Work fast because the mixture will get harder to spread as it cools.  Reserve.

Make the chocolate mousse. Place the cream in the bowl of a Kitchen Aid and place it in a cool place for at least 30 minutes. Beat until firm. Transfer to a bowl and keep in the fridge. Wash the Kitchen Aid bowl, you will use it to whip the egg yolks. Melt the chocolate in a bain-marie. Reserve. Heat the sugar with the water in a saucepan. When the mixture reaches 230 F, start whipping the yolks in the mixer.   When the mixture reaches 240 ° C, pour it on the yolks while continuing to whip. Continue to beat until completely cool. The mixture should be clear and form a ribbon. Delicately stir in the melted chocolate. Your mousse is now ready.

Spread the mousse all over the cake, making sure it completely covers the space between the cake and the wall of the pan. Add all the mousse to the top of the cake, forming a thick smooth layer that will almost reach the top of the pan. Smooth the surface with an offset spatula, cover with plastic wrap and freeze for at least 6 hours, preferably overnight.

Prepare the icing. Cut the chocolate in small pieces, pour the almost boiling cream on top, wait a couple of minutes and gently mix. Add the corn syrup. Cool until it is around body temperature, and working very fast, in a single movement, pour it over the still frozen cake. Once the icing sets, decorate with white chocolate drizzle, or in any other way you envision.  Keep in the fridge until serving time. Slice using a knife moist with warm water, cleaning it after each cut.

ENJOY!

to print the recipe, click here

Comments:  Traditionally, the Gateau Royal is made with a base of almond sponge, similar to the Joconde used in the Opera Cake. Jennifer likes it better with a genoise, because the cake needs to be fully frozen after assembling, and the genoise performs better upon freezing-defrosting. She speaks, I listen. Chocolate genoise it was. My other departure from tradition happened in the final step, the icing. A real Royale shines (literally) with the coating of a mirror glaze. I had a few issues and resorted to plan  B, a more humble pouring ganache. The mirror glaze adventure shall be re-visited in the future. And I promise you won’t have to wait for the Bewitching to turn ten.

I will not lie to you. Making this cake will be a labor of love. One of the components, the crunchy topping for the genoise, requires making pate noisette. The photo above shows the overall process. The nuts are coated with the syrup and you must cook them until it all caramelizes and forms a nice shiny coating on the nuts. It takes a little time, and constant attention. Once you get to that stage, a powerful mixer like a Vitamix is the method of choice to liquefy it, so that the result will be a luscious, thick and smooth cream. Once the pate noisette is ready, it will be combined with special French cookies called Gavottes, which will probably require a virtual trip to the Store That Sells It All, aka amazon.com. Adaptations in the US often call for rice krispies. Their job is only to provide texture. Since it’s not every day that a food blog turns nine years old, I went the extra mile and used the real deal. When folks at the department tasted the cake, the ALL wanted to know what was the crunchy filling. It is that good, my friends. Leftover pate noisette is the stuff Nirvana is made of. I put it to good use in some macarons, remember?

Assembling this cake is a ton of fun. It needs to freeze for several hours before the icing is poured on top, so in case you make it, keep that in mind. Definitely better to spread the process. You can bake the cake on day one, make the praline and the mousse on day two, and coat it on day three. Easy peasy. The resulting cake has everything a choco-holic loves: intense chocolate flavor in each layer, perfect contrast of texture thanks to the praline, and that Nutella-aura that turns us all into happy kids. Cannot imagine a better cake to celebrate a special occasion.

A little slice of chocolate heaven!

So here I am, inviting you to follow me as I start my 10th year of food blogging. Expect a lot more baking, by the way. I want to learn different skills, from tempering chocolate to working with choux pastry, from sugar work to entremets. Petit fours? Yeah, I want to tackle them too…

If you’ve been with Bewitching Kitchen for a while, or happened to stumble on my site today for the first time, thanks for being here! 

Special thanks to Jennifer, who virtually held my hand during the preparation of the cake,
calming me down in some particularly thrilling moments
(wink, wink).

Celebrate, grab a pin!

ONE YEAR AGO: The Bewitching Kitchen turns eight!

TWO YEARS AGO: The Bewitching Kitchen Turns Seven!

THREE YEARS AGO: Bewitching Kitchen Turns Six!

FOUR YEARS AGO: The Bewitching Kitchen turns Five!

FIVE YEARS AGO: The Bewitching Kitchen turns Four!

SIX YEARS AGO: The Bewitching Kitchen Turns Three! 

SEVEN YEARS AGO:  The Bewitching Kitchen turns Two!

EIGHT YEARS AGO:  Bewitching Birthday!

NINE YEARS AGO: Welcome to my blog!

SaveSave

SaveSave

SaveSave

SaveSave

SaveSave

SaveSave

SaveSave

SaveSave

SaveSave

SaveSave

SaveSave

SaveSave

SaveSave

SaveSave

SaveSave

SaveSave

SaveSave

SaveSave

SaveSave

SaveSave

SaveSave

SaveSave

SaveSave

SaveSave

SaveSave

SaveSave

FRAISIER CAKE: A CELEBRATION OF SPRING

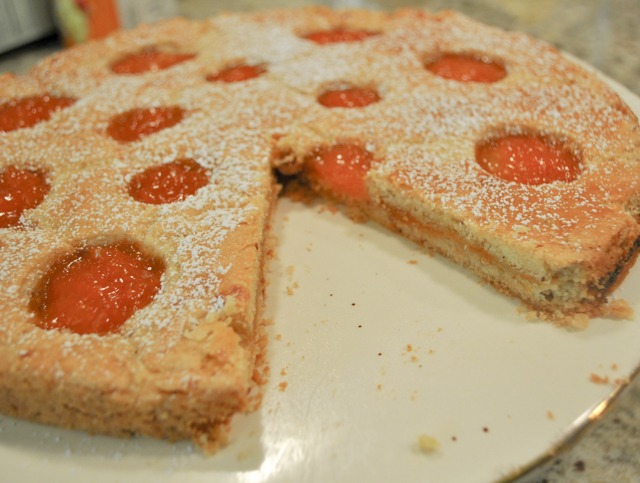
Fraisier is a classic cake in French patisserie. You will find countless versions for it. The cake can be round, square, rectangular, the topping also quite varied:  meringue, a thin layer of gelatin, or some marzipan. You can also go with a more rustic version topped with just a dusting of powdered sugar. The common denominator is two layers of cake, separated by a filling of strawberries in buttercream (preferably mousseline, which is buttercream on steroids). Some of the strawberries must be cut in half lengthwise and sit at the edge, so that they will be visible in the assembled cake.  What’s not to like? For my version I used a simple genoise brushed with Cointreau-syrup, a mousseline cream with a touch of white chocolate, and for the topping a thin layer of almond paste.

FRAISIER CAKE
(adapted from many sources)

for the cake:
6 eggs
5 tbs butter
1 cup (225g) sugar
1 + 3/4 cup (210g) flour
1/2 tsp vanilla paste

For simple syrup:
6 Tablespoons water
6 Tablespoons sugar
3 tsp Cointreau

For creme mousseline:
2½ cups (600ml) whole milk
1/2 tsp vanilla bean paste
3 large eggs
2 egg yolks
3/4 cup (150g) granulated sugar
1/2 cup (56g) corn starch
454g  butter, softened, divided
100 g white chocolate, melted and cooled

For decoration:
Hulled and halved strawberries for perimeter of the cake (I used 19 halves)
Diced strawberries for the filling (about 12 large strawberries)
100 g almond paste
powdered sugar for rolling

Equipment: One 10-inch round cake pan; one 9.5-inch cake ring or springform pan.

Heat the oven to 350 F. Prepare a 10 inch cake pan by buttering the interior. Then dust with flour and set aside.  

Place the butter in a small dish and cover then melt in the microwave. Set aside to let cool. Fill a pot with about 1 inch water over medium high heat. Once it starts to simmer, sit the bowl of a stand mixer over the pot. Put the eggs and sugar in the bowl and beat with a whisk until it warms up to a temperature between 130 to 140 degrees F. Return the bowl to the stand mixer with a whisk attachment. Whisk the mixture on high-speed. Continue to beat until the batter is cool to the touch. The end result should be a light batter that has tripled in volume.

Set aside 2 tbs of the batter in a small bowl. Add the flour to the large bowl of batter in increments, gently folding until no dry streaks remain. Blend together the 2 tbs of batter with the melted butter. Pour into the large bowl of batter and stir until incorporated. Fill the prepared cake pan with the batter. Place pan in oven and bake until cake springs back when lightly touched. Baking time should be about 30 minutes. Remove pan and invert cake onto a rack to cool.

While the cake is cooling, make the simple syrup by heating the water and sugar in a small saucepan. Once it comes to a boil, remove from heat and stir the Cointreau. Set aside to cool.

Make the mousseline cream by combining in a saucepan the milk and vanilla paste, then bringing to a simmer over low-heat. Do not let the milk come to a boil. Reserve. Place the eggs, egg yolks and sugar in a mixing bowl. Whisk vigorously until the mixture turns a light shade of yellow and becomes slightly thick and frothy, about 3 minutes. Add the cornstarch and whisk vigorously until completely incorporated.

Slowly pour about 1/4 cup of the warm milk into the egg mixture, and whisk continuously to temper the eggs.  Add the rest of the milk, always whisking. Once all the milk has been added to the eggs, pour everything back into the saucepan, and over low heat keep whisking until the cream comes to a full boil, but do it slowly. Keep removing from the heat and placing it back if you feel it is boiling too quickly. Do not stop whisking, and make sure to go over each little spot of the bottom of the pan to prevent the cream from scorching.

When large bubbles start coming to the surface, continue whisking for 15 seconds, then remove from heat, let it stand for a couple of minutes and add half of the butter, then the melted and cooled chocolate. Pass it through a fine sieve to remove any little lumps and place in the fridge for a couple of hours or overnight, with a plastic film on top to prevent a skin from forming.

When fully cold, remove from fridge, place in a Kitchen Aid and beat at full speed for 5 minutes or longer, to bring it to room temperature. Now add the other half of the butter, which must be softened.  Beat until fully smooth. The mousseline cream is ready to use.

Assemble the cake: Place a piece of acetate film against the inner surface of the cake ring. If needed, trim the top crust of the sponge cake, to level it. Split in half and place the bottom half (cut side face up)in a 9 1/1 inch cake ring set over a cardboard cake round of the same size. Brush with half of the Cointreau syrup.

Place each strawberry half upright inside the ring, forming an interior circle. The stem top should be face down and the cut side facing the inside of the flan ring. Smooth one cup of the mousseline cream over the split cake inside the flan ring. The cream should cover all exposed cake. Then place diced strawberries covering the center of the cake.  Fill all spaces with the mousseline cream by using a piping tip and covering until you reach the top of the flan ring. Then place the other cake half over the cream layer and brush the top with the remaining syrup. Refrigerate for 30 minutes.

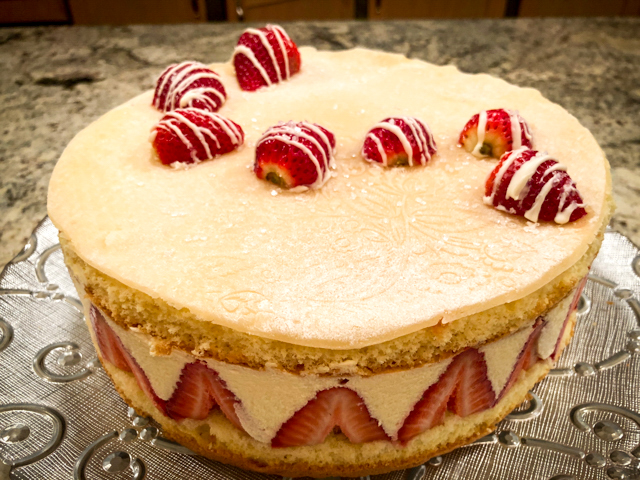
Roll a piece of almond paste very thin, make a pattern on the surface if you have an embossing rolling-pin. Cover the cake with a very thin layer of mousseline cream, then set the rolled almond paste on top, with the pattern facing up. Decorate with strawberries, if desired.

Refrigerate until serving time.

ENJOY!

to print the recipe, click here

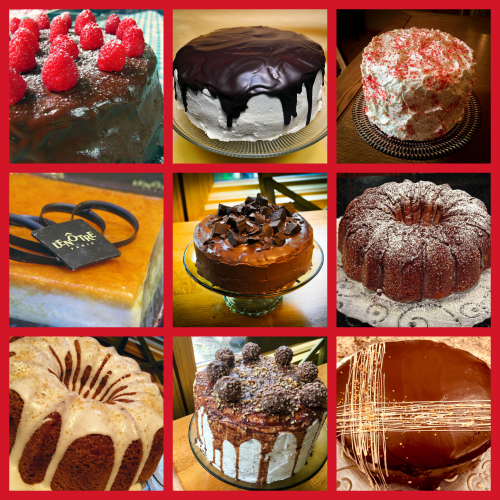
Comments: One thing that makes it easier to assemble a Fraisier is placing acetate film to line the  perimeter of the pan. I used my beloved elephant pins (a gift from my niece) to keep the acetate in place (see 2nd of the smaller photos in the composite above). The film makes sure that once you lift the ring the sides of the cake won’t be messed up, by smearing the cream or moving the strawberries in the process. Super clever.

Some recipes instruct you to cover the center of the cake with whole strawberries standing with the pointed end up, but I think that would make a bit harder to cut the cake in slices. I decided to dice the fruit instead and distribute the pieces more or less evenly on the surface. I like the way it turned out.

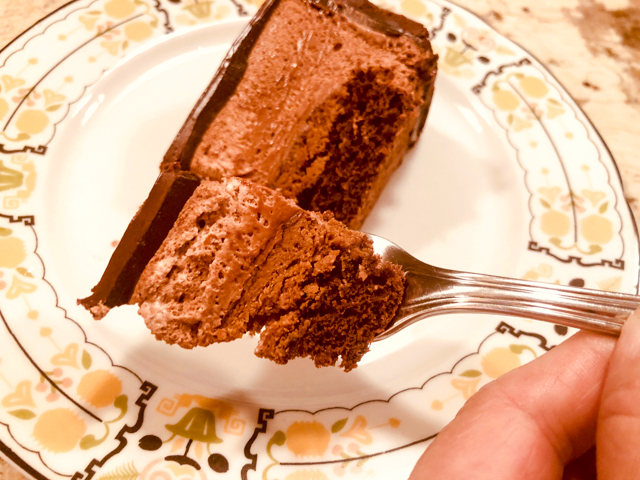
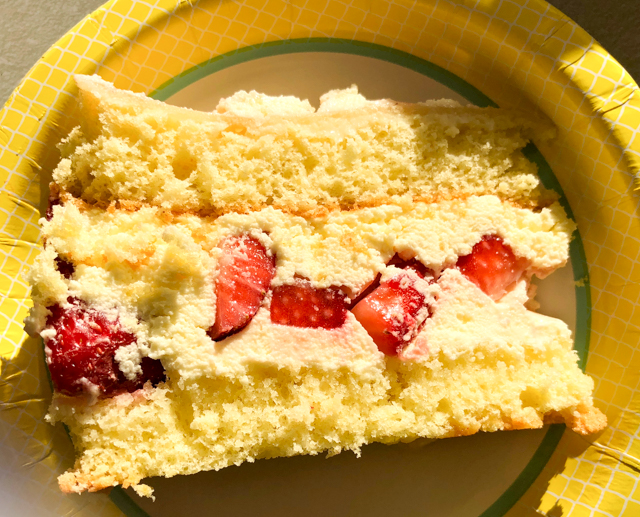
The sun shinning through the window, cast a bright yellow tone on the slice of cake I served in our department mail room. Interesting effect…

For the topping, my goal was to imprint a pattern on the thin layer of almond paste. I used a wooden rolling-pin, but unfortunately the effect was barely visible.

Points to consider in the future

Exchanging thoughts with Patissiers Extraordinaires Gary and Jennifer I realize a few things that could be improved. First, instead of baking a single round cake and slicing it in half, it would be nice to bake a cake in a sheet pan and cut two layers of the desired size. They could be any shape, circular, square, rectangular. The advantage of that method is that you don’t have to worry about slicing the cake horizontally and both layers would be absolutely equal in height.

As to the design on the almond paste, Gary suggests using a silicone mat instead of the rolling-pin. I think that is a great idea, and will definitely incorporate it on my next time. Perhaps even adding a bit of green food color to the paste, I’ve seen many examples that do so.

Another possibility that makes this cake even more appealing is to completely hide the cake when assembled. You achieve that by placing the strawberries outside the perimeter of the cake, which is then cut about one inch smaller than the ring. The mousseline will be outside, on the sides and top of the cake. You can see one beautiful example here.

All things considered, I am happy with the way my first attempt turned out. The almond paste layer gives a nice almond-y flavor to the cake, and the texture is not harsh at all, it gets quite a bit softer in contact with the mousseline cream underneath. No doubt there is room for improvement, but isn’t that the case for many things in life?

🙂


ONE YEAR AGO: Zucchini Frittata with Roasted Tomatoes and Goat Cheese

TWO YEARS AGO: Playing with Pectinase

THREE YEARS AGO: Poached White Asparagus with Lemon and Pistachios

FOUR YEARS AGO: Dan Lepard’s Saffron Bloomer

FIVE YEARS AGO: Fesenjan & The New Persian Kitchen

SIX YEARS AGO: Quinoa Salad with Roasted Beets

SEVEN YEARS AGO: Pasta Puttanesca

EIGHT YEARS AGO: Miche Point-a-Calliere

SaveSave

SaveSave

SaveSave

SaveSave

SaveSave

SaveSave

SaveSave

SaveSave

SaveSave

SaveSave

SaveSave

SaveSave

SaveSave

SaveSave

SaveSave

SaveSave

SaveSave

SaveSave

SaveSave

SaveSave

SaveSave

SaveSave

SaveSave

SaveSave