THE BEWITCHING KITCHEN TURNS 10! (AND A GIVEAWAY)

Ten years. I have a hard time even finding what to say. It is true that I tend to stick with routines, but I’m a bit surprised not only that I’ve reached the 10 year mark, but that I still love food blogging. More now than ever, actually. My interest in baking has a lot to do with it, obviously, but it goes beyond that. I like the feeling of having formed a community of readers, many of them food bloggers also, who always cheer me up with comments, feedback and inspiration. Ten years. More than 1,200 posts. It blows my little mind. To celebrate the occasion, a cake is obviously needed. It had to be special. I chose a cake I’ve been in love with for my whole life, but felt a bit intimidated until now to make it from scratch. Gateau Saint-Honore, a true classic in French patisserie. Light it is not, but festive? Festive is its middle name.

GATEAU SAINT-HONORE
(from Helen Fletcher’s Pastries like a Pro)

Lightened Pastry Cream
2 teaspoon gelatin
1 + 1/2 tablespoons cold water
2 + 2/3 cup milk, hot
8 egg yolks
1 cup sugar (200 grams)
6 tablespoons flour (60 grams)
2 teaspoons vanilla extract
1 cup heavy cream

Soften the gelatin in the water and set aside. Whisk the egg yolks and sugar together in a non-reactive saucepan.  Whisk in the flour.  Add the milk slowly, whisking well and scraping the corners of pan with a rubber spatula to make sure all of the egg yolk mixture is incorporated.

Place over medium heat and, stirring constantly, bring to a boil.  Boil for 1 minute, stirring constantly.  Remove from the heat and add the vanilla.  Tear the gelatin into small pieces and stir it into the hot liquid (there is no need to liquefy it, the heat of the mixture will do this for you).  Pour into a storage container, cover the surface with plastic wrap, poke a few holes in it and refrigerate overnight to chill.

Slightly whisk the pastry cream to soften it.  Whip the cream to stiff peaks.  Fold into the pastry cream.  The mixture is ready to pipe.

Basic Choux Pastry
1/2 cup water
4 tablespoons butter (60 grams)
1/4 teaspoon salt
3/4 cup sifted bread flour (100 grams)
3 whole eggs
1 + 1/2 tablespoons beaten egg (about half of a beaten egg)

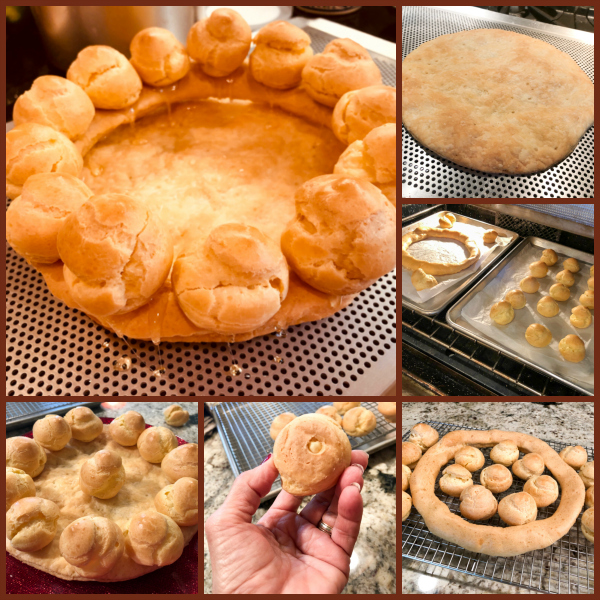
Heat the oven to 400 degrees. Prepare two baking sheets with parchment paper. Draw a 10 inch circle on one piece of parchment. Set aside.

Combine the water, butter and salt in a small, heavy saucepan.  Heat until the butter is melted and bring to a rapid boil. Add all the flour at once and stir rapidly until a large ball of dough forms that cleans the bottom and sides of the pan.With the pan still over heat, mash and flatten the panade with a spoon against the bottom of the pan.

Stir, bringing the bottom of the mixture to the top. Continue turning the panade and mashing it for 1 full minute. Remove the mixture from the heat and flatten it again in the bottom of the pan. Cool for 5 minutes. Place the panade in a food processor or the bowl of a mixer fitted with a paddle. Add the eggs and beaten egg. Process or mix until completely blended and a smooth paste forms.

At this point, gently wad up the parchment and soak in warm water for 5 to 7 minutes.  When finished, gently shake off some of the water, but not all of it.  Place on the baking sheet.  Fit a pastry bag with a #8 plain tip and fill the bag with the choux paste.  Pipe the choux paste on the inside of the circle. With the remaining paste pipe 20 walnut size puffs onto the second baking sheet after soaking it also. With a wet finger, lightly press down the pointy tops so they are round.

Bake for 25 minutes or until a deep golden brown. Cool completely.

Pate Brisee
3/4 cup sifted all-purpose flour (85 grams)
1/3 cup sifted cake flour (35 grams)
1/2 teaspoon salt
7 tablespoons butter, cut in small pieces and refrigerated (105 grams)
2 tablespoon beaten egg
1 teasoon lemon juice
2 tablespoons ice water

Heat oven to 375 degrees. Line a baking sheet with parchment paper.

In a processor bowl fitted with the steel blade, combine the flours and salt; process briefly to mix.   Add the butter and place in a circle over the flours. Pulse until the butter is cut into large pieces.

Mix the egg, lemon juice and ice water. Pour over the flour/butter mixtureand pulse until it lumps together in its about the size of peas. Do not over-procress and especially don’t let it form a ball.  Pour it out onto a work surface lightly dusted lightly with flour and push together into a ball. Form into a thick disc.

Wrap in plastic wrap and refrigerate for at least 30 minutes before rolling. Roll into a round about 11 inches. Trim the dough into a 10 1/2 inch round. Place on a parchment lined baking sheet, dock with a fork and refigerate about 30 minutes or until it is firm. Bake for 20 to 25 minutes until golden, firm and crisp. Cool completely.

Assembling the cake.
Place the pate brisee base on a 10 inch round.   Set aside. Fit a pastry bag with a #2 plain tip. Make a hole in the bottom of each puff with a toothpick or cake tester. Enlarge it so the pastry tip will fit inside the puff.  Fill the bag with pastry cream and pipe the cream into the puffs.  Clean the bottom off so no cream oozes out.   Set aside. Reserve the remaining pastry cream.

Make the caramel below.

Caramel
1/2 cup water
2 cups sugar

Place the water in a small saucepan. Add the sugar. Bring to a boil. Wash down the sides of the pan with a brush dipped in cold water. Boil the syrup hard until it just starts to color. At this point you must work quickly.  The syrup will continue to color as you work. With a spoon dipped in the hot caramel, drizzle caramel around the edges of  the pate.

Quickly place the choux paste ring on top of the base. Working quickly and carefully, dip the bottom of the small puffs in the caramel and attach them to the top of the choux ring.  Quickly and very, very carefully dip the bottom of a small puff in the caramel and place it on the ring. Continue until the ring is covered with puffs.

Finishing the Gateau St. Honore
1/4 cup water
1 cup sugar

Place in a small saucepan.  Prepare as above for the Caramel.  However, this time take it to a dark amber. Cool for 30 to 40 second and Immediately spoon it over the puffs.

Fill the inside of the ring halfway up with pastry cream.Fit a pastry bag with a #8 open star tip and fill with the remaining pastry cream. Pipe large swirls over the pastry cream. Refrigerate for a few hours before serving.

ENJOY!

to print the recipe, click here

Comments: I wanted to use a tried and true recipe from an author I trust. Helen Fletcher’s recipes never disappoint me. Keep in mind that there are quite a few variations of this amazing gateau. For starters, the base can be either laminated dough or a pate brisee. The former is obviously a lot more involved, and the method changes also, because when using laminated dough the whole thing is baked together at the same time – the ring and usually additional inner circles (think of them as a maize) piped over the base. They add a bit more pastry component under the creamy topping. When using pate brisee, the ring is baked separately and later “glued” to the base with caramel.  For my first attempt, I opted for pate brisee.  I made it in a particular weekend in which I went into crazy baking mode. It was…  intense to say the least. So pate brisee it was.

The traditional cream is a Chibouste, patisserie cream lightened up with what is essentially a meringue. That was how the cake was designed back in 1847 in the bakery at Rue St Honore in Paris. I used whipped cream, following Helen’s recipe.  It is – if you can believe it – a bit richer. But a 10th blog anniversary does not come often.  You do need something to lighten up the patisserie cream, otherwise the dessert would feel quite heavy and dense. Plus, you cannot really pipe “cream pat” (yeap, we are besties).

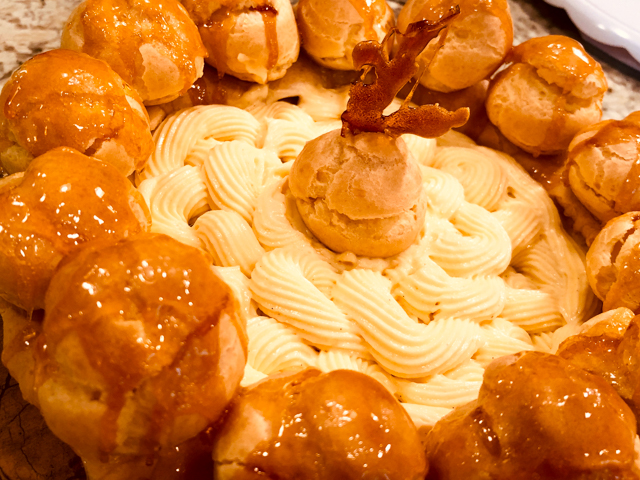
It is now full disclosure time. If you’ve been around my blog for a while, you should know that rarely patisserie stuff goes in smooth-mode with Sally.  Take a look at the central choux puff. It is bald. I had saved the sexiest of them all for the center stage, and of course that was the one who did not get the final caramel glaze.  I howled in shock when I noticed. But having been through a few ordeals with the preparation of the caramel, I could not bring myself to make more to coat just that one. Plus, I thought that some spun sugar carefully placed all over it would look nice and hide its nakedness.  Spun sugar.  Do you see ANY spun sugar on my gateau? No you do not. (pause to sob). I tried. I tried four times. I followed youtube instructions, I used thermometers, I burned fingers. The only thing spun was my brain. The mess in the kitchen? Unreal. I managed to come up with some abstract caramel thingie to stab on decorate the naked puff, and pretended that was my intention from the beginning. So I now desperately need to conquer the spun. I lose battles. But I refuse to lose the war.

Decoration messed up or not, it did not matter. The picture below shows all that was left from the cake by the time a get-together for some Tesla-afficcionados was over. The cake was delicious, even if I say so myself. It is of course, very rich, but it feels light and airy, not sure how that is even possible, having witnessed the amount of eggs, butter, and sugar involved. Let’s call it a French Miracle.

And now for the giveaway… It is a wonderful book that I believe will have even patisserie-phobes grabbing a whisk and marching to the kitchen with a big confident smile. The title says it all: Patisserie Made Simple. And it delivers what it promises.

I love this book, and if you would like a copy, I will enter you in the giveaway if you leave a comment. No matter where you live, I will ship it to you if you win it. I will reveal the winner on June 30th.

I want to thank all  who  enjoy hanging out here in this virtual spot, and invite you to follow with me as I start my  second decade of food blogging. Ten years… oh, my!

ONE YEAR AGO: The Bewitching Kitchen turns 9!

TWO YEAR AGO: The Bewitching Kitchen turns eight!

THREE YEARS AGO: The Bewitching Kitchen Turns Seven!

FOUR YEARS AGO: Bewitching Kitchen Turns Six!

FIVE YEARS AGO: The Bewitching Kitchen turns Five!

SIX YEARS AGO: The Bewitching Kitchen turns Four!

SEVEN YEARS AGO: The Bewitching Kitchen Turns Three! 

EIGHT YEARS AGO:  The Bewitching Kitchen turns Two!

NINE YEARS AGO:  Bewitching Birthday!

TEN YEARS AGO: Welcome to my blog!


FRAISIER CAKE: A CELEBRATION OF SPRING

Fraisier is a classic cake in French patisserie. You will find countless versions for it. The cake can be round, square, rectangular, the topping also quite varied:  meringue, a thin layer of gelatin, or some marzipan. You can also go with a more rustic version topped with just a dusting of powdered sugar. The common denominator is two layers of cake, separated by a filling of strawberries in buttercream (preferably mousseline, which is buttercream on steroids). Some of the strawberries must be cut in half lengthwise and sit at the edge, so that they will be visible in the assembled cake.  What’s not to like? For my version I used a simple genoise brushed with Cointreau-syrup, a mousseline cream with a touch of white chocolate, and for the topping a thin layer of almond paste.

FRAISIER CAKE
(adapted from many sources)

for the cake:
6 eggs
5 tbs butter
1 cup (225g) sugar
1 + 3/4 cup (210g) flour
1/2 tsp vanilla paste

For simple syrup:
6 Tablespoons water
6 Tablespoons sugar
3 tsp Cointreau

For creme mousseline:
2½ cups (600ml) whole milk
1/2 tsp vanilla bean paste
3 large eggs
2 egg yolks
3/4 cup (150g) granulated sugar
1/2 cup (56g) corn starch
454g  butter, softened, divided
100 g white chocolate, melted and cooled

For decoration:
Hulled and halved strawberries for perimeter of the cake (I used 19 halves)
Diced strawberries for the filling (about 12 large strawberries)
100 g almond paste
powdered sugar for rolling

Equipment: One 10-inch round cake pan; one 9.5-inch cake ring or springform pan.

Heat the oven to 350 F. Prepare a 10 inch cake pan by buttering the interior. Then dust with flour and set aside.  

Place the butter in a small dish and cover then melt in the microwave. Set aside to let cool. Fill a pot with about 1 inch water over medium high heat. Once it starts to simmer, sit the bowl of a stand mixer over the pot. Put the eggs and sugar in the bowl and beat with a whisk until it warms up to a temperature between 130 to 140 degrees F. Return the bowl to the stand mixer with a whisk attachment. Whisk the mixture on high-speed. Continue to beat until the batter is cool to the touch. The end result should be a light batter that has tripled in volume.

Set aside 2 tbs of the batter in a small bowl. Add the flour to the large bowl of batter in increments, gently folding until no dry streaks remain. Blend together the 2 tbs of batter with the melted butter. Pour into the large bowl of batter and stir until incorporated. Fill the prepared cake pan with the batter. Place pan in oven and bake until cake springs back when lightly touched. Baking time should be about 30 minutes. Remove pan and invert cake onto a rack to cool.

While the cake is cooling, make the simple syrup by heating the water and sugar in a small saucepan. Once it comes to a boil, remove from heat and stir the Cointreau. Set aside to cool.

Make the mousseline cream by combining in a saucepan the milk and vanilla paste, then bringing to a simmer over low-heat. Do not let the milk come to a boil. Reserve. Place the eggs, egg yolks and sugar in a mixing bowl. Whisk vigorously until the mixture turns a light shade of yellow and becomes slightly thick and frothy, about 3 minutes. Add the cornstarch and whisk vigorously until completely incorporated.

Slowly pour about 1/4 cup of the warm milk into the egg mixture, and whisk continuously to temper the eggs.  Add the rest of the milk, always whisking. Once all the milk has been added to the eggs, pour everything back into the saucepan, and over low heat keep whisking until the cream comes to a full boil, but do it slowly. Keep removing from the heat and placing it back if you feel it is boiling too quickly. Do not stop whisking, and make sure to go over each little spot of the bottom of the pan to prevent the cream from scorching.

When large bubbles start coming to the surface, continue whisking for 15 seconds, then remove from heat, let it stand for a couple of minutes and add half of the butter, then the melted and cooled chocolate. Pass it through a fine sieve to remove any little lumps and place in the fridge for a couple of hours or overnight, with a plastic film on top to prevent a skin from forming.

When fully cold, remove from fridge, place in a Kitchen Aid and beat at full speed for 5 minutes or longer, to bring it to room temperature. Now add the other half of the butter, which must be softened.  Beat until fully smooth. The mousseline cream is ready to use.

Assemble the cake: Place a piece of acetate film against the inner surface of the cake ring. If needed, trim the top crust of the sponge cake, to level it. Split in half and place the bottom half (cut side face up)in a 9 1/1 inch cake ring set over a cardboard cake round of the same size. Brush with half of the Cointreau syrup.

Place each strawberry half upright inside the ring, forming an interior circle. The stem top should be face down and the cut side facing the inside of the flan ring. Smooth one cup of the mousseline cream over the split cake inside the flan ring. The cream should cover all exposed cake. Then place diced strawberries covering the center of the cake.  Fill all spaces with the mousseline cream by using a piping tip and covering until you reach the top of the flan ring. Then place the other cake half over the cream layer and brush the top with the remaining syrup. Refrigerate for 30 minutes.

Roll a piece of almond paste very thin, make a pattern on the surface if you have an embossing rolling-pin. Cover the cake with a very thin layer of mousseline cream, then set the rolled almond paste on top, with the pattern facing up. Decorate with strawberries, if desired.

Refrigerate until serving time.

ENJOY!

to print the recipe, click here

Comments: One thing that makes it easier to assemble a Fraisier is placing acetate film to line the  perimeter of the pan. I used my beloved elephant pins (a gift from my niece) to keep the acetate in place (see 2nd of the smaller photos in the composite above). The film makes sure that once you lift the ring the sides of the cake won’t be messed up, by smearing the cream or moving the strawberries in the process. Super clever.

Some recipes instruct you to cover the center of the cake with whole strawberries standing with the pointed end up, but I think that would make a bit harder to cut the cake in slices. I decided to dice the fruit instead and distribute the pieces more or less evenly on the surface. I like the way it turned out.

The sun shinning through the window, cast a bright yellow tone on the slice of cake I served in our department mail room. Interesting effect…

For the topping, my goal was to imprint a pattern on the thin layer of almond paste. I used a wooden rolling-pin, but unfortunately the effect was barely visible.

Points to consider in the future

Exchanging thoughts with Patissiers Extraordinaires Gary and Jennifer I realize a few things that could be improved. First, instead of baking a single round cake and slicing it in half, it would be nice to bake a cake in a sheet pan and cut two layers of the desired size. They could be any shape, circular, square, rectangular. The advantage of that method is that you don’t have to worry about slicing the cake horizontally and both layers would be absolutely equal in height.

As to the design on the almond paste, Gary suggests using a silicone mat instead of the rolling-pin. I think that is a great idea, and will definitely incorporate it on my next time. Perhaps even adding a bit of green food color to the paste, I’ve seen many examples that do so.

Another possibility that makes this cake even more appealing is to completely hide the cake when assembled. You achieve that by placing the strawberries outside the perimeter of the cake, which is then cut about one inch smaller than the ring. The mousseline will be outside, on the sides and top of the cake. You can see one beautiful example here.

All things considered, I am happy with the way my first attempt turned out. The almond paste layer gives a nice almond-y flavor to the cake, and the texture is not harsh at all, it gets quite a bit softer in contact with the mousseline cream underneath. No doubt there is room for improvement, but isn’t that the case for many things in life?

🙂


ONE YEAR AGO: Zucchini Frittata with Roasted Tomatoes and Goat Cheese

TWO YEARS AGO: Playing with Pectinase

THREE YEARS AGO: Poached White Asparagus with Lemon and Pistachios

FOUR YEARS AGO: Dan Lepard’s Saffron Bloomer

FIVE YEARS AGO: Fesenjan & The New Persian Kitchen

SIX YEARS AGO: Quinoa Salad with Roasted Beets

SEVEN YEARS AGO: Pasta Puttanesca

EIGHT YEARS AGO: Miche Point-a-Calliere

SaveSave

SaveSave

SaveSave

SaveSave

SaveSave

SaveSave

SaveSave

SaveSave

SaveSave

SaveSave

SaveSave

SaveSave

SaveSave

SaveSave

SaveSave

SaveSave

SaveSave

SaveSave

SaveSave

SaveSave

SaveSave

SaveSave

SaveSave

SaveSave

HEAVENLY HOMEMADE FROMAGE BLANC

When I lived in France I often had lunch with Valerie,  a beautiful French woman with a sensible approach to food and life in general, who was also our laboratory technician.  Her meals always involved a small appetizer, the main dish and dessert, followed by a shot of espresso.  During those lunches she introduced me to three French delicacies: Kyr Royale, Badoit water, and fromage blanc , her favorite light dessert. I became hooked on all three the first time that I tried them.

With regard to French cheeses, fromage blanc doesn’t get the praise it deserves. It’s smooth, tangy, light, and refreshing. Plus, you can enjoy it in different ways: plain, or with honey, sugar or fruit; with salt and herbs as a spread for crusty bread,  or whipped with cream to incorporate in recipes.

I’ve been in a state of fromage blanc withdrawal since then, but no longer!  Thanks to a tiny package from the New England Cheesemaking Supply Company, I’m the proud owner of almost 2 pounds of fresh cheese that sent me straight back to Paris as I drizzled it with honey and raised a spoonful to my lips… I’m sure Valerie would love it too!  😉


FROMAGE BLANC

(recipe from New England Cheesemaking Supply Co.)

1 gallon of whole milk, pasteurized
1 packet of DS culture (order here)
(cheese cloth for draining)

Heat the milk in a large pan to 86F. Add the contents of the package and mix well. Cover the pan and allow it to sit at room temperature for 12 hours.

Line a colander with double thickness of cheesecloth, place it in the sink, and carefully ladle the curdled milk into it. Let it drain for 6 to 12 hours, depending on how thick you like it to be. (You can do this step in the fridge, placing the colander inside a pan to catch the draining liquid).

When the cheese is in the consistency you like, remove it to a container and keep it refrigerated.

ENJOY!

to print the recipe, click here

This slideshow requires JavaScript.


Comments: If you have ever considered making cheese at home, I urge you to try this recipe! I cannot praise enough the customer service at New England Cheesemaking Supply:  contrary to the other two companies I contacted, they went out of their way to ensure that I would get the culture quickly.    A real pleasure to deal with! I am now tempted to make mozzarella at home, their website makes everything seem pretty easy… 😉 And they have a nice blog too, check it out here.

ONE YEAR AGO: A Perfect Sunday Dinner

Add to FacebookAdd to DiggAdd to Del.icio.usAdd to StumbleuponAdd to RedditAdd to BlinklistAdd to TwitterAdd to TechnoratiAdd to Yahoo BuzzAdd to Newsvine

LET IT SNOW, LET IT SNOW, EGGS IN SNOW

Eggs in snow” or “oeufs a la neige” or “ovos nevados“… conveys the same delight in any language: a classy, delicious, impressive dessert, that’s surprisingly simple to make. Besides that, you can prepare its components in advance, which is the golden rule for a relaxed host.


OEUFS A LA NEIGE

(adapted from several sources)

for the creme anglaise
4 egg yolks
1/2 cup sugar
1 tsp cornstarch (optional)
1 + 1/2 cup boiling milk

for the meringue
4 egg whites
6 Tbs sugar
1 tsp vanilla
1/4 tsp cream of tartar
1/4 tsp salt

for the caramel glaze
2/3 cup sugar
1/4 cup water

Thinly sliced almonds (optional)

Prepare the creme anglaise: beat the sugar and yolks with an electric mixer for a few minutes, until the color turns pale yellow and the texture becomes somewhat thick (ribbon stage). Beat in the cornstarch, if you decide to use it, and while still beating, slowly add the hot milk without scorching the egg yolks.
Transfer the mixture to a saucepan and warm over low heat, while constantly stirring. Don’t let it boil, but bring the temperature to 170F on a candy thermometer. Remove from heat and pass it through a fine sieve to remove any bits of egg yolk that might ruin the texture of the creme anglaise. Put it in the fridge until ready to assemble the dessert.

Prepare the meringue:
Starting with egg whites at room temperature, beat them with the vanilla, cream of tartar, and salt until soft peaks form. Add the sugar and continue beating at very high speed, until the peaks are all glossy and thick.
Heat water in a large skillet to 180F (at this point, the water will form bubbles on the edges). Using two tablespoons or an ice cream scoop, spoon mounds of meringue and gently dislodge them into the water. You can cook several at the same time, making sure that the water never boils. If it does the meringues will disintegrate. Cook them for 3-4 minutes per side, then transfer to a baking sheet lined with a soft cloth to drain any excess water. Reserve in the fridge.

When ready to assemble the dessert, add about 1/4 cup of creme anglaise to the serving dish and add 3 cooked meringues to the dish. Sprinkle on some almonds and glaze everything with streams of caramel, made as follows:

Add the sugar to a small saucepan, drizzle the water on top. Set the mixture over medium-low heat, and gently swirl the pan until the sugar dissolves. Then, increase the heat to high, cover the pan, and boil the caramel for 2 minutes. Remove the lid and continue boiling until the sugar turns amber. Place the bottom of the pan in cold water to rapidly cool it, and working quickly, dip a fork in the caramel and allow it to stream through the tines of the fork onto the  cooked meringue and almonds.

Serve immediately, or keep in the fridge for 1-2 hours.

ENJOY!

to print the recipe, click here

for more photos and comments, keep reading