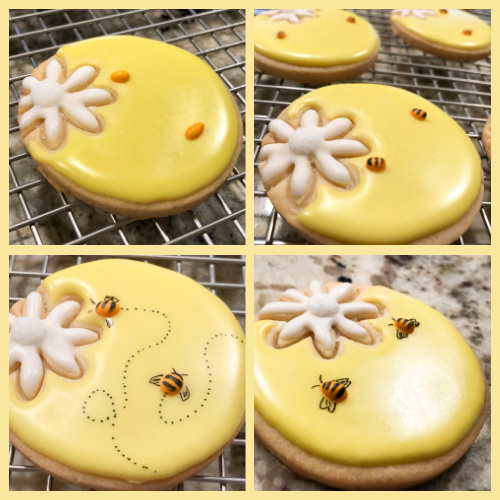
BUSY BEE SUGAR COOKIES

Not too long ago I made some macarons decorated with little bees (view post here). I really wanted to send some to a friend, but in the past I’ve been burned badly trying to ship macarons. What to do? What to do? Turn them into sugar cookies instead! Much more mail-friendly. I adapted the decoration to give those bees a flower to fly to, and to get busy. Then I got busy myself… The cookie dough recipe is a recent incorporation into the Bewitching Kitchen. It produces very sharp edges and I also like the texture of the cookie after baking.

NEAT EDGES SUGAR COOKIES
(adapted from Baking a Moment)

1 cup (227g) unsalted butter,cubed, cold
1 cup (200g) granulated sugar
zest of 1 lemon or half an orange
2 eggs
3 1/2 cups (420g) all-purpose flour
1/2 cup (60g) cornstarch
1/2 teaspoon kosher salt
1/4 tsp baking powder
1 teaspoon Fiori di Sicilia extract (or vanilla, or lemon extract)

to decorate:
your favorite recipe of Royal Icing (I use Tanya’s)
sprinkles
food-safe pen

Heat the oven to 350 F and line baking sheets with parchment. Sift the flour, cornstarch, baking powder and salt, and set aside. Mix the sugar with the zest rubbing it well to release the oils. Cream the butter with the flavored sugar, just until smooth and combined.

Mix in the eggs and Fiori di Sicilia (or other flavoring extract) until incorporated. Add the flour mixture on low-speed, in three portions. The mixture will seem very dry and sandy at first, but after a couple of minutes the mixer it will start to pull away from the sides of the bowl.

Remove the dough from the bowl, cut in two pieces and wrap one in plastic. Roll the second piece of dough out between 2 sheets of parchment paper, to a thickness of 1/4 inch. Cut into rounds, press a detail flower using another type of cutter, and freeze for 10 minutes. Bake for 10 to 15 minutes, depending on the size of the cookie. I like to have a slight golden tone at the edges.

Cool on a rack and decorate as desired. For the bee decoration you’ll need yellow, and white Royal Icing with flooding consistency, and orange Royal Icing in orange (very small amount, just for the bee’s body).

ENJOY!

to print the recipe, click here

Comments: At the risk of sounding repetitive, I must say I had a considerable amount of fun making these cookies. Perhaps because I made those according to my own imagination, did not follow any design found in the internetic world. I am usually not fully satisfied with my bakes, but this batch of cookies ended up just the way I wanted. What more can a poor baker wish for?

For Royal Icing, I used my default recipe, which you can find in Tanya’s blog. I started flooding the white flower, let it crust. Added a layer of additional icing to the center, and some sanding sugar. Then I flooded the yellow part. Waited for it to crust and piped the bee body. Then, patience was called for. I placed the cookies away from sight and did not touch them until next day. You really want to have the icing fully set before moving on to the next step. A food pen does the rest, details of bee body, wings, and flight path. Finally, I painted the center of the flower with gold.

As to the cookie dough recipe, I’ve settled on this one for the past 6 weeks or so. I’ve tweaked it quite a bit, and this version is probably my favorite, although by now you probably know I rarely leave a recipe alone for too long… The amount of cornstarch can vary from 1/2 cup to 1/3 cup (60 to 40g), and the edges will show a slight difference in sharpness depending on how much you use. I suggest you play around with it and decide what is the magical combination that suits your needs and taste. I prefer to add a tiny amount of baking powder, rather than leaving the recipe without.

Before I leave you, a little announcement. Since I’ve been making sugar cookies on a weekly basis, I will publish posts that group my favorite designs under the title “Joy Cookie Club.” There will be no recipe, just a brief description of the techniques used to decorate them. I hope you will enjoy those posts, the first one should be published in the near future.

ONE YEAR AGO: Mincemeat Pies, when the third time is a charm

TWO YEARS AGO: Shibari Bread]

THREE YEARS AGO: Incredibly Simple Times Four – January 2018 

FOUR YEARS AGO: Two Salads and a Blog Award!

FIVE YEARS AGO: When Three is Better than Two

SIX YEARS AGO: Somebody Stop Me!

SEVEN YEARS AGO: Zucchini Pasta with Cilantro-Cashew Pesto

EIGHT YEARS AGO: Bran Muffins, Take Two

NINE YEARS AGO: Brown Butter Chocolate Chip Cookies

TEN YEARS AGO: Mogo Mojo

ELEVEN YEARS AGO: Slow-Roasted Chicken Thighs: an Ice-Breaker

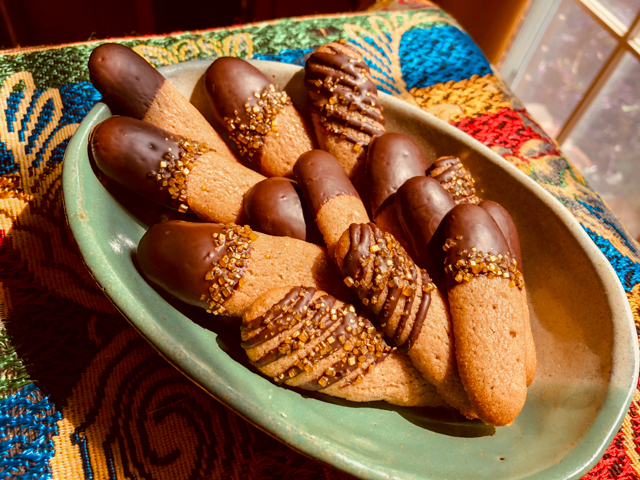
CHOCOLATE-DIPPED CINNAMON COOKIES: VEGAN & DELICIOUS

Today I share a recipe for delicious cookies that happen to be vegan. No eggs, no dairy, but no sacrifice of flavor and texture. The recipe comes from Modern Vegan Desserts, written by a professional patissiere, Petra Stahlová. I invite you to read my review on her book (as well as musings on vegan baking in general) by visiting the Home Bakers Collective site, with a click here.

CHOCOLATE-DIPPED CINNAMON COOKIES
(published with permission from Petra Stahlová)

62g soft vegan butter (I used Country Crock plant butter)
62g icing sugar
15g almond flour
54g aquafaba
82g plain flour
3g ground cinnamon
200g 70% dark chocolate

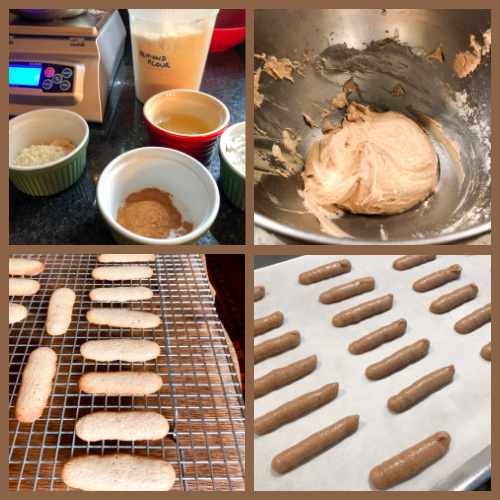
In a mixer, beat the softened butter and the icing sugar until light and fluffy, then mix in the almond flour. Gradually mix in the aquafaba, adding a tablespoon of plain flour after each addition of liquid. Once all the liquid has been mixed in, carefully stir in the rest of the flour and the cinnamon with a spatula.

In a bowl, cover the batter with cling film so that it directly touches the surface, and leave to rest for half an hour at room temperature. Put the dough into a pastry bag with a 10mm diameter tip. Place either a silicon mat or some baking paper on the baking tray and pipe out 2.5 inches long lines onto the sheet. Don’t squeeze the bag too hard; the width of the batter should correspond to the diameter of the tip, i.e. 10mm. Leave half-an-inch space between the cookies, as they will spread out during baking.

Heat your oven to 375F (convection on, if available) and bake for about 7 minutes until the cookies are golden brown. Afterwards, leave the cookies on the baking tray for half a minute to firm up and then transfer them onto a cooling rack.

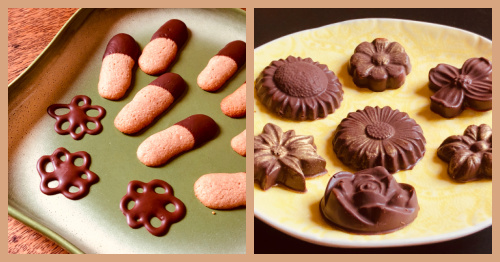
Temper the chocolate, then dip the cooled cookies and put them on either a silicon mat or baking paper to let the chocolate crystallize. Decorate with sprinkles, if so desired.

ENJOY!

to print the recipe, click here

Comments: I made these cookies for Mondays with Sweetness, in which I share bakes with our departmental colleagues. Since there is one adorable person who is allergic to eggs, I am always trying to find bakes that she will be able to enjoy. Nobody could tell these are vegan. The cinnamon flavor is perfect, the chocolate complements it well, and with the golden sprinkles they get a festive look. If you don’t feel like tempering chocolate, you can get by with candy melts but there will be a little compromise in flavor. I usually take the opportunity of tempering chocolate to make some extra decorations that might come in handy in future bakes.

I close this post inviting you to read more about Modern Vegan Desserts,
so please stop by the Home Bakers Collective.

ONE YEAR AGO: Lemony Barley with Shrimp and Spinach

TWO YEARS AGO:Black Rice with Roasted Cauliflower

THREE YEARS AGO:
La Couronne Bordelaise

FOUR YEARS AGO: A Special Birthday Dinner

FIVE YEARS AGO: Duck Confit for a Special Occasion

SIX YEARS AGO: Tuscan Grilled Chicken and Sausage Skewers

SEVEN YEARS AGO: Celebrate Wednesday with Pork Tenderloin & Apples

EIGHT YEARS AGO: Salmon Wellington

NINE YEARS AGO: The Green Chip Alternative

TEN YEARS AGO: Weekend Pita Project

ELEVEN YEARS AGO: Let it snow, let it snow, eggs in snow

COOKIES WITH A SMILE

For almost two years now I’ve been baking for weekly homeless meals, in a church-organized project called Common Table. Before pandemic times they had a sit-down dinner in a big room, so I could bake whatever I felt like it, including regular cakes, pies, tarts. With Covid-19 in the equation, everything changed. They show up and grab a bag with their meal, so any sweets must be individually wrapped and packed together with their main meal. This has obviously restricted my choices of things to bake, and I find myself making more cookies and less of everything else. But, there is always a silver lining. Focusing on cookies made me decide to improve my decorating skills, so that sweets could also bring a smile, especially for families with kids. Every week I include about a dozen iced sugar cookies, so that I can practice different styles of decoration, and at the same time not get too overwhelmed by the process. Visiting Youtube University I try to learn from the great cookie decorators out there. In this post I show you a few of my favorite recent adventures and include the video tutorials I followed to make them. The basic cookie recipes were either gingerbread (this post) or variations of my default recipe for sugar cookies.

PENGUIN GINGERBREAD COOKIE

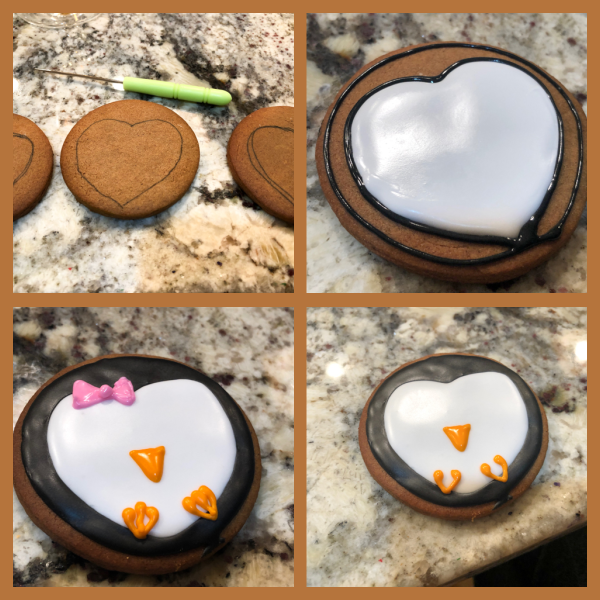
To make these cutie pies I followed Haniela’s tutorial found in this link. Starting with a simple round cookie I drew a heart shape with a food pen. Then I used four different colors of Royal Icing: black and white with flood consistency, and orange and pink with thick consistency. For Royal icing I recommend the wonderful recipe from my tent-baking friend Tanya. All piping was done without icing tips, just bags cut with sharp scissors.

After flooding with white, I waited for it to crust, flooded with black and waited for it to crust also. A couple of hours later I made the details of nose, feet, and the little bow. For the feet, it is better to pipe the two external parts, wait 10 minutes and pipe the central one, so that they don’t join together. Next, just like in the video, I drew the eyes, and added red luster powder to the cheeks with a soft brush. Finally, I piped an outline of white royal icing, and immediately touched the wet surface of the cookie into a plate with black sanding sugar. I love my little penguin girls.

SANTA’S HEAD

To make these sleepy Santas, I followed the tutorial from Little Cookie Co. Just three colors of Royal Icing are needed: white, peach and red. Her tutorial explains it all very well, and I was just a little nervous to make the mustache, because it had to be piped free hand and I have a hard time making things symmetrical. I guess it turned out ok, maybe Santa had a bit too much eggnog the night before, but these are trying times for all.

SNOWGLOBE SUGAR COOKIE

Another wonderful tutorial by Little Cookie Co. I made quite a few of those during the month of December, some smaller containing just a small snowman, some with a Christmas tree as Royal icing transfer (shown in the composite picture that opened this post). If you watch the tutorial, you’ll see she pipes the tree with icing free-hand (check it out at 4 min and 5 seconds), but I simply could not bring myself to even try. This is a more elaborate cookie to make, many layers, a lot of waiting, a work of patience. But I do think the result is pretty nice!

SWAN SUGAR COOKIE

I followed part of the tutorial shown in this link, but added my own feathers… oops my own design of feathers. I am actually featherless. I modified it because I don’t care for the taste (or texture) of fondant, although I admit it looks absolutely stunning. It seems also quite a bit of work, as each feather must be shaped individually using small silicone molds. I decided to just pipe some white Royal Icing and immediately shower it with white sanding sugar.

The cookie is actually quite simple to make. Flood the body with white, let it crust. Add the orange beak leaving a small space between the beak and body. Right away add a small band of black royal icing, and pull with a scribe tool very lightly towards the beak and towards the body. A small dot of black for the eye, and just the tiniest touch of white off center on the eye. It is a small detail that makes eyes look a lot more realistic.

HOT CHOCOLATE MUG COOKIE

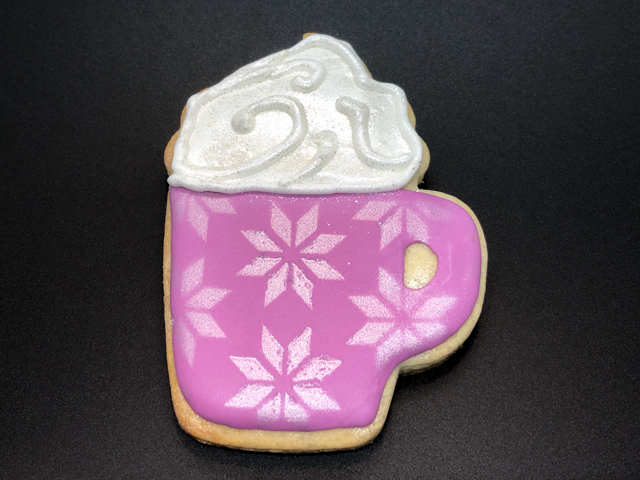
To make these cookies I followed the tutorial from this link (at 4 min 20 sec). For the decoration of the mug itself, I opted for three different styles. Two are shown above: royal icing transfer of a snowflake, or wet-on-wet white icing over the basic blue. After the mug crusted, I added the whipped cream part, let that crust and hours later added the white swirls + mandatory sanding sugar coating.

The third style was air-brushing with white pearl dye and a stencil. The top was sprayed with Diamond dust, a product I featured recently on In My Kitchen.

REINDEER LITTLE STAR

For these cookies I did not follow a tutorial, just saw them somewhere in the internet, saved a screenshot and improvised my version. Flooded the white part, waited about 10 minutes, flooded the upper brown, waited a couple of hours and added the triangle white for ears, black for antlers, and red for nose. Next morning it was time to draw the eyes and add red powder dust for the cheeks. Perhaps this was my favorite cookie of this series, although I do love the Penguin Girls…

I tell you one thing, I already miss holiday baking!

ONE YEAR AGO: Pearled Farro with Asparagus Coins

TWO YEARS AGO: Pistachio Caramel and Apple Mousse Cake

THREE YEARS AGO: Someone turns 70 today!

FOUR YEARS AGO: Carioca Cake, the Final Chapter

FIVE YEARS AGO: Duck Confit for a Special Occasion

SIX YEARS AGO: Ken Forkish’s Warm Spot Sourdough 

SEVEN YEARS AGO: Bran Muffins, Rainbows, and a wonderful surprise!

EIGHT YEARS AGO: Salmon Wellington

NINE YEARS AGO: The Green Chip Alternative

TEN YEARS AGO: Weekend Pita Project

ELEVEN YEARS AGO: Let it snow, let it snow, eggs in snow

SWAN COOKIES

COOKIES FOR THE HOLIDAYS: SPRINGERLE

Springerle cookies have been around for more than 700 years, and just that thought brings me a smile. It fascinates me that after hundreds of years we still talk about them and so many bakers – particularly in Europe – preserve the tradition by baking batches and batches during the holiday season. The name translates from German as “little jumpers”. Some say that indicates the way they seem to jump in the oven when they bake. Others believe that in the beginning the images imprinted on the cookies showed men on horses, like little jumpers. We’ll probably never know for sure, but what we do know is that they are flavored with anise, leavened with a special ingredient (ammonium carbonate, aka Hartshorn), and the dough takes a large amount of eggs beaten for a long time. Back in the 1300’s, a baker not only had to make the cookies, but also carve the wooden molds they were shaped in. The reputation of a baker would rest not only on the cookies themselves, but in the complexity and beauty of the mold he had produced. Absolutely amazing. Disclaimer: I did not carve my own molds. Please don’t judge.

SPRINGERLE COOKIES
(scaled down from House on the Hill)

1/4 teaspoon baker’s ammonia (Hartshorn)
1 tablespoons milk
3 large eggs, room temperature
360g powdered sugar
57g (1/4 cup) unsalted butter, softened but not melted
1/4 teaspoon salt
1/4 teaspoon of anise oil
454g sifted cake flour (I used Softasilk)
grated rind of orange

to paint the cookies (optional):
powder luster (mine are from Oh Sweet Art)
vodka or lemon extract

Make the cookies: Dissolve baker’s ammonia in milk and set aside (avoid the temptation to take a sniff, you will regret it). Beat eggs until very thick, this will take from 10 to 15 minutes. Slowly beat in the powdered sugar, then the softened butter. Add the the mixture of baker’s ammonia and milk, salt, anise oil and orange zest.

Gradually beat in as much flour as you can with the mixer, then stir in the remainder of the flour to make a stiff dough. Turn onto floured surface and knead in enough flour to make a good print without sticking. Refrigerate for one hour, but keep in mind the dough can be refrigerate the dough for up to 3 days.

On a floured surface, roll dough depending on the depth of the carving in the cookie press you are using. Shallow carvings will need to be thinner while deeper carvings will need to be thicker. Flour your cookie mold for each and every pressing. Press the mold firmly and straight down into the dough, then lift, cut with the cookie cutter of your choice, and place the formed cookie onto a flat surface to dry.

Do not cover the cookies while they dry. The goal of drying is to set the design. Let the cookies dry at least for 24 hours. It is better to leave them alone for a couple of days, so the design will be better retained during baking.

On baking day, heat the oven to 255F to 325F (depending on the size of your cookie and how white you like to have them), for 10 to 15 minutes. Let the cookies cool and paint, if you so desire.

ENJOY!

to print the recipe, click here

Comments: I cannot lie to you, Springerle baking can be tricky. I only do it in December, because it is so deeply associated with this time of the year. In fact, it is quickly becoming a personal holiday tradition for me. First thing to keep in mind, you need the special leavening agent. It has a crystal, grainy structure and gives the cookie its unique texture. If you bake them with regular baking powder, you lose that component. Second, be patient. These cookies cannot be baked on the same day you shape them because the pattern needs to set by drying, sometimes it can take 3 days, depending on your environment. I never had to wait more than 48 hours.

most of my molds are from www.springerle.com

If they are not dry, when they go into the oven, the pattern will be quickly lost as the cookie expands. If they are fully dry but the oven a little too hot, they will form cracks and might even explode, like you can see on my first composite photo above. That brings me to my third advice: always, always, ALWAYS bake a test cookie. I normally place three, one large, one medium, one small, and see how they behave. The temperature that works best for me (for all cookie sizes, in fact) is 275F. It might be different for your oven.

Painting them is the part I enjoy the most. It is a good idea to get very fine brushes so that you can highlight details. I think pastel tones, silver, white and gold are my favorites, particularly to decorate more classic designs.

But this year I pushed the boundaries a bit and used more dramatic colors in some of my cookies…

I also used more modern shapes, that would quite likely horrify bakers from old Swabia…

These were bought from Fun Food Tools (at etsy.com). They definitely take Springerle into a totally new direction… My apologies to the purists. Since they were already such a dramatic departure, I went crazy with the colors also…

As you know, the main flavor of these cookies is anise, which not everyone is fond of. For real anise lovers, you can go one step further and bake them over a layer of anise seeds. I like the flavor, but don’t care for the texture of the seeds at the bottom, so I always skip this step.

I hope you enjoyed this final post on Holiday Cookies. Springerle baking will definitely be part of my end of the year routine. As to the other 11 months, I will practice baking molded cookies using regular baking powder and different flavors. Stay tuned!

ONE YEAR AGO: Bread – Episode 2 of Great American Baking Show

TWO YEARS AGO: Apple and Sobacha Caramel Dome Cake

THREE YEARS AGO: Cocktail Spiced Nuts

FOUR YEARS AGO: How the Mighty Have Fallen

FIVE YEARS AGO: Festive Night at Central

SIX YEARS AGO: The Perfect Boiled Egg

SEVEN YEARS AGO: Light Rye Sourdough with Cumin and Orange

EIGHT YEARS AGO: Homemade Calziones

NINE YEARS AGO: Plum-Glazed Duck Breasts

TEN YEARS AGO: Holiday Double-Decker

ELEVEN YEARS AGO: New York Deli Rye

COOKIES FOR THE HOLIDAYS: MACARONS

I admit that macarons per se might not be firmly associated with the holiday season, but one of the things I love about them is their versatility. Like fantastic actors, they can play any part, as long as you dress them properly. Today I share six versions with a festive winter aura.

BASIC MACARON RECIPE CAN BE FOUND IN THIS POST

YIN & YANG PEPPERMINT MACARONS
(from the Bewitching Kitchen)

1 recipe from basic method, divided in two

For filling:
160g powdered sugar
57g unsalted butter, softened (4 tablespoons)
1 teaspoon peppermint extract
pinch of salt
heavy cream or milk to adjust consistency, if needed

When your macaron batter is starting to get homogeneous, divide it in two portions, dye one green and one red, and proceed to the end of macaronage. Place each batter in a separate piping bag, and then cut the tips and side them side by side into another bag (if you have two sizes, it is a good idea to use two smaller bags inside the larger one, but it is totally doable with bags of the same size).

Pipe shells and bake as specified in the recipe.

For the filling, use a hand-held electric mixer and whisk the butter until creamy. Add the powdered sugar, peppermint extract and salt. Whisk in low-speed at first, the increase speed and whisk until creamy and smooth. If needed, add a very small amount of milk or heavy cream.

Pipe the filling in shells, close them, and leave in fridge overnight to mature.

ENJOY!

to print the recipe, click here

Comments: The amount of peppermint extract to use will depend on the brand you use, how strong it is, and of course, your personal taste. Next time I make them, I will include some crushed peppermint candy. I did not have any around at the time, and we are pretty strict with our rules. Grocery store twice a week, with a list in hand, in and out quickly. So I really did not want to break the rules to go get the candy. Instead, the macs were kept simple. As to the yin-yang design, you do need the batters in two separate bags, otherwise they mix too much during piping. The effect is also nice, but will be less dramatic.

CARDAMON-GANACHE MACARONS
(from the Bewitching Kitchen)

1 recipe from basic method

for the filling:
100g heavy cream
100g milk chocolate
4 cardamon pods
10g butter)

Make the macaron batter dyed with a dark caramel color (I used Progel Chestnut). When shells are cold, decorate with air-brush using gold color and any stencil you like.

For the filling, heat the cream with cardamon pods, crushed. When almost boiling, close the pan and let it sit for 30 minutes. Pass the cream through a sieve to remove the cardamon, weigh the cream, adjust back to 100g, and heat to almost boiling then pour over the chocolate cut in small pieces. Let it sit for 5 minutes then whisk gently to dissolve the chocolate. Add the softened butter and whisk until smooth.

Let the ganache sit at room temperature until it reaches a consistency appropriate for piping. You can also whip the ganache if you like it to have more body, but don’t overdo it or it might get grainy.

Fill shells and let the macarons sit in the fridge overnight before serving.

ENJOY!

to print the recipe, click here

I adore cardamon, and made this ganache twice already. On my second time I added ground cardamon together with the pods, and used them to fill shortbread-type cookies. It was very very good.

SNOWFLAKE BLACK WALNUT MACARONS
(from the Bewitching Kitchen)

1 recipe from basic method

for the filling:
4 ounces cream cheese (half a regular package), softened
57g butter, room temperature
1/4 teaspoon black walnut extract
1/4 tsp cinnamon
1/8 tsp cloves
pinch of salt
225 g powdered sugar
1/4 cup ground Black Walnuts, lightly toasted

Add the cream cheese, butter and black walnut extract to a bowl and beat until very smooth with an electric hand-held mixer. Add cinnamon, cloves, and pinch of salt, then slowly add powdered sugar,  whisk until smooth and fluffy. Fold in the black walnuts.

Fill the shells. If desired, decorate the top with royal icing to make patterns of snowflakes, or any other pattern you like.

ENJOY!

to print the recipe, click here

Comments: Snowflakes are everywhere in cookie decoration these days, and of course, it’s the perfect time of the year to showcase them. They are easy to draw, just 4 straight lines criss-crossed, and then go crazy with the little details. I’ve been practicing with tip-less bags, but for these drawings I found it easier to couple the bag with a very fine tip, number 1 from Wilton.

But you can also do other styles of piping like this little rosette. Just mark the center, 8 points around it, take a deep breath and pipe!

The black walnut filling was featured in the blog back in July, but this time I added cinnamon and cloves, inspired by Phil’s family recipe for “Cottage Cookies” which I must make to share with you at some point. In fact, he was surprised that it is not yet in the blog.

ORANGE AND CRANBERRY MACARONS
(from the Bewitching Kitchen)

1 recipe from basic method

For filling:
160g powdered sugar
57g unsalted butter, softened (4 tablespoons)
1/2 teaspoon orange extract extract
zest of half a large orange
pinch of salt
heavy cream or milk to adjust consistency, if needed
cranberry relish or jam (I used store-bought)

Make the macarons using orange gel food color.

For the filling, use a hand-held electric mixer and whisk the butter until creamy. Add the powdered sugar, orange extract, zest and salt. Whisk in low-speed at first, the increase speed and whisk until creamy and smooth. If needed, add a very small amount of milk or heavy cream.

Fill shells with a small dollop of cranberry jam in the center, surround it with a circle of orange buttercream. Decorate with Royal icing or air brushing, if so desired.

Leave macarons in fridge overnight to mature.

ENJOY!

to print the recipe, click here

For these macarons, I used two different styles of decoration, one with Royal icing concentric swirl, and another in which I sprayed the two sides of the shells with coral and orange dyes, trying to mimic the colors associated with the two flavors. Some candy melt drizzle and sprinkles for good measure…

I loved this combination of flavors, cranberry and orange is a real classic, so I highly recommend you try this one.

EGGNOG MACARONS
(filling from The Jam Lab)

1 recipe from basic method

For the filling:
4 tbsp unsalted butter, room temperature
½ teaspoon salt
½ teaspoon freshly grated nutmeg
2 tablespoons rum extract (or rum if you don’t mind the alcohol)
2 tablespoons heavy cream
3 ½ cups to 4 cups powdered sugar

Make macaron shells and dye with green gel color.

For the filling, use a hand-held electric mixer and whisk the butter until creamy. Add the powdered sugar, salt, spices and flavoring. Whisk in low-speed at first, the increase speed and whisk until creamy and smooth. Add heavy cream until the consistency is right for piping. Assemble shells with the filling, if desired you can air-brush with gold details using a stencil.

Keep the macarons in the fridge overnight before serving.

ENJOY!

to print the recipe, click here

Comments: Most recipes that call for eggnog use “the real thing” added to buttercream. We don’t drink eggnog, so I did not want to buy a big carton that would sit in the fridge. This recipe from JamLab is perfect. I used rum extract because my macarons are donated and alcohol is not allowed. If you want to do as I did, I recommend this extract.

GINGERBREAD MACARONS
(filling from Pies and Tacos)

for the filling:
160g powdered sugar
57g unsalted butter, softened
1/2 teaspoon vanilla extract
1 teaspoon molasses
1/4 teaspoon ground ginger
1/4 teaspoon ground cinnamon
1/4 teaspoon nutmeg
milk or heavy cream if needed

Make the shells and use a caramel food dye to color the batter.

For the filling, cream butter using a hand-held electric mixer until very creamy. Add the sugar, spices and flavoring, keep whisking at low-speed at first, then increase the speed. If needed, adjust consistency with heavy cream or milk.

Pipe filling on shells, and decorate with a band of gold luster. Stick little gingerbread-shaped sprinkles using small dots of royal icing. Leave macarons in the fridge overnight before serving.

ENJOY!

to print the recipe, click here

Comments: I loved the flavor of this filling. As to the decoration, I quickly realized that even if the gingerbread men looked quite cute on the shell, glueing them did not bring me joy. They are so delicate, and it was quite labor-intensive to adjust them with tweezers on top of the icing. I made a few and then switched to plan B. There is a limit to my Zen.

Of all the macarons from this post, the one that got the highest praise was…… drum roll…. drum roll….. the EGGNOG! I was surprised by how many of the testers said it was maybe the best ever from all the ones I’ve shared over the past few months.

I hope you enjoyed this series, featuring one of the concoctions I love to bake the most… Stay tuned for the final post on Holiday Cookies, in which I’ll feature Springerle.

ONE YEAR AGO: The Great American Baking Show

TWO YEARS AGO: Broccoli Souffle

THREE YEARS AGO: Panettone Time!

FOUR YEARS AGO: How the Mighty Have Fallen

FIVE YEARS AGO: Festive Night at Central

SIX YEAR AGO: The Perfect Boiled Egg

SEVEN YEARS AGO: Light Rye Sourdough with Cumin and Orange

EIGHT YEARS AGO: Homemade Calzones

NINE YEARS AGO: Plum-Glazed Duck Breasts

TEN YEARS AGO: Holiday Double-Decker

ELEVEN YEARS AGO: New York Deli Rye