SUGARPRISM WATERCOLOR MACARONS

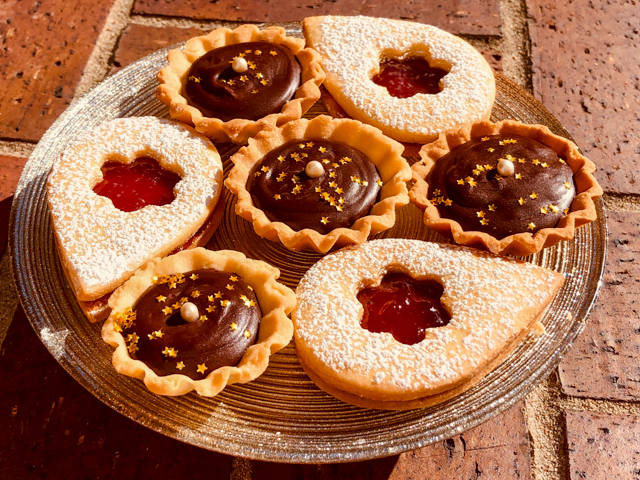
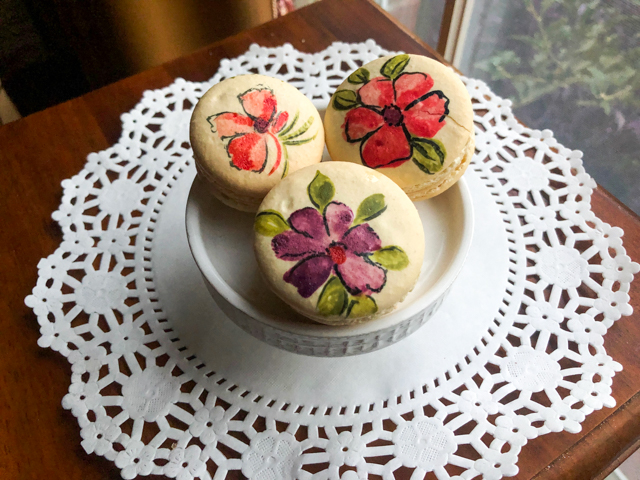
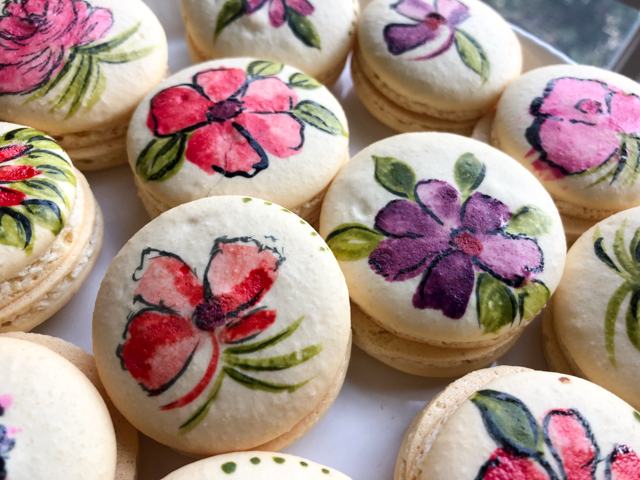
In case you’ve missed it, I’ve been keeping a second blog dedicated exclusively to cookies (click here to visit For the Love of Cookies). Back in July, I wrote a post about Sugarprism, a new product I fell in love with. Michelle, the inventor of Sugarprism hosts a page in Facebook entitled “Painting with Sugarprism“, and I highly recommend that you visit and join if the subject interests you. She is an amazing artist, and offers FREE – you read that right: FREE – tutorials of specific painting techniques. I took her 90 min lesson on watercolor painting of macarons and could not wait to share my babies here. So there you go. I took the class on Sunday, and the post is ready 36 hours later. That’s because I am over the moon with the whole experience! Can you tell?

VEGAN COFFEE GANACHE MACARONS
(adapted from Pies and Tacos)

for shells:
110 grams almond flour
110 grams powdered sugar
75 grams aquafaba
1/4 teaspoon cream of tartar
66 grams granulated sugar
tiny amount of Americolor GOLD food gel dye

for vegan coffee ganache:
1/3 cup coconut cream
60g semisweet chocolate chips (vegan)
2 tsp espresso powder

Process the almond flour and powdered sugar in a food processor for about 20 seconds total using short pulses. Sift the mixture and reserve.

Place the aquafaba in the bowl of a mixer. Start whipping on low speed and add the cream of tartar. Whip for about 30 seconds, until the aquafaba starts getting white and thick like soup. Raise the speed to medium and continue to whip for another couple of minutes, until you are able to see streaks left by the whisk on the aquafaba. Raise the speed to high, and start to add the granulated sugar, slowly, a bit at a time. Continue to whip until the aquafaba achieves stiff peaks, which can take 10 minutes or more, depending on your mixer. Add the food color close to the end of whipping.

Add the sifted dry ingredients to the whipped aquafaba. Start folding with a spatula slowly. Fold the batter forming a letter J with the spatula. You will fold until the batter is flowing slowly but effortlessly off the spatula.  Transfer the batter to the piping bag. Pipe circles on a baking sheet lined with silicon mat. Slam the trays against the counter to release air bubbles. Let the trays rest for 30-45 minutes until the shells are dry.

Heat the oven to 285ºF. Bake one tray at a time for a total of 20 minutes, or until the macarons tops do not twist independently of the bottom if you try to rotate them.

Make the filling: Heat up the coconut cream until hot. Pour over chocolate chips. Whisk until all chocolate chips have melted, add the espresso powder and whisk until fully smooth. Chill it in the fridge for a few hours. Remove from the fridge about 40 minutes before you wish to fill the macarons. This will help the ganache have the perfect consistency. Assemble shells, fill with ganache, and decorate as desired. Leave in the fridge for 24 hours for perfect consistency.

to print the recipe, click here

Comments: Never in a million years I imagined I could paint in real time as the instructor is showing the technique and be very happy with the outcome. Michelle shows exactly how to do it, it’s all in the angle of the brush, the amount of paint, and how you move the brush to get the different styles of petals. You would think that painting macarons would be super time-consuming but once you get the gist of it, it goes fast and it is oh-so-very-Zen…

The vegan coffee ganache surprised me by how much I liked it. Very easy to make, and contrary to regular cream-based ganache, it reaches piping consistency faster in the fridge. I will be trying different versions, not necessarily to couple with vegan shells.

Michelle, I cannot thank you enough for the great tutorial,
I enjoyed each minute!

ONE YEAR AGO: Dutch Macarons and a cookbook review

TWO YEARS AGO: Yogurt Tart

THREE YEAR AGO: Grilled Lamb-Stuffed Pita Bread

FOUR YEARS AGO: Elderflower Macarons

FIVE YEARS AGO: A Duet of Sorbets

SIX YEARS AGO: Sobering Peach Sorbet

SEVEN YEARS AGO: Spiralizer Fun

EIGHT YEARS AGO: Beer-Marinated Grilled Skirt Steak

NINE YEARS AGO:  Secret Recipe Club: Corn Chowda

TEN YEARS AGO: Page-A-Day Calendar (Pits and Chief 5 minutes of fame…)

ELEVEN YEARS AGO: Home Sweet Home (our beloved Pits in one of his last photos)

TWELVE YEARS AGO: Marbled Rye

ONE GIFT, ONE DOUGH, TWO RECIPES

Last month my dear friend Louise sent me a wonderful gift: a box with many (and by many I mean more than 50!) little tartlet tins in several different shapes and sizes. I was speechless, and so touched by her generosity! It is now time to share my first adventure with this special gift. A single dual-purpose dough was used to make little tarts and a modernized version of Linzer cookies. The recipe for the dough comes from Haniela’s blog. She is one of the cookie artists I follow and try to learn from. I suspect it will become my default dough for sweet tarts. The texture is perfect, and I loved the way it is intensely flavored with vanilla.

CHOCOLATE GANACHE MINI-TARTLETS
(dough recipe from Haniela’s)

for the dough:
430g all-purpose-flour
1/8 tsp salt
160g powdered sugar
3 egg yolks
2 tsp vanilla bean paste or vanilla extract
226 g unsalted butter, at room temperature

for the filling:
6oz dark chocolate, cut in small pieces
1/2 cup heavy cream
1/8 tsp orange oil
sprinkles to decorate (optional)

Sift flour and salt. Set aside. In a mixer fitted with a paddle beater, mix butter and powdered sugar until smooth. In a small dish whisk together egg yolks and vanilla. Gradually beat egg yolk mixture into the creamed butter. Scrape the bowl a few times as needed.

On low-speed, gradually add flour mixture to butter mixture. Mix until it starts to come together. If the dough is too crumbly, add 1tsp milk. Do not overwork the dough. Invert the dough onto a clean work surface or into a large bowl and gather dough together with your hands into a ball. Then form the dough into a disk, wrap it in the foil and chill for 1 to 2 hours.

Heat oven to 350F. Place mini tart shell molds onto a baking sheet. Spray with a non-stick spray, set aside. Take out the chilled dough, cut it in half. Let if soften for 5 minutes. Roll it to 1/8 inch rolling. Cut out as many rounds as you can. Gather scraps and re-roll. Shape the tarts and use a fork to prick the bottom of the shells. Bake at 350F for 12-14 minutes until golden around the edges.

Let cool for 10-15 minutes before removing tarts from the molds. Turn the mold upside down and tap it firmly onto your work surface to release the shell. Let the tarts cool before adding a filling.

Make the filling: place the chocolate in a bowl, heat the heavy cream to almost boiling, and pour over the chocolate. Wait a few minutes, add the orange oil, and gently stir until fully smooth. Let the ganache cool for about 5 minutes, then place in a piping bag and fill the tartlets, smoothing the top. Decorate with sprinkles, if desired. Place in the fridge to set the ganache for about 30 minutes. Serve at room temperature.

ENJOY!

to print the recipe, click here

Comments: Check Hani’s site for detailed step-by-step instructions. As she shows, the best way to shape the dough is using an empty tin of the same format to press it in, with a Saran wrap type plastic over the dough to protect it. Works like a charm (check top right picture in composite above). You can make many tartlets and store them in the freezer for a mini-tartlet emergency…

The same exact dough can be rolled and cut into any shape you like to make a Linzer version. I went with a teardrop and cut-out small flower shapes for the top layer.

Simply bake the cookies, let them cool, and spread a thin layer of the jam of your choice. I used seedless raspberry jam for this batch.

A little shower with powdered sugar is optional, but in my opinion, a nice finishing touch.

The dough is wonderful to work with, and as a cutout cookie, it held the shape well. The tartlets puffed up a bit, but midway through baking I pressed them down gently. Perfect texture.

A big thank you to Louise and Haniela!

ONE YEAR AGO: Rocking the Zucchini Boat

TWO YEARS AGO: Polenta Bites with Spicy Tomato Sauce

THREE YEAR AGO: Vague Mousse Cake

FOUR YEARS AGO: Cottage Loaf, my very own technical challenge

FIVE YEARS AGO: Pork Ribs: Sticky, Spicy and Awesome

SIX YEARS AGO: Sobering Peach Sorbet

SEVEN YEARS AGO: Buttermilk-Blueberry Breakfast Cake

EIGHT YEARS AGO: Silky Cauliflower Puree with Almond Milk

NINE YEARS AGO: Beef and Broccoli Stir-fr

TEN YEARS AGO:Wheat Germ and Sage Sourdough Bread

ELEVEN YEARS AGO:Popeye-Pleasing Salad

TWELVE YEARS AGO:Summer’s Finale

TURKEY TACO SALAD

When we go to Mexican restaurants, my default request is taco salad, in part because most other offerings are pretty heavy and the portions huge. At least when I have a salad the risk of getting into a food coma are a bit lower. The inspiration for this version came from many sources, and I must say I’m pretty happy with it. What made it special for me was the inclusion of red cabbage and jicama. Full disclosure: julienning the jicama was not particularly pleasant. A small price to pay.

TURKEY TACO SALAD
(from the Bewitching Kitchen)

for the dressing:
1 small bunch of fresh cilantro (no need for precision here)
1 tablespoon agave nectar
juice from 2 limes (about 1/4 cup)
1/4 cup grape seed oil

for the salad component:
1 pound ground turkey
1 tablespoon olive oil
1 tablespoon chili powder
2 tsp ground cumin
1 tsp kosher salt
3 cups shredded red cabbage
3 cups romaine lettuce, chopped
1/2 large jicama, peeled and julienned

Make the dressing: combine all ingredients in a blender or small food processor and puree until as smooth as possible.

Add the red cabbage to a large bowl and add half of the dressing to it. Leave it in the fridge for an hour or so.

In a large skillet, heat the olive oil, add the turkey and salt, and cook for a few minutes. Add the chili, cumin, mix, and drizzle about 1/4 cup of water to the pan. Cover, simmer gently for a few minutes, the remove the lid and allow most of the water to evaporate. Reserve.

Assemble the salad: Place the cabbage (already seasoned) on a serving platter, add the lettuce, jicama, toss gently. Add the cooked meat on top, and the additional reserved dressing.

ENJOY!

to print the recipe, click here

Comments: If you want to turn this into a vegetarian meal, omit the turkey and add roasted garbanzo beans instead. Or maybe sweet potatoes. The red cabbage gives it a very nice texture, and the jicama also contributes a lot. I just wish there was an easy way to deal with jicama, I am always afraid I’ll lose one or two fingers whenever I prepare it. But it has such a nice, fresh flavor. Totally worth the trouble.

I love this dressing. Definitely not for the cilantro-haters out there. Finally, what makes this perfect for me is the contrast of hot and cold. I’ve been planning many meals now with this in mind. We had a very small amount leftover and as usual, I was the lucky one who enjoyed it the following day. My husband is a real gentleman.

ONE YEAR AGO: Cheese and Pesto Emmer Roll-ups and Elaine’s Cookbook Review

TWO YEARS AGO: Mango-Hazelnut Entremet Cake

THREE YEAR AGO: Lebanese Lentil Salad and a Cookbook Review

FOUR YEARS AGO: Cottage Loaf

FIVE YEARS AGO: Sourdough Loaf with Cranberries and Walnuts

SIX YEAR AGO: Sichuan Pork Stir-Fry in Garlic Sauce

SEVEN YEARS AGO: Our Green Trip to Colorado

EIGHT YEARS AGO: Ditalini Pasta Salad

NINE YEARS AGO: Celebrate Wednesday with a Thai Seafood Curry

TEN YEARS AGO:  Post-workout Breakfast

ELEVEN YEARS AGO: Semolina Barbecue Buns

TWELVE YEARS AGO: Lavash Crackers

BROCCOLI SALAD WITH POMEGRANATE SEEDS AND TAHINI DRESSING

This is getting a bit annoying: the number of recipes I am sharing of food that simply does not show well in pictures. This salad exceeded my expectations in terms of flavor and texture, but it is hard to believe if you just look at the photos. Once again, I will ask you to trust me. I have a few pointers to modify it slightly, so check the comments if interested in making it. Let me just say before I forget, leftovers hold super well in the fridge and taste delicious even with a brief warming in the microwave, going from salad to a regular side dish. The green and red motif will be perfect for the holidays, an observation made by the husband. In fact, he’s already requested we have it for Thanksgiving. That is some endorsement! Make it. You will love it also… The picture below shows the salad right before incorporating the dressing, so you can see how thick and luscious it is, and adjust with water if needed. Tahini can be quite different depending on the brand you have.

BROCCOLI SALAD WITH POMEGRANATE SEEDS AND TAHINI DRESSING
(adapted from Pure Delicious)

1 head of broccoli, florets only (enough for about 3 cups)
12 grape tomatoes, quartered
1/2 cup pomegranate seeds

for the dressing:
2 Tablespoons tahini
1/3 cup olive oil
1/4 cup red wine vinegar
2 tablespoons fresh lemon juice
salt to taste
water to thin sauce if needed

Cut the broccoli florets in very small size using a knife or if you prefer, a food processor, but try not to over-do it.

Mix all the ingredients for the dressing except the water, in a small food processor or blender. Process until smooth. If too thick, add some cold water.

Pour the dressing over the broccoli, add the tomatoes and pomegranate seeds and toss gently. Salad holds well for many hours, keep in the fridge and serve at room temperature.

ENJOY!

to print the recipe, click here

Comments: I used the food processor to cut the broccoli, but I advise you to cut it by hand, so that the pieces end up slightly larger and more homogeneous in size. Yes, it is a bit more work, but it will be worth it. If you want to have the broccoli warm later, save some pomegranate seeds to add on top. The contrast of cold pomegranate seeds with the slightly warm broccoli is particularly nice.

We had ours with Bulgogi Chicken, which I intend to feature in the blog soon because it was another super simple recipe but exploding with flavor…

ONE YEAR AGO: Turkey-Spinach Meatballs with Cardamon-Tomato Sauce

TWO YEARS AGO: British Baps, a Technical Challenge

THREE YEAR AGO: Japanese-Style Cupcakes with Cherry Blossom Icing

FOUR YEARS AGO: Quick Weeknight Soups

FIVE YEARS AGO: Sourdough Loaf with Cranberries and Walnuts

SIX YEARS AGO: Sichuan Pork Stir-Fry in Garlic Sauce

SEVEN YEARS AGO: Our Green Trip to Colorado

EIGHT YEARS AGO: Ditalini Pasta Salad

NINE YEARS AGO: Celebrate Wednesday with a Thai Seafood Curry

TEN YEARS AGO:  Post-workout Breakfast

ELEVEN YEARS AGO: Semolina Barbecue Buns

TWELVE YEARS AGO: Lavash Crackers

LEMONY GRILLED BONELESS CHICKEN THIGHS

One of our favorite main dishes, boneless chicken thighs cook on the grill very fast and always turn out moist and tender. For this marinade, make sure you leave it several hours in the fridge, the acidity in the lemon won’t affect the texture and the flavor will be much more pronounced. Yes, that is a lot of meat for two people, but we always cook with leftovers in mind.

LEMONY GRILLED CHICKEN THIGHS
(from the Bewitching Kitchen)

8 boneless, skin-less chicken thighs
for the marinade:
1 tsp salt
1/2 tsp black pepper
1 tsp smoked paprika
1 tsp Herbes de Provence
1/4 cup avocado oil
juice of 1 lemon
2 tsp Dijon mustard

Make a marinade whisking well all ingredients in a bowl. Add to the pieces of chicken, preferably inside a large plastic bag. Place in the fridge for several hours.

Heat the grill and remove the chicken from the marinade. Pat it dry, and if you like it to be a bit more salty, season each piece lightly with additional salt (we do like that).

Grill on both sides until done, in our grill it takes a total of 16 minutes, 8 minutes per side.

ENJOY!

to print the recipe, click here

Comments: We cook boneless chicken thighs all the time, I like to use a yogurt-based marinade, and smoked paprika is almost always part of it. There’s something about its flavor when you grill the meat that I find irresistible. This marinade is considerably brighter, so to speak. More intensely flavored. For this meal, I paired the juicy chicken thighs with air-fried cauliflower, and snow peas sauteed with lemon plus a touch of soy sauce. Apparently, I can never had too much lemon around. Excellent dinner! And, pretty light too.

ONE YEAR AGO: Springerle Cookies

TWO YEARS AGO: Chickpeas and Zucchini with Tahini Sauce

THREE YEAR AGO: Mokonut’s Rye Cranberry Chocolate Chip Cookies

FOUR YEARS AGO: Incredibly Simple Times Four

FIVE YEARS AGO: Going naked, and my husband loved it

SIX YEARS AGO: Cream Cheese Mini-Pancakes with Smoked Salmon

SEVEN YEARS AGO:  Star-Shaped Chocolate Brioche Bread

EIGHT YEARS AGO: Blueberry-Banana Bread 

NINE YEARS AGO: Into the Light Again

TEN YEARS AGO: Five Grain Sourdough Bread

ELEVEN YEARS AGO: The Nano-Kitchen

TWELVE YEARS AGO: Kaiser Rolls