STILL GOT STOUT?

Not too long ago I told you we got a bottle of stout beer as a gift from one of our graduate students.  It turns out Chuck didn’t just give us one bottle, but three.  My stud husband insisted on drinking one of them (the nerve!), so  I was left with only two for my cooking adventures. Clearly, I endure a lot to keep our marriage happy.  😉  Having made a chocolate cake with the first bottle, I wanted to switch gears and use the other in a savory recipe. After a quick search on my scary-long list of “to make soon” recipes, I found exactly what I was hoping for: a brisket with a bourbon glaze, and a stout-based braising liquid. Irresistible.

BRAISED BRISKET WITH BOURBON-APRICOT GLAZE
(adapted from Bon Appetit, February 2012)

for the dry rub:
1 tablespoon plus 1 teaspoon kosher salt
1 teaspoon ground black pepper
1/2 teaspoon smoked paprika
1/8 teaspoon ground cinnamon

for the meat:
1 flat-cut brisket (about 4-pounds, with 1/3 inch top fat layer kept intact)
2 tablespoons grapeseed oil, divided
2 chopped shallots
1 garlic clove, smashed
2 cups water
2 cups beef stock
1  bottle stout beer (12 ounces)
3/4 cup bourbon
1/4 cup (packed) light brown sugar
1/4 cup soy sauce
6 large sprigs thyme
3 celery stalks, chopped
4 plum tomatoes,  chopped
4 large carrots, chopped
1 tablespoon balsamic vinegar

for the glaze:
1/2 cup apricot preserves
2 teaspoons bourbon
Kosher salt and freshly ground black pepper
Mix all ingredients for the rub in a small bowl, and rub the brisket all over with it. Cover and place in the refrigerator from 2 hours to overnight. Remove to room temperature 1 hour before you start cooking.

Heat the oven to 325 F.  Heat 1 tablespoon of grapeseed oil on a large, oven-proof pot until very hot.  Add the brisket, fat side down, and cook undisturbed for about 6 minutes, until golden brown. Turn the meat over and cook for 4 to 5 more minutes.  Remove the meat to a plate and tent lightly with aluminum foil.

Reduce heat to medium and add remaining 1 tablespoon oil. Add shallots and garlic. Cook, stirring occasionally for about 5 minutes. Add water, beef broth and all remaining ingredients. Bring liquid to a simmer. Return brisket to pot. Cover and transfer to oven.

Braise until brisket is very tender to the touch but still holds its shape, about 4 and a half hours. Using a large spatula, transfer brisket, fat side up, to a large plate. Strain the braising liquid into a large bowl. Return liquid to pot, bring to a simmer, and cook until reduced to 2 cups, about 15 minutes. Score fat side of brisket by cutting a crosshatch pattern. Return brisket, fat side up, to pot with reduced braising liquid.

Make the glaze by transferring 1/4 cup of the braising liquid to a blender, and pureeing with the apricot preserves and the bourbon.  Season with salt and pepper.  Preheat broiler. Spread 3–4 tablespoons glaze on top of brisket with a silicone brush. Broil brisket in pot until browned and glazed, watching carefully to prevent burning, 4–5 minutes.

Transfer brisket to a cutting board. Slice against the grain and transfer to a large platter. Ladle braising liquid over. Drizzle remaining glaze on top, if desired.

ENJOY!

to print the recipe, click here

Comments: You can braise the meat until it is still firm enough to serve in slices  as indicated in the recipe, or allow it to go a little longer in the oven until it starts to fall apart. Full disclosure: I intended to follow recipe as originally written, but someone invited me to go to Home Depot to get just a couple of things we needed around the house. The detour was longer than I anticipated, and by the time we got home, the brisket had passed the point of “sliceability”. We didn’t mind at all, meat that shreds into the braising sauce is hard to beat.

Leftovers were absolutely amazing. I cooked some noodles for the second time around, and used the braising liquid as my pasta sauce. I salivate as I type this and remember the deliciousness of that meal. Another great use for leftovers would be a moussaka type dish, as this one made last month by Celia.  The season for long braises is pretty much over, so this was a fantastic recipe to wrap the month of March.

ONE YEAR AGO: The Real Vodka Sauce

TWO YEARS AGO: Spring Rolls on a Spring Day

Add to FacebookAdd to DiggAdd to Del.icio.usAdd to StumbleuponAdd to RedditAdd to BlinklistAdd to TwitterAdd to TechnoratiAdd to Yahoo BuzzAdd to Newsvine

SECRET RECIPE CLUB: ORANGE AND ROSEMARY PORK TENDERLOIN

The time has come again, for the much awaited Reveal Day of The Secret Recipe Club!  I felt a shiver up and down my spine when I got my assignment, and it is easy to see why:  my assigned blog, A Taste of Home Cooking, has been around since 2006!  She is a veteran food blogger by definition!

I struggled to choose a recipe, because too many appealed to me, and to make my life even harder, she kept publishing new posts with more enticing stuff,  like a recent Roasted Brussels Sprouts with Mushrooms and Cream.  At some point, I had to quit going back, and settled on two  possibilities, the first you’ll see today, of course, but I will be making the other one soon, independent of the SRC.


ORANGE AND ROSEMARY PORK TENDERLOIN
(slightly modified from A Taste of Home Cooking)

2 pork tenderloins
4 oranges, juiced
4 tablespoons olive oil
2 tablespoons white wine vinegar
2 teaspoons agave nectar
2 cloves garlic, finely chopped
2 tablespoons fresh rosemary, chopped
1/2 teaspoon kosher salt
Freshly ground black pepper
1/4 cup heavy cream
chopped parsley leaves

Cut the tenderloins in 3 or 4 equal portions and place them in a plastic bag. Whisk together the marinade ingredients and pour them over the meat. Cover and refrigerate for at least 4 hours, preferably overnight, massaging the meat when you have a chance, or moving the pieces around).

Preheat the oven to 370 degrees. Remove the pork from the fridge and pour the marinade into a small saucepan.

Heat an oven-safe skillet over medium-high heat. Place the pork pieces into the skillet and sear on all sides, about 10 minutes total. Put the skillet in the oven and roast for 20 minutes, until cooked through  (the meat should be pale pink in the center; if using a meat thermometer, the recommended safe internal temperature is 160°F), flipping the meat a couple of times during the roasting.

While the meat is roasting, put the saucepan with the remaining marinade over medium-high heat and bring to a boil. Keep boiling, uncovered, stirring regularly, until the marinade has reduced halfway. Add in the cream, salt and parsley. Stir, and keep warm over low heat.

When the meat is ready, remove the skillet from the oven, and transfer the meat to a cutting board. If there are any juices in the skillet add them to the sauce and bring back to a boil. Cut the meat pieces into thick slices and serve with the sauce,sprinkling more fresh parsley on top.

ENJOY!

to print the recipe, click here

Comments:  This recipe was originally from Clotilde, of Chocolate and Zucchini, another ultra-veteran blog, but I followed all the modifications from “A Taste of Home”,  like browning the meat before, and increasing baking time.  Departing from both versions, I opted for an amount of cream halfway  between them.   You can get by with less, maybe a couple of tablespoons, or splurge, but I felt the meat had just the right amount of naughtiness the way I made it… 😉

After making this recipe, I am convinced we should all use oranges more often in sauces, marinades, salad dressings.  They bring the citric component, but a lot more natural sweetness.

I loved this month’s adventure at The Secret Recipe Club!  If you want to see what my fellow bloggers came up with, simply click on the links brought to you by the cute blue frog below.

Note added after publication: curious to see who got the Bewitching?  Jump to “The Double Dipped Life”, and see the recipe she chose (a favorite of ours, by the way).

ONE YEAR AGO: Pistachio-Walnut Sourdough Bread (we loved this one!)

TWO YEARS AGO:  Pork Tenderloin and Blue Cheese

Add to FacebookAdd to DiggAdd to Del.icio.usAdd to StumbleuponAdd to RedditAdd to BlinklistAdd to TwitterAdd to TechnoratiAdd to Yahoo BuzzAdd to Newsvine


GOT STOUT?

Make a chocolate stout cake!

This wasn’t just any stout beer …it was a stout made by Chuck, a graduate student in our lab, who is soon to become Dr. Chuck.  In my husband’s opinion he already deserves a PhD in beer making.  We like to think that growing bacteria in our lab on a regular basis helped him master the brewer’s yeast, but maybe that’s just wishful thinking.  What matters is that Chuck has been producing amazing beer, and he often shares his favorites with us. I love to cook with beer, so when he gave us a couple of bottles of his oatmeal stout I immediately reserved one  to make this cake.  As an added bonus, it gave me a chance to use this very cool baking pan, that was sitting ignored in our kitchen for way too long, from my cake-phobia.

CHOCOLATE STOUT CAKE
(from Bon Appetit, September 2002)

1 cup stout beer
1 cup unsalted butter
3/4 cup unsweetened cocoa powder (Dutch-process)
2 cups all purpose flour
2 cups sugar
1 + 1/2 teaspoons baking soda
3/4 teaspoon salt
2 large eggs
2/3 cup sour cream
Heat the oven to 350°F.  If using a bundt type pan (or the flower pan I did), make sure to coat all the ridges with melted butter, using a brush.  Bring 1 cup stout and 1 cup butter to simmer in heavy large saucepan over medium heat. Add cocoa powder and whisk until the mixture is fully  smooth.  Allow it to cool slightly.

In a large bowl, whisk flour, sugar, baking soda, and 3/4 teaspoon salt. In another bowl, beat eggs and sour cream until blended, preferably using an electric mixer.  Add the  beer-chocolate mixture to the egg- sour cream and beat just until combined. Add flour mixture and beat briefly on slow speed. Using a spatula, fold the batter to make sure everything is well mixed, with no clumps of flour remaining.

Pour batter into prepared pan. Bake cake until tester inserted into center comes out clean, 35to 40 minutes for a single cake, or 25 to 30 minutes for a 6-single cake pan. Transfer cake to rack; cool completely in the pan, then turn cake out onto rack.  Serve with a dust of powdered sugar on top, if so desired.

ENJOY!

to print the recipe, click here

To my taste, this cake is close to perfect!  The bitterness of the beer cuts any excessive sweetness, making this chocolate cake a “grown-up” dessert.   The original recipe called for a ganache coating, but I opted for a light dusting of powdered sugar instead.

The flower pan makes for a nice presentation, but one cake might be a bit too big for a single person.  I was happy with half, saving the other half for later.  About 5 minutes later, that is…   😉

ONE YEAR AGO: The Odd Couple

ONE YEAR AGO: Cottage Loaf and Yeasty Dogs

Add to FacebookAdd to DiggAdd to Del.icio.usAdd to StumbleuponAdd to RedditAdd to BlinklistAdd to TwitterAdd to TechnoratiAdd to Yahoo BuzzAdd to Newsvine

MY SECOND GUEST BLOG FEAST!

A while ago I was invited to write a guest post over at Feastie, and I chose a sourdough bread for the occasion.  To my delight, I recently got a second invitation to do a guest feature.  My Mom has always told me that if you are invited twice to go to someone’s house, it must mean they like you, so I hope it works the same for food blogging!  😉  Jessica asked me to blog on any type of meat recipe.  We are meat lovers here, so that was not a problem.   But I don’t face any challenge without some hyperventilation (and a little drama), so my poor husband had to endure me walking in circles around the kitchen, talking to myself, talking to the dogs, trying to pick the perfect recipe. That odd behavior lasted for about a week. It can be unsettling after a while.  My Mom got it right twice:  I married a saint.

So, if you are wondering what all my hyperventilation led to, jump right over to Feastie and find out!  Two words for you: pork and spinach.  Three: feta. Four: delicious!

HEART-HEALTHY RECIPE FOR A CAUSE

Through The Secret Recipe Club, I got to know Jey, from “The Jey of Cooking“.  A year ago, her Mom received a new heart in a transplant, and Jey decided to post a heart-healthy recipe in her blog, inviting also other bloggers to do the same.  For every recipe posted, she made a donation for The American Heart Association .  Now, to mark the first anniversary of her mother’s surgery, she is launching the same campaign, and this is my contribution.  By the way, if you have a food blog, or even if you don’t, you can join too: simply cook a heart-healthy recipe, blog or take photos from it, and send an email to Jey, you can find more details jumping here.  The deadline is March 25th.

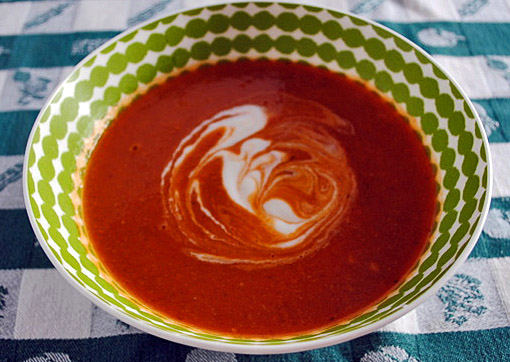
CHICKPEA AND FIRE-ROASTED TOMATO SOUP
(adapted from Fine Cooking; issue 116, March 2012)

1 Tbs. olive oil
Fine sea salt
1 medium shallot, finely diced
1 celery stalk, finely diced
2 carrots, finely diced
1 can chickpeas, drained and rinsed (15 oz)
1 can fire-roasted diced tomatoes (14.5 oz)
2 rosemary sprigs
3 cups water (or vegetable broth)
Freshly ground black pepper
1/4 cup low fat yogurt
squeeze of lemon juice

Heat the olive oil in a saucepan over medium heat.Add the onion, celery, carrot, and a pinch of salt and cook for about 5 minutes. Add the chickpeas and tomatoes with their juice, stir to combine, and cook for 1 minute. Add the rosemary, water, 1 tsp salt, and freshly ground black pepper.  Partially cover the pan and simmer gently for 20 minutes.  Remove the sprigs of rosemary, leaving behind any leaves that fell off the stem.  Purée the soup with a hand blender or in batches in a regular blender or food processor. Season to taste with salt and pepper.

In a small bowl, mix the yogurt with lemon juice and a pinch of salt. Divide the soup among 4 bowls, add a nice dollop of yogurt in the center of the bowl, and swirl it around with chopsticks.

ENJOY!

to print the recipe, click here

The original recipe, in the latest issue of Fine Cooking,  used regular tomatoes and had a higher proportion of chickpeas.  I confess to having a mild addiction to the heat and flavor of Muir fire-roasted tomatoes, so I try to sneak them in my cooking at every opportunity.   Their heat was quite obvious, so the yogurt swirl was a nice addition to tame the fire.

We are pretty much saying goodbye to soup weather, but this version would be great even on a warm Summer evening.  Chickpeas and tomatoes are  awesome together. I have paired them in stews and salads, but this was my first time enjoying them in a soup.  Tasty!

Jey, I hope you’ll get a lot of contributions to celebrate the first anniversary of your Mom’s surgery!

ONE YEAR AGO: Almond Butter Cake

TWO YEARS AGO:  Taillevent (a meal to remember…)

Add to FacebookAdd to DiggAdd to Del.icio.usAdd to StumbleuponAdd to RedditAdd to BlinklistAdd to TwitterAdd to TechnoratiAdd to Yahoo BuzzAdd to Newsvine