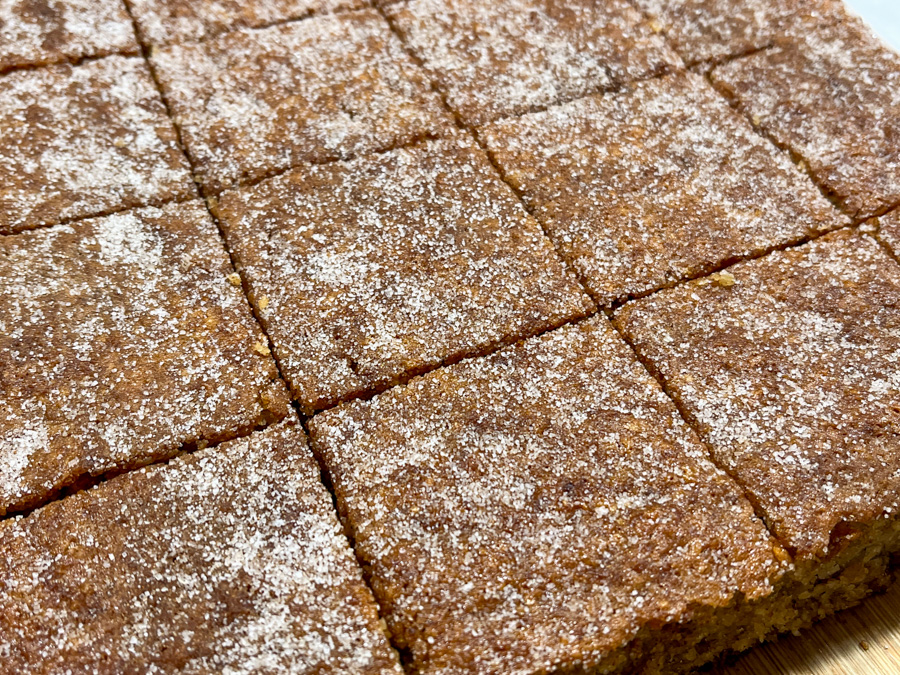
This is quite likely one of the easiest cakes to make, and I just know you will fall in love with it at first bite. One very unusual ingredient goes into the batter: bread crumbs instead of any type of flour. Don’t twist your nose, and please don’t run away! This is a deliciously moist, not too sweet cake, with intense banana flavor. I slightly modified the recipe my friend Alberto sent me. It is a winner!
BRAZILIAN-STYLE BANANA CAKE (slightly modified from our friend Alberto’s recipe)
5 very ripe bananas 4 eggs 80g oil (grape seed or canola) 100g granulated sugar 100g brown sugar 1/2 tsp cinnamon 2 cups breadcrumbs (unseasoned, about 1 tablespoon baking powder 1/2 tsp salt
cinnamon + sugar to dust the top after baking
Spray a 9 x 13 pan with baking spray and cover with parchment paper coming up the sides. Reserve. Heat the oven to 350F.
Place in a blender all the ingredients up to cinnamon. Blend at full speed until the batter is smooth.
Place the bread crumbs, baking powder and salt in a large bowl, whisking to combine. Pour the blended mixture on top, and mix gently with a spatula. Pour the batter in the prepared pan and bake for 40 minutes, until a toothpick inserted in the center comes out clean and the sides look dry and golden. Sprinkle cinnamon sugar lightly on top while the cake is still hot.
Comments: Phil fell in love with this cake, and he is a serious banana cake critic! The version we had in Brazil baked by our friend had a more intense banana flavor, but then again, it is hard to beat the flavor of a Brazilian banana in the height of the Summer… The texture of the cake is very unique, and it stays moist and tender for days. I highly recommend you give this recipe a try…
Surpresa de uva means “Grape Surprise”. It is essentially the most traditional of all Brazilian sweets – the brigadeiro – hiding a full grape inside. Everybody back home loves it, but I must admit this was my first time trying one. It was not “a thing” when I was growing up a few years ago (cough, cough). We loved it so much that the husband requested me to work on a “blueberry surprise.” I am on it!
SURPRESA DE UVA (from the Bewitching Kitchen)
1 can condensed milk 1 tablespoon butter 2 tablespoons heavy cream 1/3 cup white chocolate, cut in small pieces pinch of salt 16 to 20 small seedless green grapes sanding sugar to coat sprinkles to decorate (optional)
Add the condensed milk, butter, heavy cream, chocolate and salt to a heavy non-stick pan and cook, stirring constantly over medium to low heat, until bubbly and the mixture starts to release from the sides of the pan. Once that happens, lower the heat as low as it will go, and keep stirring for another couple of minutes.
Remove from heat, transfer to a small baking dish to cool faster. Place in the fridge if you like to speed up the cooling process. Once at room temperature, grab small amounts with a spoon, spread on the palm of your hand and place a grape in the center. Carefully roll the mixture around (wet hands help), enclosing the grape. Roll on sanding sugar. Decorate with a sprinkle, if so desired.
They will keep at room temperature for a day or two, many days in the fridge, and even longer frozen.
Comments: These are sooooo delicious! Brigadeiro is sweet, very sweet. The inclusion of the grape is brilliant, it cuts the sweetness with just the right amount of fresh. I envision a blueberry version in the future, trying to imagine the right flavor of brigadeiro to enclose it with. Stay tuned!
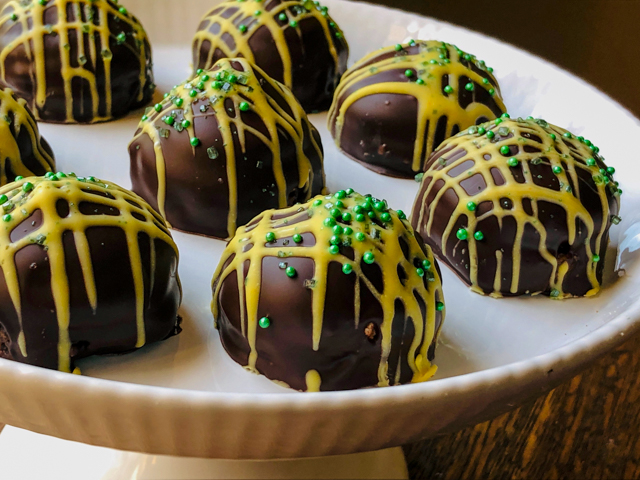
A departure on the Brazilian classic, I love the way these turned out. The raspberry cuts through the sweetness and gives them a little sharp bite I find quite pleasant. If brigadeiros are new to you, I urge you to make a batch. You can start from the traditional version, or go straight for this dressed up variation.
RASPBERRY BRIGADEIROS (from the Bewitching Kitchen)
1 can (14 oz) condensed milk 1 tablespoon butter 100g white chocolate, cut in pieces dash of salt 1/4 cup raspberry jam, seedless 1 tsp Amorettti raspberry flavor (optional) nonpareils, white and pink gold air-brush color (optional)
Grease a small baking dish with butter and set aside.
In a medium non-stick pan, combine the butter, sweetened condensed milk, and salt over medium-low heat, stirring constantly with a wooden spoon. Once the brigadeiro mix is warm, add the chocolate pieces, the jam and continue stirring.
The mixture thickens after about 8-10 minutes, and once you can run your spoon through the middle of it without it running back together for 2-3 seconds, it is done. When it starts to thicken, add the raspberry flavor, if using.
Pour the mixture into the greased plate, and let it chill until you can handle it with your bare hands. Form little balls and roll on nonpareils to coat. If desired, add a little gold color with an air-brush. Place them in small candy cups.
Comments: Brigadeiros are very sweet by nature (reducing condensed milk leaves you no way out of it), but even those who are against overly sweet goodies will enjoy this version. The raspberry does its magic.
I went with two colors, pink and white, and added a touch of gold because these brigadeiros had to be dressed for a special party. Have you heard that a certain food blog will turn 12 years old very soon? I say no more for the time being…
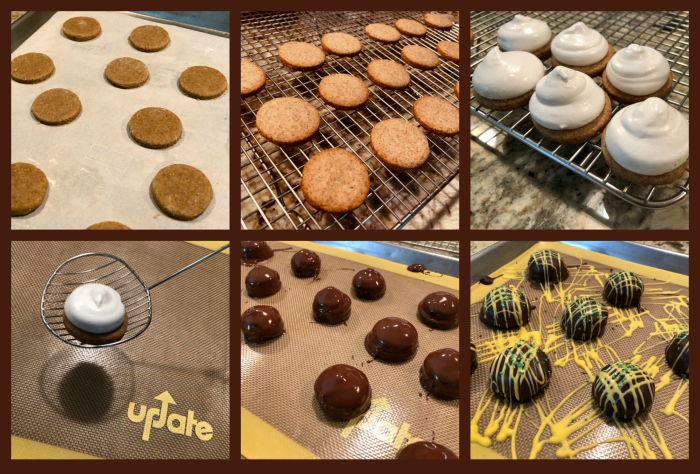
One year ago, filming of Season 5 of The Great American Baking Show was coming to an end. In fact it was probably right this very day a year ago that Dana, Marissa and Brother Andrew faced their last baking challenges in that dreamy tent. Amazing that with this assignment we went full circle, and all the bakers who participate in “the collective”, proposed challenges on a monthly basis. It makes my heart sing. Dana chose a very cool project for the month of August. Recreate your favorite childhood treat. I had to give it some thought, but then my friend Denise (who grew up in Rio) reminded me of something called Nhá Benta. No need to panic, I will explain to you exactly how to say it (after the comments). Nhá Benta is a kind of sweet that is found in many countries under names like Marshmallow Puff, Tunnock’s Tea Cakes, Mallomars. The Brazilian version had a very thin base and a ton (I mean a real huge amount) of marshmallow on top. It was very messy to eat, which was a bit of a turn-off for me. Both my late Dad and I, we shared a little quirk: intense dislike of sugary mess. Even as a child, you would never see me with ice cream melting down my arm or lips. The very idea would leave me paralyzed. But it was so tasty, I could never resist it for very long. My re-make of this Brazilian classic is “user-friendly” and “Dad-approved.” A bigger, sturdier cookie base, and just the right amount of marshmallow to allow you to bite into it and not lose your dignity. To make it even more Brazilian, a green-and-yellow decoration, because sprinkles make my world go around.
NHÁ BENTA (from the Bewitching Kitchen)
for the cookie base:
100g flour
25g whole wheat flour
25g hazelnut flour (or hazelnuts, finely ground)
50g brown sugar
½ tsp salt
113g unsalted butter (½ cup) cold, cubed
2 tbsp milk
1 tsp vanilla
for the marshmallow (makes more than you’ll need):
200 g sugar
¼ cup water
5 sheets gelatin
2 egg whites
¼ fine salt
For the chocolate coating:
250g chocolate couverture, tempered
1 tsp coconut oil, melted
drizzle: white chocolate, melted and dyed with oil-soluble food dye
sprinkles
Heat oven to 350F.
In a food processor, pulse together the flours, sugar and salt. Add the butter and pulse until mixture resembles coarse crumbs. Add the milk and vanilla and pulse until dough holds together when squeezed. Turn the dough out onto the counter and knead gently to bring together. Dust the counter with flour and roll the dough to ¼-inch thickness. Cut into rounds and place on a parchment-lined baking sheet. Freeze for 10 minutes. Bake until firm and beginning to brown on the edges, 12 to 15 minutes. Cool for 2 minutes on baking sheet, then transfer to a wire cooling rack to cool completely.
Make the marshmallows only when the cookies are ready and cool, because it sets reasonably quickly. Soak the gelatin sheets in cold water. Add the sugar and water in a small saucepan and bring to a boil over medium-high heat. Start whipping the egg whites so that they are at soft peaks within 5 minutes or so. Reduce the heat in the saucepan to medium and boil until mixture reaches 235-240F. Remove from heat and allow bubbling to subside.
With the mixer running on medium-high, gradually stream in the sugar syrup and drained gelatin sheets along the side of the mixing bowl into the egg whites. Continue to beat until glossy, thick and cooled to room temperature, about 6 to 8 minutes. Add the salt and mix for 1 minute.
Spoon the mixture into a piping bag fitted with a medium round piping tip and pipe over the cookies to form a dome. If dome needs smoothing, moisten fingers with water and gently smooth dome. Set aside to cool.
Temper the chocolate and add the coconut oil, mixing gently to incorporate. Immediately dip the cookies, marshmallow side down, into the chocolate. Flip to coat the bottom and place them gently over Silpat or parchment paper (do not place over a grid like a drying rack because that will mess up the coating at the bottom). Melt white chocolate and dye yellow. Place in a small piping bag, cut a very thin opening, and drizzle the surface of the covered cookies. Add sprinkles right away. Cool and serve, they can be stored in the fridge.
Comments: First of all, if you want to make a version closer to the authentic one sold in Brazil by Kopenhagen, roll the cookie very thin, and pile that marshmallow as if you are trying to reach the ceiling. Good luck coating it all with tempered chocolate… but I bet it can be done. This was messy enough for me, I tell you. The drizzles are optional and are never found in the commercially available Nhá Bentas.
So what about its name? It would be best translated as Ms Benta. Nhá is a contraction of the word sinhá, a term commonly used in rural areas of the country decades ago. Basically, they are both variations of the formal “Senhora” still used today as a respectful way to refer to an older woman. For instance, my friends addressed my Mom as “Senhora Salete”, and my Dad as “Senhor Danillo.” The pronunciation of the word can be tricky for foreigners, so here we go, repeat after me…
This was my first time making Nha’ Bentas and I had no idea 2 egg whites would produce such a big volume of marsmallow. If your mixer handles 1 egg white, consider halving the recipe that part of the recipe. I also had quite a bit leftover tempered chocolate, and saved it for future adventures…
Follow your heart…
Dana, this was such a clever challenge, I am looking forward to the flash-back into childhood of our tent-baking friends. I invite my readers to stop by the Home Bakers Collective to read all about it.
In case you’ve missed my big announcement:
12 days to showtime!
Want to say it as a native? Pay attention to the nasal sound of PÃO… and repeat after me…
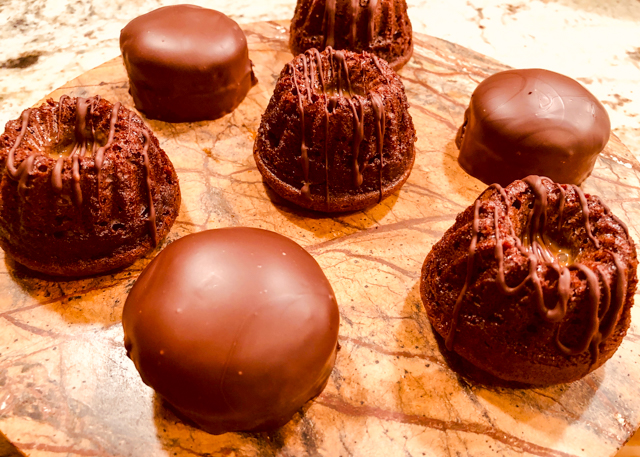
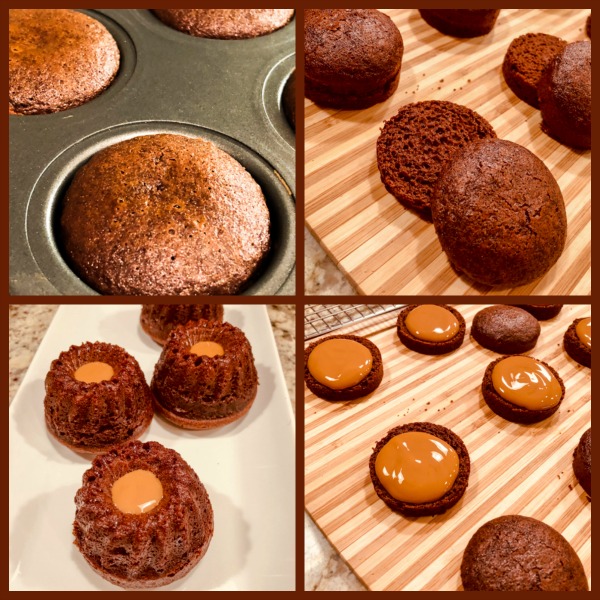
Pão de mel translates literally as “honey bread.” However, it is definitely not a bread, and honey might not be the first flavor that comes to mind once you take your first bite. I admit the name is misleading, but I am thrilled to share this recipe with you, because it is a real classic in my home country. It has flavors I adore (that ginger, spicy thing), enclosed in a nice chocolate shell. The ones I grew up with were a bit on the dense side. My family had no tradition of baking, so I only had pão de mel that you get in stores, wrapped in plastic for who knows how long. This version is so good, very soft, tender, sweet and spicy. I made two kinds, the traditional, covered with a shell of chocolate, and a little departure from the classic, in bundt shape. You decide which one you like best.
PÃO DE MEL (from the Bewitching Kitchen, adapted from several sources)
1 egg 250mL whole milk 90 g sugar 270 g honey 30 g butter, melted and cooled 240 g all purpose flour 7 g baking soda 1 teaspoon baking powder 1 tablespoon ground cinnamon 1/4 teaspoon salt ½ teaspoon of nutmeg 1/4 tsp ground cloves 3 tablespoons cocoa powder (Dutch process is fine)
for the filling; dulce de leche (store bought or homemade)
for covering: tempered bittersweet chocolate, about 500 g
Mix the egg with milk, sugar, honey and butter in a large bowl. Whisk well. In another bowl, stir in the remaining dry ingredients and sift them slowly over the egg mixture in three portions, stirring well after each addition until a smooth, homogeneous mixture is formed. Place batter in fridge for 15 minutes.
In the meantime, turn the oven on at 360 F. If using non-stick mini cake pans, you don’t need to do anything. Otherwise grease and flour the pans lightly. Ideally you need a 6 cm round tin (a bit less than 2.5 inches). Pour the batter halfway through the tin, do not fill more than half. Bake for 15 to 20 minutes. Unmold the still warm rolls and let them cool completely on a rack. Cut them in half and stuff each with the dulce de leche.
Temper chocolate and cover each little pao de mel.
Alternatively, bake the batter in mini bundt pans, fill the central hole with dulce de leche and decorate with a drizzle of tempered chocolate. Mini bundt pans will take slightly longer to bake. Cool them in the mold before unmolding.
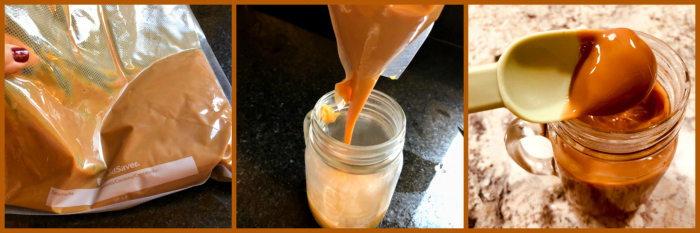
Comments: If you want to make your own dulce de leche, there are many methods to do so. Pressure cooker, slow oven, even the microwave. I opted for sous-vide and must say it was perfect. Simply pour the contents of 1 can of condensed milk into a bag, seal it and cook it at 185F for 12 to 16 hours. When the time is up, simply cut the bag and pour the contents into a container. Into the fridge ready for any dulce de leche emergency.
Homemade dulce de leche is a real treat, I highly recommend you give it a try, but of course, the canned product will work well too. Pão de mel can be frozen for a couple of months without the filling and chocolate covering. You can also simplify the process and skip the filling. The simplified version is actually more common to buy in Brazil. But normally, when people make them at home, they go the extra mile. A very sweet mile, if you ask me.
Which version was better, classic or mini-bundt? I honestly have a hard time deciding. The mini-bundt is a lot easier to make because once you un-mold the little cakes the hard work is done. You can conceivably even get by without tempering chocolate, just melting it gently and drizzling it all over. But of course, the traditional version is the one that brings fond memories of my past. It’s your turn now, make both and let me know what you think…