FALL-INSPIRED BAKING

Everyone who knows me is well-aware I am a summer-creature all the way. But there’s something about the colors of autumn that fascinate me. I suppose they fascinate all human beings. Growing up in Brazil, I had never seen trees turning color, but used to marvel at photos from Vermont or other places famous for having the most spectacular color change in their trees. Now I enjoy them in our own backyard, Phil planted a beautiful maple tree that is thriving nicely, each year more magnificent, with a more intense red tone in the leaves. Gorgeous. Today I share with you a series of recent bakes inspired by the season.

I will start with the Maple Leaf Chocolate Sugar Cookies, because I loved making them.

MAPLE LEAF CHOCOLATE COOKIES
(cookie recipe from Lilaloa and decoration technique from Salt and Serenity)

for the cookie dough:
227 g (1 cup) slightly softened unsalted butter
43 g vegetable shortening (43 grams)
300 g granulated sugar
2 large eggs ( about 100 grams)
1 teaspoon vanilla paste
1/2 teaspoon salt
3/4 teaspoon baking powder
80 g unsweetened cocoa powder
490 g all-purpose flour
(if saving the dough to roll at a later time, use 420 g flour)
for the Royal Icing:
80 g egg whites
420 g powdered sugar
food dye (brown, red, orange, and yellow)

Heat oven to 375 F. Line two baking sheets with parchment paper.
Cream butter, shortening and sugar together in the bowl of a KitchenAid type mixer with the paddle attachment. Add eggs, vanilla, baking powder and salt and mix well.
Stir in the cocoa until well blended.

Add flour and mix until the flour is completely incorporated and the dough holds together in a ball. Roll out on lightly floured surface, cut in the desired shapes.I like to place the baking sheet in the freezer for 5 minutes or in the refrigerator for 15 min before baking. Bake for 7 to 10 minutes, cool completely before icing.

Make the Royal icing: whisk the egg whites and powdered sugar using a KitchenAid type mixer until fully smooth. Adjust if needed with sugar or a little milk. I like to have it at around 15 second-icing consistency, because it works both for piping the edge and flooding, which is all I need for this design.

Pipe the four colors starting with brown, finishing with yellow, but feel free to play with them in other arrangements. Pull the colors with a needle or toothpick, watch the tutorial online for details. Allow the icing to fully set at room temperature.

ENJOY!

to print the recipe, click here

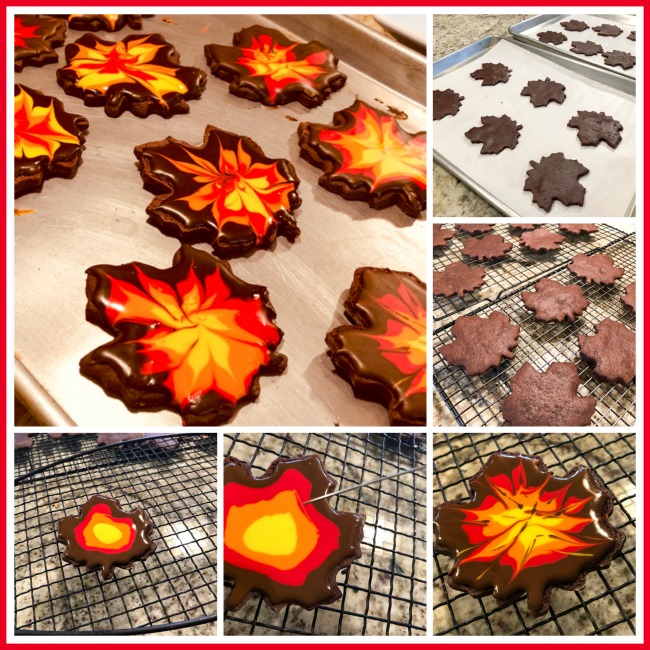
Comments: I urge you to visit Salt and Serenity and watch Cindy’s video explaining how to make this eye-catching design. It is one of those things that seem very complicated until you see how it’s done. Basically, if “I” could do it, you will be able to do it also. Trust me. It is important to use a cookie recipe that holds its shape well, and I was happy with the one I used, especially because you can roll the dough without resting it in the fridge. You know I am not the most patient baker out there.

Moving on to Halloween Brigadeiros…

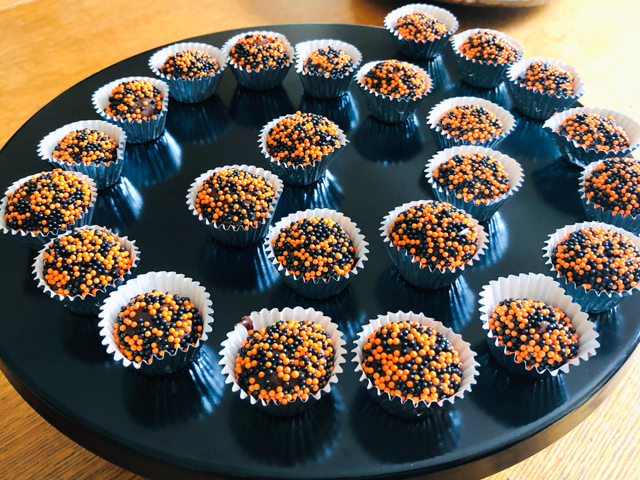
Brigadeiros are the most typical candy from Brazil, and totally addictive.  I used my default recipe and simply coated them with orange and black non-pareils. For the recipe and to read more about them, visit my old post with a click here.
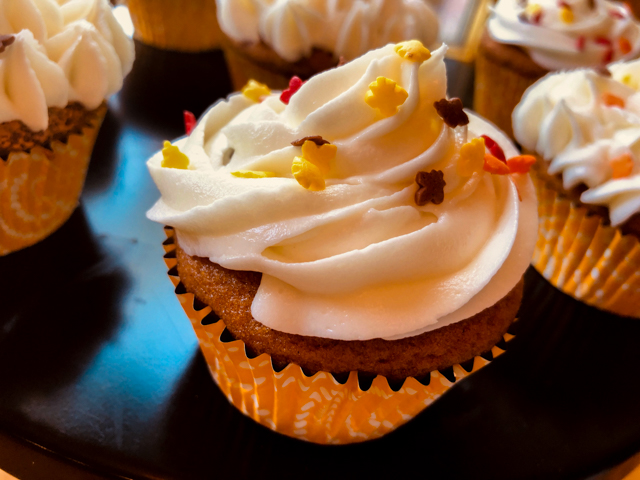
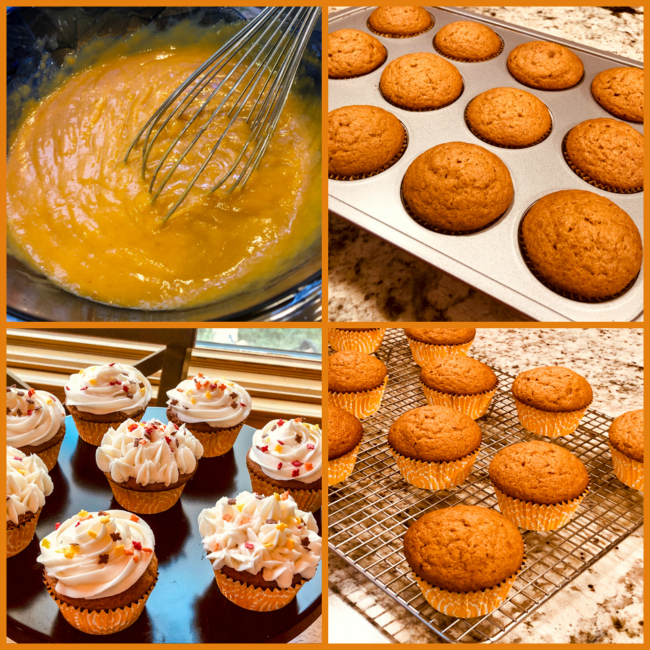
PUMPKIN CUPCAKES
(adapted from many sources)

for the cupcakes:
170 g granulated sugar
130g brown sugar
225 g all-purpose flour
1 + 1/2 tsp baking powder
½ teaspoon baking soda
2 teaspoons ground cinnamon
3/4 teaspoon ground ginger
1/2 teaspoon ground nutmeg
1/4 tsp salt
320 g canned pumpkin (about 3/4 of a small can)
150 ml grapeseed oil
3 large eggs
for the icing:
120g unsalted butter, softened
190 g cream cheese, at room temperature
675 g powdered sugar
sprinkles to decorate

Heat the oven to 375 F.  Place both sugars in the bowl of a KitchenAid type mixer and blend with the whisk so that no lumps remain in the brown sugar. Sift all other dry ingredients and mix well with the sugars.

In another medium bowl mix well the pumpkin, oil and eggs. Add to the KitchenAid bowl and mix with the paddle attachment until smooth. Place paper liners in a 12-muffin baking pan, and fill each about 3/4 of the volume.

Bake until a toothpick comes out clean, about 18 minutes.

Make the icing while the cupcakes bake and cool. Beat the butter and cream cheese with an electric mixer until pale and very smooth. Sift the icing sugar into a large bowl, then add to the butter mixture in three additions, beating well each time. 

When the cupcakes are completely cool, frost them using the icing tip of your choice. I used Wilton 1M.  Decorate with your favorite sprinkles.

ENJOY!

to print the recipe, click here

Comments: These are deliciously soft cupcakes, with the perfect amount and combination of spices. I used two different styles of piping trying to change things a bit, but the traditional swirl still gets my vote. I suppose if you want to go the more austere route, these cupcakes will shine with just a dusting of powdered sugar, so keep that in mind.

And finally, how could I possibly make a Fall inspired baking post without French macarons?

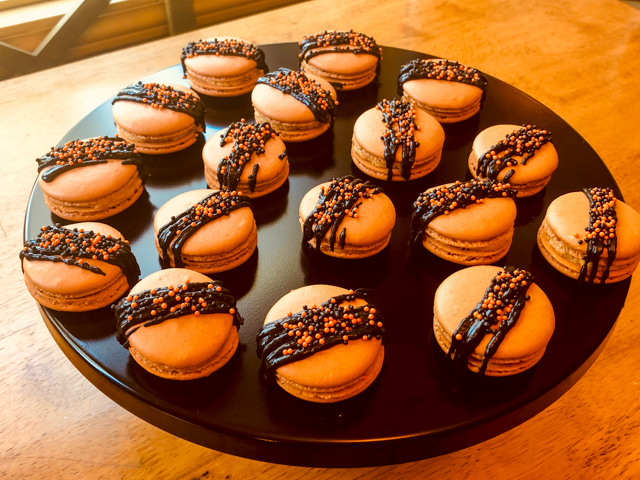
I used my default recipe, which you can find here, but added orange and brown food color at 4:1 proportion.

PUMPKIN MACARON FILLING

1/2 cup butter, softened
1/4 cup canned pumpkin pureed
2 cups powdered sugar (220 g)
1 tsp vanilla
1/2 tsp cinnamon
1/4 tsp ground ginger
1/8 tsp nutmeg
pinch of allspice
to decorate:
White Candy melts (about 3/4 cup)
black gel food dye
sprinkles of your choice

Cream the butter and pumpkin puree with an electric mixer. Add in the sugar and spices. Mix well and scrape down side of bowl. If needed, thin with a very small amount of milk or heavy cream.

Add a small amount of buttercream to a macaron shell, top with another shell. Melt the Candy melts in a microwave or double boiler. Add black food dye. Place in a piping bag, cut a very small hole in the plastic. Pipe lines on top of the macarons, immediately add sprinkles before the drizzle sets.

As always, leave the filled macarons in the fridge overnight before serving them.

ENJOY!

to print the filling recipe, click here

Comments: This is my second version of a pumpkin macaron, and I like this filling better, it has a more complex flavor. For the drizzle with black candy melts I did something a bit different, and unfortunately I am not quite sure how reproducible it is. You are welcome to try it, but if it does not work for you, don’t get mad at me. A couple of months ago I was heating candy melts and used too high power in the microwave. The suspension kind of broke, and I simply tossed it and started all over. Later I learned that you can recover the broken suspension if you add a bit of oil such as grapeseed or safflower. Something mild in flavor, obviously. This time I made the suspension break and brought it back but not to the point that it was fully smooth. I wanted some texture, and I think it worked well, at least it was close to what I had in mind.  So, next time Candy Melts play a trick on you, consider using it to your advantage…

I hope you enjoyed my quartet of bakes. Since summer is over, I might as well embrace what’s good about cooler weather: BAKING WITH ABANDON!


ONE YEAR AGO: On a Halloween Roll

TWO YEARS AGO: Pumpkin Macarons

THREE YEARS AGO: Zucchini, Lemon & Walnut Cake

FOUR YEARS AGO: Paleo Energy Bars

FIVE YEARS AGO: Pecan-Crusted Chicken with Honey Mustard Dressing

SIX YEARS AGO: Mozzarella Stuffed Turkey Burgers

SEVEN YEARS AGO:  Cashew Chicken Lettuce Wraps

EIGHT YEARS AGO: Clay-pot Pork Roast

NINE YEARS AGO: Panmarino

TEN YEARS AGO: A Classic Roast Chicken

CHICKEN AND HEART OF PALM SQUARES

Puff pastry turns any delicacy into something special. It is hard to beat the taste and texture of a nicely laminated dough. You can go sweet or savory, you can skip any additions, just form them as sticks, twist them around and enjoy plain or with a humble sprinkle of spices. Today I share a recipe for puff pastry squares using a classic Brazilian filling: chicken and hearts of palm.

CHICKEN AND HEART OF PALM SQUARES
(from the Bewitching Kitchen)

for rough puff pastry:
(makes a little more than you’ll need)
345 g unsalted butter, frozen
1 tablespoon sugar
1½ teaspoons salt
300g all-purpose flour + 2 Tbsp (to toss with grated butter)
80 g whole milk, cold
80 g water, cold (may not use it all)
1 egg for egg wash

for the filling:
2 boneless, skinless chicken breasts
2 tablespoons soy sauce
1 lemon (to poach chicken)
salt and ground black pepper to poach chicken breasts
2 Tablespoons olive oil
1 medium onion, finely diced
2 cloves garlic
salt and ground black pepper
2 large tomatoes
2 tablespoons tomato paste
100 g hearts of palm, cut in ¼ inch rounds
100 g frozen peas (no need to defrost)
80 g cream cheese (full-fat)
Sriracha sauce
fresh cilantro to taste
1 lemon
2 tablespoons flour
½ cup whole milk

Mix in a large bowl the 300g flour, sugar, and salt. Set aside.

Grate the butter using a food processor with a grating disk attachment. Toss it with 2 Tbsp flour and reserve.

Take 155 g of the grated butter and mix with the flour in the large bowl, tossing with your hands to form reasonably small crumbles. Keep the rest of the butter in the freezer. Add to the flour/butter mixture all the cold milk and half of the water. Make a smooth dough, trying to handle it as little as possible. Adjust with water and or more flour.

Roll it out as a rectangle, about 12 inches long and 4 inches wide. Add roughly 50 g of frozen grated butter to the center of the dough. Fold bottom half up, add 50 g more butter to the folded portion. Fold the top portion down, covering the butter. Turn the dough so that one open side is facing you. Roll it out as before, add the leftover grated butter exactly the same way. Fold and place in fridge for 30 minutes.

Roll the dough as before, fold two more times without adding any more butter. Roll out as a rectangle and keep in fridge until filling is ready and cold.

Roll out about 1/3 of the dough (roughly 300 g) as a square a little bigger than 12 inches. Do the same for another third of the dough.  Cut 12 squares from each piece of dough, punching a star using a cookie cutter in the center of half the squares (they will be the top of the pastry).

Place the squares that will be the bottom over parchment paper. Add enough cool chicken filling, brush the sides with egg wash, place the top pastry and push the edges to close it down. Brush the top with egg wash and bake at 400F for about 25 minutes, until golden brown.

FOR THE FILLING (can be made a couple of days in advance)
Poach the chicken breasts very gently in water seasoned with salt, pepper, soy sauce and lemon juice. I like to bring the water to almost a boil, turn the heat off, and leave the chicken in the pan for 15 minutes. Keep in mind it will cook longer in the pie.  When chicken is poached and cool enough to handle, shred the meat with your fingers or a couple of forks. Reserve.

Sautee the onion and garlic in olive oil with a touch of salt and pepper in a large skillet until fragrant. Add the shredded chicken breast, tomatoes, tomato paste, hearts of palm pieces and cook for a couple of minutes, stirring. Dissolve the flour in the milk, whisking well to avoid lumps. Pour into the meat mixture and heat until it starts to thicken.  Add the cream cheese, then the frozen peas and mix everything gently. Add the Sriracha sauce, adjust seasoning with salt and pepper if needed. Add the minced cilantro, lemon juice and allow the mixture to cool completely before assembling the pastries.

ENJOY!

to print the recipe, click here

Comments: The filling for these puff pastry squares is very similar to this one of my recent blogging past. It is a classic component of Brazilian recipes like pasteis, empadinhas and pies. The recipe will provide you with leftovers that you can enjoy over rice, pasta, mashed potatoes, or if you are truly daring, try it as a topping for pizza or flatbreads. Add a bit more cheese on top for good measure.

You will have a little bit of puff pastry leftover. You can cut in small squares, fill mini-muffin pans and play with other fillings like….

Mushroom duxelles!  Or save in the freezer for future important experiments in the kitchen. It does freeze beautifully…

ONE YEAR AGO: Seedy Crackers for a Fun Party

TWO YEARS AGO: Brutti ma Buoni Low-Carb Soup

THREE YEARS AGO: Turkey Stir-Fry with Almond Butter

FOUR YEARS AGO: Secret Recipe Club: Tailgating Party!

FIVE YEARS AGO: One Million Page Views!

SIX YEARS AGO: Tlayuda, a Mexican Pizza

SEVEN YEARS AGO: Paradise Revisited 

EIGHT YEARS AGO: Feijoada, the Ultimate Brazilian Feast

NINE YEARS AGO: Vegetable Milhojas

TEN YEARS AGO:  Italian Bread

MANDIOCA FRITA 101: FRIED YUCCA ROOT

Flash back from the past, a delicacy from Brazil that is sure to please anyone who tries it! A bit of work to prepare, but oh-so-very-worthy!

Bewitching Kitchen

I suspect that many people have never tried it, and that those who saw manioc root for sale didn’t take it home, because it looks too strange and intimidating.   That’s  all quite sad, because it means they’re missing this: the Brazilian version of french fries.

For many Brazilians, “mandioca frita” is even better than french fries.  I know, it sounds heretical, but trust me – once you try it you will be hooked.  Crunchy outside, creamy inside, with a flavor that can only be described as addictive.    I won’t lie to you, mandioca  frita takes some effort.  But  if you follow my instructions you won’t regret it.

Manioc, also known as cassava and yucca, is a major ingredient in many cuisines of the world.  You can read all about it here.

To cook the manioc, you first must peel it, a task that requires a good…

View original post 507 more words

BRAZILIAN PAO DE QUEIJO: Love at first bite!

Brazilian cooking at its best, in a quick, easy and super tasty recipe!

Bewitching Kitchen

cheesebread1

If you happen to know any Brazilians leaving abroad, ask them to name the five foods that they miss the most. I’m willing to bet that “pao de queijo” (little cheese bread) makes the list. Some might even shed a tear or two thinking about it.

Originally from the beautiful state of Minas Gerais, they are made with a farmer’s type cheese, quite unique (Minas’ cheese, read about it here).   Brazilian cheese bread  is so popular that nowadays you can buy it in stores all over the country called ‘Casa do Pao de Queijo” (Home of the Cheese Bread),  or as a dry mix, in colorful bags available at most grocery stores. I’ve lost track of how many such bags we’ve stuffed in our luggage coming back from annual trips to visit family and friends.

Last year I found a recipe for pao de…

View original post 428 more words

MEMORIES of PASTEIS

Dad left us 15 years ago today. But he did not really leave. This is a post from 9 years ago, which I re-blog today.
(comments are shutdown)

Bewitching Kitchen

When traveling to a country for the first time, it’s a good idea to pay special attention to their “street food.”   In Paris, for example, the tiny shops selling crepes (sometimes slathered with Nutella!) are a delight as one strolls along the avenues.   Many big cities are filled with  such delicacies, and in fact, one of my favorite cookbooks revolves around this topic.

On the streets of Brazil, you might stop to buy a “pastel,” and after sampling it, immediately return to the vendor for a couple more (plural = pasteis).    These fried savory pastries are sold at the entrance of street markets: every week on the same day a few blocks of a neighborhood street close to traffic, while farmers sell their produce from early morning until slightly past noon, with prices dropping as the hours pass.  You’ll smell the pasteis from a distance…

View original post 1,102 more words