INCREDIBLY SIMPLE ZUCCHINI ROUNDS

I don’t know if I am embarrassed or thrilled. Embarrassed because this is truly SO simple that it hardly qualifies as a “recipe”. But thrilled at the same time because it totally blew my expectations. So simple, so tasty. Even next day, and you know how much I go crazy for leftovers.


BAKED ZUCCHINI TOMATO STACKS
(from The Bewitching Kitchen)

1 zucchini, sliced 1/4 inch thick
olive oil
salt and pepper
Fresh tomatoes, sliced (about the same diameter as the zucchini)
grated mozzarella cheese
Herbes de Provence to taste

Line a baking sheet with parchment paper.

Lay one slice of zucchini, brush both sides with olive oil, season with a little salt and Herbes de Provence.

Place a slice of tomato on top, season with a little salt. Add shredded mozzarella on top of the tomato.

Bake at 400F for 15 to 20 minutes, until cheese is melted and golden.

ENJOY!

to print the recipe, click here

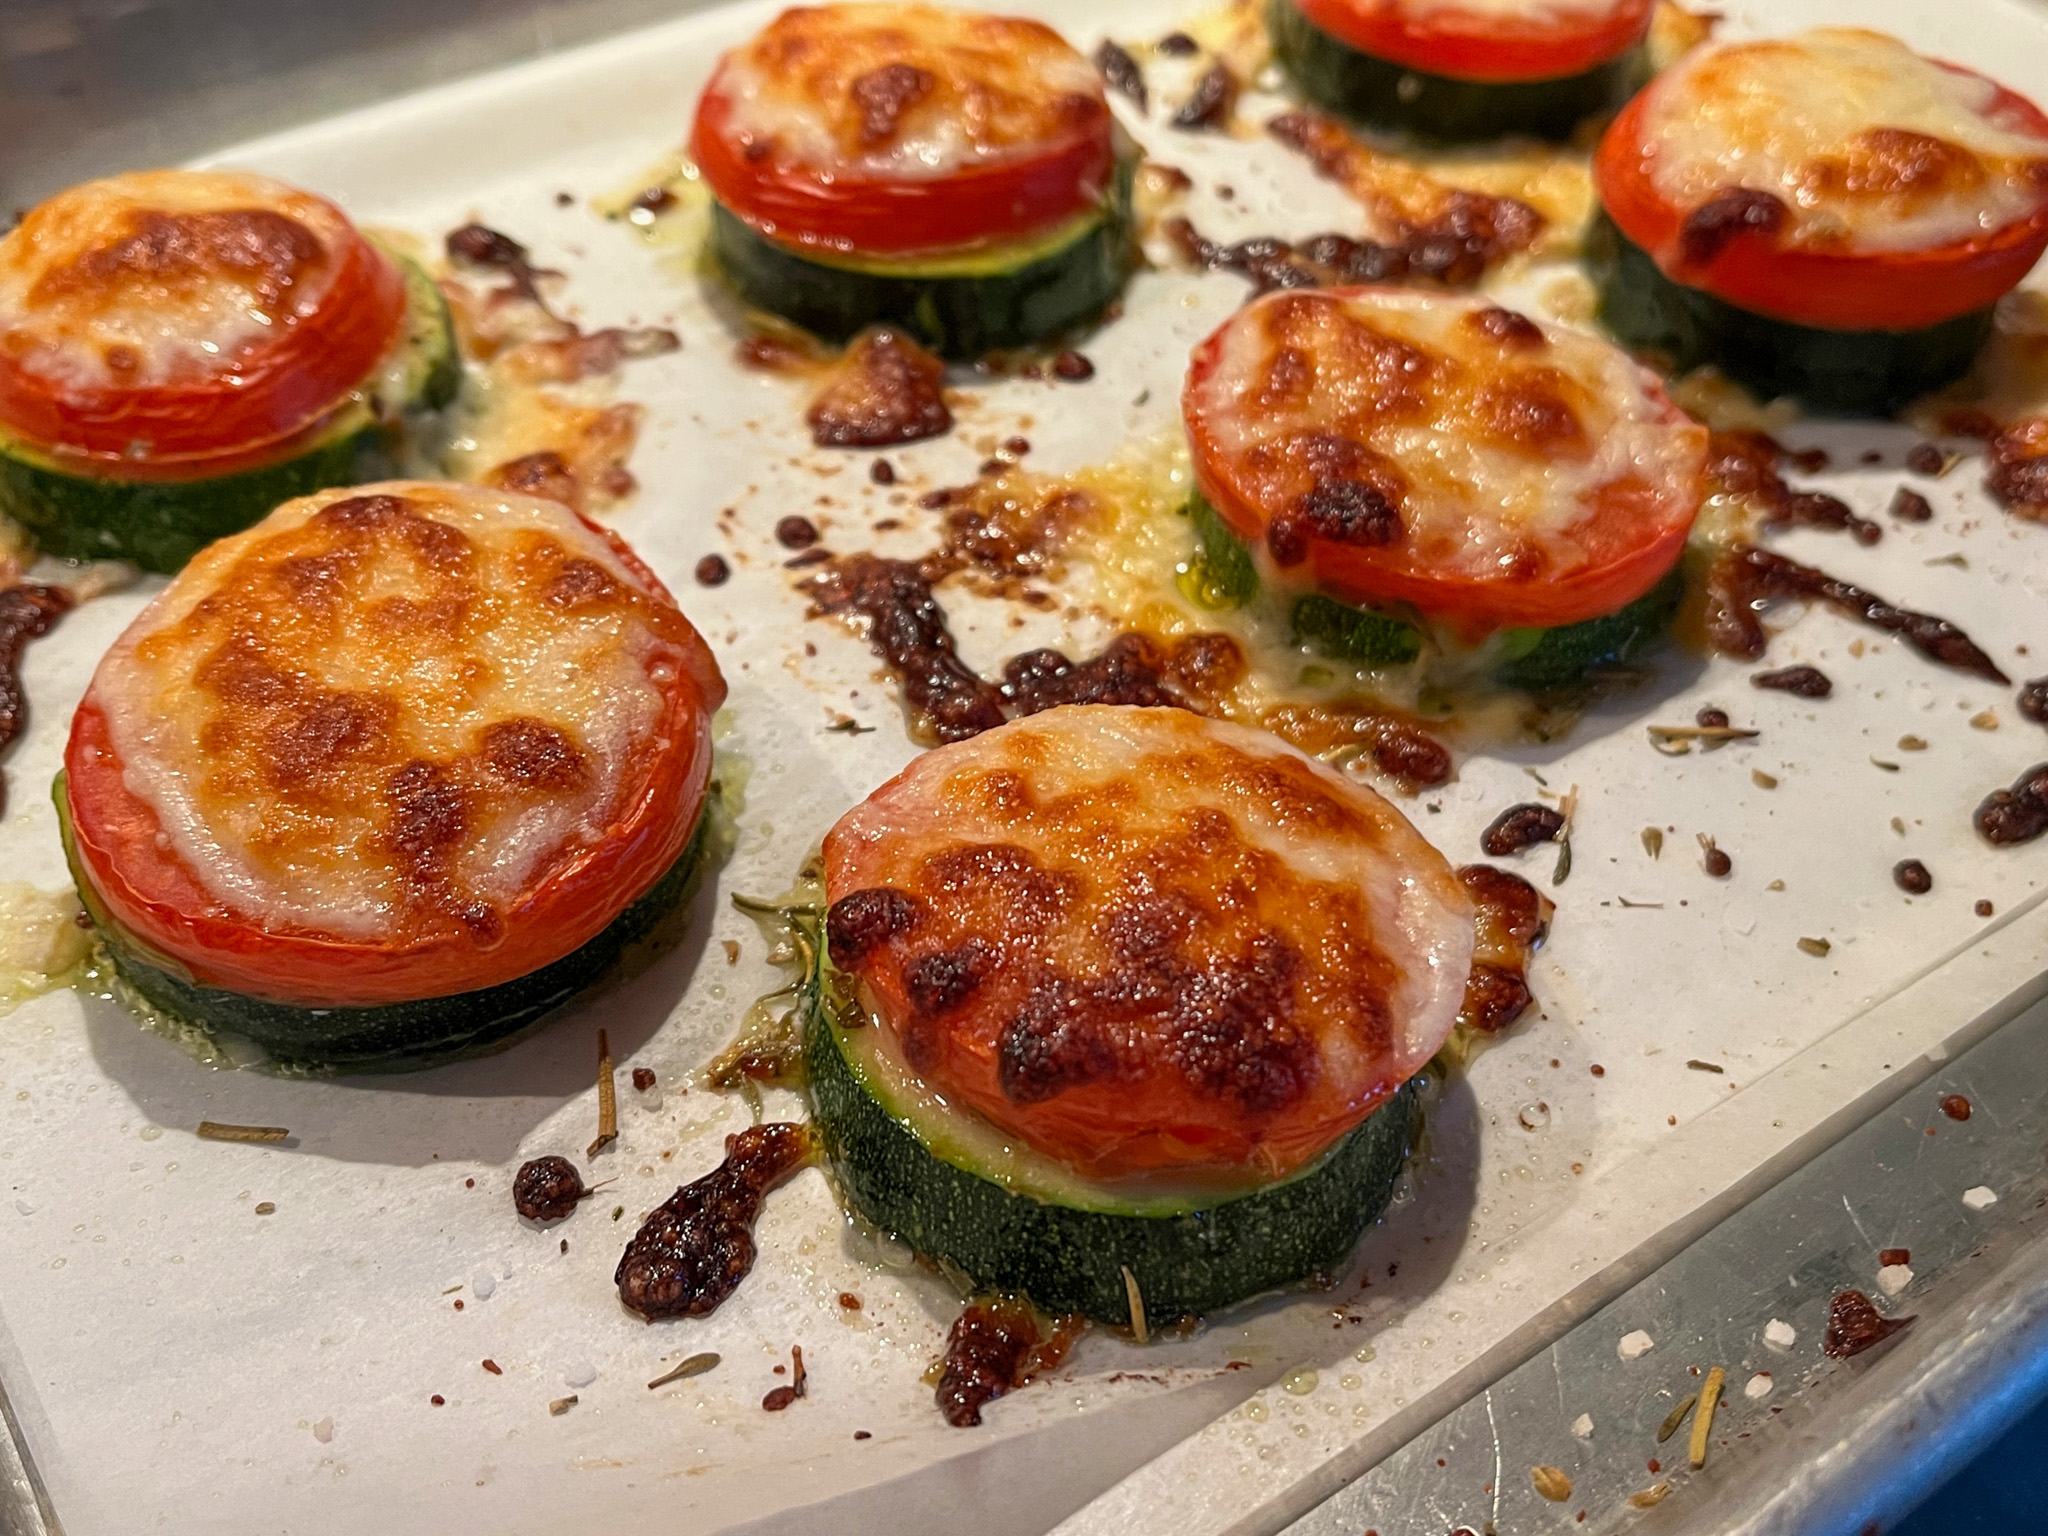
Comments: This was such a delicious side dish, I just know I will be making it again and again. Leftovers were perfect warmed up in a hot oven for just a few minutes. Zucchini tends to get a bit mushy, but for some reason, with the tomato and the cheese on top, it all works well. Give this recipe a try, I believe you will love it too…

ONE YEAR AGO: Mjukkaka, a Swedish Flat Bread

TWO YEARS AGO: Polka Dot Love Sourdough

THREE YEARS AGO: Plum Sorbet

FOUR YEARS AGO: Grilled Chicken with Sesame Roasted Carrots

FIVE YEARS AGO: Let’s Get Spooky!

SIX YEARS AGO: Miso and Sesame Roast Chicken with Revelation Quinoa

SEVEN YEARS AGO: Incredibly Simple Times Four

EIGHT YEARS AGO: Parsnip, Coconut and Lemongrass Soup

NINE YEARS AGO: In My Kitchen, October 2016

TEN YEARS AGO: Paleo Moussaka

ELEVEN YEARS AGO: In My Kitchen, October 2014

TWELVE YEARS AGO: In My Kitchen, October 2013

THIRTEEN YEARS AGO: Bourbon and Molasses Glazed Pork Tenderloin

FOURTEEN YEARS AGO: Crimson and Cream Turkey Chili

FIFTEEN YEARS AGO: Taking a break from the nano-kitchen

SIXTEEN YEARS AGO: Chocolate Chip Cookies

ZUCCHINI FRITTATA

I might be on a roll concerning special gadgets. Case in point, I have a pan that is designed to make Tarte Tatin (!!!), but today I am incredibly proud to show you how to use it to make a nice frittata. Do you need that pan? No. But are you going to be the coolest cook in town if you use it? YES, YOU ARE.

ZUCCHINI FRITTATA
(from The Bewitching Kitchen)

2 Tbsp. olive oil or unsalted butter
2 shallots, minced
2 medium zucchini, sliced and each slice quartered
4 large eggs
1/4 cup whole milk
4-6 pieces of fresh mozzarella
1/2 tsp salt
1/2 tsp Herbes de Provence
¼ tsp. freshly ground black pepper

Place rack in middle of oven; heat oven to 350°. Heat 2 Tbsp. olive oil or unsalted butter in an oven-proof skillet. Add the shallots and zucchini, sauté, stirring occasionally, until softened, about 5 minutes. Meanwhile, whisk the large eggs in a medium bowl with the milk, salt, pepper and spices mix.

Pour egg mixture into the skillet. Add the pieces of mozzarella. Cook, stirring occasionally, just until edges pull away from sides of pan, about 5 minutes. Transfer skillet to oven and bake until set, 10–15 minutes. Serve immediately or at room temperature within an hour or so.

ENJOY!

to print the recipe, click here

Comments: You can flip the frittata off the pan and serve it with the brown side up, or cut it straight in the pan, anything works. It turned out creamy, light and fluffy. The pan makes it a breeze to invert and flip the frittata onto a serving plate. We will be enjoying this type of meal in many variations on a regular basis… Mushrooms, red bell peppers, maybe even some smoked salmon in the mix.

ONE YEAR AGO: Chocolate-Covered Oreos Strike Again

TWO YEARS AGO: Sesame-Miso Yakitori

THREE YEARS AGO: Marinated Chickpeas with Slow-Roasted Red Peppers

FOUR YEARS AGO: Mini-Pullman Sourdough Bread

FIVE YEARS AGO: Gibassier

SIX YEARS AGO: Sundried Tomato Twist Bread

SEVEN YEAR AGO: And now for something completely different….

EIGHT YEARS AGO: Parsnip, Coconut, and Lemongrass Soup

NINE YEARS AGO: In My Kitchen, October 2016

TEN YEARS AGO: Paleo Moussaka

ELEVEN YEARS AGO: In My Kitchen, October 2014

TWELVE YEARS AGO: In My Kitchen, October 2013

THIRTEEN YEARS AGO: Crimson and Cream Turkey Chili

FOURTEEN YEARS AGO: Taking a break from the nano-kitchen

FIFTEEN YEARS AGO: Chocolate Chip Cookies

CORNBREAD ÆBLESKIVER

As I mentioned recently, I do love gadgets, and this pan has been sitting and waiting for too long. However, the moment I saw Karen’s post on this cool recipe, I grabbed it to play!

CORNBREAD ÆBLESKIVER
(slightly adapted from Karen’s Kitchen Stories)

140 grams (1 cup) all purpose flour
70 grams (1/2 cup) medium grind cornmeal
70 grams (1/3 cup + 1 tbs) sugar
1 tablespoon baking powder
1/2 teaspoon salt
1 cup buttermilk
2 large eggs
100 grams canned corn kernels
olive oil spray for the pan

Whisk together all of the dry ingredients in a large bowl. In another bowl, mix the wet ingredients, plus corn kernels with a fork. Pour the wet ingredients over the dry ingredients, and mix until just combined.

Heat your aebleskiver pan on medium low and spray each cavity with olive oil.
Using an ice cream scoop, fill each cavity almost to the top with the batter. Cook until the bottom begins to brown. Using a thin skewer turn the aebleskiver part way and continue to cook. Be sure to push any overflow back into the wells.

After that, add a little more batter to top them off before “closing” them, moving the opening to the bottom of the pan. Continue to cook until evenly golden brown and the center is cooked through. Serve right away or keep warm in a 200 degree F oven.

ENJOY!

to print the recipe, click here

Comments: First things first, I highly recommend this cookbook if you want to expand your Æbleskiver horizons… My main modification of the recipe was cutting the sugar by a bit more than half, and using canned corn because I had some in the pantry and got lazy to scrape fresh corn off the cob. Using the pan takes a bit of practice, I filled the cavities too much in my first batch, but the second half was perfect. I still need to perfect moving the little fritters to cook the second side, but they turned out very tasty.

.

Karen, thanks so much for inspiring me to finally make something with my pan…

.

ONE YEAR AGO: Lemon Ganache Macarons

TWO YEARS AGO: Fresh Dill and Feta Sourdough

THREE YEARS AGO: Marinated Chickpeas with Slow-Roasted Red Peppers

FOUR YEARS AGO: Passionfruit Millionaire’s Shortbread

FIVE YEARS AGO: Chai-Mango Rosette Macarons

SIX YEARS AGO: Common Table, Something New in My Life

SEVEN YEARS AGO: The Daisy, a Bread with Brioche Alter-Ego

EIGHT YEARS AGO: Pork Tenderloin, Braciole Style

NINE YEARS AGO: Raspberry Buckle

TEN YEARS AGO: Seafood Gratin for a Special Dinner

ELEVEN YEARS AGO: Cooking Sous-Vide: Sweet and Spicy Asian Pork Loin

TWELVE YEARS AGO:  Farewell to a Bewitching Kitchen

THIRTEEN YEARS AGO: In My Kitchen. June 2012

FOURTEEN YEARS AGO: Goodbye L.A.

FIFTEEN YEARS AGO: 7-6-5 Pork Tenderloin

ASPARAGUS AND PROSCIUTTO PHYLLO ROLLS

This is easy but so elegant and tasty, hard to come up with a better idea to impress guests or just enjoy a beautiful side dish on a warm Spring evening. I caught the recipe during a recent episode of TheKitchen, courtesy of Alex Guarnaschelli.

ASPARAGUS AND PROSCIUTTO PHYLLO ROLLS
(very slightly modified from FoodTV Network)

Kosher salt
18 medium stalks asparagus, ends trimmed
24 to 28 sheets phyllo dough, defrosted
olive oil spray
1 cup finely grated Parmesan
12 thin slices prosciutto

Prepare an ice bath with a medium bowl half filled with water and ice cubes.
In a large pot, bring 4 quarts water to a rolling boil. Add salt until it tastes like mild seawater. Layer a baking sheet with a clean kitchen towel. Drop the asparagus into the boiling water and cook until slightly tender when pierced with the tip of a knife, 2 to 3 minutes. Use a large slotted spoon to remove the asparagus from the water, transferring them immediately to the ice bath so that they cool down and don’t continue cooking. Let chill 5 minutes, then drain the asparagus and spread them on the baking sheet with the towel.


Heat the oven to 375 degrees F.

Place one sheet of phyllo on a flat surface with the short end closest to you. Spray the phyllo with olive oil. Sprinkle with a little of the Parmesan. Place another sheet of phyllo directly on top. Brush with additional butter and sprinkle with Parmesan.

Arrange 2 slices prosciutto in a single layer closest to you on the phyllo. Place 2 to 3 stalks of asparagus in bunches along the short side of the phyllo on top of the prosciutto and tightly roll the asparagus up in the prosciutto and phyllo to form a log. Trim the ends of the phyllo to fit the asparagus perfectly. As you make the asparagus rolls, arrange them on a baking sheet with distance between each so that they brown when baking. Spray their tops with olive oil right before baking.

Place the baking sheet in the center of the oven and bake until golden brown on the outside, 20 to 25 minutes. Sprinkle with salt.

ENJOY!

to print the recipe, click here

Comments: I wrote the recipe as published, except for the use of olive oil instead of melted butter. Amounts are really going to be flexible, I only made four rolls for us, we had three at dinner and one was my lunch next day, still delicious. I never go through the trouble of making the ice bath, I just rinse the blanched asparagus in running very cold water in a colander, and call it a day. But do as it pleases you, your kitchen, your rules. I have stopped brushing phyllo with butter a long time ago – the olive oil spray is amazingly easy, never hurts the sheets and gives enough flakiness without the extra saturated fat. We love the taste also, so it is a win-win situation for us.

I hope you give this super easy recipe a try, it is wonderful! And if you want to go the vegetarian route, maybe a little black olive tapenade or red bell pepper pesto could be nice instead of the prosciutto.

ONE YEAR AGO: Beet-Pickled Deviled Eggs

TWO YEARS AGO: My Cookie Blog Turns Two!

THREE YEARS AGO: Masala Shrimp

FOUR YEARS AGO: Victoria Sponge Mini-Cakes

FIVE YEARS AGO: Red Beet Sourdough

SIX YEARS AGO: A Modern Take on Tarte Tatin

SEVEN YEARS AGO: Minnie-Macarons, a Fun Project with a Happy Ending

EIGHT YEARS AGO: Nigella Lawson in the Bewitching Kitchen

NINE YEARS AGO: Walnut-Raisin Bran Muffins

TEN YEARS AGO: Gingersnaps with White Chocolate Chips

ELEVEN YEARS AGO: Turkey Chili with Almond Butter

TWELVE YEARS AGO: Secret Recipe Club: Leek and Cheese Tart

THIRTEEN YEARS AGO: Secret Recipe Club; Triple Chocolate Brownies

FOURTEEN YEARS AGO: Shaved Asparagus Salad

FIFTEEN YEARS AGO: Indonesian Ginger Chicken

ZUCCHINI-CHICKPEA BAKED BITES

Yet another recipe that won’t win many votes in a beauty contest, but is so tasty and simple to prepare, I had to share with you. It happens to be vegan-friendly, because contrary to similar preparations, this one takes no eggs. All binding is given by processed chickpeas, straight from a can. It came from a Brazilian blog, but I modified it slightly to reduce the amount of carbs. Thank you to my niece Raquel for sending it to me, saying that the recipe “had my name written all over it.” I think she is right!


ZUCCHINI-CHICKPEA BAKED BITES
(inspired by this post)

200 g zucchini (1 large or 2 medium), grated on a large-hole grater
250 g canned chickpeas, well-rinsed and drained
basil leaves to taste
1/2 tsp salt + more to sprinkle on zucchini
1/2 tsp smoked paprika
1/8 cup almond flour
1/8 cup all-purpose flour
panko bread crumbs
olive oil spray

Heat oven to 420F.

Salt the grated zucchini lightly and allow it to sit on a colander for 10 minutes. Squeeze the zucchini dry preferably using a towel.
Add to a food processor together with the chickpeas, salt, paprika and basil. Process until fully smooth, stopping to clean the bowl with a spatula once. Add the two flours and process just to bind it all.

Form small patties, cover with panko bread crumbs on both sides. Place them separated over aluminum foil and spray the surface with olive oil. Bake for 10 minutes, turn them gently, spray more olive oil on the top. Bake for 10 to 15 minutes longer, until golden brown. Serve with you favorite sauce or plain.

ENJOY!

to print the recipe, click here

Comments: I was a bit skeptical that the little morsels would hold shape without the help of an egg, but although very fragile, I did not have problems. Just be gentle. If you want to fry them, you could still keep them vegan by using the liquid from the chickpea can to make a whipped “egg white substitute”, coat them with that and add bread crumbs. But I tend to avoid frying because I dislike dealing with the leftover oil. Air-frying could be also a good option but our fryer has a small basket and I would have to fry in batches, so I went with the baking option.

A bit of tomato sauce and grated Parmigiano is also a nice way to serve them, although obviously not vegan anymore. I will definitely make them again, and pair with a tahini sauce which I think will be another great serving idea.

ONE YEAR AGO: Slow-Cooker Hoisin Pulled Pork

TWO YEARS AGO: I Will Cracker you Up

THREE YEARS AGO: Pickling Ribbons

FOUR  YEARS AGO: Green Beans and Carrots with Spicy Almonds

FIVE YEARS AGO: Quiche 101

SIX YEARS AGO: Persian Butternut Squash Soup

SEVEN YEARS AGO: Walnut Cranberry Sourdough Bread

EIGHT YEARS AGO: Ottolenghi in Brazil?

NINE YEARS AGO: Roasted Winter Vegetables with Miso-Lime Dressing

TEN YEARS AGO: 2012 Fitness Report: P90X2

ELEVEN YEARS AGO: Caramelized Bananas

TWELVE YEARS AGO: Roasted Lemon Vinaigrette

THIRTEEN YEARS AGO: Whole Wheat Bread