Years ago I thought that watermelon salads and watermelon skewers with feta cheese, and all things watermelon savory would fade away. But it did not, and I am glad it didn’t. Because putting it simply, watermelon works in many savory concoctions. It is refreshing, has a delicate texture, soaks dressings well, and it does not clash with other ingredients. Give it a try if you have resisted it so far.
WATERMELON SALAD WITH PECANS AND FETA CHEESE (from The Bewitching Kitchen)
Seeded and cubed watermelon, any amount you like Mixed color baby lettuce leaves ¾ cup chopped toasted pecans 1 cup crumbled feta cheese, keep in large chunks
For the vinaigrette: 3 Tbsp white wine vinegar 1 Tbsp fresh lime juice 1 Tbs agave nectar 1 tsp salt ¼ tsp pepper ¼ cup grapeseed oil
Make the vinaigrette by whisking all the ingredients except the oil together. Still whisking, pour the oil to emulsify it well. Reserve.
Make the salad. Combine watermelon and greens in a large bowl; add the vinaigrette, tossing gently to coat. Top with the toasted pecans and feta cheese. Season to taste with additional salt and pepper, if needed.
Comments: You can vary this salad in countless ways… different greens, different cheese, different nuts. I love the acidity of the vinaigrette, and I believe some ginger could go well with it also. Try to exercise self-control and don’t pick all the watermelon before your guests or family members had a chance to serve themselves…
A match made in heaven and materialized in the Bewitching Kitchen! We were lucky to get a huge bag of fresh dill from a departmental colleague and I had some feta cheese hanging in the fridge. One thing led to another and here we are!
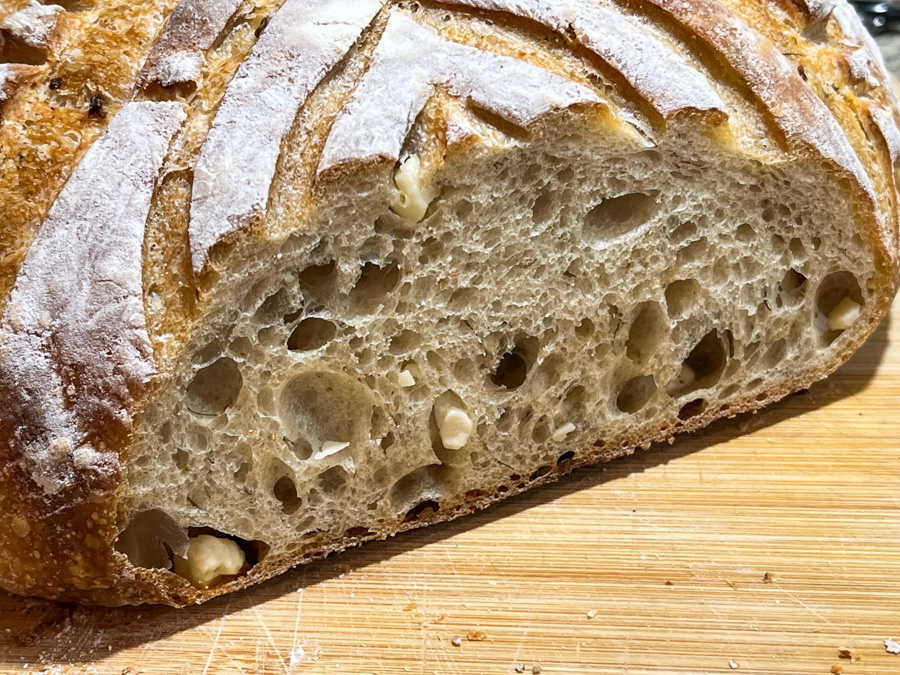
FRESH DILL AND FETA SOURDOUGH (from the Bewitching Kitchen)
475g white bread flour 25g whole-wheat flour 9g salt 350g water 65g sourdough starter at 100% hydration 2 tablespoons fresh dill, minced (or amount to taste) 50-100g feta cheese, crumbled
Make the levain mixture about 6 hours before you plan to mix the dough. It should be very bubbly and active.
When you are ready to make the final dough, place the water in the bowl of a KitchenAid type mixer and dissolve the starter in it, mixing with a spatula briefly, then add the two types of flour, and the salt. Turn the mixer on with the hook attachment and knead the dough for 3 minutes at low-speed all the time. Add the dill, knead for another minute to incorporate. If the dough is too sticky, add 1/4 cup flour, you want the dough to start clearing the sides of the bowl, but still be sticky at the bottom.
Remove from the machine, and transfer to a container lightly coated with oil, add the feta and gently mix it in. Don’t worry about incorporating it, it will all go into the dough as you fold it. Cover lightly with plastic wrap and allow it to ferment for 4 hours, folding every 45 minutes or so. After four hours bulk fermentation, shape the dough as a ball, and place, seam side up, in a lightly floured banetton. Leave at room temperature one hour, and then place in the fridge overnight, from 8 to 12 hours.
Next morning, heat the oven to 450F. Invert the dough over parchment paper, rub gently tapioca flour on the surface. Score with the pattern of your choice and bake at 450F for 45 minutes, preferably covered for the first 30 minutes to retain steam. Cool completely over a rack before slicing.
Comments: For the scoring of the surface I used a combination of razor blade and scissors. The bread had impressive oven spring, but I liked the way the design ended up. As to the flavor, I noticed that the dill came through stronger on the second day of the loaf sitting at room temperature. Usually in the evening of day #2 we slice what is left and freeze for later, so that’s what we did.
Really nice to bite into a little piece of feta cheese…..
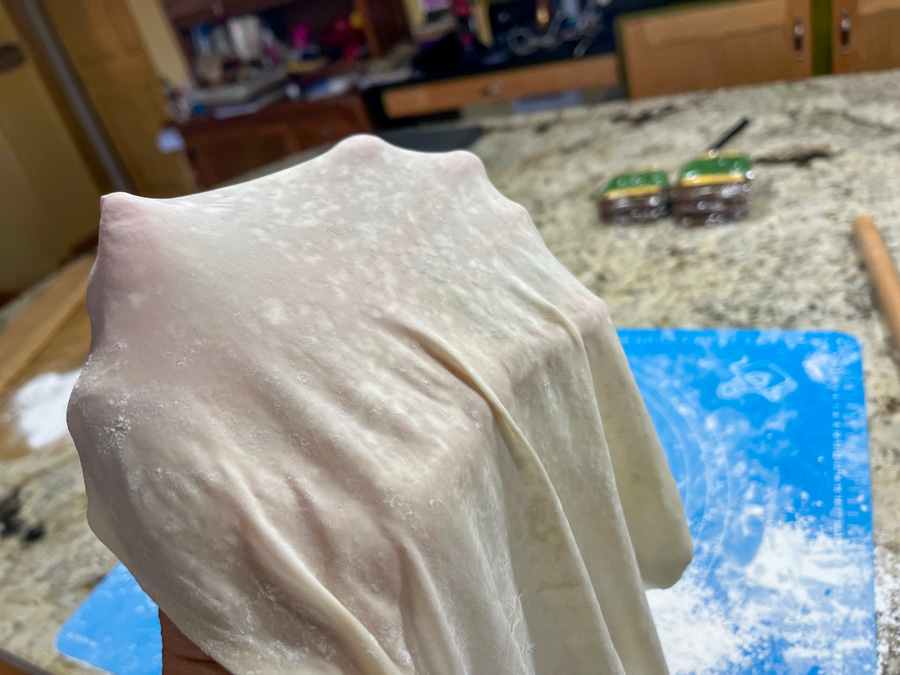
Have I totally lost my mind? No, not answering that. It turns out that I’ve always wanted to try making phyllo from scratch. When I was preparing for the Great American Baking Show, I had this annoying suspicion that it could be a technical challenge, but once you get accepted there is absolutely NO WAY to try to bake anything apart from the required, known bakes (signature and showstopper for every single episode). So I put it on the back burner ever since. But my friend Caro sent me the perfect rolling pin for the job, and it was the little nudge I needed. I tell you one thing, making phyllo is not for sissies. But I managed to have quite a bit of fun that weekend…
353 grams all purpose flour (3 cups) 1 teaspoon kosher salt 1 teaspoon baking powder 1 tablespoon olive oil 2 teaspoons white distilled vinegar 3/4 cup – 15 tablespoons warm water corn starch – to roll out and dust the dough
Make the dough by adding all ingredients and HALF the amount of water to a KitchenAid type mixer fitted with the dough hook.
Knead for a few minutes, then start adding the other half volume of the water, tablespoon by tablespoon until the dough starts to clean the sides of the bowl. Once a smooth dough forms, remove it from the machine, knead it by hand for a couple of minutes, form a smooth ball and place in a large oiled bowl for one hour.
Divide the dough into 20 equal pieces (mine were 28g each). Place each little ball over a parchment covered baking sheet. Leave for one hour at room temperature.
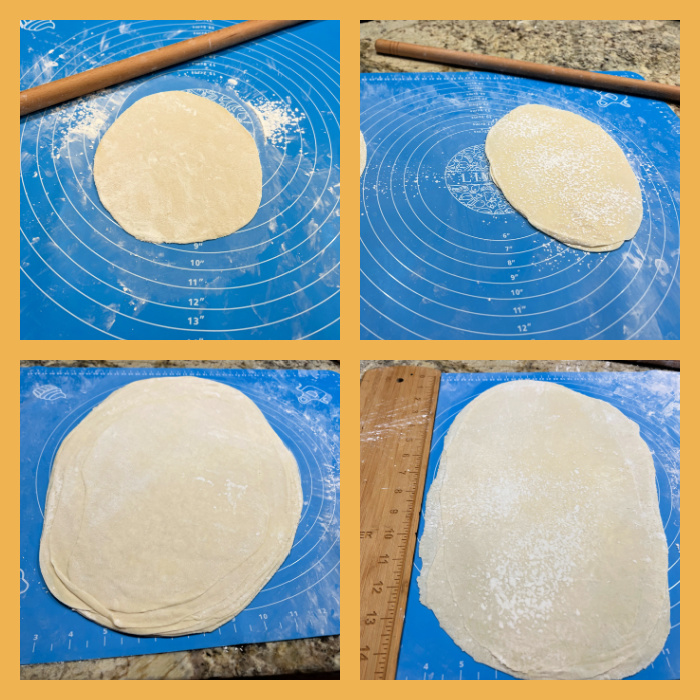
Start working the dough, first one little ball at a time, following her instructions on the video. My main change was to work with FOUR sheets at a time instead of TEN. I had too much trouble keeping them easier to separate, and decided ten was just too much for a first time. Four sheets at a time worked very nicely. That required 5 full cycles of rolling out to work on all 20 balls of dough. Another change I did was to separate each two sheets of phyllo fully rolled out with parchment paper, because I was afraid keeping them all together would result in severe sticking. I kept them in the fridge for a couple of hours before proceeding with the spanakopita and the crackers.
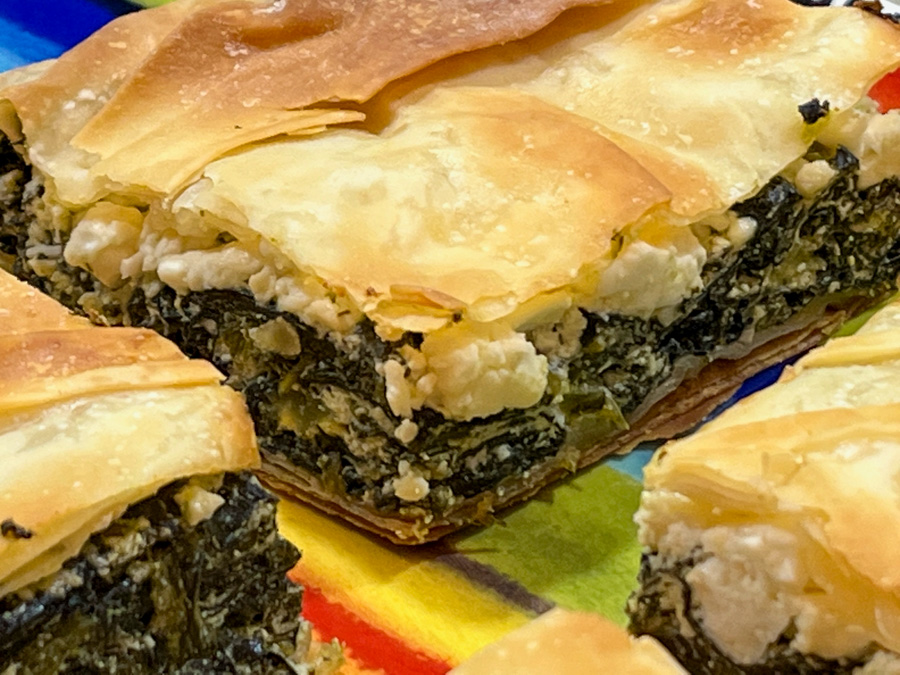
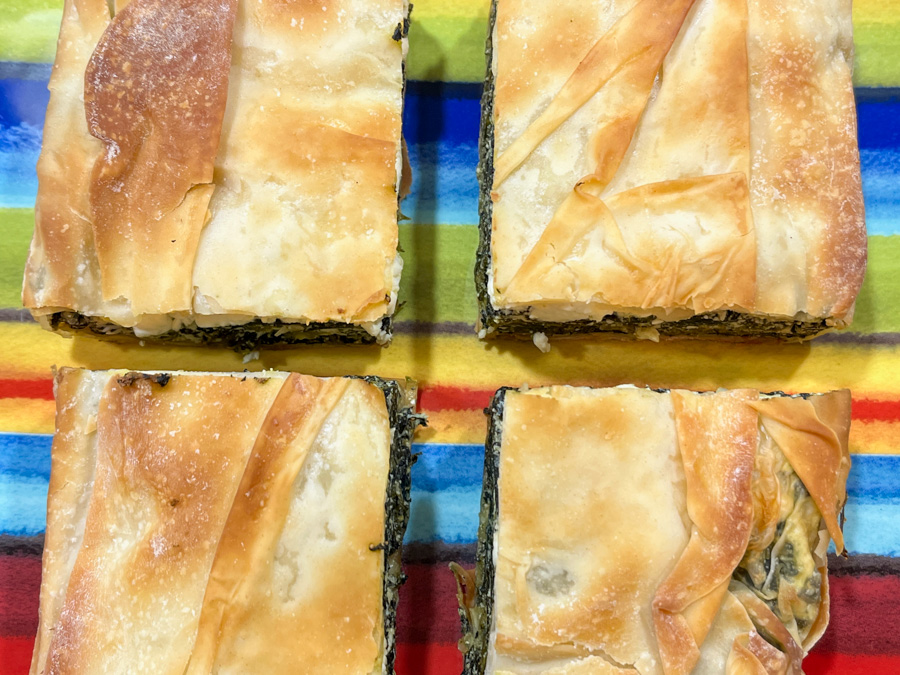
SPANAKOPITA (adapted from several sources)
8 sheets of phyllo dough (if using commercial you probably get by with 6) 500 g spinach (preferably not baby spinach) 1 tablespoon olive oil 2 ribs of celery, finely diced 1 shallot, finely diced salt and pepper to taste nutmeg to taste 200 g full-fat ricotta cheese 100 g feta cheese, crumbled in large pieces 1 egg, beaten olive oil spray
Boil water in a very large pan, add the spinach and press it down with a wooden spoon until the leaves wilt, 30 seconds or less. Drain into a large colander and place under running cold water to cool quickly. Drain well – squeeze out any excess water by pressing the spinach down with the wooden spoon, then squeezing with your hands. Using kitchen paper, pat the spinach dry into a compact shape, lay it on a board and roughly chop, then set aside.
Heat the olive oil in a large non-stick frying pan. Add the shallot, celery, and fry over a high-ish heat for 3-4 mins, stirring often, until softened and just starting to brown. Lower the heat, add the chopped spinach and stir for a few minutes to finish drying. Season with salt, pepper and nutmeg, and leave to cool.
Heat oven to 375F and put a baking sheet in to heat up. In a bowl, stir the ricotta into the beaten egg and season with pepper and a pinch of salt.
Lightly oil an 8 inch square baking pan. Lay one or two filo pastry sheets over the pan, spray with olive oil, and att two more, leaving a nice overhang on all sides. The pan should be completely covered, with a pastry overhang all round. Repeat the criss-cross layering with 2 more oiled filo sheets.
Stir the ricotta mixture into the spinach, then crumble in the feta. Lightly stir it in so you leave a few chunky pieces. Spoon this filling into the pan and level it. Bring the pastry sides up and over the filling, then brush a little oil over them. Add one or two more sheets sprayed with olive oil to top the spanakopita.
Bake for 30 to 35 mins until the pastry is crisp and golden. Leave to cool for 10-15 mins. Carefully remove from the pan, slice and serve.
Comments: The most “traditional” way to roll out phyllo is going for a very large and thin sheet, patiently rolling and stretching the dough over a lightly floured cloth. I watched videos, read articles, and decided to go for a ‘beginner’s friendly” method, in which you divide the dough in small pieces and roll them thin, but to a smaller final size. The other change is that the sheets are stacked as you roll. The video advised to stack 10 sheets but I could not make it work. I went for 4 sheets at a time, and rolled them to 9 x 13 inches. Don’t expect to get phyllo as thin as the one you can buy at the store, particularly not on your first time. But I was pretty happy with the overall outcome. Very rewarding!
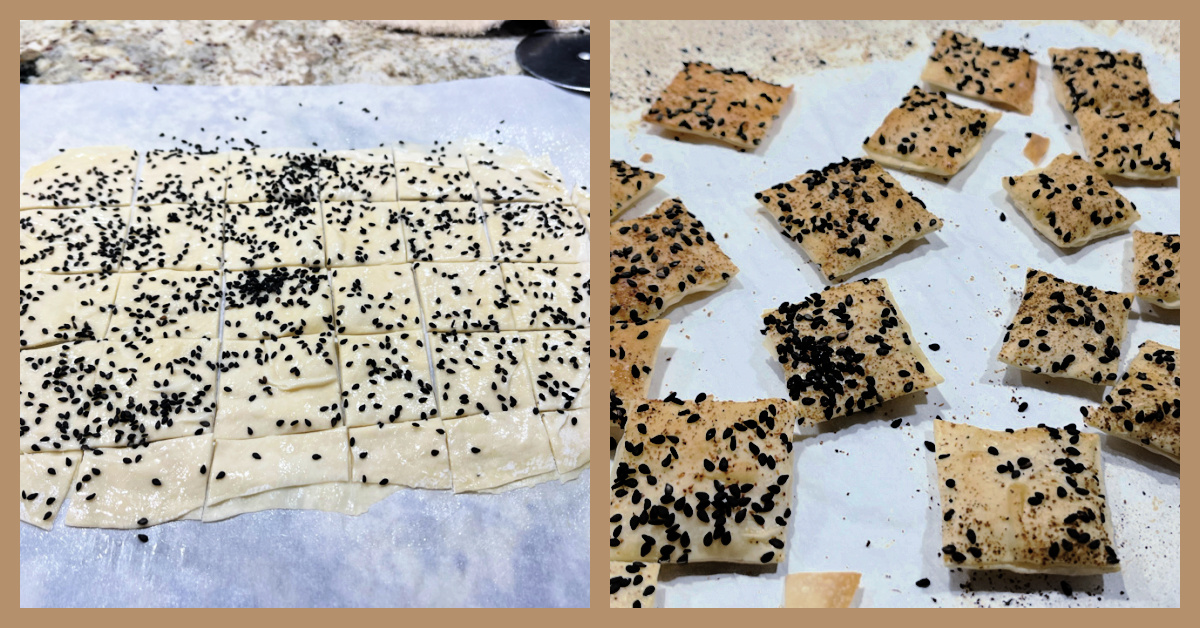
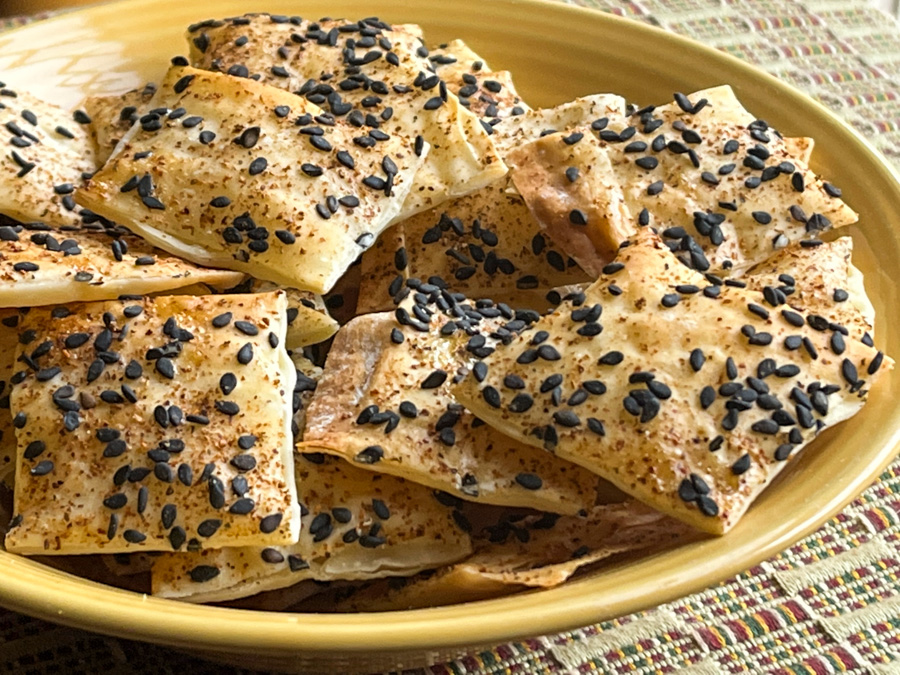
I also made crackers, using 4 of my precious sheets of home-made phyllo… Super simple. Stack the four sheets with a good spray of olive oil over each one. When you place the last sheet on top, brush some beaten egg white and add the toppings of your choice, so they will glue to the phyllo. I used black sesame seeds and Southwest spice from Penzey’s. Cut with a pizza roller and bake.
The crackers were absolutely delicious, and hubby thought I was a genius, crackers worth it of a Paul Hollywood handshake (allow me to dream, as I totally missed my chance, will you?)
I cannot lie to you, making phyllo from scratch is quite involved. I’ve found cornstarch in amazing places over the next couple of days. Things got wild, my friends… But how else can you have spanakopita made TOTALLY from scratch?
Caro, thanks so much for the thoughtful gift! I intend to make phyllo again, might even try the traditional approach and get a table cleared for the next adventure…
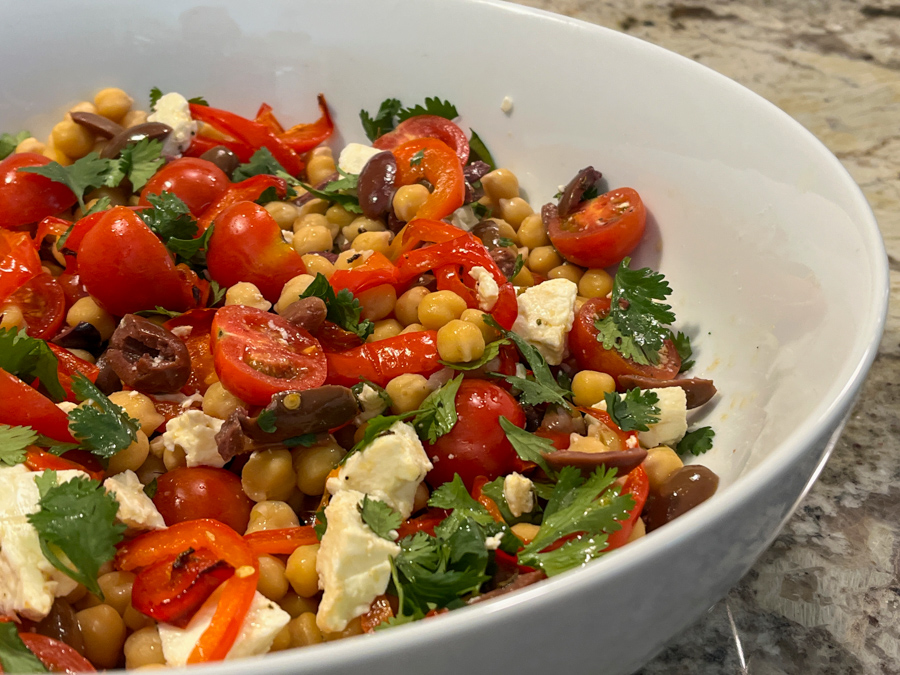
I follow a group of food bloggers I completely trust. Kelly from Inspired Edibles is part of this group. When she raves about a recipe, I usually jump on making it. This is the most recent example, and I know if you make it you will rave about it also. Two things: do not be tempted to use canned chickpeas. And go for the slow-roasting of bell peppers. These two small details make the dish shine.
MARINATED CHICKPEAS WITH SLOW-ROASTED RED PEPPERS (adapted from Inspired Edibles)
for the veggie mixture: 1 + 1/4 cup dried chickpeas (from 1 1/4 cup dry) 2 large red bell peppers, cut into strips 110 g Feta cheese 60 g pitted Kalamata olives, sliced 10 cherry tomatoes, halved parsley to serve
for the marinade: ⅓ cup olive oil 2 Tbsp fresh lemon juice 1 ½ Tbsp red wine vinegar 1 tsp Herbes de Provence ¾ tsp salt or to taste black pepper to taste ½ Tbsp honey
Soak the chickpeas overnight in cold water. Next day, drain and rinse, then cook in slightly salted water until tender, but still al dente – about 40 minutes. the chickpeas in a large pot with lots of water until desired consistency is achieved (for this recipe, I prefer the chickpeas to have some texture – not too mushy – so I aim for al dente, it takes over 1 hour). This step can be made in advance.
Heat oven to 300F and prepare the marinade by whisking together all the ingredients. Make sure when you add the honey that it gets fully integrated with the other components.
Place the cooked chickpeas (ideally still warm) in serving platter with tomatoes, olives, and feta cheese. intermingle with tomatoes, onion, olives and half of the feta. Pour the marinade over top, tossing gently to combine.
While the chickpea mixture marinades at room temperature, spread the sliced peppers out on a baking sheet, drizzle with 1.5-2 Tbsp olive oil and add a couple shakes of salt, and roast for about one hour. Add them to the chickpea mixture, and serve, sprinkled with parsley leaves.
Comments: This recipe is a winner, all the way. Leftovers were fantastic next day and even better on the second day. I warmed everything in the microwave, just barely, and there was no compromise in the texture, the taste of the marinade just got more intense. Perfect.
Make sure to stop by Kelly’s blog and read her post, as she offers a different way to enjoy it, with cucumbers in tzatziki sauce. The key is to cook the chickpeas from scratch. Totally different from canned, which works fine for other preparations such as hummus. The slow-roasting of the bell peppers is another great twist, they develop a milder flavor and very soft texture.
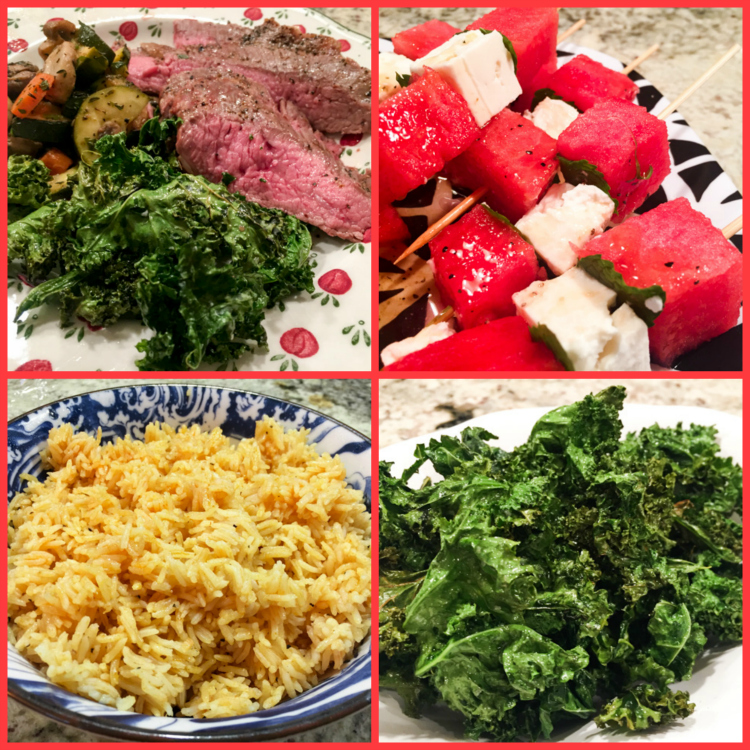
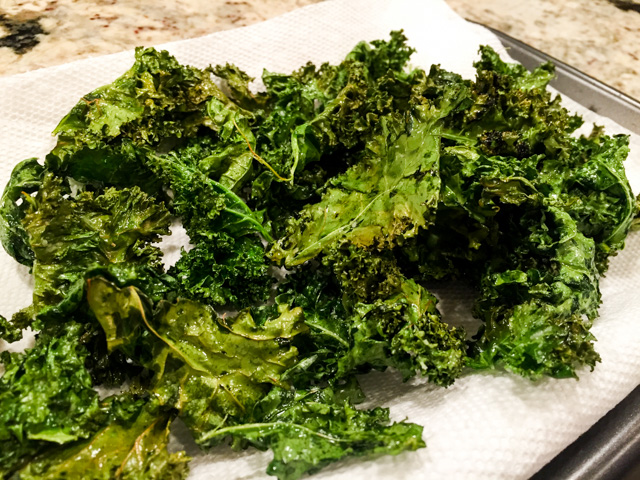
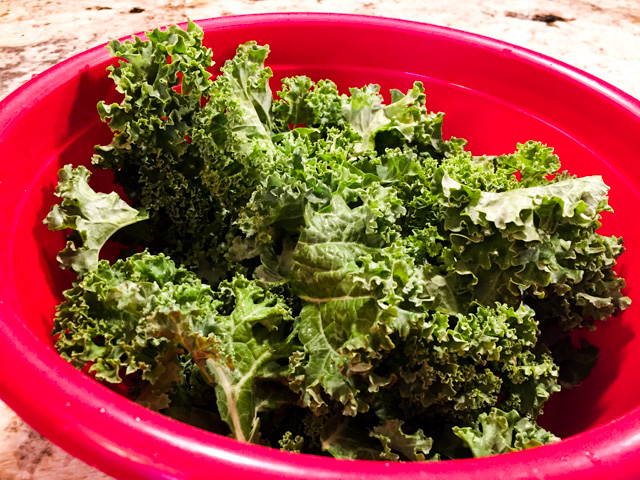
Every once in a while I like to group very simple recipes in a single post, like I did last February and again in June. Today’s post has three really simple recipes and one slightly more involved, but still uncomplicated enough to justify hanging out with the others. A meaty main dish, a cute skewer-salad, a side dish, and oh-so-very-trendy kale chips. Yeap, I am jumping on that bandwagon, and you should too because when my beloved loses all self-control next to a bowl of kale, it means a lot. Seriously, it was a scene never before witnessed in gastronomic history.
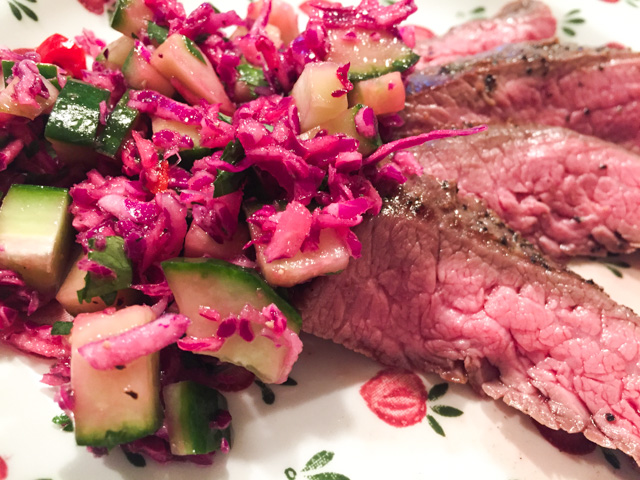
POUNDED FLANK STEAK
This non-recipe was in a recent issue of Bon Appetit. Get a flank steak, lay it over a cutting board, place a saran-wrap over it. Pound it with gusto with the flat side of a meat mallet. With gusto. You want to really get at the fibers and tenderize them. Try to go for less than 1/2 inch width all over. Season with salt and pepper, give it a very light coating (or spray) with olive oil. Grill to your desired degree of doneness. It will be medium-rare very quickly, a couple of minutes per side on a super hot grill. In fact Bon Appetit called it “minute steak” for good reason. Let the meat rest for 10 minutes before slicing against the grain.
We loved it so much I made it three times within a ten-day period. Very good paired with a red cabbage-cucumber salsa, but I need to tweak that recipe a little before sharing with you.
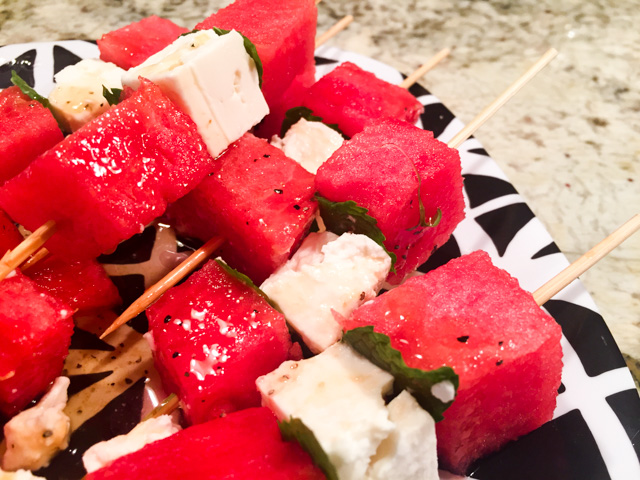
WATERMELON-FETA SKEWERS
Cut seedless watermelon into cubes. Do the same to the best quality you can find feta cheese. If you find real Greek feta, go for it. Place in wooden skewers cubes of feta and watermelon separated by pieces of fresh mint leaves. Make a simple dressing with olive oil, lemon juice, a touch of balsamic vinegar, or, if feeling particularly trendy, add a bit of pomegranate molasses. Whisk all together and drizzle over the skewers, seasoning lightly with salt and pepper (keep in mind that feta is very salty).
Only two pointers for success: use good quality feta (repeating this point because it is really important), and do not skip the mint. It offers the exact right counterpart to all other flavors. Great also as a little appetizer for a dinner party. Can be prepared in advance and kept in the fridge for a couple of hours.
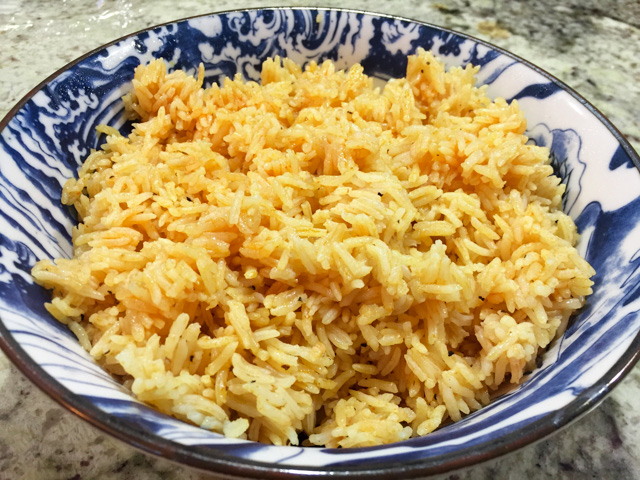
TOMATILLO RICE
TOMATILLO RICE (from the Bewitching Kitchen)
for the tomatillo sauce:
8 large tomatillos cut in half
2 medium shallots peeled
1/2 Serrano pepper, cut in half lengthwise, seeds removed
salt and pepper
1/2 cup chicken stock or water
1/2 cup cilantro leaves
juice of half a lemon
for the rice:
1 cup rice, rinsed
1 tablespoon olive oil
salt
Place the tomatillos, cut side down, shallots and Serrano pepper on a baking sheet and roast at 425 F until soft and the tomatillo skin is starting to get brown, about 30 minutes. Transfer everything to a blender shallots to a blender, add half a cup of chicken stock or water, a bunch of fresh cilantro leaves and the juice of half a lemon. Process until smooth. Adjust seasoning. Sauce is perfect over fajitas, or seafood. To make rice, you only need 1/2 cup of it.
Sautee one cup of rice on a little bit of olive oil, add 1/2 cup of tomatillo sauce and 1 + 1/2 cups of water. Cover and cook for about 18 minutes, until done. Leave it covered for 10 minutes, fluff with a fork, and serve.
Remove the stems from a bunch of fresh kale, cut the leaves in large pieces. Wash and dry them well, a salad spinner is the best way to approach it. Add very little olive oil to the leaves, massaging them briefly. Add them to the basket of an air-fryer at 390 F, and fry until done, shaking the pan every couple of minutes. It will take less than 10 minutes to finish. Season with salt, pepper, and spices of your choice if so desired. No air-fryer? No problem. The hot oven works the same way, only a bit slower. Also, make sure to have all leaves as a single layer. As to the seasoning, cumin and paprika go very well with kale, on my next batch I will try nutritional yeast, as I heard it gives it a very intriguing flavor. And of course, it would take the trendy quotient of this dish to the highest possible level. I don’t do trendy often. But sometimes, when that special mood strikes…
Phil went absolutely crazy for these chips. He showed up at the kitchen as I was preparing dinner, and mumbled his usual “hummm… kale.” Not the yummy-anticipating-hummmm… it was the “how-to-escape-this-hummm….”. So yes, I was unprepared to have to fight for the last four chips sitting at the bottom of the bowl. Go figure.
I hope you enjoyed these four simple recipes, and give some (or all) a try, even if kale might not be your thing, or watermelon in a savory dish a bit too much of a stretch for your taste buds. Sometimes it’s fun to try something different, especially when the preparation is so simple.