One color, two colors, three colors, that is…

Starting from the simplest, the idea is to try to match the shell with the sprinkle, and then choose a contrasting tone for the drizzle. Easy-peasy. What I loved the most about these macarons? The filling. Black Sesame Ganache. It cuts the excessive sweetness of the white chocolate, and echoes the nut component of the shell. I will be making that again for sure. For all macarons, use the basic recipe below.
ONE COLOR

BLACK SESAME MACARONS
(from The Bewitching Kitchen)
For the shells:
200g Icing/powdered sugar
115 g Ground Almonds/Almond Meal
115 g egg whites at room temperature (approx. 4 eggs)
1/8 tsp of cream of tartar
100 g granulated sugar
¼ tsp vanilla paste or extract
for the black sesame ganache:
300 g white chocolate, cut in small pieces
100 g heavy cream
1 tablespoon black sesame powder
1 tsp black sesame seeds
to decorate:
Candy melts + food gel dye + sprinkles
Make the shells:
Line 3 heavy baking sheets with parchment/baking paper or Silpat mats. Layer the powdered sugar, and ground almonds in a food processor. Pulse until the mixture looks like fine meal, about 12 pulses. Pass through a sieve and transfer to a small bowl or to a sheet of parchment/baking paper. Set aside.
Place the egg whites and cream of tartar in the bowl of a stand mixer fitted with the whisk attachment. Make sure that the bowl and the whisk are impeccably clean. Starting on medium speed, whip the whites with the cream of tartar until they look like light foam. The whites should not appear liquid. The foam will be light and should not have any structure.
Slowly rain in the granulated sugar in five additions, trying to aim the stream between the whisk and the side of the bowl. Turn the speed up to high. Continue to whip the meringue until it is soft and shiny. It should look like marshmallow creme (marshmallow fluff). Add the vanilla. Whip the egg whites until the mixture begins to dull and the lines of the whisk are visible on the surface of the meringue. Check the peak. It should be firm. Transfer the whites to a medium bowl.
Fold in the ground almond/almond meal mixture in two increments. Paint the mixture halfway up the side of the bowl, using the flat side of a spatula. Scrape the mixture down to the center of the bowl. Repeat two or three times, then check to see if the mixture slides slowly down the side of the bowl. Put the mixture in a piping bag fitted with your choice of piping tip (for rosette macarons, use a Wilton 1M type). If you don’t have a macaron mat, draw circles on baking/parchment paper about 2inches/5cm in diameter & turn the paper over before placing on the baking sheets. Pipe shells, I like to count numbers in my head and use the same count for each shell so they end up similar in size.
I pipe inside the circles to about 1 ¾ inches/4.5cm but you can go to 1 ½ inches (3.8cm) & the macarons will spread & fill the circle while drying.
Slam each sheet hard four to six times on the counter/worktop. Do not slam the sheets if you are making rosette macarons, just let them dry. Let the unbaked macarons dry until they look dull but not overly dry. Drying time depends on humidity. In a dry climate, the macarons can dry in 15 to 20 minutes; in a humid climate, it can take 35 to 40 minutes. Rosette macarons benefit from longer drying time.
While the macarons are drying, heat the oven to 300 F (150 C/130C Fan oven/Gas Mark 2). Bake one sheet at a time on the middle rack. Check in 11 minutes. If the tops slide or move (independently of the ‘feet’ when you gently twist the top), then bake for 2 to 3 more minutes. Check one or two. If they move when gently touched, put them back in the oven for 1 to 2 more minutes until they don’t move when touched. Let the macaroons cool for 10 minutes before removing from the pan. The macarons should release without sticking.
For the black sesame ganache:
Place the heavy cream in a small saucepan, add the black sesame powder (you can grind enough sesame seeds in a spice grinder until you get the right amount, or use store-bought powder). Bring to a gentle boil, shut down the heat, cover the pan and allow it to sit for 20 minutes. Bring it gently back to a simmer again, drizzle on top of the chocolate. After a couple of minutes, gently mix with a spatula until the chocolate melts. Add the sesame seeds. Bring to room temperature or place in the fridge for a couple of hours. Use a handheld mixer to whip the ganache lightly before using to fill the shells.
Assemble the macarons: match two shells similar in size and add ganache to the bottom of one of them. Place another shell on top and gently squeeze to take the filling all the way to the edge.
To decorate the macarons, melt Candy Melts in the microwave, add black food dye and use to drizzle the top. Add sprinkles before the candy melt hardens.
Store the macs in the fridge for 24 hours for perfect texture.
ENJOY!
to print the recipe, click here

Comments: The ganache made a little more than I needed for all the shells, I used it later to make some shortbread sandwich cookies, and it worked quite well also. The only thing to be concerned about when you do a white chocolate ganache is to make sure to increase the proportion of chocolate, or you will end up with a filling that is too soft, even if you whip it. I hope you try this filling.
TWO COLORS
CHERRY BLOSSOM MACARONS
(from The Bewitching Kitchen)
basic macaron recipe above
Divide the batter in two portions, keep one white
Add a drop of pink food gel to the second portion
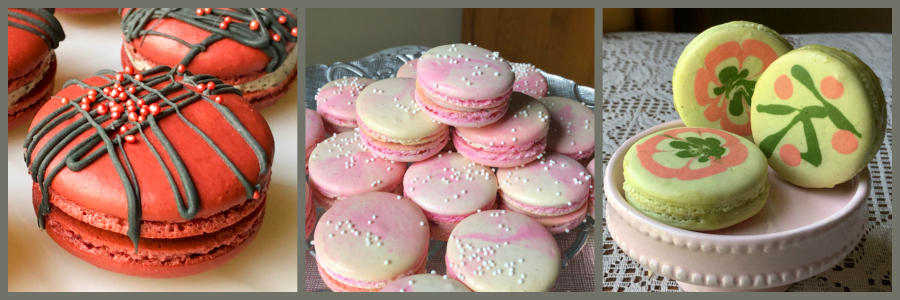
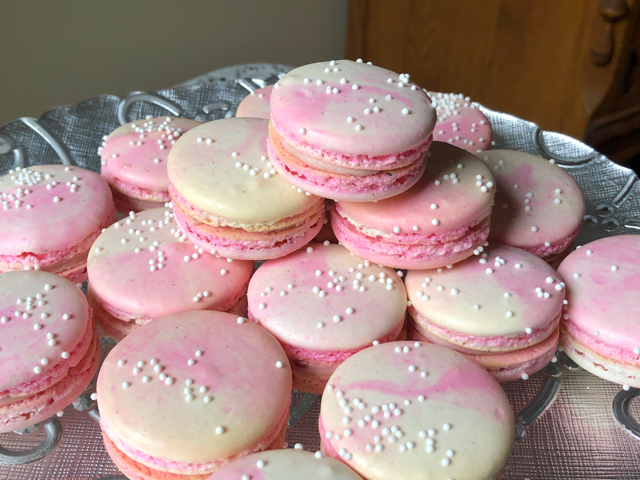
Place small amounts of batter in alternating colors over a layer of plastic wrap. Enclose the batter by wrapping the plastic around it, then place it inside a piping bag fitted with your choice of piping tip (see composite picture below).
Add sprinkles right after piping, before a skin forms.
for the filling:
8 ounces white chocolate
1/2 cup black cherry jam
3 tablespoons heavy cream
1/2 tsp Sakura essence
Place chocolate in a heatproof bowl and set over a pot of simmering water on low heat. Stir chocolate until melted. Remove from heat, and whisk in jam, heavy cream and Sakura essence. Cover and chill 2 hours, or until cold. Whip it with a hand-held electric mixer until it reaches a good consistency for piping. Transfer ganache to a piping bag and use to fill shells.
to print the recipe, click here

Comments: The way you place the different colors inside the piping bag will affect the final look of the shells. In this case, adding them in a random pattern, you’ll get quite unique swirls as you pipe along, it’s really a lot of fun. Yes, I know, I am too easily amused. You could omit the sprinkles and go just for the swirl look, but I liked the added layer of decoration they provided. Plus, I need to justify my compulsion to buy sprinkles so if there is ANY chance of incorporating them into a cookie… there they shall be.
THREE COLORS
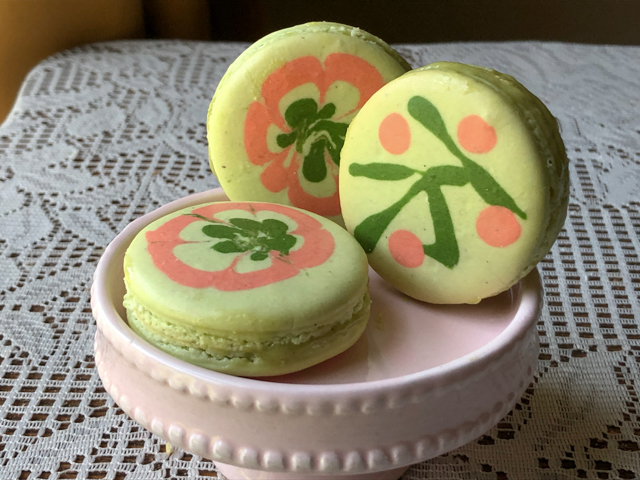
PISTACHIO MACARONS
(from the Bewitching Kitchen)
same basic recipe as above
Divide the batter in 3 portions. 3/4 will be dyed very light green (I used Sugar Art Master Elite Kiwi); the remaining will be divided in two small portions, and dyed darker green (I used Artisan Accents Forest Green), and coral (I used Sugar Art Master Elite Flame). Place the light green batter in a regular piping bag fitted with your favorite tip. Place the other colors in small piping bags, no tips needed. Cut a small opening right before using.
Pipe a slightly smaller shell than you need using the light green batter. Make about 6 shells and stop. Immediately use the other two colors to make your chosen designs. Continue piping until you use all the batter. If you have leftovers of any color, just pipe small macs or donut macs to use them up. Bang the tray very gently to release bubbles and bake.
for the pistachio ganache:
150 g white chocolate, cut in small pieces
40 g heavy cream
2 tablespoons pistachio paste
tiny amount of green food color (optional)
Bring the heavy cream to a gentle boil in a saucepan. Add to the chocolate together with the pistachio paste, and whisk until melted. You might need to use the microwave very briefly. Add green food dye if you like. Leave it at room temperature or in the fridge for a couple of hours, then whip lightly with a handheld mixer. Use to fill the shells.
to print the recipe, click here

Comments: These are SO MUCH FUN! A little departure on my first attempt at a similar decoration technique. Ok, I admit that if you are a beginner at macaron adventures, it might be better to practice a bit with a regular macaron, then move to the two-color version before attempting these. The only problem is that you need to work fast. But the possibilities for designs are endless, really. I also think that for this particular type, you are better off with the French meringue method. It is a bit too convoluted to do the Italian meringue and divide it in three portions, considering you have to divide the egg whites and the colors in meringue and almond-sugar portions, so the whole thing becomes a bit too complex for my taste. Two-colors would be doable, but three or more? I prefer to stick with the French meringue. But if you find a way to do it and the Italian meringue is your favorite method, let me know your secrets…

My first post in the 12th year of blogging had to be my favorite thing to bake. No matter how many mirror glazes, mousse cakes, sourdough breads, or cookies I make, macarons will always have a special place in my heart.

ONE YEAR AGO: Marshmallow Macarons
TWO YEAR AGO: Fujisan Bread
THREE YEARS AGO: Air-Fried Tomatoes with Hazelnut Pesto & Halloumi Cheese
FOUR YEARS AGO: Red Velvet Layered Cake
FIVE YEARS AGO: Lemon-Lavender Bars
SIX YEARS AGO: Quinoa Fried Rice
SEVEN YEARS AGO: Carrot Flan with Greens and Lemon Vinaigrette
EIGHT YEARS AGO: The Secret Recipe Club: Granola Bars
NINE YEARS AGO: Awesome Broccolini
TEN YEARS AGO: A Twist on Pesto
ELEVEN YEARS AGO: Ciabatta: Judging a bread by its holes