ONE GIFT, ONE DOUGH, TWO RECIPES

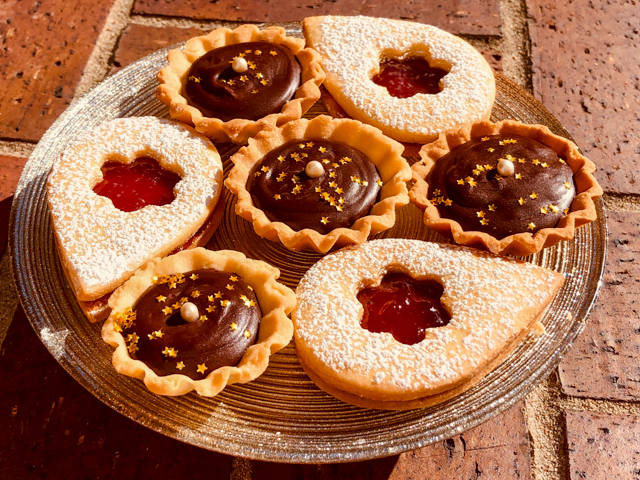
Last month my dear friend Louise sent me a wonderful gift: a box with many (and by many I mean more than 50!) little tartlet tins in several different shapes and sizes. I was speechless, and so touched by her generosity! It is now time to share my first adventure with this special gift. A single dual-purpose dough was used to make little tarts and a modernized version of Linzer cookies. The recipe for the dough comes from Haniela’s blog. She is one of the cookie artists I follow and try to learn from. I suspect it will become my default dough for sweet tarts. The texture is perfect, and I loved the way it is intensely flavored with vanilla.

CHOCOLATE GANACHE MINI-TARTLETS
(dough recipe from Haniela’s)

for the dough:
430g all-purpose-flour
1/8 tsp salt
160g powdered sugar
3 egg yolks
2 tsp vanilla bean paste or vanilla extract
226 g unsalted butter, at room temperature

for the filling:
6oz dark chocolate, cut in small pieces
1/2 cup heavy cream
1/8 tsp orange oil
sprinkles to decorate (optional)

Sift flour and salt. Set aside. In a mixer fitted with a paddle beater, mix butter and powdered sugar until smooth. In a small dish whisk together egg yolks and vanilla. Gradually beat egg yolk mixture into the creamed butter. Scrape the bowl a few times as needed.

On low-speed, gradually add flour mixture to butter mixture. Mix until it starts to come together. If the dough is too crumbly, add 1tsp milk. Do not overwork the dough. Invert the dough onto a clean work surface or into a large bowl and gather dough together with your hands into a ball. Then form the dough into a disk, wrap it in the foil and chill for 1 to 2 hours.

Heat oven to 350F. Place mini tart shell molds onto a baking sheet. Spray with a non-stick spray, set aside. Take out the chilled dough, cut it in half. Let if soften for 5 minutes. Roll it to 1/8 inch rolling. Cut out as many rounds as you can. Gather scraps and re-roll. Shape the tarts and use a fork to prick the bottom of the shells. Bake at 350F for 12-14 minutes until golden around the edges.

Let cool for 10-15 minutes before removing tarts from the molds. Turn the mold upside down and tap it firmly onto your work surface to release the shell. Let the tarts cool before adding a filling.

Make the filling: place the chocolate in a bowl, heat the heavy cream to almost boiling, and pour over the chocolate. Wait a few minutes, add the orange oil, and gently stir until fully smooth. Let the ganache cool for about 5 minutes, then place in a piping bag and fill the tartlets, smoothing the top. Decorate with sprinkles, if desired. Place in the fridge to set the ganache for about 30 minutes. Serve at room temperature.

ENJOY!

to print the recipe, click here

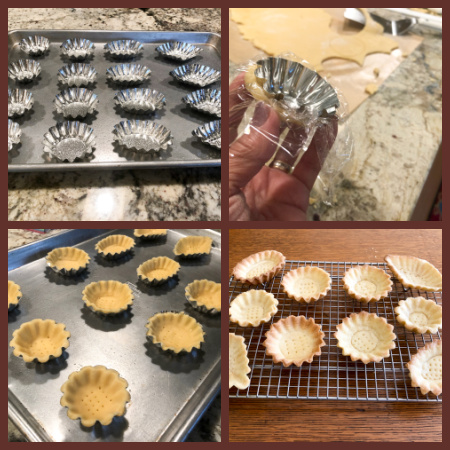
Comments: Check Hani’s site for detailed step-by-step instructions. As she shows, the best way to shape the dough is using an empty tin of the same format to press it in, with a Saran wrap type plastic over the dough to protect it. Works like a charm (check top right picture in composite above). You can make many tartlets and store them in the freezer for a mini-tartlet emergency…

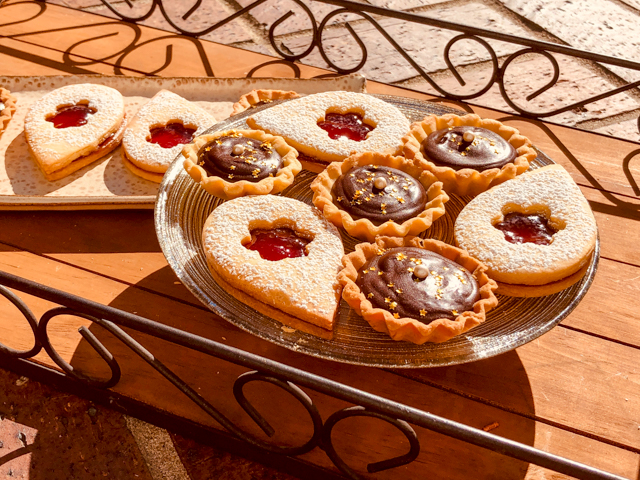
The same exact dough can be rolled and cut into any shape you like to make a Linzer version. I went with a teardrop and cut-out small flower shapes for the top layer.

Simply bake the cookies, let them cool, and spread a thin layer of the jam of your choice. I used seedless raspberry jam for this batch.

A little shower with powdered sugar is optional, but in my opinion, a nice finishing touch.

The dough is wonderful to work with, and as a cutout cookie, it held the shape well. The tartlets puffed up a bit, but midway through baking I pressed them down gently. Perfect texture.

A big thank you to Louise and Haniela!

ONE YEAR AGO: Rocking the Zucchini Boat

TWO YEARS AGO: Polenta Bites with Spicy Tomato Sauce

THREE YEAR AGO: Vague Mousse Cake

FOUR YEARS AGO: Cottage Loaf, my very own technical challenge

FIVE YEARS AGO: Pork Ribs: Sticky, Spicy and Awesome

SIX YEARS AGO: Sobering Peach Sorbet

SEVEN YEARS AGO: Buttermilk-Blueberry Breakfast Cake

EIGHT YEARS AGO: Silky Cauliflower Puree with Almond Milk

NINE YEARS AGO: Beef and Broccoli Stir-fr

TEN YEARS AGO:Wheat Germ and Sage Sourdough Bread

ELEVEN YEARS AGO:Popeye-Pleasing Salad

TWELVE YEARS AGO:Summer’s Finale

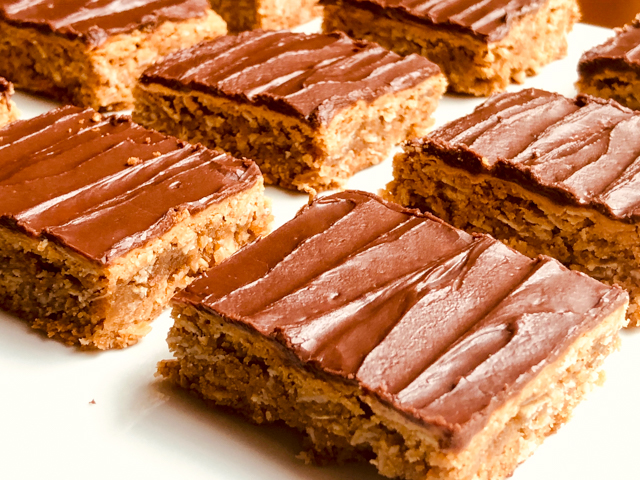
OMG PEANUT BUTTER BARS

I cannot stand the texture of peanut butter and its ability to glue to gums and teeth. The idea of grabbing a spoon of peanut butter and licking it leaves me paralyzed with terror. These peanut bars? Seriously addictive. In her original post, Lauren called them “World’s Best Peanut Butter Bars.” I have not tried that many – full disclosure, this is my second – so I share the recipe with you, and if you are a peanut butter bar connoisseur, let me know what you think.

PEANUT BUTTER BARS
(from Tastes Better from Scratch)

for the bars:
3/4 cup butter
1/2 cup granulated sugar
1 cup light brown sugar
2 large eggs
1/2 teaspoon vanilla extract
1/2 cup creamy peanut butter (plus more for spreading over baked bars)
2 + 1/2 teaspoons baking soda
1/2 teaspoon salt
1 + 1/2 cups all-purpose flour
2 cups old-fashioned rolled oats

for the chocolate frosting:
1/4 cup butter
1 Tablespoon unsweetened cocoa powder
1 + 1/2 Tablespoons milk
1 + 1/4 cups powdered sugar
1 teaspoon vanilla extract

Heat the oven to 350 degrees F. In a large mixing bowl, cream together the butter with both types of sugar. Add the eggs, vanilla, and peanut butter and mix well.

In a separate bowl mix together the dry ingredients. Add dry ingredients to creamy mixture.

Press firmly into a greased 9×13” pan. Bake at 350 degrees for 17-20 minutes. It will look just barely set in the center, and will harden as it cools. Allow to cool completely, then spread a thin layer of peanut butter over the bars.

To make the chocolate frosting: Add butter to a small skillet over medium heat. Once melted, stir in cocoa. Remove from heat and add milk, powdered sugar and vanilla. Whisk until smooth, using electric beaters to get out any lumps, if needed. .

Spread chocolate frosting over the top of the bars. Cut into squares once the topping is fully set. Using a knife moistened with very hot water from the faucet helps to get neat slices.

ENJOY!

to print the recipe, click here

Comments: These bars were donated, but I “sampled” a little of the trimmings. It’s a good thing I had planned to donate them, because just like a certain cauliflower of my recent past, portion control with this baby would require Herculean efforts. If you make it, consider cutting in even smaller squares if you can, because they are rich. Decadent. I love the inclusion of oats in the base. I am thinking of incorporating oats in sugar cookies in the near future.

ONE YEAR AGO: Kansas Sunflower Seed and Black Walnut Macarons

TWO YEARS AGO: Curry Turmeric Sourdough

THREE YEARS AGO: Black Olive Tapenade and Deviled Eggs

FOUR YEARS AGO: Blueberry Crumble Coffee Cake

FIVE YEARS AGO: Fresh Strawberry Yogurt Bundt Cake

SIX YEAR AGO: Quinoa Salad with Red Grapes and Avocado

SEVEN YEARS AGO: Strawberry Coffee Cake

EIGHT YEARS AGO: Lemon-Poppy Seed Muffins

NINE YEARS AGO: Mascarpone Brownies

TEN YEARS AGO: Salmon Tacos

ELEVEN YEARS AGOCinnamon Turban Bread

TWELVE YEARS AGO: Summertime Gratin

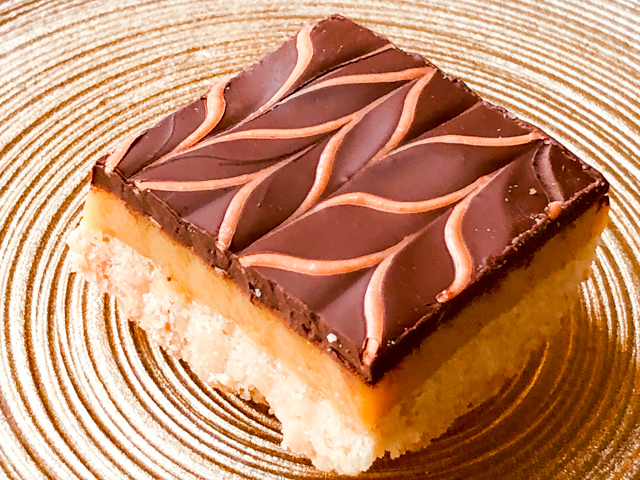
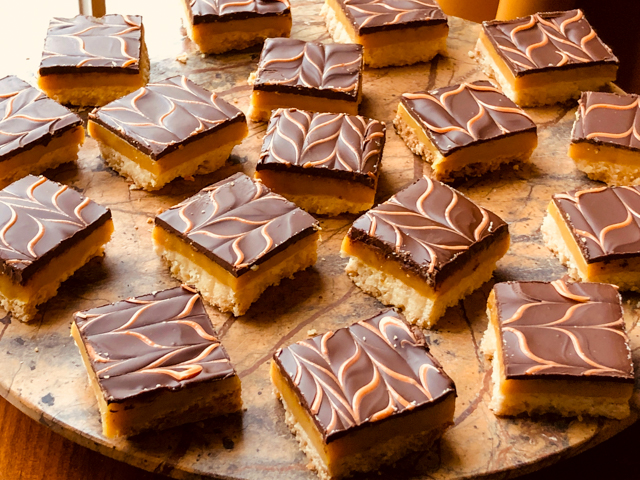
PASSION FRUIT MILLIONAIRE’S SHORTBREAD

Millionaire’s Bars are undoubtedly a classic. This version brings a bright tropical twist that works quite well. Very rich, a small piece will satisfy even those with a super sweet tooth.

PASSION FRUIT MILLIONAIRE’S SHORTBREAD
(inspired by this article)

for the shortbread base:
2½ cups (312g) all-purpose flour
½ cup (100g) granulated sugar
¾ teaspoon salt
16 tablespoons (226g) unsalted butter, melted

for the caramel:
1 can (396g)sweetened condensed milk
1 cup (210g) brown sugar
1/4 cup heavy cream
1/4 cup corn syrup
1/4 cup passion fruit pulp
1-2 tsp passionfruit flavor from Amoretti (optional)
8 tablespoons (113g) unsalted butter
½ teaspoon salt

for the topping:
225g dark chocolate
1/4 cup Candy Melts, white dyed orange with food gel

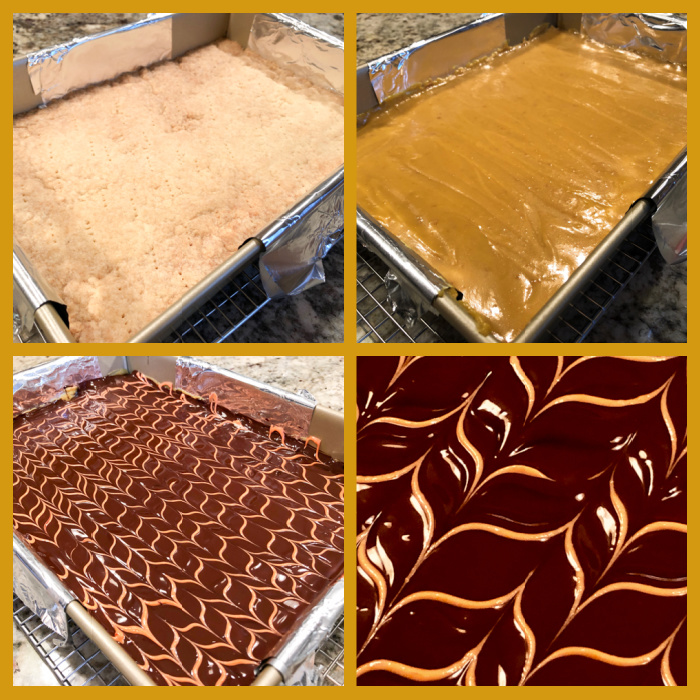
Heat oven to 350F. Butter a 9 x 13 baking pan and line it with foil, leaving pieces hanging on both the long and short sides of the pan, for easy lifting of the bar later. Make the shortbread by combining flour, sugar, and salt in medium bowl. Add melted butter and stir with a silicone spatula until no dry crumbs of flour remain. Crumble the dough evenly over the pan, and pat into even thickness with your fingers. Pierce with a fork many times all over the surface. Bake until light golden brown and firm to touch, 25 to 30 minutes. Transfer pan to wire rack. Let crust cool for 20 to 30 minutes.

Make the caramel: Stir all ingredients together in large, heavy-bottomed saucepan. Cook over medium heat, stirring frequently, until mixture reaches 238 F. This will take around 20 minutes. Pour over crust and spread to even thickness. Let cool completely, a couple of hours.

Once set, melt the chocolate in the microwave in 30-second bursts until glossy and smooth. Place the dyed candy melt in a piping bag and make a small hole. Smooth the chocolate over the caramel shortbread, then quickly add lines of the dyed candy melts. Do a feathering effect with a toothpick or a needle. Leave it set, then cut into squares.

ENJOY!

to print the recipe, click here

Comments: I made this quite some time ago, March 2020 to be precise. It was one of the last items I was able to share with our department before Covid-19 hit. I hoped to have intense passion fruit flavor in the caramel, and that was not very easy to achieve. By mixing fruit pulp with a touch of Amoretti flavor, I think I got it as intense as it could possibly be without affecting the caramel texture. If you don’t have Amoretti products hanging around, just omit it. The passion fruit by itself will be a nice touch, taming the sweetness of the caramel layer. But, as I mentioned in the opening paragraph, this is rich. They call it Millionaire’s Shortbread for good reason!

ONE YEAR AGO: Chai-Mango Rosette Macarons

TWO YEARS AGO: Common Table, Something New in My Life

THREE YEAR AGO: The Daisy, a Bread with Brioche Alter-Ego

FOUR YEARS AGO: Pork Tenderloin, Braciole Style

FIVE YEARS AGO: Raspberry Buckle

SIX YEARS AGO: Seafood Gratin for a Special Dinner

SEVEN YEARS AGO: Cooking Sous-Vide: Sweet and Spicy Asian Pork Loin

EIGHT YEARS AGO:  Farewell to a Bewitching Kitchen

NINE YEARS AGO: In My Kitchen. June 2012

TEN YEARS AGO: Goodbye L.A.

ELEVEN YEARS AGO: 7-6-5 Pork Tenderloin

THE MANY FACES OF BROWNIE CUPCAKES

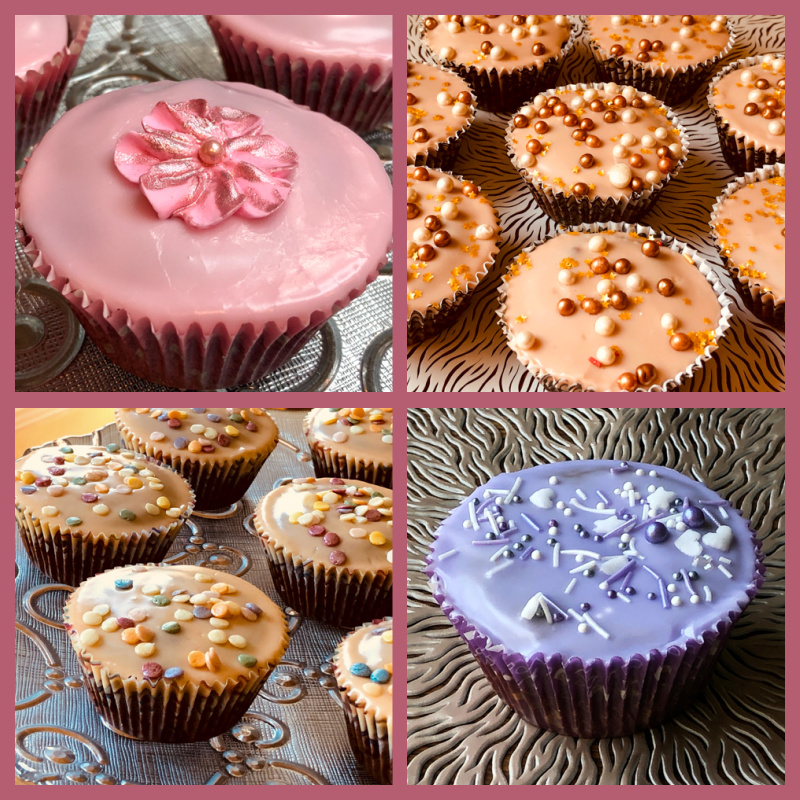
One basic recipe, several ways to dress it up. I adapted the basic brownie and icing recipes from a version found in Martha Stewart’s Cupcakes. Clockwise from top left: Rose-Mint, Chai, Lavender and Orange-Ginger Brownie Cupcakes. I started making them in August last year and they’ve been a regular component of my weekly donations. Once iced and set, they stay good for a couple of days at room temperature.

BROWNIE CUPCAKE BASIC RECIPE
(modified from Martha Stewart’s Cupcakes)

1 package Baker’s Unsweetened Chocolate (4oz)
1 stick (1/2 cup, 113 g) unsalted butter
265g sugar (1 + 1/3 cup)
2 room temperature eggs
1/2 tsp vanilla extract
1 cup (125g) all-purpose flour
1/2 tsp salt
1/2 tsp baking powder

Place 12 cupcake liners in a baking sheet, and heat the oven to 350F.

Chop the chocolate and butter in pieces, place them in a microwave-safe bowl and melt at 50% power just until the chocolate is almost fully melted. Finish melting by whisking gently until smooth. Allow it to cool for 5 to 10 minutes.

In another bowl, mix flour, salt and baking powder. Reserve.

To the melted chocolate, add the sugar and mix with a handheld mixer, when the sugar is incorporated (it won’t be smooth), add the eggs, one at a time, then the vanilla extract. Whisk until smooth, for a couple of minutes medium-speed. Gently sift the flour mixture on top, whisk just until the flour is incorporated and no dry bits can be found.

Fill each cupcake 3/4 full with the batter. Bake for 20 to 25 minutes, until a toothpick inserted in the center comes out slightly moist. Cool completely before icing.

ENJOY!

to print the recipe, click here

ROSE AND MINT BROWNIE CUPCAKES

1/3 cup milk (you won’t use it all)
1 bag Bigelow Rose Mint Tea
1/8 tsp rose water (I used Nielsen-Massey)
180g (1 + 1/2 cup) powdered sugar

Infuse the milk with the bag of tea by bringing it almost to a full-boil in a small saucepan, turning off the heat, adding the tea bag, closing the pan and leaving undisturbed for 10 minutes. Squeeze the tea bag. If you want a little more pink color, add a touch of food gel (I used fuchsia from Sugarflair, added with a toothpick).

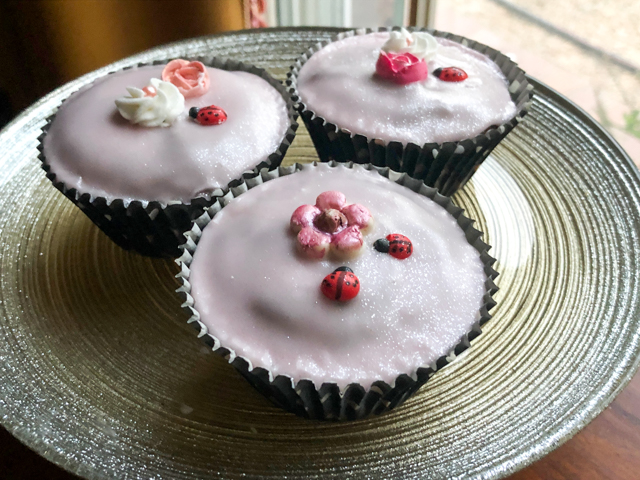
Place the powdered sugar on a large bowl and add half the amount of infused milk, whisking gently until fully dissolved. Adjust with enough additional milk to make a spreadable icing that will not pour freely from the sides of the cupcakes, but instead be thick enough to form a stable layer. Decorate with sprinkles, or flowers made from Royal icing or molded chocolate, as in the picture below.

CHAI BROWNIE CUPCAKES

1/3 cup milk (you won’t use it all)
1 bag Double Chai Stash Tea
180g (1 + 1/2 cup) powdered sugar
sprinkles (I used this one, a favorite)

Infuse the milk with the bag of tea by bringing it almost to a full-boil in a small saucepan, turning off the heat, adding the tea bag, closing the pan and leaving undisturbed for 10 minutes. Squeeze the tea bag to release flavor and reserve the milk.

Place the powdered sugar on a large bowl and add half the amount of infused milk, whisking gently until fully dissolved. Adjust with enough additional milk to make a spreadable icing that will not pour freely from the sides of the cupcakes, but instead be thick enough to form a stable layer. Decorate with sprinkles, Royal icing flowers, or molding chocolate details.

LAVENDER BROWNIE CUPCAKES

1/3 cup milk (you won’t use it all)
1/4 tsp dried lavender flowers
180g (1 + 1/2 cup) powdered sugar
sprinkles

Infuse the milk with the dried lavender by bringing it almost to a full-boil in a small saucepan, turning off the heat, closing the pan and leaving undisturbed for 10 minutes. Pass the milk mixture through a fine sieve to remove the lavender. Reserve the milk. If desired, add a tiny drop of purple food gel dye.

Place the powdered sugar on a large bowl and add half the amount of infused milk, whisking gently until fully dissolved. Adjust with enough additional milk to make a spreadable icing that will not pour freely from the sides of the cupcakes, but instead be thick enough to form a stable layer. Decorate with sprinkles.

ORANGE-GINGER BROWNIE CUPCAKES

1/3 cup milk (you won’t use it all)
1 bag Orange-Ginger tea (I used this one from Republic of Tea)
180g (1 + 1/2 cup) powdered sugar
sprinkles

Infuse the milk with the bag of tea by bringing it almost to a full-boil in a small saucepan, turning off the heat, adding the tea bag, closing the pan and leaving undisturbed for 10 minutes. Squeeze the tea bag to release flavor and reserve the milk. If desired, add a very tiny amount of orange food gel dye.

Place the powdered sugar on a large bowl and add half the amount of infused milk, whisking gently until fully dissolved. Adjust with enough additional milk to make a spreadable icing that will not pour freely from the sides of the cupcakes, but instead be thick enough to form a stable layer. Decorate with sprinkles.

ENJOY!

to print the basic recipe for icing, click here

Comments: My main modification of the recipe was to use the full package (4 oz) of the unsweetened chocolate, adjusting the flour and butter amounts, so that you are not left with a tiny bit of chocolate hanging around. The cupcakes bake without doming too much, perfect to have a flat layer of icing on top.

In this post I used tea to flavor most icings but you can also use orange or lemon zest, omit the decorations, or flavor the basic icing with any extract you like. They are super versatile. If you use molded chocolate to decorate and the room is too warm, the chocolate might get slightly soft, but it won’t lose its shape. To make decorations with molded chocolate I used mini silicone molds, and later painted them with luster powder + vodka.

ONE YEAR AGO: Olive Oil Brioche

TWO YEARS AGO: Coconut and Lime Macarons

THREE YEAR AGO: Flank Steak Carnitas

FOUR YEARS AGO: Sesame and Poppy Seed Sourdough

FIVE YEARS AGO: Pecan-Crusted Chicken from Southern at Heart

SIX YEARS AGO: Lamb Shanks en Papillote with Cauliflower-Celeriac Purée

SEVEN YEARS AGO: Chestnut Brownies and a Blog Award!

EIGHT YEARS AGO: Quinoa with Cider-Glazed Carrots

NINE YEARS AGO: Celebrate Wednesday: Heirloom Tomatoes Steal the Show

TEN YEARS AGO: Pain de Provence

ELEVEN YEARS AGO: Golspie Loaf, from the Scottish Highlands


GIANT COOKIE MEETS MOUSSE

…and the Entremet Cookie is born! I cannot take credit for it, so before I even start talking about this delicious dessert, let me thank Maxime, from Empreintesucree.fr.  She is a professional pâtissière who shares very detailed recipes of her beautiful productions. If you are a bit intimidated by entremet type cakes, this one is an excellent starting point, especially if you simplify the decoration steps (see comments). I guarantee it will still impress your guests.

ENTREMET COOKIE
(slightly modified from Empreintesucree.fr)

for the cookie base:
80 g butter (at room temperature)
65 g muscovado sugar
a pinch of salt
1 egg (55 g)
120 g all purpose flour
2 g baking powder
90 g dark chocolate mini chips

for the chocolate cream:
1 egg yolk
10 g of sugar
100 g heavy whipping cream
38 g dark chocolate (I used Lindt 70%)

for the dark chocolate buttercream:
6 Tablespoons unsalted butter, softened
290 g confectioners’ sugar
90 g unsweetened cocoa powder
1/3 cup whole milk
2 teaspoons vanilla extract
1/4 teaspoon salt

for the chocolate mousse:
180 g Caramelia chocolate (or milk chocolate of  your choice) of milk chocolate
250 g heavy whipping cream

for the chocolate velvet spray (optional)
120 g milk chocolate (I used Caramelia)
80 g of cocoa butter

for decoration:
golden stars
chocolate Crispearls

Suggested timeframe: make cookie two days before serving time and freeze it. The day before serving make the mousse, and the chocolate cream. Assemble the cake and save the cream in fridge until cake is un-molded.  On serving day make the chocolate buttercream, and the chocolate spray suspension (if using).

Make the cookie base. Heat the oven to 350 F. Cover a cookie sheet with parchment paper  and place over it a 20 cm ring. Reserve.

In the bowl of a KitchenAid type mixer, cream the butter with the brown sugar and salt. Add the egg and mix again, then sift the flour with the baking powder and mix gently.  Add the mini chocolate chips, and spoon the batter inside the ring. (It is easier to just pour the batter over the parchment paper eye-balling the dimension, then sit the ring on top and use an off-set spatula to carefully spread it uniformly inside the ring).

Bake for about 15 minutes, until the edges start to get some color. Remove from the oven, and – using oven mitts – immediately make circles with the ring, which will make the cookie base shrink a little bit, as it is still hot. You just want to have the cookie a tiny bit smaller than the ring, so that the mousse will cover the edges fully.  Allow the cookie to cool completely before placing it in the freezer.

Make the chocolate cream.  Whisk the sugar and the egg yolk in a small bowl. In parallel, heat the cream in a small saucepan. Pour the cream over the sugar/yolk mixture to temper it, then transfer everything back to the saucepan. Cook the custard over low heat until 180 F.  Pour the cream over the chocolate until it is slightly melted and mix with a spatula.  Place a plastic film in contact with the cream and reserve it in the refrigerator. When ready to assemble, place in piping bag with a plastic adaptor and have two round piping tips ready, of different sizes.

Make the chocolate mousse. Melt the Caramelia chocolate gently in a double boiler.  Bring one third of the cream, about 80 g to a simmer in a saucepan. Pour the hot cream over the melted chocolate and mix with a spatula until fully smooth. Whip the remaining whipping cream until it gets the consistency of melted ice cream.  Pour half of the cream on your milk chocolate mixture and mix gently with a spatula. Add the remaining cream and mix again until you get a perfectly smooth chocolate whipped cream.

Assemble the dessert. Stretch a piece of plastic wrap on the 20cm circle ring, pulling it well to stretch it nicely.  Flip your circle over a baking dish that fits in your freezer and place a strip of acetate film on the inside to facilitate un-molding later. Pour all the mousse into the circle, then smooth roughly. Take the cookie out of the freezer and push it upside down into the foam (the smooth side of the cookie up). The mousse should be flush with the cookie, smooth over what is needed. Reserve the dessert in the freezer overnight.

Make the dark chocolate buttercream. In the bowl of a stand mixer fitted with the paddle attachment, beat the butter on medium speed until it is smooth. Turn the speed to slow, add the icing sugar and cocoa powder and beat until combined. Pour the milk and vanilla extract then add the salt and continue beating until well combined. Increase the speed to high and beat the frosting for a couple of minutes. Place in a piping bag fitted with a 1M tip or another star-shaped tip of your choice.

Make the chocolate suspension for velvet effect.  Melt milk chocolate and cocoa butter in a double-boiler. Filter and place the mixture into the tank of your sprayer. Temperature should be 98 F. Un-mold your dessert and immediately spray the chocolate on it. Ideally, do this inside a dishwasher with racks removed. Decorate the cake with the cream and buttercream, add sprinkles of your choice. Leave in the fridge to thaw for at least one hour before serving.

ENJOY!

to print the recipe, click here

Comments: Well, I do realize that it seems a bit of a stretch to post this recipe as simple and then come up with quite a few components to make it. As I mentioned, you can simplify it quite a bit. For instance, you can skip the two different types of piped decoration and do a drizzle of melted dark chocolate all over it. That would work well. A shower of golden sprinkles for fun and a bit of a dressed up look. The velvet spray is also optional. I find it fun to do, though, and it helps me deal with guilty feelings of having a sprayer sitting in the basement just for my patisserie adventures. It’s nice to put it to use.

On that note, three things are worth mentioning. First, you must strain the melted chocolate + cocoa butter before pouring it in the sprayer. If you look at my photo above, you’ll notice how much stuff gets retained in the sieve. That could conceivably clog the sprayer and you don’t want that at all. Second, if you are using a regular paint sprayer for chocolate work, the container is large, so what works very well is to place a much smaller plastic cup inside, so that you don’t need to make a huge amount of chocolate suspension. I used an empty Benecol container. And third, do the spraying inside an empty dishwasher, because it is a messy process and all you need to do after is turn the dishwasher on.

We took this cake to a dinner party at a friend’s home, so I snapped the pictures with my cell phone very quickly. I admit they are not prize-winning shots. At any rate, everybody raved about the dessert. The cookie component goes very well with the creamy mousse, and it had just the right thickness, don’t try to make it thinner because it won’t work the same way. I loved the contrast of the sharp cocoa buttercream with the milk chocolate cream and mousse, but the cake can shine with only one of the piped toppings.

Maxime, thanks for a lovely recipe, I am thinking of many variations in the future.

ONE YEAR AGO: The Brazilian Battenberg

TWO YEARS AGO: Salzburg Sourdough

THREE YEARS AGO: If I had One Hour

FOUR YEARS AGO: Apple Cinnamon Oatmeal Cake

FIVE YEARS AGO: Sourdough Rye Bread with Flaxseeds and Oats

SIX YEARS AGO: Apricot-Raspberry Sorbet: A farewell to Summer

SEVEN YEARS AGO: Marcela’s Salpicon

EIGHT YEARS AGO: Pork Kebabs

NINE YEARS AGO: Fondant au Chocolat

TEN YEARS AGOGot Spinach? Have a salad!