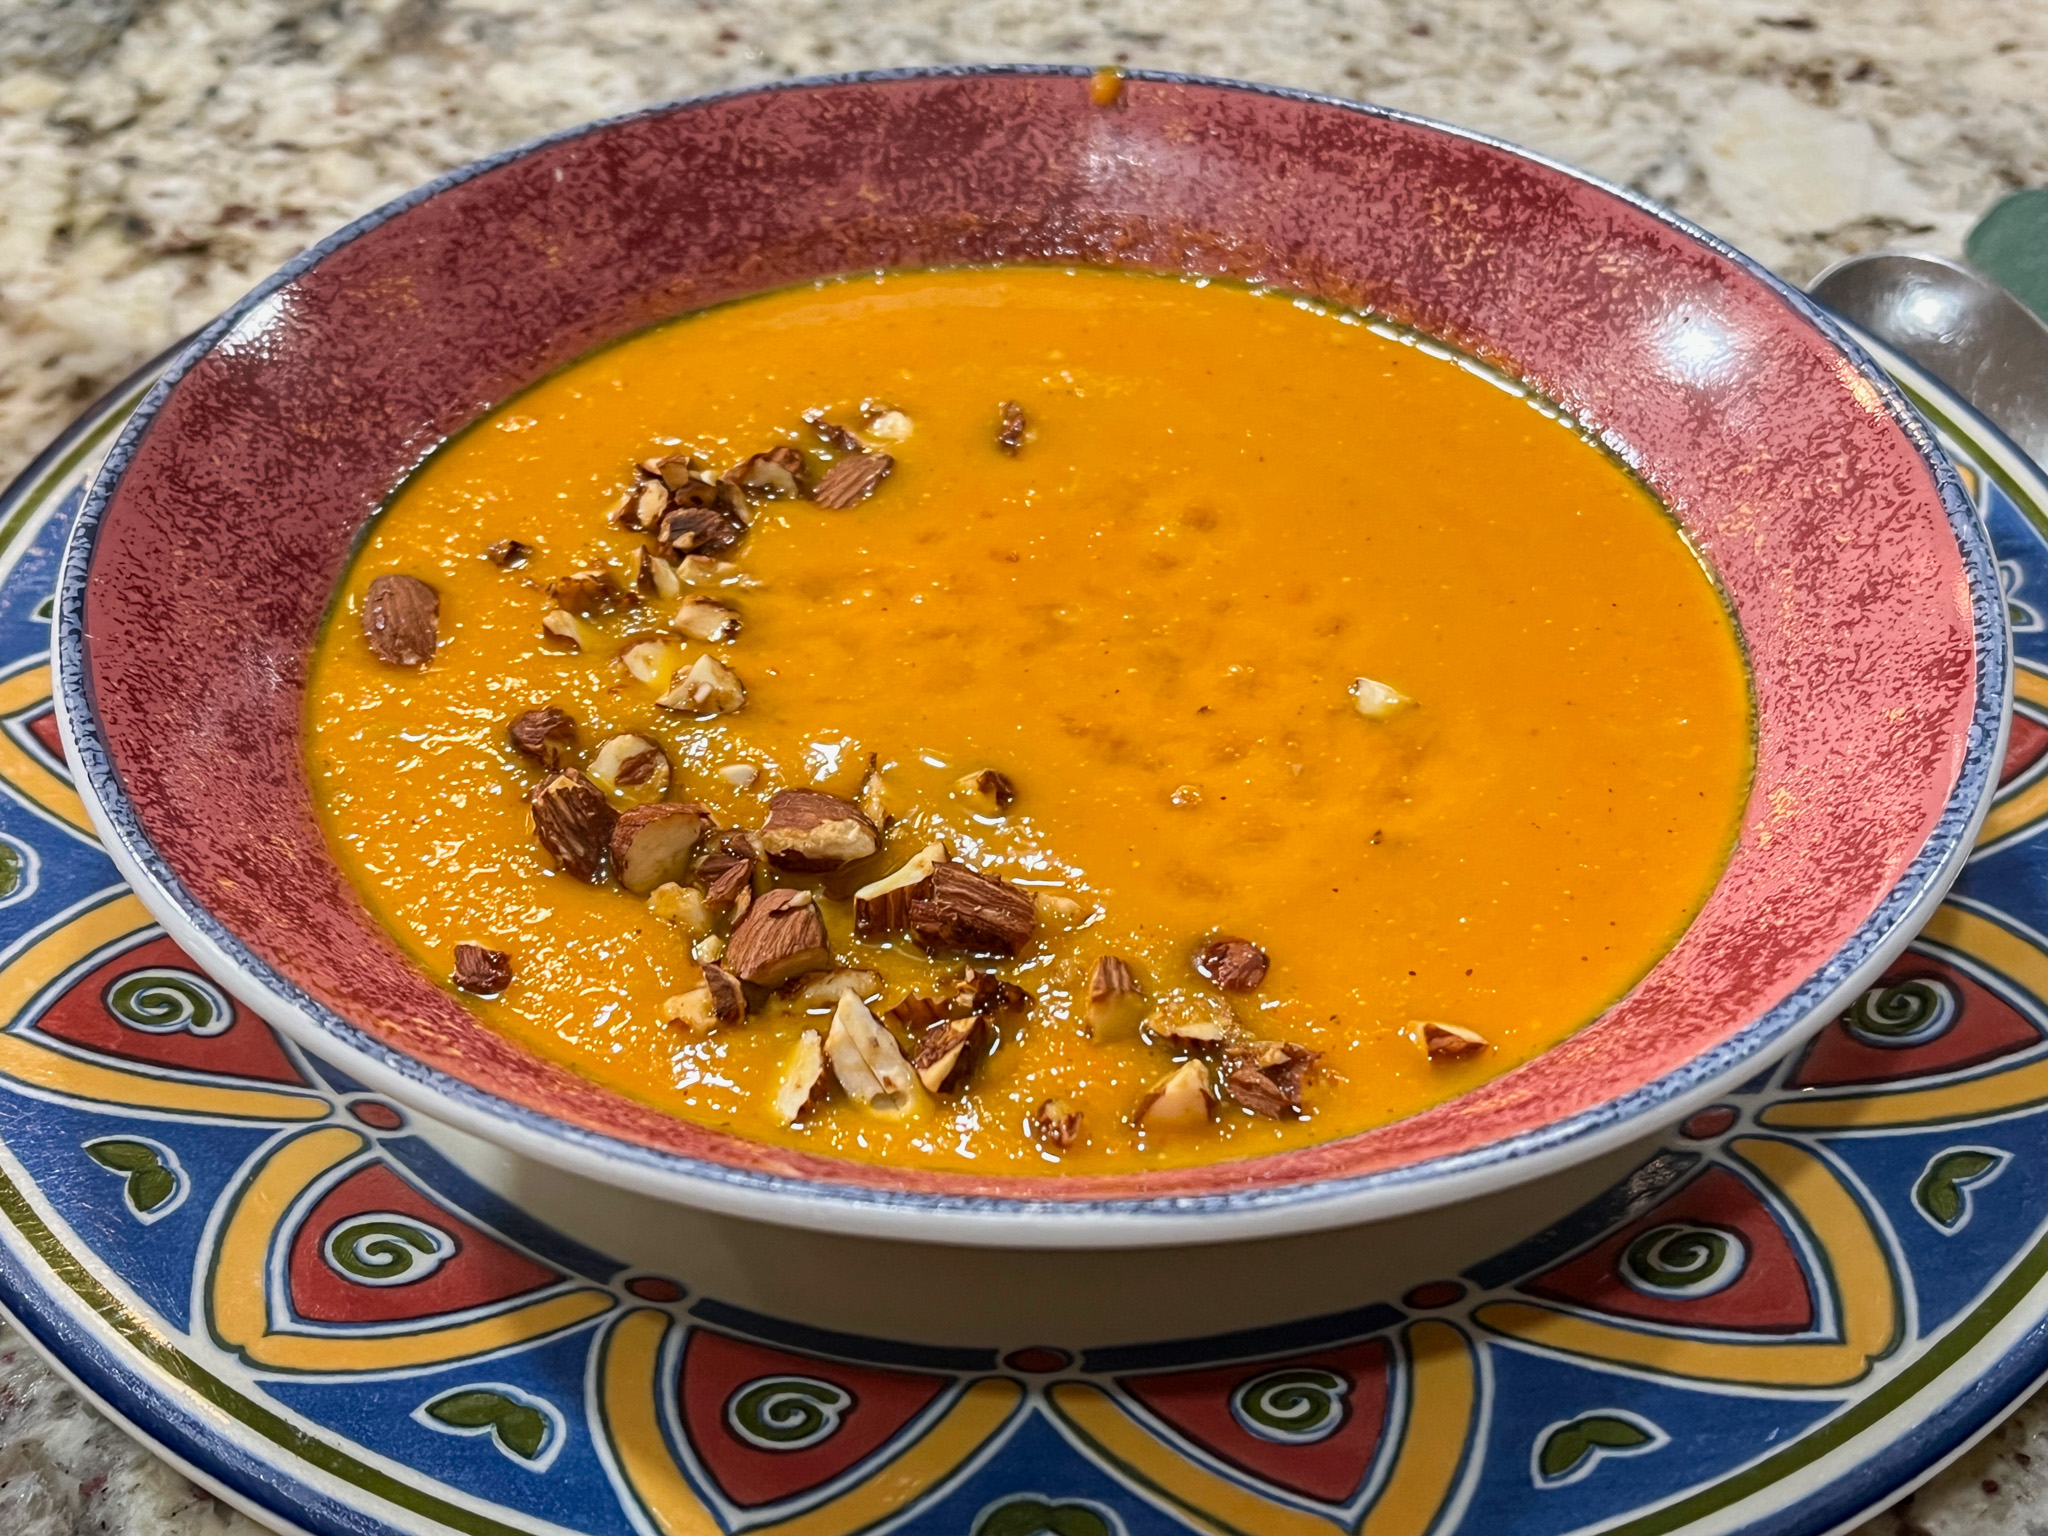
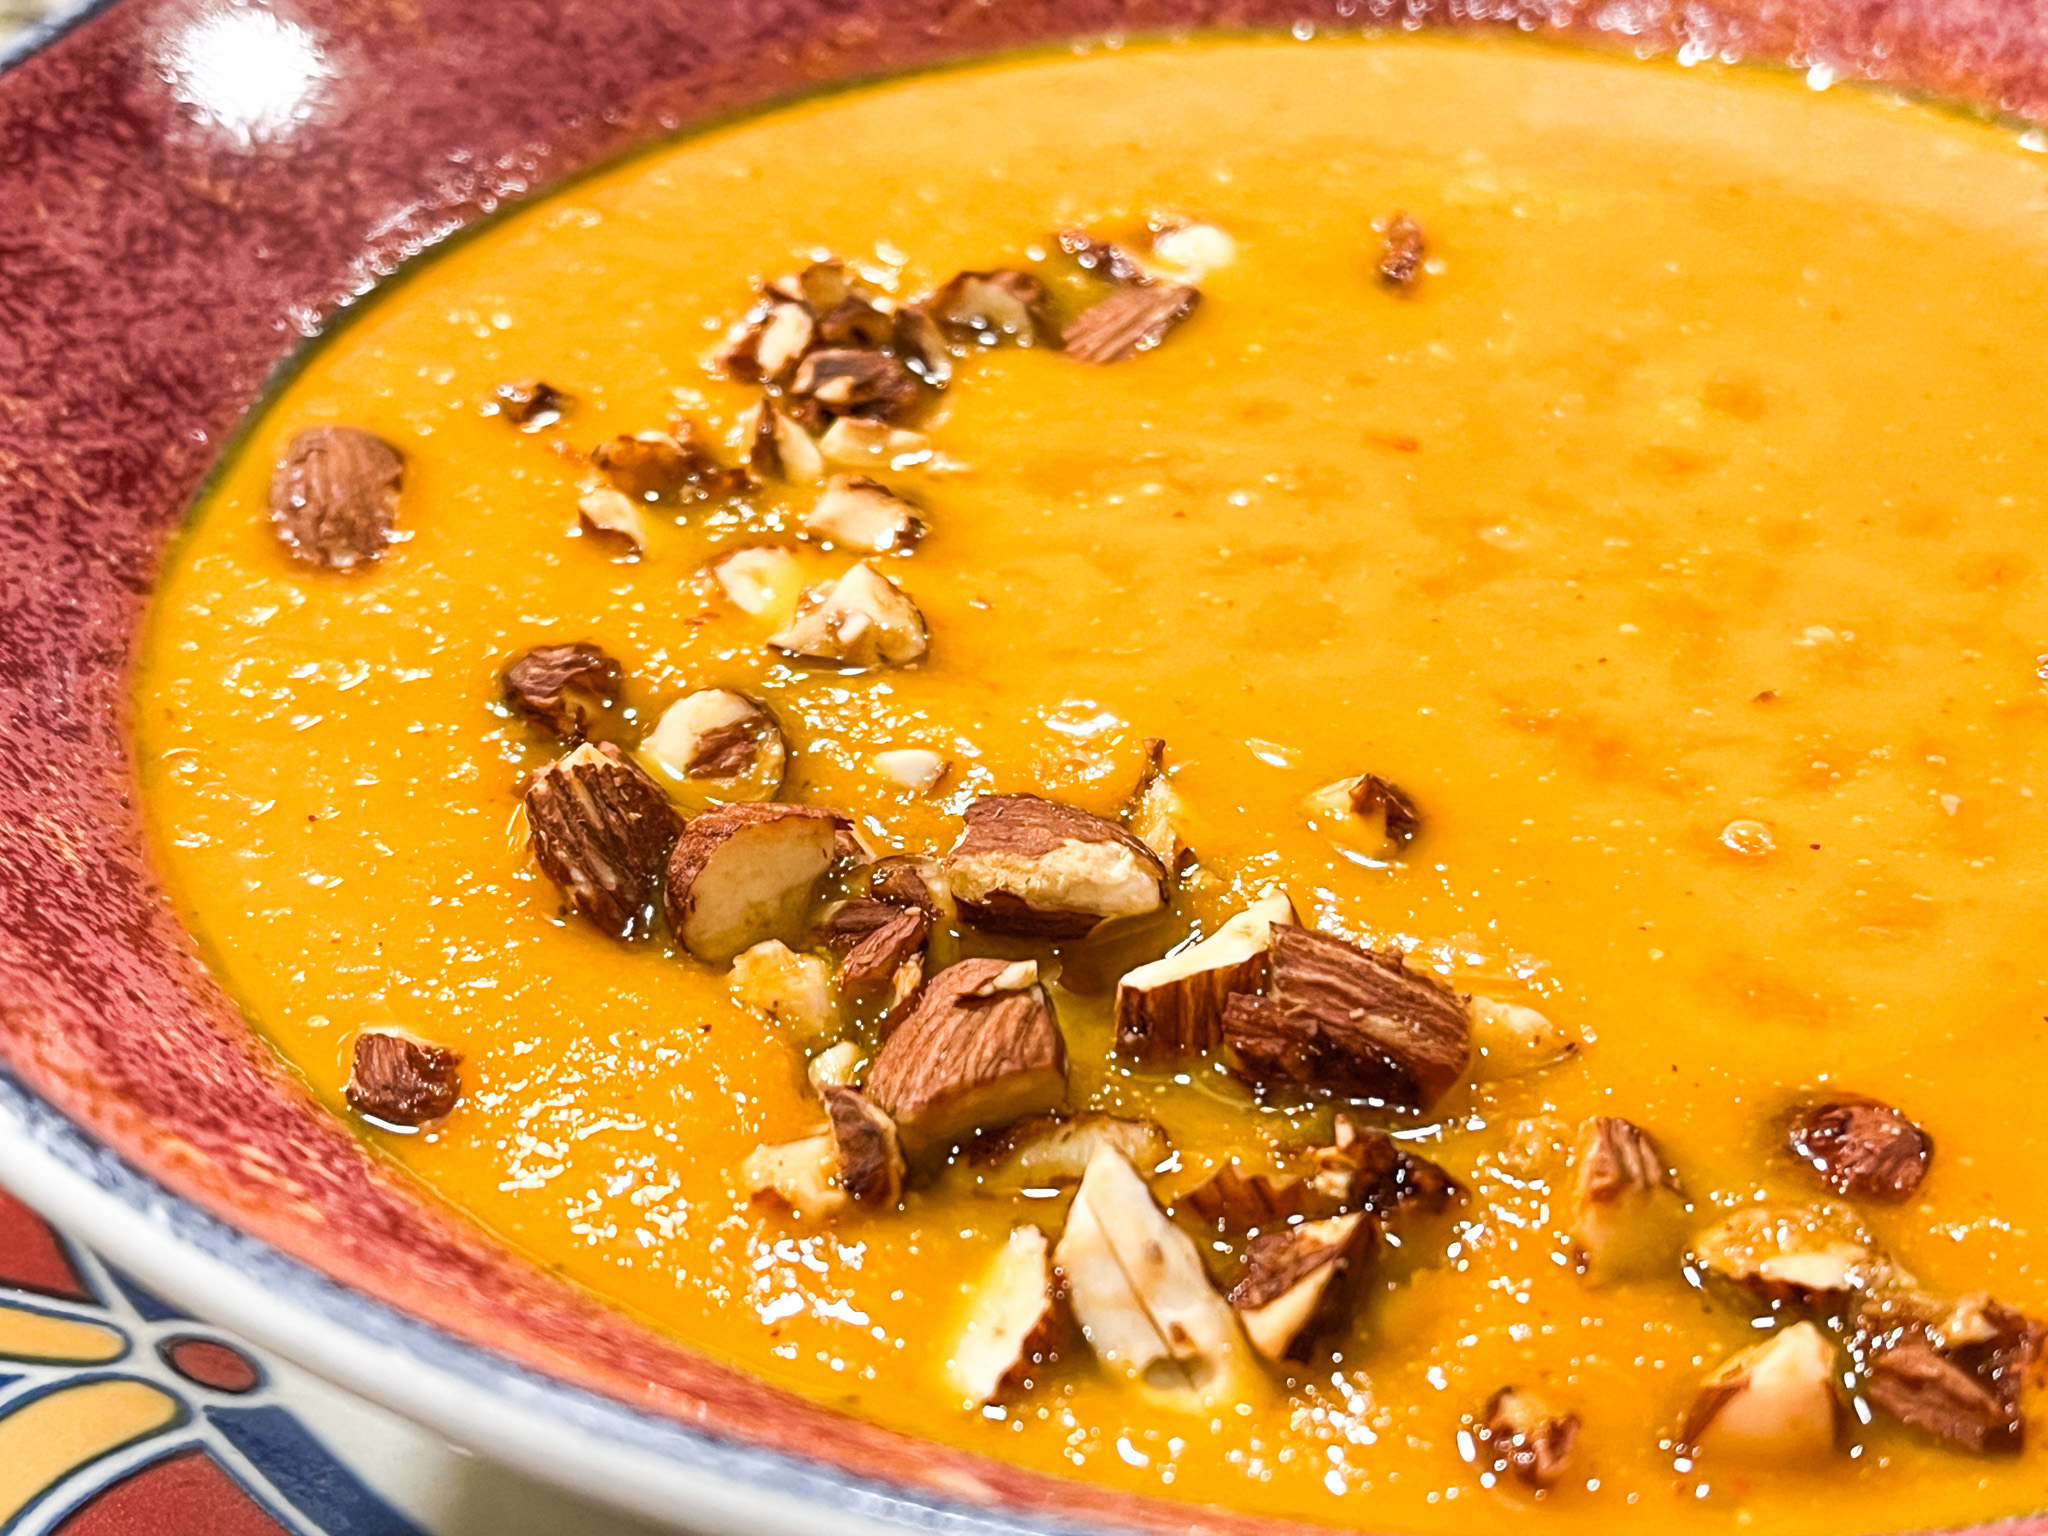
It is not that common for me to rave about a soup, but this one leaves me no other option. Absolutely delicious, super simple to prepare, just a few ingredients give it a lift from the humble to extraordinary. I modified it quite a bit to accommodate food sensitivities, but whatever you do, do not change the almond topping. Tamari-Roasted Almonds. Superb!
THAI CARROT AND SWEET POTATO SOUP WITH TAMARI-ROASTED ALMONDS (adapted from cookieandkate)
2 tablespoons olive oil 3 ribs celery, diced 1 tablespoon minced fresh ginger 1 tablespoon red curry paste 4 cups low-sodium vegetable broth ¼ cup raw almond butter 3 cups diced peeled carrots 3 cups diced peeled sweet potatoes 1 teaspoon fine-grain sea salt Freshly ground black pepper 1/2 cup raw almonds, finely chopped 1 heaping tablespoon tamari Fresh lime juice
Make the roasted almonds. Heat oven to 325F. Mix almonds with tamari, spread over a small baking sheet covered with aluminum foil. Roast for 10 to 12 minutes, until fragrant and starting to get some color. Reserve.
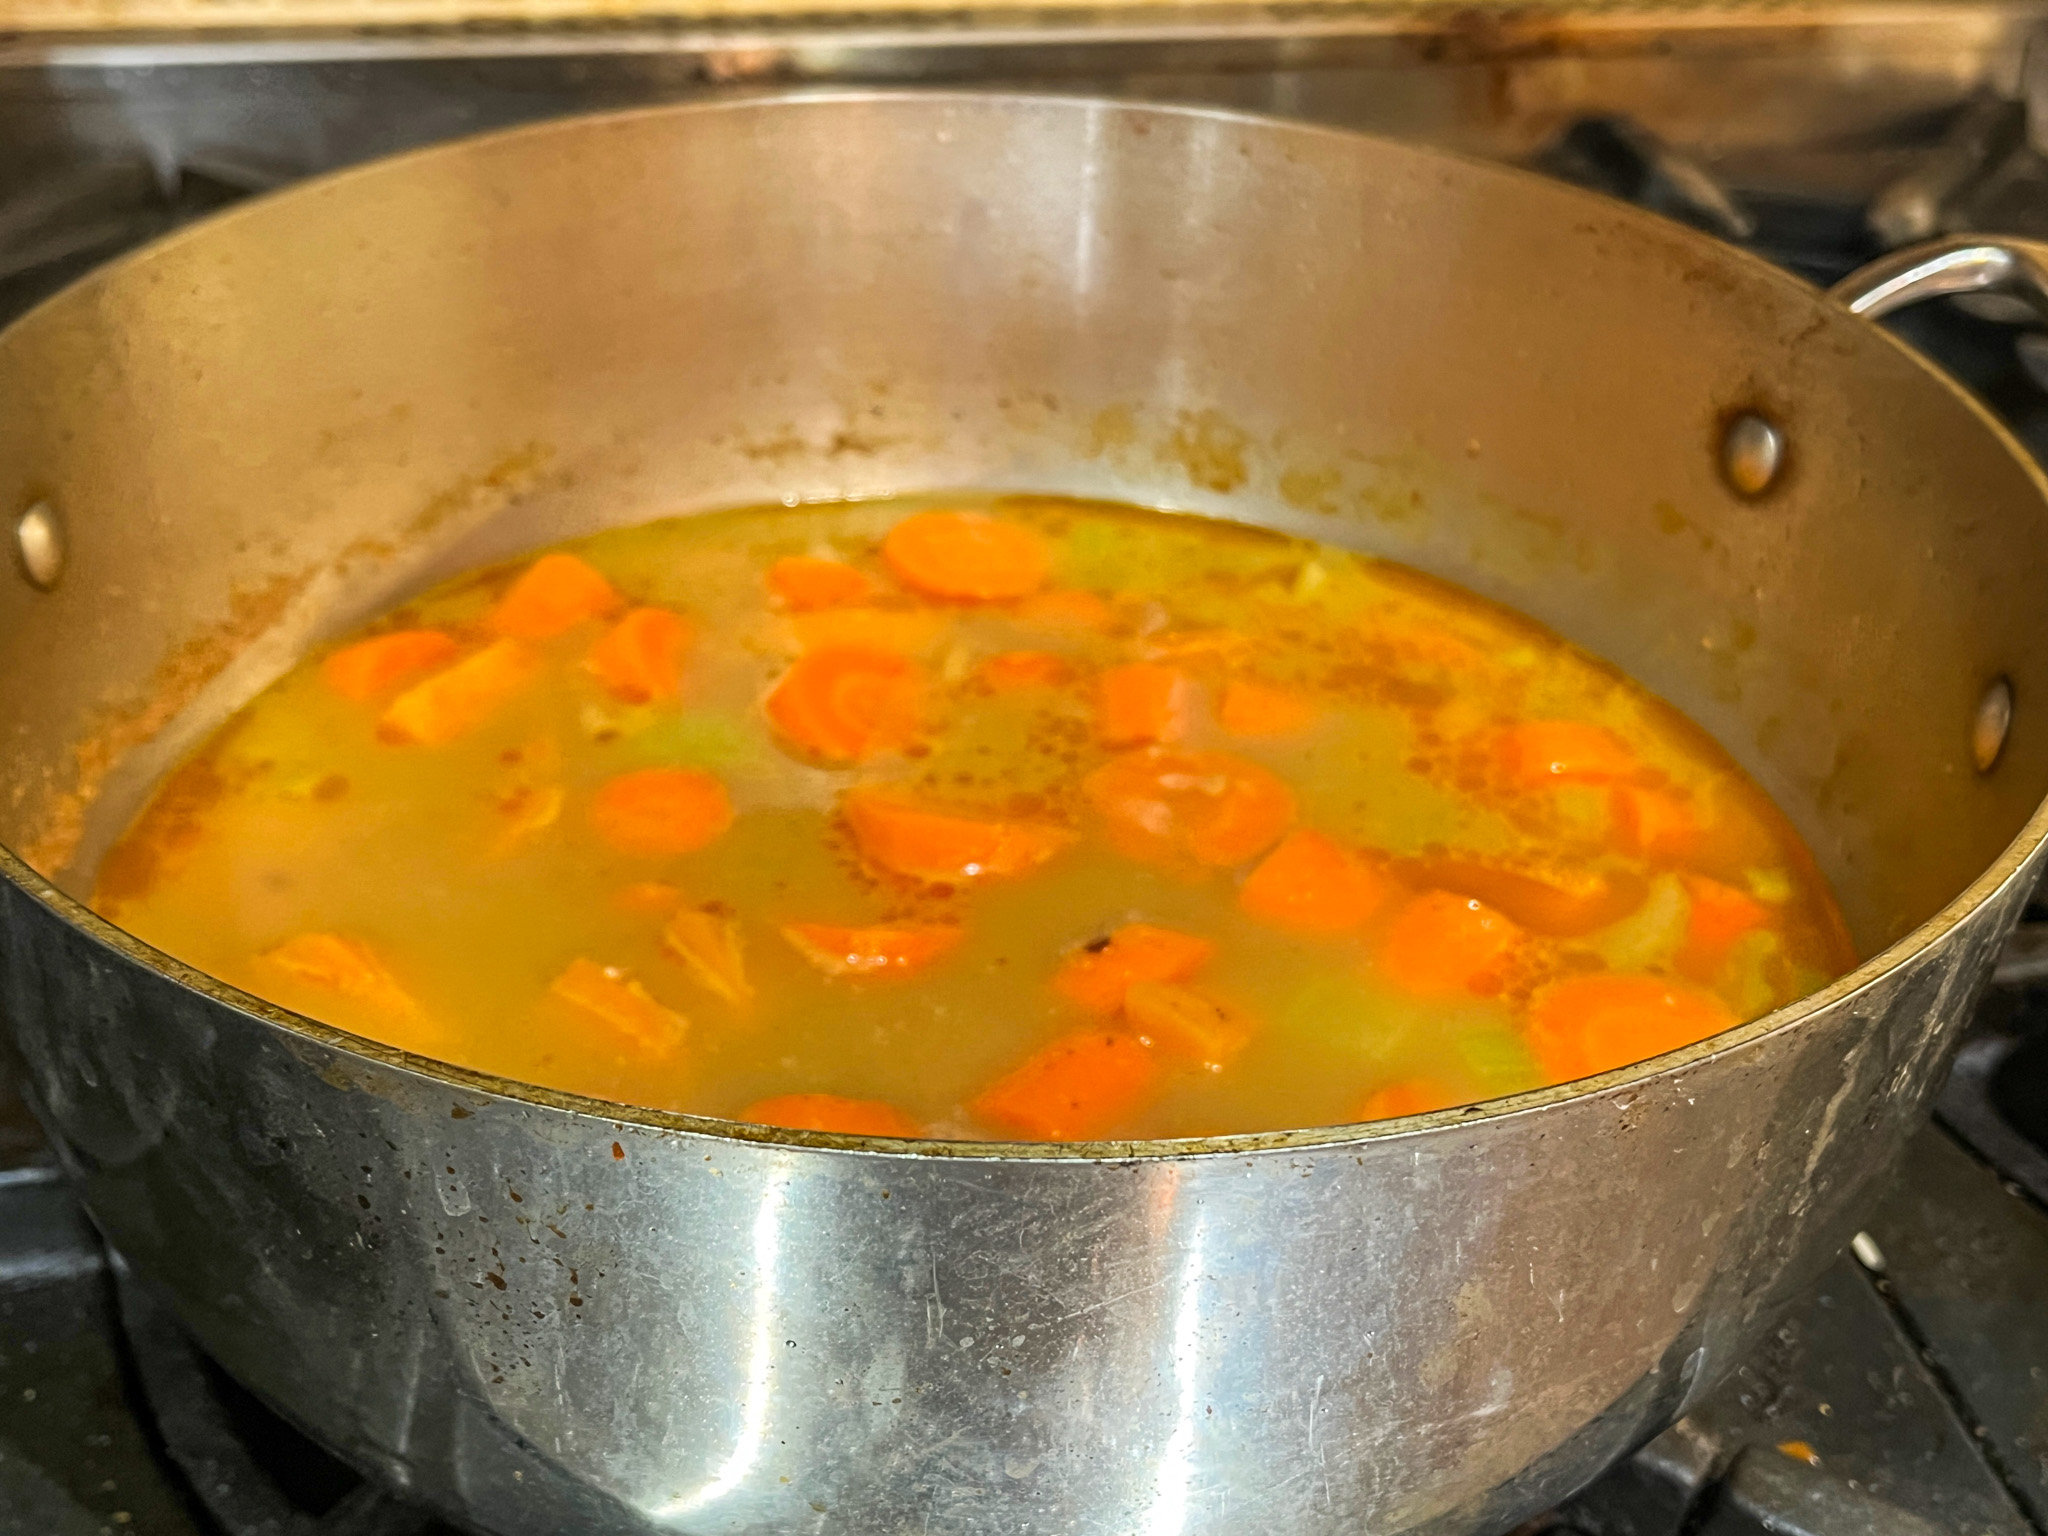
To make the soup: In a large pot, heat the olive oil over medium heat. Add the celery and ginger and sauté for a couple of minutes, until fragrant. Stir in the curry paste. In a small bowl, whisk together some of the broth with the almond butter until smooth. Add the mixture to the pot, along with the carrots, sweet potatoes, salt, and remaining vegetable broth. Stir until combined.
Bring the soup to a simmer and cook for 20 to 30 minutes (depending on how small you cut your pieces), until the vegetables are fork-tender. Transfer the soup to a blender (a Vitamix would be awesome here), and blend in batches until super smooth. If too thick, add more vegetable broth or water. Transfer the soup back to the pot and reheat if necessary.
Serve the soup with some almonds on top and squeeze a little fresh lime.
Comments: This is a vegan soup, so if you need to entertain someone who follows this type of nutrition, this would be an excellent choice. Hearty, flavorful, satisfying, perfect in taste and texture. As the weather cools down, soup becomes more and more attractive. We enjoyed it with sourdough bread, a little ham and a fried egg, so let’s say it was not even close to vegan by the time we were done… I highly recommend that you incorporate the tamari-roasted almonds in your cooking, it would go well with many different soups, salads, and even pasta.
Hawaij (or Hawaj) is a spice mixture from Yemen that came to my attention very recently. I ordered a bottle, as you can see in my previous In My Kitchen post, and put it to use. Here you have three ideas, a sourdough, a tahdig type rice, and a delicious carrot cake with cream cheese topping, super easy to make. I have a soft spot for spice mixtures. I know that I could make my own version but I love the convenience of opening the bottle and having it ready to go. This mix of flavors is right up my alley! Read more about it here.
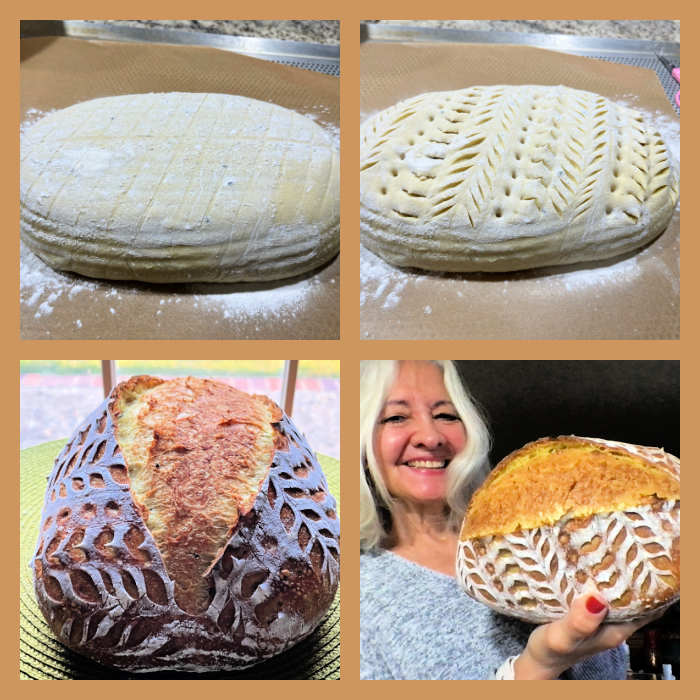
. HAWAIJ SOURDOUGH (from the Bewitching Kitchen)
365g water 75g sourdough starter at 100% hydration 470g white bread flour 30g spelt flour 1 tsp Hawaij spice mix 10g salt
Make the levain mixture about 6 hours before you plan to mix the dough. It should be very bubbly and active.
When you are ready to make the final dough, place the water in the bowl of a KitchenAid type mixer and dissolve the starter in it, mixing with a spatula briefly, then add the two types of flour, Hawaij mix, and salt. Turn the mixer on with the hook attachment and knead the dough for 4 minutes at low-speed all the time. You will notice the dough will gain quite a bit of structure even with just 4 minutes in the mixer. Remove from the machine, and transfer to a container lightly coated with oil, cover lightly with plastic wrap and allow it to ferment for 4 hours, folding every 45 minutes or so. Because the dough is already a bit developed from the initial time in the mixer, you should get very good structure after 3 and a half hours, or even sooner than that.
After four hours bulk fermentation, shape the dough as a ball, and place, seam side up, in a lightly floured banetton. Leave at room temperature one hour, and then place in the fridge overnight, from 8 to 12 hours.
Next morning, heat the oven to 450F.
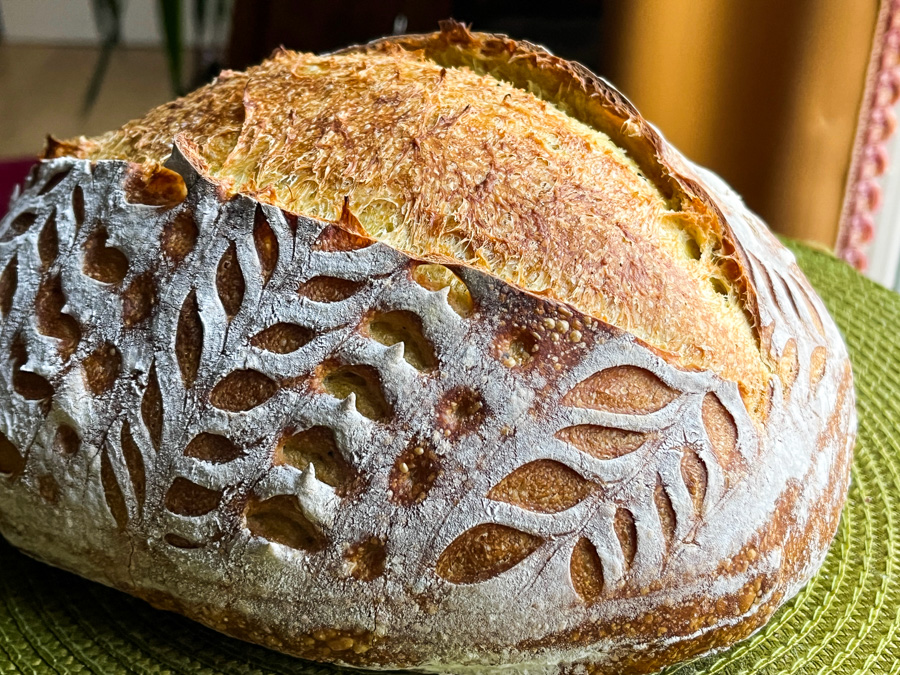
Invert the dough on a piece of parchment paper and score with a pattern with a new razor blade.
Bake at 450F for 5 minutes, quickly remove the bread from the oven, and slash it with the blade just where you want the bread to open. Cover the bread with the lid, place back in the oven for 30 minutes, uncover and bake for 15 more minutes. Cool completely over a rack before slicing.
Comments: I really love the way the bread opens up with the second slashing once the dough has been in the oven for 5 to 7 minutes, not longer. It is a bit tricky to open the pan and do the second scoring, but totally worth it. Just be careful not to burn yourself. I’ve seen this tip on several IG posts and I am quite fond of it now. Whenever you want to coach your bread to open in a specific spot to preserve your design, think about incorporating this step in your baking.
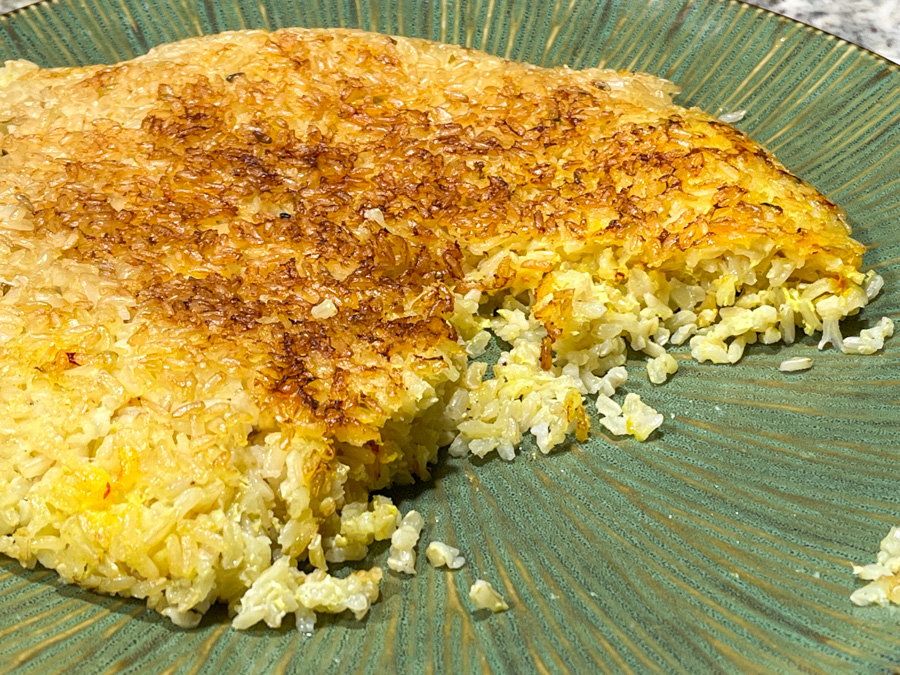
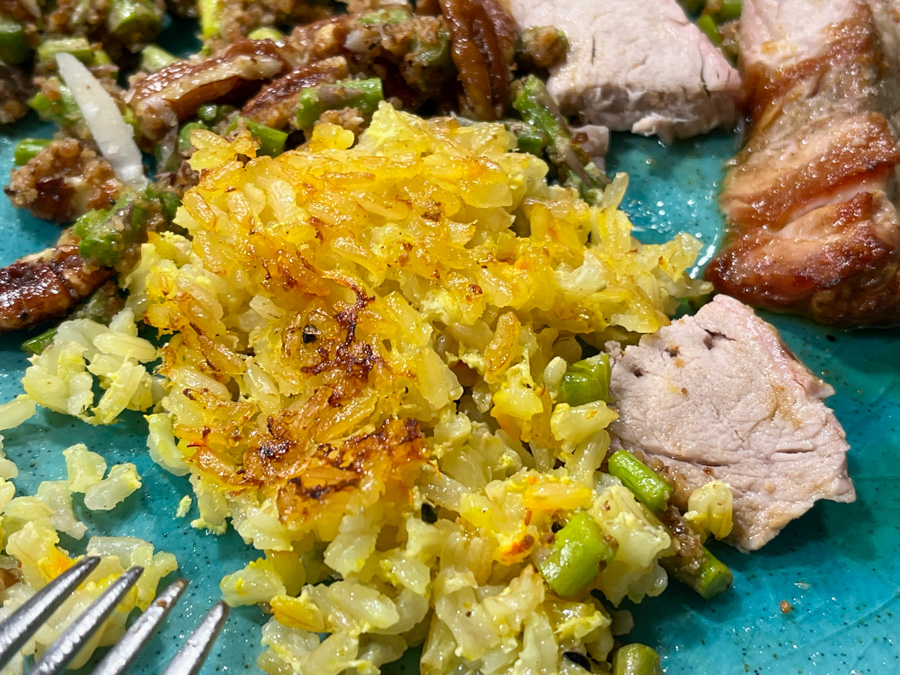
. QUICK BROWN RICE TAHDIG WITH HAWAIJ SPICE (from the Bewitching Kitchen)
1 cup brown rice 3 cups lightly salted water 1/3 cup full-fat yogurt 1/4 tsp salt 1/2 tsp Hawaij mix drizzle of olive oil
Mix the yogurt with the salt and Hawaij mix. Reserve.
Cook the rice for 20 minutes in salted boiling water and immediately drain and rinse with cold water to stop cooking. Rice and yogurt mixture can sit separately for a couple of hours before continuing.
Mix the rice with the yogurt. Heat a 10-inch non-stick skillet and add olive oil, swirling around the whole surface. When the oil starts to get hot, add the rice-yogurt mixture and spread it all over the pan, smoothing the surface with a silicon spoon. Cover the rice with a paper towel moistened with water, then place a lid. Don’t worry if the lid is not totally tight.
Place on a low-burner for exactly 30 minutes. At the end of 30 minutes check to see if the bottom is golden, if not, increase the heat lightly and remove the lid. Leave it for a minute or two, should be enough to make a nice crust at the bottom. Carefully place a platter on top and invert the rice on it. Cut in wedges to serve.
Comments: We love this quick version of tahdig made with brown rice instead of white. You will probably have to tweak the time to first parboil the rice a bit depending on the brand you use, but it is truly delicious. Again, not the most authentic version of tahdig out there, but we are hooked. I probably make it once a week ever since I first blogged about it (click here for flashback).
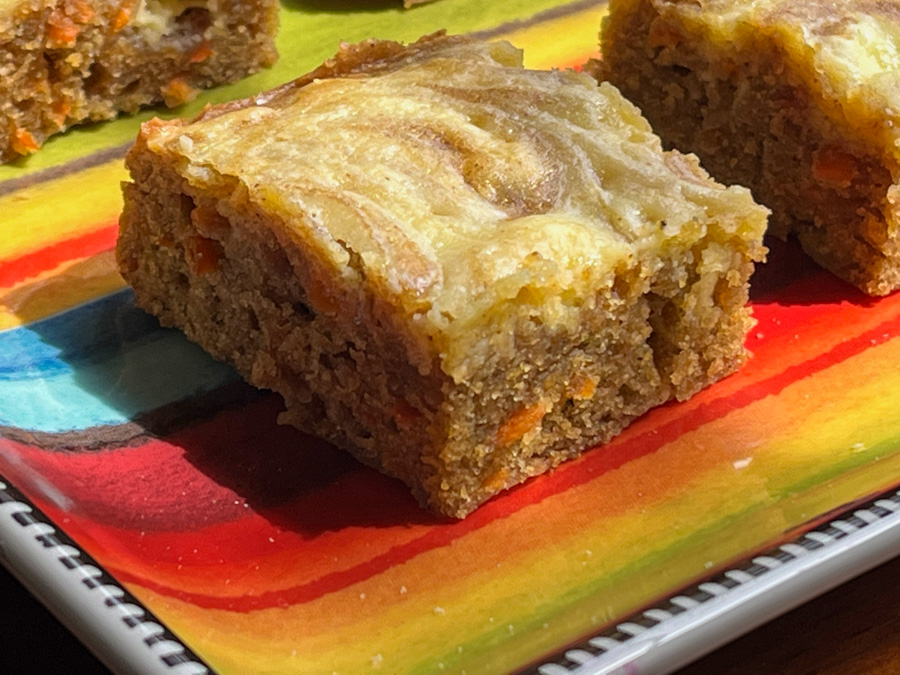
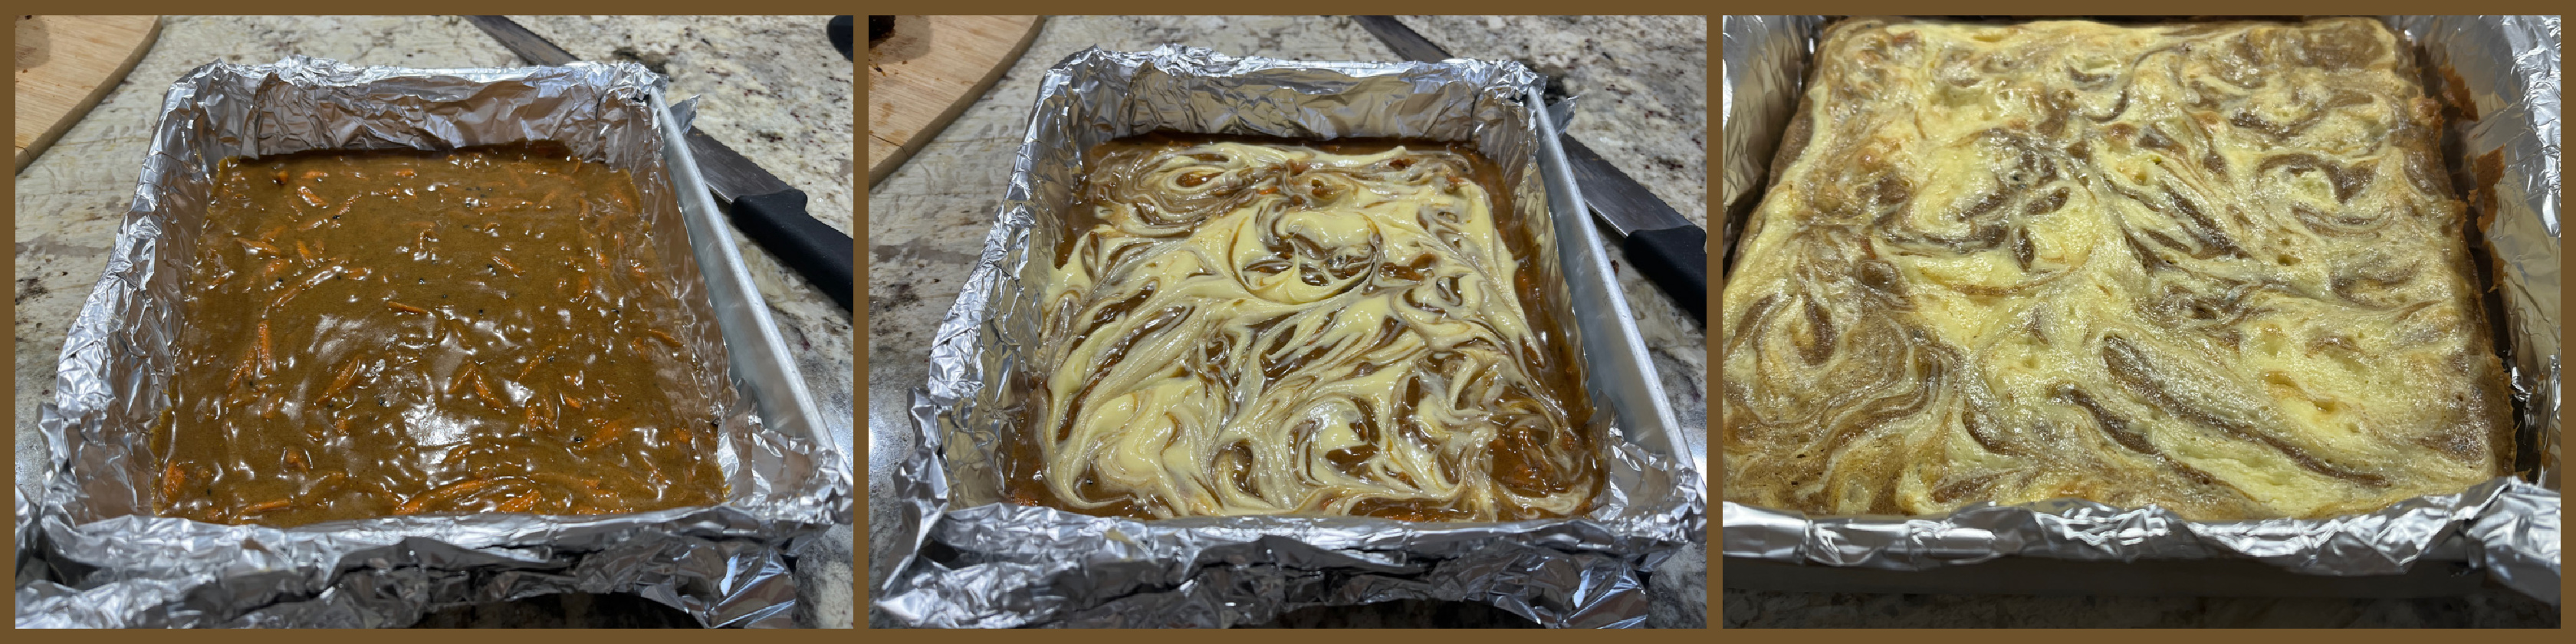
CARROT CAKE BARS WITH HAWAIJ MIX (adapted from Averie Cooks)
1/2 cup unsalted butter, melted 1 large egg 1 cup brown sugar, packed 1 teaspoon cinnamon 1 teaspoon Hawaij spice mix 1 teaspoon vanilla extract 1 cup all-purpose flour 1/2 teaspoon salt 1 cup grated carrots, loosely packed 4 ounces brick-style cream cheese, softened to room temp 1 egg yolk 1/4 cup granulated sugar
Heat oven to 350F, line an 8×8-inch pan with parchment paper, and spray with cooking spray.
To a large microwave-safe bowl, add the butter and heat on high power to melt, about 1 minute. Allow the melted butter to cool slightly, then whisk in the egg, brown sugar, spices, and vanilla. Once it is all smooth, add the flour and salt, mixing gently. Add the carrots, fold them in, then pour the batter into the prepared pan. Smooth the top with a spatula.
Prepare the topping: into a medium bowl, add the cream cheese, egg, sugar, and beat on high with a handheld electric mixer until smooth and fluffy, about 4 minutes. Turn the cream cheese out over the carrot batter using the blade of a butter knife or the tip of a spatula, and lightly swirl the cream cheese into the carrot batter. Bake for about 25 to 30 minutes, or until a toothpick inserted in the center comes out clean.
Allow to cool, uncovered in the pan, at room temp, for at least 2 hours (overnight is preferred) before slicing and serving.
Comments: These bars/blondies were a huge hit with our colleagues from the department, and I got a few emails of praise for them. They are not too sweet and the spice mixture goes perfectly with the carrot and cream cheese topping. I highly recommend you give them a try!
So that closes my first series of recipes using Hawaij. I do hope you’ve found something to inspire you!
Cucumber might be one of the most under-appreciated veggies, at least in our kitchen. I love raita, but rarely make it. At the grocery store, I grab every single veggie before inviting a cucumber into my shopping bag. But in the past couple of weeks I’ve been on a cucumber obsession, so today I share two recipes that will be part of our regular rotation from now on.
CUCUMBER & CRISPY CHICKPEAS WITH AVOCADO DRESSING
CUCUMBER AND CHICKPEA SALAD WITH AVOCADO DRESSING (adapted from Minimalist Baker)
for crispy chickpeas: 1 can chickpeas, drained and rinsed 1/2 tsp paprika salt and pepper to taste spray of olive oil if using air-fryer, 1 tablespoon olive oil if baking
for salad: 2 large cucumbers, peeled in strips, seeds removed, sliced thin 1 avocado, mashed 2 Tbsp olive oil 2 Tbsp white balsamic vinegar squirt of lemon juice 1/4 tsp each sea salt and black pepper 1/4 cup freshly chopped mint 1/4 cup freshly chopped dill
Make crispy chickpeas. Best way is with air-fryer. Spray with olive oil, season with paprika, salt and pepper, and cook for about 15 minutes in the highest temperature your fryer allows. Reserve.
When ready to make the salad, mash the avocado in a large bowl, squirt some lemon juice oven, then the olive oil, balsamic and the herbs. Season with salt. Mash it all well together. Add the slices of cucumber, toss with the creamy avocado dressing. Add the crispy chickpeas and serve.
This salad took Phil and I into a state of awe. I have a great friend who always says that food bloggers tend to use too many superlatives to describe their food, and I agree that can be annoying. But please allow me to say, this is an outstanding little salad, in which every ingredient works perfectly. Creamy, refreshing, hearty, we had zero leftovers. A moment of silence for my lunch next day, in which this salad was just a memory.
Moving on to version #2…
CUCUMBER & SHAVED CARROT SALAD WITH YOGURT-DILL DRESSING
CUCUMBER AND SHAVED CARROT SALAD WITH YOGURT-DILL DRESSING (from The Bewitching Kitchen)
2 cucumbers, peeled in strips, seeds removed, sliced very thin 1 tablespoon salt 1 large carrot, shaved in a box grater 1/2 cup full-fat yogurt 1 tablespoon olive oil 1 tablespoon white wine vinegar 1 tsp agave nectar fresh dill to taste, minced salt and pepper to taste
Place the slices of cucumber in a colander, add the salt and let it sit for 30 minutes. Lighty rinse the slices, and dry them on a paper towel.
Make the dressing by mixing yogurt, olive oil, vinegar, agave nectar, dill and spices. Whisk well. Add the dressing to the slices of cucumber, incorporate the grated carrot. Leave the salad in the fridge for about 20 minutes before serving.
Comments: I took two different approaches to the cucumber. In the first recipe I used them straight after slicing, whereas I salted them in the second version. As expected, in the salted version the cucumber had a slightly more tender texture. We loved them both ways, so if you are in a hurry, skip the salting in version #2, as it won’t compromise the outcome.
Both salads ended up as the star in our dinner, I highly recommend you consider increasing your consumption of cucumber, if you are also part of the team that keeps forgetting all about them…
Five days without our faithful goofy companion. I want to thank for all the comments in my previous post. I read each one, but cannot bring myself to answer them. Please consider yourself hugged.
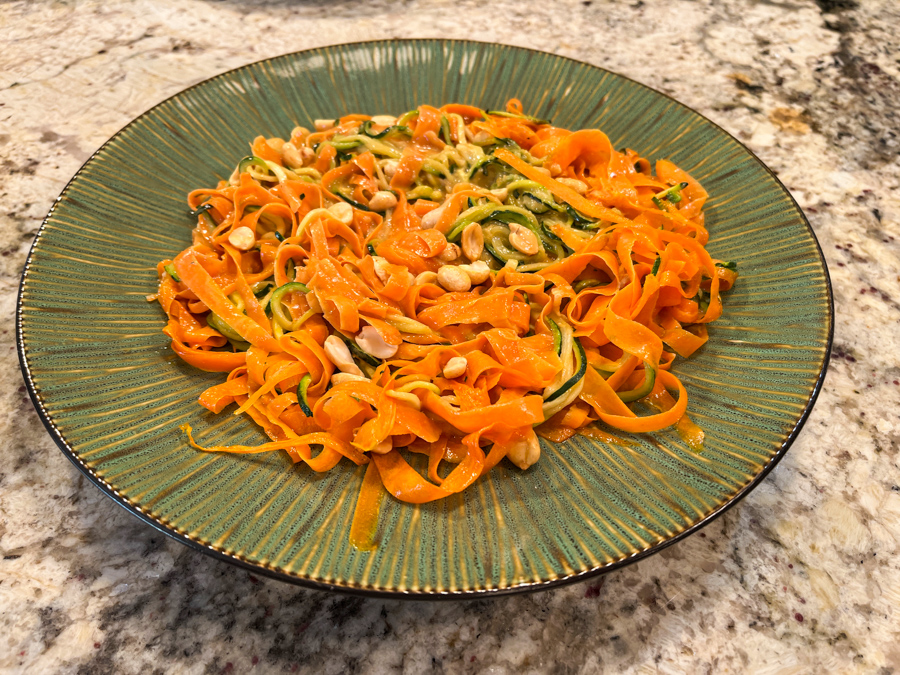
This key to this recipe is slicing the carrots in ribbons, which is a bit of a labor of love, but worth it. Couple that with spiralized zucchini, and you’ll hit a jackpot. If you do not have a spiralizer, slice the zucchini very thinly and that will do. It is surprisingly hearty, and would be a great vegetarian meal if you add perhaps some farro and a slice of bread.
CARROT AND ZUCCHINI STIR-FRY WITH PEANUT SAUCE (inspired by many sources)
3 carrots, sliced in ribbons (with a large veggie peeler) 2 large zucchini, spiralized fine 1 tablespoon grapeseed oil grated ginger to taste 1 shallot, minced salt and pepper
for the sauce: 2 tablespoons smooth peanut butter 2 tablespoons soy sauce 2 tsp sesame oil 1 tsp or more Sriracha sauce drizzle of agave nectar juice of 1/2 lemon water to adjust consistency
Heat the oil in a non-stick large wok. Sautee the ginger and the shallot until fragrant. Add the veggies, stir-fry for a couple of minutes in high heat. Drizzle the sauce, you might not need the full amount, so that the veggies are not drenched. Cook for a couple of minutes more, stirring constantly to distribute the thick sauce well into the veggies.
Comments: If you want to make a bigger amount, you might have to stir-fry the veggies in two batches, then join them and finish with the sauce. As I mentioned, slicing the carrots is not the most enjoyable activity in the world, but it is a game changer. Just incorporate the Zen and go for it. The sauce is pretty delicious and would be awesome added on top of grilled pork tenderloin, which I intend to do soon.
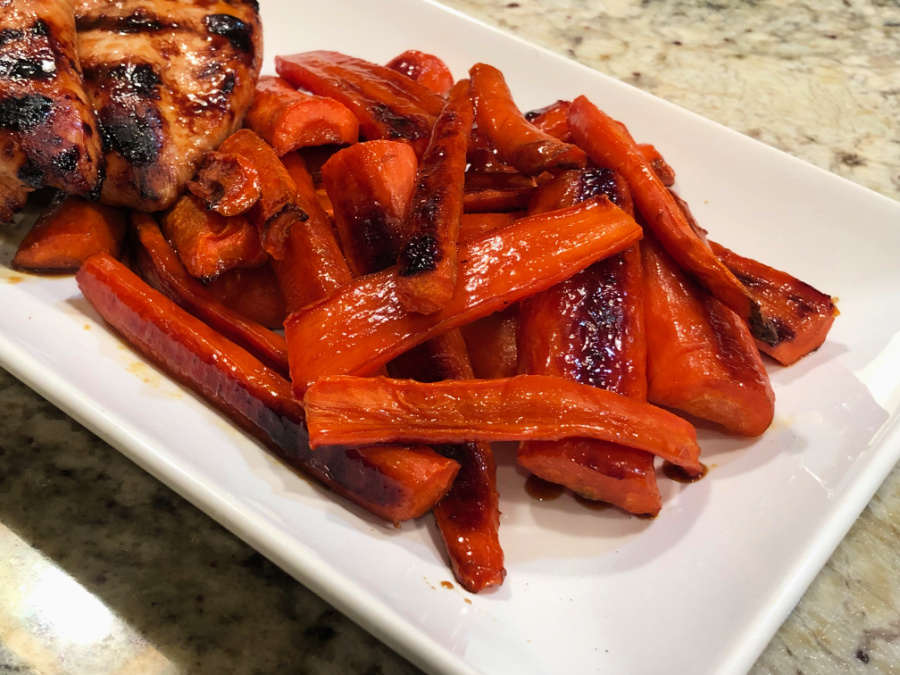
I kept waiting and waiting to get more recipes and make a more involved article in my “Incredibly Simple” category, but truth is I would MARRY these carrots if I was single and searching for a perfect match. It makes no sense to delay this post. You will not find a simpler recipe. And definitely not one that will surprise you as much for the outcome versus simplicity ratio. Do not be ashamed to buy this ingredient at the grocery store: Sweet Soy Sauce for Rice, by Kikkoman. It is all you need. Well, carrots would be nice to have also…
JAPANESE-STYLE ROASTED CARROTS (from the Bewitching Kitchen)
Carrots, cut in sticks, enough to cover a quarter baking sheet 1 to 2 tablespoons grape seed oil salt and pepper to taste 3 tablespoons sweet soy sauce for rice (Kikkoman) zest of 1/2 lemon + lemon juice to taste
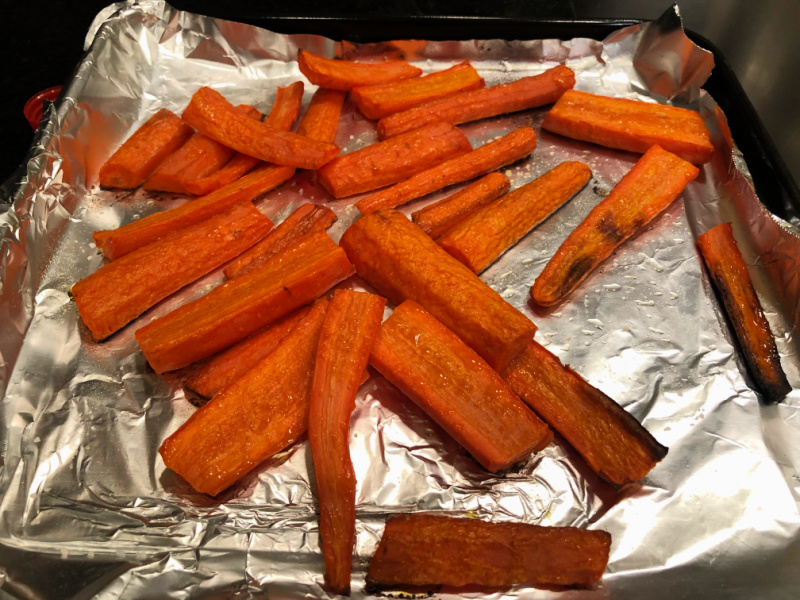
Heat oven to 420F. Coat cut carrots with olive oil, season very lightly with salt and pepper.
Roast for about 25 minutes, until edges start to get golden brown. Remove from the oven, drizzle the soy sauce and lemon zest all over, and roast for 5 minutes more, or until the sauce starts to caramelize. Serve with a little drizzle of lemon juice.
Comments: I don’t know if I will ever bother making a different version of carrots, at least not until I get bored with this beauty. If you want to feel virtuous and work harder, make the sweet soy sauce yourself from scratch. There are many recipes around (like this one), but at least once go the easy route and try this version. We all need a simple side dish in the repertoire for those times in which life seems a tad overwhelming.