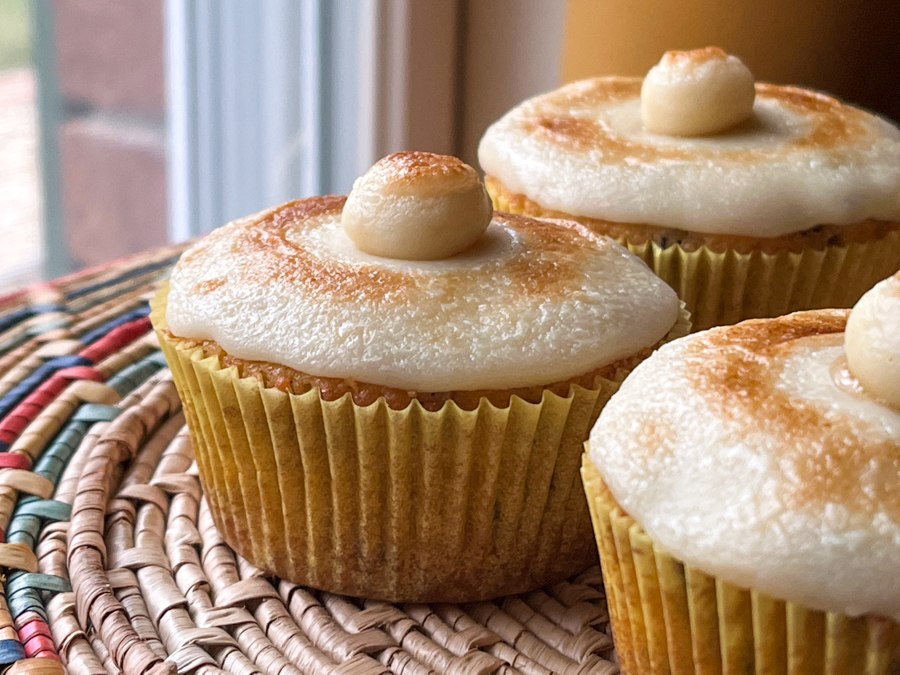
I’ve wanted to make a Simnel Cake for the longest time, since it is such a classic, but baking a large cake is not something I do very often. Cupcakes are a different story, easy to share, great to include in my weekly box of donations. I made a few changes from recipes I found in my cookbooks and online, keeping the details that matter in the original, larger version.
SIMNEL CUPCAKES (adapted from several sources)
100 marzipan 150g butter, softened 75g brown sugar 75g granulated sugar 2 large eggs, whisked 150g full-fat yoghurt zest of 1 Lemon 170g mixed dried fruits 175g all-purpose flour 2 tsp baking powder 1/2 tsp salt
To decorate 200g marzipan agave nectar to brush
Start by preparing the thin layer of marzipan that goes in the middle of the cupcakes. Divide the 100g in 12 little portions (about 8g each). Flatten them with your hands and stretch as a round that will fit inside your cupcakes. Mix the flour with baking powder and salt, reserve.
Heat the oven to 375F. Place paper liners inside the cupcake pan. Beat together the butter, sugars and lemon zest, until pale and light. Add the 2 eggs, slowly, whisking the batter well after each addition. Add the yoghurt, continue whisking. Add the flour mixture, incorporate gently, then add the dried fruit, folding until homogeneously mixed in.
Place a little cake batter in each cupcake liner, place the thin round of marzipan on top, press gently into the batter. Fill the cupcakes with more batter until 3/4 full. Bake for 20 to 25 minutes, until golden and a toothpick inserted in the middle comes out slightly moist, with some crumbs attached. Allow the cupcakes to cool for 5 minutes, then remove to a cooling rack.
When the cupcakes are cold, make the topping: roll out the fondant and cut rounds to cover the top. Make the layer as thin as possible. Use trimmings to make little balls. Attach the layer of marzipan to the cake by brushing a tiny amount of agave nectar on the cupcake, and pressing the marzipan over it. Place the little ball on top, using some agave nectar to help glue it in place. Run the cupcakes under a broiler to give some color to the marzipan. Pay close attention, because it goes from golden to burn a matter of seconds!
Comments: This is a delicious cake. The trickiest part is dealing with the marzipan, other than that, the recipe is quite straightforward. The mixture of fruit with the cake and the marzipan is a total winner. I highly recommend you give it a try. Plus, don’t they look just adorable? The cake stays fresh for a few days at room temperature, which is another big plus in my book…
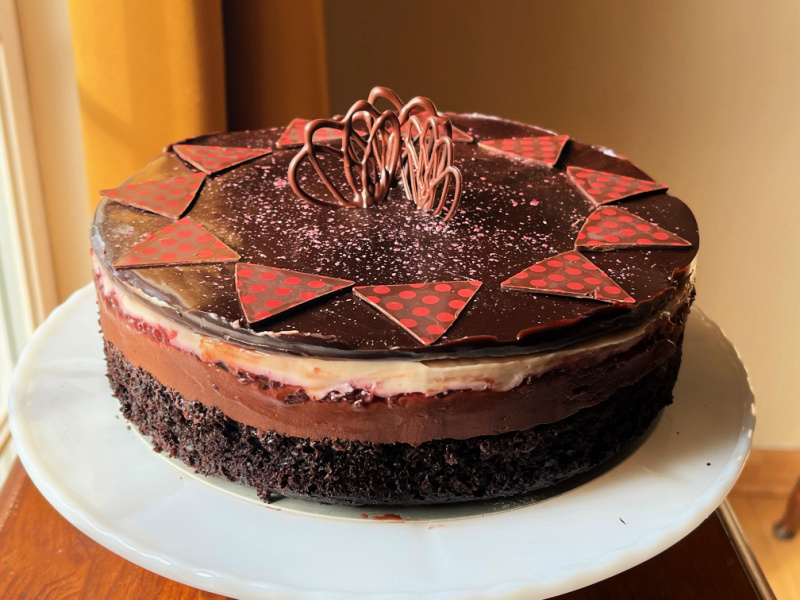
Please, do not allow the vegan word to scare you away. This was one of the tastiest cakes I’ve ever made, and I simply cannot BELIEVE it is vegan. The recipe comes from Fran Costigan’s cookbook: Vegan Chocolate, Unapologetically Luscious and Decadent Dairy-free Chocolate Desserts. Ms. Costigan has decades of experience creating dairy-free cakes and concoctions that do not rely on margarine and tofu like most do. As she points out in the introduction of the book, you can always taste margarine in the icing, and tofu will never fail to make a cake heavy. This cake – included in her “Showstoppers” chapter – is a bit involved to make, but one of the things I love about her cookbook is that she lays out a timetable suggesting how you can break the process in stages in a smooth and efficient way. I made the cake, the vanilla custard cream, and the chocolate decorations two days before. Made the mousse, assembled the cake and covered with the glaze the day before showtime. Basically, the cake was ready and waiting in the fridge before we had to take it to a get-together with friends. All that was left to do was add the chocolate decorations. Piece of (vegan) cake!
CHERRY CHOCOLATE MIROIR CAKE (from Fran Costigan’s Vegan Chocolate)
RECIPE OVERVIEW
1 recipe for Chocolate Torte to Live For (click here), baked in a 9-inch round pan and cooled (can be made a couple of days in advance)
Other components
Soaked dry cherries
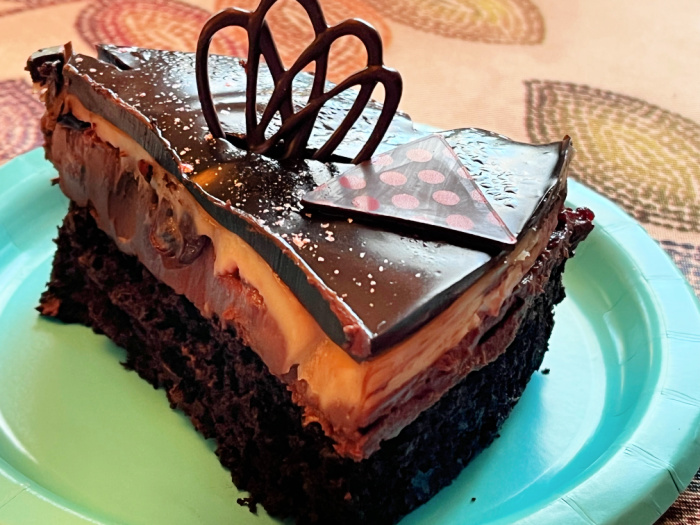
Vanilla Custard Cream: based on cashew cream and coconut milk, thickened with agar-agar
Magic Chocolate Mousse: water-ganache with a touch of olive oil, very interesting and quite tasty version
Comments: Vegan baking is not simple. Fran’s book takes that challenge and turns it into art. I don’t think it is right to publish the full recipe for such a complex cake, when so much work and effort went into its design and optimization. But the cake component, which by the way, stands beautifully on its own, can be made according to the recipe she published in her website (click here). In that version, the cake is covered with a vegan ganache and ends up very elegant in its simplicity. It remains as one of her most popular cakes, and having made it, I can understand why.
For the decorations, I tempered chocolate and used some of it to pipe designs on acetate sheet. The remaining I spread over transfer sheets (I get mine usually at bakedeco.com) and before it was fully set I cut small triangles. Fran’s version in the cookbook used fresh cherries covered in tempered chocolate, but they are not in season at the present time, so I went with my Plan B.
Everything works perfectly well in this cake, I would not change a thing. The cake is intensely chocolate-y, the two mousse components soften the overall taste. I really like the texture of glazes made with agar-agar instead of gelatin, find it a lot easier to work with and more reproducible. Gelatin-based glazes tend to get a bit slimy, particularly if sitting at room temperature for a while.
To get Fran’s cookbook – a must-have if you are into baking adventures – follow this link to amazon.
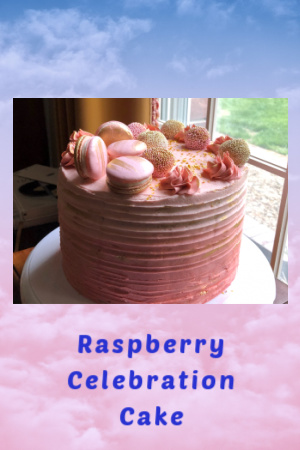
Twelve years. Hard to believe. It’s been such a journey, I sometimes don’t recognize myself in earlier posts. Like those written when I was a certified cake-o-phobe and decorated cookies were not to be found in my virtual spot. Twelve years later, I turned into a passionate baker, so much so that I started a second site just devoted to cookies. How did that happen? I have no idea, but I am having a blast with it. First things first. What is a Birthday party without cake? To celebrate this special day, I made a cake that joins my Brazilian roots (brigadeiros) with the cookies that launched me into a more serious baking path: macarons. Raspberry is the flavor. Pink and gold the colors. Happy 12th, my dear Bewitching Kitchen!
CELEBRATION PINK AND GOLDEN RASPBERRY CAKE (from the Bewitching Kitchen, cake slightly modified from My Cake School)
for one batch of cake: (I made two batches to have 4 cake layers, used 3 in the cake) 350g) sugar 285g cake flour 1 teaspoon salt 15g baking powder 5 egg whites 2 teaspoons vanilla 1 cup (242g) buttermilk 1/3 cup (72g) vegetable oil 140g unsalted butter, slightly softened.
Heat the oven to 325 degrees. Grease and flour two 8 x 2 inch round cake pans. Reserve.
In the bowl of your mixer add the dry ingredients, sugar, flour, salt and baking powder. Whisk to combine. Reserve. In a separate bowl, add the egg whites, buttermilk, vanilla and oil. Stir with a fork to combine.
With the mixer on low speed, add the slices of butter a few pieces at a time to the dry ingredients. Increase the mixer to medium speed and beat until the dry ingredients look crumbly and moistened by the butter. With the mixer on low speed, add half of the egg mixture, increase to medium speed and mix for 1 1/2 minutes, the batter will become thick and fluffy. Scrape the sides and bottom of the bowl. Add the remaining egg mixture in 2 pourings beating for 20 seconds after each addition. Divide the batter between the two pans.
Bake at 325 degrees for 35 to 40 minutes or until a toothpick inserted into the center comes out clean or with just a few crumbs attached. Let the cakes cool in the pans 10 minutes, then turn out.
for the raspberry filling: 2 cups ( 320g) raspberries 4 tbsp (60ml) water 1 cup ( 200g) sugar 25g cornstarch
Add the raspberries and water to a food processor and puree until smooth. If you’d like, you can strain the puree to remove the seeds, but in this case start from a bigger amount so you end up with 320g.
Combine the sugar and cornstarch in a medium saucepan. Stir in the raspberry puree. Cook over medium heat, stirring consistently until mixture thickens and comes to a boil, about 8-10 minutes. Allow to boil for 1 minute, then remove from heat. Refrigerate and allow to cool completely.
for the frosting: 1 cup (2 sticks) unsalted butter, at room temperature 1 cup vegetable shortening 2 teaspoons pure vanilla extract 3 to 4 tablespoons milk ¼ teaspoon salt 2 pounds (approximately 8 cups) powdered sugar food gel dye, Americolor Dusty Rose
In a large bowl, using an electric mixer on medium speed (if you have a stand mixer, use the paddle attachment), beat together the butter, shortening, and extracts until smooth and creamy.
Add 2 tablespoons of the milk or water, the salt, and half the powdered sugar and mix just until combined. Scrape down the sides of the bowl. On low speed, gradually add in the remaining sugar. Add more milk or water as needed to achieve the desired consistency.
Divide the frosting in three bowls, and add increasing amounts of gel dye to get the ombre effect.
for decoration: Raspberry Brigadeiros (recipe here) Lemon Macarons (recipe here, but omit the blueberry jam) Egyptian Gold luster powder Everclear or vodka
Cake layers can be made a week in advance and frozen. Thaw still wrapped in plastic at room temperature. Assemble the cake by placing one layer on a rotating cake stand over a cardboard round base. A little buttercream on the cardboard helps it stay stable as you work on it.
Make a little dam with buttercream frosting (use the lighter color), then add the raspberry filling. Place the second layer on top, repeat the process and top with the third. Frost the cake first with a crumb coat, refrigerate for 30 minutes, then frost with the darkest tone at the bottom. If desired, add texture with a cake comb or spatula. Use the darker color to make rosettes on top, add the brigadeiros and macarons.
Finish the look with a few strokes of gold color on the edges of the buttercream roses and ridges on the sides of the cake. If you have golden sprinkles, put them to use…
Comments: I should thank Tanya, my tent-baking friend, for the help and advice she gave me to make this cake. It turns out that I had not baked a cake in about 10 months and was feeling pretty rusty. But I am thrilled with the way it turned out, because I had this image in my mind, and the cake came pretty close to my goal. I loved making the ombre effect with the three tones of pink. Come to think of it, Dusty Rose from Americolor is a total must-have. Pink is tricky. Just a little more than you think you need will take you into bubblegum territory. Not what I wanted for my cake. Dusty Rose gives a nice pastel tone.
For the macarons, I painted one shell in solid gold, and added a brush of gold on the other side. I think the lemon of the macaron filling was a good match for the raspberry cake. As to the frosting, I went with a type of buttercream that stands well at room temperature for several hours. It is important to use a good quality shortening, and butter. I went with Spectrum and Kerrygold.
If you’ve been following me for a while or if you are new here, thank you for your support, and thanks for leaving comments and feedback on recipes you try. I step into the 13th year of this journey with the same enthusiasm I had on the second year. Or third. Or 10th. I’ve never set goals for my blog, it is a reflex of what goes on in my life as far as cooking and baking is concerned. I just try to keep it varied and interesting, and hope that it inspires others to cook and bake.
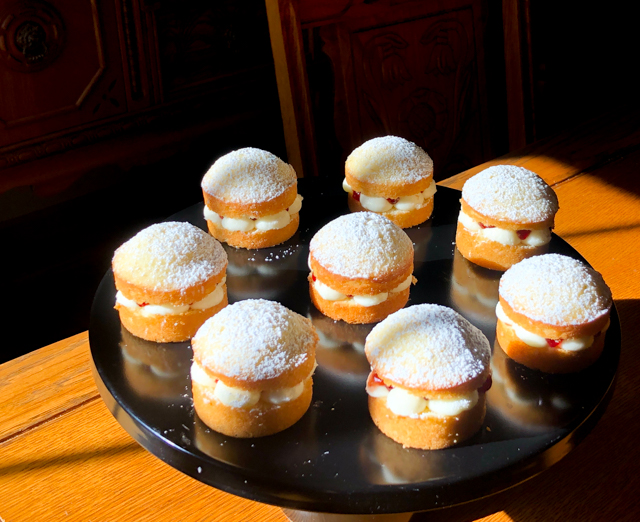
I made these cakes in November 2019, if you can believe it… Sometimes things take their sweet time to go from a folder with pictures to the blog post. Victoria Sponge is a true classic from the UK, named after Queen Victoria, because it was her favorite sweet to enjoy during afternoon tea. It is a sandwich type cake with strawberry jam, often whipped cream, and usually not iced, the top and sides left naked. Many variations exist, I am sharing a version that makes them in individual format. I find them irresistibly cute.
VICTORIA SPONGE MINI-CAKES (adapted from this article)
175g unsalted butter, at room temperature 175g granulated sugar 3 large eggs, beaten 1 tsp vanilla extract 185g all-purpose flour 1 + 1/8 tsp baking powder Pinch of salt
whipped cream lightly sweetened strawberry jam
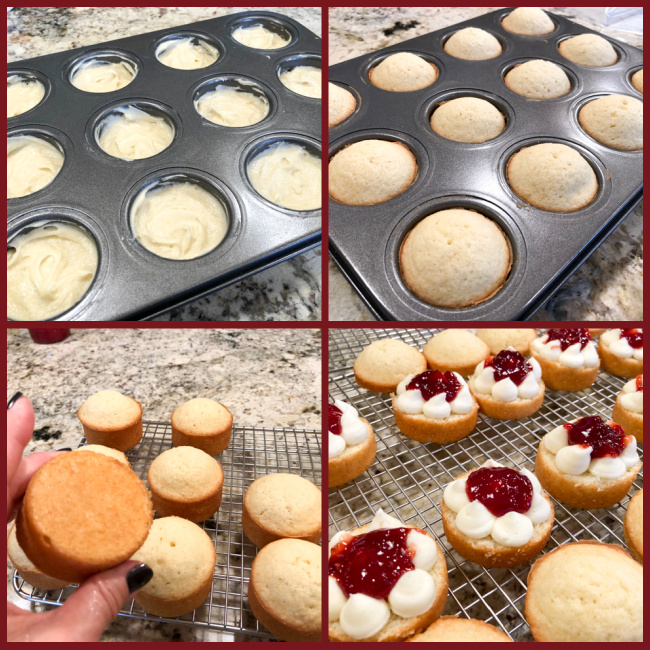
Heat the oven to 350°F. Very lightly grease the molds of a mini-cake pan.
Sift together the flour, baking powder and salt. Reserve.
Cream the butter and caster sugar together until the mixture is pale and light. Gradually add the beaten eggs, mixing well between each addition and scraping down the sides of the bowl from time to time. Add the vanilla extract and mix again.
Add the flour mixture to the batter, mixing gently until smooth. Fill the mini-cake mold, each cavity 3/4 full, no more than that. You should have enough for 12 mini-cakes. Bake on the middle shelf of the oven for 15 to 20 minutes until golden, well risen and a wooden skewer inserted into the middle of one of the cakes comes out clean.
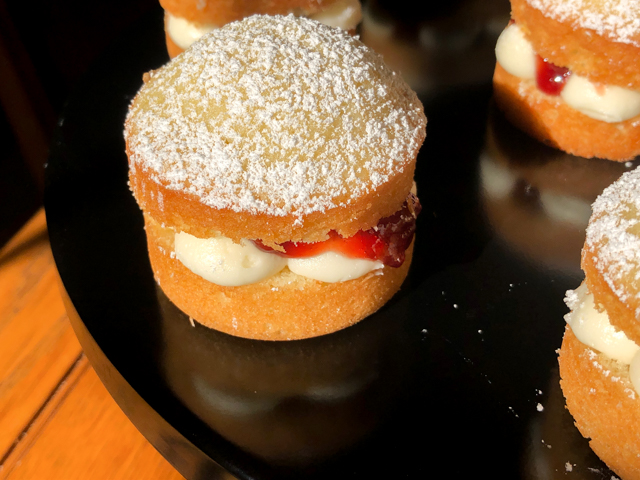
Leave the cakes to cool in the tin for 5 minutes and then ease out onto a wire cooling rack and leave until completely cool. Cut each cake in half, and pipe the whipped cream onto the bases, in dots. Drizzle the jam over the buttercream dots, place the sponge tops on and lightly dust the cakes with icing sugar.
Comments: I had to play around with the recipe a bit to get it right, adjusting the baking powder amount and not filling the mold to the top, so that the doming was just right. It was a huge hit with our departmental colleagues, I got several emails about it. The cake is tender and moist. The original recipe called for American buttercream for the filling, but I decided to go with whipped cream, stabilized with gelatin. Follow the recipe from this link. For the pan, I used this one. At the time I bought it on ebay, but could not find it available right now.
I think whipped cream is less sweet and makes the cake feel a bit lighter, but if you prefer to go with buttercream, follow the original recipe in the link I included.
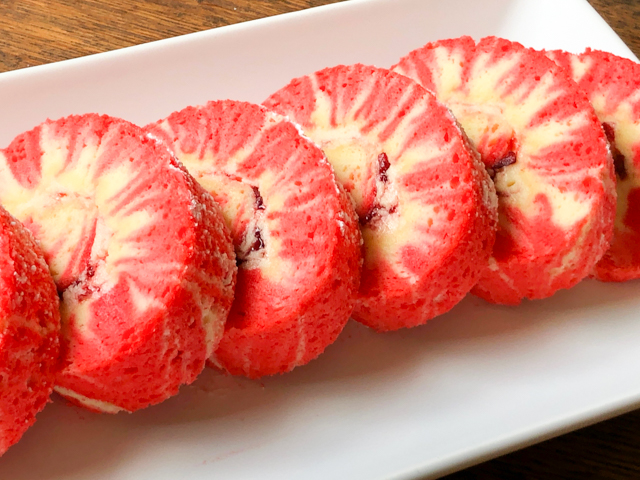
Last month I was watching a video on youtube and on the side bar a little cake got my attention because it was so whimsical. I clicked on it and found out it was the so-called Hurricane Roll. I have no idea who “invented” it, but most are made by Oriental bakers with the patience of Buddha. Patience, I don’t have, but still decided I had to make one. To make a long story short, I confess that I made FIVE. Not because they were nice and easy, but because the first three attempts did not give me the desired hurricane effect. At most, I got a tropical storm. I learned a lot during the process of trial and error, and will share with you the recipe and method that finally worked well for me.
RED HURRICANE ROLL WITH MORELLO CHERRY FILLING (from the Bewitching Kitchen)
for a 10 inch square cake
for the meringue:
110 g sugar
6 egg whites
pinch of cream of tartar
for the cake batter:
110 g milk
80 g butter, melted
85 g cake flour
15g dry milk powder
1/8 tsp vanilla paste
1/8 tsp salt
6 egg yolks
raspberry flavor from Amoretti (optional)
red gel food color
Morello cherry jam for filling (or any other filling you like)
Spray a 10-inch square pan with baking spray and cover it with parchment paper.
I use a handheld mixer to make the batter, so I start with the meringue. Whisk the egg whites with cream of tartar until it gets foamy. Add the granulated sugar very slowly and whisk to soft peaks. Reserve.
No need to wash the beater, move on to make the egg yolk component. Whisk the milk with the melted butter and vanilla in a bowl. Sieve the dry ingredients on top, whisk gently until fully combined. Add one egg yolk at a time, whisking well after each addition. Remove 135g of this batter to another bowl, add 1 tsp raspberry flavor and red food dye to taste. To this bowl, add 100g of the reserved meringue and fold gently. Place in a piping bag, no need for piping tip. Reserve.
Add what is left of the meringue to the white cake batter, and fold gently. Pour into the prepared pan – add gently the red batter on top to cover it completely, you can use an offset spatula to help even the surface.
Now do the hurricane effect. I used the handle of a wooden spoon, making stripes all over the pan back and forth horizontally, with the handle all the way into the bottom of the batter. Move it slowly. Then do the same thing in the other direction, perpendicular to the first. Bang the pan gently to release bubbles and even the surface.
Bake at 325F for 10 min, reduce temperature to 300F and bake for 25 minutes longer, but check the center of the cake so that it does not over-bake and gets dry. Remove from oven, wait 2 minutes and invert the cake on a towel sprinkled with powdered sugar. Trim the edges that tend to get too dry and interfere with rolling. Roll while warm, let it cool. Unroll, spread jam (or any filling you like), and roll back again. Place in the fridge for a couple of hours before slicing. If all went well, you should see a nice color effect due to the partial mixing of both colors.
Comments:The recipes I tried before failed to mix properly. Still made delicious cakes, but I was left with a simple roll cake like this one, made with lemon flavor and pitaya powder (clearly did not use enough, there was barely any hint of color in the second batter after baking).
Another attempt produced what I called a “Tropical Storm” effect, in which the hurricane was almost there but not fully… In this case I went with a classic vanilla/cocoa combination, and the filling was Chocolate Russian buttercream.
If you are familiar with Swiss roll cakes, you might find the method I used a bit strange, as the egg yolks are added in the end, without any intense whipping to generate more volume. There is actually a reason for it. If you do a regular batter, it will be denser, and the two colors will not mix properly. The other thing to keep in mind is that you need to be aggressive mixing the batters in that criss-cross pattern. Insert the handle all the way to the bottom (you can use a knife, chopsticks, a very small spatula also works), and work your way slowly as shown in the drawing above.
if you do that you will be rewarded with a nice effect that will become evident the moment you cut the edges. I’ve been playing quite a bit with this technique so expect a few more rolls coming on the blog soon. Apart from the hurricane effect, there is a lot you can do with two colors of cake batter. I wish I had kids around, it’s the type of bake that they would love to play with.
Disclaimer: no, we did not eat five roll cakes. I often get asked how come we don’t weigh a ton with all the sweets around. Everything I bake is donated to Common Table on Fridays. Most things I try a little bite for quality control, but that is about it.
The last time I made a dessert for the two of us was…
Valentine’s Day!
Common Table of August 08th, 2020
(I bet you are you not surprised that I keep photo records of all my weekly bakes)