GIBASSIER

Those who follow my blog might be aware that I am a huge fan of Helen Fletcher. When she praises a recipe, I just know it will be awesome. Still, this one surpassed all my expectations. Gibassier is a little brioche-like delicacy from Provence, a place that enchanted me when I visited many years ago, right during lavender harvesting season. I will never forget the fields and the intense but delicate lavender aroma present everywhere. Helen’s recipe is a breeze to make  using the food processor, but she also gives detailed instructions to make it in a regular mixer.

GIBASSIER
(from Pastries Like a Pro)

Preferment (Biga):
140 g bread flour
1/2 cup warm milk (about 105°F)
Large pinch of instant yeast

Stir together in a small bowl.  Knead several times to make a smooth ball.  Let sit at room temperature for 12 to 18 hours.

Gibassier Dough:
385 grams bread flour
6 tablespoons unsalted butter, cold (85 grams)
100 grams granulated sugar or 3 1/2 ounces)
2 + 1/2 teaspoons instant yeast
3/4 teaspoon salt
Orange zest from l medium navel orange
All of preferment from above
2 eggs
1/3 cup olive oil
1/4 cup water, divided
1/4 tsp Fiori di Sicilia (optional)
2/3 cup candied orange rind

Place the flour in the processor and pulse several times.  Cut the cold butter into pieces and arrange in a circle over the flour. Process until the butter is no longer distinguishable.

Add the sugar, yeast, salt, zest, and Fiori di Sicilia.  Pulse to incorporate. Tear the preferment into pieces and add it processor.  Process to fully incorporate.

Combine the eggs, olive oil, and half of the water. Pour over the dry ingredients and process to mix completely.  Scrape down and rearrange the dough if necessary.  The dough should be very soft.  Add water a teaspoon at a time if necessary (I did not use additional water).  Add the candied orange rind.  Pulse briefly to mix.  Do not over mix or the  rind will be too small.

Let the dough proof at room temperature for 2 hours, then deflate the dough and transfer to the fridge overnight

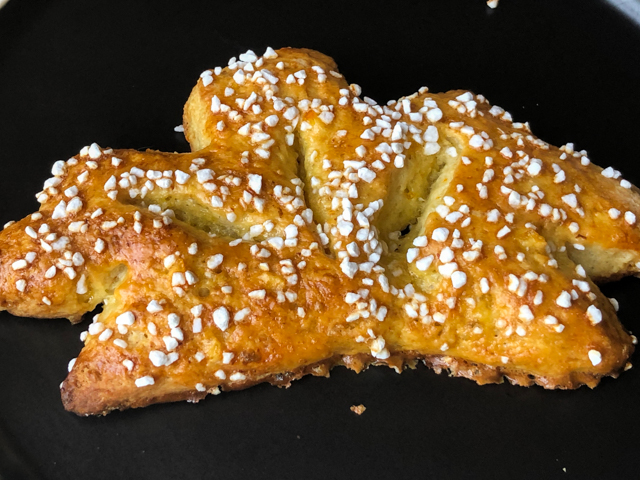
Shape the Gibassier.  Line two half-sheet pans with parchment paper. Turn the dough out. Weigh your dough and do the math to find out how many grams you should use to form each little dough. You should have enough for 14 gibassiers. In my case, I used 80 grams per little ball.  Shape all the balls, cover, and refrigerate to make it easier to cut them.  Take two or three out at a time so they don’t soften too much. Take a ball and stretch it out with your fingers to make a rough torpedo shape. Turn it so the best side is up.  With the heel of your hand press the top of the dough upward from the middle. Again from the middle of the dough, with the heel of your hand press the dough downward to form a lemon shape.  Flatten the ends to match the center. It shoud be abut 2 1/2 ” high.

With a single edge razor blade, make a cut in the middle of the dough.Then one to the left. One to the right. Along the right side of the top of the dough cut in toward the center about 3/4” to 1”. Again on the other side. Last cut in the same amount on the right side. And on the left. As you pick it up to put it on the sheet pan, stretch it out to enlarge the holes.  Place 7 on a tray.

Cover them and allow them to rise for 2 to 2 1/2 hours until puffy.

Heat the oven to 350F. While the oven is heating brush 2 or 3 of the rolls with the egg wash and sprinkle heavily with sanding sugar or pearl sugar. Bake one sheet at a time on the middle rung for 18 to 22 minutes until golden brown and baked through.

Serve warm or room temperature.

ENJOY!

to print the recipe, click here

Comments: If you’d like to make Gibassier, I urge you to stop by Helen’s site because her step-by-step photos are perfect to understand what needs to be done. Explaining just with words is a bit tricky. If you make it in the food processor, it will be easy to make just half the recipe, as the processor will handle it without issues. Everything comes together super quickly, and I like the fact that I could use butter straight from the fridge.

Some people suggest using an old credit card to do the cuts on the dough, but Helen’s idea of getting those single edged razor blades is truly spot on. I advise you to allow the final proofing to reach the 2.5 hour mark or even a little big longer as enriched doughs tend to be a bit sluggish. The puffier they get at that stage, the lighter the rolls will be. I had to cut my final proofing a bit short for half of them, and the second batch was better.


This is the type of pastry that will transport you straight to a cafe in France, sitting outside, people-watching, as you sip a little hot chocolate, coffee, or whatever suits your mood…

Helen, thank you once again not only for the inspiration but for your detailed instructions that make it all so much easier to follow.

ONE YEAR AGO: Sundried Tomato Twist Bread

TWO YEAR AGO: And now for something completely different….

THREE YEARS AGO: Parsnip, Coconut, and Lemongrass Soup

FOUR YEARS AGO: In My Kitchen, October 2016

FIVE YEARS AGO: Paleo Moussaka

SIX YEARS AGO: In My Kitchen, October 2014

SEVEN YEARS AGO: In My Kitchen, October 2013

EIGHT YEARS AGO: Crimson and Cream Turkey Chili

NINE YEARS AGO: Taking a break from the nano-kitchen

TEN YEARS AGO: Chocolate Chip Cookies

TAKING A BREAK FROM THE WILD

I’ve always been fascinated by bread baking. For years I would read books and blogs, but get discouraged because the breads I fell in love with were all made with a sourdough starter. You know, that wild yeast thing.  I would close the book, click away from the site, telling myself “why can’t they bake bread with regular yeast, like normal people?”  It was so frustrating!  Of course, if you follow my blog, you’ll know that now I love to walk on the wild side…  😉   Like many bread bakers, using commercial yeast almost feels like cheating. But, a bread leavened just with instant yeast can be amazing too. In this recipe, 80% of the formula comprises flour fermented overnight with a small amount of yeast.  It comes from Flour Water Salt Yeast, by Ken Forkish.
ready

WHAAAT? NO RECIPE?

Here’s the deal: I sent a couple of messages to Mr. Forkish asking his permission to publish the recipe, but got no answer. Of course, it’s quite possible he never checks his Facebook account.  I know many people who don’t even remember having one!  😉   Without his permission, I don’t feel it is right to include the recipe. You can read more about this subject at the end of my post.

If you want to try his method, you can click here for a great variation on his recipe that includes barley flour in the formula. The technique is exactly the same, though. I intend to make it myself soon, as I am quite fond of barley flour.

photo(1)

Comments: Of all breads I’ve made, this one was by far the loudest singer.  The noises it made while it sat on the counter, cooling, were unreal!  Interestingly, Jane, the blogger behind The Wayward Oven, had this to say about her version of Forkish’s White Bread with 80% BIGA:

“It had a wonderful aroma and the crackling as it cooled was so loud I could – no exaggeration! –  hear it across the room.”

Yeah, that was exactly the case!   I also loved Forkish’s approach of letting the bread rise with the seam side down, and then invert it for baking, without scoring the crust. The bread opens in a natural,  more rustic-looking way.  This bread has a double personality:  the taste and crust of a regular sourdough, and a crumb with the softer texture usually found in breads made with commercial yeast.  Quite an interesting combination!

shot2_opt

I am submitting this post to Susan’s Yeastspotting

And now, for something completely different…

When I started blogging, I did not give too much thought about publishing recipes from cookbooks. I changed the wording around, gave credit, and felt it was good enough.  As time passed, my views on the issue started to change, in part because I learned that some cookbook authors are completely against having their recipes out in the blogosphere, even if proper credit is given.  Then, my virtual friend Joanna published a thoughtful article on her blog, and that pretty much did it for me.  Ever since I read her post, I decided not to transcribe a recipe from any cookbook here, unless I get permission from the author, which unfortunately is not always that easy.  

If I adapt a recipe, I will publish it and link to the “inspirational source”. In fact, that is a practice considered ok by copyright laws. A very good article on the whole subject was written by David Lebowitz and is available here.  As to recipes published in food magazines,  Fine Cooking editors told me they do not mind their recipes being published as long as a link is provided to the source.  And other magazines –  such as Food and Wine, Bon Appetit, Saveur, Cooking Light – have their content online for public access, so it is not a problem to blog on them.

ONE YEAR AGO: Zucchini-Spinach Soup

TWO YEARS AGO: Pollo en Mole en Cacahuate

THREE YEARS AGO: Thom Leonard’s Country French Bread

CIABATTA, A CLASSIC ITALIAN BREAD

I’ve made it before during the Bread Baker’s Apprentice Challenge, but was not very happy with the way it turned out.   Hard to believe that it took me 17 months to bake another batch, but time tends to fly by me.   November?  Are we in November already?  What happened to 2010, that started just the other day?   😉

Ciabatta, take two: the recipe from  “The Italian Baker” calls for a mixture of flour, water, and yeast made the day before (the “biga“), and used as part of the final dough.  A total fermentation time of 3 hours allowed us to have the bread in time for lunch, as it bakes very quickly, less than 25 minutes.   I am quite pleased with this recipe, I suppose that it would work even better in a real oven, but my Breville rose to the challenge!

CIABATTA
(from The Italian Baker)

for biga:
1/8 tsp active dry yeast
1 cup + 1 Tbs water at room temperature
1 + 1/4 cup all purpose flour (165 g)

Dissolve yeast in water, add the flour and form a sticky dough.  Leave it covered at room temperature for 16 to 24 hours.

for the final dough:
2.5 Tbs milk
1/2 tsp active dry yeast
5.5 ounces water (1/2 cup + 1.5 Tbs)
1/2 T olive oil
1 cup biga (250 g)
250 g all purpose flour
1/2 Tbs salt (7.5 g)

If kneading in a mixer, stir the yeast in the milk  and let it stand for  a  couple of minutes in the bowl.  Add the water, oil, the biga, and mix to incorporate, dissolving the biga in the liquid. Add the flour and salt, and mix at low speed for a couple of minutes.   Change to the dough hook and knead 2 minutes at low speed, and 2 minutes at medium speed.  Finish kneading by hand on a well-floured surface, but adding as little extra flour as possible.

Place the dough in an oiled bowl, cover, and leave at room temperature for 1 hour and 15 minutes.  Divide the dough, which will be very soft and bubbly, in two equal pieces.  Place each half on a well floured piece of parchment paper, and shape each as a cylinder, keeping the seam side down.  Stretch it gently to give the ciabatta overall shape (a rectangle of 10 x 4 inches), and use the tip of your fingers to make deep dimples all over the dough. Cover with a damp towel and let them rise for 1.5 to 2 hours.

Bake in a pre-heated 425 F oven, spraying the bread with water three times in the first 10 minutes.   Total baking time should be 20 to 25 minutes.   Cool the loaves on a rack, and…

ENJOY!

to print the recipe, click here

Comments:  Carol Field advises against kneading this dough by hand, because it is very hard not to add more flour to prevent it from sticking.  However, if you are familiar with the way a high hydration dough behaves,  go ahead and give it a try.  Keep in mind that the less extra flour you add, the better.   She also keeps the seam side up during rising, which forces her to invert the dough on the baking sheet (or stone).  I prefer to shape them seam-side down, then transfer them gently to the oven with the parchment paper still underneath. I think that this method minimizes deflating the dough.

We enjoyed our ciabatta with mozarella and ham for lunch, and at dinner it complemented spaghetti with meatballs that shall be the subject of a post in the very near future (they were AWESOME!)…

I am submitting this post to Susan’s Yeastspotting event…

ONE YEAR AGO: Lamb Stew with Parsnips, Prunes and Chickpeas

Add to FacebookAdd to DiggAdd to Del.icio.usAdd to StumbleuponAdd to RedditAdd to BlinklistAdd to TwitterAdd to TechnoratiAdd to Yahoo BuzzAdd to Newsvine

BBA#29: PUGLIESE

Pugliese, as the name indicates, is a bread typical from Puglia, a region in the south of Italy. The bread is supposed to be quite crusty, perfect for olive oil tasting. Peter Reinhart’s recipe, like many others in the book, calls for a biga, prepared the previous day, and placed in the fridge overnight. For reasons absolutely out of my control, my biga stayed the whole night at room temperature instead of going to sleep in the fridge. I debated whether to go ahead with the recipe or start all over, but decided to go for it.

Other than forgetting to put the biga in the fridge… 😉  I had no issues with the recipe.  But, maybe my mistake contributed to a crumb texture a lot tighter than that shown on the book.  Still, it tasted very good, a little chewier than a regular Italian bread.   Once the BBA Challenge is over, I will revisit this recipe for sure!

Check out my fellow bakers’ take on Pugliese, by visiting:

Txfarmer’s blog here,

Oggi’s blog here

BBA#28: POTATO ROSEMARY BREAD

One more bread following along with the “Bread Baker’s Apprentice Challenge, the group project in which bakers make every single recipe from Peter Reinhart’s book, in the order they are published.

Potato Rosemary bread: I was looking forward to this one. Homemade bread has plenty of wonderful qualities, but often tastes best on the day it is baked, because contrary to its commercial counterparts, it has no preservatives.   However, something quite interesting happens once you add potato, or even potato cooking water to bread dough: the potato starch molecules “trap” water, and as a result, the bread stays fresh longer.   It will not lose moisture as fast as a regular bread.

Peter Reinhart’s recipe calls for a biga – a stiff mixture of flour, water, and yeast that ferments overnight – as part of the dough, that also contains a small amount of commercial yeast, flour, mashed potatoes, chopped rosemary, black pepper, and salt. Instead of kneading I folded the dough at 20, 60, and 90 minutes.  After two hours I formed a “boule”, and allowed it to rise 2 more hours.  My other modification was to bake it with steam, that is, I baked it for 30 minutes covered with a roasting pan, then removed the cover,  and allowed it to bake for ten more minutes. The internal temperature of the bread was a little higher than 200F at that point.

Here are some photos of the process…

Slashing for this kind of bread is optional, but I like to practice my skills with the baker’s blade…   😉

Large, uneven holes, a vision that makes me very happy…

Time for lunch!   Everyone is invited…

Some of my fellow bakers already made this bread, please visit their sites following the links:

Paul loved this bread, particularly how wonderful it made his home smell during baking (the same happened in our home)

TxFarmer, as usual, does a great job shaping her bread in unique ways, I love to visit her blog, even if my Chinese skills are not up to par to read the text. Maybe one day… 😉