SECRET RECIPE CLUB: RUSTIC CIABATTA AND MINI-MEATLOAVES

FOUR YEARS AS A MEMBER OF THE SECRET RECIPE CLUB!
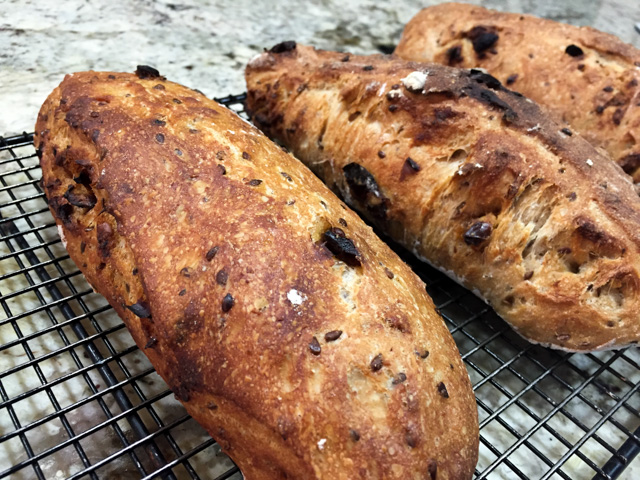
Rustic Ciabbata with Dates.
It’s that fun time of the month again, Reveal Day of The Secret Recipe Club, a virtual event in which food bloggers are assigned a site in secret, then blog about a chosen recipe at midnight of Reveal Day. In two words: incredibly awesome. But what is more awesome than that is the blog I got this month. I almost passed out from excitement, thrill, and joy. Why? Because my assigned site is one of my favorites in the whole food blogosphere: Karen’s Kitchen Stories. Just to make an analogy, if blogging was like acting, my Secret Acting Club assignment would be Meryl Streep. Yeap, that awesome!   I’ve been reading Karen’s blog forever, I consider her as one of my personal gurus in bread baking. She is the type of baker who is not afraid to push the limits, moving easily from tangzhong type breads to bialys, baguettes, all sorts of rustic sourdoughs, Pullman type loaves, really amazing what she can do with flour, water, salt, and yeast, often wild (the yeast, not her).  At my last count, she’s got 247 bread recipes in her blog. Two hundred and forty-seven. You can collect your chin off the floor now. I bookmarked so many recipes that it was not even funny. Just to give you a small sampling of the breads that tempted me: Cheese and Herb Happy Bread,  Cinnamon Swirl Pumpkin Rolls , Corn and Jalapeno Rolls (oh, my!), English Muffin Bread (I really need to make this one!), Tangzhong Whole Wheat Bread (very interesting method), Kesra Moroccan Flatbread, Hawaiian Style Sweet Rolls (reminds me of my childhood in Brazil), Stuffed Pretzel Bites (O.M.G.!). Of course, that doesn’t include the breads from her site I already made like the delicious Ka’Kat. or Forkish’s Warm Spot Sourdough. But of course there’s a lot more than bread in her blog. For instance, if you like stir-fries, she has a section on Wok Wednesdays that is a must-follow, holding so far 57 entries.  The bottom line is, I had no choice but to make two recipes from her site. A rustic ciabatta, because it would be almost rude not to choose a bread from Karen’s blog, and some mini-meatloaves because they looked so incredibly cute, I could not stop dreaming about them…
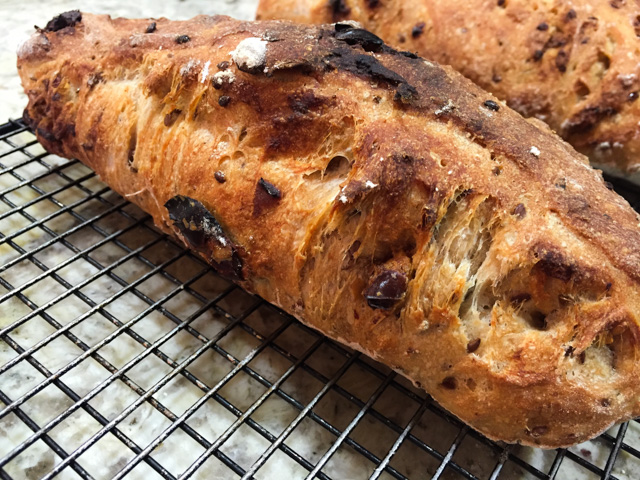
Ciabatta Dates Flax2

RUSTIC CIABATTA WITH DATES AND FLAX SEEDS
(from Karen’s Kitchen Stories)

for the soaker:
48 grams flaxseeds
72 grams (1/3 C) water
 .
for the poolish:
125 grams unbleached bread flour
125 grams (1/2 C) water
pinch of instant yeast
 .
for the final dough:
278 grams (~1 1/4 C) water
All of the poolish
300 grams unbleached bread flour
50 grams coarsely ground whole wheat flour
25 grams coarsely ground rye flour
10 grams (1 3/4 tsp) salt
2 grams (~ 3/4 tsp) instant yeast
All of the soaker
84 grams dried dates, seeded previously, cut into 1/2 inch pieces
 .
The night before baking day, mix the soaker and poolish in separate bowls. Cover both bowls with plastic wrap. Leave enough room in the poolish bowl for it to double in size.
.
The next day (about 12 to 16 hours later), measure the 278 grams of water into a large bowl or dough rising bucket. Add the poolish, and mix it into the water with your hand to break it apart. Add the flours, salt, and yeast, and mix the dough with your hands, stirring, pinching, and folding the dough to absorb all of the flour and dissolve the salt and yeast. When you pinch the dough, you should not feel any grit.
.
Once all of the ingredients are combined, mix in the soaker with your hand until evenly distributed. Add the dates, and mix to distribute. Cover the bowl with plastic wrap and let rise in a warm spot.
.
After 45 minutes, stretch and fold the dough over itself from all four “sides.” Repeat the 45 minute rest followed by a stretch-and-fold two more times (a total of 3 stretch-and-folds).  Let the dough rest for a final 45 minutes, covered, in a warm spot.
.
Scrape the dough out onto a lightly floured counter, and gently nudge it into a rectangle. Be careful not to deflate the dough. Using an oiled bench knife, cut the dough into three equal pieces. Pick each piece up with floured hands and place it on a floured couche or parchment lined baking sheet. Cover with the rest of the couche or oiled plastic wrap.  Let the dough rest for 20 minutes, while you heat the oven to 475 degrees F, and set it up with a steam pan on the lowest rack and a baking stone directly above it. Fill a spray bottle with water.
 .
When the oven is at the correct temperature, transfer the loaves to the baking stone (see notes above, or place the baking sheet with the loaves on it in the oven). Place a cup of boiling water in the steam pan (cover your oven’s window), and spray the oven walls with water. Quickly close the door.  Bake the loaves for 25 to 30 minutes, rotating halfway through. They are done when the internal temperature reaches 200 to 210 degrees F. Cool on a wire rack.
.

ENJOY!

to print the recipe, click here
.

ciabattacollage
.
Comments:
I made this bread in one of those perfect Saturdays!  Why? Because I woke up before 5am feeling super energetic, could hardly wait to get downstairs and play with my ingredients already measured since the evening before.  During the first 45 minutes rise I did a nice P90X yoga while the house was still dark, peaceful and silent…  As in a perfectly timed symphony, just as I finished my exercises, Phil woke up and made me a fantastic cappuccino…. the dogs immediately joined us in welcoming the weekend…Told ya: perfect Saturday!
.
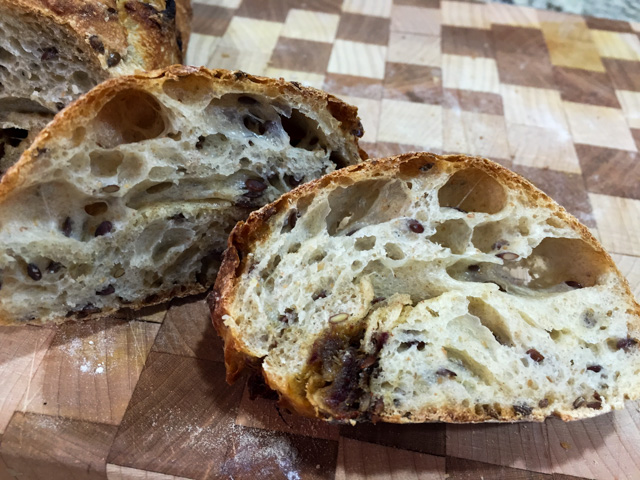
Back to Karen’s ciabatta: the dough was a pleasure to work with, gaining strength at each folding cycle. In the composite photo above, the dough is shown after the last folding cycle, all plump and shiny.  I used whole flaxseeds, Karen used ground, but I followed the exact same method, including the volume of water to make the soaker. You can use whatever type of flaxseeds you have in your pantry.  Most important thing is not to deflate the dough too much as you coach it into the ciabatta shape. The less you mess with it, the better.  You will be rewarded with a ton of holes, a very airy bread, comme il faut.
.
Crumb shot
.

We both loved this bread! The dates offer a burst of sweetness that plays well with the almost sour nature of the dough given by the extended fermentation of the poolish.  Cut a slice, toast it very very lightly, top it with some Gorgonzola and you will have to tie yourself to your seat not to fly away in a magic carpet….   Awesome combo.

 +++++++++++++++++++++++++++++++++++++++++++++++
 .

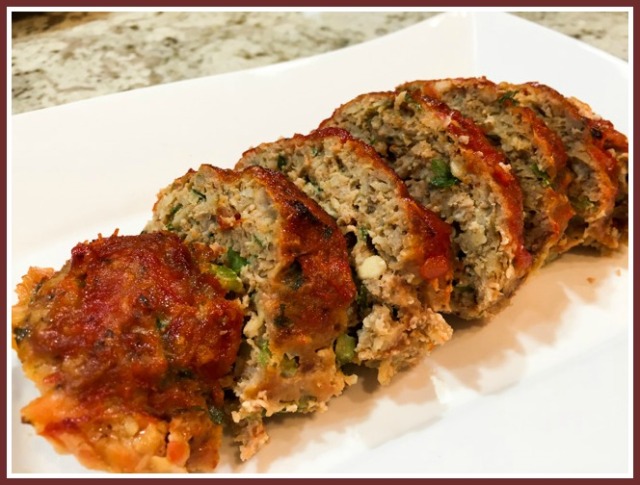
And now, for the bonus recipe from Karen’s site…  Adorable meatloaves in individual servings.  Her recipe used beef, I changed it slightly by using ground turkey.
miniloaves served11
.
INDIVIDUAL MEATLOAVES WITH CHILI SAUCE

(adapted from Karen’s Kitchen Stories)
.
1 shallot, coarsely chopped
1 rib celery, diced
1/3 cup packed flat leaf parsley leaves
4 slices of bacon, cut into 1/2 inch slices
2/3 cup rolled oats
1/4 cup boiling water
1 pound 85% lean ground turkey
1/4 pound ground pork
2 large eggs
1 1/2 tsp Kosher salt
3/4 tsp freshly ground black pepper
1 cup jarred chili sauce, such as Heinz
 .
Spray a half sheet pan with spray oil and heat the oven to 400 degrees F. In a food processor, pulse the shallot, celery, parsley, and bacon several times until well chopped.  In a large bowl, combine the oats and boiling water and stir. Add the mixture from the food processor and combine.
 .
Break up the ground turkey and pork and add them to the large bowl. Whisk the eggs and add them to the meat and oat mixture. Sprinkle with the salt and pepper. Add 1/4 cup of the chili sauce to the meat mixture. Mix with your hands until everything is well mixed.
 .
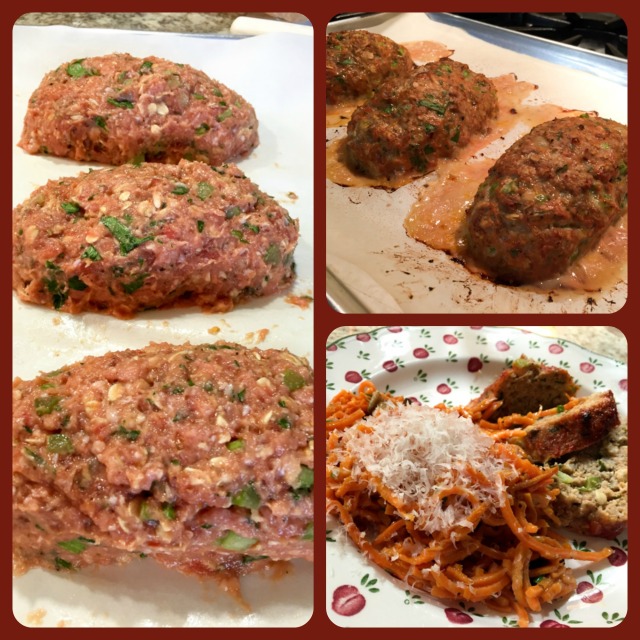
Divide the mixture into four equal parts and shape each into a small loaf, placing them onto the baking sheet. Take 1/2 cup of the chili sauce, and brush it over the four loaves.  Bake the loaves on the center rack for about 25 minutes. Remove the pan from the oven and brush the loaves with the rest (1/4 cup) of the chili sauce. Turn on the broiler, and place the pan back on the center rack. Broil for about 5 minutes, until the chili sauce just begins to brown.
.
ENJOY!
.

to print the recipe, click here
 .

PicMonkey Collage11

.
These meatloaves were sooooo good!  The chili sauce is a must, do not skip it. They turned out moist, flavorful, spicy but not overly so. I served them with sweet potato noodles that were recently published in my guest post over at Foodbod. The recipe made 3 loaves and we enjoyed them for dinner, then I had leftovers for my lunch a couple of days in a row. Heaven. Just heaven. If I may make a public confession, I had some slices straight from the fridge. Cold. Yeah, standing up, with a Jack Russell staring at me wondering how long it would take for Newton’s Law of Gravity to work its magic in his favor. HA!  Not a chance!

Karen, I hope you enjoyed your assignment this month. It goes without saying that I spent the past 4  weeks anticipating this Reveal Day, anxious to share the recipes I made from your blog. For my readers, if you don’t yet know Karen’s Kitchen Stories, stop right now and go pay her a visit.  Not only she is a great baker and cook, but a very cool person with great sense of humor and wit.  Plus, she is the Grandma of two beautiful boys, and lucky to live very close to them, so it’s easier for her to spoil them rotten.  I intend to follow her footsteps and do my best to spoil Greenlee at every chance I get…   Maybe one day I can teach Greenlee to bake a chocolate cake for her Dad too. Oops, did I just use “teach” and “bake a cake” in the same sentence?  Excuse me while I go grab a thermometer. I might be running a very high fever… (sigh)

ONE YEAR AGO: Green Rice

TWO YEARS AGO: Potato-Crusted Italian Mini-Quiches

THREE YEARS AGO: Beetroot Sourdough for the Holidays

FOUR YEARS AGO: Cod Filet with Mustard Tarragon Crust

FIVE YEARS AGO: Soba Noodles: Light and Healthy

SIX YEARS AGO: Potato-Rosemary Bread

PANE DE CASA & CROSTINI

We were invited for a dinner party last Saturday, and I asked the hostess if I could take some homemade bread. Keep in mind that she had just returned from Paris and would be serving us, her lucky guests, an assortment of cheeses brought straight from the City of Light.  My mind was already set on this great post by Celia with a step-by-step tutorial for making her “pane de casa,” a variation of ciabatta. It seemed like a perfect option for the occasion.  Celia experimented and optimized a recipe that includes semolina flour in the dough with great success!  All I had to do was to follow in her footsteps…  😉

CELIA’s PANE DE CASA
(from Celia, Fig Jam and Lime Cordial blog)

500g (3½ cups) bakers/bread flour
500g (3½ cups) fine semolina (durum wheat) flour
7g (1¾ teaspoons) dried/instant yeast (or one sachet)
18g (2¾ teaspoons) fine sea salt
750g (3 cups) fridge cold water
rye flour, for dusting

In a large mixing bowl, whisk together the flours, yeast and salt.
Add the cold water, and mix the ingredients together to form a sticky dough. Really squelch the mix through your fingers until evenly combined. Scrape off your hand and cover the bowl with a towel. Allow to rest for 15 minutes.

Give the dough a quick knead in the mixing bowl – after the short rest time it will have relaxed a little. Just fold it over itself a dozen or so times, and then scrape your hand off again and cover the bowl with plastic wrap. Allow to prove until well risen – this might take up to three hours depending on your kitchen conditions. In our kitchen the dough was ready in a little over 2 hours. It should be very airy and full of bubbles, almost fully doubled in size.

Heat the oven to 480 F (220 C). If you are using pizza stones, place them on the racks to heat up, and tear off four sheets of parchment paper. If you do not have pizza stones, line a couple of baking trays with parchment.

Heavily dust the bench and your hands with rye flour, then scrape the dough out gently – be careful not to knock all the air out of it. Fold the top of the dough into the middle, and then fold the bottom over to enclose it, forming a long rectangle. Keep your hands well dusted with rye flour, and use your scraper if necessary to help you handle the dough. Dust the top of the dough with more rye flour, then using your scraper, cut the dough into four roughly equal pieces. Dust your hands again with rye flour. Pick each piece of dough up by the ends, give it a little stretch, and then place it on a sheet of parchment to go onto the pizza stones, or onto the lined baking tray.

Spray the top of each loaf with a little water. Turn the oven down to 425 F (220 C) and put the loaves in to bake for 20 minutes. Then rotate the loaves (if you’re baking on stones, remove the parchment now) or the oven tray, and lower the heat to 350 F (125 C). Bake for a further 15 minutes, or until the loaves are crusty and hollow-sounding when tapped.

To make the crostini:
1/4 cup olive oil
pinch of dried herbs of your choice (I used herbes de Provence)

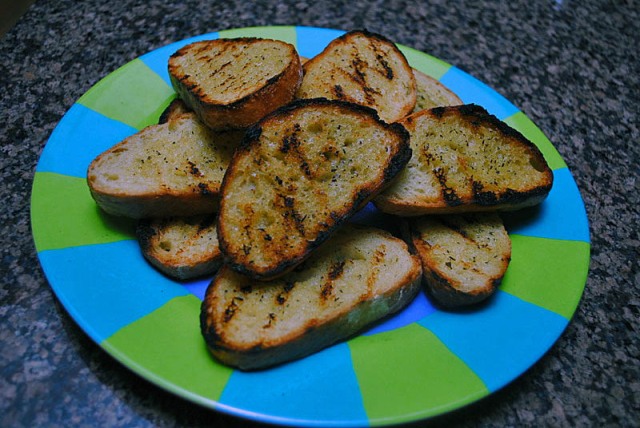
Mix the olive oil with the herbs.  Once the bread is completely cold (or next day), cut it in slices 1/4 inch thick. Brush the oil very lightly on both sides of the bread, and grill each side until nice marks form.  Give each slice a slight turn  after a couple of minutes to produce a crisscross pattern.

ENJOY!

to print the recipe, click here

Comments:  As you can see in the photo, two of my loaves ended up lighter and the crust opened almost as if the bread had been scored (it had not). Those were baked exactly as Celia did, spraying a little water on the surface.  The other loaves were baked under an inverted roasting pan previously filled and empty of hot water to generate steam in the initial 20 minutes of baking.   The difference in the crust was quite amazing!   For this type of bread, I prefer the ones baked uncovered.  Their taste was very similar, and so was their crumb structure.

In theory, crostini is simply a toasted bread and could be made in the oven, but for me nothing beats the taste and texture provided by grilling.  The use of herbs is optional, I made half of our crostini plain, so we could have some flexibility with the different cheeses.

This is a wonderful bread, with a beautiful yellowish tint due to the semolina, that also makes it last longer than regular ciabatta. Even if you are a novice in bread baking, with Celia’s detailed instructions and photos, you’ll be able to bake it without problems.

I am submitting this post to Susan’s Yeastspotting

ONE YEAR AGO: Down-Home Dig-in Chili

TWO YEARS AGO: Cinnamon Rolls

Add to FacebookAdd to DiggAdd to Del.icio.usAdd to StumbleuponAdd to RedditAdd to BlinklistAdd to TwitterAdd to TechnoratiAdd to Yahoo BuzzAdd to Newsvine

CIABATTA, A CLASSIC ITALIAN BREAD

I’ve made it before during the Bread Baker’s Apprentice Challenge, but was not very happy with the way it turned out.   Hard to believe that it took me 17 months to bake another batch, but time tends to fly by me.   November?  Are we in November already?  What happened to 2010, that started just the other day?   😉

Ciabatta, take two: the recipe from  “The Italian Baker” calls for a mixture of flour, water, and yeast made the day before (the “biga“), and used as part of the final dough.  A total fermentation time of 3 hours allowed us to have the bread in time for lunch, as it bakes very quickly, less than 25 minutes.   I am quite pleased with this recipe, I suppose that it would work even better in a real oven, but my Breville rose to the challenge!

CIABATTA
(from The Italian Baker)

for biga:
1/8 tsp active dry yeast
1 cup + 1 Tbs water at room temperature
1 + 1/4 cup all purpose flour (165 g)

Dissolve yeast in water, add the flour and form a sticky dough.  Leave it covered at room temperature for 16 to 24 hours.

for the final dough:
2.5 Tbs milk
1/2 tsp active dry yeast
5.5 ounces water (1/2 cup + 1.5 Tbs)
1/2 T olive oil
1 cup biga (250 g)
250 g all purpose flour
1/2 Tbs salt (7.5 g)

If kneading in a mixer, stir the yeast in the milk  and let it stand for  a  couple of minutes in the bowl.  Add the water, oil, the biga, and mix to incorporate, dissolving the biga in the liquid. Add the flour and salt, and mix at low speed for a couple of minutes.   Change to the dough hook and knead 2 minutes at low speed, and 2 minutes at medium speed.  Finish kneading by hand on a well-floured surface, but adding as little extra flour as possible.

Place the dough in an oiled bowl, cover, and leave at room temperature for 1 hour and 15 minutes.  Divide the dough, which will be very soft and bubbly, in two equal pieces.  Place each half on a well floured piece of parchment paper, and shape each as a cylinder, keeping the seam side down.  Stretch it gently to give the ciabatta overall shape (a rectangle of 10 x 4 inches), and use the tip of your fingers to make deep dimples all over the dough. Cover with a damp towel and let them rise for 1.5 to 2 hours.

Bake in a pre-heated 425 F oven, spraying the bread with water three times in the first 10 minutes.   Total baking time should be 20 to 25 minutes.   Cool the loaves on a rack, and…

ENJOY!

to print the recipe, click here

Comments:  Carol Field advises against kneading this dough by hand, because it is very hard not to add more flour to prevent it from sticking.  However, if you are familiar with the way a high hydration dough behaves,  go ahead and give it a try.  Keep in mind that the less extra flour you add, the better.   She also keeps the seam side up during rising, which forces her to invert the dough on the baking sheet (or stone).  I prefer to shape them seam-side down, then transfer them gently to the oven with the parchment paper still underneath. I think that this method minimizes deflating the dough.

We enjoyed our ciabatta with mozarella and ham for lunch, and at dinner it complemented spaghetti with meatballs that shall be the subject of a post in the very near future (they were AWESOME!)…

I am submitting this post to Susan’s Yeastspotting event…

ONE YEAR AGO: Lamb Stew with Parsnips, Prunes and Chickpeas

Add to FacebookAdd to DiggAdd to Del.icio.usAdd to StumbleuponAdd to RedditAdd to BlinklistAdd to TwitterAdd to TechnoratiAdd to Yahoo BuzzAdd to Newsvine