KAREN’S BRAIDED LEMON BREAD WITH BLACKBERRIES

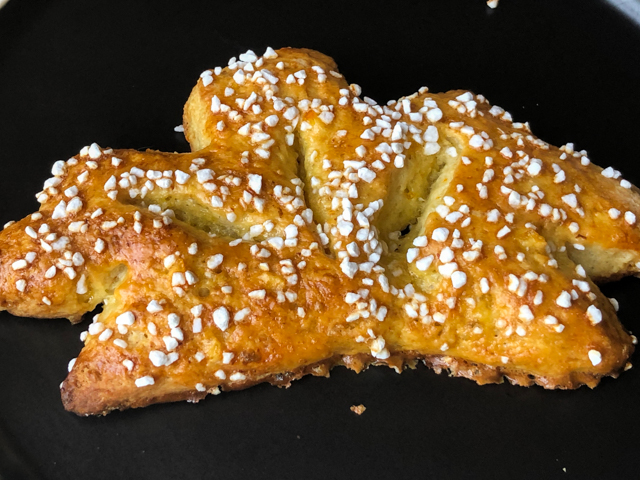
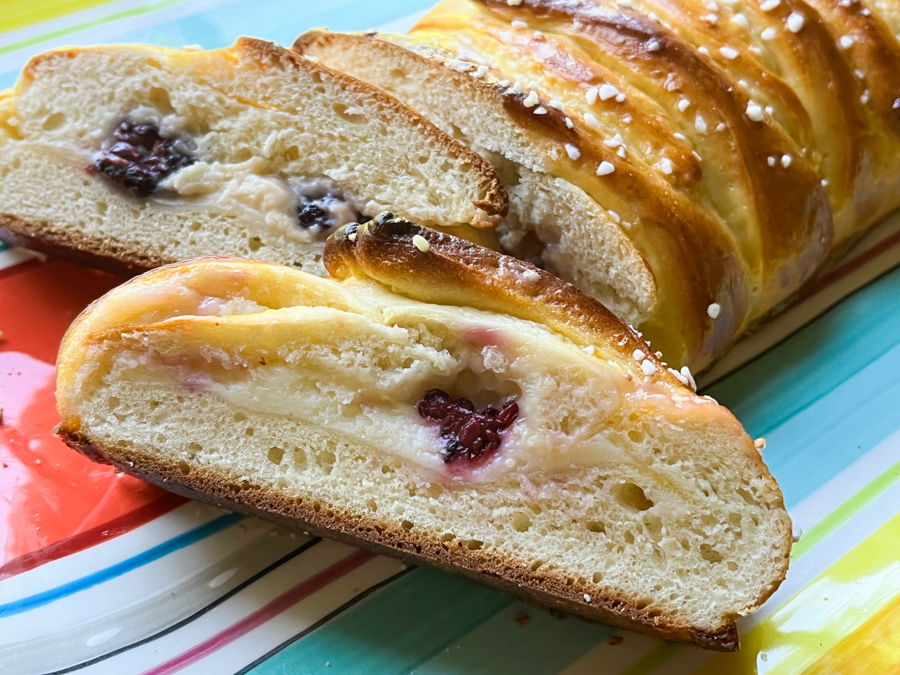
She posted. I read the post while away on a trip. Could not wait to get home to bake it. As far as enriched bread goes, you cannot get much better than this. Think brioche loaded with a tangy lemon cream and luscious blackberries. As I said, cannot get much better. THANK YOU, KAREN!

BRAIDED LEMON BREAD WITH BLACKBERRIES
(from Karen’s Kitchen Stories)


For the Sponge:
3 ounces warm water (95 to 105 degrees F)
1 teaspoon sugar
1 1/2 teaspoons instant yeast
30 grams unbleached all purpose flour

For the Final Dough:
All of the sponge
85 grams vanilla yogurt, room temperature (I used plain and added 1/2 tsp vanilla)
56 grams softened unsalted butter
1 large egg, beaten
50 grams sugar
1 teaspoon salt
1 teaspoon vanilla
300 grams unbleached all purpose flour
one beaten egg for the egg wash
pearl sugar for topping (optional, but nice)

For the Filling:
85 grams cream cheese, at room temperature
25 gram sugar
29 grams sour cream (I used creme fraiche)
1 tsp lemon juice
15 grams all-purpose flour
100 grams lemon curd
Handful of blackberries


Combine the sponge ingredients in a small bowl, stir, and cover with plastic wrap. Let it sit for 15 minutes.
In your stand mixer bowl, combine the sponge, yogurt, butter, egg, sugar, salt, vanilla, and flour. Mix with the dough hook for about 8 minutes. Place the dough in an oiled dough rising bucket or bowl, cover, and allow to rise for one to two hours, until doubled (mine took 2 hours and 30 minutes).

Mix the cream cheese, sugar, sour cream, lemon juice, and flour until smooth. Cover and set aside.
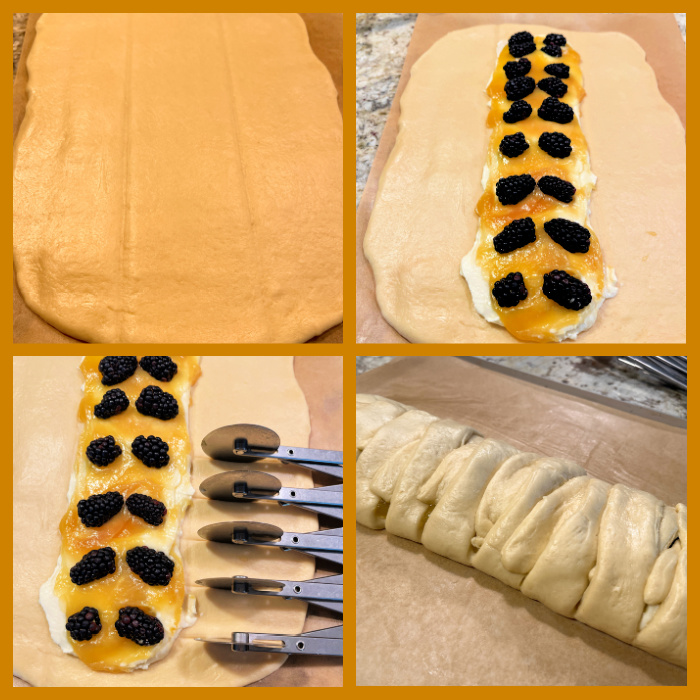
Line a cookie sheet with parchment paper. Place the risen dough not the parchment, and press or roll it into a 10 inch by 15 inch rectangle. Mark the dough lengthwise into thirds by pressing a ruler into the dough. Spread the cream cheese mixture onto the middle third, leaving about an inch uncovered at the top and the bottom. Spread the lemon curd on top of the cream cheese mixture. Top with the blackberries.

Cut the outer sides into strips. Cut off the strips from the four “corners” of the dough, leaving a flap at the top and bottom. Fold up the bottom flap and fold the strips over the filling alternating in a braid pattern. Fold the flap over the top before finishing the braid. Cover loosely with oiled plastic wrap.
Preheat the oven to 360 degrees F.


Let the dough rise for about 45 minutes. When the dough is ready, brush it with the egg wash and sprinkle it with the sugar. Bake for 25 to 30 minutes until a deep golden brown. Cool on a cooling rack for at least 20 minutes. Slice and serve.

ENJOY!

to print the recipe, click here

Comments: Make sure to stop by Karen’s post because her pictures and explanations are very detailed and will help you with the shaping. The dough is a pleasure to work with, as enriched doughs always seem to be. You can make the filling while the dough rises, and use store-bought lemon curd to make your life easier. Next time I will add more blackberries, I was afraid they would contribute too much moisture and leak too much, but that was not the case.

This basic method can be used for savory breads, or use different sweet fillings. Karen has a lot of suggestions in her article, so pay her a visit.

ONE YEAR AGO: Bulgur-Pork Tomatillo Platter

TWO YEARS AGO: Baking through the blogosphere

THREE YEARS AGO: Chickpea Burgers, Vegan and Delicious

FOUR YEARS AGO: Macarons with Ganache Noisette

FIVE YEARS AGO: Quiche with Asparagus and Fennel

SIX YEARS AGO: Fakebouleh

SEVEN YEARS AGO: Yellow Squash Soup

EIGHT YEARS AGO: Grilled Chicken with Tamarind and Coconut Glaze

NINE YEARS AGO: Chicken-Apricot Skewers

TEN YEARS AGO:  Asparagus Quiche

ELEVEN YEARS AGO: Two-stage Pea and Prosciutto Risotto

TWELVE YEARS AGO: Mellow Bakers: Corn Bread

GIBASSIER

Those who follow my blog might be aware that I am a huge fan of Helen Fletcher. When she praises a recipe, I just know it will be awesome. Still, this one surpassed all my expectations. Gibassier is a little brioche-like delicacy from Provence, a place that enchanted me when I visited many years ago, right during lavender harvesting season. I will never forget the fields and the intense but delicate lavender aroma present everywhere. Helen’s recipe is a breeze to make  using the food processor, but she also gives detailed instructions to make it in a regular mixer.

GIBASSIER
(from Pastries Like a Pro)

Preferment (Biga):
140 g bread flour
1/2 cup warm milk (about 105°F)
Large pinch of instant yeast

Stir together in a small bowl.  Knead several times to make a smooth ball.  Let sit at room temperature for 12 to 18 hours.

Gibassier Dough:
385 grams bread flour
6 tablespoons unsalted butter, cold (85 grams)
100 grams granulated sugar or 3 1/2 ounces)
2 + 1/2 teaspoons instant yeast
3/4 teaspoon salt
Orange zest from l medium navel orange
All of preferment from above
2 eggs
1/3 cup olive oil
1/4 cup water, divided
1/4 tsp Fiori di Sicilia (optional)
2/3 cup candied orange rind

Place the flour in the processor and pulse several times.  Cut the cold butter into pieces and arrange in a circle over the flour. Process until the butter is no longer distinguishable.

Add the sugar, yeast, salt, zest, and Fiori di Sicilia.  Pulse to incorporate. Tear the preferment into pieces and add it processor.  Process to fully incorporate.

Combine the eggs, olive oil, and half of the water. Pour over the dry ingredients and process to mix completely.  Scrape down and rearrange the dough if necessary.  The dough should be very soft.  Add water a teaspoon at a time if necessary (I did not use additional water).  Add the candied orange rind.  Pulse briefly to mix.  Do not over mix or the  rind will be too small.

Let the dough proof at room temperature for 2 hours, then deflate the dough and transfer to the fridge overnight

Shape the Gibassier.  Line two half-sheet pans with parchment paper. Turn the dough out. Weigh your dough and do the math to find out how many grams you should use to form each little dough. You should have enough for 14 gibassiers. In my case, I used 80 grams per little ball.  Shape all the balls, cover, and refrigerate to make it easier to cut them.  Take two or three out at a time so they don’t soften too much. Take a ball and stretch it out with your fingers to make a rough torpedo shape. Turn it so the best side is up.  With the heel of your hand press the top of the dough upward from the middle. Again from the middle of the dough, with the heel of your hand press the dough downward to form a lemon shape.  Flatten the ends to match the center. It shoud be abut 2 1/2 ” high.

With a single edge razor blade, make a cut in the middle of the dough.Then one to the left. One to the right. Along the right side of the top of the dough cut in toward the center about 3/4” to 1”. Again on the other side. Last cut in the same amount on the right side. And on the left. As you pick it up to put it on the sheet pan, stretch it out to enlarge the holes.  Place 7 on a tray.

Cover them and allow them to rise for 2 to 2 1/2 hours until puffy.

Heat the oven to 350F. While the oven is heating brush 2 or 3 of the rolls with the egg wash and sprinkle heavily with sanding sugar or pearl sugar. Bake one sheet at a time on the middle rung for 18 to 22 minutes until golden brown and baked through.

Serve warm or room temperature.

ENJOY!

to print the recipe, click here

Comments: If you’d like to make Gibassier, I urge you to stop by Helen’s site because her step-by-step photos are perfect to understand what needs to be done. Explaining just with words is a bit tricky. If you make it in the food processor, it will be easy to make just half the recipe, as the processor will handle it without issues. Everything comes together super quickly, and I like the fact that I could use butter straight from the fridge.

Some people suggest using an old credit card to do the cuts on the dough, but Helen’s idea of getting those single edged razor blades is truly spot on. I advise you to allow the final proofing to reach the 2.5 hour mark or even a little big longer as enriched doughs tend to be a bit sluggish. The puffier they get at that stage, the lighter the rolls will be. I had to cut my final proofing a bit short for half of them, and the second batch was better.


This is the type of pastry that will transport you straight to a cafe in France, sitting outside, people-watching, as you sip a little hot chocolate, coffee, or whatever suits your mood…

Helen, thank you once again not only for the inspiration but for your detailed instructions that make it all so much easier to follow.

ONE YEAR AGO: Sundried Tomato Twist Bread

TWO YEAR AGO: And now for something completely different….

THREE YEARS AGO: Parsnip, Coconut, and Lemongrass Soup

FOUR YEARS AGO: In My Kitchen, October 2016

FIVE YEARS AGO: Paleo Moussaka

SIX YEARS AGO: In My Kitchen, October 2014

SEVEN YEARS AGO: In My Kitchen, October 2013

EIGHT YEARS AGO: Crimson and Cream Turkey Chili

NINE YEARS AGO: Taking a break from the nano-kitchen

TEN YEARS AGO: Chocolate Chip Cookies