In My Kitchen posts are hosted by Sherry, from Sherry’s Pickings. At the end of this post you will find a link to jump to her site and see what everybody else is sharing this month. I join four times each year, with a new post on the first day of January, April, July and October. Like clockwork. I am the daughter of my Dad, after all.
I like to start by sharing gifts, and this time I have A LOT to be grateful for.
From my friend Caro…
A set of 10 (!!!!) Sugarflair gel food colors. If you are into cookies, macarons, buttercream, you’ve definitely heard of this brand. It is the “creme de la creme” in food coloring. Tricky to find in the US, unless you are ready to pay a great deal of cash for them. Until now, I had just flirted with them online. Not anymore. They are amazing. Thank you so much, Caro!
From my friends Val and Steve…
The most perfect mask ever! And contrary to most I get, this one fits me perfectly. Thank you so so much! Buck seems a little unhappy with it, but I said it is nothing personal against his breed.
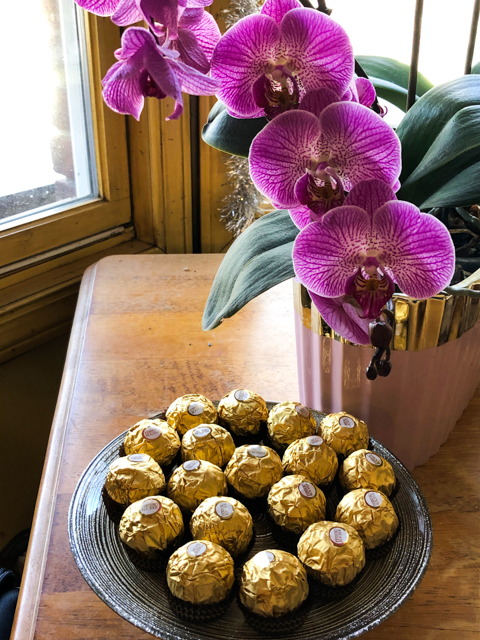
From our grad student, Taihao…
My very favorite chocolate treat, which he offered me as a Birthday gift. Since I had no idea he even knew it was my Birthday, the surprise was even sweeter. Thank you, Taihao!
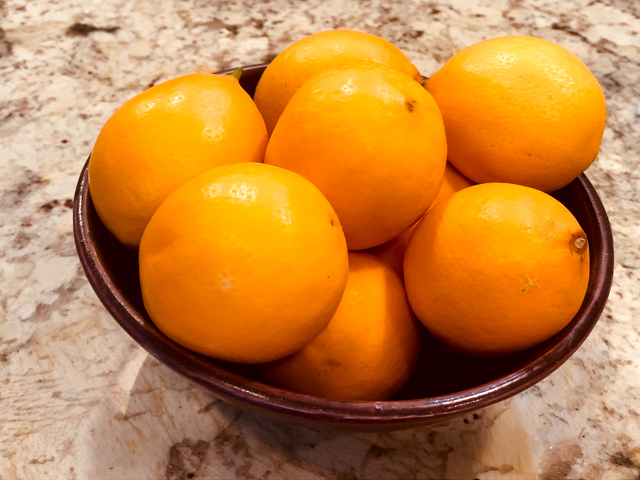
Another Birthday gift, from our friend Heather from sunny CA, Meyer lemons from her backyard.
I already put many of them to use, in macarons, and sandwich cookies. And, of course also in our regular cooking. Thank you, Heather!
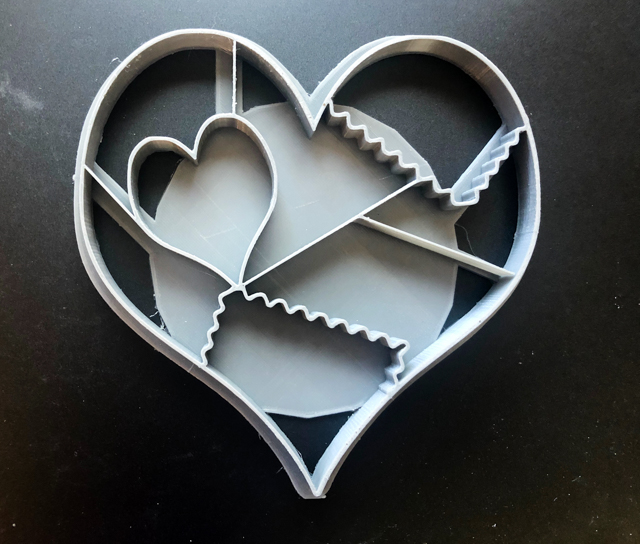
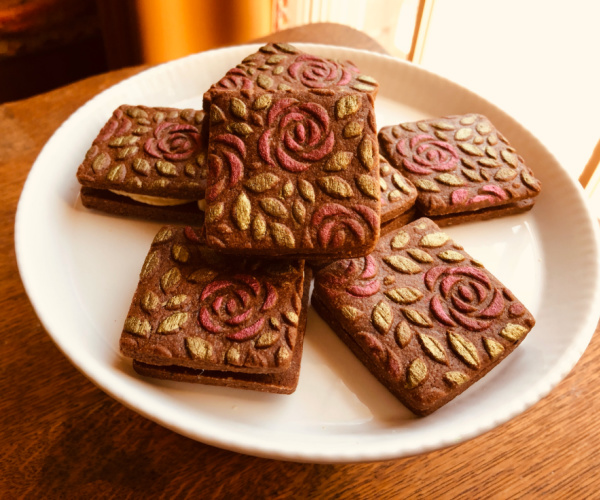
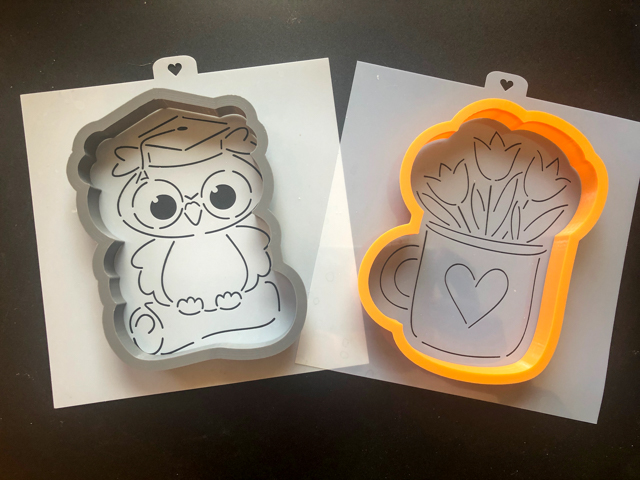
From our friend Tanya, tent-baker extraordinaire, a very special cookie cutter that she designed and produced.
Tanya makes and sells cookie cutters in her etsy store. Visit with a click here. And marvel as what she created with this very cutter by reading her blog post on the subject.
A Birthday gift from the coolest couple in NYC, Courtnie and Alex…
I could not believe my eyes when I opened the package! You can set the puzzle as one very large cookie, or make a slightly smaller version removing some of the pieces. It is cool beyond description… I have already put it to use, and you will see the results soon.
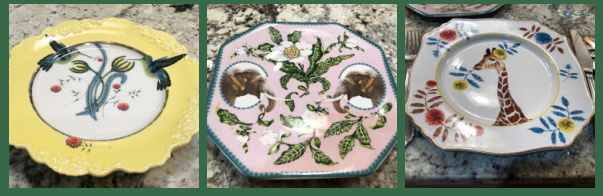
From my beloved husband….
As usual, he finds the most amazing plates on ebay. These three were all from Anthropologie, and I cannot pick a favorite, even considering my intense love for elephants. I adore the three of them.
And finally, a most special gift, combination of wedding anniversary and Birthday…. (drum roll)
A mini-projector! Mine is AKASIO, and the only complaint I have is not being able to pair it with the computer via bluetooth. It was a Nightmare on Elm Street trying to make it work, finally we just decided to live with the cable and call it a day. It does pair with the cell phone. Go figure it out. But I love it. It truly opens up the horizons for cookie decorating. So. Much. Fun. On the photo, you can see the big puzzle cookie getting ready for some drawing.
In our kitchen…
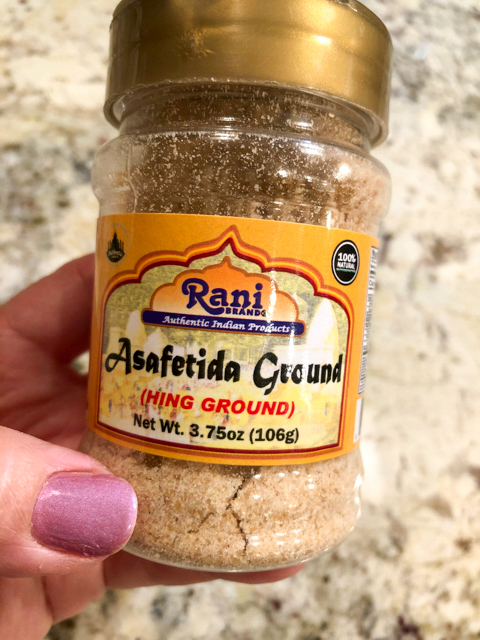
Asafetida, a very unique spice used in Indian recipes. I see it as the cousin of fish sauce. You don’t want to sniff it, just trust that the taste it imparts to the food has nothing to do with its fragrance… It is used in tiny amounts, but it will definitely bring a touch of authenticity to your table.
In our kitchen…
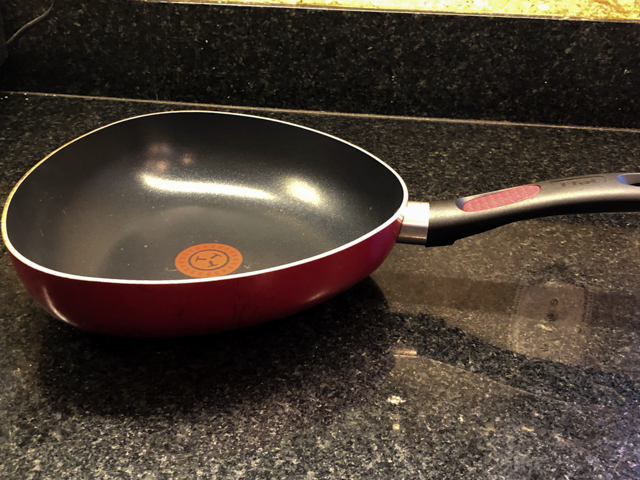
This pan, with a triangular shape, was found by Phil in a visit to Marshall’s. I cannot tell you how much we both love it. It has the perfect shape to stir-fry small amounts of mushrooms or veggies. You know that trick that chefs love to do, sending food in the air as they stir-fry? This pan makes it super easy to do. Perfect size for cooking for two, I don’ t know why it’s not far more popular.
In our kitchen…
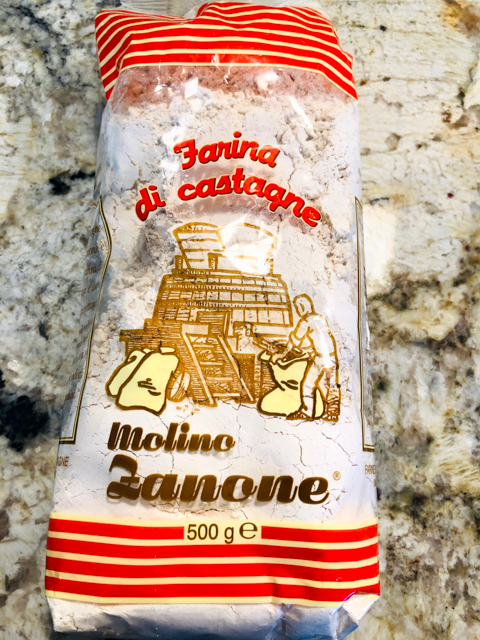
Chestnut flour. This is a very nice brand, with a delicate flavor and perfect texture. It works especially well in some vegan pastry recipes. Don’t run away, I promise they taste just like the “real thing.” Stay tuned.
In our kitchen…
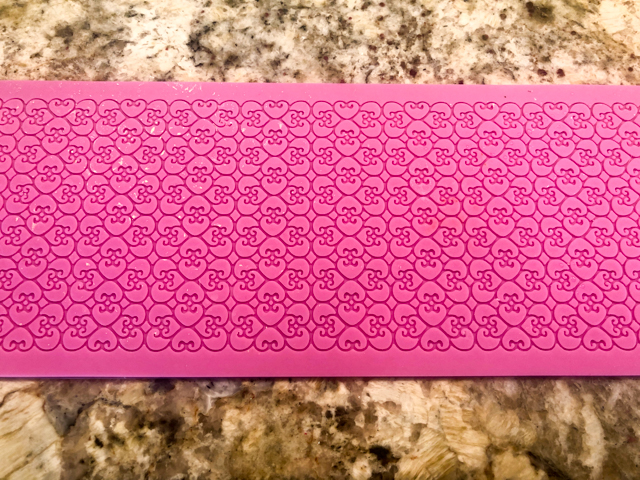
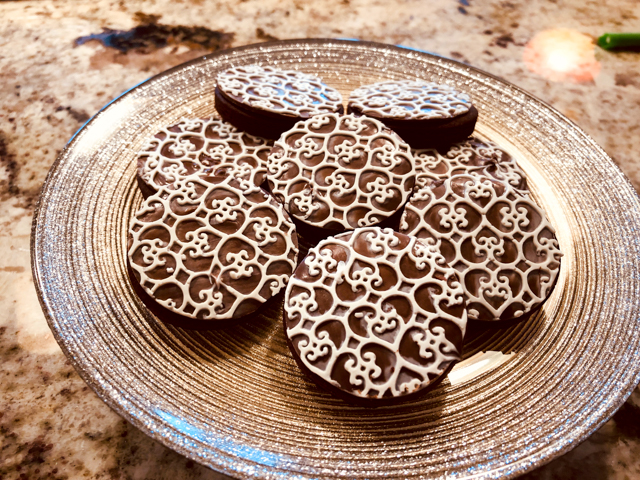
A patterned silicone mat. It is a tool designed mainly for fondant and marzipan, but I used it to make a chocolate topping for cookies. I promise a blog post about the whole technique, which is surprisingly simple.
In our kitchen…
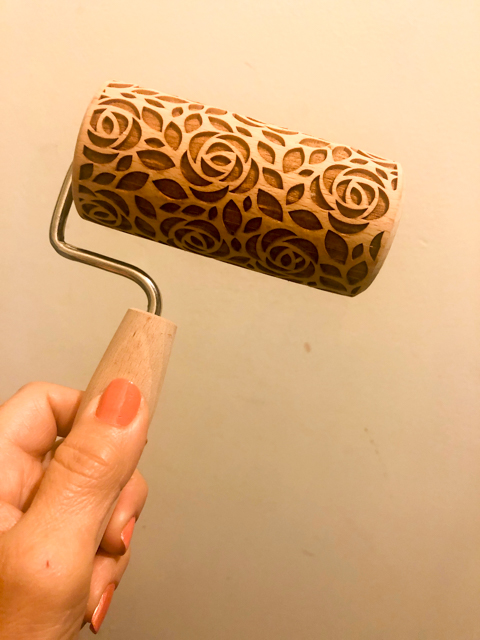
Speaking of patterned mats, I share also a patterned rolling pin. You can find countless types in shops at etsy.com with a simple search “embossed rolling pin.” I was not sure this tiny one would work well, but I am very impressed. Works like a dream. Still available here.
In our kitchen…
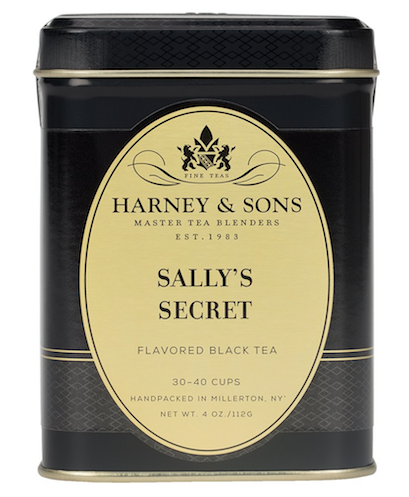
Sakura blossom green tea. This is caffeinated, so I use a little trick to reduce the caffeine a bit, as I like to enjoy tea after dinner. I boil water, put into the cup halfway up, add the tea bag, swirl it a bit for about 20 seconds, discard that water and proceed to make the tea with fresh hot water. Caffeine is very soluble and quite a bit of it is removed in the first brewing. I don’t detect much loss in overall taste of the tea, and it seems to work well for me. This is a green tea with a floral component that adds a lot to it. Order info here.
I find it smooth, elegant, mysterious. Unpredictable, dramatic, way too intense, says the opposition. Jury still out.
Do you want to know one of Sally’s secrets?
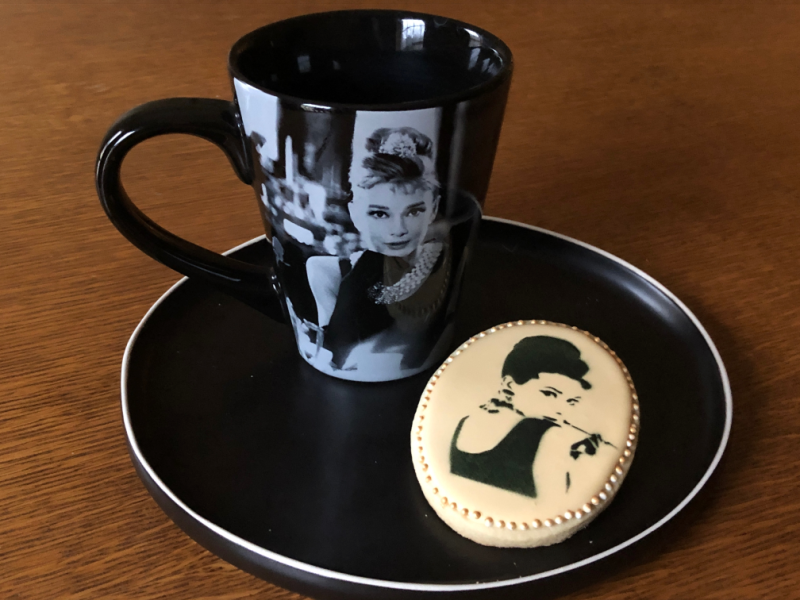
She is totally obsessed with Audrey… Stencil from etsy.com
In our kitchen…
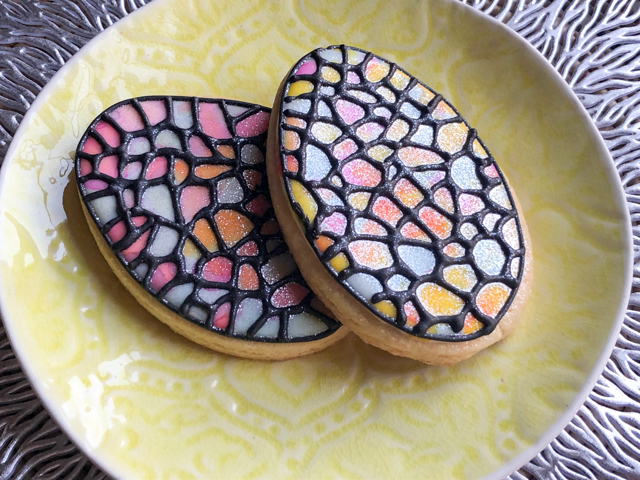
Cookie cutter & stencil combo. Another slippery slope in etsy.com… So many possibilities. You use the cookie cutter, bake the cookie, ice it, and let it set overnight. Then comes the stencil part, that you can either use an air-brush to get the overall design transferred to the surface, or use thick Royal icing scrubbed over it. I like to air-brush in dark grey or black, and once the ink dries I paint with food pens or luster dust. Check this store, one of my favorite sources.
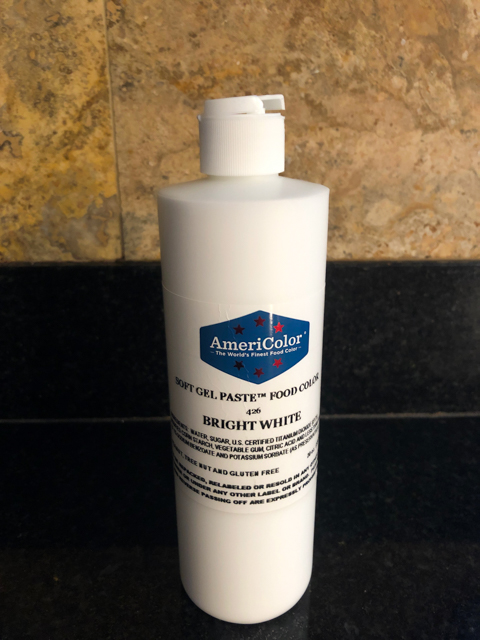
In our kitchen…
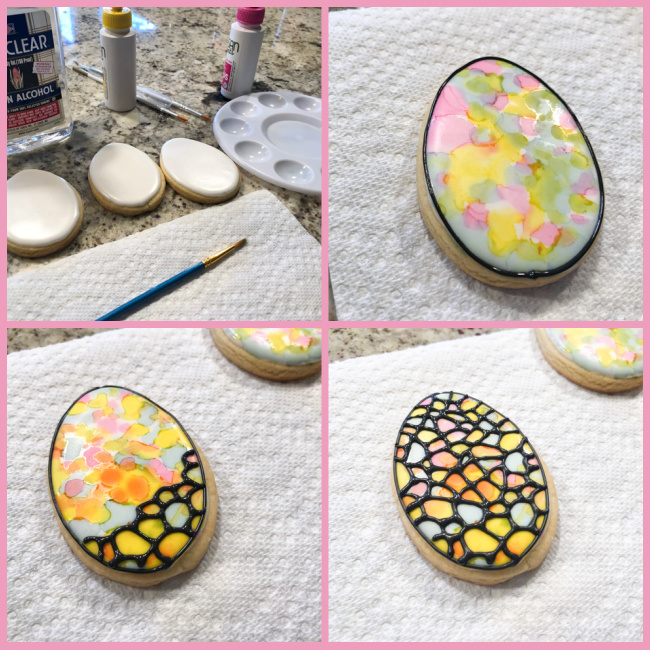
A big bottle of Americolor white gel color. It is the only brand that works well for a cracked design on cookies. So easy to achieve! Cut the cookie shapes you like, brush a light coating of Americolor white (or any other color) and bake. It works best in recipes with a small amount of baking powder so that there is more lift during baking. Other brands do not work the same way, so keep that in mind. The dye does all the work, and the effect is really quite beautiful and elegant.
In our kitchen…
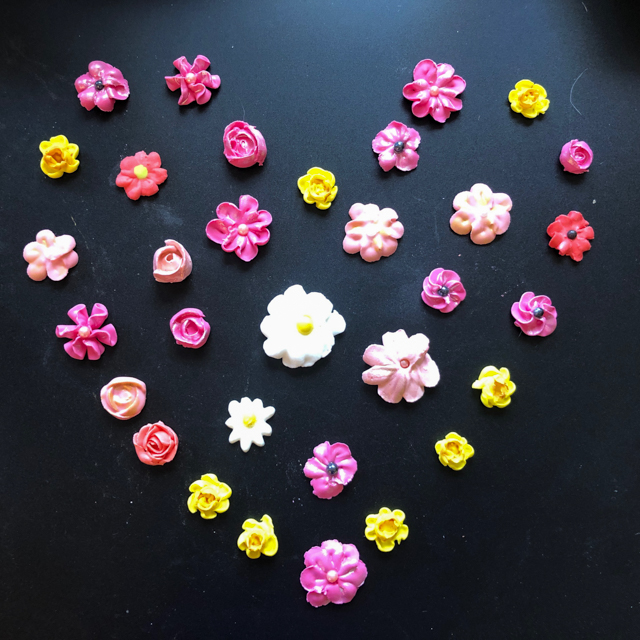
My little treasure chest of Royal icing flowers, ready and waiting to be added to cookies or cupcakes. I still need to work on the rose buds, there is a lot of room for improvement in those, but little by little I’m going to get there.
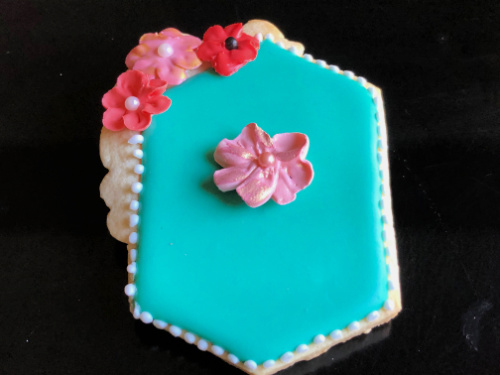
In our kitchen…
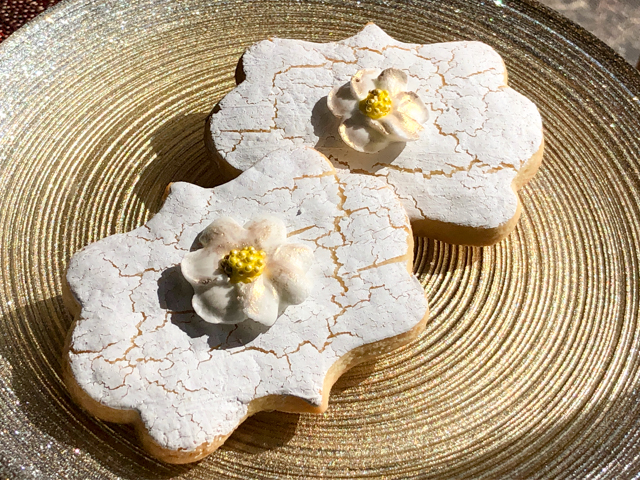
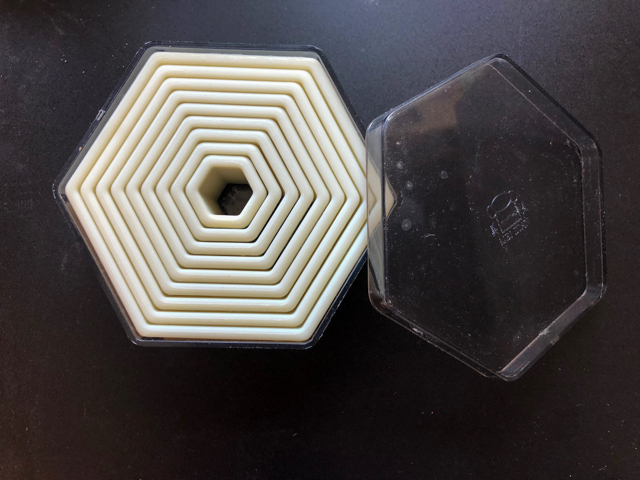
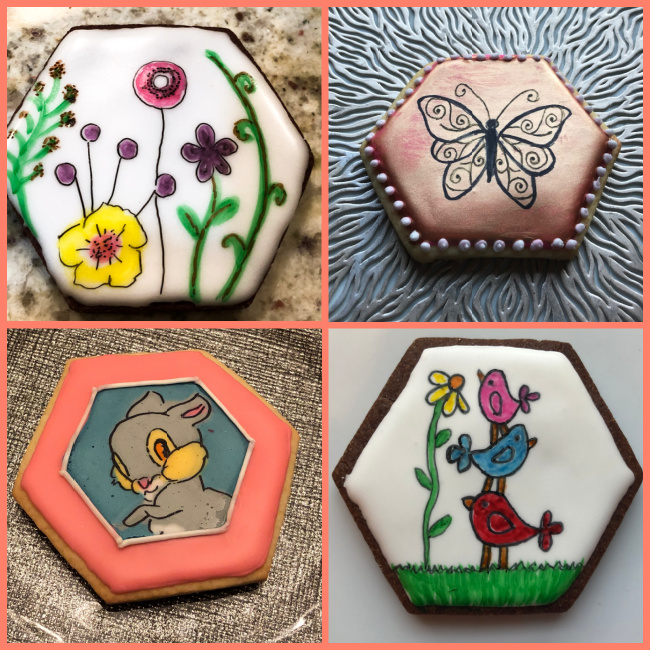
I know, a lot of cookie-oriented things, but that is the path I’ve been following lately. This set of hexagonal cookie cutters is one of my favorites. The shape is unusual and fun to play with.
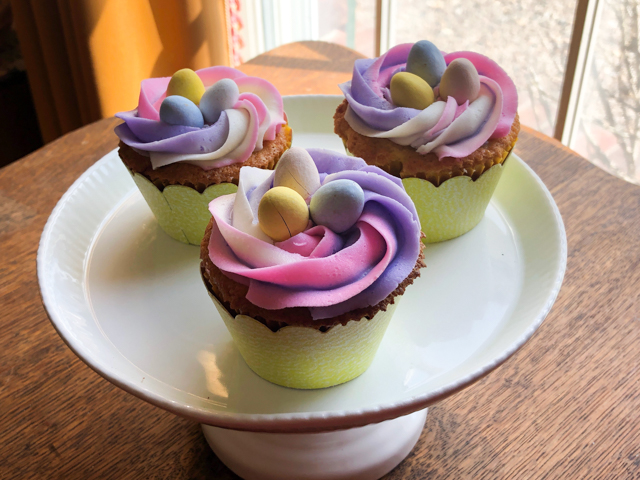
All cookies except Thumper were made using the projector. Thumper was quite likely the most involved cookie I’ve made so far, following a tutorial online. I might compose a blog post about it at some point. The drawing is in fact a Royal icing transfer.
In our kitchen…
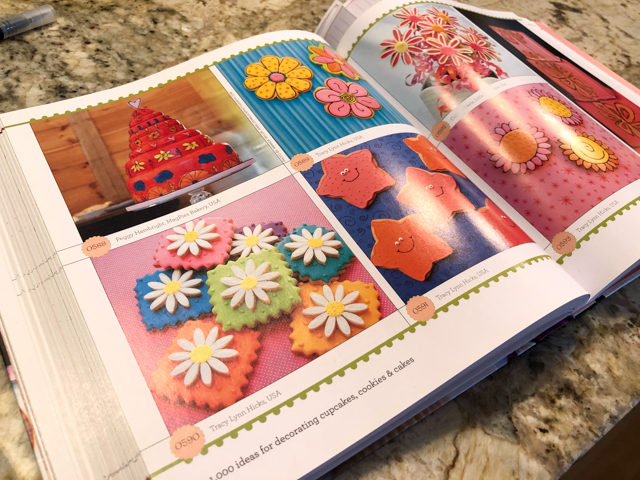
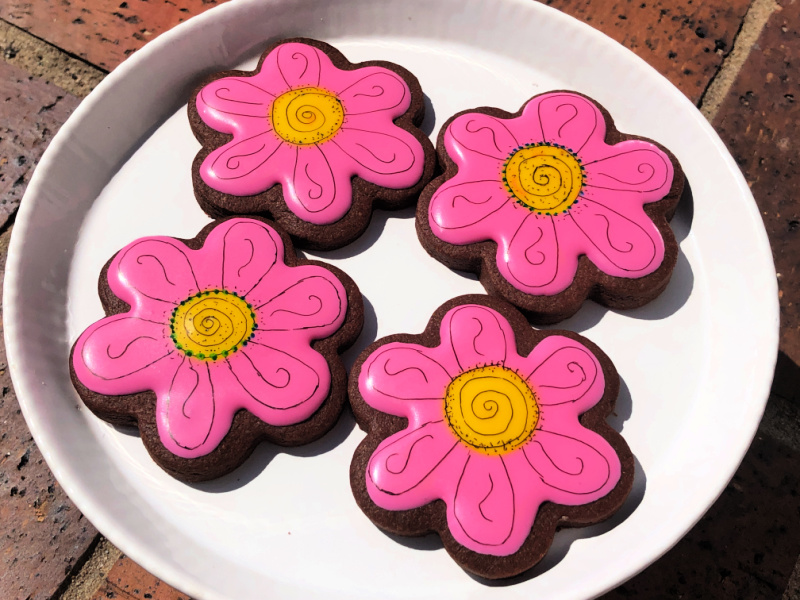
A very unusual cookbook. No recipes, just ideas. One thousand ideas, to be precise. As you flip through the pages, you’ll see photos of beautiful cakes, cupcakes, cookies, with a number and the name of the bakery where they were made. The final pages of the book list all the numbers and the techniques used.
For instance, if you look at this particular page, you will see a picture with three flower-shaped cookies, number #589. Going on the list I saw they were sugar cookies decorated with with Royal icing, so I created my version of one of those cookies. Some people left pretty negative reviews for the book on amazon, complaining that “there are no recipes or instructions”, but I think they totally missed the point. It is more an inspirational type of book, not a guide. Order info here.
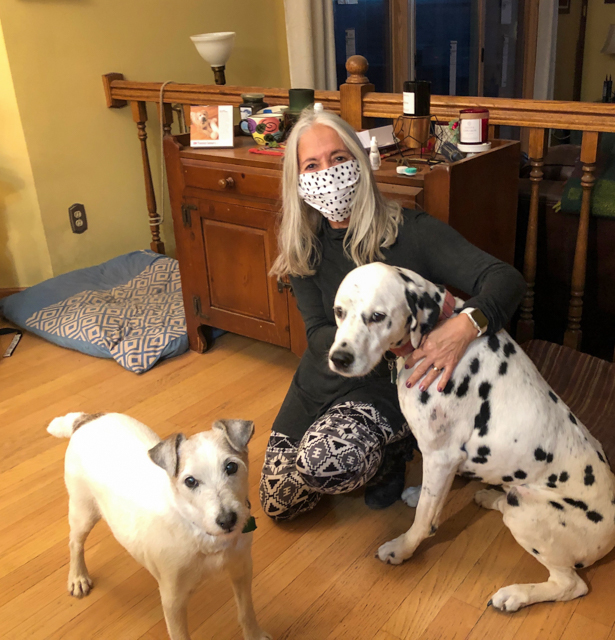
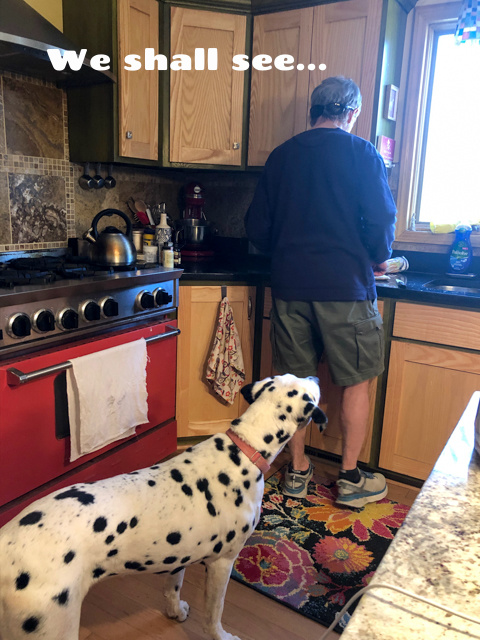
Well, I toyed with the idea of pulling an April 1st on the dogs, telling them it is a no-no for their five minutes of fame in MY blog. Because, let’s make it clear. It is MY blog. And, for reasons that shall become clear as I disclose their filthy ways, I am being VERY kind for allowing two of the three derelicts to bark their piece.
So, here’s what they’ve been up to in the past three months…
Oscar undoubtedly sees himself as the King of the World
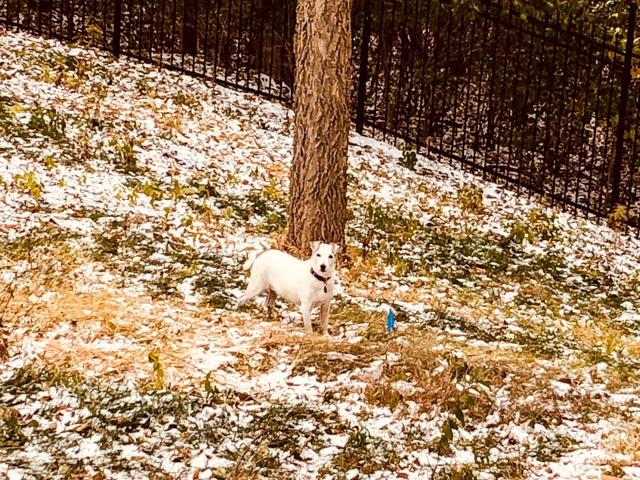
Buck is definitely the Emperor of the Backyard….
No matter the weather, he patrols every square inch of the backyard when we put him outside, and only comes back when satisfied that things are how they are supposed to be in every single little spot. He always follows the same path, a very methodical pup.
and then, of course, we have the Photobomber of the Jungle…
Great composition, courtesy of my friend Steve…
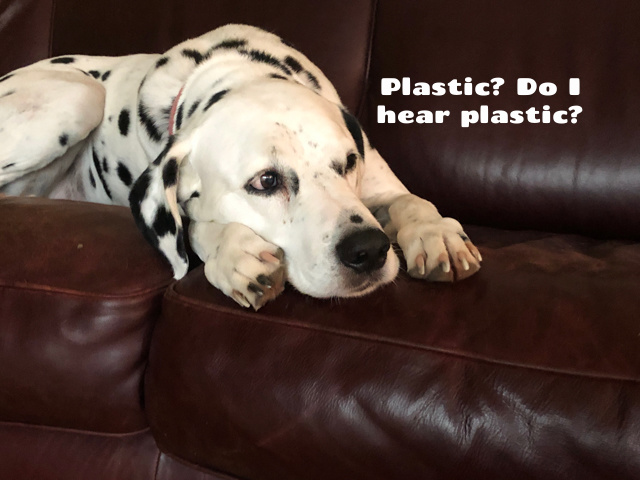
and when he is not in his virtual jungle, he is best known as the Keeper of the Couch…
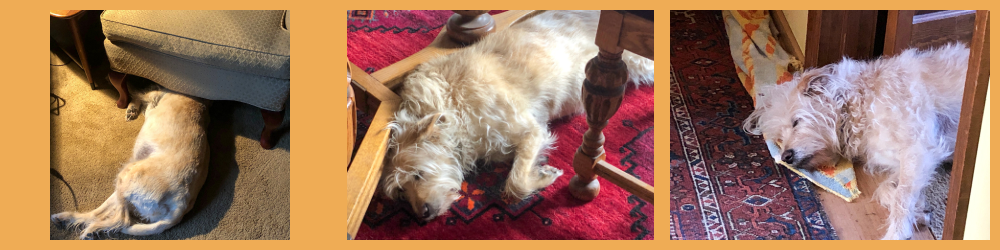
Oscar believes sofas and couches are for sissies. In fact, he never ceases to amaze us with his odd ways to get comfy.
Although in rare occasions, he will act like a more “normal” pup…
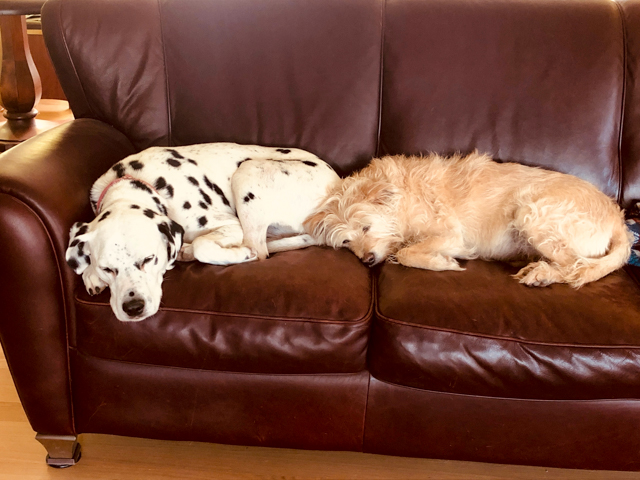
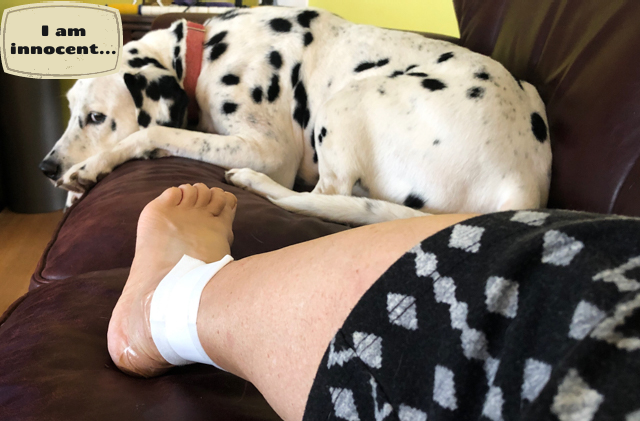
You would think that these two get along great, right? Well, not exactly, as my poor left ankle will prove to you.
Innocent? Not so fast, Black-Dotted Hero… On a Saturday night, as I sat down on a comfy arm chair to talk to my sexy husband, Oscar and Bogey approached the chair, and stood one on each side. All of a sudden I noticed Bogey growling at Oscar, showing him some major gums. In seconds, Oscar went for his leg but got my foot instead. Twice. The pain was something, as his bite definitely hit a nerve (literally). So, as I publish this post, I will be on day 4 of a 10-day course of antibiotics, and unable to wear closed shoes, as my ankle is very swollen.
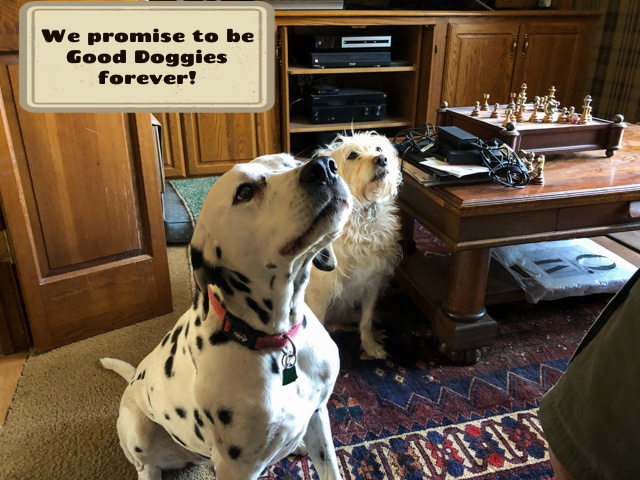
They were charged and tried with a felony offense and sentenced to 14 days with no flesh of the steer. And had to sit through a long lecture on proper canine behavior, new rules and regulations set forth by His Highness, The Alpha Human.
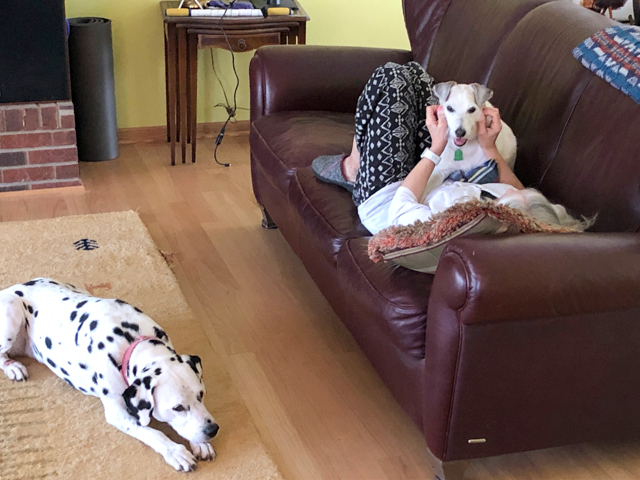
Obviously, such turn of events truly pleased the oldest, most distinguished member of the pack…
The good boy is in fact the only one allowed to bond with his favorite human on her favorite couch…
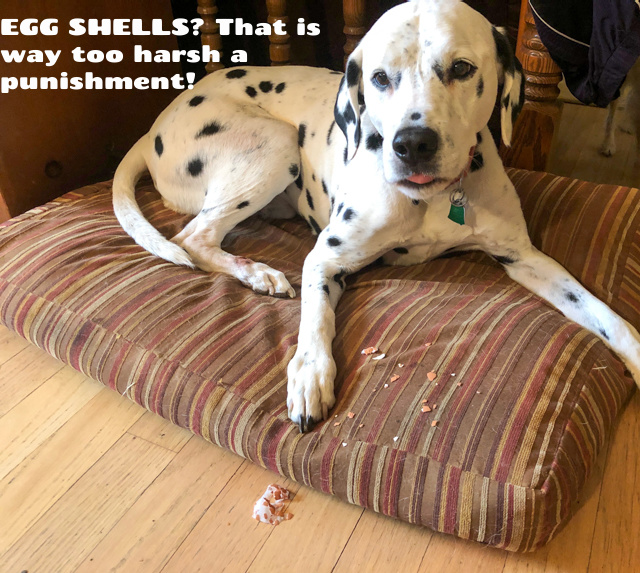
Let’s make it abundantly clear: we did not feed him egg shells. He STOLE a shell that fell on the floor, ran away through the house with it, and then decided it was too nasty to consume. Those are the facts. His sentence has therefore been altered to 18 days without the flesh of the steer.
That’s all folks! I shiver to think what they will come up with for the next installment of IMK. See you (if I am still alive) on July 1st (clockwork, remember?).
To see what is happening in kitchens of other food bloggers around the world,
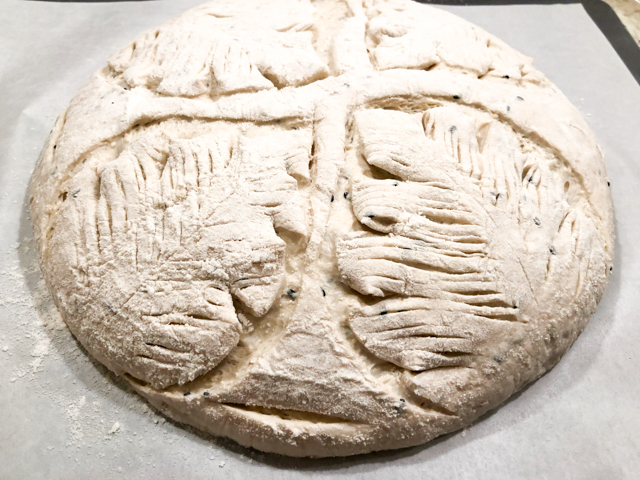
Some people find sourdough bread to be a bit “harsh” as far as texture goes. I am not part of that team, but I can understand where they are coming from. This bread retains the basic sourness of the classic, but the texture is so mellow that it reminded me of soft sandwich breads I enjoyed as a kid. It is the soaked oats and seeds that perform the magic. Absolutely delicious, I hope you’ll give it a try.
OAT AND SESAME SEED SOURDOUGH (from The Bewitching Kitchen)
375g white bread flour (+ more to adjust consistency) 25g spelt flour 220g water 100g starter at 100% hydration 40g steel-cut oats 10g white sesame seeds 10g black sesame seeds (or 20g all one type) 10g salt
When you refresh your starter, maybe 6 hours before starting the bread, make the soaker: mix the oats and sesame seeds, and add enough water to just cover them. Cover the bowl with plastic wrap and leave at room temperature until it is time to mix the dough.
Add the soaked seeds ad all other components of the dough to the bowl of a Kitchen Aid mixer fitted with the dough hook. If there is too much water not absorbed by the seeds, leave it behind, but keep in mind that a lot of the moisture of the water in the formula should come from the soaker. Knead for about 4 minutes, paying attention to the texture of the dough. It should just start to clean the sides of the bowl. If necessary, add more flour at this point. I had to add about 1/4 cup flour to mine.
Remove the dough from the Kitchen Aid, transfer to any appropriate container lightly oiled and perform a series of stretch and folds every 45 minutes. Do it four to five times, which will take you up to 4 and half hours from initial bulk fermentation. Even if you fold it only 4 times, leave it fermenting until you reach 4 and a half hours.
Shape as a round ball and place in a floured banneton, seam side up. Leave 45 to 60 minutes at room temperature, then place in the fridge overnight.
Remove the dough by inverting it on parchment paper, dust the surface with rice or white flour and slash any pattern you like. I used scissors coupled with a razor blade to get the leaf pattern.
Bake at 450F in a Dutch Oven, covered for 30 minutes, then remove the lid to brown the crust. Allow it to cool completely before slicing.
Comments: I have included sesame seeds in my sourdough breads many times in the past, but don’t remember their flavor being as evident as in this loaf. I suppose the soaking step helps with it, which surprises me. Roasting them I could understand but just the soaking? Interesting. The texture of this bread is also remarkable, so I must repeat myself and tell you to try it and serve even to those who are a little uncomfortable with a rustic sourdough loaf in all its full glory.
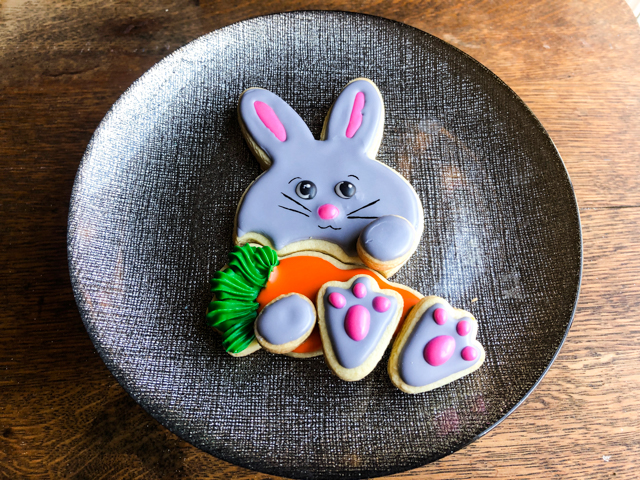
Do you know what a Franken-cookie is? No, it’s not just for Halloween, although of course you can make some perfectly tailored to that occasion. Franken cookies are made by joining different cutters in unexpected compositions. I share today my first attempt with Easter season in mind. Credit must go for the one and only Marlyn, cookier-extraordinaire from Canada (Montreal Confections). Her work is simply amazing. For a very detailed tutorial to make this little guy, click here. It starts at the 38 min mark. You will need rabbit cookie cutters + carrot shape cutter (mine was the one from this set).
FRANKEN BUNNY HONEY-LEMON COOKIE (design my Marlyn, cookie recipe from Bewitching Kitchen)
1 cup butter (226g), cut in pieces, cold 200g sugar zest of 1/2 lemon 2 eggs 1 tsp honey extract (Olive Nation) 1/2 tsp vanilla extract 420 g all-purpose flour 60 g cornstarch 1/2 tsp salt 1/4 tsp baking powder
Mix the flour, cornstarch, salt and baking powder and reserve.
Cream sugar, butter and lemon zest in the bowl of a Kitchen Aid for a couple of minutes until the sugar is incorporated well and does not feel gritty. Add the eggs, honey emulsion and vanilla extratc slowly and mix until incorporated, but don’t over-mix.
Add the flour mixture slowly, mixing in low-speed. If needed, add a little more flour, up to 1/4 cup. Once the dough comes together, stop, and form three discs. You should have three discs with about 330g each. Dough can be rolled out immediately or placed in the fridge to roll out later. It also freezes extremely well.
Cut in shapes, freeze the cut-outs for 10 minutes, then bake in a 350F oven for about 13 minutes. Ice and decorate as desired.
For my favorite Royal Icing recipe, visit Tanya’s blog with a click here.
Comments: This is my favorite cookie recipe for the time being. It is the same basic “neat edges” recipe I’ve been using for months, but the honey extract from Olive Nation truly takes this to a whole new level. I love it.
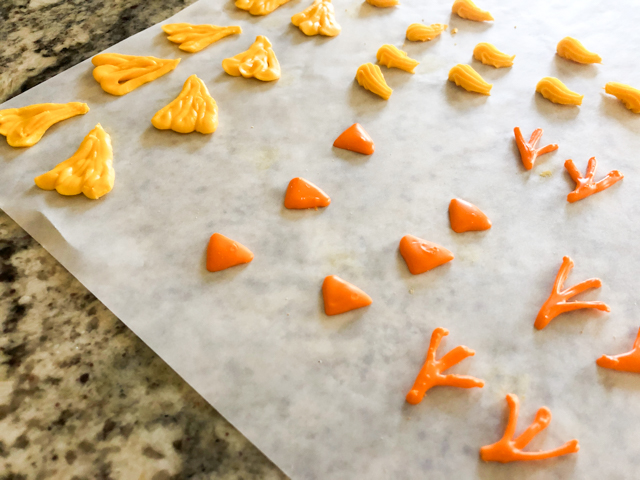
To decorate the Franken bunny, you’ll need Royal icing orange and grey in flooding consistency, pink in medium consistency (maybe around 20 -25 seconds if you like to measure it by how many seconds it takes to level off). Green in stiff consistency, as you will pipe the green part of the carrot with a star tip and you want it to hold the shape. Making the eyes as royal icing transfer was a bit tricky, but I managed to get 3 pairs that looked ok. You can always paint them with a food pen to make life easier. The transfer produces a more dramatic, realistic look.
For other fun examples of franken-cookies, take a look here, here, and here.
For this cookie, Marlyn suggests making all details as Royal Icing transfers, so make sure you plan ahead, as those need to dry overnight. Pipe more than you think you’ll need, because then you can choose the best ones, and also not go into panic mode if they break. You can always simplify and just flood the cookie then paint the details with a food pen.
The wings are made with a petal icing tip, the decoration on top of the head with a small star tip, and the beak and feet with a tipless bag, or if you prefer, a number 1 Wilton tip. Next day, flood the egg-shaped cookie with royal icing, and carefully place the transfers on top. For the eyes I used PEM black pearls, because they never bleed into the surrounding icing.
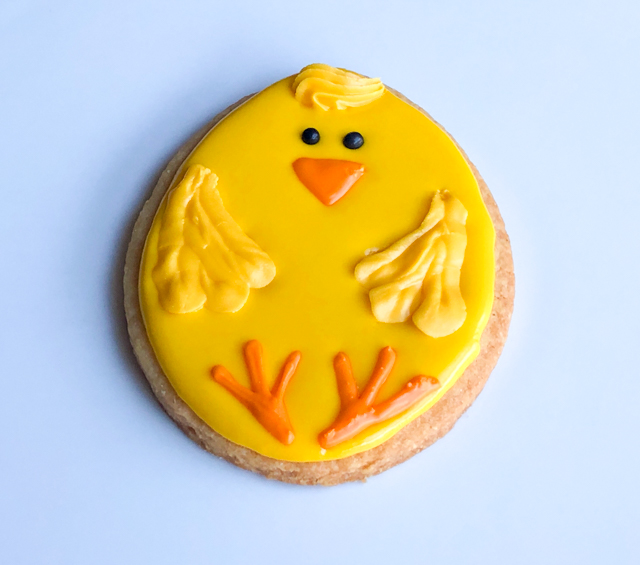
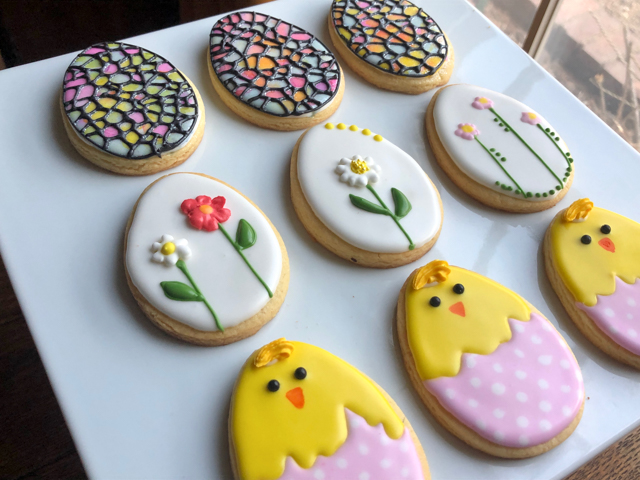
EGG-SHAPED TRILOGY
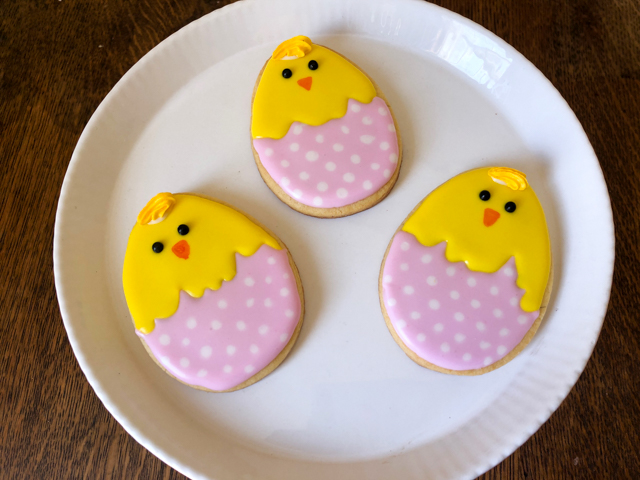
All cookies were made from the same recipe, Honey-Lemon Sugar Cookies. The simplest one to decorate is the bi-color chick, although I did use leftover decoration from the previous cookie for the top of the head. That can be omitted.
You will need pink, yellow and white Royal Icing, all in flooding consistency. Flood the pink, forming a random edge slightly above the middle of the cookie. Immediately add small white dots. Let it dry for 15 minutes, flood with yellow. Add the eyes if using black pearls, or allow to fully set before drawing the details with a food safe pen, orange and black.
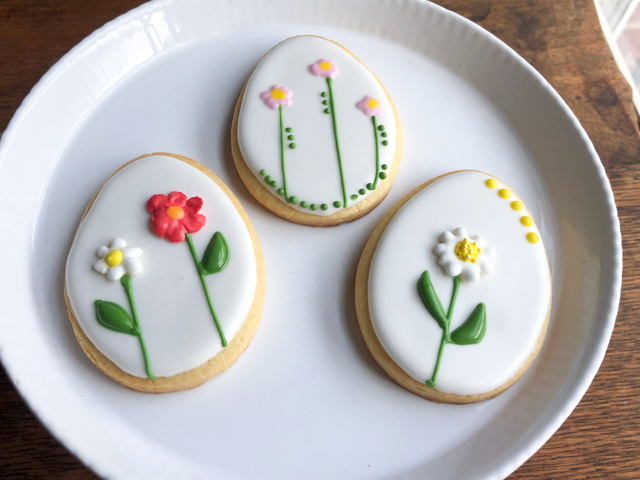
For these cookies, you will need white Royal icing to flood the surface, and if adding flowers as transfers, place them immediately on top. The upper, central cookie was decorated with simple royal icing using a tipless bag, after the flooding set.
These were a lot of fun to make. I definitely need to improve on the dreadful fine lines, but how can you improve if you don’t try, right? The design is from another great cookier, Haniela, from sunny Spain. Her detailed tutorial for these eggs is found here.
You start with a white-flooded cookie, do a tie-dye decoration with gel dye and vodka, in any shades of colors you like. Let that air-dry for a few minutes, and add the details with black Royal icing using as fine a tip as you are able to. Follow Haniela’s tutorial for the best results. I need more practice.
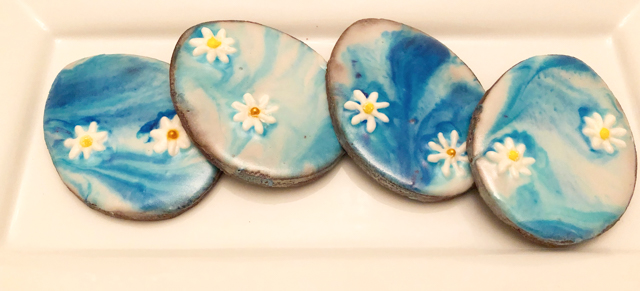
BLUE MARBLED EASTER EGGS
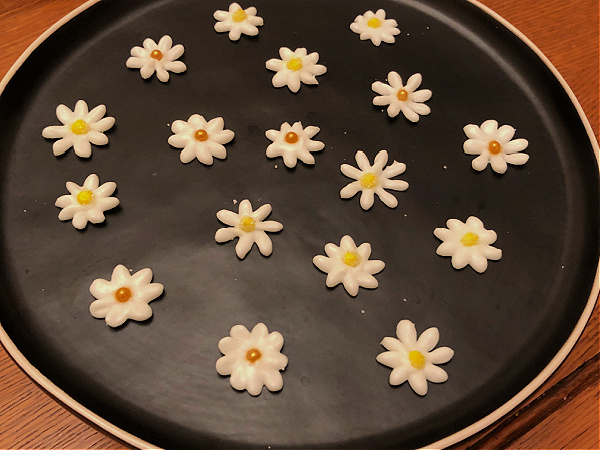
Another design by Haniela, using Royal icing in three different shades of blue, and then placing sugar daisies on the surface. Her tutorial explains it all very clearly. Once again, keep in mind that the daisies have to dry overnight before using as decoration.
BUNNY RABBIT STICK COOKIES
I could not share a series of Easter cookies without including cookie sticks, as I am quite smitten by this shape. They were inspired by CookieliciousNZ. I flooded them with light yellow Royal Icing allowed that to set, then piped the body of a bunny rabbit on top. Added a few more little details like the grass and tail. The flower cookie was made with Royal icing in detail consistency and a tipless bag.
I hope you liked this small collection of Easter-inspired sugar cookies. I have been practicing making Royal icing flowers, or simpler star-tip buds (like those used in the bunny’s tail). I simply save them in a little plastic box. It’s amazing how they can come in handy to add a little something something to cookies. Because you don’t need that much to make this type of decoration, whenever I have Royal icing leftover, I adjust the consistency to firm, and practice a few flowers. There are plenty of tutorials in youtube to help, Marlyn and Haniela have many available for free. Check their youtube channels here and here.
Do you follow Lisa is Cooking? She writes cookbook reviews and is the person I blame for quite a few of my acquisitions, which are usually Kindle versions, so I feel less guilty. Her latest post centered on a book called East: 120 Vegan and Vegetarian Recipes from Bangalore to Beijing, by Meera Sodha. I ordered it within minutes of reading the blog post. I modified one of the recipes quite a bit, and share my version with you today.
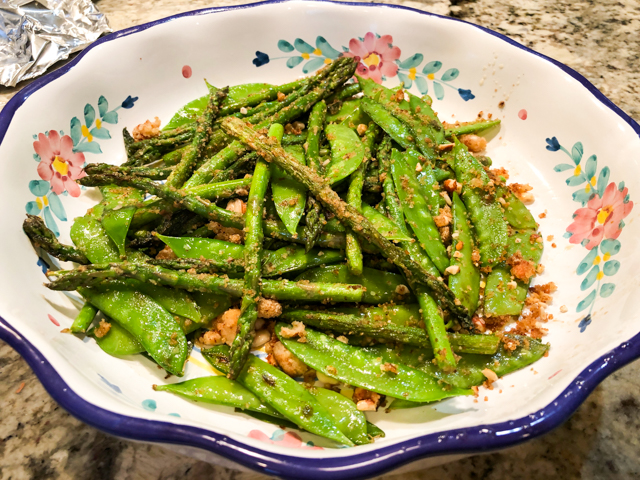
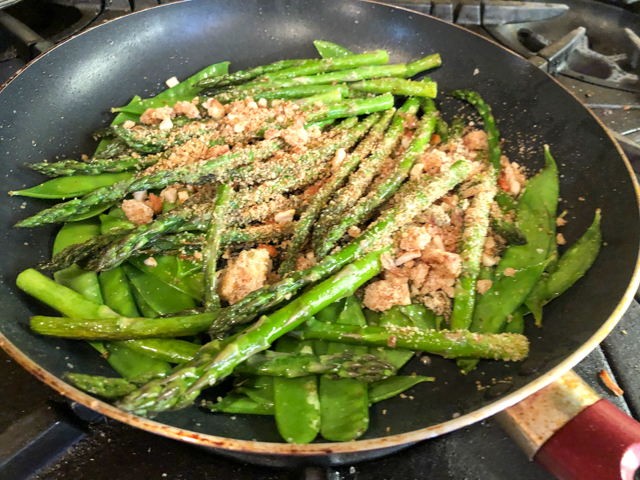
ASPARAGUS AND SNOW PEAS WITH WALNUT CRUMBS (adapted from Meera Sodha’s East)
1 bunch thin asparagus, tough ends trimmed Snow peas (about 1/4 pound) 1/4 cup grapeseed oil, divided 1/3 cup walnuts, coarsely ground 1/2 cup bread crumbs, preferably homemade (Panko works too) 1 Serrano pepper, very finely minced salt and pepper to taste zest and juice of 1 lemon (I used Meyer Lemon)
Start by making the crumb component. Heat 2 tablespoons of oil in a large non-stick skillet and add the walnuts and Serrano pepper, season lightly with salt and pepper. Stir-fry for a minute or two, add the bread crumbs, cook until fragrant and getting toasted. Immediately squirt the juice of 1/2 lemon, mix well and transfer to a bowl. Reserve.
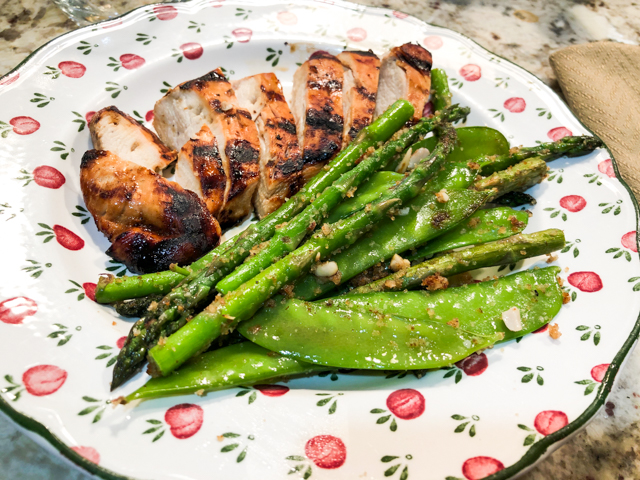
Add one tablespoon of oil to the skillet, and cook the asparagus, making sure they form a single layer in the pan with not much overlapping. Season lightly with salt and pepper. Cook in high heat for a couple of minutes, cover the pan, reduce the heat and allow it to cook in its own steam for another minute or so. Transfer to a bowl, and add a little more oil to the skillet. Now add the snow peas and cook in high heat for a couple of minutes. Add the asparagus and the reserved crumbs to the skillet, warm everything together moving it often. Squirt the juice of the remaining half of the lemon, adjust seasoning, and serve.
Comments: If you need inspiration to prepare vegetables in creative, unusual ways, this book is a must-have. But Lisa reviewed it in the best possible way, so just jump to her blog for details. I made the original version of this recipe that used peanuts and quite a bit more of the crumb component, but to my taste it was a bit much. I toned it down and also liked it better using walnuts in place of peanuts. I think a drizzle of walnut oil to finish the dish could be excellent, and I am kicking myself because I did not try it, as I do have walnut oil in the fridge. Best laid plans.
The book is full vegetarian and vegan, but I will use it mainly as a source for side-dishes. This delicious salad (she calls it a salad, although it is served warm), was enjoyed with juicy grilled chicken breasts, a recipe that quickly became a regular in our kitchen. It was a bonus recipe featured in this post from my recentpast.