SLOW-COOKER HOISIN-PULLED PORK

I did not expect to blog on this recipe, as I had a couple of not that great recipes made in the crockpot just the week before. Two big disappointments. The slow-cooker is one iffy gadget. As I’ve mentioned more than once in the past, crockpot recipes often stretch the limits of the “dump it all in and forget it.” Not every meat works in a crockpot unless you time the cooking much more carefully. This time I used my newest favorite cut, country-style boneless pork rib. Seven hours in low. Perfect texture. Perfect meal to watch a certain football game.

SLOW-COOKER HOISIN-PULLED PORK
(slightly modified from taste.com.au)

Boneless country-style pork ribs (enough to fully cover the surface of your crockpot)
1 tbsp grapeseed oil
1 large shallot, thinly sliced
4cm-piece fresh ginger, cut into matchsticks
1/4 cup tomato paste
1 cup vegetable stock
1/3 cup hoisin sauce
1/4 cup soy sauce
1 tsp Chinese five-spice mix

Place the pork in a slow cooker. Heat the oil in a large frying pan over medium-high heat. Add the onion and ginger. Stir-fry for a few minutes until the onion is soft and fragrant. Add the tomato paste and cook, stirring, for 1 minute. Add the stock, hoisin, soy sauce, and Chinese five spice. Simmer for 1 minute. Remove from heat and pour the mixture over the pork. If necessary, add a little water so that the meat is almost fully covered. Place the lid on the slow cooker and cook on LOW for 7 hours.


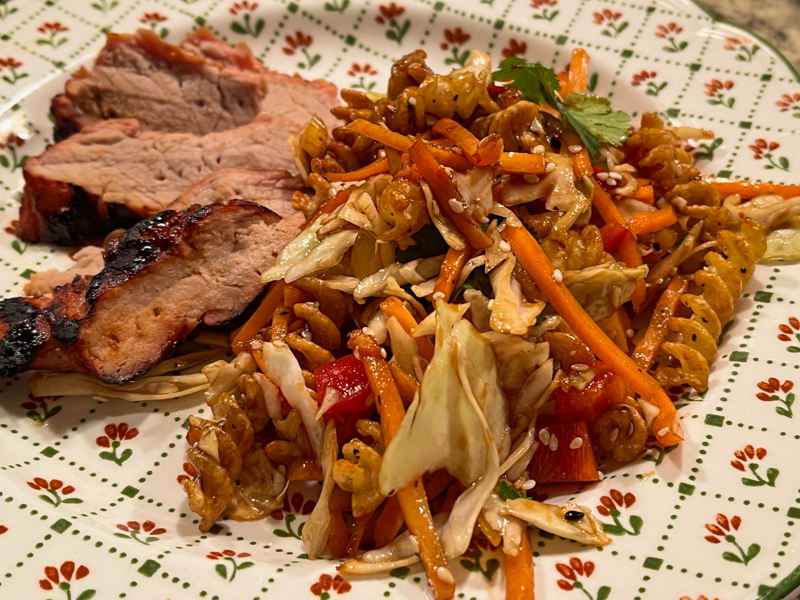
Transfer the pork to a large tray and use 2 forks to shred the meat. Transfer the braising liquid from the slow cooker to a large saucepan. Simmer over high heat for 5 minutes or until the sauce thickens slightly. Add the shredded pork and stir to combine. Serve right away.

ENJOY!

to print the recipe, click here

Comments: Pulled pork is one of my favorite meals, and of course it is great with the usual, American-style barbecue sauce. However, I must say that this Oriental version won my heart. The Chinese five-spice is a must. Star anise shines and goes together with the fresh ginger and hoisin sauce in a perfect way. I hope you’ll give it a try.

Also great on top of Smoked Paprika Sourdough

ONE YEAR AGO: I Will Cracker you Up

TWO YEARS AGO: Pickling Ribbons

THREE  YEARS AGO: Green Beans and Carrots with Spicy Almonds

FOUR YEARS AGO: Quiche 101

FIVE YEARS AGO: Persian Butternut Squash Soup

SIX YEARS AGO: Walnut Cranberry Sourdough Bread

SEVEN YEARS AGO: Ottolenghi in Brazil?

EIGHT YEARS AGO: Roasted Winter Vegetables with Miso-Lime Dressing

NINE YEARS AGO: 2012 Fitness Report: P90X2

TEN YEARS AGO: Caramelized Bananas

ELEVEN YEARS AGO: Roasted Lemon Vinaigrette

TWELVE YEARS AGO: Whole Wheat Bread

CHICKEN POBLANO TORTILLA SOUP

I don’t know why it took me so long to make this soup, as it is so popular. Every year I see countless examples in magazines, cookbooks, websites, and food blogs. And what makes it really painful is that we both loved it. Almost 13 years blogging. A chicken-tortilla-soup-virgin. No more.

CHICKEN POBLANO TORTILLA SOUP
(slightly adapted from Averie Cooks)

6 whole tomatillos, husks removed
3 whole poblano peppers
olive oil spray and a little salt
2 tablespoons olive oil
1 medium shallot, diced small
6 cups low or no-salt added chicken broth
1 can (14.5-ounce) fire-roasted diced tomatoes, not drained
2 cups cooked shredded chicken
1 + 1/2 cups frozen corn kernels
1 tablespoon chili powder
2 teaspoons cumin
1 teaspoon smoked paprika
1 teaspoon kosher salt
1 teaspoon freshly ground black pepper
Tortilla chips or strips, for garnishing

Roast the veggies: line a baking sheet with aluminum foil, spray the tomatillos and poblanos with some olive oil and season lightly with salt. Place in a 450F oven and roast until lightly charred. The tomatillos need less time in the oven, remove them when ready, allow the poblanos to roast further. Transfer the tomatillos into a blender, and process until still a bit chunky.

When the poblanos are well charred, transfer them to a plastic bag and seal. That will steam them making it easier to remove the skin. Remove the skin and seeds, cut the poblanos into slivers. Reserve. Add a very small amount of oil (2 tsp or so) into a small non-stick skillet, when very hot add the frozen kernels of corn, saute seasoning with a little salt until golden. Reserve.

Heat the remaining oil in a large stock pot, sauce the shallots for 5 minutes, add the broth, tomatoes, chicken, chili, smoked paprika, salt, and pepper. Simmer for a couple of minutes, add the reserved poblanos and corn. Simmer, uncovered, for 20 minutes in very gentle heat.

Taste, adjust seasoning, and serve with tortilla chips or strips.

ENJOY!

to print the recipe, click here

Comments: This was so delicious, I am kicking myself for never trying this soup until now. The chicken was leftover from a clay pot roasted chicken, which I made after brining it overnight in buttermilk. It was one of the best clay pot concoctions of the recent past, and I shall share with you in the near future. But any roast chicken will do, so grab one in the grocery store if you want to make it really easy on you.

This soup is a meal in itself. Nothing else needed. Satisfying, complex, the tortillas and the corn offer that small amount of carbs that will keep you happy but not feeling heavy and lethargic. We absolutely loved it, and I hope you’ll give it a try…

ONE YEAR AGO: Kung Pao Chicken

TWO YEARS AGO: Galette de Rois

THREE YEARS AGO: Sous-Vide Overnight Oatmeal

FOUR YEARS AGO: A Valentine’s Day Opera

FIVE YEARS AGO: Incredibly Simple Times Four

SIX YEARS AGO: Walnut-Cranberry Sourdough Bread

SEVEN YEARS AGO: Ottolenghi in Brazil?

EIGHT YEARS AGO: Roasted Winter Vegetables with Miso-Lime Dressing

NINE YEARS AGO: 2012 Fitness Report: P90X2

TEN YEARS AGO: Caramelized Bananas

ELEVEN YEARS AGO: Roasted Lemon Vinaigrette

TWELVE YEARS AGO: Whole Wheat Bread

HAPPY VALENTINE’S DAY!

Would like to invite you to stop by my baby blog to see how I made my first 3D heart-shaped cookies. Click here.

TIRAMISU TART

This is a perfect dessert for Valentine’s Day, not only for the flavors and whimsical look, but – I won’t lie to you – because it is a labor of love to put it together… The recipe comes from Savour, the Australian online cooking school run by the amazing Kirsten Tibbals. I cannot share the recipe in all its many details, as it is copyrighted. One must join the site to have access to, but I can share just the list of ingredients, and include a link to the mousse I’ve used, which is not the same from Savour. I wanted something a little less rich than the original version, which was a pâté à bomb-based mousse, the most indulgent of all.


OVERVIEW OF THE RECIPE

It all starts with a chocolate-sable base, which is rolled as thin as you can, and baked in a rectangular tart pan. I used a perforated frame for that. You can also do it in a round format, using a normal tart pan with removable bottom.

Ingredients for chocolate sable base
120g unsalted butter
80g powdered sugar
1g salt
1g Vanilla Bean Paste
50g whole eggs
20g almond meal
175g plain (all-purpose) flour
30g Cocoa Powder

The ingredients are used to make a dough, rolled very thin and baked in a 290 x 90mm
(11 x 4.3 in) rectangular tart pan.

Tiramisu normally uses store-bought lady fingers, but in Kirsten’s version we go the extra mile and make our own, which is quite a fun little project. As you can see from the composite above, the lady finger batter is piped, baked and then the resulting layer is cut to fit exactly over the coffee-chocolate mousse spread in the bottom of the tart. I used THIS RECIPE for the mousse, adding 1 tsp of espresso powder to the heavy cream before incorporating into the chocolate.

Ingredients for the lady-finger sponge:
85g egg whites, room temperature
30g egg yolk
30g granulated sugar
1g salt
5g Vanilla Bean Paste
35g cornstarch
35g all-purpose flour
sugar, for sprinkling

After baking, the sponge is soaked with a coffee-Marsala syrup.

Once the sponge is placed on top, the mascarpone cream is gently spread on top, and the whole thing goes into the fridge for a little while. The last step is piping additional cream on top using either a grass tip like Kirsten does in the tutorial, or a regular round opening tip (which is what I did). A shower of cocoa powder closes the deal.

Ingredients for the mascarpone cream:
8g gold gelatine sheets
700g mascarpone cheese
220g granulated sugar
10g Vanilla Bean Paste
300g fresh cream 35% fat
70g Marsala wine (I omitted)
Cocoa Powder, for dusting

I made some decorations with tempered chocolate to add to the top. Would love to repeat this tart using the grass tip as demonstrated in the tutorial, because the look that gives is simply stunning! But I only had very small grass icing tips that are used for cookies, and that did not work at all for the top of the tart. Obviously, that gave me the opportunity to order the correct tip. Are you surprised? 😉

I should also mention that all the ingredients are enough for TWO tarts, so I halved the lady finger and the mascarpone cream amounts. I made the full recipe for the tart base because I am not very good at rolling the dough and feel better if I have more to work with. Leftovers make great little cookies.

The tart is perfect for entertaining because it is actually better made the day before. Leftovers were still quite delicious a couple of days later, much to our delight!

ONE YEAR AGO: Joy Cookie Club: Valentine’s Day

TWO YEARS AGO: Uttapam, White Lentil and Rice Flatbread

THREE YEARS AGO: Valentine’s Day Sweetheart Cookies

FOUR YEARS AGO: Fesenjan, Fast-Food Style

FIVE YEARS AGO: Lavender Macarons with White Chocolate Ganache

SIX YEARS AGO: Raspberry Chocolate Truffles

SEVEN YEARS AGO: Red Velvet Cupcakes

EIGHT YEARS AGO: Happy Valentine’s Day!

NINE YEARS AGO:  A Few Blogging Issues

TEN YEARS AGO: Dan Dan Noodles

ELEVEN YEARS AGO:  Sophie Grigson’s Parmesan Cake

TWELVE YEARS AGO: Antibiotics and Food

PASTA CHIP BHEL

Can you tell I am in love with this salad?

But first, a disclaimer… This is by no means an authentic bhel. If you are new to the term, bhel is a concoction from India, made with puffed rice and crispy sev noodles. I’ve found this version by complete accident and was so intrigued by it, I could not wait to try it. However, I have modified it substantially so if there was any resemblance with the authentic bhel, it is pretty much all gone… Can we still be friends?

PASTA CHIP BHEL
(adapted from Naturallynidhy)

for pasta chips:
1 cup cooked pasta (I used fusilli)
2 tbsp grapeseed oil
2 tsp black and white sesame seeds
1/2 tsp black pepper
salt to taste

for the salad:
1 cup mixed colors shredded cabbage or store-bought cole slaw mix
1/2 cup matchstick carrots (or shredded in food processor)
1/2 red bell pepper, finely diced
1/2 yellow bell pepper, finely diced
fresh cilantro leaves
2 tbsp grapeseed oil
2 tbsp soy sauce
1 tbsp sweet red chili sauce (I used Thai Kitchen)
1 tbsp black vinegar (or another vinegar of your choice)
1/2 tsp red chili flakes
juice of 1/2 lime (or to taste)
salt to taste
sesame seeds to serve

Turn the air-fryer to the highest temperature (mine is 390F). Mix the pasta with oil, sesame seeds, salt and pepper. Air-fry for about 10 minutes, until crispy and fragrant. If you don’t have an air-fryer, roast in the oven at 400F for about 15 minutes. Let it cool in a single layer over paper towels.

In a large bowl where you will serve the salad, make the dressing by mixing all oil, soy sauce, red chili sauce, vinegar, and chili flakes. Whisk well, then add a little lime juice, taste, and see if you’d like more lime juice. Add the pasta chips and all other ingredients to the bowl, toss well and adjust seasoning with salt and pepper if needed. Let it sit at room temperature for about 15 minutes before serving, or longer in the fridge.

Add cilantro and more sesame seeds right before serving.

ENJOY!

to print the recipe, click here

Comments: Talk about exotic flavors and textures, this salad has it all. I am now quite eager to make the real bhel, so stay tuned for that. One of my modifications was using the pasta more like you would “croutons” in a Caesar salad, just like an accent. I believe that in bhel the pasta is a main component.

All the amounts of veggies are suggestions, and super flexible. Use what you like, add other veggies if you prefer. But the idea is to have a lot of texture, and let the sauce barely smooth things out. The salad is vegan-friendly , but we “corrupted” it with grilled pork tenderloin. If you make the pasta as a main component of the salad, this could well work as a full dinner. One more thing, pay close attention to the air-frying step, and shake that pan often. It is easy to end up with some pasta crisps over-cooked. I am definitely making this or modifications of this version again and again.

ONE YEAR AGO: Be My Valentine Sourdough Bread

TWO YEARS AGO: Orange Streusel Cake

THREE YEARS AGO: Pink Praline Brioche

FOUR YEARS AGO: A Spinach Salad to Write Home About

FIVE YEARS AGO: Karen’s Four Hour French Country Bread

SIX YEARS AGO: The Siren’s Song of the Royal Icing

SEVEN YEARS AGO: Blog-worthy Roasted Butternut Squash

EIGHT YEARS AGO: Chocolate Currant Sourdough Loaf & Roasted Beet Hummus

NINE YEARS AGO: Sesame and Flax Seed Sourdough

TEN YEARS AGO: Spanakopita Meatballs

ELEVEN YEARS AGO: Saturday Morning Scones

TWELVE YEARS AGO: Pain de Mie au Levain